IVX X-Class Administrator's Manual
IVX X-Class Administrator's Manual
IVX X-Class Administrator's Manual
Create successful ePaper yourself
Turn your PDF publications into a flip-book with our unique Google optimized e-Paper software.
Function 3: Extension programming<br />
<strong>IVX</strong> X-<strong>Class</strong> Administrator’s <strong>Manual</strong><br />
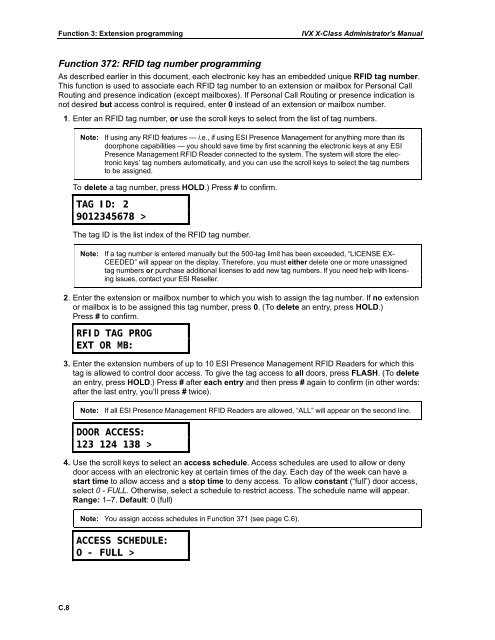
Function 372: RFID tag number programming<br />
As described earlier in this document, each electronic key has an embedded unique RFID tag number.<br />
This function is used to associate each RFID tag number to an extension or mailbox for Personal Call<br />
Routing and presence indication (except mailboxes). If Personal Call Routing or presence indication is<br />
not desired but access control is required, enter 0 instead of an extension or mailbox number.<br />
1. Enter an RFID tag number, or use the scroll keys to select from the list of tag numbers.<br />
Note: If using any RFID features — i.e., if using ESI Presence Management for anything more than its<br />
doorphone capabilities — you should save time by first scanning the electronic keys at any ESI<br />
Presence Management RFID Reader connected to the system. The system will store the electronic<br />
keys’ tag numbers automatically, and you can use the scroll keys to select the tag numbers<br />
to be assigned.<br />
To delete a tag number, press HOLD.) Press # to confirm.<br />
TAG ID: 2<br />
9012345678 ><br />
The tag ID is the list index of the RFID tag number.<br />
Note: If a tag number is entered manually but the 500-tag limit has been exceeded, “LICENSE EX-<br />
CEEDED” will appear on the display. Therefore, you must either delete one or more unassigned<br />
tag numbers or purchase additional licenses to add new tag numbers. If you need help with licensing<br />
issues, contact your ESI Reseller.<br />
2. Enter the extension or mailbox number to which you wish to assign the tag number. If no extension<br />
or mailbox is to be assigned this tag number, press 0. (To delete an entry, press HOLD.)<br />
Press # to confirm.<br />
RFID TAG PROG<br />
EXT OR MB:<br />
3. Enter the extension numbers of up to 10 ESI Presence Management RFID Readers for which this<br />
tag is allowed to control door access. To give the tag access to all doors, press FLASH. (To delete<br />
an entry, press HOLD.) Press # after each entry and then press # again to confirm (in other words:<br />
after the last entry, you’ll press # twice).<br />
Note: If all ESI Presence Management RFID Readers are allowed, “ALL” will appear on the second line.<br />
DOOR ACCESS:<br />
123 124 138 ><br />
4. Use the scroll keys to select an access schedule. Access schedules are used to allow or deny<br />
door access with an electronic key at certain times of the day. Each day of the week can have a<br />
start time to allow access and a stop time to deny access. To allow constant (“full”) door access,<br />
select 0 - FULL. Otherwise, select a schedule to restrict access. The schedule name will appear.<br />
Range: 1–7. Default: 0 (full)<br />
Note: You assign access schedules in Function 371 (see page C.6).<br />
ACCESS SCHEDULE:<br />
0 - FULL ><br />
C.8


