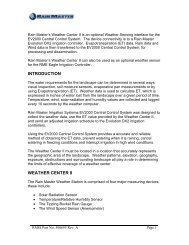
Eagle Plus User's Guide - Rain Master Control Systems
Eagle Plus User's Guide - Rain Master Control Systems
Eagle Plus User's Guide - Rain Master Control Systems

You also want an ePaper? Increase the reach of your titles
YUMPU automatically turns print PDFs into web optimized ePapers that Google loves.
RAIN MASTER TM EAGLE PLUS<br />
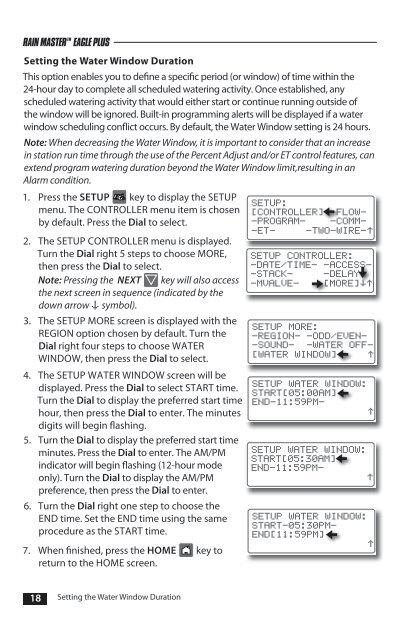
Setting the Water Window Duration<br />
This option enables you to define a specific period (or window) of time within the<br />
24-hour day to complete all scheduled watering activity. Once established, any<br />
scheduled watering activity that would either start or continue running outside of<br />
the window will be ignored. Built-in programming alerts will be displayed if a water<br />
window scheduling conflict occurs. By default, the Water Window setting is 24 hours.<br />
Note: When decreasing the Water Window, it is important to consider that an increase<br />
in station run time through the use of the Percent Adjust and/or ET control features, can<br />
extend program watering duration beyond the Water Window limit,resulting in an<br />
Alarm condition.<br />
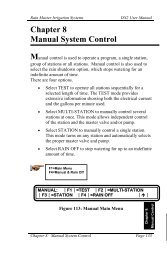
1. Press the SETUP key to display the SETUP<br />
menu. The CONTROLLER menu item is chosen<br />
by default. Press the Dial to select.<br />
2. The SETUP CONTROLLER menu is displayed.<br />
Turn the Dial right 5 steps to choose MORE,<br />
then press the Dial to select.<br />
Note: Pressing the NEXT key will also access<br />
the next screen in sequence (indicated by the<br />
down arrow symbol).<br />
3. The SETUP MORE screen is displayed with the<br />
REGION option chosen by default. Turn the<br />
Dial right four steps to choose WATER<br />
WINDOW, then press the Dial to select.<br />
4. The SETUP WATER WINDOW screen will be<br />
displayed. Press the Dial to select START time.<br />
Turn the Dial to display the preferred start time<br />
hour, then press the Dial to enter. The minutes<br />
digits will begin flashing.<br />
5. Turn the Dial to display the preferred start time<br />
minutes. Press the Dial to enter. The AM/PM<br />
indicator will begin flashing (12-hour mode<br />
only). Turn the Dial to display the AM/PM<br />
preference, then press the Dial to enter.<br />
6. Turn the Dial right one step to choose the<br />
END time. Set the END time using the same<br />
procedure as the START time.<br />
7. When finished, press the HOME key to<br />
return to the HOME screen.<br />
SETUP:<br />
[CONTROLLER] –FLOW-<br />
–PROGRAM– –COMM–<br />
–ET– –TWO–WIRE–<br />
SETUP CONTROLLER:<br />
-DATE/TIME- -ACCESS-<br />
–STACK– –DELAY–<br />
-MVALVE- [MORE]<br />
SETUP MORE:<br />
-REGION- -ODD/EVEN-<br />
-SOUND- –WATER OFF–<br />
[WATER WINDOW]<br />
SETUP WATER WINDOW:<br />
START[05:00AM]<br />
END-11:59PM-<br />
SETUP WATER WINDOW:<br />
START[05:30AM]<br />
END–11:59PM–<br />
SETUP WATER WINDOW:<br />
START-05:30PM-<br />
END[11:59PM]<br />
18 Setting the Water Window Duration