Eagle Plus User's Guide - Rain Master Control Systems
Eagle Plus User's Guide - Rain Master Control Systems
Eagle Plus User's Guide - Rain Master Control Systems

Create successful ePaper yourself
Turn your PDF publications into a flip-book with our unique Google optimized e-Paper software.
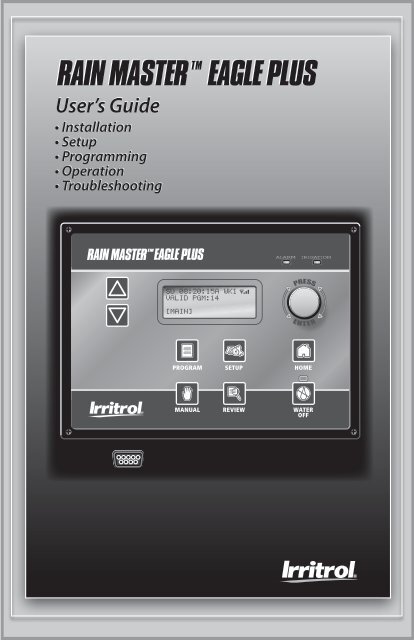
RAIN MASTER TM<br />
EAGLE PLUS<br />
User’s <strong>Guide</strong><br />
• Installation<br />
• Setup<br />
• Programming<br />
• Operation<br />
• Troubleshooting<br />
RAIN MASTER TM EAGLE PLUS<br />
ALARM<br />
IRIGATION<br />
SU 08:20:15A WK1<br />
VALID PGM:14<br />
[MAIN]
RAIN MASTER TM EAGLE PLUS<br />
Introduction<br />
Thank you for choosing the Irritrol <strong>Rain</strong> <strong>Master</strong> <strong>Eagle</strong> <strong>Plus</strong> controller for your<br />
landscape irrigation system. We at Irritrol take great pride in developing and<br />
building the finest irrigation products in the world, and are confident that<br />
your new <strong>Rain</strong> <strong>Master</strong> <strong>Eagle</strong> <strong>Plus</strong> will provide the control features, resource<br />
management tools, ease of use and robust design for years of dependable<br />
service.<br />
Programming Features<br />
• Station Run Time from 1 minute to 23 hours and 59 minutes, in 1-minute<br />
increments.<br />
• Station delay setting from 1 minute to 19 minutes and 59 seconds.<br />
• Cycle run time, Maximum Cycle time, and Soak time on a per-station basis<br />
• Pump activation independent of the master valve on a per-program basis<br />
• Program stacking or single program operation<br />
• Watering day routine options on a per-program basis include:<br />
14-Day , Skip Days and Odd/Even-numbered days.<br />
• Definable watering window from 1 minute to 24 hours.<br />
• Cycle-and-Soak or standard run time programming on a per-program basis.<br />
• Copy functions for program-to-program and station run time.<br />
• Programmable <strong>Master</strong> Valve and a Pump output control capabilities:<br />
Automatic Watering Operations<br />
• Evapotranspiration (ET) based scheduling.<br />
• Percentage adjustment on a per-program basis to allow an increase or<br />
decrease of all station runtimes within that program from 0 – 300%<br />
in 1% increments.<br />
• Calculated station run time executed to the nearest second.<br />
• Programmable Water Off to postpone irrigation from 1 to 9 days.<br />
• Automatic minimization of the water window by dynamically scheduling<br />
station starts when other stations are in the Soak mode.<br />
Evapotranspiration (ET) Features<br />
• ET processing on a per program basis.<br />
• Multiple ET sources as the basis for its ET calculations:<br />
•• Historical ET data<br />
•• Manually entered ET data<br />
•• Weather Center II weather station<br />
•• Internet (with iCentral communication enabled).<br />
ii
<strong>Control</strong> Module Features<br />
• Non-volatile memory retains all controller setup and programming<br />
information during power outages or seasonal shutdowns.<br />
• A real-time clock with non-volatile backup to maintain the current date and<br />
time during power outages without the need of batteries.<br />
• Automatically monitors all critical operating voltages and resets<br />
microprocessor during power “brown-out” or error conditions.<br />
• Automatic electronic fuse resets automatically - eliminates fuses or circuit<br />
breakers.<br />
• Automatic resumption of watering programs after power outage from the<br />
point of interruption.<br />
• Automatically detects problems on all output and input circuits.<br />
• Built-in self-test for internal circuitry.<br />
• Robust surge protection on field output circuits.<br />
Input Monitoring Features<br />
• <strong>Rain</strong> sensor ready–accepts rain sensor or weather station input.<br />
• Connectivity and input for two flow-sensing devices.<br />
• Programmable flow sensor pipe sizes for standard <strong>Rain</strong> <strong>Master</strong> flow sensors<br />
and non-standard pipe sizes.<br />
• Programmable flow monitoring for:<br />
•• Mainline flow limit<br />
•• Unscheduled flow limit<br />
•• Single-station flow limit<br />
•• Sample delay<br />
•• Measured station flow.<br />
Two-Wire Decoder System <strong>Control</strong> Features<br />
(Two-Wire Decoder System Models Only)<br />
RAIN MASTER TM EAGLE PLUS<br />
• Two-Wire Decoder board installs in place of standard station output boards<br />
• Fully integrated Two-Wire Decoder capabilities<br />
• Provides control of up to 100 decoders for a total of 202 field outputs<br />
• Auto detection and configuration during power-up<br />
• Decoder programming and monitoring capabilities include:<br />
•• Decoder and station number association<br />
•• Output current<br />
•• Station short/open circuit<br />
•• Decoder presence detection.<br />
iii
RAIN MASTER TM EAGLE PLUS<br />
Table of Contents<br />
v <strong>Control</strong> Module Overview ...........................................................................2<br />
v <strong>Control</strong>ler Interior Component Overview ................................................4<br />
v Selecting the <strong>Control</strong>ler Setup Options ...................................................6<br />
• Setting the Current Time and Date ...................................................................7<br />
• Setting a Security Access Code ...........................................................................9<br />
• Setting the Program Stack Option ...................................................................11<br />
• Setting the Station Delay Option ................................................................... 12<br />
• Setting the <strong>Master</strong> Valve Option ..................................................................... 13<br />
• Setting the Regional Options ...........................................................................14<br />
• Setting the Odd/Even Day Option .................................................................. 15<br />
• Setting the Audible Alert Option ....................................................................16<br />
• Setting the Timed Water-Off Mode .................................................................17<br />
• Setting the Water Window Duration ..............................................................18<br />
v Selecting the Program Setup Options .................................................. 19<br />
• Setting the Program Type Option ..................................................................20<br />
• Setting the Program Odd/Even Days Option ..............................................21<br />
• Setting the Program <strong>Master</strong> Valve/Pump <strong>Control</strong> Options ................... 22<br />
• Setting the Program Weather Options ......................................................... 23<br />
v Selecting the ET Setup Options .............................................................. 24<br />
v Selecting the Flow Sensor Setup and Operation Options ................. 25<br />
• Setting the Usage Option .................................................................................. 26<br />
• Setting the Standard/Custom Sensor Options .......................................... 26<br />
• Setting the Flow Limits Options ......................................................................27<br />
• Setting the Delay Option ...................................................................................28<br />
• Setting the Learned Flow Options .................................................................28<br />
• Resetting the Flow Totalizer ..............................................................................29<br />
v Setting the Communications Options ................................................... 30<br />
v Two-Wire Decoder System Setup .............................................................31<br />
• Programming the Decoders ..............................................................................31<br />
• Two-Wire Decoder System Setup ....................................................................31<br />
• Programming the Decoders ..............................................................................31<br />
• Testing the Two-Wire Decoder System ......................................................... 33<br />
• Single Station Test ................................................................................................ 33<br />
• Find Decoders Test ...............................................................................................34<br />
• All Stations Test ..................................................................................................... 35<br />
iv
RAIN MASTER TM EAGLE PLUS<br />
v Programming for Automatic Operation ...............................................36<br />
• Creating a New Program .................................................................................. 36<br />
• Setting a Two-Week Watering Schedule ......................................................37<br />
• Setting a Skip-Day Watering Schedule ........................................................37<br />
• Setting Program Start Times ........................................................................... 38<br />
• Assigning the Station Run Time ..................................................................... 38<br />
• Setting a Cycle and Soak Station Run Time ............................................... 39<br />
v Modifying a Program: .............................................................................. 41<br />
• Adjusting Program Percent Value ..................................................................42<br />
• Deleting a Program .............................................................................................42<br />
v Copying a Program or Runtime ..............................................................43<br />
• To Copy a Program ............................................................................................. 43<br />
• To Copy a Run Time ............................................................................................ 44<br />
v Review Mode ............................................................................................ 45<br />
• Program Review ...................................................................................................45<br />
• Alarm Review......................................................................................................... 46<br />
• Comm Review ...................................................................................................... 46<br />
• Flow Review .......................................................................................................... 46<br />
• Irrigation Review ..................................................................................................47<br />
• ET Review ................................................................................................................47<br />
v Manual Watering Operations ................................................................ 48<br />
• Manual Station Operation ............................................................................... 48<br />
• Manual Program Operation ............................................................................ 49<br />
• Manual Multi-Station Operation ................................................................... 50<br />
• Manual Test Functions.........................................................................................51<br />
v Alarms Feature ..........................................................................................52<br />
• Alarm Categories ..................................................................................................52<br />
• Field Wire Fault Detection .................................................................................52<br />
• Flow Detection ......................................................................................................52<br />
• Clearing Alarms ................................................................................................... 53<br />
• Analyzing Alarms ................................................................................................ 54<br />
• General Alarms .................................................................................................... 54<br />
• Flow Sensor Alarms ........................................................................................ 56<br />
• <strong>Rain</strong> Sensor or Weather Station Alarms ................................................... 58<br />
• Two-Wire Decoder System Alarms ............................................................ 59<br />
v Appendix A - General Specifications .....................................................62<br />
v Appendix B - Flow Sensor Specifications .............................................63<br />
v Appendix C - Error Code Reference Chart ............................................64<br />
v Appendix D - FCC Rules-Electromagnetic Compatibility ..................65<br />
v
RAIN MASTER TM EAGLE PLUS<br />
<strong>Control</strong> Module Overview<br />
ALARM<br />
3<br />
IRIGATION<br />
SU 08:20:15A WK1<br />
VALID PGM:14<br />
2 4<br />
[MAIN]<br />
1<br />
5<br />
6<br />
7<br />
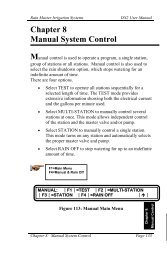
1 - Large LCD Display<br />
The large format LCD display presents all setup, programming, system control<br />
and monitoring functions in an interactive menu-driven format.<br />
Note: To conserve power, the LCD backlight dims automatically after five minutes of<br />
inactivity. The backlight is restored automatically with any controller input.<br />
The Home screen is displayed by default when the controller is in the standby<br />
mode to provide basic controller status information.<br />
The top line of the Home screen provides the<br />
current day (1), current time (2), and week 1 or<br />
week 2 of the two-week watering schedule (3).<br />
When equipped for iCentral communications,<br />
an antenna symbol (4) with signal strength<br />
indication bars will be shown.<br />
The second line indicates the current number of<br />
configured automatic programs: None or 1–8 for<br />
standard systems, or 1–16 for Two-Wire systems.<br />
When the controller is in the Water Off mode,<br />
WATER OFF is displayed.<br />
The bottom line of the Home screen provides:<br />
Main menu access (5), the pending number of<br />
alarms (6), and display sequence arrow(s) (7).<br />
2 <strong>Control</strong> Module Overview<br />
1 2 3 4<br />
5 6 7
RAIN MASTER TM EAGLE PLUS<br />
2 - Screen Sequence Keys<br />
The NEXT and BACK screen sequence keys are associated with the<br />
corresponding and arrow symbols when displayed. Pressing a sequence<br />
key steps forward or backward through a multiple-screen sequence.<br />
3 - Irrigation and Alarm Monitors<br />
The Irrigation LED monitor illuminates to indicate system watering activity. The<br />
Alarm LED monitor illuminates when a system Alarm or Alert is generated. The<br />
Alarm monitor LED will remain illuminated until cleared by the user. An audible<br />
Alert option can be enabled that will “chirp” every six seconds to indicate one or<br />
more Alarm and or Alert conditions.<br />
4 - Selection Dial<br />
The selection Dial is the main user-interface component, providing a single<br />
rotary/push-button dial to select and input all controller setup and operating<br />
features.<br />
5 - Direct Access Menu Keys<br />
Direct access to each primary menu function is provided by pressing the<br />
corresponding selection key as follows:<br />
PROGRAM Key – Selects the MAIN PROGRAM menu. Provides programrelated<br />
options including: new program setup, existing program review, program<br />
modification, deletion, and copy functions.<br />
SETUP Key – Selects the MAIN SETUP menu. Provides access to all setup<br />
option menus including: CONTROLLER operating options, FLOW monitor setup,<br />
PROGRAM operating options, COMM setup, ET setup, and TWO-WIRE system setup.<br />
MANUAL Key – Selects the MANUAL OPERATIONS menu enabling manual<br />
control operations including: SINGLE STATION and MULTI-STATION operation,<br />
PROGRAM operation and multiple TEST functions.<br />
REVIEW Key – Selects the REVIEW menu for quick access to all controller<br />
PROGRAM details, historical data logs for IRRIGATION events, ALARM events,<br />
FLOW results, ET rates, iCentral communications and controller software version.<br />
HOME Key – Returns directly to the HOME menu from any location within<br />
the menu hierarchy.<br />
6 - WATER OFF Key – Terminates all automatic watering activity. When<br />
selected, all current automatic controller operation shuts down and remains off<br />
until the WATER OFF mode is released. The Water Off LED monitor illuminates<br />
when the controller is in the WATER OFF mode.<br />
7 - Pro Max Remote <strong>Control</strong> Receptacle – Provides easy access for connection<br />
and remote operation with the (optional) Pro Max remote control system.<br />
<strong>Control</strong> Module Overview 3
RAIN MASTER TM EAGLE PLUS<br />
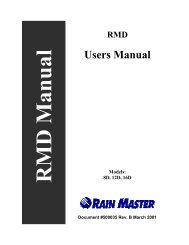
<strong>Control</strong>ler Interior Component Overview<br />
5<br />
2<br />
1<br />
Wall-mount<br />
Enclosure<br />
3<br />
6<br />
6<br />
6<br />
1<br />
2<br />
4<br />
3<br />
1<br />
3<br />
PSB Pedestal-mount Enclosure<br />
SPED Pedestal-mount Enclosure<br />
4 Interior <strong>Control</strong>ler Component Overview
1 - <strong>Master</strong> Valve/Pump/Sensor Module 1<br />
This module provides connections for<br />
all auxiliary components including:<br />
pump (1), master valve (2), field common<br />
(3), two flow sensors (3), a Weather<br />
Center II (5) or a rain/freeze<br />
sensor (6), and a 24 VAC power source.<br />
2 - Station Output Module<br />
(standard configuration)<br />
Each output module provides connections<br />
for eight station outputs (1) and<br />
two field commons (2). Up to six station<br />
output modules can be installed for a<br />
total of 48 station outputs.<br />
3 - Main Power Connection<br />
Terminal block (wall-mount models)<br />
or junction box provide connections for<br />
Line, Neutral, and Equipment Ground<br />
wiring. Pedestal models provide On/Off<br />
switch and power outlet.<br />
4 - Two-Wire Decoder Module (optional)<br />
A single Two-Wire Decoder module<br />
replaces the 8-station output board(s)<br />
and connects to the control module<br />
via a two-wire, plug-in cable assembly.<br />
The Decoder module provides two<br />
separate decoder control wire pairs (1)<br />
and a quick-disconnect terminal block<br />
to facilitate decoder programming (2).<br />
5 - iCentral with GSM Communications<br />
Modem (optional)<br />
The iCentral modem mounts on the<br />
back of the control module to provide<br />
wireless communications capability<br />
with the iCentral control system.<br />
6 - iCentral Antenna (optional)<br />
1 1<br />
External antenna (optional) provides unity gain and 200 watt power-handling<br />
capacity for loing-range communication. (Pedestal antenna location indicated<br />
but not shown in illustration.)<br />
2<br />
4<br />
2<br />
RAIN MASTER TM EAGLE PLUS<br />
4<br />
4<br />
5<br />
6<br />
7<br />
3<br />
2<br />
1<br />
2<br />
1<br />
2<br />
<strong>Control</strong>ler Internal Component Overview 5
RAIN MASTER TM EAGLE PLUS<br />
Selecting the <strong>Control</strong>ler Setup Options<br />
The controller setup options determine how the controller displays and manages<br />
the various tasks required to control and monitor your irrigation system.<br />
A set of default controller setup and operating options is established on initial<br />
power-up. The table below lists the various controller setup menu items, the<br />
available options and the factory default settings.<br />
Setup Menu Option Default<br />
Current Time Numeric Value, AM/PM 12:00:00 a.m.<br />
Current Date Alpha/Numeric Thursday, 01/ 01/2009<br />
Clock Format 12- or 24-Hour 12-Hour<br />
Access Code 4-Digit Numeric 0000<br />
Program Stacking Yes or No Yes<br />
Stacking Limits 1 to 8 Programs 3 Programs<br />
Station Delay 0–19 min, 0–59 sec 0 min, 0 sec<br />
<strong>Master</strong> Valve Config. NC or NO<br />
NC (normally closed)<br />
Units Format U.S. Standard or Metric U.S. Standard<br />
Date Format<br />
mm/dd/yy or dd/mm/yy mm/dd/yy<br />
Odd/Even Days Off<br />
<strong>Rain</strong> Days Off<br />
Yes or No<br />
1–9 or None<br />
No<br />
None<br />
Water Window 0–24 Hours 24 (12:00 a.m.–11:59 p.m.)<br />
Audible Alarm On or Off<br />
Off<br />
Note: Synchronizing the controller with the current date and time should be<br />
accomplished first. The remaining settings can be changed at any time. Some of the<br />
settings will influence corresponding programming and controller operations. These<br />
features are explained in detail within the applicable section of the User’s <strong>Guide</strong>.<br />
Upon initial power-up and after the controller has been without power for an<br />
extended period of time, the SETUP DATE/TIME screen is displayed by default.<br />
Enter the actual time and date per the following step-by-step procedure. When<br />
you have completed this initial procedure, you will be familiar with the <strong>Eagle</strong> <strong>Plus</strong><br />
menu structure and how the multifunctional Dial allows you to easily navigate to<br />
select, change, adjust and enter the various controller programming and setup<br />
options.<br />
IMPORTANT: All setup and programming selections must be entered<br />
(saved to memory) by pressing the Dial before pressing any of the Direct<br />
Access keys. The controller will disregard any selection that has not been<br />
saved.<br />
Note: An audible “chirp” tone is generated each time a valid Key or Dial entry is made.<br />
An invalid action is indicated by the chirp tone four times in rapid succession.<br />
6 Setting the Current Time and Date
Setting the Current Time and Date<br />
RAIN MASTER TM EAGLE PLUS<br />
Note: Menu items displayed between dashes can be selected. Turn the Dial in either<br />
direction to choose (bracket) the menu item, then press the Dial to select.<br />
1. The controller will display the SETUP DATE/TIME SETUP DATE/TIME:<br />
screen upon initial power up.<br />
DATE:[01/01/09]<br />
TIME:-12:00AM-<br />
FORMAT:-12 HOUR-<br />
2. Press the SETUP key to display the SETUP<br />
menu.<br />
4. Press the Dial to select the CONTROLLER menu.<br />
The DATE/TIME option is chosen by default.<br />
5. Press the Dial to select and display the SETUP<br />
DATE/TIME screen. The DATE option is chosen<br />
by default.<br />
Note: In this procedure example, the date and<br />
time will be changed from the default settings to<br />
June 15, 2011, 2:45.<br />
6. Press the Dial – the Month digits (01) will begin<br />
flashing.<br />
7. Turn the Dial to display the current month<br />
(06 = June), then press the Dial to enter the<br />
change. The Day digits (01) will begin flashing.<br />
8. Turn the Dial to display the current day<br />
(15), then press the Dial to enter the change.<br />
The Year digits (09) will begin flashing.<br />
9. Turn the Dial to display the current year (11),<br />
then press the Dial to enter the change.<br />
SETUP:<br />
[CONTROLLER] –FLOW–<br />
–PROGRAM– –COMM–<br />
–ET– –TWO–WIRE–<br />
SETUP CONTROLLER:<br />
[DATE/TIME] –ACCESS–<br />
–STACK– –DELAY–<br />
–MVALVE– –MORE–<br />
SETUP DATE/TIME:<br />
DATE:[01/01/09]<br />
TIME:-12:00AM-<br />
FORMAT:-12 HOUR-<br />
SETUP DATE/TIME:<br />
DATE:[01/01/09]<br />
TIME:-12:00AM-<br />
FORMAT:-12 HOUR-<br />
SETUP DATE/TIME:<br />
DATE:[06/01/09]<br />
TIME:-12:00AM-<br />
FORMAT:-12 HOUR-<br />
SETUP DATE/TIME:<br />
DATE:[06/15/09]<br />
TIME:-12:00AM-<br />
FORMAT:-12 HOUR-<br />
SETUP DATE/TIME:<br />
DATE:[06/15/11]<br />
TIME:-12:00AM-<br />
FORMAT:-12 HOUR-<br />
Setting the Current Time and Date 7
RAIN MASTER TM EAGLE PLUS<br />
10. Turn the Dial right one step to choose<br />
Time, then press the Dial to select. The<br />
current hour digits will begin flashing.<br />
11. Turn the Dial to display the current hour<br />
(02:), then press the Dial to enter the change.<br />
The minutes digits will begin flashing.<br />
12. Turn the Dial to display the current minute (:45),<br />
then press the Dial to enter the change. The<br />
AM designator will begin flashing.<br />
13. Turn the Dial to display PM, then press the<br />
Dial to enter the change.<br />
SETUP DATE/TIME:<br />
DATE:-06/15/11-<br />
TIME:[12:00AM]<br />
FORMAT:–12 HOUR–<br />
SETUP DATE/TIME:<br />
DATE:-06/15/11-<br />
TIME:[02:00AM]<br />
FORMAT:–12 HOUR–<br />
SETUP DATE/TIME:<br />
DATE:-06/15/11-<br />
TIME:[02:45AM]<br />
FORMAT:–12 HOUR–<br />
SETUP DATE/TIME:<br />
DATE:-06/15/11-<br />
TIME:[02:45PM]<br />
FORMAT:–12 HOUR–<br />
14. Press the HOME key to exit the SETUP menu.<br />
Note: The initial Alarms shown on the Home screen are generated by default<br />
during the power-up process and not indicative of a problem. Clear the Alarms as<br />
follows:<br />
• Turn the Dial right one step to choose ALARMS.<br />
• Press the Dial to select ALARMS.<br />
• The cause of the alarm will be displayed.<br />
Press the Dial as needed to clear the alarms.<br />
TH 02:45:39P WK1<br />
VALID PGM:NONE<br />
-MAIN- [ALARMS( 1)]<br />
TH 02:45:39P WK1<br />
POWER RESTORED<br />
[CLEAR]<br />
8 Setting the Current Time and Date
Setting a Security Access Code<br />
This feature enables the user to establish an access code that must be entered to<br />
gain access to various controller functions.<br />
The access code can be any four-digit number between 0001 and 9999. After the<br />
code has been established, a security level is applied that determines which of<br />
the controller functions can remain accessible without entering the code.<br />
• All – Disables access code requirement – enables unrestricted controller use.<br />
• Restricted – Requires access code to unlock Program and Setup functions.<br />
Manual, Review and Water Off functions remain unrestricted.<br />
• No Access – Requires access code to unlock all controller functions.<br />
1. Press the SETUP key to display the SETUP<br />
menu. The CONTROLLER option is chosen by<br />
default. Press the Dial to select CONTROLLER.<br />
The SETUP CONTROLLER menu is displayed<br />
with the DATE/TIME option chosen by default.<br />
RAIN MASTER TM EAGLE PLUS<br />
SETUP:<br />
[CONTROLLER] –FLOW-<br />
–PROGRAM– –COMM–<br />
–ET– –TWO–WIRE–<br />
SETUP CONTROLLER:<br />
[DATE/TIME] –ACCESS–<br />
–STACK– –DELAY–<br />
–MVALVE– –MORE–<br />
2. Turn the Dial right one step to choose the<br />
ACCESS option.<br />
SETUP CONTROLLER:<br />
-DATE/TIME- [ACCESS]<br />
–STACK– –DELAY–<br />
–MVALVE– –MORE–<br />
3. Press the Dial to select and display the<br />
SETUP ACCESS screen.<br />
Note: Select an access code that’s easy to recall,<br />
then keep a copy of it written down for reference<br />
if needed. If you forget or misplace your code,<br />
contact Technical Support at 1-800-777-1477.<br />
4. Press the Dial to begin. Four zeros will be<br />
displayed with the first digit flashing. Either<br />
turn the Dial to change this digit, or press the<br />
Dial to select the next digit in sequence. Repeat<br />
for all four digits.<br />
Note: All four digits of the access code must be<br />
selected and saved to retain the code in memory.<br />
Exiting this procedure before entering the last<br />
digit restores the default or previous access code.<br />
SETUP ACCESS<br />
ENTER EXISTING CODE:<br />
[XXXX]<br />
SETUP ACCESS<br />
ENTER EXISTING CODE:<br />
[0000]<br />
SETUP ACCESS<br />
ENTER EXISTING CODE:<br />
[0123]<br />
Setting a Security Access Code 9
RAIN MASTER TM EAGLE PLUS<br />
5. Entering the fourth access code digit prompts<br />
the next screen in the access setup sequence.<br />
Turn the Dial to choose the LEVEL option, then<br />
press the Dial to select.<br />
6. Turn the Dial to display the preferred security<br />
level: RESTRICTED, NO ACCESS or ALL, then<br />
Press the Dial to enter the selection.<br />
SETUP ACCESS<br />
LEVEL[ ALL ]<br />
NEW CODE–0123–<br />
–CLEAR CODE–<br />
SETUP ACCESS<br />
LEVEL[RESTRICTED]<br />
NEW CODE–0123–<br />
–CLEAR CODE–<br />
Note: Once the access code has been entered, the<br />
ACCESS DENIED! !<br />
controller functions will remain accessible until ENTER CODE:[XXXX]<br />
midnight. The access code must be entered each TO CONTINUE.<br />
time once the restrictions have been applied to gain<br />
controller access. If attempting to enter an incorrect<br />
access code, the ACCESS DENIED screen will be displayed.<br />
7. When finished, press the HOME key to<br />
return to the HOME screen.<br />
To Clear and Reset the Current Access Code:<br />
1. Starting from the SETUP ACCESS screen<br />
(shown at right), turn the Dial to choose<br />
CLEAR CODE, then press the Dial to select.<br />
2. A safety screen is prompted. Turn the Dial to<br />
choose the Yes option, then press the Dial to<br />
delete the access code.<br />
3. To reset the access code, repeat access code<br />
setup procedure, beginning at step 4.<br />
4. When finished, press the HOME key to<br />
return to the HOME screen.<br />
SETUP ACCESS<br />
LEVEL–RESTRICTED–<br />
NEW CODE–0123–<br />
[CLEAR CODE]<br />
ARE YOU SURE YOU<br />
WANT TO CLEAR THE<br />
ACCESS CODE<br />
[YES] –NO–<br />
SETUP ACCESS<br />
LEVEL[RESTRICTED]<br />
NEW CODE[XXXX]<br />
–CLEAR CODE–<br />
10 Setting a Security Access Code
Setting the Program Stack Option<br />
RAIN MASTER TM EAGLE PLUS<br />
This controller setup option enables you to specify whether multiple irrigation<br />
programs can run simultaneously, or must be “stacked” or constrained to run one<br />
at a time in chronological order.<br />
By default, Program Stack is a global option, established for all programs, but<br />
can be disabled for individual programs as preferred. The Program Stack range<br />
is adjustable from 1– 8 programs. When the Stack option is disabled for a specific<br />
program, that program is allowed to run simultaneously with other programs.<br />
Caution: Before disabling the Stack option, it is very important to consider<br />
the total current load and flow demand imposed on the system during<br />
simultaneous multiple-program operations.<br />
1. Press the SETUP key to display the SETUP<br />
menu. The CONTROLLER menu item is chosen<br />
by default. Press the Dial to select.<br />
2. The SETUP CONTROLLER menu is displayed.<br />
Turn the Dial right two steps to choose STACK.<br />
SETUP CONTROLLER:<br />
–DATE/TIME– –ACCESS–<br />
[STACK] –DELAY–<br />
–MVALVE– –MORE–<br />
3. Press the Dial to display the SETUP PROGRAM<br />
STACK screen. The Program option is chosen<br />
by default. Press the Dial to select. The<br />
program number will begin flashing.<br />
4. Turn the Dial to display the preferred program<br />
number (1–8 for standard systems, or 1–16 for<br />
two-wire decoder systems). Press the Dial to<br />
enter the number.<br />
5. Turn the Dial right one step to choose the STACK<br />
option, then press the Dial to select. The current<br />
option will begin flashing. Turn the Dial to display<br />
the preference, then press the Dial to enter.<br />
Note: The Stacking Limit option is applicable<br />
only with the Yes option selected.<br />
6. Turn the Dial right one step to choose<br />
STAKING LIMIT, then press the Dial to select.<br />
The current number will begin flashing. Turn<br />
the Dial to display the preferred number from<br />
1–8, then press the Dial to enter the selection.<br />
SETUP PROGRAM STACK:<br />
PROGRAM- 4-<br />
STACK-YES-<br />
STACKING LIMIT[2]<br />
SETUP PROGRAM STACK:<br />
PROGRAM[ 1]<br />
STACK-YES-<br />
STACKING LIMIT-1-<br />
SETUP PROGRAM STACK:<br />
PROGRAM[ 4]<br />
STACK-YES-<br />
STACKING LIMIT-1-<br />
SETUP PROGRAM STACK:<br />
PROGRAM– 4–<br />
STACK[YES]<br />
STACKING LIMIT-1-<br />
SETUP:<br />
[CONTROLLER] –FLOW-<br />
–PROGRAM– –COMM–<br />
–ET– –TWO–WIRE–<br />
7. When finished, press the HOME key to return to the HOME screen.<br />
Setting the Program Stack Option 11
RAIN MASTER TM EAGLE PLUS<br />
Setting the Station Delay Option<br />
Irrigation systems that utilize a pump station and/or slow-closing valves may<br />
require a delay or dwell time to occur between the station operating sequence.<br />
The Station Delay feature enables you to enter a delay period from 1 second to<br />
19 minutes. Note that the Station Delay period is applied globally to all station<br />
operating sequences.<br />
1. Press the SETUP key to display the SETUP<br />
menu. The CONTROLLER menu item is chosen<br />
by default. Press the Dial to select.<br />
SETUP:<br />
[CONTROLLER] –FLOW-<br />
–PROGRAM– –COMM–<br />
–ET– –TWO–WIRE–<br />
2. The SETUP CONTROLLER menu is displayed.<br />
Turn the Dial right 3 steps to choose DELAY.<br />
3. Press the Dial to display the SETUP STATION<br />
DELAY screen. The MINUTES option is chosen<br />
by default. If the preferred delay period is less<br />
than 1 minute, turn the Dial right one step to<br />
choose Seconds.<br />
4. Press the Dial to select. The current value<br />
(0 by default) will begin flashing.<br />
5. Turn the Dial to display the SECONDS value.<br />
Press the Dial to enter.<br />
6. When finished, press the HOME key to<br />
return to the HOME screen.<br />
SETUP CONTROLLER:<br />
–DATE/TIME– –ACCESS–<br />
-STACK- [DELAY]<br />
–MVALVE– –MORE–<br />
SETUP STATION DELAY:<br />
MINUTES[ 0] (0-19)<br />
SECONDS- 0- (0-59)<br />
SETUP STATION DELAY:<br />
MINUTES- 0- (0-19)<br />
SECONDS[ 0] (0-59)<br />
SETUP STATION DELAY:<br />
MINUTES- 0- (0-19)<br />
SECONDS[10] (0-59)<br />
12 Setting the Station Delay Option
Setting the <strong>Master</strong> Valve Option<br />
RAIN MASTER TM EAGLE PLUS<br />
When a master valve is utilized in the irrigation system to control the main<br />
line water supply, it is imperative that the <strong>Master</strong> Valve configuration option<br />
corresponds correctly to either a Normally Open or a Normally Closed valve. The<br />
default <strong>Master</strong> Valve configuration option is Normally Closed.<br />
For example, if a system flow limit is exceeded, the controller will turn off power<br />
to the master valve, causing it to close, when configured for Normally Closed<br />
operation, When configured for a Normally Open master valve, the controller will<br />
apply constant power to the valve, causing it to remain closed.<br />
1. Press the SETUP key to display the SETUP<br />
menu. The CONTROLLER menu item is chosen<br />
by default. Press the Dial to select.<br />
2. The SETUP CONTROLLER menu is displayed.<br />
Turn the Dial right 4 steps to choose MVALVE,<br />
then press the Dial to select.<br />
3. The SETUP MASTER VALVE screen is<br />
displayed. The NORMAL CLOSE option is<br />
chosen by default. Press the Dial to select.<br />
The option will begin flashing.<br />
4. Turn the Dial to display the NORMAL OPEN<br />
option, then press the Dial to enter.<br />
5. When finished, press the HOME key to<br />
return to the HOME screen.<br />
SETUP:<br />
[CONTROLLER] –FLOW-<br />
–PROGRAM– –COMM–<br />
–ET– –TWO–WIRE–<br />
SETUP CONTROLLER:<br />
-DATE/TIME- -ACCESS-<br />
–STACK– –DELAY–<br />
[MVALVE] –MORE–<br />
SETUP MASTER VALVE:<br />
TYPE[NORMAL CLOSE]<br />
SETUP MASTER VALVE:<br />
TYPE[NORMAL OPEN ]<br />
Setting the <strong>Master</strong> Valve Option 13
RAIN MASTER TM EAGLE PLUS<br />
Setting the Regional Options<br />
Regional options enable you to configure the display information for various<br />
regional options including: units of measure, display language and date format.<br />
The chart below provides the Regional options and the default settings.<br />
Units Language Date Format<br />
English<br />
- English (default) MM/DD/YY<br />
Metric<br />
- Spanish (month, day, year<br />
- French<br />
- German<br />
- Italian<br />
- default)<br />
DD/MM/YY<br />
(day, month, year)<br />
Note: Regional option availability differs for Domestic and International controller<br />
models. Domestic models provide optional selection of the Date Format only.<br />
1. Press the SETUP key to display the SETUP SETUP:<br />
menu. The CONTROLLER menu item is chosen [CONTROLLER] –FLOW-<br />
–PROGRAM– –COMM–<br />
by default. Press the Dial to select.<br />
–ET– –TWO–WIRE–<br />
2. The SETUP CONTROLLER menu is displayed.<br />
Turn the Dial right 5 steps to choose MORE,<br />
then press the Dial to select.<br />
Note: Pressing the NEXT key will also access<br />
the next screen in sequence (indicated by the<br />
down arrow symbol).<br />
3. The SETUP MORE screen is displayed with the<br />
REGION option chosen by default. Press the<br />
Dial to select.<br />
4. The SETUP REGION menu screen is displayed<br />
with the DATE FORMAT chosen by default.<br />
5. Press the Dial to select. Turn the Dial to display<br />
the preferred option, then press the Dial to<br />
enter the selection.<br />
SETUP CONTROLLER:<br />
-DATE/TIME- -ACCESS-<br />
–STACK– –DELAY–<br />
-MVALVE- [MORE]<br />
SETUP MORE:<br />
[REGION] -ODD/EVEN-<br />
–SOUND– -WATER OFF–<br />
-WATER WINDOW-<br />
SETUP REGION:<br />
UNITS-ENGL. -<br />
LANGUAGE-ENGLISH-<br />
DATE FORMAT[MM/DD]<br />
SETUP REGION:<br />
UNITS-METRIC-<br />
LANGUAGE-ENGLISH-<br />
DATE FORMAT[MM/DD]<br />
6. When finished, press the HOME key to return to the HOME screen.<br />
14 Setting the Regional Options
Setting the Odd/Even Day Option<br />
By default, the Odd/Even calendar day scheduling option is disabled. In order to<br />
utilize this control feature in the Program Setup options, it must first be enabled in the<br />
<strong>Control</strong>ler Setup options.<br />
Note: For additional information regarding the function and implementation of the<br />
Odd/Even feature, refer to Program Setup Options on page 21.<br />
1. Press the SETUP key to display the SETUP<br />
menu. The CONTROLLER menu item is chosen<br />
by default. Press the Dial to select.<br />
2. The SETUP CONTROLLER menu is displayed. SETUP CONTROLLER:<br />
Turn the Dial right 5 steps to choose MORE, -DATE/TIME- -ACCESSthen<br />
press the Dial to select.<br />
–STACK– –DELAY–<br />
-MVALVE- [MORE]<br />
Note: Pressing the NEXT key will also access<br />
the next screen in sequence (indicated by the down<br />
arrow symbol).<br />
3. The SETUP MORE screen is displayed with the<br />
REGION option chosen by default.<br />
Turn the Dial right one step to choose the<br />
ODD/EVEN option, then press the Dial to select.<br />
5. The SETUP ODD/EVEN screen is displayed with<br />
WATERING - NO chosen by default.<br />
Note: For this option, it is preferable to set TYPE<br />
first, and then set the WATERING - YES/NO option.<br />
(See step 6 below.)<br />
6. Turn the Dial to choose TYPE, then press the<br />
Dial to select. Turn the Dial to display EVEN or<br />
ODD, then press the Dial to enter.<br />
RAIN MASTER TM EAGLE PLUS<br />
SETUP:<br />
[CONTROLLER] –FLOW-<br />
–PROGRAM– –COMM–<br />
–ET– –TWO–WIRE–<br />
SETUP MORE:<br />
–REGION– [ODD/EVEN]<br />
–SOUND– -WATER OFF–<br />
-WATER WINDOW-<br />
SETUP ODD/EVEN:<br />
WATERING[NO ]<br />
TYPE-ODD -<br />
SETUP ODD/EVEN:<br />
WATERING -NO -<br />
TYPE[EVEN]<br />
7. Turn the Dial left one step to choose WATERING,<br />
then press the Dial to select. Turn the Dial to<br />
display YES, then press the Dial to select.<br />
SETUP ODD/EVEN:<br />
WATERING[YES]<br />
TYPE[EVEN]<br />
A WARNING screen will be displayed. Press<br />
the Dial to select OK, or turn Dial to choose<br />
CANCEL, then press the Dial to return to the<br />
previous screen.<br />
WARNING: YOU HAVE<br />
ELECTED TO WATER ON<br />
EVEN CALENDAR DAYS<br />
ONLY. [OK] -CANCEL-<br />
8. When finished, press the HOME key to return to the HOME screen.<br />
Setting the Odd/Even Day Option 15
RAIN MASTER TM EAGLE PLUS<br />
Setting the Audible Alert Option<br />
The Audible Alert option is Off by default. When enabled, an Alarm condition will<br />
trigger an Alert “chirp” tone every six seconds until the Alarm condition is cleared.<br />
1. Press the SETUP key to display the SETUP<br />
menu. The CONTROLLER menu item is chosen<br />
by default. Press the Dial to select.<br />
2. The SETUP CONTROLLER menu is displayed.<br />
Turn the Dial right 5 steps to choose MORE,<br />
then press the Dial to select.<br />
Note: Pressing the NEXT key will also access<br />
the next screen in sequence (indicated by the<br />
down arrow symbol).<br />
3. The SETUP MORE screen is displayed with the<br />
REGION option chosen by default. Turn the<br />
Dial right two steps to choose SOUND, then<br />
press the Dial to select.<br />
4. The SETUP SOUND screen is displayed with<br />
the OFF option selected by default.<br />
5. Press the Dial to select, then turn the Dial<br />
to display ON. Press the Dial to enter the<br />
selection.<br />
SETUP:<br />
[CONTROLLER] –FLOW-<br />
–PROGRAM– –COMM–<br />
–ET– –TWO–WIRE–<br />
SETUP CONTROLLER:<br />
-DATE/TIME- -ACCESS-<br />
–STACK– –DELAY–<br />
-MVALVE- [MORE]<br />
SETUP MORE:<br />
-REGION- -ODD/EVEN-<br />
[SOUND] -WATER OFF–<br />
-WATER WINDOW-<br />
SETUP SOUND:<br />
AUDIBLE ALARM[OFF]<br />
6. When finished, press the HOME key to return to the HOME screen.<br />
16 Setting the Audible Alert Option
Setting the Timed Water-Off Mode<br />
This feature provides a means of placing the controller in the Water Off mode for<br />
a timed duration from 1 to 9 days.<br />
Note: The Water Off mode can be terminated at any time by any one of the following<br />
methods:<br />
• Press the WATER OFF key.<br />
• Reset the Water Off day duration to NONE.<br />
• Choose TURN WATER ON from the MAIN menu, then press the Dial to select<br />
TURN WATER OFF.<br />
1. Press the SETUP key to display the SETUP SETUP:<br />
menu. The CONTROLLER menu item is chosen [CONTROLLER] –FLOWby<br />
default. Press the Dial to select.<br />
–PROGRAM– –COMM–<br />
–ET– –TWO–WIRE–<br />
2. The SETUP CONTROLLER menu is displayed.<br />
Turn the Dial right 5 steps to choose MORE,<br />
then press the Dial to select.<br />
Note: Pressing the NEXT key will also access<br />
the next screen in sequence (indicated by the<br />
down arrow symbol).<br />
3. The SETUP MORE screen is displayed with the<br />
REGION option chosen by default. Turn the<br />
Dial right three steps to choose WATER OFF,<br />
then press the Dial to select.<br />
RAIN MASTER TM EAGLE PLUS<br />
SETUP CONTROLLER:<br />
-DATE/TIME- -ACCESS-<br />
–STACK– –DELAY–<br />
-MVALVE- [MORE]<br />
SETUP MORE:<br />
-REGION- -ODD/EVEN-<br />
-SOUND- [WATER OFF]<br />
-WATER WINDOW-<br />
4. The SETUP WATER OFF screen is displayed.<br />
SETUP WATER OFF:<br />
Press the Dial to select [None], then turn the NUMBER OF DAYS<br />
Dial to display 1 to 9 days.<br />
CONTROLLER REMAINS<br />
IN WATER OFF [ 4]<br />
5. Press the Dial to enter. The controller will switch<br />
to the WATER OFF mode and the LED indicator<br />
will illuminate.<br />
Note: If a 1-day duration is selected, the WATER OFF mode will be automatically<br />
released at the day change (Midnight).<br />
6. When finished, press the HOME key to return to the HOME screen.<br />
Setting the Timed Water-Off Mode 17
RAIN MASTER TM EAGLE PLUS<br />
Setting the Water Window Duration<br />
This option enables you to define a specific period (or window) of time within the<br />
24-hour day to complete all scheduled watering activity. Once established, any<br />
scheduled watering activity that would either start or continue running outside of<br />
the window will be ignored. Built-in programming alerts will be displayed if a water<br />
window scheduling conflict occurs. By default, the Water Window setting is 24 hours.<br />
Note: When decreasing the Water Window, it is important to consider that an increase<br />
in station run time through the use of the Percent Adjust and/or ET control features, can<br />
extend program watering duration beyond the Water Window limit,resulting in an<br />
Alarm condition.<br />
1. Press the SETUP key to display the SETUP<br />
menu. The CONTROLLER menu item is chosen<br />
by default. Press the Dial to select.<br />
2. The SETUP CONTROLLER menu is displayed.<br />
Turn the Dial right 5 steps to choose MORE,<br />
then press the Dial to select.<br />
Note: Pressing the NEXT key will also access<br />
the next screen in sequence (indicated by the<br />
down arrow symbol).<br />
3. The SETUP MORE screen is displayed with the<br />
REGION option chosen by default. Turn the<br />
Dial right four steps to choose WATER<br />
WINDOW, then press the Dial to select.<br />
4. The SETUP WATER WINDOW screen will be<br />
displayed. Press the Dial to select START time.<br />
Turn the Dial to display the preferred start time<br />
hour, then press the Dial to enter. The minutes<br />
digits will begin flashing.<br />
5. Turn the Dial to display the preferred start time<br />
minutes. Press the Dial to enter. The AM/PM<br />
indicator will begin flashing (12-hour mode<br />
only). Turn the Dial to display the AM/PM<br />
preference, then press the Dial to enter.<br />
6. Turn the Dial right one step to choose the<br />
END time. Set the END time using the same<br />
procedure as the START time.<br />
7. When finished, press the HOME key to<br />
return to the HOME screen.<br />
SETUP:<br />
[CONTROLLER] –FLOW-<br />
–PROGRAM– –COMM–<br />
–ET– –TWO–WIRE–<br />
SETUP CONTROLLER:<br />
-DATE/TIME- -ACCESS-<br />
–STACK– –DELAY–<br />
-MVALVE- [MORE]<br />
SETUP MORE:<br />
-REGION- -ODD/EVEN-<br />
-SOUND- –WATER OFF–<br />
[WATER WINDOW]<br />
SETUP WATER WINDOW:<br />
START[05:00AM]<br />
END-11:59PM-<br />
SETUP WATER WINDOW:<br />
START[05:30AM]<br />
END–11:59PM–<br />
SETUP WATER WINDOW:<br />
START-05:30PM-<br />
END[11:59PM]<br />
18 Setting the Water Window Duration
Selecting the Program Setup Options<br />
Within the <strong>Control</strong>ler Setup menu options, the selections made applied<br />
universally to all active programs. Within the Program Setup options, operating<br />
parameters specific to each program are established.<br />
The table below lists the various available Program Setup options and the factory<br />
default settings.<br />
Setup Program Menu Option Default<br />
Type<br />
- Water Days: 14-Day/Skip Day 14-Day<br />
- Irrigation/Non-Irrigation Irrigation<br />
- Cycle and Soak: Yes/No No<br />
Odd/Even Days - Enabled/Disabled Disabled<br />
Weather - ET: Enabled/Disabled Disabled<br />
- <strong>Rain</strong> Sensor: Yes/No<br />
No<br />
RAIN MASTER TM EAGLE PLUS<br />
Program Type<br />
• Water Days – A 14-day schedule is the default option that enables individual<br />
days of a recurrent, two-week schedule to be assigned. The Skip-Day option<br />
constrains active days to a specified interval, ranging from every day (skip 0<br />
days), to once every 31 days (skip 30 days).<br />
• Irrigation/Non-Irrigation – Programs can be defined for either irrigation control<br />
or non-irrigation control; e.g., outdoor lighting or filter pumps as preferred.<br />
• Cycle/Soak – The Cycle and Soak option enables a delay period to be<br />
interspersed with the station run time to help reduce runoff due to a low<br />
absorption rate or to prevent furrowing and seed loss during an initial turf<br />
grow-in period.<br />
Odd/Even Days<br />
When enabled, either Odd- or Even-day watering is specified. Within the<br />
individual Program Setup options, the specified option (Odd or Even) is<br />
displayed with a YES/NO option. Selecting YES assigns the schedule to the<br />
program; selecting NO ignores the schedule.<br />
Note: The Odd/Even day scheduling option must be enabled within the <strong>Control</strong>ler<br />
Setup options to be selectable within the Program Setup options.<br />
<strong>Master</strong> Valve /Pump:<br />
This option enables/disables concurrent operation of the <strong>Master</strong> Valve (MV) and/<br />
or Pump on a per-program basis. By default, both <strong>Master</strong> Valve and Pump output<br />
controls are assigned to all irrigation programs and disabled for all non-irrigation<br />
programs.<br />
Selecting the Program Setup Options 19
RAIN MASTER TM EAGLE PLUS<br />
Setting the Program Type Option<br />
1. Press the SETUP key to display the SETUP<br />
menu. The CONTROLLER menu item is chosen<br />
by default. Press the Dial to select.<br />
2. Turn the Dial right two steps to choose<br />
PROGRAM, then press the Dial to select.<br />
3. The SETUP PROGRAM menu screen is displayed<br />
with TYPE chosen by default.<br />
Press the Dial to select.<br />
SETUP:<br />
[CONTROLLER] –FLOW-<br />
–PROGRAM– –COMM–<br />
–ET– –TWO–WIRE–<br />
SETUP:<br />
-CONTROLLER- -FLOW-<br />
[PROGRAM] –COMM–<br />
–ET– –TWO–WIRE–<br />
SETUP PROGRAM:<br />
[TYPE] -ODD/EVEN-<br />
-MV/PUMP- -ET SETUP<br />
4. The next SETUP PROGRAM screen in sequence<br />
is displayed with the program number chosen<br />
by default. Press the Dial to select. Turn the Dial<br />
to display the preferred program number, then<br />
press the Dial to enter.<br />
5. Turn the Dial right one step to choose the<br />
WATER DAYS. The 14 DAY option is displayed<br />
by default. Press the Dial to select.<br />
6. Turn the Dial to display SKIP DAY or 14 DAY<br />
option as preferred, then press the Dial to enter<br />
the selection.<br />
SETUP PROGRAM: [ 1]<br />
WATER DAYS- 14 DAY-<br />
TYPE- IRRIGATION -<br />
CYCLE/SOAK- NO-<br />
SETUP PROGRAM: - 2-<br />
WATER DAYS[ 14 DAY ]<br />
TYPE- IRRIGATION -<br />
CYCLE/SOAK- NO-<br />
SETUP PROGRAM: - 2-<br />
WATER DAYS[SKIP DAY]<br />
TYPE- IRRIGATION -<br />
CYCLE/SOAK- NO-<br />
7. Turn the Dial right one step to choose the<br />
Program TYPE option, then press the Dial to<br />
select.<br />
SETUP PROGRAM: - 2-<br />
WATER DAYS-SKIP DAY-<br />
TYPE[ IRRIGATION ]<br />
CYCLE/SOAK- NO-<br />
8. Turn the Dial to display NON IRRIGATION<br />
(i.e. for outdoor lighting) or IRRIGATION option,<br />
then press the Dial to enter the selection.<br />
9. Turn the Dial right one step to choose the<br />
CYCLE /SOAK option.<br />
10. Turn the Dial to display the YES or NO option,<br />
then press the Dial to enter the selection.<br />
11. When finished, press the HOME key<br />
to return to the HOME screen.<br />
20 Setting the Program Type Option<br />
SETUP PROGRAM: - 2-<br />
WATER DAYS-SKIP DAY-<br />
TYPE[NON-IRRIGATION]<br />
CYCLE/SOAK- NO-<br />
SETUP PROGRAM: - 2-<br />
WATER DAYS-SKIP DAY-<br />
TYPE- IRRIGATION -<br />
CYCLE/SOAK[ NO] -<br />
SETUP PROGRAM: - 2-<br />
WATER DAYS-SKIP DAY-<br />
TYPE- IRRIGATION -<br />
CYCLE/SOAK[YES] -
Setting the Program Odd/Even Calendar Days Option<br />
Note: To assign program(s) to an Odd or Even numbered calendar day schedule,<br />
the Odd /Even schedule option must be established first within the <strong>Control</strong>ler setup<br />
parameters. Refer to page 15 for <strong>Control</strong>ler Odd/Even setup procedures.<br />
Note: Programs can only be assigned to an Odd OR Even schedule, as specified<br />
within <strong>Control</strong>ler setup parameters. In other words, one program can not be assigned<br />
to an Even schedule and another program assigned to an Odd schedule.<br />
Note: When the Odd/Even program option is enabled, watering will NOT occur on<br />
the 31st day of the month or Leap Day (February 24).<br />
1. Press the SETUP key to display the SETUP<br />
menu. The CONTROLLER menu item is chosen<br />
by default. Press the Dial to select.<br />
2. Turn the Dial right two steps to choose<br />
PROGRAM, then press the Dial to select.<br />
3. The SETUP PROGRAM menu screen is displayed<br />
with the TYPE option chosen by default. Turn<br />
the Dial right one stop to choose the ODD/EVEN<br />
option, then press the Dial to select.<br />
4. The program number is chosen by default.<br />
Press the Dial to select, then turn the Dial to<br />
display the preferred program number. Press<br />
the Dial to enter the selection.<br />
5. Turn the Dial right one step to choose the<br />
YES/NO option. By default the Odd or Even<br />
option is not selected for programs.<br />
6. To assign the EVEN day option to this program,<br />
press the Dial to select NO. The option will<br />
begin flashing. Turn the Dial to display YES,<br />
then press the Dial to enter the selection.<br />
RAIN MASTER TM EAGLE PLUS<br />
SETUP:<br />
[CONTROLLER] –FLOW-<br />
–PROGRAM– –COMM–<br />
–ET– –TWO–WIRE–<br />
SETUP:<br />
-CONTROLLER- -FLOW-<br />
[PROGRAM] –COMM–<br />
–ET– –TWO–WIRE–<br />
SETUP PROGRAM:<br />
-TYPE- [ODD/EVEN]<br />
-MV/PUMP- -ET SETUP<br />
SETUP PROGRAM:[ 1]<br />
ODD/EVEN:ENABLED<br />
EVEN–YES<br />
SETUP PROGRAM:- 1-<br />
ODD/EVEN:ENABLED<br />
EVEN[NO ]<br />
SETUP PROGRAM:- 1-<br />
ODD/EVEN:ENABLED<br />
EVEN[NO ]<br />
7. Repeat this procedure for each program number as required, beginning at<br />
step 4.<br />
8. When finished, press the HOME key to return to the HOME screen.<br />
Setting the Program Odd/Even Days Option 21
RAIN MASTER TM EAGLE PLUS<br />
Setting the Program <strong>Master</strong> Valve/Pump <strong>Control</strong> Options<br />
Note: By default, the master valve and pump control options are enabled for all<br />
programs. Disabling these functions may be required for non-irrigation programs.<br />
See page 13 for <strong>Master</strong> Valve/Pump configuration and setup procedures.<br />
1. Press the SETUP key to display the SETUP<br />
menu. The CONTROLLER menu item is chosen<br />
by default. Press the Dial to select.<br />
2. Turn the Dial right two steps to choose<br />
PROGRAM, then press the Dial to select.<br />
SETUP:<br />
[CONTROLLER] –FLOW-<br />
–PROGRAM– –COMM–<br />
–ET– –TWO–WIRE–<br />
3. Press the Dial to display the SETUP PROGRAM<br />
menu screen. TYPE is chosen by default.<br />
4. Turn the Dial right two steps to choose<br />
MV/PUMP.<br />
5. Press the Dial to display the MASTER VALVE<br />
and PUMP screen. The program number is<br />
chosen by default.<br />
6. Press the Dial to select the program number.<br />
Turn the Dial to display the preferred program<br />
number, then press the Dial to enter.<br />
SETUP:<br />
-CONTROLLER- -FLOW-<br />
[PROGRAM] –COMM–<br />
–ET– –TWO–WIRE–<br />
SETUP PROGRAM:<br />
[TYPE] -ODD/EVEN-<br />
-MV/PUMP- -ET SETUP<br />
SETUP PROGRAM:<br />
-TYPE- -ODD/EVEN-<br />
[MV/PUMP] -ET SETUP-<br />
SETUP PROGRAM:[ 1]<br />
MASTER VALVE-YES-<br />
PUMP-YES-<br />
SETUP PROGRAM:- 1-<br />
MASTER VALVE[YES]<br />
PUMP-YES-<br />
7. Turn the Dial right one step to choose the<br />
MASTER VALVE option. YES is selected by default.<br />
To disable MASTER VALVE operation for this<br />
program, press the Dial to select, turn the Dial to<br />
display NO, then press the Dial to select.<br />
8. Turn the Dial right one step to choose the<br />
PUMP option. YES is selected by default.<br />
To disable PUMP operation for this program,<br />
turn the Dial to display NO, then press the Dial<br />
to select.<br />
9. Repeat this procedure for each program as preferred, beginning at step 5.<br />
10. When finished, press the HOME key to return to the HOME screen.<br />
22 Setting the Program <strong>Master</strong> Valve/Pump <strong>Control</strong> Options<br />
SETUP PROGRAM:- 1-<br />
MASTER VALVE[NO ]<br />
PUMP-YES-<br />
SETUP PROGRAM:- 1-<br />
MASTER VALVE-NO -<br />
PUMP[NO ]
Setting the Program Weather Options<br />
The optional ET (Evapotranspiration) and/or <strong>Rain</strong> Sensor control features are<br />
disabled by default for all programs. In order to utilize either of these features,<br />
they must first be enabled within the Weather option screen.<br />
Note: When ET is enabled for a program, a Percent Adjustment applied to that program<br />
will be ignored. Refer to Modify Program options, page 41 for additional information.<br />
1. Press the SETUP key to display the SETUP<br />
menu. The CONTROLLER menu item is chosen<br />
by default. Press the Dial to select.<br />
2. Turn the Dial right two steps to choose<br />
PROGRAM, then press the Dial to select.<br />
3. Turn the Dial right two steps to choose the<br />
WEATHER option. Press the Dial to display<br />
the ET and RAIN SENSOR option screen. The<br />
program number is chosen by default.<br />
4. Press the Dial to select. The program number<br />
will begin flashing. Turn the Dial to display the<br />
preferred program number, then press the<br />
Dial to enter the selection.<br />
5. Turn the Dial right one step to choose the ET<br />
option. DISABLED is selected by default.<br />
RAIN MASTER TM EAGLE PLUS<br />
SETUP:<br />
[CONTROLLER] –FLOW-<br />
–PROGRAM– –COMM–<br />
–ET– –TWO–WIRE–<br />
SETUP:<br />
-CONTROLLER- -FLOW-<br />
[PROGRAM] –COMM–<br />
–ET– –TWO–WIRE–<br />
SETUP PROGRAM:<br />
-TYPE- -ODD/EVEN-<br />
-MV/PUMP- [WEATHER]<br />
SETUP PROGRAM:[ 2]<br />
ET-DISABLED-<br />
RAIN SENSOR- NO -<br />
SETUP PROGRAM:- 2-<br />
ET[DISABLED]<br />
RAIN SENSOR- NO -<br />
6. Press the Dial to select. Turn the Dial to display<br />
the ENABLED option. Press the Dial to enter<br />
the selection.<br />
7. Turn the Dial right one step to choose the<br />
RAIN SENSOR option. NO is selected by<br />
default.<br />
SETUP PROGRAM:- 2-<br />
ET[ENABLED ]<br />
RAIN SENSOR- NO -<br />
SETUP PROGRAM:- 2-<br />
ET-ENABLED -<br />
RAIN SENSOR[ NO ]<br />
8. Press the Dial to select. Turn the Dial to<br />
display the YES option to enable the option<br />
for this program.<br />
9. Repeat this procedure for each program<br />
number as preferred, beginning at step 4.<br />
SETUP PROGRAM:- 2-<br />
ET-ENABLED -<br />
RAIN SENSOR[YES ]<br />
10. When finished, press the HOME key to return to the HOME screen.<br />
Setting the Program Weather Options 23
RAIN MASTER TM EAGLE PLUS<br />
Selecting the ET Setup Options<br />
All required ET configuration parameters are provided within the ET Setup Menu<br />
screen. The table below lists the available ET setup options and default settings.<br />
ET Setup Menu Option Default<br />
Manual Adjust No or .010 – .490 No<br />
Reference ET .00–.50 .10<br />
Reference Month Jan–Dec Jan<br />
ET .00–.50 .10<br />
Source Historic, Internet Historic<br />
or Weather Station<br />
1. Press the SETUP key to display the SETUP<br />
menu. The CONTROLLER menu item is chosen<br />
by default.<br />
2. Turn the Dial right four steps to choose ET,<br />
then press the Dial to select.<br />
3. Press the Dial to display the SETUP ET menu<br />
screen. The MANUAL option is chosen by<br />
default.<br />
SETUP:<br />
[CONTROLLER] –FLOW-<br />
–PROGRAM– –COMM–<br />
–ET– –TWO–WIRE–<br />
SETUP:<br />
-CONTROLLER- -FLOW-<br />
-PROGRAM- –COMM–<br />
[ET] –TWO–WIRE–<br />
SETUP ET:MANUAL[NO ]<br />
REFERENCE-.10-<br />
MONTH-JAN- ET-.10-<br />
SOURCE- HISTORIC -<br />
4. Press the Dial to select. The default value will<br />
begin flashing. Turn the Dial to change the<br />
value to the preferred setting. Press the Dial<br />
to save.<br />
SETUP ET:MANUAL-NO -<br />
REFERENCE[.20]<br />
MONTH-JAN- ET-.10-<br />
SOURCE- HISTORIC -<br />
5. Turn the Dial to choose the next option to be adjusted. Repeat the procedure<br />
beginning at Step 3.<br />
6. When finished, press the HOME key to return to the HOME screen.<br />
24 Selecting the ET Setup Preferences
Selecting the Flow Sensor Setup and Operation Options<br />
RAIN MASTER TM EAGLE PLUS<br />
The <strong>Eagle</strong> <strong>Plus</strong> can support two separate flow sensors to continuously monitor<br />
main line and individual station flow rates. If a flow rate is detected outside the<br />
specified parameter, an Alarm condition is triggered.<br />
The controller supports Standard and Custom flow sensor configurations. The<br />
Standard option applies factory-default K and Offset values for <strong>Rain</strong> <strong>Master</strong> flow<br />
sensors. The Custom option enables K and Offset values to be set as preferred.<br />
The table below lists the flow sensor setup options, and default settings.<br />
Flow Setup Menu Option Default<br />
Sensors Bronze: 1.0”, 1.25”, 1.5”, 2.0” & 2.5“<br />
(Material/Size) PVC: 1.5”, 2.0”, 3.0“ & 4.0” 1.5” PVC<br />
Usage None, Flow 1, Flow 2, Flow 1 & Flow 2 Flow 1<br />
Type Standard or Custom Standard<br />
Delay 1–6 Minutes 2 Minutes<br />
Flow Limits Station: 0–999 GPM 200 GPM<br />
Main: 1–5000 GPM<br />
500 GPM<br />
Unscheduled: 0–999 GPM<br />
200 GPM<br />
Learned Flow 1–All 1<br />
Limit Adjust 5–80% 20%<br />
Totalizer 0–999,999 Gallons 0 Gallons<br />
Set the Sensor Enable/Disable Option<br />
1. Press the SETUP key to display the SETUP<br />
menu. The CONTROLLER menu item is chosen<br />
by default.<br />
2. Turn the Dial right one step to choose FLOW,<br />
then press the Dial to select and display the<br />
SETUP FLOW screen.<br />
3. The SENSORS option is chosen by default.<br />
Press the Dial to select.<br />
4. Turn the Dial to display ENABLED, then press<br />
the Dial to enter the selection.<br />
Note: SENSORS ENABLED must be selected to<br />
access the remaining Flow setup features.<br />
SETUP:<br />
[CONTROLLER] –FLOW-<br />
–PROGRAM– –COMM–<br />
–ET– –TWO–WIRE–<br />
SETUP:<br />
-CONTROLLER- [FLOW]<br />
–PROGRAM– –COMM–<br />
–ET– –TWO–WIRE–<br />
SETUP FLOW:<br />
SENSORS [DISABLED]<br />
USAGE-FLOW1 ONLY -<br />
-MORE-<br />
SETUP FLOW:<br />
SENSORS [ENABLED ]<br />
USAGE-FLOW1 ONLY -<br />
-MORE-<br />
Selecting the Flow Sensor Setup and Operation Preferences 25
RAIN MASTER TM EAGLE PLUS<br />
Setting the Usage Option<br />
1. Turn the Dial to choose the USAGE option. The<br />
FLOW 1 ONLY option is selected by default.<br />
Press the Dial to select.<br />
2. Turn the Dial to display the preferred option<br />
(FLOW 1, FLOW 2, FLOW 1 & 2 or NONE).<br />
Press the Dial to enter the selection.<br />
3. Turn the Dial to choose the MORE option or<br />
press the Next key.<br />
SETUP FLOW:<br />
SENSORS -ENABLED -<br />
USAGE[FLOW1 ONLY ]<br />
-MORE-<br />
SETUP FLOW:<br />
SENSORS -ENABLED -<br />
USAGE[FLOW2 ONLY]<br />
-MORE-<br />
SETUP FLOW:<br />
SENSORS -ENABLED -<br />
USAGE-FLOW2 ONLY-<br />
[MORE]<br />
Setting the Standard/Custom Sensor Options<br />
1. The SETUP FLOW menu is displayed with the<br />
SENSORS option chosen by default. Press the<br />
Dial to select SENSORS.<br />
2. The SETUP FLOW SENSOR screen is displayed,<br />
with the sensor number option chosen by<br />
default. Press the Dial to select, then turn the<br />
Dial to display SENSOR 1 or 2. Press the Dial to<br />
enter the selection.<br />
3. Turn the Dial to choose the STANDARD for<br />
<strong>Rain</strong> <strong>Master</strong> flow sensor or CUSTOM for alternate<br />
flow sensor makes. Press the Dial to select.<br />
SETUP FLOW:<br />
[SENSOR] -DELAY-<br />
–LIMITS– –LEARN–<br />
–TOTALIZER–<br />
SETUP FLOW SENSOR[2]<br />
TYPE:<br />
–STANDARD- -CUSTOM-<br />
• For <strong>Rain</strong> <strong>Master</strong> Flow Sensors:<br />
4. The sensor SIZE option is chosen. Press the Dial<br />
to select, then turn the Dial to display the actual<br />
sensor size. Press the Dial to enter the selection.<br />
• For Alternate Flow Sensors:<br />
4. The sensor OFFSET value option is chosen by<br />
default. Press the Dial to select, then turn the<br />
Dial to display the preferred value (0–999).<br />
Press the Dial to enter the selection.<br />
5. Turn the Dial to choose the K value. Press the<br />
Dial to select, then turn the Dial to display the<br />
preferred value (0–32767). Press the Dial to<br />
enter the selection.<br />
SETUP FLOW SENSOR 2<br />
SIZE[ 2.00 INCH ]<br />
SETUP FLOW SENSOR 2<br />
OFFSET=[109]<br />
K=- 0-<br />
SETUP FLOW SENSOR-2-<br />
TYPE:<br />
[STANDARD] -CUSTOM-<br />
SETUP FLOW SENSOR 2<br />
OFFSET=-109-<br />
K=[ 779]<br />
26 Selecting Flow Sensor Setup and Operation Preferences
Setting the Flow Limits Options<br />
Flow rate alarm criteria are based on the flow rate values specified in the LIMITS<br />
screen. In most cases, the factory default values can serve as a starting point<br />
until the actual flow rate values are known. Using the Learned Flow procedure<br />
provided on Page 28, will enable the actual flow rate values to be automatically<br />
acquired and entered in Flow Limits screen in lieu of setting the values manually.<br />
1. Press the Back key to step back to the<br />
SETUP FLOW menu. Turn the Dial to choose<br />
LIMITS.<br />
2. The Station number option is chosen by<br />
default. Press the Dial to select, then turn the<br />
Dial to display the preferred station number.<br />
Press the Dial to enter.<br />
3. Turn the Dial to choose the STATION flow<br />
limit. Press the Dial to select, then turn the<br />
Dial to display the preferred value from<br />
0 to 999. Press the Dial to enter the selection.<br />
IMPORTANT: When the PROGRAM STACKING option is not used, multiple<br />
programs/stations are allowed to operate simultaneously. The MAIN LINE<br />
flow limit must be set to correspond with the maximum cumulative flow<br />
rate during multi- program operation.<br />
4. Turn the Dial to choose the Main Line flow<br />
limit. Press the Dial to select, then turn the<br />
Dial to display the preferred value from<br />
0 to 9999. Press the Dial to enter.<br />
RAIN MASTER TM EAGLE PLUS<br />
SETUP FLOW:<br />
-SENSOR- -DELAY-<br />
[LIMITS] –LEARN–<br />
–TOTALIZER–<br />
SETUP LIMITS: (GPM)<br />
STATION[ 2] -200-<br />
MAIN LINE-500-<br />
UNSCHEDULED-200-<br />
SETUP LIMITS: (GPM)<br />
STATION- 2- [175]<br />
MAIN LINE-500-<br />
UNSCHEDULED-200-<br />
SETUP LIMITS: (GPM)<br />
STATION- 2- -175-<br />
MAIN LINE[450]<br />
UNSCHEDULED-200-<br />
Note: Setting the Unscheduled flow limit establishes the maximum allowable<br />
flow through the main line while the irrigation system is static. If the flow rate<br />
exceeds the limit, an Alarm is triggered and the system will shut down until<br />
the cause is resolved. A small or zero value for unscheduled flow is generally<br />
sufficient unless supplemental irrigation is used; i.e., via a quick-coupler or gate<br />
valve. In this case, the Unscheduled flow limit must be set at the maximum<br />
supplemental flow rate.<br />
5. Turn the Dial to choose the UNSCHEDULED<br />
flow limit. Press the Dial to select, then turn<br />
the Dial to display the preferred value from<br />
0 to 999. Press the Dial to enter the selection.<br />
STATION- 2- -175-<br />
SETUP LIMITS: (GPM)<br />
MAIN LINE- 450-<br />
UNSCHEDULED[ 0]<br />
Selecting Flow Sensor Setup and Operation Preferences 27
RAIN MASTER TM EAGLE PLUS<br />
Setting the Delay Option<br />
The Delay time entered in this setup screen determines how long a station will<br />
run before the flow data is sampled.<br />
Note: An extra 10 seconds will be added to the selected Delay time.<br />
1. Press the BACK key to step back through the<br />
menu sequence to the SETUP FLOW menu.<br />
2. Turn the Dial right one step to choose the<br />
DELAY option. Press the Dial to select.<br />
3. The SETUP FLOW DELAY screen is displayed<br />
with the delay time chosen by default. Press<br />
the Dial to select, then turn the Dial to display<br />
the preference from 1 to 6 minutes. Press the<br />
Dial to enter the selection.<br />
Note: Established programs can be selected by number, or when more than one<br />
valid program exists, the ALL option will be displayed. When the ALL option is<br />
selected, all valid programs will run one at a time in numeric sequence.<br />
2. The SETUP LEARNED FLOW menu is displayed,<br />
with the program number option chosen by<br />
default. Press the Dial to select, then turn the<br />
Dial to display a specific program number,<br />
or select All to run all programs in sequence.<br />
SETUP FLOW:<br />
[SENSOR] -DELAY-<br />
–LIMITS– –LEARN–<br />
–TOTALIZER–<br />
SETUP FLOW:<br />
-SENSOR- [DELAY]<br />
–LIMITS– –LEARN–<br />
–TOTALIZER–<br />
SETUP FLOW DELAY<br />
DELAY[2] MINUTES<br />
BEFORE LIMIT CHECKS<br />
ARE PERFORMED<br />
Setting the Learned Flow Options<br />
During the Learned Flow procedure, each station assigned to a selected program<br />
is operated in sequence for the run time specified in the Delay option screen.<br />
An additional 10 seconds is added at the end of the delay period in which the<br />
nominal flow rate is acquired. To help prevent false threshold Alarms due to typical<br />
variations in flow rate, the controller establishes the maximum flow rate value by<br />
increasing the nominal flow rate by a specified percentage factor from 5 to 80%.<br />
Note: To utilize the learned flow feature, at least one valid automatic watering<br />
program must be defined.<br />
1. Press the BACK key to step back to the SETUP FLOW:<br />
SETUP FLOW menu. Turn the Dial to choose the -SENSOR- -DELAY-<br />
Learn option, then press the Dial to enter the –LIMITS– [LEARN]<br />
–TOTALIZER–<br />
selection.<br />
SETUP LEARNED FLOW:<br />
LEARN PROGRAM[ALL]<br />
ADJUST LIMIT BY-20-%<br />
-START-<br />
28 Selecting Flow Sensor Setup and Operation Preferences
3. Turn the Dial to choose the ADJUST LIMIT value.<br />
Press the Dial to select, then turn the Dial to<br />
display the preferred increase from 5 to 80%.<br />
Turn the Dial to choose START, then press the<br />
Dial to select.<br />
4. A WARNING screen is displayed. The station run<br />
time (DELAY) time plus 10 seconds is indicated,<br />
and the START option is chosen by default.<br />
Note: Choosing and selecting the CANCEL option<br />
discontinues the procedure and reverts to the<br />
SETUP LEARNED FLOW screen.<br />
5. Press the Dial to start the operation. A status<br />
screen will be displayed identifying the station<br />
number being tested, the current flow rate,<br />
and the run time remaining.<br />
Note: Choosing and selecting the ABORT option discontinues the procedure and<br />
reverts to the SETUP LEARNED FLOW screen.<br />
Resetting the Flow Totalizer<br />
All flow sensor data is stored in the controller memory and can be reviewed at<br />
any time. The flow totalizer feature monitors the flow data registered by each<br />
flow sensor and displays the combined total volume. The totalizer can be set to<br />
display flow data in GAL (gallons), CCF (100 cubic feet), or ACRE-FEET (ACF) as<br />
preferred. The RESET feature enables the totalizer to be reset to zero and begin<br />
compiling total flow data from that point forward.<br />
1. Press the BACK key to step back to the<br />
SENSOR FLOW menu. Turn the Dial to choose<br />
the TOTALIZER option. Press the Dial<br />
to select.<br />
2. The GAL (gallons) display units option is chosen<br />
by default. To select an alternate unit of measure,<br />
press the Dial to select, then turn the Dial<br />
to display the preferred option. Press the Dial to<br />
enter the selection.<br />
Note: The TOTAL will be automatically converted to the equivalent unit measure.<br />
3. Turn the Dial to choose RESET TOTAL.<br />
Press the Dial to reset the totalizer to 0.<br />
The previous date and time will is updated<br />
to the current date and time. All data will be<br />
logged beginning at this time and date.<br />
RAIN MASTER TM EAGLE PLUS<br />
SETUP LEARNED FLOW:<br />
LEARN PROGRAM-ALL-<br />
ADJUST LIMIT BY[20]%<br />
-START-<br />
WARNING: EACH<br />
STATION WILL TURN ON<br />
FOR:130<br />
[START] -CANCEL-<br />
SETUP LEARNED FLOW:<br />
ADJUST LIMIT BY 20%<br />
STATION: 1 154 GPM<br />
TIME:01:05 [ABORT]<br />
SETUP FLOW:<br />
-SENSOR- -DELAY-<br />
–LIMITS– -LEARN-<br />
[TOTALIZER]<br />
SETUP TOTALIZER:<br />
FROM02/18/10 01:00PM<br />
TOTAL=21440 [GAL]<br />
-RESET TOTAL-<br />
SETUP TOTALIZER:<br />
FROM04/08/11 02:33PM<br />
TOTAL=0 -CCF-<br />
[RESET TOTAL]<br />
Selecting Flow Sensor Setup and Operation Preferences 29
RAIN MASTER TM EAGLE PLUS<br />
Setting the Communications Options<br />
Note: The iCentral TM interface board and external antenna must be installed to<br />
access and utilize the following controller functions.<br />
The <strong>Eagle</strong> <strong>Plus</strong> can take full advantage of the iCentral capabilities when equipped<br />
with the optional iCentral interface board and antenna. Additional functions<br />
include, remote programming, ZipET TM evapotranspiration data, and the<br />
Smart Alerts TM , comprehensive alert messaging.<br />
The straight-forward communication setup options include: Enable, Disable,<br />
and Test. The communications test checks signal strength and two-way<br />
communications with the iCentral. The 60-second test is monitored as it<br />
progresses. When testing has concluded, the relative signal strength is rated as:<br />
Excellent, Good, Fair, Poor, or None. In addition, a CSQ value from 0–32 is provided.<br />
1. Press the SETUP key to display the SETUP<br />
menu. Turn the Dial to choose COMM.<br />
2. Press the Dial to display the SETUP COMMUNI-<br />
CATION screen. The ENABLED option is chosen<br />
by default.<br />
3. Turn the Dial to select START, then press the<br />
Dial to initiate the test.<br />
4. The count-down screen will be displayed.<br />
• To terminate the test, press the BACK<br />
• The results will be displayed at the<br />
conclusion.<br />
key.<br />
Note: If the signal strength is NONE or POOR,<br />
and/the or the CSQ number is low, and/or FAIL<br />
is indicated, contact <strong>Rain</strong> <strong>Master</strong> technical<br />
support at 1-800-777-1477 for recommended<br />
troubleshooting procedures.<br />
SETUP:<br />
-CONTROLLER- -FLOW-<br />
–PROGRAM– [COMM]<br />
–ET– –TWO–WIRE–<br />
SETUP COMMUNICATION:<br />
COMM[ENABLED ]<br />
COMM CARD: PRESENT<br />
COMM TEST-START-<br />
SETUP COMMUNICATION:<br />
COMM-ENABLED -<br />
COMM CARD: PRESENT<br />
COMM TEST[START]<br />
COMMUNICATION TEST:<br />
TIME REMAINING: 53<br />
COMMUNICATION TEST<br />
SIG STRENGTH: GOOD<br />
ICENTRAL TEST:PASS<br />
CSQ: 10<br />
ICENTRAL TEST:FAIL<br />
SIG STRENGTH: POOR<br />
COMMUNICATION TEST<br />
CSQ: 1<br />
30 Setting the Communications Options
Two-Wire Decoder System Setup<br />
When the <strong>Eagle</strong> <strong>Plus</strong> is equipped with the Two-Wire Decoder interface board,<br />
access to the Two-Wire setup menu options become available. The setup<br />
functions for the Two-Wire Decoder system include:<br />
• Program Decoder – Provides Decoder programming and setup options.<br />
• Show Stations – Retrieves and displays current station address information.<br />
• Test – Provides multiple test functions for Decoder station address verification.<br />
Note: If the decoder board is not installed or a<br />
hardware malfunction has occurred, the prompt<br />
screen shown at right will be displayed.<br />
RAIN MASTER TM EAGLE PLUS<br />
SETUP TWO-WIRE<br />
TWO-WIRE BOARD NOT<br />
FUNCTIONING OR NOT<br />
PRESENT.<br />
Programming the Decoders<br />
<strong>Rain</strong> <strong>Master</strong> decoders are available in 1-, 2-, and 4-station output models, and<br />
as shipped from the factory, have no pre-defined station assignments. To be<br />
recognized by the <strong>Eagle</strong> <strong>Plus</strong> controller, each station must be addressed as either<br />
a station number from 0 – 200, a <strong>Master</strong> Valve, or a Pump control. To facilitate<br />
decoder programming, a quick-connect terminal block is provided on the<br />
Two-Wire Decoder board.<br />
Note: The <strong>Eagle</strong> <strong>Plus</strong> enables the decoders to be temporarily connected and<br />
programmed without disconnecting power. Confirm the Power LED on the Decoder<br />
board is illuminated before continuing. If it is not illuminated, confirm that power is on<br />
and the Decoder board is properly connected to <strong>Control</strong> Module.<br />
CAUTION: Red and Black decoder wires must be connected to the decoder<br />
board terminal block in the correct orientation. Damage to the decoder and/<br />
or controller may result from crossing the wire connection.<br />
1. Insert the red and black decoder leads into the corresponding quick-release<br />
terminal connectors as indicated below.<br />
Status LED<br />
Red Wire Lead<br />
Black Wire Lead<br />
Decoder Board<br />
Cable to <strong>Control</strong><br />
Module<br />
Power LED<br />
Status LED<br />
Decoder<br />
Two-Wire Decoder System Setup 31
RAIN MASTER TM EAGLE PLUS<br />
2. Press the SETUP key to display the SETUP<br />
menu. The CONTROLLER menu item is chosen<br />
by default. Turn the Dial right five steps to<br />
choose the TWO-WIRE menu option, then press<br />
the Dial to select.<br />
3. The SETUP TWO-WIRE menu screen is<br />
displayed with PROGRAM DECODER option<br />
chosen by default. Press the Dial to select.<br />
Status LEDs on the Decoder Board and<br />
Decoder should begin blinking to confirm<br />
communication.<br />
Note: If the Decoder Status LED does not illuminate periodically, confirm the<br />
red and black lead wires are properly connected to the terminal block. A faulty<br />
decoder is indicated if the Status LED does not illuminate.<br />
4. The PROGRAM DECODER screen is displayed<br />
with the NEW ADDRESS option chosen.<br />
Note: In this example, NONE indicates that<br />
decoder station slot 1 (of 4 available slots)<br />
has no programmed address.<br />
5. To select a different decoder station slot<br />
number, turn the Dial to choose the slot<br />
number, then press the Dial to select. Turn<br />
the Dial to display the preferred number, then<br />
press the Dial to enter the selection.<br />
6. Press the Dial to choose NEW ADDRESS. Turn<br />
the Dial to display the preferred address<br />
(001–200, MV, PMP or NONE), then press the<br />
Dial to enter. In this example, station number 12<br />
will be assigned to decoder station slot 2 of 4.<br />
7. Turn the Dial to choose PROGRAM, then<br />
press the Dial to begin the procedure. Within<br />
a few moments the results will be displayed.<br />
If programming was successful, OK will be<br />
momentarily displayed in the upper right<br />
corner, and the next decoder station number<br />
in sequence will be displayed. If programming<br />
was not successful, FAIL will be displayed and<br />
an Alarm will be generated.<br />
SETUP:<br />
-CONTROLLER- -FLOW-<br />
–PROGRAM– –COMM–<br />
–ET– [TWO–WIRE]<br />
SETUP TWO-WIRE<br />
[PROGRAM DECODER]<br />
-SHOW STATIONS-<br />
-TEST-<br />
PROGRAM DECODER:<br />
CURRENT ADDRESS:NONE<br />
NEW ADDRESS[NONE]<br />
-1- OF 4 -PROGRAM-<br />
PROGRAM DECODER:<br />
CURRENT ADDRESS:NONE<br />
NEW ADDRESS[NONE]<br />
[2] OF 4 -PROGRAM-<br />
PROGRAM DECODER:<br />
CURRENT ADDRESS:NONE<br />
NEW ADDRESS[012]<br />
-2- OF 4 -PROGRAM-<br />
PROGRAM DECODER:<br />
CURRENT ADDRESS:NONE<br />
NEW ADDRESS-012-<br />
-2- OF 4 [PROGRAM]<br />
PROGRAM DECODER: OK<br />
CURRENT ADDRESS: FAIL<br />
NEW ADDRESS-012-<br />
-3- OF 4 [PROGRAM]<br />
Note: To clear the Alarm, refer to Resolving Alarms, page 52.<br />
8. Repeat the programming procedure for all decoder stations as required.<br />
32 Two-Wire Decoder System Setup
Testing the Two-Wire Decoder System<br />
The Two-Wire Decoder system test feature provides methods of testing the<br />
decoder installation to easily verify communication, station assignment and<br />
operating status and log the results. The following test options are available:<br />
• Single Station: Tests a selected Decoder station number.<br />
• Find Decoders: Searches communication path for all responding Decoders.<br />
• All Programmed: Tests all decoder stations (1–200, <strong>Master</strong> Valve or Pump) that<br />
have been defined within a program.<br />
• All Stations: Tests all decoder stations, <strong>Master</strong> Valve and Pump controls.<br />
• Alarm Logging Options: Test results can be logged as Alarms indicating Pass<br />
and/or Fail as selected.<br />
•• Log Fail Alarm: When selected, a decoder station that fails the test criteria<br />
will be logged.<br />
•• Log Pass Alarm: When selected, a decoder station that passes the test<br />
criteria will be logged<br />
Single Station Test<br />
1. Press the SETUP key to display the SETUP<br />
menu. Turn the Dial to choose the TWO-WIRE<br />
option, then press the Dial to select.<br />
RAIN MASTER TM EAGLE PLUS<br />
SETUP:<br />
-CONTROLLER- -FLOW-<br />
–PROGRAM– –COMM–<br />
–ET– [TWO–WIRE]<br />
2. The SETUP TWO-WIRE menu screen is displayed<br />
with the PROGRAM DECODER option chosen by<br />
default. Turn the Dial to choose the TEST option,<br />
then press the Dial to select.<br />
3. The SETUP TWO-WIRE TEST screen is displayed<br />
with SINGLE STATION test type chosen by<br />
default.<br />
4. Turn the Dial to choose the LOG FAILURES<br />
option. To change the current setting, press the<br />
Dial to select, then turn the Dial to display the<br />
preference. Repeat this procedure for the LOG<br />
PASS option as preferred.<br />
5. Turn the Dial to choose GO, then press the Dial<br />
to continue.<br />
SETUP TWO-WIRE<br />
-PROGRAM DECODER-<br />
-SHOW STATIONS-<br />
[TEST]<br />
SETUP TWO-WIRE TEST<br />
TYPE[SINGLE STATION]<br />
LOG FAILURES-YES-<br />
LOG PASS-YES- -GO-<br />
SETUP TWO-WIRE TEST<br />
TYPE-SINGLE STATION-<br />
LOG FAILURES[NO ]<br />
LOG PASS-YES- -GO-<br />
SETUP TWO-WIRE TEST<br />
TYPE-SINGLE STATION-<br />
LOG FAILURES-NO -<br />
LOG PASS-YES- [GO]<br />
Two-Wire Decoder System Setup 33
RAIN MASTER TM EAGLE PLUS<br />
6. The SINGLE STATION TEST screen will be displayed<br />
with STATION 1 chosen by default.<br />
To change the station selection, press the Dial<br />
to select, turn the Dial to display the preferred<br />
station number, then press the Dial to enter.<br />
7. Turn the Dial to choose GO, then press the Dial<br />
to start the test.<br />
Note: The test will take approximately 3 minutes.<br />
8. The test results will be displayed. Based on the<br />
Alarm Log options selected, an alarm may be<br />
generated.<br />
Note: To pause or stop the test, turn the Dial to<br />
choose STOP, then press the Dial to pause the test.<br />
To resume the test, press the Dial again.<br />
To terminate the test, press the BACK key.<br />
9. Press the HOME key to return to the Home<br />
screen. Turn the Dial to choose ALARMS, then<br />
press the Dial to review the Alarm screen.<br />
10. Turn the Dial to choose CLEAR, then press the<br />
Dial to clear the alarm.<br />
Note: Clearing alarms removes the screen<br />
prompts and turns off the Alarm LED indicator.<br />
Logged alarm information is accessed from the<br />
REVIEW menu screen.<br />
Find Decoders Test<br />
1. Press the SETUP key to display the SETUP<br />
menu. Turn the Dial to choose the TWO-WIRE<br />
option, then press the Dial to select.<br />
2. The SETUP TWO-WIRE menu screen is displayed<br />
with the PROGRAM DECODER option chosen by<br />
default. Turn the Dial to choose TEST, then press<br />
the Dial to select.<br />
3. The SETUP TWO-WIRE TEST screen is displayed<br />
with SINGLE STATION test type chosen by<br />
default. Press the Dial to select, then turn the<br />
Dial to display FIND DECODERS.<br />
34 Two-Wire Decoder System Setup<br />
SINGLE STATION TEST<br />
STATION[ 1]<br />
-GO-<br />
SINGLE STATION TEST<br />
STATION- 1-<br />
[GO]<br />
SETUP TWO-WIRE TEST:<br />
TESTING STATION: 12<br />
TESTING CURRENT: .18<br />
VERSION: 0 [STOP]<br />
WE 02:47:41P WK1<br />
VALID PGM:NONE<br />
-MAIN-[ALARMS( 1)]<br />
06/16 WE 02:48:01P<br />
STATION 12<br />
DECODER FOUND<br />
[CLEAR]<br />
SETUP:<br />
-CONTROLLER- -FLOW-<br />
–PROGRAM– –COMM–<br />
–ET– [TWO–WIRE]<br />
SETUP TWO-WIRE<br />
-PROGRAM DECODER-<br />
[SHOW STATIONS]<br />
-TEST-<br />
SETUP TWO-WIRE TEST<br />
TYPE[FIND DECODERS ]<br />
LOG FAILURES-YES-<br />
LOG PASS-YES- -GO-
4. Turn the Dial to choose the LOG FAILURES<br />
option. To change the current setting, press the<br />
Dial to select, then turn the Dial to display the<br />
preference. Repeat this procedure for the LOG<br />
PASS option as preferred.<br />
5. Turn the Dial to choose GO, then press the Dial<br />
to begin the test.<br />
Note: The test will take approximately 3 minutes.<br />
6. The test results will be displayed. Based on the<br />
Alarm Log options selected, an alarm may be<br />
generated.<br />
Note: To pause or stop the test, turn the Dial to<br />
choose STOP, then press the Dial to pause the test.<br />
To resume the test, press the Dial again.<br />
To terminate the test, press the BACK key.<br />
RAIN MASTER TM EAGLE PLUS<br />
SETUP TWO-WIRE TEST<br />
TYPE-SINGLE STATION-<br />
LOG FAILURES[NO ]<br />
LOG PASS-YES- -GO-<br />
SETUP TWO-WIRE TEST<br />
TYPE-SINGLE STATION-<br />
LOG FAILURES-NO -<br />
LOG PASS-YES- [GO]<br />
SETUP TWO-WIRE TEST:<br />
TESTING STATION: 12<br />
TESTING CURRENT: .18<br />
VERSION: 0 [STOP]<br />
WE 02:47:41P WK1<br />
VALID PGM:NONE<br />
-MAIN-[ALARMS( 1)]<br />
7. Press the HOME key to return to the Home screen. Turn the Dial to choose<br />
ALARMS, then press the Dial to review the Alarm screen.<br />
All Stations Test<br />
Note: To run the ALL STATIONS test, refer to the FIND DECODERS test procedure on the<br />
previous page. Select the ALL STATIONS option in lieu of FIND DECODERS in step 3.<br />
Show Stations<br />
1. Press the SETUP key to display the SETUP<br />
menu. Turn the Dial to choose the TWO-WIRE<br />
option, then press the Dial to select.<br />
SETUP:<br />
-CONTROLLER- -FLOW-<br />
–PROGRAM– –COMM–<br />
–ET– [TWO–WIRE]<br />
2. The SETUP TWO-WIRE menu screen is displayed<br />
with the PROGRAM DECODER option chosen<br />
by default. Turn the Dial to choose SHOW<br />
STATIONS, then press the Dial to begin.<br />
Note: The test will take approximately 3 minutes.<br />
SETUP TWO-WIRE<br />
-PROGRAM DECODER-<br />
[SHOW STATIONS]<br />
-TEST-<br />
CALCULATING<br />
3. The controller will search for all stations assigned<br />
to any of the 16 watering programs. The results<br />
will be display on one or more sequential<br />
screens Press the NEXT and BACK keys<br />
to access and review the screens.<br />
SHOW PROGRAMMED<br />
TWO-WIRE STATIONS:<br />
1,3,5,7,10-37,40,44<br />
49-57,59-83,87-108<br />
Two-Wire Decoder System Setup 35
RAIN MASTER TM EAGLE PLUS<br />
Programming for Automatic Operation<br />
The <strong>Eagle</strong> <strong>Plus</strong> enables you to define up to 8 automatic programs for a<br />
conventional control system, or up to 16 programs for a decoder system.<br />
A program is comprised of the following three primary operating parameters<br />
that must be established to create a valid program:<br />
• An active day schedule<br />
• A program start time<br />
• A station run time.<br />
The operating options selected within the various Setup menus are applied to<br />
the programs to further define and regulate controller operations.<br />
IMPORTANT: A program becomes valid only after all three primary<br />
operating parameters have been entered. Once a valid program is entered,<br />
all user-defined program values will remain intact. Failing to enter all three<br />
parameters correctly, or prior to the display timing-out, will invalidate that<br />
program. It is recommended to always confirm the valid program status<br />
whenever creating or modifying programs.<br />
Creating a New Program<br />
Setting a Two-Week Watering Schedule<br />
1. Press the PROGRAM key to display the<br />
PROGRAM menu. The MODIFY menu item is<br />
chosen by default. Turn the Dial to choose<br />
the NEW option, then press the Dial to select.<br />
2. The NEW PROGRAM screen is displayed with<br />
the program number chosen by default.<br />
To change the program number assignment,<br />
press the Dial to select, then turn the Dial to<br />
change the program number. Press the Dial to<br />
enter the selection.<br />
3. Turn the Dial to choose CREATE PROGRAM,<br />
then press the Dial to select.<br />
PROGRAM:<br />
-MODIFY- [NEW]<br />
-REVIEW- -DELETE-<br />
-COPY-<br />
NEW PROGRAM [ 3]<br />
VALID PGM:1-3<br />
-CREATE PROGRAM-<br />
NEW PROGRAM - 3-<br />
VALID PGM:1-3<br />
[CREATE PROGRAM]<br />
Note: If the program number selected is already<br />
an established (valid) program, a prompt screen<br />
will be displayed. Selecting YES will overwrite<br />
the existing program; selecting NO will leave<br />
the program unchanged. Repeat Step 2 and 3 to<br />
select an available program number, then<br />
continue to Step 4.<br />
ARE YOU SURE YOU<br />
WANT TO DELETE<br />
EXISTING PROGRAM 3<br />
-YES- [NO]<br />
36 Creating a New Program
4. The two-week schedule screen is displayed<br />
with S (Sunday) of W1 (Week 1) chosen by<br />
default.<br />
5. To select the day, press the Dial (an X will<br />
appear), or to skip the day, turn the Dial to the<br />
preferred day, then press the Dial to select.<br />
Note: Pressing the Dial repeatedly toggles the<br />
selection ON and OFF.<br />
6. Continue to define the remaining days of the<br />
two-week schedule in this manner.<br />
Note: The asterisk next to W1 or W2 indicates<br />
the current week of the two-week watering cycle<br />
and is not pertinent to the programming<br />
procedure.<br />
7. When the two-week schedule is set, select<br />
OK, or press the NEXT key to display the<br />
START TIME setup screen.<br />
RAIN MASTER TM EAGLE PLUS<br />
NEW PROGRAM:1<br />
S M T W T F S<br />
[ ] W1*<br />
W2<br />
NEW PROGRAM:1 -OK-<br />
S M T W T F S<br />
[ ] W1*<br />
W2<br />
NEW PROGRAM:1 [OK]<br />
S M T W T F S<br />
W1*<br />
W2<br />
NEW PROGRAM:1 [OK]<br />
S M T W T F S<br />
W1*<br />
W2<br />
Setting a Skip-Day Watering Schedule<br />
Note: The Skip Days scheduling option will not be available for the selected program<br />
unless it is initially assigned to the program within the Program Setup menu>Type<br />
options. See page 20 for Skip Day information and setup procedures.<br />
1. Turn the Dial to choose the SKIP DAYS value.<br />
Press the Dial to select, then turn the Dial to<br />
display the number of days between active<br />
watering days (0–30). Press the Dial to enter.<br />
Note: To water every day, select 0. To water<br />
every-other-day, select 1, etc.<br />
2. Turn the Dial to choose the START delay<br />
value. Press the Dial to select, then turn the<br />
Dial to display the number of days before<br />
starting the skip day cycle (0–30). Press the<br />
Dial to enter.<br />
Note: To start the watering day cycle today<br />
select 0; to start tomorrow select 1, etc.<br />
3. When the SKIP DAY setup values are set,<br />
select OK, or press the NEXT key to<br />
display the START TIME setup screen.<br />
NEW PROGRAM: 1 -OK-<br />
SKIP [03] DAYS<br />
BETWEEN WATERING.<br />
START IN -00- DAYS<br />
NEW PROGRAM: 1 -OK-<br />
SKIP -03- DAYS<br />
BETWEEN WATERING.<br />
START IN [02] DAYS<br />
NEW PROGRAM: 1 [OK]<br />
SKIP -03- DAYS<br />
BETWEEN WATERING.<br />
START IN -02- DAYS<br />
Setting a Skip-Day Watering Schedule 37
RAIN MASTER TM EAGLE PLUS<br />
Setting Program Start Times<br />
1. Each program can have up to 8 start time<br />
assignments. START TIME 1 is selected by<br />
default.<br />
2. Turn the Dial to choose HH:MM. The start time<br />
will default to 12:00AM with the hour digits<br />
selected (blinking).<br />
3. Turn the Dial to set the start time hour, then<br />
press the Dial to enter. The minutes digits will<br />
begin blinking. Set the start time minutes and<br />
AM/PM designator in the same manner.<br />
4. START TIME 2 is prompted as START TIME 1 is<br />
entered. Continue to assign up to 8 start times<br />
for this program as preferred.<br />
5. When finished, choose and select OK,<br />
or press the NEXT key to display the<br />
STATION RUN TIME setup screen.<br />
Note: To clear the displayed start time, choose and select the DELETE option.<br />
Assigning the Station Run Time<br />
Note: If the CYCLE AND SOAK option was selected for the program, continue at<br />
Setting a Cycle and Soak Station Run Time on the next page.<br />
1. STATION 1 is selected by default. To change the<br />
station number, press the Dial to select. Turn<br />
the Dial to display the preferred station number,<br />
then press the Dial to enter the selection.<br />
2. Turn the Dial to choose the station run time<br />
value, then press the Dial to select. The hours<br />
digit is selected and will begin blinking.<br />
NEW PROGRAM: 1<br />
TOTAL START TIMES:1<br />
START TIME[1]<br />
-HH:MM - -DELETE-<br />
NEW PROGRAM: 1<br />
TOTAL START TIMES:0<br />
START TIME-1-<br />
[12:00AM] -DELETE-<br />
NEW PROGRAM: 1 -OK-<br />
TOTAL START TIMES:0<br />
START TIME-1-<br />
[ 6:15AM] -DELETE-<br />
NEW PROGRAM: 1 -OK-<br />
TOTAL START TIMES:1<br />
START TIME-2-<br />
[HH:MM ] -DELETE-<br />
NEW PROGRAM: 1<br />
STATION [ 1]<br />
RUNTIME-00:00-<br />
NEW PROGRAM: 1<br />
STATION - 1-<br />
RUNTIME[ 0:00]<br />
3. Turn the Dial to display the preferred run time<br />
hours (0–23), then press the Dial to enter. The<br />
minutes digits will be selected. Turn the Dial<br />
to select the run time minutes (0–59), then<br />
press the Dial to enter.<br />
4. The next station number in sequence will be<br />
prompted. Continue to assign additional<br />
stations to this program as preferred.<br />
NEW PROGRAM: 1<br />
STATION- 1-<br />
RUNTIME[ 1:15]<br />
NEW PROGRAM: 1 [OK]<br />
STATION- 2-<br />
RUNTIME-00:00-<br />
38 Setting Program Start Times and Station Run Time
RAIN MASTER TM EAGLE PLUS<br />
5. Press the NEXT key to display the<br />
PROGRAM summary screen.<br />
Note: If the program is not valid, press the<br />
BACK key to recall, correct, and/or adjust<br />
the various program setup parameters as<br />
necessary. When the summary screen indicates<br />
that the program is valid, choose and select OK.<br />
PROGRAM: 1 NOT VALID<br />
TOTAL RUNTIME:00:00<br />
[OK]<br />
PROGRAM: 1 IS VALID<br />
TOTAL RUNTIME:06:45<br />
[OK]<br />
Setting a Cycle and Soak Station Run Time<br />
Note: The Cycle and Soak scheduling option will not be available for the selected<br />
program unless it is initially assigned to the program within the PROGRAM SETUP><br />
TYPE menu. See page 20 for the Cycle and Soak setup procedure.<br />
1. Station 1 is selected by default. To change the<br />
station number, press the Dial to select. Turn<br />
the Dial to display the preferred station number,<br />
then press the Dial to select.<br />
Important: Any station assigned to the program with a 0:00 MAX or<br />
SOAK time value will not operate during the program watering cycle.<br />
2. Turn the Dial to choose the MAX run time value,<br />
then press the Dial to select. The hour digit is<br />
selected and will begin blinking. Turn the Dial<br />
to display the run time (0–9 hours), then press<br />
the Dial to select.<br />
3. The minutes digits will be selected (blinking).<br />
Turn the Dial to select the run time minutes<br />
(0–59), then press the Dial to enter.<br />
4. Turn the Dial to choose the SOAK time value,<br />
then press the Dial to select. The hour digit<br />
is selected and will begin blinking. Turn the<br />
Dial to display the soak time (0–9 hours), then<br />
press the Dial to select.<br />
5. The minutes digits will be selected. Turn the<br />
Dial to select the RUN TIME minutes (0–59),<br />
then press the Dial to enter.<br />
NEW PROGRAM: 1<br />
STATION- 1-<br />
MAX-1:05-SOAK[2:30]<br />
RUNTIME-00:00-<br />
NEW PROGRAM: 1<br />
STATION[ 1]<br />
MAX-0:00-SOAK-0:00-<br />
RUNTIME-00:00-<br />
NEW PROGRAM: 1<br />
STATION- 1-<br />
MAX[1:00]SOAK-0:00-<br />
RUNTIME-00:00-<br />
NEW PROGRAM: 1<br />
STATION- 1-<br />
MAX[1:05]SOAK-0:00-<br />
RUNTIME-00:00-<br />
NEW PROGRAM: 1<br />
STATION- 1-<br />
MAX-1:05-SOAK[2:00]<br />
RUNTIME-00:00-<br />
Setting a Cycle and Soak Station Run Time 39
RAIN MASTER TM EAGLE PLUS<br />
6. Turn the Dial to choose the RUN TIME value,<br />
then press the Dial to select. The hours digits are<br />
selected and will begin blinking. Turn the Dial to<br />
display the run time (0–23 hours), then press the<br />
Dial to enter. The minutes digits will be selected.<br />
7. Turn the Dial to select the RUN TIME minutes<br />
(0–59), then press the Dial to enter the selection.<br />
8. The next station number in sequence will be<br />
prompted. Continue to assign additional<br />
stations to this program as preferred.<br />
When finished, choose and select OK, or press<br />
the NEXT key to display the PROGRAM<br />
summary screen.<br />
Note: The Program summary screen enables you<br />
to quickly verify the status and total run time of<br />
the program. If the program is not valid, press the<br />
BACK key to recall, correct and/or adjust the<br />
various program setup parameters as necessary.<br />
NEW PROGRAM: 1<br />
STATION- 1-<br />
MAX-1:05-SOAK-2:30-<br />
RUNTIME[00:00]<br />
NEW PROGRAM: 1<br />
STATION- 1-<br />
MAX-1:05-SOAK-2:30-<br />
RUNTIME[04:50]<br />
NEW PROGRAM: 1 -OK-<br />
STATION- 2-<br />
MAX-0:00-SOAK-0:00-<br />
RUNTIME[00:00]<br />
PROGRAM: 1 NOT VALID<br />
TOTAL RUNTIME:00:00<br />
[OK]<br />
PROGRAM: 1 IS VALID<br />
TOTAL RUNTIME:06:45<br />
[OK]<br />
9. When finished, choose and select OK to complete the setup requirements for<br />
the selected program.<br />
40 Setting a Cycle and Soak Station Run Time (continued)
Modifying a Program<br />
The Modify Program feature provides a convenient way to access and adjust any<br />
parameter of an established program including:<br />
• Days – Two-Week and Skip Days schedules<br />
• Runtime – Station run time assignment<br />
• Start – Start time assignments<br />
• Percent – Run Time adjustment by percentage for all assigned stations.<br />
1. Press the PROGRAM key to display the<br />
PROGRAM menu. The MODIFY menu item is<br />
chosen by default. Press the Dial to select.<br />
RAIN MASTER TM EAGLE PLUS<br />
PROGRAM:<br />
[MODIFY] -NEW-<br />
-REVIEW- -DELETE-<br />
-COPY-<br />
2. The program number is chosen by default.<br />
To change the program number assignment,<br />
press the Dial to select, then turn the Dial to<br />
display the preferred number. Press the Dial<br />
to enter the selection.<br />
3. Turn the Dial to choose a portion of the<br />
program to be modified. Press the Dial to<br />
display the initial modification screen.<br />
MODIFY PROGRAM[1]<br />
-DAYS- -RUNTIME-<br />
-START- -PERCENT-<br />
MODIFY PROGRAM-1-<br />
[DAYS] -RUNTIME-<br />
-START- -PERCENT-<br />
Note: The PROGRAM setup options defined for DAYS, STATION RUN TIMES and<br />
START TIMES are utilized for the modification procedures. To assist in the modification<br />
process, refer to the corresponding PROGRAM SETUP procedures, beginning<br />
on page 36<br />
Modifying a Program 41
RAIN MASTER TM EAGLE PLUS<br />
Adjusting Program Percent Value<br />
To account for changes in season or weather, the total operating duration for any<br />
established program cycle time can be easily increased or decreased by a percentage<br />
factor from 0%–300%, in 1% increments. The run time for each station<br />
assigned to the program will be modified by the percentage change.<br />
IMPORTANT: Increasing the program cycle duration can result in a conflict<br />
with other scheduled watering programs and/or the defined Water Window<br />
duration. The recommended method of increasing run time by percentage<br />
is to make small, incremental changes while monitoring the results over a<br />
period of time.<br />
1. From the MODIFY PROGRAM menu screen,<br />
turn the Dial to choose PERCENT, then press<br />
the Dial to select.<br />
2. Turn the Dial to choose the PERCENT value.<br />
Press the Dial to select, then turn the Dial to<br />
display the preferred percent value (0–300).<br />
Press the Dial to enter the selection.<br />
3. Repeat procedure for each program as needed.<br />
Deleting a Program<br />
The Delete Program feature provides a convenient method of accessing and<br />
clearing all established operating parameters from a specified program.<br />
1. Press the PROGRAM key to display the<br />
PROGRAM menu. Turn the Dial to choose the<br />
DELETE option, then press the Dial to select.<br />
MODIFY PROGRAM-1-<br />
-DAYS- -RUNTIME-<br />
-START- [PERCENT]<br />
MODIFY PROGRAM- 1-<br />
PERCENT[100]<br />
PROGRAM:<br />
-MODIFY- -NEW-<br />
-REVIEW- [DELETE]<br />
-COPY-<br />
2. Turn the Dial to choose the PROGRAM number.<br />
Press the Dial to select, then turn the Dial to<br />
display the PROGRAM number to delete. Press<br />
the Dial to enter the selection.<br />
3. A decision screen will be prompted with the<br />
YES option chosen. To complete the Delete<br />
function, press the Dial to enter YES. To abort<br />
the Delete function and return to the previous<br />
screen, choose and select the NO option.<br />
DELETE PROGRAM[ 1]<br />
TOTAL STATIONS: 6<br />
TOTAL START TIMES:3<br />
-YES- -NO-<br />
ARE YOU SURE YOU<br />
WANT TO DELETE<br />
PROGRAM 1<br />
[YES] -NO-<br />
42 Adjusting and Deleting a Programs
Copying a Program or Runtime<br />
The Copy function provides a convenient method of transferring all program<br />
setup parameters* from one program to another, or to apply a specific station<br />
run time to multiple stations. When setting up multiple programs with<br />
similar attributes, the copy functions will not only reduce the setup time by<br />
eliminating redundant tasks, but will help ensure consistency throughout the<br />
overall watering program setup structure.<br />
*Note: Program attributes include: watering day schedule, station run time, cycle<br />
and soak time, start times and percent adjust factor.<br />
To Copy a Program:<br />
1. Press the PROGRAM key to display the<br />
PROGRAM menu. Turn the Dial to choose<br />
the COPY option, then press the Dial to select.<br />
RAIN MASTER TM EAGLE PLUS<br />
PROGRAM:<br />
-MODIFY- -NEW-<br />
-REVIEW- -DELETE-<br />
[COPY]<br />
2. Turn the Dial to choose the Copy Program<br />
option, then press the Dial to select.<br />
COPY FUNCTION:<br />
[COPY PROGRAM]<br />
-COPY RUNTIME-<br />
3. Press the Dial to choose the COPY PROGRAM<br />
number. Press to select, then turn the Dial<br />
to display the PROGRAM number to be copied<br />
from. Press the Dial to enter the selection.<br />
4. Turn the Dial to choose the TO PROGRAM<br />
number. Press to select, then turn the Dial<br />
to display the recipient program number.<br />
Press the Dial to enter the selection.<br />
5. Turn the Dial to choose OK, then press<br />
the Dial to enter the selection.<br />
Note: A decision screen will be prompted with<br />
the OK option chosen by default.<br />
To complete the Copy function, press the Dial<br />
to begin the Copy function. To abort the Copy<br />
function and return to the previous screen, choose<br />
and select the CANCEL option.<br />
6. Upon completion of the copy function, the<br />
initial COPY FUNCTION screen will be displayed.<br />
Repeat the procedure for additional programs<br />
as preferred.<br />
COPY PROGRAM[ 1]<br />
TO<br />
PROGRAM- 1-<br />
-OK-<br />
COPY PROGRAM- 1-<br />
TO<br />
PROGRAM[ 2]<br />
-OK-<br />
COPY PROGRAM- 1-<br />
TO<br />
PROGRAM[ 2]<br />
[OK]<br />
WARNING:PROGRAM 2<br />
WILL BE OVERWRITTEN<br />
[OK] -CANCEL-<br />
COPY FUNCTION:<br />
[COPY PROGRAM]<br />
[COPY RUNTIME]<br />
Copy Functions 43
RAIN MASTER TM EAGLE PLUS<br />
To Copy a Run Time:<br />
1. Press the PROGRAM key to display the<br />
PROGRAM menu. Turn the Dial to choose the<br />
COPY option, then press the Dial to select.<br />
2. Turn the Dial to choose the COPY RUNTIME<br />
option, then press the Dial to select.<br />
3. The COPY RUN TIME screen is displayed with<br />
the run time value chosen. Press the Dial<br />
to select, then turn the Dial to display the<br />
preferred run time hours (0–23). Repeat to<br />
select the run time minutes (0–59).<br />
4. Turn the Dial to choose TO PROGRAM. Press<br />
the Dial to select, then turn the Dial to display<br />
the recipient program number. Press the Dial<br />
to enter the selection.<br />
Note: All station numbers, inclusive from the<br />
BEGIN and END station numbers entered, will<br />
receive the specified run time assignment.<br />
5. Turn the Dial to choose BEGIN STATION. Press<br />
the Dial to select, then turn the Dial to display<br />
the preferred beginning station number. Press<br />
the Dial to enter the selection.<br />
6. Turn the Dial to choose END STATION. Press<br />
the Dial to select, then turn the Dial to display<br />
the preferred station number. Press the Dial to<br />
enter the selection.<br />
7. Turn the Dial to choose OK, then press Dial to<br />
begin the Copy function.<br />
8. Upon completion of the copy function,<br />
the initial COPY FUNCTION screen will be<br />
displayed. Repeat the procedure for additional<br />
programs as preferred.<br />
PROGRAM:<br />
-MODIFY- -NEW-<br />
-REVIEW- -DELETE-<br />
[COPY]<br />
COPY FUNCTION:<br />
[COPY PROGRAM]<br />
[COPY RUNTIME]<br />
COPY RUNTIME[00:15]<br />
TO PROGRAM- 1-<br />
BEGIN STATION- 1-<br />
END STATION- 1-OK-<br />
COPY RUNTIME-00:15-<br />
TO PROGRAM[ 1]<br />
BEGIN STATION- 1-<br />
END STATION- 1-OK-<br />
COPY RUNTIME-00:15-<br />
TO PROGRAM- 1-<br />
BEGIN STATION[ 9]<br />
END STATION- 1-OK-<br />
COPY RUNTIME-00:15-<br />
TO PROGRAM- 1-<br />
BEGIN STATION- 9-<br />
END STATION[ 18]OK-<br />
COPY RUNTIME-00:15-<br />
TO PROGRAM- 1-<br />
BEGIN STATION- 9-<br />
END STATION- 18[OK]<br />
COPY FUNCTION:<br />
[COPY PROGRAM]<br />
[COPY RUNTIME]<br />
44 Copy Functions
Review Mode<br />
The Review mode feature provides a convenient method of accessing all current<br />
controller program structure information, as well as historical records of prior irrigation<br />
activity, flow rates and ET values and wireless communications activity.<br />
The REVIEW menu options include direct Program setup parameters, historical<br />
data logs for Irrigation activity, Alarm events, Flow rates, ET values, iCentral Communication<br />
protocol data and S/W (controller configuration).<br />
Note: All information displayed on the Review screens is provided for reference and<br />
evaluation only. No changes or deletions to programming, operating, configuration<br />
or Alarm events can be made while the controller is in the Review mode.<br />
Program Review<br />
The Program review screens, accessible from both the PROGRAM and REVIEW<br />
menus, access the following information for each irrigation program:<br />
• Total program run time duration<br />
• Program run time Adjust % factor<br />
• Active watering day schedule<br />
• Total assigned start times<br />
• Total assigned station numbers<br />
• Individual station run time assignment<br />
• Cycle and Soak duration time (when applicable)<br />
1. Press the REVIEW key to display the<br />
REVIEW menu. The PROGRAM option is chosen<br />
by default.<br />
RAIN MASTER TM EAGLE PLUS<br />
PROGRAM:<br />
-MODIFY- -NEW-<br />
[REVIEW] -DELETE-<br />
-COPY-<br />
2. Press the Dial to select. The REVIEW PROGRAM<br />
screen is displayed with the PROGRAM number<br />
chosen. Press the Dial to select, then turn the<br />
Dial to display the preferred program number.<br />
Press the Dial to enter the selection.<br />
3. Press the NEXT and Back keys to<br />
navigate through the sequence of PROGRAM<br />
REVIEW screens.<br />
Note: The PROGRAM number option is provided<br />
on the top line of each review screen to access<br />
information for any program as preferred.<br />
REVIEW:<br />
[PROGRAM] -ALARM-<br />
-IRRIGATION- -FLOW-<br />
-COMM- -ET- -S/W-<br />
REVIEW PROGRAM[ 1]<br />
TOTAL STATIONS: 7<br />
TOTAL RUNTIME:<br />
2 HRS 24 MINUTES<br />
Review Functions 45
RAIN MASTER TM EAGLE PLUS<br />
Alarm Review<br />
The alarm event archive will retain a maximum of 220 records. All alarm events<br />
are stored in chronological first-in, first-out order. When the archive reaches<br />
capacity, the oldest event record drops off as a new record enters.<br />
1. Press the REVIEW key to display the<br />
REVIEW menu. The PROGRAM option is chosen<br />
by default. Turn the Dial to choose ALARM,<br />
then press the Dial to select.<br />
2. The alarm archive screen will be displayed<br />
with a summary the last Alarm event. Press<br />
the NEXT and BACK keys to navigate<br />
through the sequence of review screens.<br />
Communication Review Screens<br />
Note: COMM review information (listed on four consecutive screens) provides comprehensive<br />
technical data pertaining to wireless communications configuration and<br />
activity.<br />
1. Press the REVIEW key to display the<br />
REVIEW menu. The PROGRAM option is chosen<br />
by default. Turn the Dial to choose COMM,<br />
then press the Dial to select.<br />
2. Press the NEXT key to access the remaining<br />
review screen sequence.<br />
Flow Review<br />
The Flow data archive retains up to 12 months of data records and compiled<br />
for review by month. The first of two review screens provides the selections for<br />
month and display units, with the total flow represented for each of two flow sensors.<br />
The second screen displays the sum total for both flow sensors.<br />
1. Press the REVIEW key to display the<br />
REVIEW menu. The PROGRAM option is chosen<br />
by default. Turn the Dial to choose FLOW, then<br />
press the Dial to enter the selection.<br />
2. The initial REVIEW FLOW screen is displayed<br />
with flow data for the current month. To<br />
change the month, press the Dial to select,<br />
then turn the Dial to display the preferred<br />
month. Press the Dial to enter the selection.<br />
3. To use alternate display UNITS, turn the Dial<br />
to choose UNITS. Press the Dial to select, then<br />
turn the Dial to display the preference. Press<br />
the Dial to enter the selection.<br />
46 Review Functions<br />
REVIEW:<br />
-PROGRAM- [ALARM]<br />
-IRRIGATION- -FLOW-<br />
-COMM- -ET- -S/W-<br />
01/02 FR 10:23:37AM<br />
STATION 147<br />
DECODER NOT FOUND<br />
REVIEW:<br />
-PROGRAM- -ALARM-<br />
-IRRIGATION- -FLOW-<br />
[COMM] -ET- -S/W-<br />
REVIEW COMM<br />
S8901260580015370817<br />
MDM S/N:50399736<br />
[MORE]<br />
REVIEW:<br />
-PROGRAM- -ALARM-<br />
-IRRIGATION- [FLOW]<br />
-COMM- -ET- -S/W-<br />
REVIEW FLOW:[JUN]<br />
UNITS-GALLONS -<br />
FLOW1=XXXXXXXX<br />
FLOW2=XXXXXXXX<br />
REVIEW FLOW:-JUN-<br />
UNITS[GALLONS ]<br />
FLOW1=XXXXXXXX<br />
FLOW2=XXXXXXXX
4. Press the NEXT key access the second review<br />
screen displaying the flow data total for both<br />
sensors (if applicable). The same preference<br />
options for MONTH and UNITS are provided.<br />
Irrigation Review<br />
A record of the last 25 automatic irrigation programs are stored in chronological<br />
order with the latest event displayed first. When the archive reaches capacity, the<br />
earliest event record is deleted as a new event is recorded.<br />
1. Press the REVIEW key to display the<br />
REVIEW menu. The PROGRAM option is chosen<br />
by default. Turn the Dial to choose IRRIGATION,<br />
then press the Dial to select.<br />
2. A summary of the most recent operation is<br />
displayed. Press the NEXT and BACK<br />
keys to navigate through the review screens.<br />
RAIN MASTER TM EAGLE PLUS<br />
REVIEW FLOW:[JUN]<br />
UNITS-GALLONS -<br />
TOTAL F1+F2=XXXXXXXX<br />
REVIEW:<br />
-PROGRAM- -ALARM-<br />
[IRRIGATION] -FLOW-<br />
-COMM- -ET- -S/W-<br />
PROGRAM 1 START<br />
06/03 TH 01:45AM<br />
END<br />
06/03 TH 03:15AM<br />
Configuration Review<br />
1. Press the REVIEW key. Turn the Dial to<br />
choose S/W, then press the Dial to select.<br />
A summary of the current configuration is<br />
provided.<br />
REVIEW:<br />
-PROGRAM- -ALARM-<br />
-IRRIGATION- -FLOW-<br />
-COMM- [ET] -S/W-<br />
REVIEW:<br />
-PROGRAM- -ALARM-<br />
-IRRIGATION- -FLOW-<br />
-COMM- -ET- [S/W]<br />
REVIEW CONFIGURATION<br />
TYPE: CONVENTIONAL<br />
FIRMWARE:V0.0.0<br />
MAX STATION:48<br />
ET Review<br />
All ET data provided to the controller via the Internet or a Weather Center II<br />
weather station is retained for a rolling 14-day period.<br />
The ET data received via the Internet (HISTORIC) is displayed in inches and sent<br />
to the controller at midnight of the current day. ET data received from the weather<br />
station (WXSTATION) is displayed as a number of pulses accumulated by the<br />
weather station since midnight.<br />
1. Press the REVIEW key to display the<br />
REVIEW menu. The PROGRAM option is chosen<br />
by default. Turn the Dial to choose ET, then<br />
press the Dial to select.<br />
2. Press the Dial to advance or press the BACK<br />
key to retract the review screen sequence.<br />
ET: SOURCE=HISTORIC<br />
01/06 ET=.10<br />
01/05 ET=.10<br />
01/04 ET=.10[MORE]<br />
Review Functions 47
RAIN MASTER TM EAGLE PLUS<br />
Manual Watering Operations<br />
The <strong>Eagle</strong> <strong>Plus</strong> features a full complement of manual control options enabling<br />
the irrigation system to be operated whenever and however supplemental<br />
watering is preferred.<br />
The manual control options enable you to operate the system by:<br />
• STATION – Operate an individual station for a specified run time.<br />
• PROGRAM – Operate specified watering program(s).<br />
• MULTI-STATION – Operate up to six stations simultaneously for a specified run<br />
time.<br />
• TEST – Operate a specified group of stations in numeric sequence for a<br />
specified run time.<br />
Note: When stations or programs are selected for manual operation, the controller<br />
determines if there is an association with the <strong>Master</strong> Valve and/or Pump output.<br />
If an association exists with any selected station or program, the <strong>Master</strong> Valve and/<br />
or Pump output will be activated during the manual operation. In Multi-Station<br />
manual mode, the <strong>Master</strong> Valve and/or Pump output can be selected independently<br />
as preferred.<br />
Manual Station Operation<br />
1. Press the MANUAL key to display the<br />
MANUAL OPERATIONS menu screen. The<br />
STATION option is selected by default.<br />
MANUAL OPERATIONS:<br />
[STATION] -PROGRAM-<br />
-MULTI STATION-<br />
-TEST-<br />
2. Press the Dial to select. The STATION number<br />
option is chosen by default. Press the Dial to<br />
select, then turn the Dial to display the<br />
preferred number. Press the Dial to select.<br />
3. Turn the Dial to choose the RUNTIME value.<br />
Press the Dial to select, then turn the Dial to<br />
display the hour digits (00–23). Press the Dial to<br />
select, then turn the Dial to display the<br />
minutes digits (00–59). Press the Dial to enter<br />
the selection.<br />
4. Turn the Dial to choose START, then press<br />
the Dial to begin the manual operation.<br />
The MANUAL OPERATIONS status screen will<br />
be displayed.<br />
RUNTIME[01:25]<br />
STATION- 1-<br />
MANUAL OPERATIONS:<br />
-START-<br />
MANUAL OPERATIONS:<br />
STATION- 1-<br />
RUNTIME[01:25]<br />
-START-<br />
MANUAL OPERATIONS:<br />
STATION- 1-<br />
RUNTIME-01:25-<br />
[START]<br />
48 Manual Station Operation
5. Three manual control options are provided on<br />
the status screen:<br />
• STOP - Toggles station operation OFF and ON.<br />
• NEXT - Turns off the current station, resets<br />
the run time, and turns on the next station in<br />
numeric sequence.<br />
• PREVIOUS - Turns off the current station and turns on the previous station in<br />
numeric sequence.<br />
Turn the Dial to choose the control option, then press the Dial to select.<br />
6. When finished, press the HOME key to return to the HOME screen.<br />
Manual Program Operation<br />
1. Press the MANUAL key to display the<br />
MANUAL OPERATIONS menu screen.<br />
The STATION option is selected by default.<br />
2. Turn the Dial right one step to choose<br />
PROGRAM. Press the Dial to select. The next<br />
MANUAL OPERATIONS screen in sequence<br />
will be displayed<br />
3. The PROGRAM number option is chosen by<br />
default. Press the Dial to select, then turn<br />
the Dial to display the preferred number.<br />
Press the Dial to select.<br />
4. Turn the Dial to choose START, then press<br />
the Dial to begin the manual operation.<br />
The MANUAL OPERATIONS status screen will<br />
be displayed.<br />
Note: Selecting STOP displays a decision screen. Manual operation will not be<br />
terminated unless the YES option is selected. Selecting YES will terminate any additional<br />
programs in the queue. Selecting NO steps back to the status screen.<br />
5. When finished, press the HOME key to<br />
return to the HOME screen.<br />
RAIN MASTER TM EAGLE PLUS<br />
STATION: 1 01:24:58<br />
MVALVE:ON PUMP:OFF<br />
[STOP]<br />
-NEXT- -PREVIOUS-<br />
MANUAL OPERATIONS:<br />
[STATION] -PROGRAM-<br />
-MULTI STATION-<br />
-TEST-<br />
MANUAL OPERATIONS:<br />
-STATION- [PROGRAM]<br />
-MULTI STATION-<br />
-TEST-<br />
MANUAL OPERATIONS:<br />
PROGRAM[ 1]<br />
-START-<br />
PROGRAM 1<br />
STATION: 1 00:58:01<br />
MVALVE:ON PUMP:OFF<br />
[STOP]<br />
CURRENT PROGRAMS<br />
WANT TO ABORT THE<br />
ARE YOU SURE YOU<br />
[YES] -NO-<br />
Manual Program Operations 49
RAIN MASTER TM EAGLE PLUS<br />
Manual Multi-Station Operation<br />
1. Press the MANUAL key to display the<br />
MANUAL OPERATIONS menu screen. The<br />
STATION option is selected by default.<br />
2. Turn the Dial right two steps to choose<br />
MULTI-STATION. Press the Dial to select.<br />
The next screen in sequence will be displayed.<br />
3. The MANUAL STATION number is chosen by<br />
default. Press the Dial to select, then turn the<br />
Dial to display a STATION number, MVor PMP<br />
to be included in the operation. Press the Dial<br />
to enter the selection.<br />
4. Repeat this procedure to include up to five<br />
additional outputs. The selections are displayed<br />
as they are entered.<br />
Note: To clear the current station list, select CLR<br />
(located between PMP and 1) , then press the Dial<br />
to refresh the screen.<br />
MANUAL OPERATIONS:<br />
[STATION] -PROGRAM-<br />
-MULTI STATION-<br />
-TEST-<br />
MANUAL STATION:[ 1]<br />
RUNTIME-00:00-<br />
STATIONS:1<br />
-START-<br />
MANUAL STATION:[ 11]<br />
RUNTIME-00:00-<br />
STATIONS:1-3,6,9,11<br />
-START-<br />
MANUAL STATION:[CLR]<br />
RUNTIME-00:00-<br />
STATIONS:NONE<br />
-START-<br />
5. Turn the Dial to choose the RUNTIME value.<br />
Press the Dial to select, then turn the Dial to<br />
display the hour digits (00–23). Press the Dial to<br />
select, then turn the Dial to display the<br />
minutes digits (00–59). Press the Dial to enter<br />
the selection.<br />
6. Turn the Dial to choose START, then press<br />
the Dial to begin the manual operation.<br />
The status screen will be displayed indicating the<br />
station list and the remaining run time.<br />
To terminate the operation, press the Dial to<br />
select STOP.<br />
Note: If flow sensing is operational, the indicated<br />
total flow will be displayed in the status screen.<br />
MANUAL STATION:- 11-<br />
RUNTIME[00:20]<br />
STATIONS:1-3,6,9,11<br />
-START-<br />
MANUAL OPERATIONS:<br />
-STATION- -PROGRAM-<br />
[MULTI STATION]<br />
-TEST-<br />
MANUAL STATION:- 11-<br />
RUNTIME-00:20-<br />
STATIONS:1-3,6,9,11<br />
[START]<br />
STATIONS:1-3,6,9,11<br />
00:20:07<br />
FLOW=1747 GPM [STOP]<br />
7. When finished, press the HOME key to return to the HOME screen.<br />
50 Manual Multi-Station Operation
Manual Test Functions<br />
The manual Test function enables a group of stations to be selected and<br />
operated in numeric order for a specified run time.<br />
1. Press the MANUAL key to display the<br />
MANUAL OPERATIONS menu screen. The<br />
STATION option is selected by default.<br />
RAIN MASTER TM EAGLE PLUS<br />
MANUAL OPERATIONS:<br />
[STATION] -PROGRAM-<br />
-MULTI STATION-<br />
-TEST-<br />
2. Turn the Dial right three steps to choose TEST.<br />
Press the Dial to select. The next screen in<br />
sequence will be displayed.<br />
MANUAL OPERATIONS:<br />
-STATION- -PROGRAM-<br />
-MULTI STATION-<br />
[TEST]<br />
3. The beginning station number of the test group<br />
is chosen by default. Press the Dial to select, then<br />
turn the Dial to display the preferred station<br />
number. Press the Dial to enter the selection.<br />
4. Turn the Dial to choose the group ending<br />
station number*. Press the Dial to select, then<br />
turn the Dial to display the preferred station<br />
number. Press the Dial to enter the selection.<br />
*Note: The ending station number will be limited<br />
to the controller station count configuration.<br />
5. Turn the Dial to choose the RUN TIME value.<br />
Press the Dial to select, then turn the Dial to<br />
display the preferred run time duration from<br />
01–59 minutes. Press the Dial to enter the<br />
selection.<br />
6. Turn the Dial to choose START, then press the<br />
Dial to begin the manual operation.<br />
MANUAL TEST OF<br />
STATION[ 9] TO- 48-<br />
RUN TIME-01-MINS<br />
-START-<br />
MANUAL TEST OF<br />
STATION- 9- TO[ 18]<br />
RUN TIME-01-MINS<br />
-START-<br />
RUN TIME[05]MINS<br />
STATION- 9- TO- 18-<br />
MANUAL TEST OF<br />
-START-<br />
MANUAL TEST OF<br />
STATION- 9- TO[ 18]<br />
RUN TIME-05-MINS<br />
[START]<br />
7. Three manual control options are provided on<br />
the status screen:<br />
• STOP - Toggles station operation OFF and ON.<br />
• NEXT - Turns off the current station, resets<br />
the run time, and turns on the next station in<br />
numeric sequence.<br />
• PREVIOUS - Turns off the current station and<br />
turns on the previous station in numeric sequence.<br />
Turn the Dial to choose the control option, then press the Dial to select.<br />
8. When finished, press the HOME key to return to the HOME screen.<br />
STATION: 1 01:24:58<br />
MVALVE:ON PUMP:OFF<br />
[STOP]<br />
-NEXT- -PREVIOUS-<br />
Manual Test Functions 51
RAIN MASTER TM EAGLE PLUS<br />
Alarms Feature<br />
The Alarms feature provides important, timely information regarding a condition<br />
or event that requires user attention. Whenever one or more alarm conditions<br />
occur, the Alarm LED indicator illuminates and is accompanied by a brief<br />
description of the root cause. An optional “chirp” tone can be enabled that will<br />
sound once every six seconds until the alarm notices have been cleared. Clearing<br />
alarm notices is important since a pending alarm condition may affect future<br />
automatic irrigation.<br />
IMPORTANT: Depending on the cause of the alarm, clearing the alarm<br />
notification does not necessarily resolve or eliminate the root cause.<br />
All alarm events are archived in a read-only buffer as they occur. The archive<br />
stores up to 220 Alarm events and cannot be emptied. Alarms are compiled in<br />
chronological order with the most recent event displayed first. Once the buffer is<br />
full, the oldest event drops off as a new one enters. The Alarm archive is accessed<br />
from REVIEW menu screen.<br />
About Field Wire and Flow Alarms<br />
Field Wire Fault Detection: The <strong>Eagle</strong> <strong>Plus</strong> can detect a short in the field wire<br />
and instantly turn off that station. The controller will automatically advance from<br />
the faulty station to the next programmed station during a watering cycle.<br />
The display will report the fault condition any time a field wire fault occurs.<br />
Additionally, the Alarm LED indicator will illuminate and the audible alert (when<br />
enabled) will sound until all Alarms are cleared.<br />
Flow Detection: When operating in conjunction with one or two system flow<br />
sensors, the controller will provide the following watchdog functions:<br />
v Upon detection of catastrophic high-flow, the controller will trigger an alarm<br />
and respond automatically as follows:<br />
• Shut down all active stations.<br />
• Shut down a normally-open master valve.<br />
• Prohibit all program cycle starts until the alarm is cleared.<br />
v Upon detection of unscheduled flow, the controller will trigger an alarm and<br />
respond automatically as follows:<br />
• Shut down a normally-open master valve.<br />
• Prohibit all program cycle starts until the alarm is cleared.<br />
v Upon detection of flow outside the established upper or lower flow limits, the<br />
controller will trigger an alarm and respond automatically as follows:<br />
• Shut down the defective station and prohibit its operation until the alarm is<br />
cleared.<br />
• Advance to the next station in the program sequence.<br />
52 Alarms Feature Overview
Clearing Alarms<br />
Clearing an alarm notice will remove it from the HOME screen, turn off the alarm<br />
LED indicator and silence the audible alert tone. A record of the alarm event will be<br />
stored in alarm archive until automatically deleted.<br />
Note: The procedure for clearing alarms is slightly different if more than 10 alarm<br />
conditions are indicated. Use the following procedures to clear alarms as applicable.<br />
To clear 10 Alarms or less:<br />
1. From the Home screen, turn the Dial to choose<br />
ALARMS, then press the Dial to select.<br />
2. The first Alarm condition is displayed. Press the<br />
Dial to clear the Alarm. The next Alarm condition<br />
will be displayed. Press the Dial to clear each<br />
remaining Alarm.<br />
To clear more than 10 Alarms:<br />
1. From the Home screen, turn the Dial to choose<br />
ALARMS, then press the Dial to select.<br />
2. The first Alarm condition is displayed. Press the<br />
Dial to clear the Alarm.<br />
3. The next screen provides the option to clear<br />
one or all remaining Alarms. To clear all<br />
remaining Alarms, turn the Dial to choose<br />
CLEAR ALL ALARMS, then press the Dial to<br />
clear the Alarms.<br />
RAIN MASTER TM EAGLE PLUS<br />
TU 07:56:14P WK1<br />
VALID PGM:4<br />
-MAIN- [ALARMS( 2)]<br />
06/03 TU 07:56:10PM<br />
SERVICE ESTABLISHED<br />
[CLEAR]<br />
TU 07:56:14P WK1<br />
VALID PGM:4<br />
-MAIN- [ALARMS( 12)]<br />
06/03 TU 07:56:10PM<br />
SERVICE ESTABLISHED<br />
[CLEAR]<br />
ALARMS.<br />
YOU HAVE 011 ACTIVE<br />
-CLEAR THIS ALARM-<br />
[CLEAR ALL ALARMS]<br />
Clearing Alarms 53
RAIN MASTER TM EAGLE PLUS<br />
Analyzing Alarms<br />
The table below represents a variety of alarm notices that may be encountered<br />
for various controller input and output hardware configurations.<br />
•Generic<br />
1 – Power Restored<br />
2 – Configuration Error<br />
3 – Configuration Change<br />
4 – MV Sensor Board Failure<br />
5 – Program (#) Start Time Falls<br />
Outside Water Window<br />
6 – Electrical Short<br />
7 – Wireless Service Disruption<br />
8 – Output Board: (#) Failure<br />
•Flow Sensor<br />
1 – Main Line Flow<br />
2 – Station Flow (over)<br />
3 – Station Flow (under)<br />
4 – Unscheduled Flow<br />
•<strong>Rain</strong>/Weather Sensor<br />
1 – <strong>Rain</strong> Sensor: Wet<br />
2 – Hourly <strong>Rain</strong> Limit Exceeded<br />
3 – Daily <strong>Rain</strong> Limit Exceeded<br />
4 – Weather Station Out of Range<br />
•Two-Wire Decoder<br />
1 – Two-Wire Board Failure<br />
2 – Two-Wire Field Wire Overcurrent<br />
Detected<br />
3 – Station (#) Decoder Not Found<br />
4 – Station (#) Open Circuit At Solenoid<br />
5 – Station (#) Short Circuit at Solenoid<br />
6 – Station (#) Decoder Comm Error<br />
7 – Two-Wire Decoder Programming<br />
Failure<br />
8 – Two-Wire Decoder Failure<br />
To assist in quickly locating a particular condition, the alarms are categorized<br />
by controller hardware configuration. Use the listed number and description to<br />
locate the specific condition and accompanying relevant information from the<br />
following examples.<br />
• Generic<br />
1 – Power Restored<br />
06/03 TU 07:56:14PM<br />
POWER RESTORED<br />
This Alarm occurs whenever power to the controller has been lost and restored,<br />
and is provided for reference only.<br />
2 – Configuration Error<br />
[CLEAR]<br />
RAIN MASTER<br />
EAGLE PLUS<br />
CONFIGURATION ERROR<br />
WWW.RAINMASTER.COM<br />
This alarm notice occurs if the controller has failed to detect if the controller is<br />
configured for conventional output or a two-wire decoder system.<br />
• The controller will make multiple attempts to detect the output configuration.<br />
• If a valid configuration is not detected, the controller will remain inoperable.<br />
• Contact <strong>Rain</strong> <strong>Master</strong> technical service at 1-800-777-1417.<br />
54 Analyzing Alarms – Generic
3 – Configuration Change<br />
MAX STATION IS: 48<br />
11/03 FR 11:32:05AM<br />
MAX STATION WAS: 40<br />
[CLEAR]<br />
RAIN MASTER TM EAGLE PLUS<br />
This alarm occurs each time a controller configuration change is detected including:<br />
• A change in the station count is detected such as adding/removing an output<br />
board.<br />
•4 – <strong>Master</strong> Valve, Pump or Sensor Error<br />
11/03 SU 16:06:39<br />
MV SENSOR BOARD<br />
FAILURE EC=###<br />
[CLEAR]<br />
This Alarm indicates the <strong>Master</strong> Valve board has either failed or has data in it that<br />
is out or range or non-existent.<br />
Note: See Appendix C - Error Code Reference Chart on page 64 for additional EC<br />
information. Contact <strong>Rain</strong> <strong>Master</strong> technical service at 1-800-777-1477.<br />
5 – Program Start Time Falls Outside Water Window<br />
10/19 FR 09:20:13AM<br />
PROGRAM 05 STARTTIME<br />
FALLS OUTSIDE WATER<br />
WINDOW. [CLEAR]<br />
This Alarm indicates that a start time for a specified program will fall outside the<br />
established limits of the Water Window.<br />
• The controller will not start a program outside of Water Window and will<br />
terminate programs when the end of the Water Window is reached.<br />
6 – Electrical Short<br />
07/15 MO 10:00:00AM<br />
STATION 26<br />
ELECTRICAL SHORT<br />
[CLEAR]<br />
This Alarm indicates a short circuit or excessive current draw has been detected<br />
on a specific station output.<br />
• The station will be turned off and will not operate in any subsequent program<br />
watering cycles until the alarm is cleared.<br />
• The next programmed station in sequence will start.<br />
Analyzing Alarms – Generic 55
RAIN MASTER TM EAGLE PLUS<br />
7 – Wireless Service Disruption<br />
01/23 SU 06:06:39AM<br />
SERVICE ESTABLISHED<br />
This alarm occurs whenever wireless service is established or re-established with<br />
the network carrier.<br />
• A counter is associated with this Alarm that determines how many times this<br />
event must occur during the current day before the alarm is sent. The default<br />
value is 1, with a maximum value of 100 (established in the iCentral).<br />
Note: If the value is set to 100, this Alarm will never be sent to iCentral again.<br />
8 – Output Board Failure<br />
10/19 FR 03:30:05PM<br />
OUTPUT BOARD:6<br />
FAILURE EC=###<br />
[CLEAR]<br />
This Alarm indicates the controller has detected an output board failure while<br />
attempting to activate one or more station outputs on the board.<br />
• The offending output board number is indicated.<br />
Note: A two- or three-digit Failure EC code number is provided for use by customer<br />
service personnel only.<br />
•Flow Sensor Alarms<br />
1 – Main Line Flow<br />
[CLEAR]<br />
05/18 SU 02:09:06PM<br />
MAIN LINE<br />
MEASURED=764 GPM<br />
LIMIT:350 [CLEAR]<br />
This alarm indicates the main line flow has exceeded the established upper flow<br />
limit.<br />
Once the controller detects this alarm:<br />
• All currently operating stations will be shut down.<br />
• No irrigation programs/stations will irrigate until this alarm is cleared.<br />
All non-irrigation programs shall remain operational.<br />
• Shuts down a Normally-Open <strong>Master</strong> Valve.<br />
56 Analyzing Alarms – Generic and Flow Sensor
2 –Station High-Flow<br />
04/05 FR 22:19:26<br />
STATION ### HI FLOW<br />
MEASURED=364 GPM<br />
LIMIT:346 [CLEAR]<br />
RAIN MASTER TM EAGLE PLUS<br />
This alarm indicates that a station flow has exceeded the established upper flow<br />
limit.<br />
Once the controller detects this condition:<br />
• The station will be turned off and restricted from running in any subsequent<br />
program watering cycles until the alarm is cleared.<br />
• The next station in sequence assigned to the program will operate.<br />
3 – Station No-Flow<br />
05/18 SU 02:09:15PM<br />
STATION 169 NO FLOW<br />
MEASURED=0 GPM<br />
[CLEAR]<br />
This alarm indicates a station flow that is less than the established flow range.<br />
Once the controller detects this condition:<br />
• The station will be turned off.<br />
• The next station (if any) of this program will operated.<br />
• The station will be restricted from running in any subsequent program watering<br />
cycles until the alarm is cleared.<br />
4 – Unscheduled Flow<br />
08/27 TH 11:47:13AM<br />
UNSCHEDULED FLOW<br />
MEASURED=36 GPM<br />
LIMIT:32 [CLEAR]<br />
This alarm indicates that flow in the main line has been detected at an unscheduled<br />
time.<br />
Once the controller detects this event:<br />
• All operating programs are terminated.<br />
• No scheduled programs will start until this alarm is cleared.<br />
• The controller will not generate a another alarm for this event until the current<br />
Alarm is cleared.<br />
• Shuts down a Normally-Open <strong>Master</strong> Valve.<br />
Analyzing Alarms – Flow Sensor 57
RAIN MASTER TM EAGLE PLUS<br />
•<strong>Rain</strong> Sensor or Weather Station Alarms<br />
1 – <strong>Rain</strong> Sensor Status Change<br />
02/07 SU 16:06:39PM<br />
RAIN SENSOR:WET<br />
[CLEAR]<br />
This alarm occurs when the rain sensor status has changed from Dry to Wet, or<br />
Wet to Dry.<br />
• When a WET condition is detected during a program watering cycle, the program<br />
will continue running, but all field outputs associated with the program<br />
will be turned off.<br />
• The controller will continue running all scheduled watering programs, but no<br />
field outputs will be energized while the WET condition is detected.<br />
• If the sensor status changes to DRY while the program is running, station output<br />
will be reinstated enabling any current station operation to resume for the<br />
duration of the remaining run time.<br />
2 – Hourly <strong>Rain</strong> Limit Exceeded<br />
12/24 TH 10:09:58AM<br />
HOURLY RAIN LIMIT<br />
EXCEEDED. 0.20 INCH<br />
[CLEAR]<br />
This alarm occurs when the weather station determines that the established<br />
hourly rainfall limit has been exceeded.<br />
• All watering programs will be suspended until the <strong>Rain</strong> Hold mode has been<br />
released.<br />
• The controller will not generate another alarm for this event until the current<br />
alarm is cleared.<br />
3 – Daily <strong>Rain</strong> Limit Exceeded<br />
11/07 FR 11:00:46PM<br />
DAILY RAIN LIMIT<br />
EXCEEDED, 0.50 INCH<br />
[CLEAR]<br />
This alarm occurs when the weather station determines that the established<br />
daily rainfall limit has been exceeded.<br />
• All watering programs will be suspended until the <strong>Rain</strong> Hold mode has been<br />
released.<br />
• The controller will not generate another alarm for this event until the current<br />
alarm is cleared.<br />
58 Analyzing Alarms – <strong>Rain</strong>/Weather Sensor
4 – Weather Station Out of Range<br />
10/13 FR 04:30:05AM<br />
WX STATION OUT OF<br />
RANGE ET=.50<br />
[CLEAR]<br />
RAIN MASTER TM EAGLE PLUS<br />
This alarm indicates the Weather Station is reporting the maximum ET rate has<br />
been exceeded and attention is required.<br />
• This Alarm condition will not be reported more than once per day.<br />
• The maximum value reported from a weather station is 0.50 maximum.<br />
• The Alarm event occurs if the weather station reads more than the maximum<br />
50 rate of pulses per 24-hour period.<br />
• The historic ET value for the current month will be used for ET computation in<br />
lieu of the indicated value.<br />
•Two-Wire Decoder System Alarms<br />
1 – Two-Wire Board Failure<br />
03/09 FR 13:30:05<br />
TWO WIRE BOARD<br />
FAILURE EC=###<br />
[CLEAR]<br />
This alarm indicates an error has occurred pertaining to the Two-Wire Decoder<br />
output board.<br />
Note: See Appendix C - Error Code Reference Chart on page 64 for additional EC information.<br />
Contact <strong>Rain</strong> <strong>Master</strong> technical service at 1-800-777-1477.<br />
2 – Two-Wire Field Wiring Over-current Detected<br />
07/15 MO 10:00:35AM<br />
TWO WIRE FIELD<br />
WIRING OVERCURRENT<br />
DETECTED. [CLEAR]<br />
This alarm indicates higher than normal current load is detected on the decoder<br />
communication/power two-wire cable.<br />
• All stations will be turned off.<br />
• All subsequent watering programs will be canceled.<br />
Note: Wait two minutes before clearing alarm and retrying the two-wire system.<br />
Analyzing Alarms – Two-Wire Decoder System 59
RAIN MASTER TM EAGLE PLUS<br />
3 – Station (#) Decoder Not Found<br />
07/15 MO 10:00:21AM<br />
STATION 153<br />
DECODER NOT FOUND<br />
[CLEAR]<br />
This alarm event occurs if the controller attempts to operate a decoder station<br />
number that either does not exist or is not recognized by the controller.<br />
• This alarm occurs exclusively during Test mode operations.<br />
4 – Station (#) Open Circuit at Solenoid<br />
07/15 MO 10:00:00AM<br />
STATION 109<br />
OPEN CIRCUIT AT<br />
SOLENOID [CLEAR]<br />
This alarm indicates an open-circuit condition exists on the specified decoder station<br />
solenoid connection.<br />
• The station will be turned off, and the next station in sequence will start.<br />
• The controller will not attempt to operate the station until the alarm is cleared.<br />
5 – Station (#) Short Circuit at Solenoid<br />
07/15 MO 10:00:05AM<br />
STATION 109<br />
SHORT CIRCUIT AT<br />
SOLENOID [CLEAR]<br />
This alarm indicates a short-circuit condition exists on the specified decoder station<br />
solenoid connection.<br />
• The station will be turned off, and the next station in sequence will start.<br />
• The controller will not attempt to operate the station until the alarm is cleared.<br />
6 – Station (#) Decoder Comm Error<br />
07/15 MO 10:02:25AM<br />
STATION 99<br />
DECODER COMM ERROR<br />
[CLEAR]<br />
This alarm indicates the controller cannot communicate successfully with the<br />
specified decoder station.<br />
• The alarm will be reported each time the controller attempts to operate the station.<br />
• This alarm condition is not indicated during Test mode operations.<br />
60 Analyzing Alarms – Two-Wire Decoder System
7 – Station (#) Decoder Programming Failure<br />
07/15 MO 10:04:13AM<br />
TWO-WIRE DECODER<br />
PROGRAMMING FAILURE<br />
[CLEAR]<br />
RAIN MASTER TM EAGLE PLUS<br />
This alarm is recorded during the decoder programming process indicating an<br />
error occurred, preventing the decoder from being successfully programmed.<br />
• The alarm will be reported each time programming the decoder is attempted.<br />
8 – Station (#) Decoder Failure<br />
07/15 MO 10:07:08AM<br />
TWO-WIRE DECODER<br />
FAILURE EC=###<br />
[CLEAR]<br />
This alarm indicates the two-wire decoder system is inoperable.<br />
• The alarm will be reported each time programming the decoder is attempted.<br />
Note: See Appendix C - Error Code Reference Chart on page 64 for additional EC information.<br />
Contact <strong>Rain</strong> <strong>Master</strong> technical service at 1-800-777-1477.<br />
Analyzing Alarms – Two-Wire Decoder System 61
RAIN MASTER TM EAGLE PLUS<br />
Appendix A - General Specifications<br />
Cabinet Dimensions:<br />
• Wall Mount: 11” W x 16” H x 5.625” D (27,9cm W x 40,6cm H x 14,29cm D)<br />
• Pedestal Mount:<br />
PSB: 16.5” W x 38” H x 17.25” D (41,9cm W x 96,5cm H x 43,8cm D)<br />
SPED: 16” W x 34” H x 16” D (40,6cm W x 86,4cm H x 40,6cm D)<br />
Temperature Range:<br />
• Operating: +14°F to +140°F (-10°C to +60°C)<br />
• Storage: -22°F to +149°F (-30°C to +65°C).<br />
Power Specifications:<br />
• Internal Transformer, Class 2, UL Listed, CSA Certified (or equivalent)<br />
Input: 120 VAC ± 10%, 50/60 Hz<br />
Output: 24 VAC ± 10%, 50/60 Hz<br />
• Maximum Load Per Station: 0.5A @ 24 VAC @ 77° (25°C)<br />
• Maximum Load Per <strong>Master</strong> Valve: 0.5A @ 24 VAC @ 77°F (25°C)<br />
• Maximum Load Per Pump Output: 0.5A @ 24 VAC @ 77°F (25°C)<br />
• Total Maximum Load: 1.5A @ 24 VAC.<br />
Output Surge Protection (excluding 2-wire decoder models):<br />
6KV common, 1KV normal.<br />
<strong>Control</strong>ler Memory:<br />
The <strong>Eagle</strong> <strong>Plus</strong> utilizes NVRAM (Non-volatile Random Access Memory)<br />
technology to protect all user-defined program and setup data from loss in<br />
the event of a power failure. Time and date settings will be maintained without<br />
power for approximately 30 days.<br />
62 Appendix A – General Specifications
Appendix B - Flow Sensor Specifications<br />
The <strong>Eagle</strong> <strong>Plus</strong> controller supports the complete line of Irritrol flow sensor models<br />
listed in the following tables.<br />
PVC Sensor Body Material<br />
Sensor Model # FS-150 FS-200 FS-300 FS-400<br />
Pipe Size 1½” 2” 3” 4”<br />
Operating Range 5-100 GPM 10-200 GPM 20-300 GPM 40-500 GPM<br />
Max. Water Press.* 100 psi 100 psi 100 psi 100 psi<br />
K-Value 457 776 2268 3752<br />
Offset Value 0 104 483 834<br />
Connection Type Slip Slip Slip Slip<br />
*Maximum water pressure @ 68° F (20°C).<br />
Bronze Sensor Body Material<br />
*Includes copper male adapter.<br />
RAIN MASTER TM EAGLE PLUS<br />
Sensor Model # FS-8100 FS-8125 FS-8150 FS-8200 FS-8250<br />
Pipe Size 1” 1¼” 1½” 2” 2½”<br />
Operating Range 2-40 GPM 3-60 GPM 4-80 GPM 10-100 GPM 16-160 GPM<br />
Max. Water Press. 400 psi 400 psi 400 psi 200 psi 200 psi<br />
K-Value 109 209 291 750 1021<br />
Offset Value 27 32 24 0 370<br />
Connection Type NPT Female NPT Female NPT Female NPT Female* NPT Female<br />
Note: In addition to the standard models listed above, an impeller-type flow sensor<br />
adapter, Model # FS-INSERT-B, is available to accommodate pipe sizes from 3 to 40”<br />
(7.6 to 102cm). Requires pipe saddle with 2” female NPT inlet.<br />
Appendix B – Flow Sensor Specifications 63
RAIN MASTER TM EAGLE PLUS<br />
Appendix C -Error Code Reference Chart<br />
The chart below provides a cross reference of EC error code numbers, included in<br />
various alarm screens, to the root cause of the alarm. This information is primarily<br />
used for system troubleshooting to help <strong>Rain</strong> <strong>Master</strong> service personnel quickly<br />
identify and resolve most controller operating issues that may be encountered.<br />
EC #<br />
2-Wire Base Error Codes<br />
Cause<br />
2. . . . . . . . . OVER CURRENT<br />
4. . . . . . . . . I2C ERROR<br />
5. . . . . . . . . ILLEGAL COMMAND<br />
6. . . . . . . . . COMMAND REJECTED<br />
8. . . . . . . . . MORE DATA READY<br />
11 . . . . . . . . FRAME ERROR<br />
12 . . . . . . . . TWO WIRE MODE FAULT<br />
15 . . . . . . . . UNIT BUSY<br />
16 . . . . . . . . REMOTE LOGIN<br />
223 . . . . . . . . CHKSUM CALC ERROR<br />
224 . . . . . . . . ADDRESS ERROR<br />
230 . . . . . . . . UNIT EXISTS<br />
231 . . . . . . . . COMM ERROR<br />
EC #<br />
2-Wire Bridge Error Codes<br />
Cause<br />
9. . . . . . . . . . SLOW POWERUP<br />
10 . . . . . . . . . OVER CURRENT<br />
13 . . . . . . . . . CHECKSUM<br />
14. . . . . . . . . NO RESPONSE<br />
MV Sensor Board Error Codes<br />
EC #<br />
Cause<br />
40 . . . . . . . . SHORT<br />
41 . . . . . . . . ET<br />
42 . . . . . . . . READ ET<br />
43 . . . . . . . . RAIN<br />
44 . . . . . . . . TRIAC<br />
45 . . . . . . . . FLOW1<br />
46 . . . . . . . . FLOW2<br />
47 . . . . . . . . MV/PUMP<br />
EC #<br />
2-Wire Decoder Error Codes<br />
Cause<br />
3 . . . . . . . . NO RESPONSE<br />
7 . . . . . . . . CHECKSUM ERROR<br />
64 . . . . . . . . OVER CURRENT<br />
65 . . . . . . . . SHORT CIRCUIT<br />
66 . . . . . . . . OPEN CIRCUIT<br />
67 . . . . . . . . I2C ERROR<br />
68 . . . . . . . . ILLEGAL COMMAND<br />
69 . . . . . . . . COMMAND REJECTED<br />
70 . . . . . . . . PARTIAL READING<br />
71 . . . . . . . . FRAMING ERROR<br />
72 . . . . . . . . LIMIT EXCEEDED<br />
73 . . . . . . . . PORTS EXCEEDED<br />
74 . . . . . . . . LOW STARTUP VOLTAGE<br />
75 . . . . . . . . DATA READY<br />
76 . . . . . . . . BELOW LOWER LIMIT<br />
77 . . . . . . . . DATA OVERFLOW<br />
78 . . . . . . . . NO AC VOLTAGE<br />
220 . . . . . . . . QTY SENT ERROR<br />
221 . . . . . . . . QTY RECEIVED ERROR<br />
222 . . . . . . . . CHKSUM CALC ERROR<br />
232 . . . . . . . . FOUND<br />
233 . . . . . . . . NOT FOUND<br />
234 . . . . . . . . PROG ERROR<br />
EC #<br />
Output Board Error Codes<br />
Cause<br />
4. . . . . . . . . COMMUNICATION ERROR<br />
255. . . . . . . . . LOST COMMUNICATION<br />
EC #<br />
iCentral Error Codes<br />
Cause<br />
100. . . . . . . . . COMMUNICATION ERROR<br />
64 Appendix C – Error Code Reference Chart
RAIN MASTER TM EAGLE PLUS<br />
Appendix D - FCC Rules - Electromagnetic Compatibility<br />
This equipment generates and uses radio frequency energy and if not installed and<br />
used properly, that is, in strict accordance with the manufacturer’s instructions, may<br />
cause interference to radio and television reception. It has been type tested and<br />
found to comply with the limits for a FCC Class B computing device in accordance<br />
with the specifications in Subpart J of Part 15 of FCC Rules, which are designed to<br />
provide reasonable protection against such interference in a residential installation.<br />
However, there is no guarantee that interference will not occur in a particular<br />
installation. If this equipment does cause interference to radio or television<br />
reception, which can be determined by turning the equipment off and on, the user<br />
is encouraged to try to correct the interference by one or more of the following<br />
measures:<br />
• Reorient the receiving antenna.<br />
• Relocate the irrigation controller with respect to the receiver.<br />
• Move the irrigation controller away from the receiver.<br />
• Plug the irrigation controller into a different outlet so the irrigation controller<br />
and receiver are on different branch circuits.<br />
If necessary, the user should consult the dealer or an experienced radio/television<br />
technician for additional suggestions. The user may find the following booklet<br />
prepared by the Federal Communications Commission helpful:<br />
“How to Identify and Resolve Radio-TV Interference Problems”. This booklet is<br />
available from the U.S. Government Printing Office, Washington, DC 20402. Stock<br />
No. 004-000-00345-4.<br />
Appendix D – FCC Rules- Electromagnetic Compatibility 65
RAIN MASTER TM EAGLE PLUS<br />
Notes:<br />
66 Notes Page
Notes:<br />
RAIN MASTER TM EAGLE PLUS<br />
Notes Page 67
www.irritrol.com • www.rainmaster.com<br />
© 2010 Irritrol Form Number 373-0550 Rev. B