Sanitary pumps
Sanitary pumps
Sanitary pumps

You also want an ePaper? Increase the reach of your titles
YUMPU automatically turns print PDFs into web optimized ePapers that Google loves.
Installation<br />
<strong>Sanitary</strong> <strong>pumps</strong><br />
Elimination of noise and vibration<br />
In order to achieve optimum operation and minimum<br />
noise and vibration, consider vibration dampening of the<br />
pump. Generally, always consider this for <strong>pumps</strong> with<br />
motors above 11 kW. Smaller motors, however, may also<br />
cause undesirable noise and vibration.<br />
Noise and vibration are generated by the rotations in the<br />
motor and pump and by the flow in pipes and fittings.<br />
The effect on the environment is subjective and depends<br />
on correct installation and the state of the remaining<br />
system.<br />
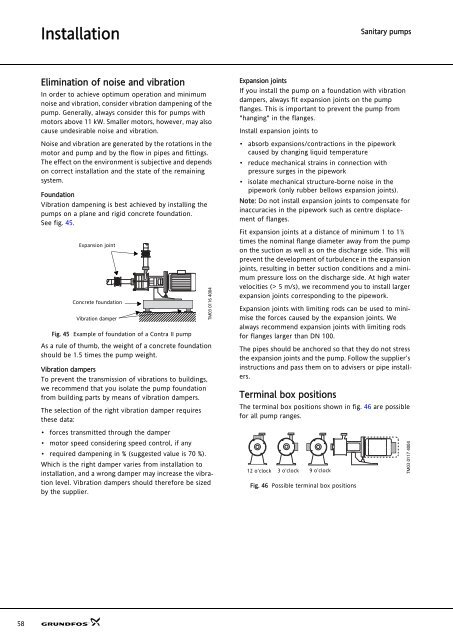
Foundation<br />
Vibration dampening is best achieved by installing the<br />
<strong>pumps</strong> on a plane and rigid concrete foundation.<br />
See fig. 45.<br />
Expansion joint<br />
Concrete foundation<br />
Vibration damper<br />
Fig. 45 Example of foundation of a Contra II pump<br />
As a rule of thumb, the weight of a concrete foundation<br />
should be 1.5 times the pump weight.<br />
Vibration dampers<br />
To prevent the transmission of vibrations to buildings,<br />
we recommend that you isolate the pump foundation<br />
from building parts by means of vibration dampers.<br />
The selection of the right vibration damper requires<br />
these data:<br />
• forces transmitted through the damper<br />
• motor speed considering speed control, if any<br />
• required dampening in % (suggested value is 70 %).<br />
Which is the right damper varies from installation to<br />
installation, and a wrong damper may increase the vibration<br />
level. Vibration dampers should therefore be sized<br />
by the supplier.<br />
TM03 0116 4004<br />
Expansion joints<br />
If you install the pump on a foundation with vibration<br />
dampers, always fit expansion joints on the pump<br />
flanges. This is important to prevent the pump from<br />
"hanging" in the flanges.<br />
Install expansion joints to<br />
• absorb expansions/contractions in the pipework<br />
caused by changing liquid temperature<br />
• reduce mechanical strains in connection with<br />
pressure surges in the pipework<br />
• isolate mechanical structure-borne noise in the<br />
pipework (only rubber bellows expansion joints).<br />
Note: Do not install expansion joints to compensate for<br />
inaccuracies in the pipework such as centre displacement<br />
of flanges.<br />
Fit expansion joints at a distance of minimum 1 to 1½<br />
times the nominal flange diameter away from the pump<br />
on the suction as well as on the discharge side. This will<br />
prevent the development of turbulence in the expansion<br />
joints, resulting in better suction conditions and a minimum<br />
pressure loss on the discharge side. At high water<br />
velocities (> 5 m/s), we recommend you to install larger<br />
expansion joints corresponding to the pipework.<br />
Expansion joints with limiting rods can be used to minimise<br />
the forces caused by the expansion joints. We<br />
always recommend expansion joints with limiting rods<br />
for flanges larger than DN 100.<br />
The pipes should be anchored so that they do not stress<br />
the expansion joints and the pump. Follow the supplier’s<br />
instructions and pass them on to advisers or pipe installers.<br />
Terminal box positions<br />
The terminal box positions shown in fig. 46 are possible<br />
for all pump ranges.<br />
12 o’clock 3 o’clock 9 o’clock<br />
Fig. 46 Possible terminal box positions<br />
TM03 0117 4004<br />
58