ENGLISH Mini DV/S-VHS VIDEO CASSETTE RECORDER - Jvc.dk
ENGLISH Mini DV/S-VHS VIDEO CASSETTE RECORDER - Jvc.dk
ENGLISH Mini DV/S-VHS VIDEO CASSETTE RECORDER - Jvc.dk

Create successful ePaper yourself
Turn your PDF publications into a flip-book with our unique Google optimized e-Paper software.
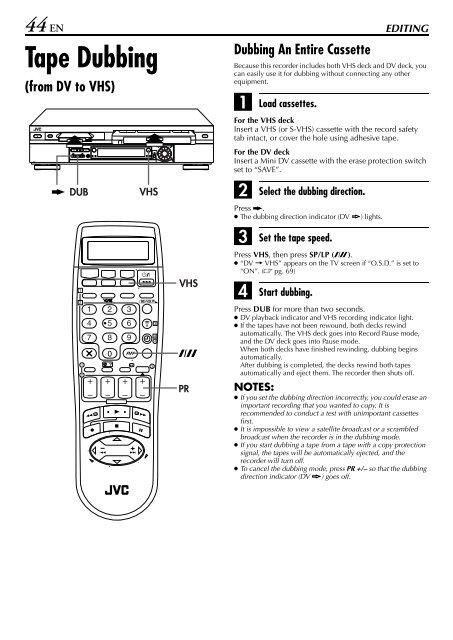
44 EN EDITING<br />
Tape Dubbing<br />
(from <strong>DV</strong> to <strong>VHS</strong>)<br />
1<br />
2<br />
1<br />
2<br />
1 2 3<br />
4 5 6<br />
7 8 9<br />
0<br />
1 3 2<br />
3<br />
3<br />
4<br />
4<br />
Dubbing An Entire Cassette<br />
Because this recorder includes both <strong>VHS</strong> deck and <strong>DV</strong> deck, you<br />
can easily use it for dubbing without connecting any other<br />
equipment.<br />
A<br />
Load cassettes.<br />
For the <strong>VHS</strong> deck<br />
Insert a <strong>VHS</strong> (or S-<strong>VHS</strong>) cassette with the record safety<br />
tab intact, or cover the hole using adhesive tape.<br />
For the <strong>DV</strong> deck<br />
Insert a <strong>Mini</strong> <strong>DV</strong> cassette with the erase protection switch<br />
set to “SAVE”.<br />
B<br />
Select the dubbing direction.<br />
Press .<br />
● The dubbing direction indicator (<strong>DV</strong> ) lights.<br />
C<br />
Set the tape speed.<br />
Press <strong>VHS</strong>, then press SP/LP (p).<br />
● “<strong>DV</strong> ] <strong>VHS</strong>” appears on the TV screen if “O.S.D.” is set to<br />
“ON”. (� pg. 69)<br />
D<br />
Start dubbing.<br />
Press DUB for more than two seconds.<br />
● <strong>DV</strong> playback indicator and <strong>VHS</strong> recording indicator light.<br />
● If the tapes have not been rewound, both decks rewind<br />
automatically. The <strong>VHS</strong> deck goes into Record Pause mode,<br />
and the <strong>DV</strong> deck goes into Pause mode.<br />
When both decks have finished rewinding, dubbing begins<br />
automatically.<br />
After dubbing is completed, the decks rewind both tapes<br />
automatically and eject them. The recorder then shuts off.<br />
NOTES:<br />
● If you set the dubbing direction incorrectly, you could erase an<br />
important recording that you wanted to copy. It is<br />
recommended to conduct a test with unimportant cassettes<br />
first.<br />
● It is impossible to view a satellite broadcast or a scrambled<br />
broadcast when the recorder is in the dubbing mode.<br />
● If you start dubbing a tape from a tape with a copy protection<br />
signal, the tapes will be automatically ejected, and the<br />
recorder will turn off.<br />
● To cancel the dubbing mode, press PR +/– so that the dubbing<br />
direction indicator (<strong>DV</strong> ) goes off.