ENGLISH Mini DV/S-VHS VIDEO CASSETTE RECORDER - Jvc.dk
ENGLISH Mini DV/S-VHS VIDEO CASSETTE RECORDER - Jvc.dk
ENGLISH Mini DV/S-VHS VIDEO CASSETTE RECORDER - Jvc.dk

You also want an ePaper? Increase the reach of your titles
YUMPU automatically turns print PDFs into web optimized ePapers that Google loves.
50 EN EDITING (cont.)<br />
Edit To Or From<br />
Another Video<br />
Recorder<br />
1<br />
2<br />
1<br />
2<br />
1 2 3<br />
4 5 6<br />
7 8 9<br />
0<br />
Advantages of S-<strong>VHS</strong> video recorders<br />
You can edit from <strong>VHS</strong> to S-<strong>VHS</strong>, S-<strong>VHS</strong> to <strong>VHS</strong>, or from<br />
S-<strong>VHS</strong> to S-<strong>VHS</strong>.<br />
● From <strong>VHS</strong> to S-<strong>VHS</strong>: Record <strong>VHS</strong> playback signals in the<br />
S-<strong>VHS</strong> mode. Although the picture quality is inherently<br />
limited by that of the original, the edited tape has better<br />
picture quality than those made by <strong>VHS</strong>-to-<strong>VHS</strong> editing.<br />
● From S-<strong>VHS</strong> to <strong>VHS</strong>: Because the picture quality of the<br />
source material is very high, the edited tape has better<br />
picture quality than those made by <strong>VHS</strong>-to-<strong>VHS</strong> editing.<br />
● From S-<strong>VHS</strong> to S-<strong>VHS</strong>: All signals will be transferred with<br />
minimum degradation.<br />
3<br />
3<br />
4<br />
4<br />
You can use your recorder as the source player or as the<br />
recording deck.<br />
A<br />
Make connections.<br />
Connect the player’s 21-pin SCART connector to the<br />
recorder’s 21-pin SCART connector as illustrated on<br />
page 51.<br />
A When using your recorder as the source player ...<br />
... connect its AV1 (L-1) IN/OUT connector to the<br />
recording deck.<br />
B When using your recorder as the recording deck ...<br />
... connect its AV2 (L-2) IN/DECODER connector to<br />
the source player.<br />
C If another recorder is compatible with the Y/C<br />
signal ...<br />
... connect your recorder’s AV1 (L-1) IN/OUT<br />
connector to another recorder.<br />
With C connection ...<br />
● When using your recorder as the recording deck (C-a), set<br />
“L-1 INPUT” to “S-<strong>VIDEO</strong>” and “L-2 SELECT” to “A/V”<br />
(� pg. 52, 53).<br />
● When using your recorder as the source player (C-b), set “L-1<br />
OUTPUT” to “S-<strong>VIDEO</strong>” (� pg. 52).<br />
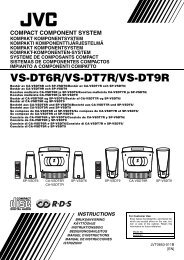
B<br />
Select the recording deck.<br />
Press <strong>VHS</strong> or <strong>DV</strong>.<br />
C<br />
Set the input mode of recording deck.<br />
With this video recorder, press AUX (number key “0”)<br />
and/or PR to select “L-1” for the AV1 (L-1) IN/OUT<br />
connector, or “L-2” for the AV2 (L-2) IN/DECODER<br />
connector, depending on the connector being used.<br />
● When using another recorder as the recording deck, refer to its<br />
instruction manual.<br />
● When using the AV2 (L-2) IN/DECODER connector, set “L-2<br />
SELECT” to “A/V” (� pg. 53).<br />
D<br />
Set the edit mode. (<strong>VHS</strong> deck only)<br />
See “PICTURE CONTROL” on page 70.<br />
E<br />
Start the source player.<br />
Engage the Play mode of the source player.<br />
F<br />
Start the recording deck.<br />
Engage the Record mode of the recording deck.