ENGLISH Mini DV/S-VHS VIDEO CASSETTE RECORDER - Jvc.dk
ENGLISH Mini DV/S-VHS VIDEO CASSETTE RECORDER - Jvc.dk
ENGLISH Mini DV/S-VHS VIDEO CASSETTE RECORDER - Jvc.dk

Create successful ePaper yourself
Turn your PDF publications into a flip-book with our unique Google optimized e-Paper software.
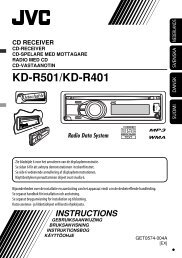
<strong>Mini</strong> <strong>DV</strong>/S-<strong>VHS</strong><br />
<strong>VIDEO</strong> <strong>CASSETTE</strong> <strong>RECORDER</strong><br />
TV<br />
CABLE/SAT<br />
1 LCD PROG AUDIO – –:– – TV/VCR<br />
2<br />
1 2 3<br />
4 5 6<br />
3<br />
VPS/PDC DAILY/QTDN. WEEKLY/HEBDO<br />
7 8 9<br />
4<br />
4<br />
0000 AUX<br />
MENU<br />
0<br />
ENTER/ENTREE<br />
1 PROG<br />
30 SEC OK<br />
3<br />
2<br />
TV<br />
Ð<br />
<strong>DV</strong><br />
<strong>VHS</strong><br />
START STOP DATE PR<br />
DEBUT FIN<br />
EXPRESS<br />
TV PR +<br />
TV PR Ð<br />
TV<br />
+<br />
PULL-OPEN<br />
TIRER-OUVRIR<br />
<strong>DV</strong> DUB <strong>VHS</strong><br />
COPIE<br />
<strong>DV</strong> <strong>VHS</strong><br />
TM<br />
PR Ð / +<br />
PUSH / TURN<br />
24H<br />
EXPRESS<br />
1 3 2<br />
PULL-OPEN<br />
TIRER-OUVRIR<br />
<strong>ENGLISH</strong><br />
CONTENTS<br />
SAFETY FIRST 2<br />
Safety Precautions ...................................... 2<br />
INDEX 4<br />
INSTALLING YOUR NEW <strong>RECORDER</strong> 10<br />
Basic Connections ................................... 10<br />
S-<strong>VIDEO</strong> Connection ............................... 11<br />
INITIAL SETTINGS 12<br />
Auto Set Up ............................................. 12<br />
Preset Download ..................................... 14<br />
Language ................................................. 16<br />
SAT CONTROL SET 17<br />
Satellite Receiver Control Setting ............. 17<br />
T-V LINK 19<br />
T-V Link Functions ................................... 19<br />
PLAYBACK/RECORDING ON <strong>VHS</strong> DECK 20<br />
Basic Playback (<strong>VHS</strong> deck) ...................... 20<br />
Basic Recording (<strong>VHS</strong> deck) .................... 21<br />
Playback Features (<strong>VHS</strong> deck) .................. 22<br />
Recording Features (<strong>VHS</strong> deck) ................ 26<br />
B.E.S.T. Picture System (<strong>VHS</strong> deck) .......... 29<br />
PLAYBACK/RECORDING ON <strong>DV</strong> DECK 30<br />
Basic Playback (<strong>DV</strong> deck) ........................ 30<br />
Basic Recording (<strong>DV</strong> deck) ...................... 31<br />
Playback Features (<strong>DV</strong> deck) ................... 32<br />
Recording Features (<strong>DV</strong> deck) .................. 34<br />
TIMER RECORDING 36<br />
G-CODE/SHOWVIEW Timer<br />
Programming ........................................... 36<br />
Express Timer Programming ..................... 38<br />
24 Hour Express Timer Programming ....... 40<br />
EDITING 44<br />
Tape Dubbing (from <strong>DV</strong> to <strong>VHS</strong>) ............. 44<br />
Tape Dubbing (from <strong>VHS</strong> to <strong>DV</strong>) ............. 45<br />
Normal Dubbing (from <strong>DV</strong> to <strong>VHS</strong>) ......... 46<br />
Normal Dubbing (from <strong>VHS</strong> to <strong>DV</strong>) ......... 47<br />
Edit From A Camcorder ........................... 48<br />
Edit To Or From Another Video<br />
Recorder .................................................. 50<br />
Output/Input Set ...................................... 52<br />
Audio Dubbing ........................................ 54<br />
Insert Editing ............................................ 56<br />
Random Assemble Editing ....................... 58<br />
REMOTE CONTROL 60<br />
Remote Control Functions ....................... 60<br />
SYSTEM CONNECTIONS 63<br />
Connecting To A Printer .......................... 63<br />
Connecting To A Satellite Receiver .......... 64<br />
Connecting/Using A Decoder .................. 66<br />
Connecting/Using A Stereo System .......... 67<br />
SUBSIDIARY SETTINGS 68<br />
Mode Set ................................................. 68<br />
Tuner Set ................................................. 74<br />
Clock Set ................................................. 80<br />
G-CODE/SHOWVIEW System Setup ...... 82<br />
TROUBLESHOOTING 83<br />
QUESTIONS AND ANSWERS 87<br />
SPECIFICATIONS 88<br />
LISTE OF TERMS 89<br />
LPT0640-001A<br />
EN
2 EN SAFETY FIRST<br />
Safety Precautions<br />
The rating plate and the safety caution are on the rear of the unit.<br />
WARNING: DANGEROUS VOLTAGE INSIDE<br />
WARNING: TO PREVENT FIRE OR SHOCK HAZARD, DO NOT EXPOSE THIS UNIT<br />
TO RAIN OR MOISTURE.<br />
CAUTION<br />
8 When you are not using the recorder for a long period of time, it is recommended that you disconnect<br />
the power cord from the mains outlet.<br />
8 Dangerous voltage inside. Refer internal servicing to qualified service personnel. To prevent electric<br />
shock or fire hazard, remove the power cord from the mains outlet prior to connecting or<br />
disconnecting any signal lead or aerial.<br />
WARNING<br />
There are two different types of SECAM colour systems: SECAM-L, used in FRANCE (also called SECAM-<br />
West), and SECAM-B, used in Eastern European countries (also called SECAM-East).<br />
1. This recorder can also receive SECAM-B colour television signals for recording and playback.<br />
2. Recordings made of SECAM-B television signals produce monochrome pictures if played back on a<br />
video recorder of SECAM-L standard, or do not produce normal colour pictures if played back on a<br />
PAL video recorder with SECAM-B system incorporated (even if the TV set is SECAM-compatible).<br />
3. SECAM-L prerecorded cassettes or recordings made with a SECAM-L video recorder produce<br />
monochrome pictures when played back with this recorder.<br />
4. This recorder cannot be used for the SECAM-L standard. Use a SECAM-L recorder to record SECAM-L<br />
signals.<br />
IMPORTANT<br />
8 Please read the various precautions on pages 2 and 3 before installing or operating the recorder.<br />
8 It should be noted that it may be unlawful to re-record pre-recorded tapes, records, or discs without<br />
the consent of the owner of copyright in the sound or video recording, broadcast or cable programme<br />
and in any literary, dramatic, musical, or artistic work embodied therein.<br />
● Cassettes marked “S-<strong>VHS</strong>” and “<strong>VHS</strong>” can be used with this video cassette recorder. However, S-<strong>VHS</strong> recordings are possible only<br />
with cassettes marked “S-<strong>VHS</strong>”.<br />
By using the S-<strong>VHS</strong> ET function, it is possible to record and play back with S-<strong>VHS</strong> picture quality on <strong>VHS</strong> cassettes with this recorder.<br />
● Cassettes marked “<strong>Mini</strong> <strong>DV</strong>” can be used with the <strong>DV</strong> deck of this recorder. The <strong>DV</strong> deck can play back and record only PAL signals.<br />
● G-CODE is a trademark of Gemstar Development Corporation and is registered in the following countries: Australia, China, Hong<br />
Kong, Japan, South Korea, New Zealand and Taiwan.<br />
SHOWVIEW is a trademark of Gemstar Development Corporation and is registered in the following countries: Austria, Belgium, Czech<br />
Republic, Denmark, Finland, France, Germany, Greece, Hungary, Iceland, Italy, Luxembourg, Netherlands, Norway, Poland,<br />
Portugal, Russia, Slovakia, South Africa, Spain, Sweden, and Switzerland. The G-CODE/SHOWVIEW system is manufactured under<br />
license from Gemstar Development Corporation.<br />
G-CODE and SHOWVIEW are different trademarks used to represent the same easy recording feature. However, for simplicity, only the<br />
term SHOWVIEW will be used. If you use G-CODE system, follow the same steps listed for the SHOWVIEW system.,
For Italy:<br />
“It is declared that this product, brand JVC, conforms to the <strong>Mini</strong>stry Decree n. 548 of 28 Aug.’95<br />
published in the Official Gazette of the Italian Republic n. 301 of 28 Dec.’95”<br />
The STANDBY/ON 1 button does not completely shut off mains power from the unit, but switches<br />
operating current on and off. “`” shows electrical power standby and “!” shows ON.<br />
Video tapes recorded with this video recorder in the LP (Long Play) mode cannot be played back on a<br />
single-speed video recorder.<br />
EN 3<br />
When the equipment is installed in a cabinet or a shelf, make sure that it has sufficient space on all sides to<br />
allow for ventilation (10 cm or more on both sides, on top and at the rear.)<br />
When discarding batteries, environmental problems must be considered and the local rules or laws<br />
governing the disposal of these batteries must be followed strictly.<br />
Failure to heed the following precautions may result in damage to the recorder, remote control or video<br />
cassette.<br />
1. DO NOT place the recorder ...<br />
... in an environment prone to extreme temperatures or humidity.<br />
... in direct sunlight.<br />
... in a dusty environment.<br />
... in an environment where strong magnetic fields are generated.<br />
... on a surface that is unstable or subject to vibration.<br />
2. DO NOT block the recorder’s ventilation openings or holes.<br />
(If the ventilation openings or holes are blocked by a newspaper or cloth, etc., the heat may not be able<br />
to get out.)<br />
3. DO NOT place heavy objects on the recorder or remote control.<br />
4. DO NOT place anything which might spill on top of the recorder or remote control.<br />
(If water or liquid is allowed to enter this equipment, fire or electric shock may be caused.)<br />
5. DO NOT expose the apparatus to dripping or splashing.<br />
6. DO NOT use this equipment in a bathroom or places with water. Also DO NOT place any containers<br />
filled with water or liquids (such as cosmetics or medicines, flower vases, potted plants, cups, etc.) on top<br />
of this unit.<br />
7. DO NOT place any naked flame sources, such as lighted candles, on the apparatus.<br />
8. AVOID violent shocks to the recorder during transport.<br />
MOISTURE CONDENSATION<br />
Moisture in the air will condense on the recorder when you move it from a cold place to a warm place, or<br />
under extremely humid conditions—just as water droplets form in the surface of a glass filled with cold<br />
liquid. Moisture condensation on the head drum will cause damage to the tape. In conditions where<br />
condensation may occur, keep the recorder turned on for a few hours to let the moisture dry.
4 EN INDEX<br />
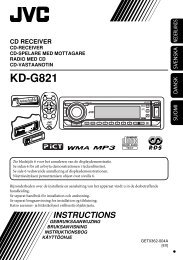
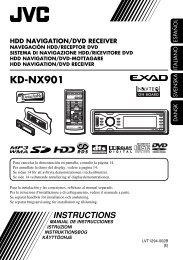
FRONT VIEW<br />
<strong>DV</strong> IN/OUT<br />
ENTREE/SORTIE <strong>DV</strong><br />
<strong>DV</strong> DUB<br />
COPIE<br />
A STANDBY/ON 1 Button � pg. 12<br />
B <strong>DV</strong> Eject Button � pg. 30, 31<br />
C Stop 8 Button � pg. 20, 21, 30, 31<br />
D <strong>Mini</strong> <strong>DV</strong> Cassette Loading Slot<br />
E Play 4 Button � pg. 20, 30<br />
F Pause 9 Button � pg. 21, 22, 31, 32<br />
G <strong>DV</strong> Button � pg. 30, 31<br />
H <strong>VHS</strong> Button � pg. 20, 21<br />
I <strong>VHS</strong> Cassette Loading Slot<br />
J Random Assemble Edit (R.A.EDIT) Button<br />
� pg. 58<br />
K Random Assemble Edit START Button � pg. 59<br />
L <strong>VIDEO</strong> Input Connector � pg. 48, 56<br />
M <strong>VHS</strong> Eject Button � pg. 20, 21<br />
N <strong>DV</strong> IN/OUT connector (i.Link*) � pg. 48<br />
* i.Link refers to the IEEE1394-1995 industry specification and<br />
extensions thereof. The logo is used for products compliant with<br />
the i.Link standard.<br />
PULL-OPEN<br />
TIRER-OUVRIR<br />
To access covered buttons/connectors, pull and open the<br />
cover.<br />
<strong>VHS</strong><br />
<strong>DV</strong> <strong>VHS</strong><br />
PR – / +<br />
PUSH / TURN<br />
24H<br />
EXPRESS<br />
1 3 2<br />
R.A.EDIT START<br />
IN /OUT<br />
INSERT A.DUB<br />
O Dubbing Direction (<strong>DV</strong> / <strong>VHS</strong>) Indicators<br />
� pg. 44, 45<br />
P Dubbing (DUB) Button � pg. 44, 45<br />
Dubbing Direction ( / ) Buttons � pg. 44, 45<br />
Q Record 7 Button � pg. 21, 31<br />
R <strong>DV</strong> mode Indicators � pg. 30, 31<br />
S Infrared Beam Receiving Window<br />
T Front Display Panel � pg. 6<br />
U <strong>VHS</strong> mode Indicators � pg. 20, 21<br />
V 24H EXPRESS # Button � pg. 40<br />
W Advanced JOG Dial � pg. 20, 30, 40<br />
X INSERT Button � pg. 57<br />
Y Random Assemble Edit IN/OUT Button � pg. 58<br />
Z Audio Dubbing (A.DUB) Button � pg. 55<br />
a Remote PAUSE Connector � pg. 48<br />
b AUDIO Input Connectors � pg. 48, 54, 56<br />
c S-<strong>VIDEO</strong> Input Connector � pg. 48, 56
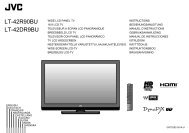
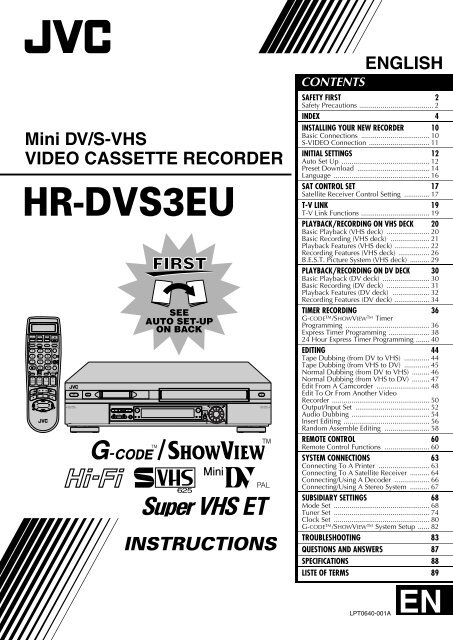
REAR VIEW<br />
ANTENNA<br />
ANTENNE<br />
IN<br />
ENTREE<br />
OUT<br />
SORTIE<br />
S OUT<br />
SORTIE<br />
AV1 (L-1)<br />
AV2 (L-2)<br />
A ANTENNA IN Connector � pg. 10<br />
B S OUT Connector � pg. 11<br />
C AV1 (L-1) IN/OUT Connector<br />
� pg. 10, 50, 64, 65, 66<br />
D Mains Power Cord � pg. 10<br />
E ANTENNA OUT Connector � pg. 10<br />
IN/OUT<br />
ENTREE/SORTIE<br />
IN/DECODER<br />
ENTREE/DECODEUR<br />
SAT CONTROL<br />
CONTROLEUR SAT<br />
AUDIO<br />
L<br />
OUT<br />
SORTIE<br />
R<br />
EN 5<br />
F AV2 (L-2) IN/DECODER Connector<br />
� pg. 17, 50, 64, 65, 66<br />
G SAT CONTROL Connector � pg. 17<br />
H AUDIO OUT (L/R) Connectors � pg. 67<br />
I Cooling fan<br />
● This prevents the temperature from rising inside the recorder.<br />
Do not remove it.<br />
● Install the recorder so as not to block the area around the fan.<br />
● The fan may be activated even if the recorder is turned off.
6 EN INDEX (cont.)<br />
FRONT DISPLAY PANEL<br />
A B.E.S.T. Picture System Display (<strong>VHS</strong> deck only)<br />
� pg. 29<br />
B Symbolic Mode Indicators<br />
PLAY:<br />
FF/REW VARIABLE<br />
SEARCH:<br />
AUDIO DUBBING:<br />
AUDIO DUBBING PAUSE:<br />
INSERT:<br />
INSERT PAUSE:<br />
AV INSERT:<br />
AV INSERT PAUSE:<br />
STILL:<br />
SLOW:<br />
RECORD:<br />
RECORD PAUSE:<br />
C Tape Speed Indicators � pg. 21, 31<br />
D Start Time Indicator ( ) � pg. 38, 40<br />
Stop Time Indicator ( ) � pg. 38, 40<br />
E “Timer” Indicator � pg. 37, 39, 40<br />
F Tape Remaining Time Indicator (<strong>VHS</strong> deck only)<br />
� pg. 27<br />
G Channel/Clock Display � pg. 15<br />
H Instant REVIEW Indicator (<strong>VHS</strong> deck only)<br />
� pg. 23<br />
I VPS/PDC Indicator � pg. 37, 39<br />
J S-<strong>VHS</strong> Indicator (<strong>VHS</strong> deck only) � pg. 71<br />
K VCR Indicator<br />
L “Cassette Loaded” Mark<br />
M Counter/Remain Display (<strong>VHS</strong> deck only)<br />
� pg. 27<br />
Time Code Display (<strong>DV</strong> deck only) � pg. 35<br />
N Mode Display (L-1, L-2, F-1 or SAT*)<br />
* When “L-2 SELECT” is set to “SAT” (� pg. 53), “SAT” appears<br />
instead of “L-2”.
ON-SCREEN DISPLAY (for <strong>VHS</strong> deck)<br />
When “O.S.D.” is set to “ON” (� pg. 69), various<br />
operational indicators appear on the TV screen.<br />
A Operation Mode Indicators<br />
B Tape Speed SP/LP/EP<br />
* EP is for NTSC playback only.<br />
C Tape Direction<br />
D Counter Display<br />
E Tape Remaining Time Indicator � pg. 27<br />
F Audio Mode Display � pg. 25<br />
ON-SCREEN DISPLAY (for <strong>DV</strong> deck)<br />
When “O.S.D.” is set to “ON” (� pg. 69), various<br />
operational indicators appear on the TV screen.<br />
A Operation Mode Indicators<br />
B Tape Speed SP/LP<br />
C Sound Mode Display � pg. 73<br />
D Time Code Display � pg. 35<br />
EN 7<br />
G Tape Position Indicator<br />
The tape position indicator<br />
appears on the TV screen<br />
when you press 3 or<br />
5 from the Stop mode<br />
or perform an Index Search<br />
(� pg. 23). The position of<br />
“q” in relation to “0”<br />
(beginning) or “+” (end)<br />
shows you where you are<br />
on the tape.<br />
Beginning End<br />
NOTE:<br />
Depending on the type of tape being used, the tape position<br />
indicator may not appear correctly.<br />
H Type of Broadcast � pg. 28<br />
I <strong>VHS</strong> Indicator<br />
J Current Day/Month/Year<br />
K Clock Display<br />
L Channel Position Number and Station Name/<br />
Auxiliary Input Indicator (L-1, L-2, F-1 or SAT*)<br />
* When “L-2 SELECT” is set to “SAT” (� pg. 53), “SAT” appears<br />
instead of “L-2”.<br />
Dubbing Direction Indicators<br />
(<strong>DV</strong> ] <strong>VHS</strong>/<strong>DV</strong> } <strong>VHS</strong>) � pg. 44, 45<br />
M Timer Warning Display<br />
A warning appears on the TV screen to tell you that the timerrecording<br />
is to start in 5 minutes if you’re not in the Timer<br />
mode at that time. The warning blinks for the entire 5<br />
minutes leading up to the start of timer recording. To clear<br />
the display, press & on the remote control.<br />
N “Cassette Loaded” Mark<br />
E Audio Mode Display � pg. 33<br />
F Type of Broadcast � pg. 35<br />
G <strong>DV</strong> Indicator<br />
H Current Day/Month/Year<br />
I Clock Display<br />
J Channel Position Number and Station Name/<br />
Auxiliary Input Indicator (L-1, L-2, F-1 or SAT*)<br />
* When “L-2 SELECT” is set to “SAT” (� pg. 53), “SAT” appears<br />
instead of “L-2”.<br />
Dubbing Direction Indicators<br />
(<strong>DV</strong> ] <strong>VHS</strong>/<strong>DV</strong> } <strong>VHS</strong>) � pg. 44, 45<br />
K Timer Warning Display<br />
A warning appears on the TV screen to tell you that the timerrecording<br />
is to start in 5 minutes if you’re not in the Timer<br />
mode at that time. The warning blinks for the entire 5<br />
minutes leading up to the start of timer recording. To clear<br />
the display, press & on the remote control.<br />
ERROR Indicator*<br />
* ERROR indicator appears when you start dubbing a tape with a<br />
copy protection signals or when Audio Dubbing or Insert Editing is<br />
not possible depending on the condition.<br />
L “Cassette Loaded” Mark
8 EN INDEX (cont.)<br />
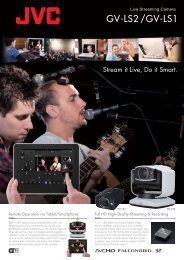
REMOTE CONTROL<br />
2<br />
TV<br />
CABLE/SAT<br />
1 2 3<br />
4 5<br />
DAILY/QTDN.<br />
6<br />
7 8 9<br />
1 PROG<br />
2<br />
TV<br />
–<br />
<strong>DV</strong><br />
1 LCD PROG AUDIO<br />
VPS/PDC<br />
0000<br />
START<br />
DEBUT<br />
AUX<br />
0<br />
STOP<br />
FIN<br />
EXPRESS<br />
ENTER/ENTREE<br />
30 SEC OK<br />
3<br />
TV PR +<br />
TV PR –<br />
Buttons with a small dot on the left side of the name can also<br />
be used to operate your TV. (� pg. 61)<br />
<strong>VHS</strong><br />
– –:– –<br />
WEEKLY/HEBDO<br />
DATE PR<br />
TV/VCR<br />
TV<br />
+<br />
3<br />
4<br />
4<br />
MENU<br />
A LCD Panel � pg. 36<br />
B <strong>DV</strong> Button � pg. 30, 31<br />
C TV/CABLE/SAT Button � pg. 61, 62<br />
D AUDIO Button � pg. 25, 33<br />
^ (TV Muting) Button � pg. 61<br />
E LCD PROG Button � pg. 36<br />
F Number Keys � pg. 21, 31, 36<br />
G DAILY Button � pg. 37, 39<br />
H VPS/PDC Button � pg. 37, 39<br />
I Counter Reset 0000 Button � pg. 27<br />
Cancel & Button � pg. 42<br />
J Programme Check " Button � pg. 42<br />
K PROG Button � pg. 38<br />
L START +/– Button � pg. 38<br />
M STOP +/– Button � pg. 38<br />
N Rewind 3 Button � pg. 20, 30<br />
O Play 4 Button � pg. 20, 30<br />
P Record 7 Button � pg. 21, 31<br />
Q Stop 8 Button � pg. 20, 30<br />
R r t Button � pg. 12<br />
TV PR +/– Button � pg. 61<br />
S <strong>VHS</strong> Button � pg. 20, 21<br />
T STANDBY/ON 1 Button � pg. 12<br />
U Display – –:– – Button � pg. 27<br />
V TV/VCR Button � pg. 61<br />
W REVIEW Button � pg. 23<br />
X Transmit Button � pg. 36<br />
Y WEEKLY Button � pg. 37, 39<br />
Z Timer # Button � pg. 37, 39<br />
a AUX Button � pg. 48<br />
b MENU Button � pg. 16<br />
c Auto Tracking p Button � pg. 25<br />
SP/LP Button � pg. 21, 31<br />
d OK Button � pg. 13<br />
e 30 SEC Button � pg. 23<br />
f PR +/– Button � pg. 21, 31<br />
g DATE +/– Button � pg. 39<br />
h Fast Forward 5 Button � pg. 20, 30<br />
i Pause 9 Button � pg. 21, 31<br />
j w e Button � pg. 22, 23<br />
TV % +/– Button � pg. 61
How To Use<br />
EN 9<br />
The remote control can operate most of your video recorder’s functions, as well as basic functions of TV sets and satellite receivers<br />
of JVC and other brands. (� pg. 61, 62)<br />
● Point the remote control toward the receiving window.<br />
● The maximum operating distance of the remote control is about 8 m.<br />
NOTES:<br />
● When inserting the batteries, be sure to insert in the correct directions as indicated under the battery cover.<br />
● If the remote control doesn’t work properly, remove its batteries, wait a short time, replace the batteries and then try again.<br />
Remote Control LCD<br />
The remote control can operate not only the video recorder but also some of your TV and satellite receiver’s functions. The LCD<br />
indicates which of these (<strong>VIDEO</strong>, TV or CABLE/SAT) the remote control can currently operate. When you first purchase the remote<br />
control, or after you have just replaced the batteries, <strong>VIDEO</strong> A (A code) is selected.<br />
A To operate your video recorder, first press the <strong>VHS</strong> or <strong>DV</strong>. To switch<br />
the remote control’s A/B/C/D code, refer to page 60.<br />
B To operate your TV, first press TV/CABLE/SAT until “TV” appears<br />
on the LCD. (� pg. 61)<br />
C To operate your satellite receiver, first press TV/CABLE/SAT until<br />
“CABLE SAT” appears on the LCD. (� pg. 62)<br />
NOTES:<br />
Even if “TV” is displayed on the LCD, the following operations can be performed without switching the mode.<br />
● Basic operations for the recorder<br />
After an operation is completed, “TV” reappears on the LCD.<br />
● Express timer programming and SHOWVIEW timer programming operations<br />
To perform a TV operation again, switch to TV mode first.<br />
● Accessing main menu<br />
To perform a TV operation again, switch to TV mode first.
10 EN INSTALLING YOUR NEW <strong>RECORDER</strong><br />
Basic Connections<br />
ANTENNA<br />
IN<br />
TV aerial cable<br />
RF cable<br />
(provided)<br />
AV1 (L-1)<br />
IN/OUT<br />
ANTENNA<br />
OUT<br />
21-pin SCART<br />
connector<br />
Aerial connector<br />
Back of TV<br />
21-pin SCART<br />
cable<br />
(provided)<br />
Mains outlet<br />
Mains power cord<br />
Back of recorder<br />
ATTENTION:<br />
Your TV must have a 21-pin AV input connector<br />
(SCART) for the connection to the recorder.<br />
It’s essential that your video recorder be properly<br />
connected.<br />
THESE STEPS MUST BE COMPLETED BEFORE ANY<br />
<strong>VIDEO</strong> OPERATION CAN BE PERFORMED.<br />
A<br />
Check the contents.<br />
Make sure the package contains all of the accessories<br />
listed in “SPECIFICATIONS” on page 88.<br />
B<br />
Situate the recorder.<br />
Place the recorder on a stable, horizontal surface.<br />
C<br />
Connect the recorder to TV.<br />
A Disconnect the TV aerial cable from the TV.<br />
B Connect the TV aerial cable to the ANTENNA IN<br />
connector on the rear panel of the recorder.<br />
C Connect the provided RF cable between the<br />
ANTENNA OUT connector on the rear panel of the<br />
recorder and the TV’s aerial connector.<br />
D Connect the provided 21-pin SCART cable between<br />
the AV1 (L-1) IN/OUT connector on the rear panel of<br />
the recorder and the TV’s 21-pin SCART connector.<br />
● The AV1 (L-1) IN/OUT connector accepts and delivers either a<br />
composite signal (regular video signal) or a Y/C signal (a signal<br />
in which the luminance and chrominance signals are<br />
separated). If your TV’s 21-pin AV input connector (SCART) is<br />
compatible with the Y/C signal, set “L-1 OUTPUT” to<br />
“S-<strong>VIDEO</strong>” after the connection and the initial settings are<br />
completed (� pg. 52). You can obtain high-quality S-<strong>VHS</strong><br />
pictures. (For connection, be sure to use a 21-pin SCART cable<br />
that is compatible with the Y/C signal.)<br />
● Set your TV to the <strong>VIDEO</strong> (or AV), Y/C, or RGB mode<br />
according to the type of your TV’s SCART connector.<br />
● For switching the TV’s mode, refer to the instruction manual of<br />
your television.<br />
● To obtain high-quality S-<strong>VHS</strong> pictures, you can also use the<br />
S-<strong>VIDEO</strong> connection described on page 11.<br />
D<br />
Connect the recorder to mains.<br />
Plug the end of the mains power cord into a mains outlet.<br />
After the connection is completed, perform “Auto Set<br />
Up” on page 12.
S-<strong>VIDEO</strong> Connection<br />
8 To connect to a TV with S-<strong>VIDEO</strong>/AUDIO IN<br />
connectors . . .<br />
A<br />
Connect the recorder to TV.<br />
A Connect the aerial, recorder and TV as per “Basic<br />
Connections” (� pg. 10).<br />
B Connect the recorder’s S OUT connector to the TV’s<br />
S-<strong>VIDEO</strong> IN connector.<br />
C Connect the recorder’s AUDIO OUT connectors to the<br />
TV’s AUDIO IN connectors.<br />
B<br />
TV aerial cable<br />
ANTENNA<br />
ANTENNE<br />
IN<br />
ENTREE<br />
ANTENNA IN<br />
OUT<br />
SORTIE<br />
S OUT<br />
SORTIE<br />
ANTENNA OUT<br />
S-Video cable<br />
(not provided)<br />
S OUT<br />
AV1 (L-1)<br />
AV2 (L-2)<br />
Connect the recorder to mains.<br />
IN/OUT<br />
ENTREE/SORTIE<br />
IN/DECODER<br />
ENTREE/DECODEUR<br />
AUDIO OUT<br />
Plug the end of the mains power cord into a mains outlet.<br />
SAT CONTROL<br />
CONTROLEUR SAT<br />
AUDIO<br />
L<br />
OUT<br />
SORTIE<br />
RF cable (provided)<br />
R<br />
Aerial connector<br />
S-<strong>VIDEO</strong> IN<br />
connector<br />
AUDIO IN connectors<br />
Audio cable<br />
(not provided)<br />
Mains outlet<br />
Mains power cord<br />
Back of recorder<br />
Back of TV<br />
EN 11<br />
NOTES:<br />
● You can obtain high-quality S-<strong>VHS</strong> pictures.<br />
● With S-<strong>VIDEO</strong> connection, you cannot use the Preset<br />
Download function (� pg. 14).<br />
● If your TV is not stereo-capable, use the recorder’s AUDIO<br />
OUT connectors to connect to an audio amplifier for Hi-Fi<br />
stereo sound reproduction. (� pg. 67)<br />
● To operate the recorder with your TV using the S-<strong>VIDEO</strong><br />
connection, set your TV to its AV mode.<br />
● For switching the TV’s mode, refer to the instruction manual of<br />
your television.<br />
After the connection is completed, perform “Auto Set<br />
Up” on page 12.
12 EN INITIAL SETTINGS<br />
Auto Set Up<br />
Auto Channel Set/Auto Clock Set/<br />
Auto Guide Program Number Set<br />
After the 1 button on the recorder or remote control is<br />
pressed for the first time to power on the recorder, by simply<br />
selecting your country*, the Auto Set Up function sets the<br />
tuner channels, clock** and Guide Program numbers<br />
automatically.<br />
* If you live in Belgium (BELGIUM) or Switzerland (SUISSE), you also<br />
need to select your language.<br />
** If you live in Hungary (MAGYARORSZÁG), Czech Republic (CESKÁ<br />
REPUBLIKA), Poland (POLSKA) or other countries in Eastern Europe<br />
(OTHER EASTERN EUROPE), set the clock manually.<br />
International Telephone Country Code<br />
BELGIUM<br />
CESKÁ REPUBLIKA<br />
DANMARK<br />
DEUTSCHLAND<br />
ESPAÑA<br />
GREECE<br />
ITALIA<br />
MAGYARORSZÁG<br />
NEDERLAND<br />
1<br />
2<br />
1<br />
2<br />
1 2 3<br />
4 5 6<br />
7 8 9<br />
:<br />
:<br />
:<br />
:<br />
:<br />
:<br />
:<br />
:<br />
:<br />
32<br />
42<br />
45<br />
49<br />
34<br />
30<br />
39<br />
36<br />
31<br />
0<br />
NORGE<br />
ÖSTERREICH<br />
POLSKA<br />
PORTUGAL<br />
SUISSE<br />
SUOMI<br />
SVERIGE<br />
OTHER WESTERN EUROPE<br />
OTHER EASTERN EUROPE<br />
3<br />
3<br />
4<br />
4<br />
:<br />
:<br />
:<br />
:<br />
:<br />
:<br />
:<br />
:<br />
:<br />
47<br />
43<br />
48<br />
351<br />
41<br />
358<br />
46<br />
– –<br />
EE<br />
Before starting, make sure of the following:<br />
● The TV aerial cable should be connected to the recorder.<br />
● The recorder’s mains power cord should be connected to a<br />
mains outlet.<br />
● If you want to use the on-screen display, the TV should be<br />
set to its AV mode.<br />
A<br />
Turn on the recorder.<br />
Press 1 on the recorder or remote control. The Country<br />
Set display appears on the front display panel and/or on<br />
the TV screen.<br />
B<br />
Select your country.<br />
On the front display panel<br />
Press rt to select your international telephone country<br />
code of your country referring to the chart in the left<br />
column.<br />
(Example) DEUTSCHLAND (49) is selected.<br />
On the on-screen display<br />
Press rt to move the<br />
highlight bar (pointer) to your<br />
country’s name.<br />
NOTES:<br />
● If you have selected BELGIUM (32) or SUISSE (41), go to<br />
step 3.<br />
● If you have selected MAGYARORSZÁG (36), CESKÁ<br />
REPUBLIKA (42), POLSKA (48) or OTHER EASTERN EUROPE<br />
(EE), press OK. The Clock Set screen appears. Set the clock<br />
manually (� pg. 80), then go to step 4.<br />
● If you have selected any other country name (code), press OK<br />
and go to step 4.
C<br />
Select the language.<br />
Press OK. The Language Set display appears on the front<br />
display panel and/or on the TV screen.<br />
On the front display panel<br />
Press rt to select your language code.<br />
Language Code<br />
<strong>ENGLISH</strong><br />
DEUTSCH<br />
FRANCAIS<br />
ITALIANO<br />
CASTELLANO<br />
(Example) DEUTSCH (02) is selected for SUISSE (41).<br />
International telephone<br />
country code Language code<br />
D<br />
:<br />
:<br />
:<br />
:<br />
:<br />
01<br />
02<br />
03<br />
04<br />
05<br />
On the on-screen display<br />
Press rt to move the<br />
highlight bar (pointer) to the<br />
language of your choice.<br />
Perform Auto Set Up.<br />
Press OK. The AUTO SET/T-V LINK display appears on<br />
the front display panel and/or on the TV screen.<br />
On the front display panel<br />
Press rt to select “Auto” and press OK or e.<br />
On the on-screen display<br />
Press rt to move the<br />
highlight bar (pointer) to<br />
“AUTO SET” and press OK or<br />
e.<br />
NEDERLANDS<br />
SVENSKA<br />
NORSK<br />
SUOMI<br />
DANSK<br />
DANSK<br />
SUOMI<br />
NORSK<br />
SVENSKA<br />
NEDERLANDS<br />
CASTELLANO<br />
ITALIANO<br />
FRANCAIS<br />
DEUTSCH<br />
<strong>ENGLISH</strong><br />
:<br />
:<br />
:<br />
:<br />
:<br />
06<br />
07<br />
08<br />
09<br />
10<br />
“Auto” blinks on the front display panel; do NOT press<br />
any button on the recorder or remote control until the<br />
front display panel shows clock time, “(CH) 1” or<br />
“– –:– –” as illustrated on page 15.<br />
● If you are using the on-screen<br />
display, the AUTO SET<br />
screen will appear. As Auto<br />
Set Up progresses, the “q”<br />
mark on the TV screen<br />
moves from left to right.<br />
When the Auto Set Up is<br />
completed, “SCAN<br />
COMPLETED” appears for<br />
about 5 seconds, then the<br />
normal screen appears.<br />
EN 13<br />
Beginning End<br />
● When you have connected the video recorder to a TV offering<br />
T-V Link via a fully-wired 21-pin SCART cable (� pg. 10) and<br />
the TV is turned on, the recorder automatically performs the<br />
Preset Download (� pg. 14) even if you select “Auto” for<br />
Auto Set Up function.<br />
ATTENTION<br />
Once you have performed Auto Set Up, even if the recorder’s<br />
memory backup has expired, all the stored stations and their<br />
Guide Program numbers remain in the recorder’s memory<br />
and the recorder will not perform Auto Set Up again. You<br />
only need to set the clock. (� pg. 80)<br />
If you have moved to a different area, perform each setting as<br />
required.<br />
● Tuner setting � pg. 74<br />
● Clock setting � pg. 80<br />
If a new station starts broadcasting in your area, perform<br />
tuner setting (� pg. 74).<br />
NOTES:<br />
● In the area where no TV station transmits a PDC (Programme<br />
Delivery Control) signal, the recorder can perform neither<br />
Auto Clock Set nor Auto Guide Program Number Set.<br />
● If there is a power cut, or if you press 1 or MENU while Auto<br />
Set Up is in progress, Auto Set Up will be interrupted; be sure<br />
to turn off the recorder power once and try again from step 1.<br />
● Auto Clock Set may not function properly depending on the<br />
reception condition.<br />
● If no sound accompanies the picture or the audio sounds<br />
unnatural on some channels that have been stored by Auto Set<br />
Up, the TV system setting for those channels may be incorrect.<br />
Select the appropriate TV system for those channels<br />
(� pg. 77, “INFORMATION”).
14 EN INITIAL SETTINGS (cont.)<br />
Preset Download<br />
Auto Channel Set by Downloading<br />
from TV/Auto Clock Set/Auto Guide<br />
Program Number Set<br />
ATTENTION<br />
You can use this function only with a TV offering T-V Link,<br />
etc.* Be sure to use a fully-wired 21-pin SCART cable.<br />
* Compatible with TVs offering T-V Link, EasyLink, Megalogic,<br />
SMARTLINK, Q-Link, DATA LOGIC or NexTView Link via fullywired<br />
21-pin SCART cable. The degree of compatibility and<br />
available functions may differ by system.<br />
1<br />
2<br />
1<br />
2<br />
1 2 3<br />
4 5 6<br />
7 8 9<br />
0<br />
NOTES:<br />
● For details, refer to the instruction manual of your TV.<br />
● In the area where no TV station transmits a PDC (Programme<br />
Delivery Control) signal, the recorder can perform neither<br />
Auto Clock Set nor Auto Guide Program Number Set.<br />
● If there is a power cut, or if you press 1 or MENU while<br />
downloading or set up is in progress, it will be interrupted; be<br />
sure to turn off the recorder power once and try again from the<br />
beginning.<br />
● Auto Clock Set may not function properly depending on the<br />
reception condition.<br />
● On this recorder, the characters available for station names<br />
(ID) are A–Z, 0–9, –, f, + and I (space). Some names of<br />
downloaded stations may differ from those of your TV<br />
(� pg. 78).<br />
3<br />
3<br />
4<br />
4<br />
If you have connected the recorder to your TV via a 21-pin<br />
SCART cable (� pg. 10), the recorder will automatically<br />
perform Preset Download instead of the Auto Set Up in step 4 on<br />
page 13. After downloading, the recorder sets the clock and<br />
Guide Program numbers automatically.<br />
Perform steps 1 to 3 of “Auto Set Up” on page 12 before<br />
continuing.<br />
A<br />
Perform Preset Download.<br />
Press OK. The AUTO SET/T-V LINK display appears on<br />
the front display panel and/or on the TV screen.<br />
On the front display panel<br />
Press rt to select “CH – –” and press OK or e.<br />
On the on-screen display<br />
Press rt to move the<br />
highlight bar (pointer) to<br />
“T-V LINK” and press OK or<br />
e.<br />
Preset positions on the front display panel increase from<br />
“CH1”; do NOT press any button on the recorder or remote<br />
control until the front display panel shows clock time,<br />
“(CH) 1” or “– –:– –” as illustrated on page 15.<br />
● If you are using the on-screen<br />
display, the T-V LINK screen<br />
will appear. Then the GUIDE<br />
PROG SET screen will appear<br />
during Guide Program<br />
Number Set. When Preset<br />
Download is completed,<br />
“COMPLETED” appears for<br />
about 5 seconds, then the<br />
normal screen appears.<br />
● If you press any button on the<br />
recorder or remote control<br />
while downloading is in<br />
progress, it will be interrupted.
Results of Auto Set Up/Preset Download appear on the front display panel<br />
EN 15<br />
If both Auto Channel Set and Auto Clock Set have been performed successfully, the<br />
correct current time is displayed.<br />
Turn on the TV and select its AV mode, then make sure that all necessary stations have been stored<br />
in the recorder’s memory by using the PR button(s).<br />
● If station names (ID – � pg. 79) have also been stored in the recorder’s memory, the station name<br />
will be displayed at the top left corner of the TV screen for about 5 seconds when the recorder is<br />
tuned to a different station.<br />
● If you want to set the tuner manually such as to add or skip channels, to change channel<br />
positions, or to set or change station names, see pages 76 – 79.<br />
If Auto Channel Set has succeeded but Auto Clock Set has not, “1” (channel position) is<br />
displayed.<br />
A Turn on the TV and select its AV mode, then make sure that all necessary stations have been<br />
stored in the recorder’s memory by using the PR button(s).<br />
● If station names (ID – � pg. 79) have also been stored in the recorder’s memory, the station name<br />
will be displayed at the top left corner of the TV screen for about 5 seconds when the recorder is<br />
tuned to a different station.<br />
● If you want to set the tuner manually such as to add or skip channels, to change channel<br />
positions, or to set or change station names, see pages 76 – 79.<br />
B Perform “Clock Set” on page 80.<br />
If both Auto Channel Set and Auto Clock Set have failed, “– –:– –” is displayed.<br />
Make sure the cables are connected properly and turn off the recorder’s power once, then turn the<br />
recorder’s power back on again.<br />
The Country Set display appears on the front display panel and/or on the TV screen; perform “Auto<br />
Set Up” on page 12 or “Preset Download” on page 14 again.<br />
IMPORTANT<br />
● To check if the Guide Program numbers have been set correctly, perform the SHOWVIEW Timer Programming (� pg. 36).<br />
● In certain reception conditions, station names may not be stored correctly, and auto Guide Program Number Set may not work<br />
properly. If the Guide Program numbers are not set properly when you timer-record a TV programme using the SHOWVIEW<br />
system, the recorder will record a TV programme of a different station. When programming the timer using the SHOWVIEW<br />
system, be sure to check the desired channel is selected correctly (� pg. 36, “G-CODE/SHOWVIEW Timer Programming”).<br />
● Your video recorder memorizes all detected stations even if reception of some of them is poor. You can delete those stations with<br />
an unacceptable picture (� pg. 77, “Delete A Channel”).<br />
INFORMATION<br />
Language for the on-screen display<br />
Auto Set Up also selects the language automatically for the on-screen display depending on the Country setting you have made in<br />
step 2 on page 12 (unless you have selected BELGIUM or SUISSE), as shown below.<br />
SUOMI ] SUOMI DANMARK ] DANSK NEDERLAND ] NEDERLANDS<br />
PORTUGAL ] <strong>ENGLISH</strong> ÖSTERREICH ] DEUTSCH GREECE ] <strong>ENGLISH</strong><br />
DEUTSCHLAND ] DEUTSCH CESKÁ REPUBLIKA ] <strong>ENGLISH</strong> OTHER WESTERN EUROPE] <strong>ENGLISH</strong><br />
POLSKA ] <strong>ENGLISH</strong> ITALIA ] ITALIANO OTHER EASTERN EUROPE ] <strong>ENGLISH</strong><br />
NORGE ] NORSK MAGYARORSZÁG ] <strong>ENGLISH</strong><br />
SVERIGE ] SVENSKA ESPAÑA ] CASTELLANO<br />
If you want to change the language setting manually, see “Language” on page 16.<br />
Just Clock<br />
Your recorder is equipped with the Just Clock function which provides accurate time keeping through automatic adjustments at<br />
regular intervals, by reading data from a PDC signal. If you want to take advantage of this function, simply set it to “ON”<br />
(� pg. 80, “Just Clock”).
16 EN INITIAL SETTINGS (cont.)<br />
Language<br />
Turn on the TV and select the AV mode.<br />
1<br />
2<br />
1<br />
2<br />
1 2 3<br />
4 5 6<br />
7 8 9<br />
0<br />
3<br />
3<br />
4<br />
4<br />
This recorder offers you the choice to view on-screen<br />
messages in 10 different languages. Though Auto Set Up<br />
selects the language automatically (� pg. 15), you can<br />
change the language setting manually as required.<br />
A<br />
Press MENU.<br />
B<br />
C<br />
Access the Main Menu screen.<br />
Access the Country Set screen.<br />
Press rt to move the<br />
highlight bar (pointer) to<br />
“AUTO CH SET”, then press<br />
OK or e.<br />
Select your country.<br />
Press rt to move the highlight bar (pointer) to your<br />
country’s name, then press OK or e.<br />
D<br />
E<br />
Press MENU.<br />
Select the language.<br />
Press rt to move the<br />
highlight bar (pointer) to the<br />
language of your choice.<br />
● You do not have to press OK;<br />
pressing OK enters AUTO SET/<br />
T-V LINK screen.<br />
Return to the normal screen.<br />
MAIN MENU<br />
MODE SET<br />
<strong>VHS</strong> MODE SET<br />
<strong>DV</strong> MODE SET<br />
AUTO CH SET<br />
MANUAL CH SET<br />
OUTPUT/INPUT SET<br />
INITIAL SET<br />
DANSK<br />
SUOMI<br />
NORSK<br />
SVENSKA<br />
NEDERLANDS<br />
CASTELLANO<br />
ITALIANO<br />
FRANCAIS<br />
DEUTSCH<br />
<strong>ENGLISH</strong><br />
[MENU] : EXIT
SAT CONTROL SET<br />
Satellite Receiver<br />
Control Setting<br />
Your recorder<br />
Transmitter<br />
Satellite receiver<br />
21-pin SCART cable<br />
(provided)<br />
AV2 (L-2) IN/DECODER<br />
Satellite receiver<br />
Satellite Controller<br />
(suggested locations)<br />
Satellite Controller<br />
(provided)<br />
SAT CONTROL<br />
Back of recorder<br />
EN 17<br />
The following procedure is required if you receive<br />
satellite channels through a satellite receiver.<br />
Approximately 20 seconds before the SHOWVIEW timer<br />
programming (� pg. 36) or Express timer programming<br />
(� pg. 38) starts, the recorder sets its input mode to “L-2”<br />
and automatically switches the satellite receiver’s<br />
channels using the provided Satellite Controller.<br />
Installing Satellite Controller<br />
A<br />
Situate the Satellite Controller.<br />
Place the Satellite Controller so that the path between its<br />
transmitter and the satellite receiver’s remote sensor is<br />
unobstructed.<br />
B<br />
Attach the Satellite Controller.<br />
Fix securely using the adhesive strip attached on the back<br />
of the Satellite Controller.<br />
C<br />
Make connections.<br />
Be sure to connect the recorder’s AV2 (L-2) IN/DECODER<br />
connector to the satellite receiver’s 21-pin SCART<br />
connector.<br />
NOTE:<br />
When connecting your satellite receiver, refer to its instruction<br />
manual.<br />
D<br />
Connect the Satellite Controller to recorder.<br />
Connect the Satellite Controller to the SAT CONTROL<br />
connector on the rear panel.
18 EN SAT CONTROL SET (cont.)<br />
Setting satellite receiver's brand and<br />
channel<br />
After installation, set the satellite receiver’s brand and<br />
channel correctly; otherwise, the Satellite Controller<br />
cannot work correctly.<br />
A<br />
Turn on the satellite receiver.<br />
Turn on the satellite receiver’s power.<br />
B<br />
Press MENU.<br />
1<br />
2<br />
1<br />
2<br />
1 2 3<br />
4 5 6<br />
7 8 9<br />
Turn on the TV and select the AV mode.<br />
0<br />
Access the Main Menu screen on the<br />
recorder.<br />
3<br />
3<br />
4<br />
4<br />
C<br />
Access the Initial Set screen.<br />
Press rt to move the highlight bar (pointer) to “INITIAL<br />
SET”, then press OK or e.<br />
D<br />
E<br />
F<br />
Access the Sat Control Set screen.<br />
Press rt to move the<br />
highlight bar (pointer) to<br />
“SAT CONTROL SET”, then<br />
press OK or e.<br />
Enter the satellite receiver’s brand.<br />
Press the appropriate number<br />
keys to enter the brand code<br />
from the list on page 19, then<br />
press OK.<br />
● If the brand code you entered<br />
is invalid, the code field will<br />
be reset. Enter the correct<br />
brand code again.<br />
● If the recorder is in playback or<br />
recording mode, you cannot<br />
set the brand code.<br />
Select the satellite receiver’s channel for<br />
testing.<br />
Press the appropriate number<br />
keys to enter one of the<br />
channel positions on the<br />
satellite receiver, then press<br />
OK.<br />
● You can select the channel<br />
position between 1 to 999.<br />
● After pressing OK, the recorder<br />
enters the Test mode.
SAT CONTROL SET (cont.)<br />
T-V LINK<br />
G<br />
Check the result of the test.<br />
If the satellite receiver’s<br />
channel number has been<br />
changed to the same one as<br />
you set in step 6 ...<br />
Press rt to move the highlight<br />
bar (pointer) to “CHANGED<br />
TO ...”, then press OK or e to<br />
finish the Sat Control Set mode.<br />
If the satellite receiver’s<br />
channel number has not been changed correctly ...<br />
Press rt to move the highlight bar (pointer) to “NOT<br />
CHANGED”, then press OK or e. Then perform the<br />
procedure again from step 5.<br />
BRAND NAME CODE<br />
JVC<br />
AMSTRAD<br />
CANAL SATELLITE<br />
CANAL +<br />
D-BOX<br />
ECHOSTAR<br />
ECHOSTAR (VIA DIGITAL)<br />
FINLUX<br />
FORCE<br />
GALAXIS<br />
GRUNDIG<br />
HIRSCHMANN<br />
ITT NOKIA<br />
JERROLD<br />
KATHREIN<br />
LUXOR<br />
MASCOM<br />
MASPRO<br />
NOKIA<br />
PACE<br />
PANASONIC<br />
PHILIPS<br />
RFT<br />
SABA<br />
SAGEM<br />
SALORA<br />
SIEMENS<br />
SKYMASTER<br />
THOMSON<br />
TPS<br />
TRIAX<br />
WISI<br />
73<br />
60, 61, 62, 63, 92<br />
81<br />
81<br />
85<br />
78, 79, 80<br />
82<br />
68<br />
89<br />
88<br />
64, 65<br />
64, 78, 99<br />
68<br />
75<br />
70, 71, 96<br />
68<br />
93<br />
70<br />
87, 94<br />
65, 67, 74, 86, 92<br />
74, 92<br />
66, 84<br />
69<br />
97<br />
83, 90<br />
68<br />
64<br />
69, 98<br />
97<br />
83<br />
91<br />
64<br />
NOTES:<br />
● The Satellite Controller may not work with all types of satellite<br />
receiver.<br />
● For some satellite receivers, you need to set its channel input<br />
mode to 2-digit.<br />
● If your satellite receiver has more than two channel modes, be<br />
sure to set to “All Channel Mode”. For details, refer to the<br />
instruction manual of the satellite receiver.<br />
● When selecting the satellite receiver’s channel (� step 6),<br />
signals from the remote control may interfere with signals<br />
transmitted from the Satellite Controller. In this case, move the<br />
remote control as close to the recorder’s infrared beam<br />
receiving window as possible.<br />
EN 19<br />
T-V Link Functions<br />
When you connect the recorder to your TV via a fully-wired 21pin<br />
SCART cable (� pg. 10), the following functions are<br />
available. You can use these functions only with a TV offering<br />
T-V Link, etc.*<br />
For details, refer to the instruction manual of your TV.<br />
* Compatible with TVs offering T-V Link, EasyLink, Megalogic,<br />
SMARTLINK, Q-Link, DATA LOGIC or NexTView Link via fully-wired<br />
21-pin SCART cable. The degree of compatibility and available<br />
functions may differ by system.<br />
NexTView Link<br />
You can download the EPG (Electronic Programme Guide)<br />
information from your TV for timer-programming on the<br />
recorder.<br />
For details, refer to the instruction manual of your TV.<br />
TV Auto Power On<br />
The TV will turn on and be set to its AV mode automatically<br />
whenever you play a tape.<br />
For details, refer to the instruction manual of your TV.<br />
VCR Auto Standby<br />
You can use your TV’s remote control to turn off the recorder.<br />
For details, refer to the instruction manual of your TV.<br />
Direct Rec<br />
You can easily start recording the programme that you are<br />
watching on your TV. When you use this function, set “DIRECT<br />
REC” to “ON” (� pg. 69).
20 EN PLAYBACK/RECORDING ON <strong>VHS</strong> DECK<br />
Basic Playback<br />
(<strong>VHS</strong> deck)<br />
Turn on the TV and select the AV mode.<br />
1<br />
2<br />
1<br />
2<br />
1 2 3<br />
4 5 6<br />
7 8 9<br />
0<br />
1 3 2<br />
3<br />
3<br />
4<br />
4<br />
A<br />
Load a cassette.<br />
Make sure the window side is up, the rear label side is<br />
facing you and the arrow on the front of the cassette is<br />
pointed toward the recorder.<br />
● Do not apply too much pressure when inserting.<br />
● The recorder’s power comes on automatically.<br />
● If the record safety tab has been removed, playback begins<br />
automatically.<br />
B<br />
Select the <strong>VHS</strong> deck.<br />
Press <strong>VHS</strong>.<br />
● The <strong>VHS</strong> button lights on the recorder.<br />
C<br />
Find the programme start point.<br />
If the tape is advanced past the start point, press 3 or<br />
turn the JOG dial to the left. To go forward, press 5 or<br />
turn the JOG dial to the right.<br />
D<br />
Start playback.<br />
Press 4. “BEST” appears blinking in the recorder’s front<br />
display panel during automatic tracking. (� pg. 29)<br />
● The <strong>VHS</strong> playback indicator lights on the recorder.<br />
E<br />
Stop playback.<br />
Press 8. Then press to remove the cassette.<br />
● The <strong>VHS</strong> playback indicator turns off.<br />
NOTE:<br />
It is impossible to play back a tape on the <strong>VHS</strong> deck while the<br />
recording is in progress on the <strong>DV</strong> deck. When you start<br />
recording on the <strong>DV</strong> deck during playback on the <strong>VHS</strong> deck,<br />
playback stops on the <strong>VHS</strong> deck and recording continues on the<br />
<strong>DV</strong> deck.<br />
Usable cassettes<br />
● Compact <strong>VHS</strong> camcorder recordings can be played on this<br />
video recorder. Simply place the recorded cassette into a<br />
<strong>VHS</strong> Cassette Adapter and it can be used just like any fullsized<br />
<strong>VHS</strong> cassette.<br />
● This video recorder can record on regular <strong>VHS</strong> and Super<br />
<strong>VHS</strong> cassettes. While only <strong>VHS</strong> signals can be recorded on<br />
regular <strong>VHS</strong> cassettes*, both <strong>VHS</strong> and Super <strong>VHS</strong> signals<br />
can be recorded and played back using Super <strong>VHS</strong><br />
cassettes.<br />
* By using the S-<strong>VHS</strong> ET function, it is possible to record and<br />
play back with S-<strong>VHS</strong> picture quality on <strong>VHS</strong> cassettes<br />
with this recorder.
Basic Recording<br />
(<strong>VHS</strong> deck)<br />
Turn on the TV and select the AV mode.<br />
1<br />
2<br />
1<br />
2<br />
1 2 3<br />
4 5 6<br />
7 8 9<br />
0<br />
1 3 2<br />
3<br />
3<br />
4<br />
4<br />
A<br />
Load a cassette.<br />
EN 21<br />
Insert a <strong>VHS</strong> (or S-<strong>VHS</strong>) cassette with the record safety<br />
tab intact.<br />
● The recorder’s power comes on automatically.<br />
B<br />
Select the <strong>VHS</strong> deck.<br />
Press <strong>VHS</strong>.<br />
● The <strong>VHS</strong> button lights on the recorder.<br />
C<br />
Choose a programme.<br />
Press PR +/– or the number keys. Or push the JOG dial<br />
and turn it to the left or right to select the channel you<br />
wish to record.<br />
D<br />
Set the tape speed.<br />
Press SP/LP (p). Check the SP/LP indicator on the<br />
recorder’s front display panel to confirm the selected tape<br />
speed.<br />
E<br />
Start recording.<br />
Press and hold 7 and press 4 on the remote control, or<br />
press 7 on the recorder.<br />
● The <strong>VHS</strong> recording indicator lights on the recorder.<br />
B.E.S.T. takes place at the beginning of both the first SP and<br />
the first LP recording after inserting the cassette. (� pg. 29)<br />
If “DIRECT REC” is set to “ON”, the programme that appears<br />
on the TV screen will be recorded (� pg. 69).<br />
F<br />
Pause/Resume recording.<br />
Press 9. Press 4 to resume recording.<br />
● You can select channel during the Record Pause mode.<br />
G<br />
Stop recording.<br />
Press 8. Then press to remove the cassette.<br />
● The <strong>VHS</strong> recording indicator turns off.<br />
NOTE:<br />
It is not possible to record a TV programme on both the <strong>VHS</strong><br />
deck and the <strong>DV</strong> deck simultaneously. In addition, it is not<br />
possible to record simultaneously from the same external input.
22 EN PLAYBACK/RECORDING ON <strong>VHS</strong> DECK (cont.)<br />
Playback Features<br />
(<strong>VHS</strong> deck)<br />
NOTE:<br />
Refer to the illustrations below as you read the following<br />
procedures.<br />
Reverse Forward<br />
Reverse<br />
search<br />
5steps<br />
Reverse<br />
play<br />
1<br />
2<br />
1<br />
2<br />
Reverse<br />
slow<br />
motion<br />
2steps<br />
1 2 3<br />
4 5 6<br />
7 8 9<br />
0<br />
Slow<br />
motion<br />
2steps<br />
Normal<br />
play<br />
Forward<br />
search<br />
6steps<br />
ATTENTION<br />
● Picture may not appear during high-speed search with an LPrecorded<br />
tape.<br />
● In the high-speed search, still, slow motion or frame-by-frame<br />
playback mode, the picture will be distorted.<br />
● When normal playback resumes from search, still, slow<br />
motion or frame-by-frame playback, the picture may jitter<br />
vertically momentarily depending on the type of TV being<br />
used.<br />
3<br />
3<br />
4<br />
4<br />
Clean the video heads using a dry cleaning<br />
cassette — TCL-2 — when:<br />
● Rough, poor picture appears while a tape is played back.<br />
● The picture is unclear or no picture appears.<br />
● “USE CLEANING <strong>CASSETTE</strong>” appears on the screen (only<br />
with “O.S.D.” set to “ON” (� pg. 69)).<br />
Still Picture/Frame-By-Frame<br />
Playback<br />
1 Pause during playback.<br />
Push the JOG dial.<br />
OR<br />
Press 9.<br />
2 Activate frame-by-frame playback.<br />
Turn the JOG dial to the right for forward frame-by-frame<br />
playback, or to the left for reverse frame-by-frame<br />
playback.<br />
OR<br />
Press 9.<br />
OR<br />
Press w or e.<br />
NOTE:<br />
Still picture playback stops automatically after 5 minutes to<br />
protect the heads.<br />
To resume normal playback, press 4 or push the JOG<br />
dial.<br />
Slow Motion<br />
During playback, turn the JOG dial one click to the left<br />
for forward slow motion. To play in reverse slow motion,<br />
continue to turn the JOG dial to the left after selecting all<br />
the forward direction slow motion modes.<br />
OR<br />
During still picture, press and hold 9 for 2 seconds, then<br />
release. Press 9 and release again to return to still<br />
picture.<br />
OR<br />
During still picture, press and hold w or e. Release to<br />
return to still picture.<br />
NOTES:<br />
● Manual tracking is possible during slow motion playback.<br />
(� pg. 25)<br />
● Slow motion playback stops automatically after 5 minutes to<br />
protect the heads.<br />
To resume normal playback, press 4.
High-Speed (Turbo) Search<br />
During playback, turn the JOG dial quickly to the left or<br />
right.<br />
OR<br />
During playback or still, press 5 for forward highspeed<br />
search, or 3 for reverse high-speed search.<br />
NOTE:<br />
For short searches, press and hold 5 or 3 for over 2<br />
seconds during playback or still picture. When released, normal<br />
playback resumes.<br />
Variable Speed Search<br />
During playback, turn the JOG dial to the right for<br />
forward variable-speed search, or to the left for reverse<br />
variable-speed search.<br />
OR<br />
During playback, press w or e.<br />
● The more times you press, the faster the playback picture<br />
moves.<br />
● To decrease speed, press the button for the opposite direction.<br />
To resume normal playback, press 4.<br />
Skip Search<br />
During playback, press 30 SEC 1 to 4 times to skip over<br />
unwanted sections.<br />
Each press initiates a 30-second period of fast-motion<br />
playback. Normal playback resumes automatically.<br />
To resume normal playback during a Skip Search,<br />
press 4.<br />
Index Search<br />
EN 23<br />
Your recorder automatically marks<br />
index codes at the beginning of<br />
each recording. This function gives<br />
you quick access to any one of 9<br />
index codes in either direction.<br />
NOTE:<br />
Before starting, make sure the<br />
recorder is in the Stop mode.<br />
Activate Index Search.<br />
Press w or e (2 or 6). “2 1” or “6 1” is<br />
displayed on the TV screen and search begins in the<br />
corresponding direction.<br />
● To access index codes 2 through 9, press w or e repeatedly<br />
until the correct index number is displayed.<br />
Example:<br />
To locate the beginning of B from the current position, press w<br />
twice.<br />
To locate the beginning of D from the current position, press e<br />
once.<br />
Current position<br />
● When the specified index code is located, playback begins<br />
automatically.<br />
Instant ReView<br />
Index number<br />
Simply by pressing a single button, the recorder power comes<br />
on, rewinds, and begins playback of the last timer-recorded<br />
programme. If you have several programmes recorded, you can<br />
easily access any of them.<br />
NOTE:<br />
Before starting, make sure that the recorder is off and that the<br />
Timer mode is disengaged.<br />
Activate Instant ReView.<br />
Press REVIEW. The recorder power comes on and the<br />
recorder searches for the index code indicating the start<br />
of the last timer-recorded programme. Once it’s found,<br />
playback begins automatically.<br />
● The front display panel tells you how many programmes have<br />
been timer-recorded. If you have, for example, 3 programmes,<br />
“REVIEW” and “3” appear and blink. To watch the first of the 3<br />
programmes, press REVIEW three times. The recorder searches<br />
and begins playback automatically. You can access a<br />
programme as far as 9 index codes away from the current tape<br />
position.
24 EN PLAYBACK/RECORDING ON <strong>VHS</strong> DECK (cont.)<br />
1<br />
2<br />
1<br />
2<br />
1 2 3<br />
4 5 6<br />
7 8 9<br />
0<br />
3<br />
3<br />
4<br />
4<br />
Next Function Memory<br />
The Next Function Memory “tells” the recorder what to do after<br />
rewinding. Before continuing, make sure the recorder is in the<br />
Stop mode.<br />
a- For Automatic Start Of Playback<br />
Press 3, then press 4 within 2 seconds.<br />
b- For Automatic Power Off<br />
Press 3, then press 1 within 2 seconds.<br />
c- For Automatic Cassette Ejection After Tape Rewind<br />
Press 3, then press within 2 seconds.<br />
NOTE:<br />
The Automatic Power Off does not work if “AUTO TIMER” is set<br />
to “ON”. If “AUTO TIMER” is set to “ON”, the recorder directly<br />
goes into the Timer-Standby mode at the same time when the 1<br />
is pressed for the Automatic Power Off.<br />
Repeat Playback<br />
Your recorder can automatically play back the whole tape 100<br />
times repeatedly.<br />
1 Start playback.<br />
Press 4.<br />
2 Activate Repeat Playback.<br />
Press 4 and hold for over 5 seconds, then release.<br />
● The Play indicator ( u) on the front display panel blinks<br />
slowly.<br />
● After playing back a tape 100 times, the recorder stops<br />
automatically.<br />
3 Stop Repeat Playback.<br />
Press 8 at any time.<br />
● Pressing 4, 3, 5 or 9 also stops Repeat Playback.
1<br />
2<br />
1<br />
2<br />
1 2 3<br />
4 5 6<br />
7 8 9<br />
0<br />
3<br />
3<br />
4<br />
4<br />
Manual Tracking<br />
EN 25<br />
Your recorder is equipped with automatic tracking control.<br />
During playback, you can override this and adjust the tracking<br />
manually by pressing the PR buttons.<br />
1 Override automatic tracking.<br />
Press p on the remote control.<br />
2 Adjust the tracking manually.<br />
Press PR + or –.<br />
● Press p again to return to automatic tracking.<br />
NOTE:<br />
When a new tape is inserted, the recorder enters the automatic<br />
tracking mode automatically.<br />
Soundtrack Selection<br />
Your recorder is capable of recording three soundtracks (HI-FI L,<br />
HI-FI R and NORM) and will play back the one you select.<br />
During Playback<br />
Pressing AUDIO changes the soundtrack as follows:<br />
TRACK<br />
On-Screen Display<br />
H I F I<br />
LjhR<br />
H I F I<br />
Lj<br />
H I F I<br />
hR<br />
USE<br />
For Hi-Fi stereo tapes<br />
For main audio of Bilingual tapes<br />
For sub audio of Bilingual tapes<br />
NORM For audio-dubbed tapes<br />
H I F I<br />
NORM<br />
For audio-dubbed tapes<br />
NOTES:<br />
● “HI FI L j h R” should normally be selected. In this mode,<br />
Hi-Fi stereo tapes are played back in stereo, and the normal<br />
audio track is played back automatically for tapes with only<br />
normal audio.<br />
● For instructions on recording stereo and bilingual<br />
programmes, refer to page 28.<br />
● “O.S.D.” must be set to “ON” or the on-screen displays will<br />
not appear (� pg. 69).
26 EN PLAYBACK/RECORDING ON <strong>VHS</strong> DECK (cont.)<br />
Recording Features<br />
(<strong>VHS</strong> deck)<br />
1 3 2<br />
Recording Resume Function<br />
If there is a power outage during recording, Instant Timer<br />
Recording (in the right column) or timer recording<br />
(� pg. 36, 38, 40), the recording will resume automatically<br />
when power is restored to the recorder unless the recorder’s<br />
memory backup has expired.<br />
Accidental erasure prevention<br />
To prevent accidental recording on a recorded cassette,<br />
remove its safety tab. To record on it later, cover the hole<br />
with adhesive tape.<br />
Record safety tab<br />
Record One Programme While<br />
Watching Another<br />
Once recording is in progress, all you need to do is to set<br />
the channel controls on the TV for the station you wish to<br />
view.<br />
● The programme selected with the TV’s channel controls<br />
appears on the TV screen, while the one selected with the<br />
recorder’s PR buttons is recorded on the tape.<br />
● If a decoder is connected to the recorder (� pg. 66), you can<br />
select a scrambled channel as well with the TV channel<br />
controls.<br />
Instant Timer Recording (ITR)<br />
This easy method lets you record for from 30 minutes to 6 hours<br />
(selectable in 30-min. increments), and shuts the recorder off<br />
after recording is finished.<br />
1 Start recording.<br />
Press 7 on the recorder.<br />
2 Engage the ITR mode.<br />
Press 7 again. “o” blinks and “0:30” appears on the front<br />
display panel.<br />
3 Set the recording duration.<br />
If you want to record for more than 30 minutes, press 7<br />
to extend the time. Each press extends recording time by<br />
30 minutes.<br />
NOTES:<br />
● You can only perform ITR using the 7 button on the recorder’s<br />
front panel.<br />
● You can play back a tape on <strong>DV</strong> deck while using the <strong>VHS</strong><br />
deck for Instant Timer Recording. However, remember that the<br />
recorder will turn itself off when the Instant Timer Recording<br />
ends.
1<br />
2<br />
1<br />
2<br />
1 2 3<br />
4 5 6<br />
7 8 9<br />
0<br />
3<br />
3<br />
4<br />
4<br />
Elapsed Recording Time Indication<br />
EN 27<br />
1 Set the counter display.<br />
Press – –:– – until a counter reading appears on the front<br />
display panel.<br />
2 Reset the counter.<br />
Press 0000 before starting recording or playback.<br />
● The counter is reset to “0:00:00” and shows the exact elapsed<br />
time as the tape runs. You can check the exact time of a<br />
recording or playback.<br />
Tape Remaining Time<br />
Press – –:– – until the time remaining on the tape appears<br />
on the front display panel.<br />
● The front display panel shows the tape remaining time with<br />
“y” displayed.<br />
● By pressing the – –:– – button, you can change the display to<br />
show the counter reading, channel position*, clock time or<br />
tape remaining time.<br />
* Channel position is not displayed during playback.<br />
NOTE:<br />
Depending on the type of tape being used, the tape remaining<br />
time reading may not appear right away, or is not correct.<br />
“– –:– –” may sometimes appear, or the display may blink on<br />
occasion.
28 EN PLAYBACK/RECORDING ON <strong>VHS</strong> DECK (cont.)<br />
Retake<br />
You can cut out unnecessary parts of a TV programme while you<br />
are recording it.<br />
End of programme Beginning of programme<br />
Unnecessary Unnecessary<br />
Programme Programme<br />
part part<br />
Recorded part<br />
Go back to end of programme to cut out<br />
unnecessary part<br />
1 Engage the Record-Pause mode.<br />
Press 9 during recording.<br />
2 Locate the start point.<br />
Turn the JOG dial to the left or right (or hold down 3<br />
or 5) and release it when you reach the point where<br />
you want to resume recording.<br />
● Your recorder returns to the Record-Pause mode.<br />
3 Resume recording.<br />
Press 4 when you wish to resume recording.<br />
NOTE:<br />
Retake function does not work during Direct Rec (� pg. 19,<br />
69).<br />
Receiving Stereo and Bilingual<br />
Programmes<br />
Your recorder is equipped with a Sound-Multiplex decoder (A2)<br />
and a Digital stereo sound decoder (NICAM) making reception<br />
of stereo and bilingual broadcasts possible.<br />
When the channel is changed, the type of broadcast being<br />
received will be displayed on the TV screen for a few seconds.<br />
Type of Broadcast Being<br />
Received<br />
A2 Stereo<br />
A2 Bilingual<br />
Regular Monaural<br />
NICAM Stereo<br />
NICAM Bilingual<br />
NICAM Monaural<br />
On-screen Display<br />
ST<br />
BIL.<br />
(none)<br />
ST NICAM<br />
BIL. NICAM<br />
NICAM<br />
● To listen to a stereo programme, press AUDIO until<br />
“HIFI L jhR” appears on the TV screen.<br />
● To listen to a bilingual programme, press AUDIO until<br />
“HIFI L j” or “HIFI h R” appears on the TV screen.<br />
● To listen to the standard (Regular Monaural) audio while<br />
receiving a NICAM broadcast, press AUDIO until “NORM”<br />
appears on the front display panel or the TV screen.<br />
NOTE:<br />
“O.S.D.” must be set to “ON” or the on-screen displays will not<br />
appear (� pg. 69).<br />
To Record Stereo and Bilingual Programmes (A2)<br />
Stereo programmes are automatically recorded in stereo on the<br />
Hi-Fi audio track (with the normal audio track recording mixed L<br />
and R channel sound).<br />
● Bilingual programmes are automatically recorded in bilingual<br />
on the Hi-Fi audio track. The main soundtrack will be<br />
recorded on the normal audio track.<br />
To Record NICAM Stereo and Bilingual<br />
Programmes<br />
The NICAM audio programme will be recorded on the Hi-Fi<br />
audio track, and the standard audio programme will be recorded<br />
on the normal audio track.<br />
NOTES:<br />
● If the quality of stereo sound being received is poor, the<br />
broadcast will be received in monaural with better quality.<br />
● Before playing back a programme recorded in stereo, or a<br />
bilingual programme, refer to “Soundtrack Selection” on<br />
page 25.
B.E.S.T. Picture<br />
System<br />
(<strong>VHS</strong> deck)<br />
The B.E.S.T. (Biconditional Equalised Signal Tracking)<br />
system checks the condition of the tape in use during<br />
playback and recording, and compensates to provide the<br />
highest-possible playback and recording pictures. You<br />
can set “B.E.S.T.” to “ON” or “OFF” to your preference<br />
(� pg. 70).<br />
Playback<br />
The recorder assesses the quality of the tape once you<br />
initiate playback.<br />
● The recorder adjusts the playback picture quality based on the<br />
quality of the tape in use.<br />
● B.E.S.T. is active during automatic tracking. “BEST” appears<br />
blinking on the recorder’s front display panel.<br />
NOTES:<br />
● When watching a tape recorded with “B.E.S.T.” set to “ON”, it<br />
is recommended that you leave B.E.S.T. on during playback as<br />
well.<br />
● When watching a rental tape or one recorded on another<br />
video recorder, or when using this recorder as the player for<br />
editing, set B.E.S.T. to your preference (� pg. 70).<br />
● “BEST” only appears at the beginning of automatic tracking.<br />
Even though it doesn’t appear after that, the B.E.S.T. function is<br />
operative.<br />
Recording<br />
EN 29<br />
The recorder assesses the quality of the tape once you<br />
initiate recording.<br />
DURING B.E.S.T.<br />
B.E.S.T. COMPLETE<br />
● The recorder spends approximately 7 seconds assessing the<br />
condition of the tape, then begins recording.<br />
NOTES:<br />
● The B.E.S.T. system works for both SP and LP modes only after<br />
a tape has been inserted and the Record mode is first initiated.<br />
It does not work during recording.<br />
● In the case of timer recordings, the B.E.S.T. system works<br />
before recording is initiated.<br />
● Once the cassette is ejected, the B.E.S.T. data is cancelled. The<br />
next time the cassette is used for recording, B.E.S.T. is reperformed.<br />
● Pressing the recorder’s 7 button while “BEST” is displayed<br />
does not start Instant Timer Recording (� pg. 26).<br />
ATTENTION<br />
Since the B.E.S.T. system works before recording actually<br />
starts, there is a delay of approximately 7 seconds after 7<br />
and 4 on the remote control are pressed, or 7 on the<br />
recorder is pressed. To make sure you record the desired<br />
scene or programme in its entirety, first perform the following<br />
steps:<br />
A Press and hold 9 and press 7 to engage the Record<br />
Pause mode.<br />
● The recorder then automatically checks the condition of<br />
the tape and, after approximately 7 seconds, re-enters<br />
Record Pause mode.<br />
B Press 4 to start recording.<br />
If you want to bypass the B.E.S.T. system and begin recording<br />
immediately, set “B.E.S.T.” to “OFF” (� pg. 70).
30 EN PLAYBACK/RECORDING ON <strong>DV</strong> DECK<br />
Basic Playback<br />
(<strong>DV</strong> deck)<br />
Turn on the TV and select the AV mode.<br />
1<br />
2<br />
1<br />
2<br />
1 2 3<br />
4 5 6<br />
7 8 9<br />
0<br />
1 3 2<br />
3<br />
3<br />
4<br />
4<br />
A<br />
Load a cassette.<br />
Make sure the window side is up, the rear label side is<br />
facing you and the arrow on the front of the cassette is<br />
pointed toward the recorder.<br />
● Do not apply too much pressure when inserting.<br />
● The recorder’s power comes on automatically.<br />
● If the erase protection switch is set to “SAVE”, playback begins<br />
automatically. It takes about 15 seconds until the playback<br />
picture appears.<br />
● Make sure the VCR indicator appears on the front display<br />
panel. If not, press TV/VCR on the remote control to turn on<br />
the VCR indicator.<br />
B<br />
Select the <strong>DV</strong> deck.<br />
Press <strong>DV</strong>.<br />
● The <strong>DV</strong> button lights on the recorder.<br />
C<br />
Find the programme start point.<br />
If the tape is advanced past the start point, press 3 or<br />
turn the JOG dial to the left. To go forward, press 5 or<br />
turn the JOG dial to the right.<br />
D<br />
Start playback.<br />
Press 4.<br />
● The <strong>DV</strong> playback indicator lights on the recorder.<br />
E<br />
Stop playback.<br />
Press 8. Then press to remove the cassette.<br />
● The <strong>DV</strong> playback indicator turns off.<br />
Usable cassettes<br />
Only cassettes marked can be used with the <strong>DV</strong><br />
deck.<br />
NOTE:<br />
When you record a tape on the <strong>DV</strong> deck with the recording<br />
speed set to “LP”, it is recommended to play back that tape back<br />
on this <strong>DV</strong> deck. Digital video recorder from other<br />
manufacturers may not be able to play back the tape properly.
Basic Recording<br />
(<strong>DV</strong> deck)<br />
Turn on the TV and select the AV mode.<br />
1<br />
2<br />
1<br />
2<br />
1 2 3<br />
4 5 6<br />
7 8 9<br />
0<br />
1 3 2<br />
3<br />
3<br />
4<br />
4<br />
A<br />
Load a cassette.<br />
EN 31<br />
Insert a <strong>Mini</strong> <strong>DV</strong> cassette with the erase protection switch<br />
set to “REC”.<br />
● The recorder’s power comes on automatically.<br />
B<br />
Select the <strong>DV</strong> deck.<br />
Press <strong>DV</strong>.<br />
● The <strong>DV</strong> button lights on the recorder.<br />
C<br />
Choose a programme.<br />
Press PR +/– or the number keys. Or push the JOG dial<br />
and turn it to the left or right to select the channel you<br />
wish to record.<br />
D<br />
Set the tape speed.<br />
Press SP/LP (p). Check the SP/LP indicator on the<br />
recorder’s front display panel to confirm the selected tape<br />
speed.<br />
E<br />
Start recording.<br />
Press and hold 7 and press 4 on the remote control, or<br />
press 7 on the recorder.<br />
● The <strong>DV</strong> recording indicator lights on the recorder.<br />
If “DIRECT REC” is set to “ON”, the programme that appears<br />
on the TV screen will be recorded (� pg. 69).<br />
F<br />
Pause/Resume recording.<br />
Press 9. Press 4 to resume recording.<br />
● You can select channel during the Record Pause mode.<br />
G<br />
Stop recording.<br />
Press 8. Then press to remove the cassette.<br />
● The <strong>DV</strong> recording indicator turns off.<br />
NOTES:<br />
● It is not possible to record a TV programme on both the <strong>VHS</strong><br />
deck and the <strong>DV</strong> deck simultaneously. In addition, it is not<br />
possible to record simultaneously from the same external<br />
input.<br />
● When you record a tape on the <strong>DV</strong> deck with the recording<br />
speed set to “LP”, it is recommended to play back that tape<br />
back on this <strong>DV</strong> deck. Digital video recorder from other<br />
manufacturers may not be able to play back the tape properly.
32 EN PLAYBACK/RECORDING ON <strong>DV</strong> DECK (cont.)<br />
Playback Features<br />
(<strong>DV</strong> deck)<br />
NOTE:<br />
Refer to the illustrations below as you read the following<br />
procedures.<br />
Reverse Forward<br />
Reverse<br />
search<br />
3steps<br />
Reverse<br />
play<br />
1<br />
2<br />
1<br />
2<br />
Reverse<br />
slow<br />
motion<br />
1step<br />
1 2 3<br />
4 5 6<br />
7 8 9<br />
0<br />
Slow<br />
motion<br />
1step<br />
Normal<br />
play<br />
Forward<br />
search<br />
3steps<br />
ATTENTION<br />
Picture may appear distorted during variable speed search.<br />
3<br />
3<br />
4<br />
4<br />
Clean the video heads using a dry cleaning<br />
cassette — M-<strong>DV</strong>12CL — when:<br />
● No picture during playback.<br />
● Blocks of noise appear during playback.<br />
● “USE CLEANING <strong>CASSETTE</strong>” appears on the screen (only<br />
with “O.S.D.” set to “ON” (� pg. 69)).<br />
Still Picture/Frame-By-Frame<br />
Playback<br />
1 Pause during playback.<br />
Push the JOG dial.<br />
OR<br />
Press 9.<br />
2 Activate frame-by-frame playback.<br />
Turn the JOG dial to the right for forward frame-by-frame<br />
playback, or to the left for reverse frame-by-frame<br />
playback.<br />
OR<br />
Press 9.<br />
OR<br />
Press w or e.<br />
NOTE:<br />
Still picture playback stops automatically after 3 minutes to<br />
protect the heads.<br />
To resume normal playback, press 4 or push the JOG<br />
dial.<br />
Slow Motion<br />
During playback, turn the JOG dial one click to the left<br />
for forward slow motion. To play in reverse slow motion,<br />
continue to turn the JOG dial to the left.<br />
OR<br />
During still picture, press and hold 9 for 2 seconds, then<br />
release. Press 9 and release again to return to still<br />
picture.<br />
OR<br />
During still picture, press and hold w or e. Release to<br />
return to still picture.<br />
NOTE:<br />
Forward slow motion playback stops automatically after 1<br />
minute, reverse slow motion playback after 30 seconds to<br />
protect the heads.<br />
To resume normal playback, press 4.
High-Speed (Turbo) Search<br />
For forward high-speed search<br />
During playback, turn the JOG dial quickly to the right.<br />
For reverse high-speed search<br />
(refer to the JOG dial illustration)<br />
During playback, turn the<br />
JOG dial one or two click to<br />
the right (➀), and then turn it<br />
quickly to the left (➁).<br />
● Reverse high-speed search may<br />
not be activated when turning<br />
the JOG dial directly to the left<br />
during normal playback.<br />
OR<br />
JOG dial<br />
During playback or still, press<br />
5 for forward high-speed<br />
search, or 3 for reverse high-speed search.<br />
NOTE:<br />
For short searches, press and hold 5 or 3 for over 2<br />
seconds during playback or still picture. When released, normal<br />
playback resumes.<br />
Variable Speed Search<br />
During playback, turn the JOG dial to the right for<br />
forward variable-speed search, or to the left for reverse<br />
variable-speed search.<br />
OR<br />
During playback, press w or e.<br />
● The more times you press, the faster the playback picture<br />
moves.<br />
● To decrease speed, press the button for the opposite direction.<br />
To resume normal playback, press 4.<br />
Next Function Memory<br />
EN 33<br />
The Next Function Memory “tells” the recorder what to do after<br />
rewinding. Before continuing, make sure the recorder is in the<br />
Stop mode.<br />
a- For Automatic Start Of Playback<br />
Press 3, then press 4 within 2 seconds.<br />
b- For Automatic Power Off<br />
Press 3, then press 1 within 2 seconds.<br />
c- For Automatic Cassette Ejection After Tape Rewind<br />
Press 3, then press within 2 seconds.<br />
NOTE:<br />
The Automatic Power Off does not work if “AUTO TIMER” is set<br />
to “ON”. If “AUTO TIMER” is set to “ON”, the recorder directly<br />
goes into the Timer-Standby mode at the same time when the 1<br />
is pressed for the Automatic Power Off.<br />
Soundtrack Selection<br />
Your recorder is capable of recording two soundtracks (L and R)<br />
and will play back the one you select.<br />
During Playback<br />
Pressing AUDIO changes the soundtrack as follows:<br />
TRACK<br />
On-Screen Display<br />
USE<br />
LjhR For stereo or Bilingual tapes<br />
Lj For main audio of Bilingual tapes<br />
hR For sub audio of Bilingual tapes<br />
NOTES:<br />
● For instructions on recording stereo and bilingual<br />
programmes, refer to page 35.<br />
● “O.S.D.” must be set to “ON” or the on-screen displays will<br />
not appear (� pg. 69).
34 EN PLAYBACK/RECORDING ON <strong>DV</strong> DECK (cont.)<br />
Recording Features<br />
(<strong>DV</strong> deck)<br />
1 3 2<br />
Recording Resume Function<br />
If there is a power outage during recording, Instant Timer<br />
Recording (in the right column) or timer recording<br />
(� pg. 36, 38, 40), the recording will resume automatically<br />
when power is restored to the recorder unless the recorder’s<br />
memory backup has expired.<br />
Accidental erasure prevention<br />
To prevent accidental recording on a recorded cassette, set<br />
its erase protection switch to “SAVE”. To record on it later, set<br />
the switch to “REC”.<br />
Erase protection switch<br />
Record One Programme While<br />
Watching Another<br />
Once recording is in progress, all you need to do is to set<br />
the channel controls on the TV for the station you wish to<br />
view.<br />
● The programme selected with the TV’s channel controls<br />
appears on the TV screen, while the one selected with the<br />
recorder’s PR buttons is recorded on the tape.<br />
● If a decoder is connected to the recorder (� pg. 66), you can<br />
select a scrambled channel as well with the TV channel<br />
controls.<br />
Instant Timer Recording (ITR)<br />
This easy method lets you record for from 30 minutes to 2 hours<br />
(selectable in 30-min. increments), and shuts the recorder off<br />
after recording is finished.<br />
1 Start recording.<br />
Press 7 on the recorder.<br />
2 Engage the ITR mode.<br />
Press 7 again. “o” blinks and “0:30” appears on the front<br />
display panel.<br />
3 Set the recording duration.<br />
If you want to record for more than 30 minutes, press 7<br />
to extend the time. Each press extends recording time by<br />
30 minutes.<br />
NOTE:<br />
You can only perform ITR using the 7 button on the recorder’s<br />
front panel.
Time Code<br />
1<br />
2<br />
1<br />
2<br />
1 2 3<br />
4 5 6<br />
7 8 9<br />
0<br />
During recording, a time code is recorded on the tape. This time<br />
code is used to confirm the position on the tape when playing<br />
back or editing a tape. To perform Random Assemble Editing<br />
(� pg. 58), time code is necessary.<br />
Press – –:– – until the time code on the tape appears on<br />
the front display panel.<br />
● By pressing the – –:– – button, you can change the display to<br />
show the time code, channel position*, clock time.<br />
* Channel position is not displayed during playback.<br />
NOTES:<br />
The presence of a blank (unrecorded) portion in the middle of a<br />
tape can result in misoperation.<br />
A “blank portion” of a tape is a section where nothing is<br />
recorded on the tape. If you start recording in a blank portion of<br />
a tape, the time codes will start from “0:00:00” again. If identical<br />
time codes are recorded in two different places on a tape,<br />
Random Assemble Editing and other similar functions might not<br />
operate properly.<br />
In the following cases, you should play back the tape and<br />
confirm where a scene ends, and then begin recording from<br />
there:<br />
● When starting recording in the middle of a tape on which a<br />
recording has already been made.<br />
● When you finish recording on a tape, then played back that<br />
recording in order to check it, and now wish to continue<br />
recording.<br />
● When you lost power or the batteries died while you were<br />
recording with a camcorder.<br />
3<br />
3<br />
4<br />
4<br />
Receiving Stereo and Bilingual<br />
Programmes<br />
EN 35<br />
Your recorder is equipped with a Sound-Multiplex decoder (A2)<br />
and a Digital stereo sound decoder (NICAM) making reception<br />
of stereo and bilingual broadcasts possible.<br />
When the channel is changed, the type of broadcast being<br />
received will be displayed on the TV screen for a few seconds.<br />
Type of Broadcast Being<br />
Received<br />
A2 Stereo<br />
A2 Bilingual<br />
Regular Monaural<br />
NICAM Stereo<br />
NICAM Bilingual<br />
NICAM Monaural<br />
On-screen Display<br />
ST<br />
BIL.<br />
(none)<br />
ST NICAM<br />
BIL. NICAM<br />
NICAM<br />
● To listen to a stereo programme, press AUDIO until “L jhR”<br />
appears on the TV screen.<br />
● To listen to a bilingual programme, press AUDIO until “L j”<br />
or “h R” appears on the TV screen.<br />
● To listen to the standard (Regular Monaural) audio while<br />
receiving a NICAM BIL broadcast, set “AUDIO REC” to<br />
“MONO” (� pg. 73).<br />
NOTE:<br />
“O.S.D.” must be set to “ON” or the on-screen displays will not<br />
appear (� pg. 69).<br />
To Record Stereo and Bilingual Programmes (A2)<br />
Stereo programmes are automatically recorded in stereo on the<br />
audio track.<br />
● Bilingual programmes are automatically recorded in bilingual<br />
on the audio track.<br />
To Record NICAM Bilingual Programmes<br />
See “AUDIO REC” on page 73.<br />
NOTE:<br />
Before playing back a bilingual programme, refer to “Soundtrack<br />
Selection” on page 33.
36 EN TIMER RECORDING<br />
G-CODE/<br />
SHOWVIEW Timer<br />
Programming<br />
With the SHOWVIEW system, timer programming is greatly<br />
simplified because each TV programme has a corresponding<br />
code number which your recorder is able to recognize.<br />
You can use the remote control with LCD panel to enter the<br />
SHOWVIEW number.<br />
Before performing the SHOWVIEW Timer<br />
Programming:<br />
● Make sure that the recorder’s built-in clock is set properly.<br />
● Turn on the TV and select the AV mode.<br />
INFORMATION<br />
G-CODE and SHOWVIEW are different trademarks used to<br />
represent the same easy recording feature, but only the term<br />
SHOWVIEW system will be used. If you use the G-CODE<br />
system, follow the same instructions listed for the SHOWVIEW<br />
system.<br />
LCD panel<br />
1<br />
2<br />
1<br />
2<br />
1 2 3<br />
4 5 6<br />
7 8 9<br />
0<br />
3<br />
3<br />
4<br />
4<br />
A<br />
Press 1.<br />
B<br />
Turn on the recorder.<br />
Load a cassette.<br />
Insert a <strong>VHS</strong> (or S-<strong>VHS</strong>) cassette with the record safety<br />
tab intact.<br />
OR<br />
Insert a <strong>Mini</strong> <strong>DV</strong> cassette with the erase protection switch<br />
set to “REC”.<br />
C<br />
Select the deck.<br />
Press <strong>VHS</strong> or <strong>DV</strong>.<br />
D<br />
Access the SHOWVIEW display.<br />
Press LCD PROG.<br />
The LCD panel looks like this:<br />
E<br />
Enter the SHOWVIEW number.<br />
Press the number keys to enter the SHOWVIEW number of<br />
a programme you wish to record.<br />
● If you make a mistake, press & and input the correct number.<br />
The SHOWVIEW number you enter appears on the LCD panel:<br />
F<br />
Transmit the SHOWVIEW number.<br />
Press to transmit the SHOWVIEW number from the<br />
remote control to the recorder.<br />
● If the number you entered is invalid, “ERROR” appears on the<br />
TV screen and “Err” appears on the front display panel. Input a<br />
valid SHOWVIEW number.
G<br />
Check the programme data.<br />
The SHOWVIEW number you<br />
entered and the matching<br />
timer-recording information<br />
are displayed on the TV<br />
screen. Check they are<br />
correct.<br />
The front display panel shows the programme start time.<br />
Pressing " changes the display to the programme stop<br />
time, then the date and channel position.<br />
IMPORTANT<br />
Make sure the channel position number you wish to record is<br />
displayed; if not, see “G-CODE/SHOWVIEW System Setup”<br />
on page 82 and set the Guide Program number correctly.<br />
H<br />
Set the tape speed.<br />
Press SP/LP (p).<br />
I<br />
Set the VPS/PDC mode.<br />
Press VPS/PDC to select “ON” or “OFF”.<br />
● If “VPS/PDC ON” is displayed on the TV screen or “VPS/PDC”<br />
is lit on the front display panel, VPS/PDC is set to ON.<br />
● If “VPS/PDC OFF” is displayed on the TV screen or “VPS/PDC”<br />
is not lit on the front display panel, VPS/PDC is set to OFF.<br />
� “VPS/PDC Recording” on page 39.<br />
J<br />
Return to the normal screen.<br />
Press PROG or OK. “PROGRAM COMPLETED” appears<br />
on the TV screen for about 5 seconds, then the normal<br />
screen appears. If “PROGRAM OVERLAPPED” appears<br />
on the TV screen and “Err” on the front display panel, see<br />
page 43.<br />
● Repeat steps 3 – 10 for each additional programme.<br />
K<br />
Engage the recorder’s timer mode.<br />
Press # (TIMER). The recorder turns off automatically and<br />
“#” appears on the front display panel.<br />
● To disengage the timer mode, press # (TIMER) again.<br />
Satellite Receiver Users<br />
To timer-record a satellite broadcast using the SHOWVIEW<br />
system:<br />
A Perform “Satellite Receiver Control Setting” on page 17.<br />
B Perform steps 1 – 11. In step 7, the front display panel<br />
shows “L2” for the channel position. In step 9, you cannot<br />
set “VPS/PDC” to “ON”.<br />
C Leave the satellite receiver’s power on.<br />
EN 37<br />
NOTES:<br />
● To Change The Stop Time . . .<br />
...press STOP +/– in step 7. You can compensate for<br />
anticipated programme schedule delays.<br />
● To Timer-Record Weekly Or Daily Serials . . .<br />
...in step 7, press WEEKLY (number key “9”) for weekly<br />
serials or DAILY (number key “8”) for daily serials (Monday —<br />
Friday). Either “WEEKLY” or “DAILY” appears on the TV<br />
screen. Pressing the button again makes the corresponding<br />
indication disappear.<br />
● You can programme each deck to timer-record as many as 6<br />
programmes. If you try to programme the recorder to record a<br />
seventh, “PROGRAM FULL” appears on the TV screen and<br />
“FULL” appears on the front display panel. To record the extra<br />
programme, you must first cancel any unnecessary<br />
programmes (� pg. 42).<br />
● It is not possible to timer-record a TV programme with a<br />
SHOWVIEW number which starts with “0”.<br />
● It is not possible to timer-record a satellite broadcast received<br />
on the channel position “0” by the satellite receiver.<br />
● It is not possible to timer-record the same programme on both<br />
the <strong>VHS</strong> deck and the <strong>DV</strong> deck simultaneously.<br />
● During timer recording, it is not possible to change the<br />
recording deck (<strong>VHS</strong> or <strong>DV</strong>).<br />
● If the times that are programmed for recording on the <strong>DV</strong> deck<br />
and on the <strong>VHS</strong> deck overlap, the earlier start time takes<br />
precedence. If the start times are the same, the <strong>VHS</strong> deck<br />
takes precedence.<br />
INFORMATION<br />
Instead of the steps 4 – 6, you can enter the SHOWVIEW<br />
number using the on-screen menu.<br />
A Press PROG to access the SHOWVIEW screen.<br />
B Press the number keys to<br />
enter the SHOWVIEW number<br />
of a programme you wish to<br />
record.<br />
● If you make a mistake,<br />
press & and input the<br />
correct number.<br />
C Press OK, then go to step 7<br />
in the left column.<br />
● If the number you entered<br />
is invalid, “ERROR” appears on the TV screen and “Err”<br />
appears on the front display panel. Input a valid<br />
SHOWVIEW number.<br />
● If the “GUIDE PROG SET” screen appears, see<br />
“ATTENTION” below.<br />
ATTENTION<br />
Guide Program Number Set<br />
“GUIDE PROG SET” appears after performing step C above<br />
if the Guide Program number for the SHOWVIEW number you<br />
entered has not been set.<br />
If you want to set the Guide Program number for the satellite<br />
broadcast station, press the number key “0” to change “TV<br />
PROG” to “SAT”. Press rt to input the channel position<br />
number on which your recorder or satellite receiver receives<br />
that station, then press OK or e to set the Guide Program<br />
number. The SHOWVIEW Program screen appears.<br />
(Example)<br />
To timer-record a ZDF<br />
programme with the<br />
SHOWVIEW system.<br />
* If your recorder receives ZDF on<br />
the channel position 2, press OK<br />
or e after entering “2”.
38 EN TIMER RECORDING (cont.)<br />
Express Timer<br />
Programming<br />
If you do not know the SHOWVIEW number for the programme<br />
you wish to record, use the following procedure to set your<br />
recorder to timer-record the programme.<br />
Before performing Express Timer Programming:<br />
● Make sure that the recorder’s built-in clock is set properly.<br />
● Turn on the TV and select the AV mode.<br />
1<br />
2<br />
1<br />
2<br />
1 2 3<br />
4 5 6<br />
7 8 9<br />
0<br />
3<br />
3<br />
4<br />
4<br />
A<br />
Press 1.<br />
B<br />
Turn on the recorder.<br />
Load a cassette.<br />
Insert a <strong>VHS</strong> (or S-<strong>VHS</strong>) cassette with the record safety<br />
tab intact.<br />
OR<br />
Insert a <strong>Mini</strong> <strong>DV</strong> cassette with the erase protection switch<br />
set to “REC”.<br />
C<br />
Select the deck.<br />
Press <strong>VHS</strong> or <strong>DV</strong>.<br />
D<br />
Press PROG.<br />
E<br />
Access the SHOWVIEW screen.<br />
Access the Programme screen.<br />
Press START+/–. (If you’re<br />
just starting out, “P1”<br />
appears.)<br />
The front display panel looks like this:<br />
F<br />
Enter the programme start time.<br />
Press START+/– to enter the<br />
time you want recording to<br />
start.<br />
● Press and hold START+/– to<br />
move in 30-minute<br />
increments, or press and<br />
release repeatedly to move 1<br />
minute at a time.<br />
The front display panel looks like this:<br />
G<br />
Enter the programme stop time.<br />
Press STOP+/– to enter the time you want recording to<br />
stop.<br />
● Press and hold STOP+/– to move in 30-minute increments, or<br />
press and release repeatedly to move 1 minute at a time.
H<br />
Enter the programme date.<br />
Press DATE+/–.<br />
● The current date appears on the TV screen. The date you enter<br />
appears in its place.<br />
I<br />
J<br />
Enter the channel position.<br />
Press PR+/–.<br />
● If you want to set a satellite<br />
programme, press the number<br />
key “0” to change “TV PROG”<br />
to “SAT”, then press PR+/–.<br />
Set the tape speed.<br />
Press SP/LP (p).<br />
K<br />
Set the VPS/PDC mode.<br />
Press VPS/PDC to select “ON” or “OFF”.<br />
● If “VPS/PDC ON” is displayed on the TV screen or “VPS/PDC”<br />
is lit on the front display panel, VPS/PDC is set to ON.<br />
● If “VPS/PDC OFF” is displayed on the TV screen or “VPS/PDC”<br />
is not lit on the front display panel, VPS/PDC is set to OFF.<br />
� “VPS/PDC Recording” in the right column<br />
L<br />
Return to the normal screen.<br />
Press PROG or OK. “PROGRAM COMPLETED” appears<br />
on the TV screen for about 5 seconds, then the normal<br />
screen appears. If “PROGRAM OVERLAPPED” appears<br />
on the TV screen and “Err” on the front display panel, see<br />
page 43.<br />
● Repeat steps 3 – 12 for each additional programme.<br />
M<br />
Engage the recorder’s timer mode.<br />
Press # (TIMER). The recorder turns off automatically<br />
and “#” appears on the front display panel.<br />
● To disengage the timer mode, press # (TIMER) again.<br />
To Timer-Record Weekly Or Daily Serials . . .<br />
...anytime during steps 5 through 11, press WEEKLY (number<br />
key “9”) for weekly serials or DAILY (number key “8”) for daily<br />
serials (Monday – Friday). Either “WEEKLY” or “DAILY” appears<br />
on the TV screen. Pressing the button again makes the<br />
corresponding indication disappear.<br />
EN 39<br />
NOTES:<br />
● You can programme each deck to timer-record as many as 6<br />
programmes. If you try to programme the recorder to record a<br />
seventh, “PROGRAM FULL” appears on the TV screen and<br />
“FULL” appears on the front display panel. To record the extra<br />
programme, you must first cancel any unnecessary<br />
programmes (� pg. 42).<br />
● It is not possible to timer-record a satellite broadcast received<br />
on the channel position “0” by the satellite receiver.<br />
● It is not possible to timer-record the same programme on both<br />
the <strong>VHS</strong> deck and the <strong>DV</strong> deck simultaneously.<br />
● During timer recording, it is not possible to change the<br />
recording deck (<strong>VHS</strong> or <strong>DV</strong>).<br />
● If the times that are programmed for recording on the <strong>DV</strong> deck<br />
and on the <strong>VHS</strong> deck overlap, the earlier start time takes<br />
precedence. If the start times are the same, the <strong>VHS</strong> deck takes<br />
precedence.<br />
Satellite Receiver Users<br />
To timer-record a satellite broadcast using Express Timer<br />
Programming:<br />
A Perform “Satellite Receiver Control Setting” on page 17.<br />
B Perform steps 1 – 13. In step 9, press the number key “0”<br />
to change “TV PROG” to “SAT”. The front display panel<br />
shows “L2” for the channel position. Then press PR+/– to<br />
enter the channel position for the satellite broadcast. In<br />
step 11, you cannot set “VPS/PDC” to “ON”.<br />
C Leave the satellite receiver’s power on.<br />
VPS/PDC Recording<br />
Now available from some TV stations, PDC (Programme<br />
Delivery Control) and VPS (Video Programme System) are<br />
service designed to assure safe, accurate timer recording.<br />
With this system, special code signals are transmitted<br />
together with the audio/video signals. These code signals<br />
control your video recorder and have precedence over the<br />
advertised times you may have preset into the timer. This<br />
means that your recorder will start and stop recording when<br />
the preset TV programmes actually start and end — even if<br />
the broadcast time of a preset TV programme is changed.<br />
NOTES:<br />
● When you use Express Timer Programming, set the start time<br />
(VPS or PDC time) exactly as advertised in the TV listing. A<br />
different time than advertised will result in no recording.<br />
● VPS/PDC recording is also possible when a satellite receiver<br />
or a cable system is connected to AV2 (L-2) IN/DECODER<br />
connector on your recorder.<br />
● VPS/PDC recording is also possible via the AV1 (L-1) IN/OUT<br />
connector.<br />
How to check if the station being received transmits a<br />
VPS/PDC signal (<strong>VHS</strong> deck only)<br />
A Press – –:– – until the channel position appears on the<br />
front display panel.<br />
B Hold down START+ for about 5 seconds.<br />
“VPS/PDC” appears blinking on the front display panel.<br />
If a VPS/PDC signal is detected from the station,<br />
“VPS/PDC” will stop blinking.<br />
If no VPS/PDC signal is detected from the station,<br />
“VPS/PDC” will blink at a slower rate.<br />
C Press – –:– – or START+ again to return to normal display.
40 EN TIMER RECORDING (cont.)<br />
24 Hour Express<br />
Timer Programming<br />
Before performing the 24 Hour Express Timer<br />
Programming:<br />
● Make sure that the recorder’s built-in clock is set properly.<br />
● Set the tape speed.<br />
● Select the deck.<br />
● For the <strong>VHS</strong> deck:<br />
Insert a <strong>VHS</strong> (or S-<strong>VHS</strong>) cassette with the record safety tab<br />
intact.<br />
For the <strong>DV</strong> deck:<br />
Insert a <strong>Mini</strong> <strong>DV</strong> cassette with the erase protection switch<br />
set to “REC”.<br />
1 3 2<br />
You can programme a timer recording that starts within 24 hours<br />
using the JOG dial on the recorder.<br />
A<br />
Enter the programme mode.<br />
Press 24H EXPRESS # on the recorder. The start time<br />
indicator ( ) starts blinking on the front display panel.<br />
● The current tape speed and VPS/PDC setting appear on the<br />
front display panel, but it is impossible to change the setting.<br />
You can only change the setting after programming<br />
(� pg. 42).<br />
B<br />
Set the programme start/stop time and<br />
channel.<br />
Turn the JOG dial to the left or right to set the time you<br />
want recording to start.<br />
● One click stop of the JOG dial changes the time in 5-minute<br />
intervals.<br />
Push the JOG dial. The stop time indicator ( ) starts<br />
blinking on the front display panel. Turn the JOG dial to<br />
the left or right to set the time you want recording to stop.<br />
Push the JOG dial. Turn the JOG dial to the left or right to<br />
select the channel you wish to record.<br />
● You can cancel the setting at any time by pressing and holding<br />
the JOG dial for more than 3 seconds or pressing & on the<br />
remote control. Repeat the step 2.<br />
C<br />
Engage the recorder’s timer mode.<br />
Press 24H EXPRESS #. The recorder turns off<br />
automatically and “#” appears on the front display<br />
panel.<br />
● To disengage the timer mode, press # (TIMER) or<br />
24H EXPRESS # again.
NOTES:<br />
● You can programme each deck to timer-record as many as 6<br />
programmes. If you try to programme the recorder to record a<br />
seventh, “PROGRAM FULL” appears on the TV screen and<br />
“FULL” appears on the front display panel. To record the extra<br />
programme, you must first cancel any unnecessary<br />
programmes (� pg. 42).<br />
● It is not possible to timer-record a satellite broadcast received<br />
on the channel position “0” by the satellite receiver.<br />
● If “Err” appears on the front display panel, repeat the steps on<br />
page 40 again.<br />
● When a menu screen is shown, you cannot use 24 Hour<br />
Express Timer Programming function. Press MENU to return to<br />
normal screen, and try again.<br />
● You can use 24 Hour Express Timer Programming function<br />
also when the recorder is turned off.<br />
● For 24 Hour Express Timer Programming function, the<br />
programme overlap warning display does not appear even if<br />
some programmes overlap each other. The programme with<br />
the lower programme number will be recorded and the other<br />
one will not be recorded correctly.<br />
● It is not possible to timer-record the same programme on both<br />
the <strong>VHS</strong> deck and the <strong>DV</strong> deck simultaneously.<br />
● During timer recording, it is not possible to change the<br />
recording deck (<strong>VHS</strong> or <strong>DV</strong>).<br />
● If the times that are programmed for recording on the <strong>DV</strong> deck<br />
and on the <strong>VHS</strong> deck overlap, the earlier start time takes<br />
precedence. If the start times are the same, the <strong>VHS</strong> deck takes<br />
precedence.<br />
● You cannot use 24 Hour Express Timer Programming function<br />
if you select the <strong>DV</strong> deck and set the channel to “F-1”.<br />
EN 41
42 EN TIMER RECORDING (cont.)<br />
Check, cancel and change programmes<br />
A<br />
Disengage the timer mode.<br />
Press # (TIMER), then press 1.<br />
B<br />
Access the Programme Check screen/display.<br />
Press ".<br />
● The Programme Check screen<br />
or display appears for the deck<br />
(<strong>VHS</strong> or <strong>DV</strong>) being selected.<br />
1<br />
2<br />
1<br />
2<br />
1 2 3<br />
4 5 6<br />
7 8 9<br />
0<br />
3<br />
3<br />
4<br />
4<br />
C<br />
Access the Programme screen/display.<br />
Press " again to check<br />
more information. Each time<br />
you press ", the next<br />
programme’s information<br />
appears.<br />
The front display panel shows the programme start time. Pressing<br />
OK changes the display to the programme stop time, then the<br />
date and the channel position.<br />
To cancel or change a programme...<br />
D<br />
Cancel or change a programme.<br />
Press & to cancel a programme. To change programme<br />
settings, press the appropriate button: START+/–,<br />
STOP+/–, DATE+/–, PR+/–, VPS/PDC and/or SP/LP<br />
(p).<br />
● You can change “TV PROG” to “SAT” for the channel position<br />
by pressing the number key “0”.<br />
E<br />
Return to the normal screen/display.<br />
Press " as many times as necessary. If there are still<br />
some programmes remaining, go to step 6.<br />
F<br />
Return to the timer mode.<br />
Press # (TIMER).<br />
NOTE:<br />
You can also check the programmes on the front display panel<br />
even if the recorder’s power is off (unless the recorder is in the<br />
Power Save mode � pg. 69) or the recorder is in the Timer<br />
mode; however, it is not possible to cancel or change the<br />
programmes.
ATTENTION<br />
If the programme you have<br />
just made and “<strong>DV</strong>” are<br />
blinking, there is a<br />
conflicting programme on<br />
the <strong>DV</strong> deck.<br />
A Press rt to move the<br />
highlight bar to “<strong>DV</strong>”,<br />
then press OK or e.<br />
<strong>DV</strong> Programme Check<br />
screen appears.<br />
B Cancel or change<br />
programme setting as<br />
described in step 2 and<br />
3 in the right column.<br />
1<br />
2<br />
1<br />
2<br />
1 2 3<br />
4 5 6<br />
7 8 9<br />
0<br />
3<br />
3<br />
4<br />
4<br />
EN 43<br />
When programmes overlap each other<br />
If “PROGRAM OVERLAPPED” appears, you have another<br />
programme overlapping the programme you have just made.<br />
The Programme Check screen appears and conflicting<br />
programmes will start blinking.<br />
Example: Programme 1 (you have just made) and<br />
Programme 4 overlap each other on the <strong>VHS</strong> deck.<br />
A<br />
Confirm the overlapping programmes.<br />
Overlapping programmes blink on the TV screen.<br />
B<br />
Select the programme to modify.<br />
Press rt, then press OK or e.<br />
● You can only select one of the overlapping programmes.<br />
NOTE:<br />
If you do not mind this overlap, press PROG to finish the timer<br />
programme setting. The programme with the lower programme<br />
number will be recorded and the other one will not be recorded<br />
correctly. If no changes are made for approximately 1 minute,<br />
the recorder will return to the normal screen.<br />
C<br />
Cancel or change programme setting.<br />
To cancel a programme, press & when the Programme<br />
screen you do not want is shown. “PROGRAM<br />
COMPLETED” appears on the TV screen for about 5<br />
seconds, then the normal screen appears.<br />
To change a programme, press the appropriate button:<br />
START+/–, STOP+/–, DATE+/–, PR+/–, VPS/PDC and/or<br />
SP/LP (p) when the Programme screen on which you<br />
want to make changes is shown, then press OK.<br />
“PROGRAM COMPLETED” appears on the TV screen for<br />
about 5 seconds, then the normal screen appears.<br />
NOTE:<br />
If the overlap is not yet solved, or another overlap occurs with<br />
the timer programme setting after making the last correction on a<br />
programme, the conflicting programmes will be shown on the<br />
Programme Check screen again. Repeat the above steps again<br />
until the overlap is solved.
44 EN EDITING<br />
Tape Dubbing<br />
(from <strong>DV</strong> to <strong>VHS</strong>)<br />
1<br />
2<br />
1<br />
2<br />
1 2 3<br />
4 5 6<br />
7 8 9<br />
0<br />
1 3 2<br />
3<br />
3<br />
4<br />
4<br />
Dubbing An Entire Cassette<br />
Because this recorder includes both <strong>VHS</strong> deck and <strong>DV</strong> deck, you<br />
can easily use it for dubbing without connecting any other<br />
equipment.<br />
A<br />
Load cassettes.<br />
For the <strong>VHS</strong> deck<br />
Insert a <strong>VHS</strong> (or S-<strong>VHS</strong>) cassette with the record safety<br />
tab intact, or cover the hole using adhesive tape.<br />
For the <strong>DV</strong> deck<br />
Insert a <strong>Mini</strong> <strong>DV</strong> cassette with the erase protection switch<br />
set to “SAVE”.<br />
B<br />
Select the dubbing direction.<br />
Press .<br />
● The dubbing direction indicator (<strong>DV</strong> ) lights.<br />
C<br />
Set the tape speed.<br />
Press <strong>VHS</strong>, then press SP/LP (p).<br />
● “<strong>DV</strong> ] <strong>VHS</strong>” appears on the TV screen if “O.S.D.” is set to<br />
“ON”. (� pg. 69)<br />
D<br />
Start dubbing.<br />
Press DUB for more than two seconds.<br />
● <strong>DV</strong> playback indicator and <strong>VHS</strong> recording indicator light.<br />
● If the tapes have not been rewound, both decks rewind<br />
automatically. The <strong>VHS</strong> deck goes into Record Pause mode,<br />
and the <strong>DV</strong> deck goes into Pause mode.<br />
When both decks have finished rewinding, dubbing begins<br />
automatically.<br />
After dubbing is completed, the decks rewind both tapes<br />
automatically and eject them. The recorder then shuts off.<br />
NOTES:<br />
● If you set the dubbing direction incorrectly, you could erase an<br />
important recording that you wanted to copy. It is<br />
recommended to conduct a test with unimportant cassettes<br />
first.<br />
● It is impossible to view a satellite broadcast or a scrambled<br />
broadcast when the recorder is in the dubbing mode.<br />
● If you start dubbing a tape from a tape with a copy protection<br />
signal, the tapes will be automatically ejected, and the<br />
recorder will turn off.<br />
● To cancel the dubbing mode, press PR +/– so that the dubbing<br />
direction indicator (<strong>DV</strong> ) goes off.
Tape Dubbing<br />
(from <strong>VHS</strong> to <strong>DV</strong>)<br />
1<br />
2<br />
1<br />
2<br />
1 2 3<br />
4 5 6<br />
7 8 9<br />
0<br />
1 3 2<br />
3<br />
3<br />
4<br />
4<br />
Dubbing An Entire Cassette<br />
EN 45<br />
Because this recorder includes both <strong>VHS</strong> deck and <strong>DV</strong> deck, you<br />
can easily use it for dubbing without connecting any other<br />
equipment.<br />
A<br />
Load cassettes.<br />
For the <strong>VHS</strong> deck<br />
Insert a <strong>VHS</strong> (or S-<strong>VHS</strong>) cassette with the record safety<br />
tab removed.<br />
For the <strong>DV</strong> deck<br />
Insert a <strong>Mini</strong> <strong>DV</strong> cassette with the erase protection switch<br />
set to “REC”.<br />
B<br />
Select the dubbing direction.<br />
Press .<br />
● The dubbing direction indicator ( <strong>VHS</strong>) lights.<br />
C<br />
Set the tape speed.<br />
Press <strong>DV</strong>, then press SP/LP (p).<br />
● “<strong>DV</strong> } <strong>VHS</strong>” appears on the TV screen if “O.S.D.” is set to<br />
“ON”. (� pg. 69)<br />
D<br />
Start dubbing.<br />
Press DUB for more than two seconds.<br />
● <strong>VHS</strong> playback indicator and <strong>DV</strong> recording indicator light.<br />
● If the tapes have not been rewound, both decks rewind<br />
automatically. The <strong>DV</strong>deck goes into Record Pause mode, and<br />
the <strong>VHS</strong> deck goes into Pause mode.<br />
When both decks have finished rewinding, dubbing begins<br />
automatically.<br />
After dubbing is completed, the decks rewind both tapes<br />
automatically and eject them. The recorder then shuts off.<br />
NOTES:<br />
● If you set the dubbing direction incorrectly, you could erase an<br />
important recording that you wanted to copy. It is<br />
recommended to conduct a test with unimportant cassettes<br />
first.<br />
● It is impossible to view a satellite broadcast or a scrambled<br />
broadcast when the recorder is in the dubbing mode.<br />
● If you start dubbing a tape from a tape with a copy protection<br />
signal, the tapes will be automatically ejected, and the<br />
recorder will turn off.<br />
● To cancel the dubbing mode, press PR +/– so that the dubbing<br />
direction indicator ( <strong>VHS</strong>) goes off.
46 EN EDITING (cont.)<br />
Normal Dubbing<br />
(from <strong>DV</strong> to <strong>VHS</strong>)<br />
1<br />
2<br />
1<br />
2<br />
1 2 3<br />
4 5 6<br />
7 8 9<br />
0<br />
1 3 2<br />
NOTES:<br />
● If you set the dubbing direction incorrectly, you could erase an<br />
important recording that you wanted to copy. It is<br />
recommended to conduct a test with unimportant cassettes<br />
first.<br />
● There may be a discrepancy of several seconds between where<br />
you intend editing to start, and where it actually starts.<br />
● The superimposed indication during the operation or dubbing<br />
is not recorded.<br />
● It is impossible to view a satellite broadcast or a scrambled<br />
broadcast when the recorder is in the dubbing mode.<br />
● To cancel the dubbing mode, press PR +/– so that the dubbing<br />
direction indicator (<strong>DV</strong> ) goes off.<br />
● When dubbing a <strong>Mini</strong> <strong>DV</strong> tape that was produced by audio<br />
dubbing, you need to set “12BIT MODE” to the appropriate<br />
mode before playing back the tape. (� pg. 73)<br />
3<br />
3<br />
4<br />
4<br />
You can dub selected scenes on a tape, starting and stopping<br />
wherever you wish.<br />
A<br />
Load cassettes.<br />
For the <strong>VHS</strong> deck<br />
Insert a <strong>VHS</strong> (or S-<strong>VHS</strong>) cassette with the record safety<br />
tab intact, or cover the hole using adhesive tape.<br />
For the <strong>DV</strong> deck<br />
Insert a <strong>Mini</strong> <strong>DV</strong> cassette with the erase protection switch<br />
set to “SAVE”.<br />
B<br />
Select the dubbing direction.<br />
Press .<br />
● The dubbing direction indicator (<strong>DV</strong> ) lights.<br />
C<br />
Set the tape speed.<br />
Press <strong>VHS</strong>, then press SP/LP (p).<br />
● “<strong>DV</strong> ] <strong>VHS</strong>” appears on the TV screen if “O.S.D.” is set to<br />
“ON”. (� pg. 69)<br />
D<br />
Locate the start point on the <strong>DV</strong> deck.<br />
A Press <strong>DV</strong>.<br />
B Press 4 to start playback.<br />
C Press 9 to pause playback a little before the start<br />
point.<br />
E<br />
Prepare the <strong>VHS</strong> deck for dubbing.<br />
A Press <strong>VHS</strong>.<br />
B Press and hold 9 and press 7 so that the <strong>VHS</strong> deck<br />
enters the Record Pause mode.<br />
● <strong>DV</strong> playback indicator and <strong>VHS</strong> recording indicator light.<br />
F<br />
Press START.<br />
G<br />
Start dubbing.<br />
Pause dubbing.<br />
Press START.<br />
● The <strong>VHS</strong> deck enters the Recording Pause mode, then the <strong>DV</strong><br />
deck enters the Dubbing Pause mode.<br />
H<br />
End dubbing.<br />
Press 8 to stop recording on the <strong>VHS</strong> deck. Then press<br />
<strong>DV</strong> and press 8 to stop playback on the <strong>DV</strong> deck.
Normal Dubbing<br />
(from <strong>VHS</strong> to <strong>DV</strong>)<br />
1<br />
2<br />
1<br />
2<br />
1 2 3<br />
4 5 6<br />
7 8 9<br />
0<br />
1 3 2<br />
NOTES:<br />
● If you set the dubbing direction incorrectly, you could erase an<br />
important recording that you wanted to copy. It is<br />
recommended to conduct a test with unimportant cassettes<br />
first.<br />
● There may be a discrepancy of several seconds between where<br />
you intend editing to start, and where it actually starts.<br />
● The superimposed indication during the operation or dubbing<br />
is not recorded.<br />
● It is impossible to view a satellite broadcast or a scrambled<br />
broadcast when the recorder is in the dubbing mode.<br />
● To cancel the dubbing mode, press PR +/– so that the dubbing<br />
direction indicator ( <strong>VHS</strong>) goes off.<br />
● Before you start dubbing, set “SOUND MODE” to the<br />
appropriate mode. (� pg. 73)<br />
3<br />
3<br />
4<br />
4<br />
EN 47<br />
You can dub selected scenes on a tape, starting and stopping<br />
wherever you wish.<br />
A<br />
Load cassettes.<br />
For the <strong>VHS</strong> deck<br />
Insert a <strong>VHS</strong> (or S-<strong>VHS</strong>) cassette with the record safety<br />
tab removed.<br />
For the <strong>DV</strong> deck<br />
Insert a <strong>Mini</strong> <strong>DV</strong> cassette with the erase protection switch<br />
set to “REC”.<br />
B<br />
Select the dubbing direction.<br />
Press .<br />
● The dubbing direction indicator ( <strong>VHS</strong>) lights.<br />
C<br />
Set the tape speed.<br />
Press <strong>DV</strong>, then press SP/LP (p).<br />
● “<strong>DV</strong> } <strong>VHS</strong>” appears on the TV screen if “O.S.D.” is set to<br />
“ON”. (� pg. 69)<br />
D<br />
Locate the start point on the <strong>VHS</strong> deck.<br />
A Press <strong>VHS</strong>.<br />
B Press 4 to start playback.<br />
C Press 9 to pause playback a little before the start<br />
point.<br />
E<br />
Prepare the <strong>DV</strong> deck for dubbing.<br />
A Press <strong>DV</strong>.<br />
B Press and hold 9 and press 7 so that the <strong>DV</strong> deck<br />
enters the Record Pause mode.<br />
● <strong>VHS</strong> playback indicator and <strong>DV</strong> recording indicator light.<br />
F<br />
Press START.<br />
G<br />
Start dubbing.<br />
Pause dubbing.<br />
Press START.<br />
● The <strong>DV</strong> deck enters the Recording Pause mode, then the <strong>VHS</strong><br />
deck enters the Dubbing Pause mode.<br />
H<br />
End dubbing.<br />
Press 8 to stop recording on the <strong>DV</strong> deck. Then press<br />
<strong>VHS</strong> and press 8 to stop playback on the <strong>VHS</strong> deck.
48 EN EDITING (cont.)<br />
Edit From A<br />
Camcorder<br />
1<br />
2<br />
1<br />
2<br />
1 2 3<br />
4 5 6<br />
7 8 9<br />
0<br />
3<br />
3<br />
4<br />
4<br />
You can use a camcorder as the source player and your<br />
recorder as the recording deck.<br />
You can perform digital dubbing if you connect a device<br />
such as a camcorder which has a <strong>DV</strong> IN/OUT connector.<br />
Because the signals are digital, there is no loss of video or<br />
audio quality as a result of editing.<br />
A<br />
Make connections.<br />
A If the camcorder has no S-<strong>VIDEO</strong> output connector ...<br />
... connect the camcorder’s AUDIO OUT and <strong>VIDEO</strong><br />
OUT connectors to the recorder’s front panel AUDIO<br />
and <strong>VIDEO</strong> input connectors.<br />
B If the camcorder has an S-<strong>VIDEO</strong> output connector ...<br />
... connect the camcorder’s AUDIO OUT and<br />
S-<strong>VIDEO</strong> OUT connectors to the recorder’s front panel<br />
AUDIO and S-<strong>VIDEO</strong> input connectors.<br />
C If the camcorder has a <strong>DV</strong> IN/OUT connector ...<br />
... connect the camcorder’s <strong>DV</strong> IN/OUT connector to<br />
the recorder’s <strong>DV</strong> IN/OUT connector.<br />
● When using a monaural camcorder, connect its AUDIO OUT<br />
connector to the AUDIO L input connector on your recorder.<br />
● When a Master Edit Control-equipped JVC camcorder is used,<br />
the camcorder is capable of controlling the recorder. Refer to<br />
the camcorder’s instruction manual for operating procedure.<br />
B<br />
Select the recording deck.<br />
Press <strong>VHS</strong> or <strong>DV</strong>.<br />
C<br />
Set the recorder’s input mode.<br />
Press AUX (number key “0”) and/or PR to select “F-1”.<br />
● When using the <strong>VHS</strong> deck as the recording deck, set “<strong>VHS</strong> F-1<br />
INPUT” to “<strong>VIDEO</strong>” for the AUDIO/<strong>VIDEO</strong> input connectors,<br />
or “S-<strong>VIDEO</strong>” for the AUDIO/S-<strong>VIDEO</strong> input connectors,<br />
depending on the connectors being used (� pg. 53).<br />
D<br />
Set the edit mode. (<strong>VHS</strong> deck only)<br />
See “PICTURE CONTROL” on page 70.<br />
E<br />
Start the camcorder.<br />
Engage the Play mode of the camcorder.<br />
F<br />
Start the recorder.<br />
Engage the Record mode of the recorder.
A If the camcorder has no S-<strong>VIDEO</strong> output connector ...<br />
Recorder<br />
<strong>Mini</strong>-plug cable<br />
(not provided)<br />
(JVC camcorder only)<br />
Camcorder<br />
Player<br />
EDIT<br />
AUDIO OUT<br />
<strong>VIDEO</strong> OUT<br />
PAUSE<br />
connector<br />
<strong>VIDEO</strong> input<br />
1 3 2 1 3 2<br />
AUDIO input<br />
Audio cable<br />
(not provided)<br />
1 3 2<br />
Video cable<br />
(not provided)<br />
C If the camcorder has a <strong>DV</strong> IN/OUT connector ...<br />
Recorder<br />
Camcorder<br />
Player<br />
<strong>DV</strong> IN/OUT<br />
<strong>DV</strong> cable (VC-V<strong>DV</strong>204)<br />
(not provided)<br />
<strong>DV</strong> IN/<br />
OUT<br />
EDIT<br />
PAUSE<br />
connector<br />
<strong>Mini</strong>-plug cable<br />
(not provided)<br />
(JVC camcorder only)<br />
B If the camcorder has an S-<strong>VIDEO</strong> output connector ...<br />
Recorder<br />
<strong>Mini</strong>-plug cable<br />
(not provided)<br />
(JVC camcorder only)<br />
Camcorder<br />
Player<br />
EDIT<br />
AUDIO OUT<br />
S-<strong>VIDEO</strong> OUT<br />
PAUSE<br />
connector<br />
S-<strong>VIDEO</strong> input<br />
AUDIO<br />
input<br />
Audio cable<br />
(not provided)<br />
S-Video cable<br />
(not provided)<br />
EN 49<br />
NOTES:<br />
About <strong>DV</strong> IN/OUT connector<br />
● To output digital signal when dubbing from the <strong>VHS</strong> deck to<br />
other device through the <strong>DV</strong> IN/OUT connector, press , and<br />
then press 4 to start playback on the <strong>VHS</strong> deck.<br />
● To input digital signal when dubbing from other device to the<br />
<strong>VHS</strong> deck through the <strong>DV</strong> IN/OUT connector, press , and<br />
then press 7 to start recording on the <strong>VHS</strong> deck.<br />
● It is possible to control the <strong>DV</strong> deck from the AVC protocolequipped<br />
device that is connected to the <strong>DV</strong> IN/OUT connector.<br />
To control the <strong>VHS</strong> deck, use the buttons on this recorder and<br />
the remote control.<br />
● All necessary cables can be obtained from your dealer.<br />
● When you select “EDIT” to dub tapes in step 4, be sure to select<br />
“AUTO” (or “NORM” when “B.E.S.T.” is set to “OFF”) after you<br />
finish dubbing the tapes.<br />
● When you are editing through the <strong>DV</strong> IN/OUT connector, the<br />
recorder will stop if the player begins playing a blank portion of<br />
tape or the signal is interrupted.<br />
● When connecting this recorder to a device equipped with a <strong>DV</strong><br />
input connector, be sure to use the optional <strong>DV</strong> cable<br />
(VC-V<strong>DV</strong>204).
50 EN EDITING (cont.)<br />
Edit To Or From<br />
Another Video<br />
Recorder<br />
1<br />
2<br />
1<br />
2<br />
1 2 3<br />
4 5 6<br />
7 8 9<br />
0<br />
Advantages of S-<strong>VHS</strong> video recorders<br />
You can edit from <strong>VHS</strong> to S-<strong>VHS</strong>, S-<strong>VHS</strong> to <strong>VHS</strong>, or from<br />
S-<strong>VHS</strong> to S-<strong>VHS</strong>.<br />
● From <strong>VHS</strong> to S-<strong>VHS</strong>: Record <strong>VHS</strong> playback signals in the<br />
S-<strong>VHS</strong> mode. Although the picture quality is inherently<br />
limited by that of the original, the edited tape has better<br />
picture quality than those made by <strong>VHS</strong>-to-<strong>VHS</strong> editing.<br />
● From S-<strong>VHS</strong> to <strong>VHS</strong>: Because the picture quality of the<br />
source material is very high, the edited tape has better<br />
picture quality than those made by <strong>VHS</strong>-to-<strong>VHS</strong> editing.<br />
● From S-<strong>VHS</strong> to S-<strong>VHS</strong>: All signals will be transferred with<br />
minimum degradation.<br />
3<br />
3<br />
4<br />
4<br />
You can use your recorder as the source player or as the<br />
recording deck.<br />
A<br />
Make connections.<br />
Connect the player’s 21-pin SCART connector to the<br />
recorder’s 21-pin SCART connector as illustrated on<br />
page 51.<br />
A When using your recorder as the source player ...<br />
... connect its AV1 (L-1) IN/OUT connector to the<br />
recording deck.<br />
B When using your recorder as the recording deck ...<br />
... connect its AV2 (L-2) IN/DECODER connector to<br />
the source player.<br />
C If another recorder is compatible with the Y/C<br />
signal ...<br />
... connect your recorder’s AV1 (L-1) IN/OUT<br />
connector to another recorder.<br />
With C connection ...<br />
● When using your recorder as the recording deck (C-a), set<br />
“L-1 INPUT” to “S-<strong>VIDEO</strong>” and “L-2 SELECT” to “A/V”<br />
(� pg. 52, 53).<br />
● When using your recorder as the source player (C-b), set “L-1<br />
OUTPUT” to “S-<strong>VIDEO</strong>” (� pg. 52).<br />
B<br />
Select the recording deck.<br />
Press <strong>VHS</strong> or <strong>DV</strong>.<br />
C<br />
Set the input mode of recording deck.<br />
With this video recorder, press AUX (number key “0”)<br />
and/or PR to select “L-1” for the AV1 (L-1) IN/OUT<br />
connector, or “L-2” for the AV2 (L-2) IN/DECODER<br />
connector, depending on the connector being used.<br />
● When using another recorder as the recording deck, refer to its<br />
instruction manual.<br />
● When using the AV2 (L-2) IN/DECODER connector, set “L-2<br />
SELECT” to “A/V” (� pg. 53).<br />
D<br />
Set the edit mode. (<strong>VHS</strong> deck only)<br />
See “PICTURE CONTROL” on page 70.<br />
E<br />
Start the source player.<br />
Engage the Play mode of the source player.<br />
F<br />
Start the recording deck.<br />
Engage the Record mode of the recording deck.
A B<br />
TV receiver<br />
(AV mode) Player<br />
Your recorder<br />
21-pin SCART cable<br />
(not provided)<br />
TV receiver<br />
(AV mode)<br />
Recorder<br />
Recorder<br />
S-Video cable<br />
(not provided)<br />
Player<br />
21-pin SCART cable<br />
(provided)<br />
Another recorder<br />
Your recorder<br />
21-pin SCART cable<br />
(provided)<br />
Another recorder<br />
Recorder Your recorder<br />
21-pin SCART cable<br />
(provided)<br />
Another recorder<br />
Player Your recorder<br />
21-pin SCART cable<br />
(provided)<br />
Recorder<br />
Another recorder<br />
21-pin SCART cable<br />
(not provided)<br />
21-pin SCART cable<br />
(not provided)<br />
EN 51<br />
TV receiver<br />
(AV mode)<br />
NOTES:<br />
● All necessary cables can be obtained from your dealer.<br />
● For Y/C signal input/output, be sure to use a 21-pin SCART cable that is compatible with the Y/C signal.<br />
● When you select “EDIT” to dub tapes in step 4, be sure to select “AUTO” (or “NORM” when “B.E.S.T.” is set to “OFF”) after you<br />
finish dubbing the tapes.<br />
● When you use this recorder as the source player for editing, be sure to set “O.S.D.” to “OFF” before starting (� pg. 69).<br />
● If you are using another recorder with S-Video and Audio input/output connectors, you can connect those connectors to this<br />
recorder’s S-<strong>VIDEO</strong> and AUDIO input/output connectors.<br />
When using your recorder as the source player ...<br />
... connect its rear panel S OUT and AUDIO OUT connectors to the recording deck’s S-Video and Audio input connectors.<br />
When using your recorder as the recording deck ...<br />
... connect its front panel S-<strong>VIDEO</strong> and AUDIO input connectors to the source player’s S-Video and Audio output connectors. Then,<br />
set the recorder’s input mode to “F-1”, and set “<strong>VHS</strong> F-1 INPUT” to “S-<strong>VIDEO</strong>” (� pg. 53).<br />
Player<br />
C-a C-b<br />
Audio cable<br />
(not provided)<br />
TV receiver<br />
(AV mode)
52 EN EDITING (cont.)<br />
Output/Input Set<br />
L-1 OUTPUT and L-1 INPUT Setting<br />
The AV1 (L-1) IN/OUT connector accepts and delivers either a<br />
composite signal (regular video signal) or a Y/C signal (a signal<br />
in which the luminance and chrominance signals are separated).<br />
Set “L-1 OUTPUT” and “L-1 INPUT” to the appropriate mode<br />
depending on the type of appliance connected to the recorder’s<br />
AV1 (L-1) IN/OUT connector.<br />
A<br />
Press MENU.<br />
1<br />
2<br />
1<br />
2<br />
1 2 3<br />
4 5 6<br />
7 8 9<br />
Access the Main Menu screen.<br />
0<br />
3<br />
3<br />
4<br />
4<br />
B<br />
C<br />
D<br />
Press MENU.<br />
Access the Output/Input Set screen.<br />
Press rt to move the<br />
highlight bar (pointer) to<br />
“OUTPUT/INPUT SET”, then<br />
press OK or e.<br />
Select the output or input mode for the AV1<br />
(L-1) IN/OUT connector.<br />
Press rt to move the<br />
highlight bar (pointer) to “L-1<br />
OUTPUT” or “L-1 INPUT”.<br />
Then, press OK or e to select<br />
the appropriate setting.<br />
* The default setting is bold in<br />
the table below.<br />
8 L-1 OUTPUT<br />
<strong>VIDEO</strong>: If a connected appliance’s input is<br />
compatible only with regular video<br />
signals, set to “<strong>VIDEO</strong>”.<br />
S-<strong>VIDEO</strong>: If a connected appliance’s input is<br />
compatible with Y/C signals, set to<br />
“S-<strong>VIDEO</strong>”. You can obtain highquality<br />
S-<strong>VHS</strong> picture. (For<br />
connection, be sure to use a 21-pin<br />
SCART cable that is compatible with<br />
the Y/C signal.)<br />
8 L-1 INPUT<br />
<strong>VIDEO</strong>: If a connected appliance’s output is<br />
compatible only with regular video<br />
signals, set to “<strong>VIDEO</strong>”.<br />
S-<strong>VIDEO</strong>: If a connected appliance’s output is<br />
compatible with Y/C signals, set to<br />
“S-<strong>VIDEO</strong>”. You can obtain highquality<br />
S-<strong>VHS</strong> picture. (For<br />
connection, be sure to use a 21-pin<br />
SCART cable that is compatible with<br />
the Y/C signal.)<br />
Return to the normal screen.<br />
NOTES:<br />
● If “L-1 OUTPUT” is set to “S-<strong>VIDEO</strong>”, it is impossible to set<br />
“L-1 INPUT” to “S-<strong>VIDEO</strong>”.<br />
● If “L-2 SELECT” is set to “DECODER”, it is impossible to set<br />
“L-1 INPUT” to “S-<strong>VIDEO</strong>”.
L-2 SELECT Setting<br />
Set “L-2 SELECT” to the appropriate mode depending on the<br />
type of appliance connected to the recorder’s AV2 (L-2) IN/<br />
DECODER connector.<br />
Perform steps 1 and 2 of “L-1 OUTPUT and L-1 INPUT<br />
Setting” on page 52.<br />
A<br />
B<br />
Select the input mode for the AV2 (L-2) IN/<br />
DECODER connector.<br />
Press rt to move the<br />
highlight bar (pointer) to “L-2<br />
SELECT”. Then, press OK or<br />
e to select the appropriate<br />
setting.<br />
* The default setting is bold in<br />
the table below.<br />
8 L-2 SELECT<br />
A/V: To use this recorder as the recording<br />
deck with the player connected to<br />
the AV2 (L-2) IN/DECODER<br />
connector, or to use the satellite<br />
receiver connected to the AV2 (L-2)<br />
IN/DECODER connector.<br />
DECODER: To use a decoder connected to the<br />
AV2 (L-2) IN/DECODER connector.<br />
SAT: To view a satellite programme with<br />
the TV set while the recorder is<br />
turned off. (� pg. 64)<br />
Press MENU.<br />
Return to the normal screen.<br />
NOTES:<br />
● If you have a satellite receiver or a decoder connected to the<br />
AV2 (L-2) IN/DECODER connector, be sure to set “L-2<br />
SELECT” back to appropriate mode after editing.<br />
● If you are not connecting a satellite receiver or a decoder to<br />
the AV2 (L-2) IN/DECODER connector, leave “L-2 SELECT” set<br />
to “A/V”.<br />
● The default setting is “A/V”; if the recorder’s memory backup<br />
has expired due to a power cut or because the AC was<br />
removed from the recorder, “A/V” will be automatically<br />
selected when the power is restored to the recorder. If you are<br />
using a satellite receiver or a decoder, be sure to set “L-2<br />
SELECT” back to appropriate mode.<br />
● When “L-2 SELECT” is set to “SAT”, “SAT” appears on TV<br />
screen or front display panel instead of “L-2” or “L2”.<br />
● If “L-1 OUTPUT” is set to “S-<strong>VIDEO</strong>”, it is impossible to set<br />
“L-2 SELECT” to “DECODER”.<br />
<strong>VHS</strong> F-1 INPUT Setting<br />
EN 53<br />
Set “<strong>VHS</strong> F-1 INPUT” to the appropriate mode depending on the<br />
connector (<strong>VIDEO</strong> or S-<strong>VIDEO</strong> input connector) being used on<br />
the front panel.<br />
Perform steps 1 and 2 of “L-1 OUTPUT and L-1 INPUT<br />
Setting” on page 52.<br />
A<br />
B<br />
Press MENU.<br />
Select the input mode for the <strong>VIDEO</strong>/<br />
S-<strong>VIDEO</strong> connector.<br />
Press rt to move the<br />
highlight bar (pointer) to<br />
“<strong>VHS</strong> F-1 INPUT”. Then,<br />
press OK or e to select the<br />
appropriate setting.<br />
* The default setting is bold in<br />
the table below.<br />
8 <strong>VHS</strong> F-1 INPUT<br />
<strong>VIDEO</strong>: If a connected appliance’s output is<br />
compatible only with regular video<br />
signals, set to “<strong>VIDEO</strong>”.<br />
S-<strong>VIDEO</strong>: If a connected appliance’s output is<br />
compatible with Y/C signals, set to<br />
“S-<strong>VIDEO</strong>”. You can obtain highquality<br />
S-<strong>VHS</strong> picture. (For<br />
connection, be sure to use a 21-pin<br />
SCART cable that is compatible with<br />
the Y/C signal.)<br />
Return to the normal screen.
54 EN EDITING (cont.)<br />
Audio Dubbing<br />
<strong>VHS</strong> Audio Dubbing<br />
Audio Dubbing replaces the normal audio sound of a<br />
previously recorded tape with a new soundtrack.<br />
Normal audio track<br />
Video/Hi-Fi audio<br />
track<br />
<strong>DV</strong> Audio Dubbing<br />
Pre-recorded tape<br />
Audio-dubbed tape<br />
This function lets you record new audio, without<br />
erasing the original audio, on a <strong>DV</strong> tape that was<br />
recorded with “SOUND MODE” set to “12BIT”<br />
(� pg. 73).<br />
ATTENTION:<br />
You cannot perform Audio Dubbing on a tape that was<br />
recorded with “SOUND MODE” set to “16BIT” (� pg. 73),<br />
on a tape that was recorded at the “LP” speed, or on a blank<br />
tape.<br />
Your recorder<br />
Your recorder<br />
CD player, etc.<br />
Audio mixer<br />
1<br />
2<br />
1<br />
2<br />
Original sound<br />
AUDIO OUT<br />
1 2 3<br />
4 5 6<br />
7 8 9<br />
0<br />
1 3 2<br />
CD player, etc.<br />
1 3 2<br />
3<br />
3<br />
4<br />
4<br />
Mixer output
A<br />
Make connections.<br />
Connect an audio component to the AUDIO L + R input<br />
connectors on the recorder’s front panel.<br />
● When connecting a monaural audio component, use only the<br />
recorder’s AUDIO L input connector.<br />
B<br />
Load a cassette.<br />
For the <strong>VHS</strong> deck<br />
Insert a <strong>VHS</strong> (or S-<strong>VHS</strong>) cassette with the record safety<br />
tab intact, or cover the hole using adhesive tape.<br />
For the <strong>DV</strong> deck<br />
Insert a <strong>Mini</strong> <strong>DV</strong> cassette with the erase protection switch<br />
set to “REC”.<br />
C<br />
Select the recording deck.<br />
Press <strong>VHS</strong> or <strong>DV</strong>.<br />
● When using the <strong>DV</strong> deck as the recording deck, press so<br />
that the audio signals from the AUDIO L + R input connectors<br />
can be recorded. The dubbing direction indicator ( <strong>VHS</strong>)<br />
lights.<br />
D<br />
Set the recorder’s input mode.<br />
Press AUX (number key “0”) and/or PR to select “F-1”.<br />
E<br />
Locate the start point.<br />
Press 4 to start playback of the tape in your recorder, and<br />
press 9 when you reach the point where you want to start<br />
dubbing.<br />
F<br />
Engage the Audio Dubbing mode.<br />
Press A.DUB.<br />
● Your recorder enters the Audio Dubbing Pause mode. (“o”<br />
blinks, “u” and “i” light up on the front display panel.)<br />
● To perform Audio Dubbing with audio mixing, press AUDIO<br />
to select “HI FI L jhR” or “L jhR” at this point. When<br />
using the <strong>DV</strong> deck as the recording deck, also make sure that<br />
“12BIT MODE” is set to “SOUND1” (� pg. 73).<br />
* Audio Dubbing with audio mixing is not possible if you are using a<br />
monaural audio component, or if you don’t have an audio mixer.<br />
G<br />
Start dubbing.<br />
EN 55<br />
Engage the audio component’s Play mode, then press 4<br />
to start the tape in your recorder; Audio Dubbing begins<br />
at this point.<br />
● “o” blinks and “u” is displayed on the front display panel.<br />
● To stop dubbing temporarily, press 9. Press 4 to resume<br />
dubbing.<br />
H<br />
End Audio Dubbing.<br />
Press 8 to stop the tape in your recorder, and engage the<br />
audio component’s Stop mode.<br />
NOTES:<br />
● Once the Audio Dubbing starts, you can not use the other<br />
deck.<br />
● When monitoring the audio-dubbed sound on the <strong>DV</strong> deck,<br />
set “12BIT MODE” to “SOUND2” (� pg. 73).<br />
● When monitoring the sound during Audio Dubbing, the<br />
normal soundtrack is automatically selected. If you wish to<br />
hear the mixed sound (Hi-Fi + Normal soundtracks), press<br />
AUDIO to select “HI FI NORM” (� pg. 25). (<strong>VHS</strong> deck only)<br />
● Audio Dubbing stops automatically when the counter reaches<br />
“0:00:00”, and the recorder enters the Play mode. Check the<br />
counter reading before dubbing. (<strong>VHS</strong> deck only)<br />
● Audio Dubbing is also possible using the rear panel AV1 (L-1)<br />
IN/OUT or AV2 (L-2) IN/DECODER connector. When using<br />
these 21-pin SCART connectors, be sure to select the correct<br />
input mode (“L-1” or “L-2”) in step 4.<br />
● When playing back an audio-dubbed tape on the <strong>VHS</strong> deck,<br />
press AUDIO on the remote control to select the soundtrack<br />
you wish to hear (� pg. 25). When playing back an audiodubbed<br />
<strong>Mini</strong> <strong>DV</strong> tape on the <strong>DV</strong> deck, set “12BIT MODE” to<br />
“SOUND2” (� pg. 73).<br />
● Audio dubbing is not possible using the <strong>DV</strong> IN/OUT<br />
connector.<br />
● Audio dubbing is not possible on a blank portion of the tape.
56 EN EDITING (cont.)<br />
Insert Editing<br />
<strong>VHS</strong> Insert Editing<br />
Insert Editing replaces part of the recorded scene with<br />
new material. Both the picture and Hi-Fi audio<br />
soundtrack are replaced with new ones, while the<br />
normal audio soundtrack remains unchanged. If you<br />
wish to change the normal audio track as well, use the<br />
Audio Dubbing function simultaneously.<br />
For Insert Editing, use your recorder as the recording<br />
deck.<br />
Source tape<br />
Recording tape<br />
Before Insert Editing<br />
Normal audio<br />
track<br />
After Insert Editing Video/Hi-Fi<br />
audio track<br />
<strong>DV</strong> Insert Editing (SP mode only)<br />
The picture is replaced with new one, while the audio<br />
soundtrack remains unchanged.<br />
For Insert Editing, use your recorder as the recording<br />
deck.<br />
ATTENTION:<br />
Insert Editing is not possible with a <strong>Mini</strong> <strong>DV</strong> cassette<br />
recorded in LP mode.<br />
Recorder Your recorder<br />
Another recorder<br />
1 3 2<br />
Audio/Video signal S-Video signal<br />
Player<br />
1<br />
2<br />
1<br />
2<br />
1 2 3<br />
4 5 6<br />
7 8 9<br />
0<br />
3<br />
3<br />
4<br />
4
A<br />
Make connections.<br />
Connect the player’s <strong>VIDEO</strong> OUT or S-<strong>VIDEO</strong> OUT and<br />
AUDIO OUT connectors to your recorder’s <strong>VIDEO</strong> or<br />
S-<strong>VIDEO</strong> and AUDIO input connectors on the front<br />
panel.<br />
B<br />
Select the recording deck.<br />
Press <strong>VHS</strong> or <strong>DV</strong>.<br />
● When using the <strong>DV</strong> deck as the recording deck, press so<br />
that the video and audio signals from the <strong>VIDEO</strong>/S-<strong>VIDEO</strong> and<br />
AUDIO L + R input connectors can be recorded. The dubbing<br />
direction indicator ( <strong>VHS</strong>) lights.<br />
C<br />
Set the recorder’s input mode.<br />
Press AUX (number key “0”) and/or PR to select “F-1”.<br />
● When using the <strong>VHS</strong> deck as the recording deck, set “<strong>VHS</strong> F-1<br />
INPUT” to “<strong>VIDEO</strong>” for the AUDIO/<strong>VIDEO</strong> input connectors,<br />
or “S-<strong>VIDEO</strong>” for the AUDIO/S-<strong>VIDEO</strong> input connectors,<br />
depending on the connectors being used. (� pg. 53)<br />
D<br />
Prepare the recording cassette.<br />
For the <strong>VHS</strong> deck<br />
Load the recording cassette into the <strong>VHS</strong> deck, and play<br />
it back to determine the edit-out point (the end of the<br />
segment to be replaced) using the JOG dial, or pressing w<br />
e and 9.<br />
Then press 0000 to reset the counter.<br />
For the <strong>DV</strong> deck<br />
Load the recording cassette into the <strong>DV</strong> deck.<br />
E<br />
Locate the start point.<br />
Determine the edit-in point (the beginning of the segment<br />
to be replaced) using the JOG dial, or pressing w e and<br />
9.<br />
● Be sure to engage the Still mode at the edit-in point.<br />
F<br />
Engage the Insert Editing mode.<br />
Press INSERT.<br />
● Your recorder enters the Insert Pause mode. (“o”, “u” and<br />
“i” light up on the front display panel.)<br />
● The TV screen changes from the still picture to the input<br />
source you are going to record.<br />
G<br />
Start Editing.<br />
EN 57<br />
Load the source cassette and play back the segment that<br />
is to be inserted. When you reach the start of the section<br />
of the source tape that you wish to insert, press 4 to start<br />
the tape in your recorder; Insert Editing begins at this<br />
point.<br />
● “o” and “u” are displayed on the front display panel.<br />
H<br />
End Insert Editing.<br />
For the <strong>VHS</strong> deck<br />
At counter “0:00:00”, Insert Editing will stop<br />
automatically while the tape continues running in the<br />
Play mode. If you wish to stop Insert Editing before the<br />
specified edit-out point, press 0000.<br />
For the <strong>DV</strong> deck<br />
Press 8 to stop recording on the <strong>DV</strong> deck.<br />
AV Insert Editing (<strong>VHS</strong> deck only)<br />
If you want to replace the picture, Hi-Fi audio soundtrack<br />
and normal audio soundtrack all at the same time ...<br />
... In step 6, after you press INSERT, press A.DUB also.<br />
(“o” and “u” blink and “i” lights up on the front display<br />
panel.)<br />
NOTES:<br />
● Once the Insert Editing starts, you can not use the other deck.<br />
● All necessary cables can be obtained from your dealer.<br />
● Insert Editing cannot be performed on a <strong>VHS</strong> (or S-<strong>VHS</strong>)<br />
cassette that has had its record safety tab removed, or on a<br />
<strong>Mini</strong> <strong>DV</strong> cassette that has had its erase protection switch set to<br />
“SAVE”.<br />
● When Insert Editing is performed on a tape that has been<br />
recorded on another video recorder, the inserted portion may<br />
appear distorted.<br />
● In Insert Editing, the recording speed (SP/LP) is determined by<br />
the previous recording to be replaced. If the previous<br />
recording’s speed changes within a single edit, the inserted<br />
picture will be distorted at the switching point. (<strong>VHS</strong> deck<br />
only)<br />
● A small portion of the recording which precedes an insert edit<br />
may become erased.<br />
● Insert Editing is also possible using the rear panel AV1 (L-1) IN/<br />
OUT or AV2 (L-2) IN/DECODER connector. When using these<br />
21-pin SCART connectors, be sure to select the correct input<br />
mode (“L-1” or “L-2”) in step 3.<br />
● Insert Editing is not possible using the <strong>DV</strong> IN/OUT connector.<br />
● Insert Editing is not possible on a blank portion of the tape.
58 EN EDITING (cont.)<br />
Random Assemble<br />
Editing<br />
1<br />
2<br />
1<br />
2<br />
1 2 3<br />
4 5 6<br />
7 8 9<br />
0<br />
1 3 2<br />
3<br />
3<br />
4<br />
4<br />
64-programme Editing Memory<br />
(8 programmes x 8 scenes)<br />
By using the Random Assemble Editing function, you can select<br />
up to 8 scenes from a previously recorded <strong>Mini</strong> <strong>DV</strong> cassette and<br />
automatically dub them onto a <strong>VHS</strong> cassette.<br />
Random Assemble Editing is possible only when dubbing from<br />
the <strong>DV</strong> deck to the <strong>VHS</strong> deck.<br />
A<br />
Load cassettes.<br />
Insert a <strong>VHS</strong> (or S-<strong>VHS</strong>) cassette and a <strong>Mini</strong> <strong>DV</strong> cassette.<br />
B<br />
Press <strong>DV</strong>.<br />
C<br />
Select the <strong>DV</strong> deck.<br />
Access the R.A.Edit screen.<br />
Press R.A.EDIT. The R.A.Edit screen appears.<br />
D<br />
E<br />
Select the programme.<br />
Press rt to move the<br />
highlight bar (pointer) to<br />
select one programme you<br />
want to edit, then press OK<br />
or e.<br />
● If you want to remove a<br />
programme from the R.A.EDIT<br />
screen, press & in step 5 and 6<br />
to delete all the edit-in and<br />
edit-out points.<br />
Locate the start point.<br />
Press 4 to start playback.<br />
Find the edit-in point on the<br />
source tape from where you<br />
want the edited scene to<br />
begin by pressing 9, then<br />
press IN/OUT.<br />
● The edit-in point is registered<br />
in memory and appears on the<br />
screen.
F<br />
G<br />
Locate the end point.<br />
Press 4 to start playback.<br />
Find the edit-out point where<br />
you want the edited scene to<br />
end by pressing 9, then press<br />
IN/OUT.<br />
● The edit-out point is registered<br />
in memory and appears on the<br />
screen.<br />
● The total time of the edited<br />
scenes is displayed to the right<br />
of “TOTAL”.<br />
● Repeat steps 5 and 6 for each<br />
additional scene.<br />
Prepare the source tape.<br />
Rewind the tape in the <strong>DV</strong> deck to the beginning of the<br />
scene you want to edit.<br />
H<br />
Prepare the <strong>VHS</strong> deck for dubbing.<br />
A Press <strong>VHS</strong>.<br />
B Search for the point where you want to start dubbing<br />
by pressing 4, 5 or 3 then press 8.<br />
C Press 7, then the <strong>VHS</strong> deck enters the Record Pause<br />
mode.<br />
I<br />
Start Random Assemble Editing.<br />
Press START (or OK).<br />
● Automatic editing begins; all the specified scenes are copied<br />
to the <strong>VHS</strong> deck in the order they were registered.<br />
● The on-screen display remains while your recorder searches<br />
for each scene (blinking cursor indicates scene currently being<br />
searched for), but disappears during actual editing.<br />
● During scene search, the <strong>VHS</strong> deck automatically enters its<br />
Record-Standby mode.<br />
● When all registered scenes have been edited, the <strong>DV</strong> deck<br />
enters the Pause mode, the <strong>VHS</strong> deck enters its Record Pause<br />
mode, and the arrow blinks at the next available number.<br />
J<br />
End Random Assemble Editing.<br />
Press R.A.EDIT twice to return to the normal screen.<br />
Press 8 to stop the <strong>VHS</strong> deck’s Record Pause mode.<br />
Press <strong>DV</strong>, then press 8 to stop the <strong>DV</strong> deck’s Pause mode.<br />
EN 59<br />
To Make Corrections ...<br />
... in step 5 or 6, you can cancel registered in and out points by<br />
pressing &. Each time you press, the preceding point is erased.<br />
● If, for example, you have registered 5 sets of in and out points<br />
and want to reset the first set, you have to press & until all<br />
points after the first set have been erased. Reenter them after<br />
you have repaired the first set of points.<br />
NOTES:<br />
● When Random Assemble Editing does not work, press ,<br />
then perform Random Assemble Editing again.<br />
● To cancel the registered scene, press &. Each time & is<br />
pressed, the latest registered scene is erased.<br />
● When the source tape has more than 2 identical time codes<br />
(� pg. 35), the recorder may not find the edit-in point you set<br />
and a malfunction may occur.<br />
● When choosing a scene, set edit-in and edit-out points so that<br />
there's a relatively large difference between them.<br />
● If the search time for an in-point exceeds 5 minutes, the <strong>VHS</strong><br />
deck's Record-Pause mode will be cancelled and editing will<br />
not take place.<br />
● If there are blank portions before or after the edit-in and editout<br />
points, a blue-backed screen may be included in the<br />
edited version.<br />
● Since time codes register time only as accurately as seconds,<br />
the time code total time may not match the total programme<br />
time exactly.<br />
● To use Random Assemble Editing consecutively for two or<br />
more programmes, press START for each programme.<br />
When dubbing from another <strong>Mini</strong> <strong>DV</strong> cassette, change the<br />
<strong>Mini</strong> <strong>DV</strong> cassette first, and then press START.
60 EN REMOTE CONTROL<br />
Remote Control<br />
Functions<br />
Remote A/B/C/D Code Switching<br />
The remote control is capable of controlling four JVC video<br />
recorders independently. Each of recorders can respond to one<br />
of four codes (A, B, C or D). The remote control is preset to send<br />
A code signals because your video recorder is initially set to<br />
respond to A code signals. You can easily modify your video<br />
recorder to respond to B, C or D code signals.<br />
LCD panel<br />
1<br />
2<br />
1<br />
2<br />
1 2 3<br />
4 5 6<br />
7 8 9<br />
0<br />
3<br />
3<br />
4<br />
4<br />
1 3 2<br />
On the remote control<br />
A<br />
Display the code.<br />
Press and hold <strong>VHS</strong> or <strong>DV</strong> on the remote control for over<br />
2 seconds. The code currently set blinks on the LCD<br />
panel.<br />
B<br />
Change the remote control code.<br />
Press the number key “1” for A, “2” for B, “3” for C or “4”<br />
for D.<br />
C<br />
Set the remote control code.<br />
Press OK to set the code.<br />
On the recorder<br />
D<br />
Display the code.<br />
Press 4 on the recorder for over 5 seconds while the<br />
recorder is turned off. The code currently set appears on<br />
the front display panel.<br />
● If the code displayed on the front display panel is different<br />
from the code set on the remote control, go to step 5.<br />
E<br />
Change the recorder’s code.<br />
Press 8 on the remote control. The code currently set on<br />
the remote control will be applied to the recorder.<br />
NOTE:<br />
When “POWER SAVE” is set to “ON” (� pg. 69), it is<br />
impossible to change the remote code.
TV Multi-Brand Remote Control<br />
Your remote control can operate the basic functions of your TV<br />
set. In addition to JVC TVs, other manufacturer’s TVs can also be<br />
controlled.<br />
Before performing the following steps:<br />
Turn off the TV using its remote control.<br />
LCD panel<br />
1<br />
2<br />
1<br />
2<br />
1 2 3<br />
4 5 6<br />
7 8 9<br />
0<br />
IMPORTANT<br />
Although the provided remote control unit is compatible with<br />
JVC televisions, as well as many other models, it may not work<br />
with your TV, or in some instances, may have limited function<br />
capability.<br />
Control Your TV Using Additional Buttons<br />
Use the number keys, and the p button, & button or #<br />
button to select the TV’s channel.<br />
● With televisions under Code 01, 02, 07, 10, 11, 14, 20, 23,<br />
24, 25, 27, 33 or 35, the p button corresponds to the 1digit/2-digit<br />
entry switching button (often labelled – /– –) of<br />
your TV’s remote control.<br />
● With televisions under Code 01, 28, 29 or 34, the &<br />
button corresponds to the 10 + button, and the # button<br />
corresponds to the 20 + button of your TV’s remote<br />
control.<br />
NOTE:<br />
The way these buttons are used is determined by your TV.<br />
Use these buttons as instructed for your TV’s remote control.<br />
3<br />
3<br />
4<br />
4<br />
A<br />
Set the TV brand code.<br />
EN 61<br />
Press TV/CABLE/SAT to switch the display to “TV” and<br />
keep pressing the button down until “TV-_ _” appears.<br />
Enter your TV’s brand code using the number keys, then<br />
press OK.<br />
Press 1 on the recorder’s remote control to turn on the<br />
TV and try operations (� step 2).<br />
● Once you have set the remote control to operate the TV, you<br />
do not have to repeat this step until you replace your remote<br />
control’s batteries.<br />
● Some brands of TV have more than one code. If the TV does<br />
not function with one code, try entering another.<br />
B<br />
Operate the TV.<br />
First, press TV/CABLE/SAT to switch the display to “TV”.<br />
Then press the corresponding button: 1, TV/VCR,<br />
TV PR +/–, TV %+/– (Volume), ^ (TV Muting),<br />
number keys.<br />
● For some brands of TV, you must press OK after having pressed<br />
the number keys.<br />
● To return the remote control to video recorder control, press<br />
<strong>VHS</strong> or <strong>DV</strong>.<br />
BRAND NAME CODE<br />
JVC<br />
BLAUPUNKT<br />
BRANDT<br />
FERGUSON<br />
FINLUX<br />
FUNAI<br />
LG/GOLDSTAR<br />
GRAETZ<br />
GRUNDIG<br />
HITACHI<br />
ITT<br />
LUXOR<br />
MITSUBISHI<br />
MIVAR<br />
NEC<br />
NOKIA<br />
NORDMENDE<br />
PANASONIC<br />
PHILIPS<br />
SABA<br />
SALORA<br />
SAMSUNG<br />
SELECO<br />
SHARP<br />
SONY<br />
TELEAVIA<br />
TELEFUNKEN<br />
THOMSON<br />
TOSHIBA<br />
01, 23, 24, 25<br />
19<br />
26<br />
27<br />
30<br />
32<br />
18<br />
28<br />
19<br />
10<br />
28<br />
28<br />
03<br />
29<br />
20<br />
31<br />
26<br />
11<br />
02<br />
26<br />
28<br />
02, 12, 33, 34, 35<br />
28<br />
06<br />
07<br />
26<br />
26<br />
26<br />
14
62 EN REMOTE CONTROL (cont.)<br />
Satellite Receiver Multi-Brand Remote<br />
Control<br />
Your remote control can operate the basic functions of your<br />
satellite receiver set. In addition to JVC satellite receivers, other<br />
manufacturer’s satellite receivers can also be controlled.<br />
Before performing the following steps:<br />
Turn off the satellite receiver using its remote control.<br />
LCD panel<br />
1<br />
2<br />
1<br />
2<br />
1 2 3<br />
4 5 6<br />
7 8 9<br />
0<br />
IMPORTANT<br />
Although the provided remote control unit is compatible with<br />
JVC satellite receivers, as well as many other models, it may not<br />
work with your satellite receiver, or in some instances, may have<br />
limited function capability.<br />
3<br />
3<br />
4<br />
4<br />
A<br />
Set the satellite receiver brand code.<br />
Press TV/CABLE/SAT to switch the display to “CABLE<br />
SAT” and keep pressing the button down until<br />
“SATCBL-_ _” appears.<br />
Enter your satellite receiver’s brand code using the<br />
number keys, then press OK.<br />
Press 1 on the recorder’s remote control to turn on the<br />
satellite receiver and try operations (� step 2).<br />
● Once you have set the remote control to operate the satellite<br />
receiver, you do not have to repeat this step until you replace<br />
your remote control’s batteries.<br />
● Some brands of satellite receiver have more than one code. If<br />
the satellite receiver does not function with one code, try<br />
entering another.<br />
B<br />
Operate the satellite receiver.<br />
First, press TV/CABLE/SAT to switch the display to<br />
“CABLE SAT”.<br />
Then press the corresponding button: 1, TV PR +/–,<br />
number keys.<br />
● For some brands of satellite receiver, you must press p after<br />
having pressed the number keys.<br />
● The number keys may not function with some satellite<br />
receivers.<br />
● To return the remote control to video recorder control, press<br />
<strong>VHS</strong> or <strong>DV</strong>.<br />
BRAND NAME CODE<br />
JVC<br />
AMSTRAD<br />
CANAL SATELLITE<br />
CANAL +<br />
D-BOX<br />
ECHOSTAR (VIA DIGITAL)<br />
FINLUX<br />
FORCE<br />
GALAXIS<br />
GRUNDIG<br />
HIRSCHMANN<br />
ITT NOKIA<br />
JERROLD<br />
KATHREIN<br />
LUXOR<br />
MASCOM<br />
MASPRO<br />
NOKIA<br />
PACE<br />
PANASONIC<br />
PHILIPS<br />
RFT<br />
SAGEM<br />
SALORA<br />
SIEMENS<br />
SKYMASTER<br />
TPS<br />
TRIAX<br />
WISI<br />
73<br />
60, 61, 62, 63, 92<br />
81<br />
81<br />
85<br />
82<br />
68<br />
89<br />
88<br />
64, 65<br />
64, 78<br />
68<br />
75<br />
70, 71<br />
68<br />
93<br />
70<br />
87<br />
65, 67, 74, 86, 92<br />
74<br />
66, 84<br />
69<br />
83<br />
68<br />
64<br />
69<br />
83<br />
91<br />
64
SYSTEM CONNECTIONS<br />
Connecting To A<br />
Printer<br />
<strong>DV</strong> IN/OUT<br />
<strong>DV</strong> cable (VC-V<strong>DV</strong>204)<br />
(not provided)<br />
To <strong>DV</strong> IN connector<br />
Your recorder<br />
1 3 2<br />
Digital printer<br />
EN 63<br />
You can make printouts of video images by connecting<br />
the GV-DT1/GV-DT3 Digital Printer (sold separately) to<br />
the <strong>DV</strong> IN/OUT connector.<br />
A<br />
Make connections.<br />
Connect the printer’s <strong>DV</strong> IN connector to the recorder’s<br />
<strong>DV</strong> IN/OUT connector.<br />
B<br />
Select the deck.<br />
Press <strong>DV</strong>.<br />
● When you use the <strong>VHS</strong> deck ...<br />
... Press . The dubbing direction indicator ( <strong>VHS</strong>) lights.<br />
C<br />
Start playback.<br />
Press 4.<br />
● The image being displayed on the TV screen is output to the<br />
digital printer. Any on-screen displays are not output.<br />
NOTES:<br />
About <strong>DV</strong> IN/OUT connector<br />
● To output digital signal when dubbing from the <strong>VHS</strong> deck to<br />
other device through the <strong>DV</strong> IN/OUT connector, press ,<br />
and then pressing 4 to start playback on the <strong>VHS</strong> deck.<br />
● When connecting this recorder to a device equipped with a<br />
<strong>DV</strong> input connector, be sure to use the optional <strong>DV</strong> cable<br />
(VC-V<strong>DV</strong>204).
64 EN SYSTEM CONNECTIONS (cont.)<br />
Connecting To A Satellite Receiver<br />
Simple Connections<br />
This is an example of simple connection if your TV has<br />
one 21-pin AV input (SCART) connector.<br />
Connect the satellite receiver to the AV2 (L-2) IN/<br />
DECODER connector, then connect the AV1 (L-1) IN/<br />
OUT connector to the TV’s connector.<br />
Back of TV<br />
ANTENNA<br />
ANTENNE<br />
IN<br />
ENTREE<br />
Aerial<br />
connector<br />
21-pin SCART connector<br />
OUT<br />
SORTIE<br />
S OUT<br />
SORTIE<br />
ANTENNA IN<br />
ANTENNA OUT<br />
IN/OUT<br />
AV1 (L-1) ENTREE/SORTIE<br />
TV aerial<br />
cable<br />
IN/DECODER<br />
AV2 (L-2)<br />
ENTREE/DECODEUR<br />
NOTES:<br />
● Set “L-2 SELECT” to “A/V” (� pg. 53).<br />
● To record a programme via the satellite receiver, select L-2<br />
mode by pressing AUX (number key “0”) and/or PR so that<br />
“L-2” appears on the front display panel.<br />
● For details, refer to the instruction manual of the satellite<br />
receiver.<br />
SAT CONTROL<br />
CONTROLEUR SAT<br />
IMPORTANT<br />
When you set “L-2 SELECT” to “SAT” (� pg. 53), it is possible to view a satellite broadcast with the TV set to its AV mode even if<br />
the recorder is in timer mode, in stop mode, in recording mode or turned off. When the recorder is in Stop mode or recording,<br />
press TV/VCR on the remote control to turn off the VCR indicator on the front display panel.<br />
● Set “L-1 OUTPUT” to “<strong>VIDEO</strong>” and set the satellite receiver’s output and the TV’s input to the composite mode.<br />
● When the recorder is turned off, only a composite signal is output from the recorder to TV.<br />
● If you turn on the recorder when the satellite receiver’s power is off, nothing appears on the TV screen. In this case, turn on the<br />
satellite receiver, or set the TV to its TV mode, or press TV/VCR on the remote control to set the recorder to the video mode.<br />
Aerial<br />
AUDIO<br />
L<br />
OUT<br />
SORTIE<br />
R<br />
Outdoor unit<br />
Satellite cable<br />
TV<br />
VCR<br />
Mains outlet<br />
Satellite receiver<br />
DECODER<br />
Back of recorder
Perfect Connections<br />
This is an example of recommended connection if your<br />
TV has two 21-pin AV input (SCART) connectors.<br />
Connect the decoder to the satellite receiver’s connector<br />
if you have a decoder, AV1 (L-1) IN/OUT connector to<br />
TV’s connector, and AV2 (L-2) IN/DECODER connector<br />
to the satellite receiver’s connector. Then connect the<br />
satellite receiver and TV.<br />
Aerial<br />
connector<br />
Back of TV<br />
EXT.1<br />
21-pin SCART<br />
connector<br />
EXT.2<br />
ANTENNA<br />
ANTENNE<br />
IN<br />
ENTREE<br />
OUT<br />
SORTIE<br />
ANTENNA IN<br />
ANTENNA OUT<br />
S OUT<br />
SORTIE<br />
TV aerial<br />
cable<br />
IN/OUT<br />
AV1 (L-1) ENTREE/SORTIE<br />
IN/DECODER<br />
AV2 (L-2)<br />
ENTREE/DECODEUR<br />
EN 65<br />
NOTES:<br />
● Set “L-2 SELECT” to “A/V” (� pg. 53).<br />
● To record a programme via the satellite receiver, select L-2<br />
mode by pressing AUX (number key “0”) and/or PR so that<br />
“L-2” appears on the front display panel.<br />
● To receive a scrambled broadcast, descramble the signal with<br />
the satellite receiver.<br />
● For details, refer to the instruction manual of the satellite<br />
receiver and decoder.<br />
Aerial<br />
SAT CONTROL<br />
CONTROLEUR SAT<br />
AUDIO<br />
L<br />
OUT<br />
SORTIE<br />
R<br />
Outdoor unit<br />
Satellite cable<br />
TV<br />
VCR<br />
Decoder<br />
Satellite receiver<br />
DECODER<br />
Back of recorder<br />
Mains outlet
66 EN SYSTEM CONNECTIONS (cont.)<br />
Connecting/Using<br />
A Decoder<br />
TV aerial<br />
cable<br />
RF cable<br />
(provided)<br />
Decoder<br />
TV receiver<br />
AV1 (L-1) IN/OUT<br />
Back of recorder<br />
AV2 (L-2) IN/DECODER<br />
The AV2 (L-2) IN/DECODER connector can be used as an<br />
input connector for an external decoder (descrambler).<br />
Simply connect a decoder and you can enjoy the variety<br />
of programming that is available through scrambled<br />
channels.<br />
A<br />
Select the input mode.<br />
Set “L-2 SELECT” to “DECODER”. (� pg. 53)<br />
B<br />
Connect the decoder.<br />
Connect your recorder’s AV2 (L-2) IN/DECODER<br />
connector to the decoder’s 21-pin SCART connector<br />
using a 21-pin SCART cable.<br />
C<br />
Set the tuner.<br />
Perform the procedure as described in “When Receiving<br />
A Scrambled Broadcast” on page 77.
Connecting/Using A Stereo System<br />
EN 67<br />
These instructions enable you to connect your video recorder to your Hi-Fi stereo system (if you have one) and listen to<br />
the soundtrack through the stereo.<br />
Make connections.<br />
ANTENNA<br />
ANTENNE<br />
IN<br />
ENTREE<br />
OUT<br />
SORTIE<br />
FM tuner<br />
CD player<br />
Stereo amplifier<br />
S OUT<br />
SORTIE<br />
Connect the AUDIO OUT L and R connectors on your<br />
video recorder to the AUX IN or TAPE MONITOR<br />
connectors on your stereo system’s receiver or amplifier.<br />
NOTE:<br />
When listening to sound through the connected stereo system,<br />
turn the TV’s volume down completely.<br />
I I I I I I I I I I I I I I I I I I I I I I I I I I I I I I I I I I I I I I I I I I I<br />
Speaker Television Speaker<br />
AUX IN or TAPE MONITOR<br />
AV1 (L-1)<br />
AV2 (L-2)<br />
IN/OUT<br />
ENTREE/SORTIE<br />
IN/DECODER<br />
ENTREE/DECODEUR<br />
AUDIO OUT<br />
SAT CONTROL<br />
CONTROLEUR SAT<br />
AUDIO<br />
L<br />
OUT<br />
SORTIE<br />
R<br />
Audio cable<br />
(not provided)<br />
Mains outlet<br />
Back of recorder<br />
CAUTIONS:<br />
● This recorder has a dynamic range of more than 80 dB with<br />
regards to its Hi-Fi audio capability. It is recommended that<br />
you check the maximum level if you are going to listen to the<br />
Hi-Fi audio signals through a stereo amplifier. A sudden surge<br />
in the input level to the speakers may damage them.<br />
● Some speakers and televisions are specially shielded to<br />
prevent television interference. If both are of the non-shielded<br />
type, do not place the speakers adjacent to the TV set as this<br />
can adversely affect the video playback picture.
68 EN SUBSIDIARY SETTINGS<br />
Mode Set<br />
Turn on the TV and select the AV mode.<br />
1<br />
2<br />
1<br />
2<br />
1 2 3<br />
4 5 6<br />
7 8 9<br />
0<br />
3<br />
3<br />
4<br />
4<br />
You can change various mode settings on TV screen by<br />
following the procedure described below.<br />
For each mode setting, see pages 69 to 73.<br />
MODE SET � pg. 69<br />
<strong>VHS</strong> MODE SET � pg. 70<br />
<strong>DV</strong> MODE SET � pg. 73<br />
● The procedure shows how to set “O.S.D.” to “ON” on<br />
the “MODE SET” screen as an example.<br />
A<br />
Press MENU.<br />
B<br />
C<br />
D<br />
Access the Main Menu screen.<br />
Access the Mode Set screen.<br />
Press rt to move the<br />
highlight bar (pointer) to<br />
“MODE SET”, then press OK<br />
or e.<br />
Select the mode.<br />
Press rt to move the<br />
highlight bar (pointer) to<br />
“O.S.D.”.<br />
Select the mode setting.<br />
Press OK or e.<br />
E<br />
Press MENU.<br />
Return to the normal screen.
EN 69<br />
MODE SET * The default setting is bold in the table below.<br />
8 O.S.D.<br />
ON<br />
OFF<br />
8 AUTO TIMER<br />
ON<br />
OFF<br />
8 DIRECT REC<br />
ON<br />
OFF<br />
8 POWER SAVE<br />
ON<br />
OFF<br />
When this function is set to “ON”, various operational indicators appear on the TV<br />
screen. Messages appear in the selected language (� pg. 15, 16).<br />
NOTES:<br />
● When you use this recorder as the source player for editing, be sure to set “O.S.D.” to<br />
“OFF” before starting.<br />
● During playback, the operation mode indicators may be disturbed depending on the type of<br />
tape being used.<br />
When this function is set to “ON”, the timer is automatically engaged when the<br />
recorder power is turned off, and automatically disengaged when the recorder is<br />
powered back on.<br />
NOTE:<br />
For safety, when “AUTO TIMER” is set to “OFF”, all other recorder functions are disabled<br />
while the Timer mode is engaged. To disengage the timer, press # (TIMER).<br />
When this function is set to “ON”, you can easily start recording the programme<br />
that you are watching on your TV. Press and hold 7 and press 4 on the remote<br />
control, or press 7 on the recorder.<br />
NOTES:<br />
● When you use the Direct Rec function, be sure to use a TV offering T-V LINK, etc. and<br />
connect a fully-wired 21-pin SCART cable between the recorder and the TV (� pg. 10).<br />
● If “DIRECT REC” is set to “OFF”, the 7 button functions as described in “Basic Recording”<br />
(� pg. 21, 31).<br />
● During the Direct Rec, “– –” appears on the front display panel.<br />
● Retake function (� pg. 28) does not work during Direct Rec. (<strong>VHS</strong> deck only)<br />
When this function is set to “ON”, you can reduce the power consumption while<br />
the recorder is turned off.<br />
NOTES:<br />
● During Power Save mode ...<br />
... the front display panel will be turned off.<br />
... the Just Clock function (� pg. 80) does not work.<br />
... the picture may be distorted momentarily when you turn on/off the recorder.<br />
● Power Save does not work when ...<br />
... the recorder is in the Timer mode.<br />
... the recorder’s power is turned off after timer-recording or Instant Timer Recording.<br />
... “L-2 SELECT” is set to “DECODER” or “SAT” (� pg. 53).
70 EN SUBSIDIARY SETTINGS (cont.)<br />
<strong>VHS</strong> MODE SET * The default setting is bold in the table below.<br />
8 B.E.S.T.<br />
ON<br />
OFF<br />
8 PICTURE CONTROL<br />
AUTO<br />
EDIT<br />
SOFT<br />
SHARP<br />
8 AUTO SP]LP TIMER<br />
ON<br />
OFF<br />
You can set the B.E.S.T. (Biconditional Equalised Signal Tracking) system to “ON” or<br />
“OFF” (� pg. 29).<br />
This feature helps you to adjust the playback picture quality according to your<br />
preference. Normally select “AUTO”.<br />
AUTO: Provides the optimised picture benefits of the B.E.S.T. Picture<br />
System.<br />
EDIT: <strong>Mini</strong>mizes picture degradation during editing (recording and<br />
playback).<br />
SOFT: Reduces image coarseness when viewing overplayed tapes<br />
containing a lot of noise.<br />
SHARP: Clearer, sharper-edged picture when viewing images with lots of<br />
flat, same-coloured surfaces such as cartoons.<br />
NOTES:<br />
● When you select “EDIT”, “SOFT” or “SHARP”, the selected mode will not change until you<br />
select another mode.<br />
● When you select “EDIT” to dub tapes, be sure to select “AUTO” after you finish dubbing the<br />
tapes.<br />
● When “B.E.S.T.” is “OFF”, “PICTURE CONTROL” switches automatically from “AUTO” to<br />
“NORM”.<br />
When this function is set to “ON”, the recorder automatically switches to LP mode<br />
to allow complete recording if there is not enough tape to record the entire<br />
programme while timer-recording in SP mode.<br />
For Example . . .<br />
Recording a programme of 210 minutes in length onto a 180-minute tape<br />
Approximately 150 minutes Approximately 60 minutes<br />
SP mode LP mode<br />
Total 210 minutes<br />
Make sure you set this function to “ON”, before the timer-recording starts.<br />
NOTES:<br />
● If you have programmed the recorder to timer-record 2 or more programmes, the second<br />
programme and those thereafter may not fit on the tape if you set “AUTO SP]LP TIMER” to<br />
“ON”. In this case, make sure the mode is not engaged, then set the tape speed manually<br />
during timer programming.<br />
● In order to ensure that the recording fits on the tape, this feature may leave a slight nonrecorded<br />
section at the end of the tape.<br />
● There may be some noise and sound disturbance at the point on the tape where the<br />
recorder switches from SP to LP mode.<br />
● The Auto SP]LP Timer feature is not available during ITR (Instant Timer Recording), and<br />
the feature will not work properly with any tapes longer than E-180, or with some tapes of<br />
shorter lengths.<br />
● If you perform timer recording with both VPS/PDC and the Auto SP]LP Timer activated,<br />
and the programme goes beyond its originally scheduled length, there may be times when<br />
the programme cannot be recorded in its entirety.
EN 71<br />
<strong>VHS</strong> MODE SET (cont.) * The default setting is bold in the table below.<br />
8 DIGITAL 3R<br />
ON<br />
OFF<br />
8 S-<strong>VHS</strong><br />
ON<br />
OFF<br />
8 S-<strong>VHS</strong> ET<br />
ON<br />
OFF<br />
When this function is set to “ON”, the Digital 3R picture system applies edge<br />
correction to the luminance signal to enhance detail.<br />
NOTES:<br />
● Normally it is recommended to keep “DIGITAL 3R” set to “ON”.<br />
● Depending on the type of tape being used, picture quality may be better with “DIGITAL 3R”<br />
set to “OFF”.<br />
● If you use the recorder as the source player for editing, be sure to set “DIGITAL 3R” to<br />
“OFF” before starting.<br />
Your recorder can record in S-<strong>VHS</strong> (Super <strong>VHS</strong>), S-<strong>VHS</strong> ET or <strong>VHS</strong>.<br />
● To record in S-<strong>VHS</strong>:<br />
Set “S-<strong>VHS</strong>” to “ON”. Then, insert a cassette marked “S-<strong>VHS</strong>”. The S-<strong>VHS</strong> indicator<br />
lights up on the front display panel.<br />
The S-<strong>VHS</strong> recording mode is selected.<br />
● To record in S-<strong>VHS</strong> ET on a <strong>VHS</strong> cassette:<br />
Set “S-<strong>VHS</strong> ET” to “ON”. (� See below.) Then, insert a cassette marked “<strong>VHS</strong>”.<br />
The S-<strong>VHS</strong> indicator lights up on the front display panel.<br />
● To record in <strong>VHS</strong>:<br />
Insert a cassette marked “<strong>VHS</strong>”.<br />
Set “S-<strong>VHS</strong> ET” to “OFF”. (� See below.)<br />
● To record in <strong>VHS</strong> on an S-<strong>VHS</strong> cassette:<br />
Insert a cassette marked “S-<strong>VHS</strong>”. The S-<strong>VHS</strong> indicator lights up on the front<br />
display panel. Then, set “S-<strong>VHS</strong>” to “OFF”. The S-<strong>VHS</strong> indicator goes off.<br />
The <strong>VHS</strong> recording mode is selected.<br />
NOTE:<br />
When playing back a tape that has been recorded in S-<strong>VHS</strong> or S-<strong>VHS</strong> ET, the S-<strong>VHS</strong> indicator<br />
lights up on the front display panel regardless of the “S-<strong>VHS</strong>” mode setting.<br />
You can record in SP mode on <strong>VHS</strong> cassettes with S-<strong>VHS</strong> picture quality. Tapes<br />
recorded using this function can be played back on a recorder equipped with the<br />
S-<strong>VHS</strong> ET function.<br />
When this function is set to “ON”, the S-<strong>VHS</strong> indicator lights up on the front<br />
display panel.<br />
NOTES:<br />
● You can activate the S-<strong>VHS</strong> ET function only before you start recording on a <strong>VHS</strong> cassette.<br />
● Before recording, make sure that “B.E.S.T.” is set to “ON”. (� pg. 70)<br />
● You cannot activate the S-<strong>VHS</strong> ET function ...<br />
... while recording is in progress.<br />
... while timer-recording or Instant Timer Recording (� pg. 26, 34) is in progress.<br />
... while B.E.S.T. (� pg. 29) is in progress.<br />
● The S-<strong>VHS</strong> ET function does not work ...<br />
... with S-<strong>VHS</strong> cassettes.<br />
... with recordings in LP mode.<br />
● To keep the highest quality recording and playback pictures over a long period of time,<br />
S-<strong>VHS</strong> recording on S-<strong>VHS</strong> cassettes is recommended.<br />
● Use of high grade tapes is recommended for S-<strong>VHS</strong> ET recordings. On some tapes, picture<br />
quality will not improve even if the S-<strong>VHS</strong> ET function is used. Check the recording quality<br />
before you start important recordings.<br />
● You can play back a tape recorded using the S-<strong>VHS</strong> ET function on most of S-<strong>VHS</strong> recorders<br />
and of <strong>VHS</strong> recorders equipped with SQPB (S-<strong>VHS</strong> QUASI PLAYBACK) function. (Notice<br />
some recorders are not compatible with the S-<strong>VHS</strong> ET function.)<br />
● While playing back a tape recorded using the S-<strong>VHS</strong> ET function on some recorders, noise<br />
may appear. (If playback picture becomes blurred or interrupted, use a cleaning cassette.)<br />
● In the high-speed search, still, slow-motion or frame-by-frame playback modes (� pg. 22,<br />
32), noise may appear. If these modes are performed frequently on a tape recorded using<br />
the S-<strong>VHS</strong> ET function, the tape may be damaged and the picture may be deteriorated.
72 EN SUBSIDIARY SETTINGS (cont.)<br />
<strong>VHS</strong> MODE SET (cont.) * The default setting is bold in the table below.<br />
8 COLOUR SYSTEM<br />
PAL/NTSC<br />
MESECAM<br />
8 DIGITAL TBC/NR<br />
ON<br />
OFF<br />
8 <strong>VIDEO</strong> STABILIZER<br />
ON<br />
OFF<br />
You can play back PAL, NTSC and MESECAM tapes, or record PAL and SECAM*<br />
signals on this recorder. Select the appropriate colour system.<br />
* SECAM signals will be recorded as MESECAM on this recorder; MESECAM is the<br />
designation for tapes with SECAM signals that have been recorded on a MESECAMcompatible<br />
PAL video cassette recorder.<br />
PAL/NTSC: To record PAL signals, or play back a PAL or NTSC tape.<br />
MESECAM: To record SECAM signals, or play back a MESECAM tape.<br />
NOTES:<br />
● It is not possible to record in S-<strong>VHS</strong> if “MESECAM” is selected. The recording mode is<br />
forced to change to <strong>VHS</strong>.<br />
About NTSC Playback<br />
● Some TVs shrink the picture vertically and place black bars at the top and bottom of the TV<br />
screen. This is not a malfunction on the part of either the video recorder or the TV.<br />
● The picture may roll up and down. This can be corrected using the V-HOLD control found<br />
on some TVs. (This cannot be corrected if the TV does not have a V-HOLD control.)<br />
● The counter and tape remaining time readings will be incorrect.<br />
● During search, still, or frame-by-frame playback, the picture will be distorted, and there<br />
may be a loss of colour.<br />
● Depending on the type of TV, the top and bottom portions of superimposed displays may be<br />
cut off during NTSC playback.<br />
Your recorder is equipped with the Digital TBC (Time Base Corrector) that removes<br />
jitter from fluctuating video signals to deliver a stable picture even with old tapes<br />
and rental cassettes.<br />
The on/off of Digital 3-DNR (Noise Reduction) which cuts noise and enables clear<br />
picture reproduction is also linked to this function.<br />
We recommend that you set “DIGITAL TBC/NR” to “ON” when ...<br />
... playing back a tape recorded on a camcorder.<br />
... playing back a tape repeatedly used.<br />
... using this video recorder as the source player for editing.<br />
NOTES:<br />
● If you play back a tape recorded under poor TV reception condition, the picture may<br />
become more stable with Digital TBC/NR set to off.<br />
● When “DIGITAL TBC/NR” is set to “ON”, if you play back a tape where certain types of<br />
signals are recorded (using a PC or some character generators), the playback picture may be<br />
distorted. If this is the case, set “DIGITAL TBC/NR” to “OFF”.<br />
● When playing back a MESECAM tape, Digital TBC/NR does not function even though<br />
“DIGITAL TBC/NR” is set to “ON”.<br />
When this function is set to “ON”, you can automatically correct vertical vibration<br />
in the picture when playing back unstable recordings made on another recorder.<br />
NOTES:<br />
● When you finish viewing a tape, be sure to set this function to “OFF”.<br />
● Regardless of the setting, this function has no effect during recording and during special effects<br />
playback.<br />
● The on-screen display may jitter vertically when this function is set to “ON”.<br />
● To watch recordings with close-caption, set this function to “OFF”.<br />
● Video Stabilizer and Digital TBC/NR cannot be used at the same time. If you activate Digital<br />
TBC/NR when “<strong>VIDEO</strong> STABILIZER” is set to “ON”, Video Stabilizer will be automatically<br />
turned “OFF”.
EN 73<br />
<strong>DV</strong> MODE SET * The default setting is bold in the table below.<br />
8 SOUND MODE<br />
12BIT<br />
16BIT<br />
8 12BIT MODE<br />
SOUND1<br />
SOUND2<br />
FULL SOUND<br />
8 AUDIO REC<br />
NICAM<br />
MONO<br />
Select the appropriate mode before recording on a <strong>Mini</strong> <strong>DV</strong> tape.<br />
12BIT: Enables Audio Dubbing later.<br />
16BIT: Audio Dubbing is impossible but the recorded sound quality is<br />
higher than “12BIT”.<br />
Select the appropriate mode when playing back an audio-dubbed <strong>Mini</strong> <strong>DV</strong> tape.<br />
SOUND1: Original recorded sound<br />
SOUND2: Audio-dubbed sound<br />
FULL SOUND:Original recorded sound and Audio-dubbed sound<br />
NOTES:<br />
● When “12BIT MODE” is set to “FULL SOUND”, both the main and sub audio will be<br />
audible for bilingual tapes.<br />
● To select only the main audio or only the sub audio of bilingual tapes, set “12BIT MODE”<br />
to “SOUND1”.<br />
Select the appropriate mode when recording the NICAM bilingual programmes.<br />
NICAM: The NICAM audio programme will be recorded on the audio<br />
track.<br />
MONO: The Standard (monaural) audio programme will be recorded on<br />
the audio track.
74 EN SUBSIDIARY SETTINGS (cont.)<br />
Tuner Set<br />
Turn on the TV and select the AV mode.<br />
1<br />
2<br />
1<br />
2<br />
1 2 3<br />
4 5 6<br />
7 8 9<br />
0<br />
3<br />
3<br />
4<br />
4<br />
IMPORTANT<br />
Perform the following steps only if —<br />
— Auto Channel Set has not been set correctly by Auto Set<br />
Up or by Preset Download (� pg. 12, 14).<br />
— you have moved to a different area or if a new station<br />
starts broadcasting in your area.<br />
Your recorder needs to memorize all necessary stations in<br />
channel positions in order to record TV programmes. Auto<br />
Channel Set automatically assigns all receivable stations in your<br />
area to call them up by using the PR buttons without going<br />
through any vacant channels.<br />
Auto Channel Set<br />
A<br />
Press 1.<br />
B<br />
Press MENU.<br />
C<br />
D<br />
Turn on the recorder.<br />
Access the Main Menu screen.<br />
Access the Auto Channel Set screen.<br />
Press rt to move the<br />
highlight bar (pointer) to<br />
“AUTO CH SET”, then press<br />
OK or e.<br />
Select your country.<br />
Press rt to move the highlight bar (pointer) to your<br />
country’s name, then press OK or e.<br />
E<br />
Select the language.<br />
MAIN MENU<br />
MODE SET<br />
<strong>VHS</strong> MODE SET<br />
<strong>DV</strong> MODE SET<br />
AUTO CH SET<br />
MANUAL CH SET<br />
OUTPUT/INPUT SET<br />
INITIAL SET<br />
Press rt to move the highlight bar (pointer) to the<br />
language of your choice.
1<br />
2<br />
1<br />
2<br />
1 2 3<br />
4 5 6<br />
7 8 9<br />
0<br />
IMPORTANT<br />
● In certain reception conditions, station names may not be<br />
stored correctly, and Auto Guide Program Number Set may<br />
not work properly. If the Guide Program numbers are not<br />
set properly when you timer-record a TV programme using<br />
the SHOWVIEW system, the recorder will record a TV<br />
programme of a different station. When programming the<br />
timer using the SHOWVIEW system, be sure to check the<br />
desired channel is selected correctly (� pg. 36,<br />
“G-CODE/SHOWVIEW Timer Programming”).<br />
● Your video recorder memorizes all detected stations even if<br />
reception of some of them is poor. You can delete those<br />
stations with an unacceptable picture (� pg. 77, “Delete<br />
A Channel”).<br />
NOTES:<br />
● Fine tuning is performed automatically during Auto Channel<br />
Set. If you want to perform tuning manually, refer to page 78.<br />
● If you perform Auto Channel Set when the aerial cable is not<br />
connected properly, “SCAN COMPLETED –NO SIGNAL–”<br />
appears on the TV screen in step 7. When this happens, make<br />
sure of the aerial connection and press OK; Auto Channel Set<br />
will take place again.<br />
● If no sound accompanies the picture or the audio sounds<br />
unnatural on some channels that have been stored by Auto Set<br />
Up, the TV system setting for those channels may be incorrect.<br />
Select the appropriate TV system for those channels<br />
(� pg. 77, “INFORMATION”).<br />
3<br />
3<br />
4<br />
4<br />
F<br />
Perform Auto Channel Set.<br />
Press OK twice.<br />
● You can set up the recorder’s<br />
tuner also by Preset<br />
Download (� pg. 14).<br />
● The Auto Set screen appears,<br />
and remains on screen while<br />
the recorder searches for<br />
receivable stations.<br />
As Auto Channel Set<br />
progresses, the “q” mark on<br />
the TV screen moves from<br />
left to right. Wait until the TV<br />
screen as shown in step 7<br />
appears.<br />
G<br />
View the Confirmation screen.<br />
EN 75<br />
After “SCAN COMPLETED” is<br />
displayed on the TV screen for<br />
about 5 seconds, the<br />
Confirmation screen looking<br />
like the one to the right<br />
appears. The stations your<br />
recorder located appear on a<br />
Confirmation screen —<br />
channel positions (PR),<br />
channels (CH) and station names (ID – � pg. 79). The<br />
blueback screen and the programme currently being<br />
broadcast by the blinking station appear alternately for 8<br />
seconds each. To view the next page, use the rt w e<br />
button on the remote control.<br />
● The stations located in the selected country appear at the top<br />
of the list.<br />
● The Guide Program numbers will also be set automatically<br />
during Auto Channel Set.<br />
H<br />
Return to the normal screen.<br />
Beginning End<br />
Press MENU.<br />
● Using the Confirmation screen, you can skip or add channel<br />
positions, enter station names and perform other operations.<br />
Refer to pages 76 – 78 for the procedures.<br />
● Depending on reception conditions, the stations may not be<br />
stored in order, and the station names may not be stored<br />
correctly.<br />
● For information on scrambled broadcasts, refer to page 77.
76 EN SUBSIDIARY SETTINGS (cont.)<br />
Manual Channel Set<br />
Store channels that were not stored during Auto Set Up<br />
(� pg. 12), Preset Download (� pg. 14) or Auto Channel Set<br />
(� pg. 74).<br />
A<br />
Press MENU.<br />
B<br />
Access the Main Menu screen.<br />
Access the Confirmation screen.<br />
Press rt to move the highlight bar (pointer) to<br />
“MANUAL CH SET”, then press OK or e. The<br />
Confirmation screen appears.<br />
C<br />
Select the channel position.<br />
Press rt w e until an open<br />
position in which you want to<br />
store a channel begins<br />
blinking, then press OK. The<br />
Manual Channel Set screen<br />
appears.<br />
1<br />
2<br />
1<br />
2<br />
1 2 3<br />
4 5 6<br />
7 8 9<br />
0<br />
3<br />
3<br />
4<br />
4<br />
(Example) To store in position 12.<br />
The blueback screen and the<br />
programme currently being<br />
broadcast by the selected channel<br />
appear alternately for 8 seconds<br />
each.<br />
D<br />
E<br />
Select the band.<br />
Press rt to change the band<br />
between CH (regular) and CC<br />
(cable), then press e.<br />
Input the channel.<br />
Press the number keys to input the channel number you<br />
want to store.<br />
● Input “0” before any single number entries.<br />
● To input the registered station name (ID – � pg. 79), press e<br />
until “– – – –” (ID setting) begins blinking, then press rt.<br />
● For fine tuning adjustment, press e until “+/–” begins blinking,<br />
then press rt. While tuning, “+” or “–” appears.<br />
● When storing a channel that sends scrambled broadcasts,<br />
press e until “OFF” (Decoder setting) blinks, then press rt to<br />
set “DECODER” to “ON” (“OFF” is the default setting).<br />
● When “L-2 SELECT” is set to “A/V” or “SAT”, the “DECODER”<br />
setting cannot be changed (� pg. 53).<br />
F<br />
Enter new channel information.<br />
Press OK and the Confirmation screen appears.<br />
● Repeat steps 3 – 6 as necessary.<br />
G<br />
Close the Confirmation screen.<br />
Press MENU.<br />
● To change positions, see “Change Station Channel Position”<br />
(� pg. 77).<br />
● If you wish to set station names other than the ones registered<br />
in your recorder, see “Set Stations (B)” (� pg. 78).<br />
ATTENTION<br />
Guide Program numbers are not set when channels are<br />
stored manually. If an attempt is made at timer programming<br />
with the SHOWVIEW system in this state, the “GUIDE PROG<br />
SET” screen appears; set the Guide Program numbers on this<br />
screen. (� pg. 37, “ATTENTION — Guide Program<br />
Number Set”)<br />
Or perform “Guide Program Number Set” (� pg. 82).
Delete A Channel<br />
Perform steps 1 and 2 of “Manual Channel Set” on page 76<br />
to access the Confirmation screen before continuing.<br />
A<br />
Select the item.<br />
Press rt w e until the item you want to delete begins<br />
blinking.<br />
B<br />
Delete a channel.<br />
Press &.<br />
● The item directly beneath the cancelled one moves up one<br />
line.<br />
● Repeat steps 1 and 2 as necessary.<br />
C<br />
Press MENU.<br />
Close the Confirmation screen.<br />
Change Station Channel Position<br />
Perform steps 1 and 2 of “Manual Channel Set” on page 76<br />
to access the Confirmation screen before continuing.<br />
A<br />
Select the item.<br />
Press rt w e until the item you want to move begins<br />
blinking. Then press OK and the station name (ID) and its<br />
channel (CH) number begin blinking.<br />
B<br />
Select the new position.<br />
Press rt w e to move the station to the new channel<br />
position, then press OK.<br />
Example: If you moved the station in position 4 to position 2, the<br />
stations originally in positions 2 and 3 each move<br />
down one space.<br />
● Repeat steps 1 and 2 as necessary.<br />
C<br />
Press MENU.<br />
Close the Confirmation screen.<br />
When Receiving A Scrambled<br />
Broadcast<br />
A<br />
Select the decoder mode.<br />
Set “L-2 SELECT” to “DECODER” (� pg. 53).<br />
B<br />
Access the Confirmation screen.<br />
Perform steps 1 and 2 of “Manual Channel Set” on<br />
page 76.<br />
C<br />
Select the position.<br />
EN 77<br />
Press rt w e to select the channel position broadcasting<br />
scrambled programmes, then press OK twice.<br />
D<br />
Change the decoder setting.<br />
Press e until “OFF” (decoder setting) begins blinking, and<br />
set it to “ON” by pressing rt.<br />
E<br />
Return to the Confirmation screen.<br />
Press OK.<br />
● Repeat steps 3 – 5 as necessary.<br />
F<br />
Press MENU.<br />
Close the Confirmation screen.<br />
INFORMATION<br />
If you live in Eastern Europe, “TV SYSTEM” setting appears<br />
instead of “DECODER” setting on the Manual Channel Set<br />
screen. When you can see the picture but can hear no audio,<br />
select appropriate TV system (D/K or B/G). Normally, TV<br />
programmes are broadcasted as follows.<br />
For Eastern Europe : D/K<br />
For Western Europe : B/G<br />
A Select a country in Eastern Europe in step 4 on page 74.<br />
B Press e until the TV system (D/K or B/G) blinking on the<br />
Manual Channel Set screen in step 4 on page 76.<br />
C Press rt to select appropriate TV System (D/K or B/G).
78 EN SUBSIDIARY SETTINGS (cont.)<br />
Set Stations (A)<br />
Set station names that are registered in your recorder.<br />
Perform steps 1 and 2 of “Manual Channel Set” on page 76<br />
to access the Confirmation screen before continuing.<br />
A<br />
Select the item.<br />
Press rt w e until the item you want begins blinking.<br />
B<br />
Access the Manual Channel Set screen.<br />
Press OK twice.<br />
C<br />
D<br />
Select the new station.<br />
Press e until the station name<br />
(ID) begins blinking, then<br />
press rt until the new<br />
station’s name (ID) you want<br />
to store begins blinking.<br />
Registered station names<br />
(� pg. 79) appear as you<br />
press rt.<br />
Switch the stations.<br />
Press OK.<br />
● The Confirmation screen appears.<br />
● Repeat steps 1 – 4 as necessary.<br />
E<br />
Press MENU.<br />
Close the Confirmation screen.<br />
Set Stations (B)<br />
Set station names other than the ones registered in your recorder.<br />
Perform steps 1 and 2 of “Manual Channel Set” on page 76<br />
to access the Confirmation screen and then perform steps 1<br />
and 2 of “Set Stations (A)” above before continuing.<br />
A<br />
Select the character for station name.<br />
Press e until the first letter of<br />
the station name begins<br />
blinking.<br />
B<br />
Enter the new character.<br />
Press rt to cycle through the characters (A–Z, 0–9, –, f,<br />
+, I (space) ) and stop when the desired character is<br />
indicated, then press e to enter. Enter the remaining<br />
characters the same way (maximum of 4). After entering<br />
all characters, press OK.<br />
● The Confirmation screen appears.<br />
● If you make a mistake, press w until the incorrect character<br />
begins blinking. Then enter the correct character by pressing<br />
rt.<br />
C<br />
Press MENU.<br />
Close the Confirmation screen.<br />
NOTE:<br />
The characters available for the station name (ID) are A–Z, 0–9,<br />
–, f, +, I (space) (maximum of 4).<br />
Fine-Tuning Channels Already Stored<br />
Perform steps 1 and 2 of “Manual Channel Set” on page 76<br />
to access the Confirmation screen before continuing.<br />
A<br />
Select the channel to fine-tune.<br />
Press rt w e until the channel you want to tune begins<br />
blinking.<br />
B<br />
Access the Manual Channel Set screen.<br />
Press OK twice. The Manual Channel Set screen appears.<br />
C<br />
Perform tuning.<br />
Press e until “+/–” begins blinking, then press rt until<br />
the picture is its clearest. Then press OK.<br />
● The Confirmation screen appears.<br />
● Repeat steps 1 – 3 as necessary.<br />
D<br />
Press MENU.<br />
Close the Confirmation screen.
TV Station And ID List<br />
ID* STATION NAME<br />
1000<br />
3SAT<br />
ADLT<br />
ANT3<br />
ARD<br />
ARTE<br />
B1<br />
BBC<br />
BBC1<br />
BBC2<br />
BR3<br />
C+<br />
C1<br />
CAN5<br />
CANV<br />
CH4<br />
CH5<br />
CHLD<br />
CINE<br />
CLUB<br />
CMT<br />
CNN<br />
CSUR<br />
DISC<br />
DR<br />
DR2<br />
DRS<br />
DSF<br />
ETB1<br />
ETB2<br />
EURO<br />
EUSP<br />
FEMM<br />
FILM<br />
FNET<br />
FR2<br />
FR3<br />
GALA<br />
HR3<br />
INFO<br />
ITA1<br />
ITA7<br />
ITV<br />
JSTV<br />
KA2<br />
KAB1<br />
KAN2<br />
LOCA<br />
M6<br />
MBC<br />
MCM<br />
MDR<br />
MOVE<br />
MTV<br />
MTV3<br />
N3<br />
N-TV<br />
NBC<br />
NDR3<br />
NED1<br />
NED2<br />
NED3<br />
NEWS<br />
NICK<br />
NRK<br />
NRK2<br />
ODE<br />
ORF1<br />
ORF2<br />
TV1000<br />
3SAT<br />
ADULT<br />
ANTENA3<br />
ARD<br />
ARTE<br />
BERLIN1<br />
BBC GROUP<br />
BBC1<br />
BBC2<br />
BAYERN3<br />
CANAL PLUS<br />
PORTUGUSES<br />
CANALE5<br />
KETNET CANVAS<br />
CHANNEL4<br />
CHANNEL5<br />
CHILD<br />
CINEMA<br />
TELECLUB<br />
CMT<br />
CNN<br />
ANDALUCIA<br />
DISCOVERY<br />
DR TV<br />
DR2<br />
DRS<br />
DSF<br />
ETB1<br />
ETB2<br />
EURONEWS<br />
EUROSPORTS<br />
FEMMAN<br />
FILM<br />
FILMNET<br />
France2<br />
France3<br />
GALAVISION<br />
HESSEN3<br />
INFO-KANAL<br />
ITALIA1<br />
ITALIA7<br />
ITV<br />
JSTV<br />
KA2<br />
KABEL1<br />
KANAL2<br />
LOCAL<br />
M6<br />
MBR<br />
MCM<br />
MDR<br />
MOVIE<br />
MTV<br />
MTV3<br />
NORD3<br />
N-TV<br />
NBC SUPER<br />
NDR3<br />
NED1<br />
NED2<br />
NED3<br />
NICKELODEON<br />
NRK<br />
NRK2<br />
ODEON<br />
ORF1<br />
ORF2<br />
ID* STATION NAME<br />
ORF3<br />
OWL3<br />
PREM<br />
PRO7<br />
RAI1<br />
RAI2<br />
RAI3<br />
RET4<br />
21<br />
RTBF<br />
RTL<br />
RTL2<br />
RTL4<br />
RTL5<br />
RTP<br />
S4<br />
SAT1<br />
SBS<br />
SF1<br />
SF2<br />
SHOW<br />
SIC<br />
SKY<br />
SKYN<br />
SPRT<br />
SRTL<br />
STAR<br />
SVT1<br />
SVT2<br />
SWR<br />
TCC<br />
TELE<br />
TEL5<br />
TF1<br />
TM3<br />
TMC<br />
TNT<br />
TRT<br />
TSI<br />
TSR<br />
TV1<br />
TV2<br />
TV3<br />
TV4<br />
TV5<br />
TV6<br />
TVE1<br />
TVE2<br />
TVG<br />
TVI<br />
TVN<br />
VCR<br />
VERO<br />
VH-1<br />
VIVA<br />
VIV2<br />
VMTV<br />
VOX<br />
VT4<br />
VTM<br />
WDR1<br />
WDR3<br />
YLE1<br />
YLE2<br />
ZDF<br />
ZTV<br />
ORF3<br />
OWL3<br />
PREMIERE<br />
PRO7<br />
RAI1<br />
RAI2<br />
RAI3<br />
RETE4<br />
TELE21<br />
RTBF1 or 2<br />
RTL<br />
RTL2<br />
RTL4<br />
RTL5<br />
RTP<br />
SCHWEIZ4<br />
SAT1<br />
SBS<br />
SF1<br />
SF2<br />
SHOW<br />
SOCIEDADE<br />
SKY CHANNEL<br />
SKY NEWS<br />
SPORT<br />
SUPER RTL<br />
STAR-TV<br />
SVT1<br />
SVT2<br />
SUEDWEST3<br />
TCC<br />
TELE<br />
TELE5<br />
TF1<br />
TM3<br />
TELEMONTECARLO<br />
TNT INT<br />
TRT INT<br />
TSI<br />
TSR<br />
BRTN TV1<br />
TV2<br />
TV3<br />
TV4<br />
TV5<br />
TV6<br />
TVE1<br />
TVE2<br />
TV GALICIA<br />
TV INDEPENDENT<br />
TV NORGE<br />
<strong>VIDEO</strong><br />
VERONICA<br />
VH-1<br />
VIVA<br />
VIVA2<br />
<strong>VIDEO</strong> MUSIC<br />
VOX<br />
VT4<br />
VTM<br />
West1<br />
West3<br />
YLE1<br />
YLE2<br />
ZDF<br />
ZTV<br />
EN 79<br />
* The “ID” abbreviation is what is shown on-screen in lieu of the station<br />
name. The “ID” abbreviation is listed in the Confirmation screen and is<br />
displayed on the TV screen when the recorder is tuned to a different<br />
station.
80 EN SUBSIDIARY SETTINGS (cont.)<br />
Clock Set<br />
Turn on the TV and select the AV mode.<br />
1<br />
2<br />
1<br />
2<br />
1 2 3<br />
4 5 6<br />
7 8 9<br />
0<br />
Just Clock<br />
The Just Clock function provides accurate time keeping<br />
through automatic adjustments at regular intervals, by<br />
reading data from a PDC signal.<br />
The Just Clock option can be set “ON” or “OFF” at the Clock<br />
Set screen (the default setting is “OFF”). Press OK until the<br />
Just Clock setting begins blinking, then press rt to change<br />
the setting.<br />
IMPORTANT: If you turn off Just Clock, the accuracy of your<br />
recorder’s built-in clock may be reduced, which could<br />
adversely effect timer recording. We recommend you to keep<br />
Just Clock on. In cases where the clock setting data from a<br />
PDC signal is incorrect, however, you are advised to keep<br />
Just Clock set to “OFF”.<br />
3<br />
3<br />
4<br />
4<br />
IMPORTANT<br />
If you performed Auto Set Up (� pg. 12), Preset Download<br />
(� pg. 14) or Auto Channel Set (� pg. 74), without ever<br />
having set the clock previously, the recorder’s built-in clock is<br />
also set automatically.<br />
Perform the following steps only if —<br />
—Auto Clock Set has not been performed correctly by Auto<br />
Set Up, Preset Download or Auto Channel Set.<br />
OR<br />
—the recorder’s memory backup has expired.<br />
OR<br />
—you want to change Just Clock setting (� “Just Clock” in<br />
the left column).<br />
A<br />
Press 1.<br />
B<br />
Press MENU.<br />
C<br />
Turn on the recorder.<br />
Access the Main Menu screen.<br />
Access the Initial Set screen.<br />
Press rt to move the highlight bar (pointer) to “INITIAL<br />
SET”, then press OK or e.<br />
D<br />
Access the Clock Set screen.<br />
Press rt to move the highlight bar (pointer) to “CLOCK<br />
SET”, then press OK or e. The Clock Set screen appears.<br />
NOTE:<br />
When you have selected MAGYARORSZÁG (36), CESKÁ<br />
REPUBLIKA (42), POLSKA (48) or OTHER EASTERN EUROPE<br />
(EE) for the country setting (� pg. 12, 16), you cannot use Just<br />
Clock function. Skip steps 6 and 7 on page 81.
1<br />
2<br />
1<br />
2<br />
1 2 3<br />
4 5 6<br />
7 8 9<br />
0<br />
3<br />
3<br />
4<br />
4<br />
E<br />
Set the date and time.<br />
EN 81<br />
Press rt to set the time, then press OK or e. The “DATE”<br />
display begins blinking. Repeat the same procedure to set<br />
the date and year.<br />
● When you set the time, press and hold rt to change the time<br />
by 30 minutes.<br />
● When you set the date, press and hold rt to change the date<br />
by 15 days.<br />
F<br />
Set Just Clock.<br />
The default setting is “OFF”. Set as desired by pressing<br />
rt, then press OK or e.<br />
● For the Just clock function, refer to “Just Clock” on page 80.<br />
● If you set to “OFF”, you can disregard the next step as you<br />
won’t be able to receive regular clock adjustments.<br />
G<br />
Set the source channel position for clock<br />
data.<br />
The recorder is preset to receive clock setting and<br />
adjustment data from channel position 1.<br />
Press rt to set the channel position to the number<br />
representing the station transmitting clock setting data,<br />
then press OK or e.<br />
H<br />
Press MENU.<br />
Start the clock operation.<br />
NOTES:<br />
● Just Clock (when set to “ON”) adjusts the recorder’s built-in<br />
clock every hour, except for 23:00, 0:00, 1:00 and 2:00.<br />
● Just Clock is not effective when ...<br />
... the recorder’s power is on.<br />
... the recorder is in the Timer mode.<br />
... a difference of more than 3 minutes exists between the<br />
built-in clock’s time and the actual time.<br />
... the recorder is in the Power Save mode (� pg. 69).<br />
... “L-2 SELECT” is set to “SAT” (� pg. 53).<br />
● If Just Clock is set to “ON”, the recorder’s clock is<br />
automatically adjusted at the start/end of Summer Time.<br />
● Just Clock may not function properly depending on the<br />
reception condition.
82 EN SUBSIDIARY SETTINGS (cont.)<br />
G-CODE/SHOWVIEW System Setup<br />
INFORMATION<br />
G-CODE and SHOWVIEW are different trademarks used to represent the same easy recording feature, but only the term SHOWVIEW<br />
system will be used. If you use the G-CODE system, follow the same instructions listed for the SHOWVIEW system.<br />
IMPORTANT<br />
Normally, Auto Set Up (� pg. 12), Preset Download (� pg. 14) or Auto Channel Set (� pg. 74) sets the Guide Program numbers<br />
automatically. You need to set the Guide Program numbers manually only in the following cases.<br />
● When timer-programming with the SHOWVIEW system, the channel position, where the station you wish to record is received on<br />
your recorder, is not selected,<br />
OR<br />
when you add a channel after Auto Set Up, Preset Download or Auto Channel Set has taken place,<br />
—Set the Guide Program number for that station manually.<br />
● When you wish to timer-record a satellite programme with the SHOWVIEW system,<br />
—Set the Guide Program numbers for all satellite broadcasts received on your satellite receiver.<br />
Turn on the TV and select the AV mode.<br />
Guide Program Number Set<br />
A<br />
Press MENU.<br />
B<br />
Access the Main Menu screen.<br />
Access the Initial Set screen.<br />
Press rt to move the highlight bar (pointer) to “INITIAL<br />
SET”, then press OK or e.<br />
C<br />
Access the Guide Program Set screen.<br />
Press rt to move the highlight bar (pointer) to “GUIDE<br />
PROG SET”, then press OK or e.<br />
D<br />
Enter the Guide Program number.<br />
Press rt to enter the Guide<br />
Program number for the desired<br />
station as shown in the TV<br />
listings. Then press OK or e.<br />
(Example) When inputting the<br />
Guide Program<br />
number 2 for ZDF.<br />
E<br />
F<br />
Press MENU.<br />
Enter the receiving channel position number.<br />
Press the number key “0” to<br />
select “TV PROG” or “SAT”.<br />
Then press rt to input the<br />
number of the recorder’s<br />
channel position on which the<br />
Guide Program number’s<br />
broadcast is received by the<br />
recorder or the satellite<br />
receiver. Then press OK or e.<br />
● To timer-record a satellite<br />
(Example) If ZDF is received on<br />
channel position 2.<br />
programme with the SHOWVIEW<br />
system, you need to install the<br />
provided Satellite Controller and<br />
perform the procedure described<br />
in “Satellite Receiver Control<br />
Setting” (� pg. 17).<br />
● Repeat steps 4 and 5 as<br />
necessary.<br />
Return to the normal screen.<br />
Guide Program Number<br />
“Guide Program (GUIDE PROG) number” refers to the<br />
assigned TV station numbers, according to broadcast area,<br />
for the SHOWVIEW timer recording. The Guide Program<br />
numbers can be found in most TV listings.
TROUBLESHOOTING<br />
EN 83<br />
Before requesting service for a problem, use this chart and see if you can repair the trouble yourself. Small problems are<br />
often easily corrected, and this can save you the trouble of sending your video recorder off for repair.<br />
POWER<br />
TAPE TRANSPORT<br />
PLAYBACK<br />
SYMPTOM POSSIBLE CAUSE CORRECTIVE ACTION<br />
1. No power is supplied to the recorder. ● The mains power cord is disconnected. Connect the mains power cord.<br />
2. The clock is functioning properly, but<br />
the recorder cannot be powered.<br />
● “#” is displayed on the front display<br />
panel with “AUTO TIMER” set to “OFF”.<br />
Press the # button to turn the “#”<br />
indicator off.<br />
3. The remote control won’t function. ● The batteries are discharged. Replace the dead batteries with new ones.<br />
SYMPTOM POSSIBLE CAUSE CORRECTIVE ACTION<br />
1. The tape does not run during<br />
recording.<br />
2. The tape will not rewind or fastforward.<br />
● “i” is displayed on the front display<br />
panel.<br />
● The tape is already fully rewound or<br />
fast-forwarded.<br />
Press 4 to turn the “i” indicator off.<br />
Check the cassette.<br />
SYMPTOM POSSIBLE CAUSE CORRECTIVE ACTION<br />
1. The playback picture does not appear<br />
while the tape is running.<br />
2. Noise appears during visual search. ● This is normal.<br />
3. Noise appears during normal<br />
playback. (<strong>VHS</strong> deck only)<br />
4. The playback picture is blurred or<br />
interrupted while TV broadcasts are<br />
clear or “USE CLEANING <strong>CASSETTE</strong>”<br />
message appears on the screen.<br />
5. Breaks are noticeable in Hi-Fi<br />
soundtrack. (<strong>VHS</strong> deck only)<br />
● The TV receiver is not set to the AV<br />
mode.<br />
● The automatic tracking mode is<br />
engaged.<br />
Set the TV to its AV mode.<br />
Try manual tracking. (� pg. 25)<br />
● The video heads may be dirty. For the <strong>VHS</strong> deck<br />
Use a dry cleaning cassette TCL-2, or<br />
consult your JVC dealer.<br />
For the <strong>DV</strong> deck<br />
Use a dry cleaning cassette M-<strong>DV</strong>12CL, or<br />
consult your JVC dealer.<br />
● The automatic tracking mode is<br />
engaged.<br />
Try manual tracking. (� pg. 25)
84 EN TROUBLESHOOTING (cont.)<br />
RECORDING<br />
SYMPTOM POSSIBLE CAUSE CORRECTIVE ACTION<br />
1. Recording cannot be started. ● For the <strong>VHS</strong> deck<br />
There is no cassette loaded, or the<br />
cassette loaded has had its record safety<br />
tab removed.<br />
● For the <strong>DV</strong> deck<br />
There is no cassette loaded, or the<br />
cassette loaded has had its erase<br />
protection switch set to “SAVE”.<br />
2. TV broadcasts cannot be recorded. ● “L-1”, “L-2”, “F-1” or “SAT” has been<br />
selected as the input mode.<br />
3. Tape-to-tape editing is not possible. ● The source (another video recorder,<br />
camcorder) has not been properly<br />
connected.<br />
● All necessary power switches have not<br />
been turned on.<br />
4. Camcorder recording is not possible. ● The camcorder has not been properly<br />
connected.<br />
5. “[ ” on the front display panel won’t<br />
stop blinking.<br />
Insert a <strong>VHS</strong> (or S-<strong>VHS</strong>) cassette, or using<br />
adhesive tape, cover the hole where the<br />
tab was removed.<br />
Insert a <strong>Mini</strong> <strong>DV</strong> cassette, or set the erase<br />
protection switch set to “REC”.<br />
Set to the desired channel.<br />
Confirm that the source is properly<br />
connected.<br />
Confirm that all units’ power switches are<br />
turned on.<br />
● The input mode is not correct. Set the input mode to “L-1”, “L-2” or<br />
“F-1”.<br />
Confirm that the camcorder is properly<br />
connected.<br />
● The input mode is not correct. Set the input mode to “L-1”, “L-2” or<br />
“F-1”.<br />
● The end of the tape was reached during<br />
recording.<br />
6. Audio dubbing is not possible. ● “SOUND MODE” had been set to<br />
“16BIT” at the original recording.<br />
7. Monitoring the audio-dubbed sound is<br />
not possible during audio dubbing<br />
using the <strong>DV</strong> deck.<br />
8. The programmed memory of Random<br />
Assemble Editing is disappeared.<br />
9. When performing Tape Dubbing, the<br />
beginning of the dubbing start point is<br />
not dubbed.<br />
● For the <strong>DV</strong> deck<br />
The tape speed had been set to LP at the<br />
original recording.<br />
The programme may not have been<br />
recorded in its entirety. Next time make<br />
sure you have enough time on the tape to<br />
record the entire programme.<br />
Set “SOUND MODE” to “12BIT” at the<br />
original recording. (� pg. 73)<br />
Set the tape speed to SP at the original<br />
recording.<br />
● This is normal. Monitor the sound using the connected<br />
devices.<br />
● The memory backup time has expired. Perform Random Assemble Editing again.<br />
(� pg. 58)<br />
● This is normal.
TIMER RECORDING<br />
SYMPTOM POSSIBLE CAUSE CORRECTIVE ACTION<br />
1. Timer recording won’t work. ● The clock and/or the timer have been set<br />
incorrectly.<br />
Re-perform the clock and/or timer<br />
settings.<br />
● The timer is not engaged. Press # and confirm that “#” is<br />
displayed on the front display panel.<br />
● Timer recording may not work when the<br />
recorder’s input mode is set to “F-1” for<br />
recording on the <strong>DV</strong> deck, because the<br />
recorder is waiting for the signals<br />
through <strong>DV</strong> IN/OUT (i.Link) connector.<br />
EN 85<br />
Set the channel position other than “F-1”<br />
before engaging to Timer-Standby mode.<br />
2. Timer programming is not possible. ● Timer recording is in progress. Timer programming can’t be performed<br />
while a timer recording is in progress.<br />
Wait until it finishes.<br />
3. “#” and “[ ” on the front display<br />
panel won’t stop blinking.<br />
4. “#” blinks for 10 seconds and the<br />
Timer mode is disengaged.<br />
5. The SHOWVIEW system does not timerrecord<br />
properly.<br />
6. “[ ” on the front display panel and<br />
SAT # indicator won’t stop blinking.<br />
7. The power shuts off and “[ ” won’t<br />
stop blinking.<br />
● The timer is engaged but there’s no<br />
cassette loaded.<br />
● The end of the tape was reached during<br />
timer recording.<br />
● <strong>VHS</strong> deck<br />
The loaded cassette has had its record<br />
safety tab removed.<br />
● <strong>DV</strong> deck<br />
The loaded cassette has had its erase<br />
protection switch set to “SAVE”.<br />
● # has been pressed when there are no<br />
programs in memory, or the timer<br />
record information has been<br />
programmed incorrectly.<br />
● The recorder’s channel positions have<br />
been set incorrectly.<br />
● The end of the tape was reached during<br />
Automatic Satellite Programme<br />
Recording.<br />
● <strong>VHS</strong> deck<br />
The loaded cassette has had its record<br />
safety tab removed.<br />
● <strong>DV</strong> deck<br />
The loaded cassette has had its erase<br />
protection switch set to “SAVE”.<br />
● The end of the tape was reached during<br />
Instant Timer Recording.<br />
For the <strong>VHS</strong> deck<br />
Insert a <strong>VHS</strong> (or S-<strong>VHS</strong>) cassette with the<br />
record safety tab intact, or cover the hole<br />
using adhesive tape.<br />
For the <strong>DV</strong> deck<br />
Insert a <strong>Mini</strong> <strong>DV</strong> cassette with the erase<br />
protection switch set to “REC”.<br />
The programme may not have been<br />
recorded in its entirety. Next time make<br />
sure you have enough time on the tape to<br />
record the entire programme.<br />
Remove the cassette and cover the hole<br />
with adhesive tape, or insert a cassette<br />
with the record safety tab intact.<br />
Remove the cassette and set the erase<br />
protection switch to “REC”.<br />
Check the programmed data and reprogram<br />
as necessary, then press # again.<br />
Refer to “Guide Program Number Set”<br />
(� pg. 82) and re-perform the procedure.<br />
The programme may not have been<br />
recorded in its entirety. Next time make<br />
sure you have enough time on the tape to<br />
record the entire programme.<br />
Remove the cassette and cover the hole<br />
with adhesive tape, or insert a cassette<br />
with the record safety tab intact.<br />
Remove the cassette and set the erase<br />
protection switch to “REC”.<br />
The programme may not have been<br />
recorded in its entirety. Next time make<br />
sure you have enough time on the tape to<br />
record the entire programme.
86 EN TROUBLESHOOTING (cont.)<br />
OTHER PROBLEMS<br />
SYMPTOM POSSIBLE CAUSE CORRECTIVE ACTION<br />
1. Whistling or howling is heard from the<br />
TV during camcorder recording.<br />
2. When scanning channels, some of<br />
them are skipped over.<br />
● The camcorder’s microphone is too<br />
close to the TV.<br />
Position the camcorder so its microphone<br />
is away from the TV.<br />
● The TV’s volume is too high. Turn the TV’s volume down.<br />
● Those channels have been designated to<br />
be skipped.<br />
If you need the skipped channels, restore<br />
them (� pg. 76).<br />
3. The channel cannot be changed. ● Recording is in progress. Press 9 to pause the recording, change<br />
channels, then press 4 to resume<br />
recording.<br />
4. Channel settings that were made<br />
manually seem to have changed or<br />
disappeared.<br />
5. No channels are stored in the<br />
recorder’s memory.<br />
6. The remote control won’t operate the<br />
TV or satellite receiver.<br />
7. No picture appears when you connect<br />
a device to <strong>DV</strong> IN/OUT connector.<br />
● After the manual settings were made,<br />
Auto Channel Set was performed.<br />
● The TV aerial cable was not connected<br />
to the recorder when Auto Set Up was<br />
performed.<br />
● The fully-wired 21-pin SCART cable was<br />
not connected between TV and the<br />
recorder when Preset Download was<br />
performed.<br />
● The remote control brand setting is<br />
incorrect.<br />
Perform manual setting again.<br />
Turn off the recorder once and connect<br />
the TV aerial cable to the recorder<br />
properly, then turn on the recorder again.<br />
The recorder will try Auto Set Up again<br />
(� pg. 12).<br />
Turn off the recorder once and connect<br />
the fully-wired 21-pin SCART cable to the<br />
recorder properly, then turn on the<br />
recorder again. Then perform Preset<br />
Download again (� pg. 14).<br />
Re-set the remote control to the correct<br />
brand. (� pg. 61, 62)<br />
Turn off the recorder or the connected<br />
appliance once, then turn it on again.<br />
ATTENTION<br />
This recorder contains microcomputers. External electronic noise or interference could cause malfunctioning. In such cases, switch<br />
the recorder off and unplug the mains power cord. Then plug it in again and turn the recorder on. Take out the cassette. After<br />
checking the cassette, operate the unit as usual.
QUESTIONS AND ANSWERS<br />
PLAYBACK<br />
Q. What happens if the end of the tape is reached<br />
during playback or search?<br />
A. The tape is automatically rewound to the<br />
beginning.<br />
Q. Can the video recorder indefinitely remain in<br />
the still mode?<br />
A. No. It stops automatically after 5 minutes on the<br />
<strong>VHS</strong> deck, 3 minutes on the <strong>DV</strong> deck to protect<br />
the heads.<br />
Q. When returning from variable-speed search to<br />
normal playback, the picture is disturbed.<br />
Should I be concerned about this?<br />
A. No, it is normal.<br />
Q. Noise bar appear during variable-speed search.<br />
What’s the problem?<br />
A. This is normal.<br />
Q. Sometimes, during Index Search, the video<br />
recorder can’t find the programme I want to<br />
see. Why not?<br />
A. There may be index codes too close together.<br />
RECORDING<br />
Q. When I pause and then resume a recording, the<br />
end of the recording before the pause is<br />
overlapped by the beginning of the<br />
continuation of recording. Why does this<br />
happen?<br />
A. This is normal. It reduces distortion at the pause<br />
and resume points.<br />
Q. Can the video recorder indefinitely remain in<br />
the Record-Pause mode?<br />
A. No. The video recorder goes to its Stop mode<br />
automatically after 5 minutes to protect the<br />
heads.<br />
Q. What happens if the tape runs out during<br />
recording?<br />
A. The video recorder stops recording, and “[ ”<br />
on the front display panel won’t stop blinking.<br />
TIMER RECORDING<br />
EN 87<br />
Q. “o” and “#” remain lit on the front display<br />
panel. Is there a problem?<br />
A. No. This is a normal condition for a timer<br />
recording in progress.<br />
Q. Can I programme the timer while I’m watching<br />
a tape or a TV broadcast?<br />
A. You won’t see the picture as it is replaced by the<br />
on-screen menu, but the audio from the<br />
programme or tape you’re viewing can be<br />
heard.
88 EN SPECIFICATIONS<br />
GENERAL<br />
Power requirement : AC 220 V – 240 Vd, 50 Hz/60 Hz<br />
Power consumption<br />
Power on : 31 W<br />
Power off : 6.5 W<br />
Temperature<br />
Operating : 5°C to 40°C<br />
Storage : –20°C to 60°C<br />
Operating position : Horizontal only<br />
Dimensions (WxHxD)<br />
: 435 mm x 106 mm x 380 mm<br />
Weight : 5.1 kg<br />
Input/Output : 21-pin SCART connectors:<br />
IN/OUT x 1, IN/DECODER x 1<br />
RCA connectors:<br />
<strong>VIDEO</strong> IN x 1, AUDIO IN x 1,<br />
AUDIO OUT x 1<br />
S-Video connectors:<br />
IN x 1, OUT x 1<br />
<strong>DV</strong> connector:<br />
IN/OUT x 1 (4-pin, IEEE1394<br />
conformity, digital input/output)<br />
<strong>VHS</strong> DECK <strong>VIDEO</strong>/AUDIO<br />
Signal system : PAL-type colour signal and CCIR<br />
monochrome signal, 625 lines<br />
50 fields<br />
Recording system : DA4 (Double Azimuth) head helical<br />
scan system<br />
Format : S-<strong>VHS</strong>/<strong>VHS</strong> PAL standard<br />
Signal-to-noise ratio: 45 dB<br />
Horizontal resolution<br />
(SP/LP) : 250 lines (<strong>VHS</strong>)<br />
400 lines (S-<strong>VHS</strong>)<br />
Frequency range : 70 Hz to 10,000 Hz (Normal audio)<br />
20 Hz to 20,000 Hz (Hi-Fi audio)<br />
Maximum recording time<br />
(SP) : 240 min. with E-240 video cassette<br />
(LP) : 480 min. with E-240 video cassette<br />
<strong>DV</strong> DECK <strong>VIDEO</strong>/AUDIO<br />
Signal system : PAL-type colour signal, 625 lines<br />
50 fields<br />
Recording system : Digital Component Recording<br />
Format : <strong>DV</strong> format (SD mode)<br />
Cassette : <strong>Mini</strong> <strong>DV</strong> Cassette<br />
Maximum recording time<br />
(SP) : 80 min. with M-<strong>DV</strong>80ME cassette<br />
(LP) : 120 min. with M-<strong>DV</strong>80ME cassette<br />
Audio recording system<br />
: PCM 48 kHz, 16 bit (2 ch)/<br />
32 kHz, 12 bit (4 ch)<br />
TUNER/TIMER<br />
TV channel storage capacity<br />
: 99 positions (+AUX position)<br />
Tuning system : Frequency synthesized tuner<br />
Channel coverage : VHF 44 MHz – 89 MHz/<br />
104 MHz – 300 MHz/<br />
302 MHz – 470 MHz<br />
UHF 470 MHz – 862 MHz<br />
Memory backup time<br />
: Approx. 10 min.<br />
ACCESSORIES<br />
Provided accessories<br />
: RF cable,<br />
21-pin SCART cable,<br />
Satellite Controller,<br />
Infrared remote control unit,<br />
“R6” battery x 2<br />
Specifications shown are for SP mode unless otherwise specified.<br />
E.& O.E. Design and specifications subject to change without<br />
notice.
LISTE OF TERMS<br />
A<br />
Audio Dubbing ...................................................... 54<br />
AUDIO REC .......................................................... 73<br />
Auto Channel Set .................................................... 74<br />
Auto Set Up .......................................................... 12<br />
AUTO SP]LP TIMER .............................................. 70<br />
AUTO TIMER ........................................................ 69<br />
AV Insert Editing ..................................................... 57<br />
B<br />
B.E.S.T. .......................................................... 29, 70<br />
C<br />
Change Station Channel Position ................................. 77<br />
Check, cancel and change programmes ........................ 42<br />
Clock Set .............................................................. 80<br />
COLOUR SYSTEM .................................................. 72<br />
Connecting To A Printer ........................................... 63<br />
Connecting To A Satellite Receiver .............................. 64<br />
D<br />
Delete A Channel ................................................... 77<br />
DIGITAL 3R .......................................................... 71<br />
DIGITAL TBC/NR ................................................... 72<br />
DIRECT REC .................................................... 19, 69<br />
E<br />
EDITING .............................................................. 44<br />
Elapsed Recording Time Indication .............................. 27<br />
Express Timer Programming ....................................... 38<br />
F<br />
Fine-Tuning Channels Already Stored ........................... 78<br />
G<br />
G-CODE/SHOWVIEW System Setup ........................... 82<br />
G-CODE/SHOWVIEW Timer Programming ................... 36<br />
Guide Program Number Set ................................. 37, 82<br />
H<br />
High-Speed (Turbo) Search .................................. 23, 33<br />
I<br />
Index Search ......................................................... 23<br />
Insert Editing ......................................................... 56<br />
Instant ReView ....................................................... 23<br />
Instant Timer Recording (ITR) ............................... 26, 34<br />
J<br />
Just Clock ............................................................. 80<br />
L<br />
L-1 INPUT ............................................................ 52<br />
L-1 OUTPUT ......................................................... 52<br />
L-2 SELECT ........................................................... 53<br />
Language ............................................................. 16<br />
M<br />
Manual Channel Set ................................................ 76<br />
Manual Tracking .................................................... 25<br />
Mode Set .............................................................. 68<br />
N<br />
Next Function Memory ....................................... 24, 33<br />
Normal Dubbing (from <strong>DV</strong> to <strong>VHS</strong>) ............................. 46<br />
Normal Dubbing (from <strong>VHS</strong> to <strong>DV</strong>) ............................. 47<br />
EN 89<br />
O<br />
O.S.D. ................................................................. 69<br />
ON-SCREEN DISPLAY ................................................ 7<br />
Output/Input Set ..................................................... 52<br />
P<br />
PICTURE CONTROL ................................................ 70<br />
PLAYBACK/RECORDING ON <strong>DV</strong> DECK ....................... 30<br />
PLAYBACK/RECORDING ON <strong>VHS</strong> DECK ...................... 20<br />
POWER SAVE ........................................................ 69<br />
Preset Download .................................................... 14<br />
R<br />
Random Assemble Editing ......................................... 58<br />
Record One Programme While Watching Another ...... 26, 34<br />
Recording Resume Function ................................. 26, 34<br />
Remote Control Functions .......................................... 60<br />
Repeat Playback ..................................................... 24<br />
Retake ................................................................. 28<br />
S<br />
Satellite Controller ................................................... 17<br />
Satellite Receiver Control Setting ................................. 17<br />
Set Stations (A) ....................................................... 78<br />
Set Stations (B) ....................................................... 78<br />
Skip Search ........................................................... 23<br />
Slow Motion .................................................... 22, 32<br />
SOUND MODE ...................................................... 73<br />
Soundtrack Selection .......................................... 25, 33<br />
Still Picture/Frame-By-Frame Playback .................... 22, 32<br />
S-<strong>VHS</strong> ............................................................ 50, 71<br />
S-<strong>VHS</strong> ET .............................................................. 71<br />
T<br />
Tape Dubbing (from <strong>DV</strong> to <strong>VHS</strong>) ................................. 44<br />
Tape Dubbing (from <strong>VHS</strong> to <strong>DV</strong>) ................................. 45<br />
Tape Position Indicator ............................................... 7<br />
Tape Remaining Time .............................................. 27<br />
Time Code ............................................................ 35<br />
TIMER RECORDING ................................................ 36<br />
Timer Warning Display ............................................... 7<br />
Tuner Set .............................................................. 74<br />
T-V LINK .............................................................. 19<br />
TV Station And ID List .............................................. 79<br />
V<br />
Variable Speed Search ........................................ 23, 33<br />
<strong>VHS</strong> F-1 INPUT ...................................................... 53<br />
<strong>VIDEO</strong> STABILIZER ................................................. 72<br />
VPS/PDC Recording ................................................. 39<br />
W<br />
When programmes overlap each other .......................... 43<br />
When Receiving A Scrambled Broadcast ........................ 77<br />
12BIT MODE ......................................................... 73<br />
24 Hour Express Timer Programming ............................ 40
90 EN MEMO
EN 91
Auto Set Up — referring to the front display panel<br />
The Auto Set Up function sets the tuner channels, clock and Guide Program numbers automatically.<br />
EN<br />
BEFORE YOU START PLEASE MAKE SURE THAT:<br />
8 The TV aerial cable is connected to the ANTENNA IN connector on the rear panel of the video recorder.<br />
8 The video recorder’s mains power cord is connected to a mains outlet.<br />
8 The video recorder is turned off.<br />
8 Load batteries into the remote control.<br />
1 Press 1 (recorder/remote).<br />
2 Press rt (remote) to select the international telephone<br />
country code.<br />
(Example) DEUTSCHLAND (49) is selected.<br />
● If you have selected 32 (BELGIUM) or 41 (SUISSE), press OK (remote) and select the language code by pressing rt (remote),<br />
then go to step 3.<br />
(Example) FRANCAIS (03) is selected for BELGIUM (32).<br />
International telephone<br />
country code<br />
● If you have selected 36 (MAGYARORSZÁG), 42 (CESKÁ REPUBLIKA), 48 (POLSKA) or EE (OTHER EASTERN EUROPE), press OK.<br />
The Clock Set screen appears. Set the clock manually (� pg. 80), then go to step 3.<br />
● If you have selected any other country name (code), press OK and go to step 3.<br />
3 Press OK (remote). “Auto” appears on the front display panel.<br />
4 Press OK (remote) to start Auto Set Up. DO NOT press any button on the video recorder or remote control during<br />
“Auto” is blinking.<br />
● If you have connected the recorder to a TV offering T-V Link via a 21-pin SCART cable (� pg. 10) and the TV is turned on, the<br />
recorder automatically performs “Preset Download” (� pg. 14) even if you select “Auto” in step 4.<br />
● If “– –:– –” appears on the front display panel, see page 15 of the instructions.<br />
* Once you have performed Auto Set Up, even if the recorder’s memory backup has expired, the recorder will not perform Auto<br />
Set Up again. Perform tuner setting (� pg. 74) and/or clock setting (� pg. 80) as required.<br />
FOR MORE INFORMATION SEE<br />
INSTRUCTIONS ON PAGE 12<br />
Language code<br />
International Telephone Country Code<br />
BELGIUM<br />
CESKÁ REPUBLIKA<br />
DANMARK<br />
DEUTSCHLAND<br />
ESPAÑA<br />
GREECE<br />
ITALIA<br />
MAGYARORSZÁG<br />
NEDERLAND<br />
Language Code<br />
<strong>ENGLISH</strong><br />
DEUTSCH<br />
FRANCAIS<br />
ITALIANO<br />
CASTELLANO<br />
:<br />
:<br />
:<br />
:<br />
:<br />
:<br />
:<br />
:<br />
:<br />
32<br />
42<br />
45<br />
49<br />
34<br />
30<br />
39<br />
36<br />
31<br />
:<br />
:<br />
:<br />
:<br />
:<br />
01<br />
02<br />
03<br />
04<br />
05<br />
NORGE<br />
ÖSTERREICH<br />
POLSKA<br />
PORTUGAL<br />
SUISSE<br />
SUOMI<br />
SVERIGE<br />
OTHER WESTERN EUROPE<br />
OTHER EASTERN EUROPE<br />
NEDERLANDS<br />
SVENSKA<br />
NORSK<br />
SUOMI<br />
DANSK<br />
:<br />
:<br />
:<br />
:<br />
:<br />
:<br />
:<br />
:<br />
:<br />
:<br />
:<br />
:<br />
:<br />
:<br />
47<br />
43<br />
48<br />
351<br />
41<br />
358<br />
46<br />
– –<br />
EE<br />
06<br />
07<br />
08<br />
09<br />
10<br />
Printed in Japan<br />
0902MNV * ID * VP