AVerVision SPB350 Manual
AVerVision SPB350 Manual
AVerVision SPB350 Manual

Create successful ePaper yourself
Turn your PDF publications into a flip-book with our unique Google optimized e-Paper software.
OSD Menu<br />
MENU<br />
EFFECT<br />
MIRROR<br />
PRESENTER<br />
SPLIT SCREEN<br />
PIP<br />
SETTING<br />
TIMER<br />
CAPTURE<br />
RECALL<br />
DEFAULT<br />
MENU<br />
EFFECT<br />
MIRROR<br />
PRESENTER<br />
SPLIT SCREEN<br />
PIP<br />
SETTING<br />
TIMER<br />
CAPTURE<br />
RECALL<br />
DEFAULT<br />
NEAR<br />
IMAGE<br />
EXPOSURE<br />
WHITE BALANCE<br />
BRIGHTNESS<br />
CONTRAST<br />
RESOLUTION<br />
0<br />
IMAGE<br />
EXPOSURE<br />
WHITE BALANCE<br />
BRIGHTNESS<br />
CONTRAST<br />
RESOLUTION<br />
LOWER LEFT<br />
UPPER LEFT<br />
UPPER RIGHT<br />
LOWER RIGHT<br />
MODE<br />
MANUAL FOCUS<br />
IMAGE<br />
LANGUAGE<br />
MEMORY<br />
USB CONNECTION<br />
SAVE<br />
MODE<br />
TEXT<br />
GRAPHICS<br />
HIGH FRAME<br />
MICROSCOPE<br />
MANUAL FOCUS<br />
FAR<br />
AUTO<br />
MANUAL<br />
FLICKER<br />
NIGHT VIEW<br />
MANUAL<br />
21 54<br />
FLICKER<br />
50 HZ<br />
60 HZ<br />
NIGHT VIEW<br />
AUTO<br />
OFF<br />
AUTO<br />
RED<br />
BLUE<br />
Description<br />
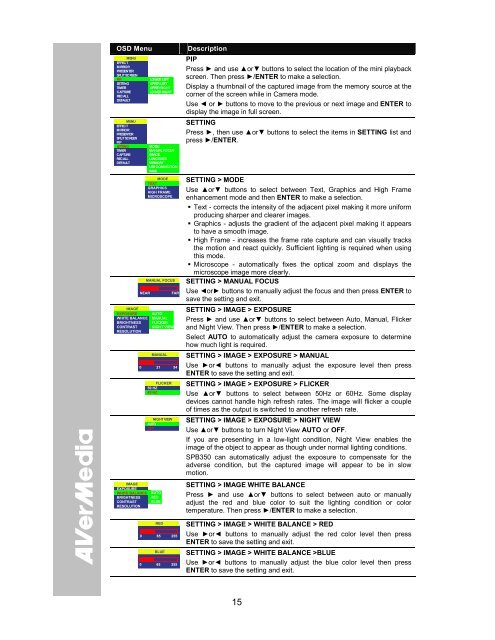
PIP<br />
Press ► and use ▲or▼ buttons to select the location of the mini playback<br />
screen. Then press ►/ENTER to make a selection.<br />
Display a thumbnail of the captured image from the memory source at the<br />
corner of the screen while in Camera mode.<br />
Use ◄ or ► buttons to move to the previous or next image and ENTER to<br />
display the image in full screen.<br />
SETTING<br />
Press ►, then use ▲or▼ buttons to select the items in SETTING list and<br />
press ►/ENTER.<br />
SETTING > MODE<br />
Use ▲or▼ buttons to select between Text, Graphics and High Frame<br />
enhancement mode and then ENTER to make a selection.<br />
Text - corrects the intensity of the adjacent pixel making it more uniform<br />
producing sharper and clearer images.<br />
Graphics - adjusts the gradient of the adjacent pixel making it appears<br />
to have a smooth image.<br />
High Frame - increases the frame rate capture and can visually tracks<br />
the motion and react quickly. Sufficient lighting is required when using<br />
this mode.<br />
Microscope - automatically fixes the optical zoom and displays the<br />
microscope image more clearly.<br />
SETTING > MANUAL FOCUS<br />
Use ◄or► buttons to manually adjust the focus and then press ENTER to<br />
save the setting and exit.<br />
SETTING > IMAGE > EXPOSURE<br />
Press ► and use ▲or▼ buttons to select between Auto, <strong>Manual</strong>, Flicker<br />
and Night View. Then press ►/ENTER to make a selection.<br />
Select AUTO to automatically adjust the camera exposure to determine<br />
how much light is required.<br />
SETTING > IMAGE > EXPOSURE > MANUAL<br />
Use ►or◄ buttons to manually adjust the exposure level then press<br />
ENTER to save the setting and exit.<br />
SETTING > IMAGE > EXPOSURE > FLICKER<br />
Use ▲or▼ buttons to select between 50Hz or 60Hz. Some display<br />
devices cannot handle high refresh rates. The image will flicker a couple<br />
of times as the output is switched to another refresh rate.<br />
SETTING > IMAGE > EXPOSURE > NIGHT VIEW<br />
Use ▲or▼ buttons to turn Night View AUTO or OFF.<br />
If you are presenting in a low-light condition, Night View enables the<br />
image of the object to appear as though under normal lighting conditions.<br />
<strong>SPB350</strong> can automatically adjust the exposure to compensate for the<br />
adverse condition, but the captured image will appear to be in slow<br />
motion.<br />
SETTING > IMAGE WHITE BALANCE<br />
Press ► and use ▲or▼ buttons to select between auto or manually<br />
adjust the red and blue color to suit the lighting condition or color<br />
temperature. Then press ►/ENTER to make a selection.<br />
RED<br />
0 65<br />
BLUE<br />
0 65<br />
255<br />
255<br />
SETTING > IMAGE > WHITE BALANCE > RED<br />
Use ►or◄ buttons to manually adjust the red color level then press<br />
ENTER to save the setting and exit.<br />
SETTING > IMAGE > WHITE BALANCE >BLUE<br />
Use ►or◄ buttons to manually adjust the blue color level then press<br />
ENTER to save the setting and exit.<br />
15