AVerVision SPB350 Manual
AVerVision SPB350 Manual
AVerVision SPB350 Manual

Create successful ePaper yourself
Turn your PDF publications into a flip-book with our unique Google optimized e-Paper software.
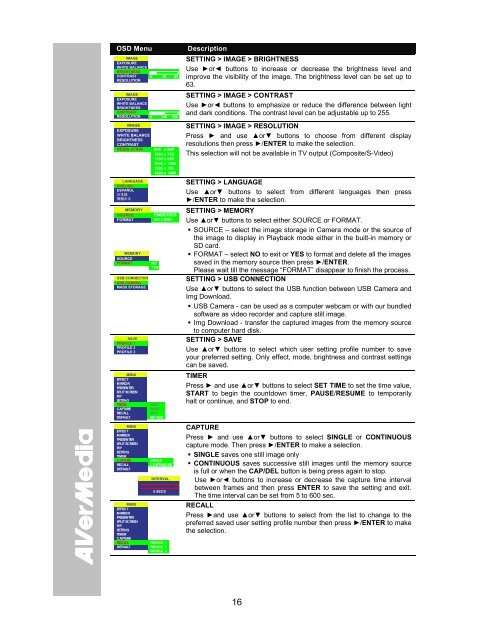
OSD Menu<br />
IMAGE<br />
EXPOSURE<br />
WHITE BALANCE<br />
BRIGHTNESS<br />
CONTRAST<br />
RESOLUTION<br />
0<br />
16<br />
63<br />
IMAGE<br />
EXPOSURE<br />
WHITE BALANCE<br />
BRIGHTNESS<br />
CONTRAST<br />
RESOLUTION 0 140 255<br />
IMAGE<br />
EXPOSURE<br />
WHITE BALANCE<br />
BRIGHTNESS<br />
CONTRAST<br />
RESOLUTION 800 x 600<br />
1024 x 768<br />
1280 x 960<br />
1600 x 1200<br />
1280 x 720<br />
1920 x 1080<br />
LANGUAGE<br />
ENGLISH<br />
ESPAÑOL<br />
日 本 語<br />
繁 體 中 文<br />
MEMORY<br />
SOURCE<br />
FORMAT<br />
MEMORY<br />
SOURCE<br />
FORMAT<br />
USB CONNECTION<br />
USB CAMERA<br />
MASS STORAGE<br />
SAVE<br />
PROFILE 1<br />
PROFILE 2<br />
PROFILE 3<br />
MENU<br />
EFFECT<br />
MIRROR<br />
PRESENTER<br />
SPLIT SCREEN<br />
PIP<br />
SETTING<br />
TIMER<br />
CAPTURE<br />
RECALL<br />
DEFAULT<br />
MENU<br />
EFFECT<br />
MIRROR<br />
PRESENTER<br />
SPLIT SCREEN<br />
PIP<br />
SETTING<br />
TIMER<br />
CAPTURE<br />
RECALL<br />
DEFAULT<br />
MENU<br />
EFFECT<br />
MIRROR<br />
PRESENTER<br />
SPLIT SCREEN<br />
PIP<br />
SETTING<br />
TIMER<br />
CAPTURE<br />
RECALL<br />
DEFAULT<br />
EMBEDDED<br />
SD CARD<br />
NO<br />
YES<br />
START<br />
PAUSE<br />
STOP<br />
SET TIME<br />
SINGLE<br />
CONTINUOUS<br />
INTERVAL<br />
5 SECS<br />
PROFILE 1<br />
PROFILE 2<br />
PROFILE 3<br />
Description<br />
SETTING > IMAGE > BRIGHTNESS<br />
Use ►or◄ buttons to increase or decrease the brightness level and<br />
improve the visibility of the image. The brightness level can be set up to<br />
63.<br />
SETTING > IMAGE > CONTRAST<br />
Use ►or◄ buttons to emphasize or reduce the difference between light<br />
and dark conditions. The contrast level can be adjustable up to 255.<br />
SETTING > IMAGE > RESOLUTION<br />
Press ► and use ▲or▼ buttons to choose from different display<br />
resolutions then press ►/ENTER to make the selection.<br />
This selection will not be available in TV output (Composite/S-Video)<br />
SETTING > LANGUAGE<br />
Use ▲or▼ buttons to select from different languages then press<br />
►/ENTER to make the selection.<br />
SETTING > MEMORY<br />
Use ▲or▼ buttons to select either SOURCE or FORMAT.<br />
SOURCE – select the image storage in Camera mode or the source of<br />
the image to display in Playback mode either in the built-in memory or<br />
SD card.<br />
FORMAT – select NO to exit or YES to format and delete all the images<br />
saved in the memory source then press ►/ENTER.<br />
Please wait till the message “FORMAT” disappear to finish the process.<br />
SETTING > USB CONNECTION<br />
Use ▲or▼ buttons to select the USB function between USB Camera and<br />
Img Download.<br />
USB Camera - can be used as a computer webcam or with our bundled<br />
software as video recorder and capture still image.<br />
Img Download - transfer the captured images from the memory source<br />
to computer hard disk.<br />
SETTING > SAVE<br />
Use ▲or▼ buttons to select which user setting profile number to save<br />
your preferred setting. Only effect, mode, brightness and contrast settings<br />
can be saved.<br />
TIMER<br />
Press ► and use ▲or▼ buttons to select SET TIME to set the time value,<br />
START to begin the countdown timer, PAUSE/RESUME to temporarily<br />
halt or continue, and STOP to end.<br />
CAPTURE<br />
Press ► and use ▲or▼ buttons to select SINGLE or CONTINUOUS<br />
capture mode. Then press ►/ENTER to make a selection.<br />
SINGLE saves one still image only<br />
CONTINUOUS saves successive still images until the memory source<br />
is full or when the CAP/DEL button is being press again to stop.<br />
Use ►or◄ buttons to increase or decrease the capture time interval<br />
between frames and then press ENTER to save the setting and exit.<br />
The time interval can be set from 5 to 600 sec.<br />
RECALL<br />
Press ►and use ▲or▼ buttons to select from the list to change to the<br />
preferred saved user setting profile number then press ►/ENTER to make<br />
the selection.<br />
16