ViviCam T028 Camera Manual - Vivitar
ViviCam T028 Camera Manual - Vivitar
ViviCam T028 Camera Manual - Vivitar

Create successful ePaper yourself
Turn your PDF publications into a flip-book with our unique Google optimized e-Paper software.
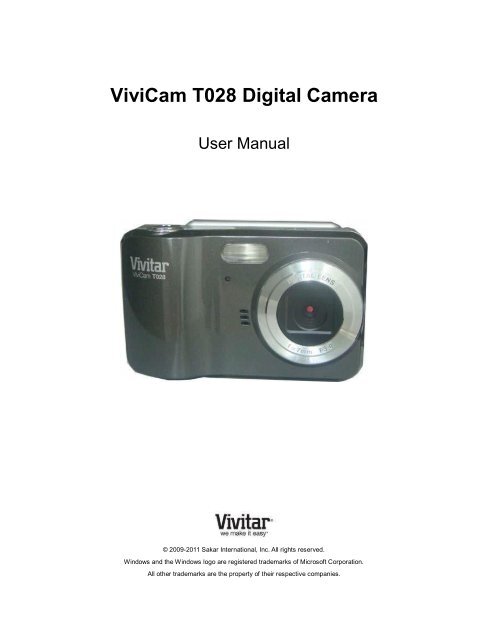
<strong>ViviCam</strong> <strong>T028</strong> Digital <strong>Camera</strong><br />
User <strong>Manual</strong><br />
© 2009-2011 Sakar International, Inc. All rights reserved.<br />
Windows and the Windows logo are registered trademarks of Microsoft Corporation.<br />
All other trademarks are the property of their respective companies.
Table of Contents<br />
Introduction .................................................................................................................................. 2<br />
What‟s Included ............................................................................................................................ 2<br />
Parts of the <strong>Camera</strong> ..................................................................................................................... 3<br />
Initial <strong>Camera</strong> Setup ..................................................................................................................... 4<br />
Main <strong>Camera</strong> Modes .................................................................................................................... 7<br />
<strong>Camera</strong> Technical Specifications .................................................................................................. 8<br />
Computer System Requirements ................................................................................................. 9<br />
Powering the <strong>Camera</strong> On/Off ..................................................................................................... 10<br />
Changing <strong>Camera</strong> Mode ............................................................................................................. 11<br />
Navigating the Menus................................................................................................................. 12<br />
Photo Capture Mode .................................................................................................................. 13<br />
Photo Playback Mode ................................................................................................................ 32<br />
Video Capture Mode .................................................................................................................. 39<br />
Video Playback Mode ................................................................................................................. 52<br />
Installing the Software ................................................................................................................ 57<br />
Connecting the <strong>Camera</strong> to the Computer ................................................................................... 58<br />
Getting Photos and Videos from your <strong>Camera</strong> to Your Computer .............................................. 59<br />
Get Started! ................................................................................................................................ 60<br />
Transferring Images from my <strong>Camera</strong> to my Computer <strong>Manual</strong>ly .............................................. 60<br />
<strong>Camera</strong> Maintenance ................................................................................................................. 61<br />
Sakar Warranty Card .................................................................................................................. 62<br />
Technical Support ....................................................................................................................... 63<br />
Troubleshooting .......................................................................................................................... 63<br />
1
Introduction<br />
Thank you for purchasing this camera. Everything you need to take quality digital photos and<br />
videos is included with your camera.<br />
<strong>Vivitar</strong> makes capturing those special moments as easy as possible.<br />
Please read this manual carefully first in order to get the most out of your digital camera.<br />
Note: Your camera needs an SD Memory card (up to 32GB) for normal use.<br />
SD Memory cards are not included and need to be purchased separately.<br />
What’s Included<br />
1. Digital <strong>Camera</strong><br />
2. USB cable<br />
3. <strong>Vivitar</strong> Experience Image Manager<br />
software Installation CD<br />
4. Wrist Strap<br />
Note: SD Memory Card and batteries not included.<br />
2
Parts of the <strong>Camera</strong><br />
1. Power Button 12. LCD Screen<br />
2. Shutter Button 13. Digital Lens<br />
3. Flash / Charge LED 14. Flash Light<br />
4. Zoom Out 15. Microphone<br />
5. Zoom In 16. Speaker<br />
6. MODE button 17. MACRO Switch<br />
7. Flash / Up / Slide Show 18. USB Slot<br />
8. Delete / Right Button 19. Wrist Strap Connector<br />
9. SET Button 20. Tripod Socket<br />
10. ViviLink / Down Button 21. SD Memory Card Slot<br />
11. Scene / Left Button 22. Battery Compartment<br />
23. Self-Timer LED<br />
3
Initial <strong>Camera</strong> Setup<br />
Installing the Batteries<br />
Installing the Memory Card<br />
SD Memory card<br />
(up to 32GB)<br />
needed for normal<br />
use<br />
Insert 2 AA (1.5V) batteries. Alkaline batteries<br />
recommended (not included).<br />
Turning On the <strong>Camera</strong><br />
Using the <strong>Camera</strong><br />
Selecting<br />
the modes<br />
Accessing the menu<br />
4
When powering the camera ON for the first time the camera will take you through the INITIAL<br />
CAMERA SETUP.<br />
Powering the <strong>Camera</strong> ON<br />
1) Batteries<br />
Make sure the batteries have been inserted properly into your digital camera, according to<br />
the polarity shown inside the battery compartment.<br />
Use 2x AA (1.5v) batteries. Alkaline batteries are recommended. (Batteries not included.)<br />
Note:<br />
<br />
<br />
<br />
<br />
Remove the batteries from the camera when not in use for an extended period.<br />
Do not mix alkaline and non-alkaline batteries.<br />
Some features, such as Flash, will not work if the battery power level is low.<br />
When the battery power is low the battery icon turns red and the camera will<br />
automatically turn off a few seconds later.<br />
<br />
The energy status of the power is displayed on LCD as shown below:<br />
Full battery power Medium battery power Low battery power<br />
2) SD Card<br />
Make sure an SD card has been properly inserted into your camera. (SD card not included.)<br />
To properly insert the SD Card:<br />
Push the SD card into the slot in the direction shown on the camera (see SD icon by the SD<br />
card slot). Push the SD card until you hear a slight clicking sound. This indicates the SD<br />
card has been inserted correctly.<br />
Note:<br />
<br />
After the camera is powered on, an SD icon will appear on the LCD display. If you do not<br />
see the SD icon on the display, please check if the card was inserted properly.<br />
<br />
Make sure the SD card is not locked (check the lock switch on the side of the SD card). If<br />
the SD card is locked this will prevent the camera from saving captured photos to the SD card.<br />
3) Power On<br />
Press the<br />
POWER button to turn on the camera.<br />
5
Setting the <strong>Camera</strong> Language<br />
1) You will first be prompted to select a language for the camera. The Language selection<br />
menu will appear. Select the language of your choice by pressing the UP and DOWN<br />
direction control buttons. Then press the SET button to confirm the selection.<br />
2) After selecting a language, you will be asked if you would like to continue with the initial<br />
camera setup. A message will appear: “Continue with <strong>Camera</strong> Setup”<br />
Select “Yes” to continue or “No” to exit the setup.<br />
Note: If you select “No” and decide to leave the camera setup, the camera will be set to its default<br />
settings. These settings can be adjusted at any time manually through the menus in the camera.<br />
Setting the Date and Time<br />
The next step in the initial camera setup is to set the date and time on the camera.<br />
Set the Date and Time as desired by pressing the RIGHT and LEFT direction control buttons to<br />
choose the specific setting and the UP and DOWN buttons to change each setting.<br />
Once you have completed setting the time and date, press the SET button to confirm the<br />
selection and move to the next part of the camera setup.<br />
Setting the ViviLink Default Option<br />
Once the Date and Time have been set, you will be asked to set the default ViviLink destination<br />
for photos and videos taken with your camera.<br />
The ViviLink technology allows you to quickly and easily upload your camera‟s photos and videos<br />
to the social networks of your choice with the accompanying software application.<br />
1) First you will be asked to choose the default ViviLink social network for Photos. Press the<br />
UP or DOWN buttons to highlight the desired default social network and press the SET<br />
button to confirm the selection.<br />
2) Next you will be asked to choose the default ViviLink social network for Videos. Press the<br />
UP or DOWN buttons to highlight the desired default social network and press the SET<br />
button to confirm the selection.<br />
3) After the ViviLink Video option is confirmed the camera is now ready to use.<br />
6
Main <strong>Camera</strong> Modes<br />
Your camera has different modes for the various camera functions.<br />
You can switch modes by pressing the MODE button on your camera after the camera has been<br />
powered ON.<br />
Photo Capture Mode<br />
Use this mode to capture pictures with your camera.<br />
This is the default mode when the camera is powered ON.<br />
To take a picture, aim your camera as desired and press the Shutter button.<br />
The picture will be automatically saved to your camera‟s memory card.<br />
To access the various menus for the Photo Capture mode, press the SET button while in<br />
the Photo Capture mode.<br />
Video Capture Mode<br />
Use this mode to capture videos with your digital camera.<br />
After turning on your camera, press the MODE button once to open the Video Capture<br />
mode. To take a video, aim your camera as desired and press the Shutter button to start<br />
the record. A red record indicator will appear on the LCD screen while record is in progress.<br />
To stop the record, press the Shutter button again. The video will be automatically saved to<br />
your camera‟s memory card.<br />
To access the various menus for the Video Capture mode, press the SET button while in the<br />
Video Capture mode.<br />
Playback Mode (Photos & Videos)<br />
Use this mode to view and manage the photos and videos on your camera.<br />
After turning on your camera, press the MODE button twice to open the Playback mode for<br />
photos and videos. You can scroll through the photos and videos that you‟ve previously<br />
taken to view, edit or delete them as desired.<br />
To access the various menus for the Playback mode for photos and videos, press the SET<br />
button while in the Playback mode.<br />
7
<strong>Camera</strong> Technical Specifications<br />
Image Sensor<br />
CMOS 5 Megapixel<br />
4000 x 3000 (12M) / 3648 x 2736 (10M) / 3264 x 2448 (8M) /<br />
Image Resolution<br />
Video Resolution<br />
File Format<br />
Internal Memory<br />
External Memory<br />
LCD Display<br />
3648 x 2048 (7M HD) / 2592 x1944 (5M) / 2048 x 1536 (3M) /<br />
1920 x 1080 (2M HD) / 640 x 480 (VGA)<br />
640X480 pixels VGA (30 fps) / 320X240 pixels QVGA (30 fps)<br />
JPEG (Photo) /AVI (Video)<br />
1 Test Photo Use Only<br />
SD Card (up to 32GB)<br />
2.4 Inch TFT<br />
Lens f=7 mm F3.0<br />
Zoom<br />
Exposure<br />
White Balance<br />
4X Digital Zoom<br />
-3.0EV ~ +3.0EV<br />
Auto, Daylight, Cloudy, Fluorescent , Incandescent<br />
ISO Auto / 100 / 200 / 400<br />
Scene<br />
Flash<br />
Self-Timer<br />
Anti-Shake<br />
Face Detect<br />
Print Photos<br />
Microphone<br />
Macro<br />
Auto, Night Portrait, Night Scenery, Portrait, Scenery, Beach,<br />
High Sensitivity<br />
No Flash, Forced On, Auto Flash, Red Eye Reduction<br />
2, 5 or 10 second delay<br />
Yes (Photo Capture Mode)<br />
Yes<br />
Yes<br />
Yes<br />
Yes, <strong>Manual</strong> Switch<br />
Interface USB 2.0<br />
System Requirements<br />
Battery<br />
Working Temperature<br />
Windows XP (SP 3), Vista (SP1) and 7 ;<br />
Mac OSX v10.5.x and above<br />
2 * AA (1.5V) batteries<br />
0~40C<br />
8
Computer System Requirements<br />
WINDOWS OS<br />
To be able to download photos and videos to your PC using the <strong>Vivitar</strong> Experience Image<br />
Manager Software, you will need the following minimum configuration:<br />
Microsoft® Windows XP with Service Pack 3, Windows Vista with Service Pack 1 or Windows 7<br />
<br />
<br />
<br />
<br />
<br />
<br />
<br />
<br />
<br />
Pentium® 4 processor (or above) <br />
512 MB of RAM, with 250 MB of free hard disk space <br />
16-bit Color monitor, 1024 X 768 recommended screen resolution <br />
CD-ROM Drive<br />
QuickTime® 6 or higher <br />
Microsoft® Internet Explorer 7 or higher<br />
Windows Media Player 10 or higher <br />
DirectX 9 or higher<br />
Internet connection required<br />
MACINTOSH OS<br />
To be able to download photos and videos to your Macintosh using the <strong>Vivitar</strong> Experience Image<br />
Manager Software, you will need the following minimum configuration:<br />
<br />
<br />
<br />
<br />
<br />
Intel processor running Mac OS X v10.5.x or later<br />
256 MB RAM, 250 MB free hard disk space<br />
Display: 1024 x 768 or higher-resolution monitor<br />
QuickTime® 6 or higher<br />
Internet connection required<br />
9
Powering the <strong>Camera</strong> On/Off<br />
<br />
<br />
Make sure the batteries have been inserted properly into your digital camera. If your camera<br />
comes with a rechargeable lithium battery, make sure it is fully charged before the first use.<br />
Make sure an SD card has been inserted into your camera.<br />
(SD card up to 32GB - SD Card not included)<br />
Please see Initial <strong>Camera</strong> Setup for more information.<br />
Powering the camera ON<br />
Press the Power button to turn your camera ON.<br />
After powering on, the camera emits a sound and the LED light turns on briefly.<br />
The LCD screen turns on with your camera in Photo Capture mode to start.<br />
Powering the camera OFF<br />
While the camera is on, you can press the<br />
camera OFF.<br />
Power button again at any point to turn your<br />
<br />
A “Goodbye” screen appears and then the camera will power off completely.<br />
Note: Your digital camera also has an Auto Power Off feature that will automatically turn off your<br />
camera after a specific period of time that your camera is left idle. The Auto Power Off settings<br />
can be set from the Auto Power Off settings menu (in either Photo Capture Mode or Video<br />
Capture Mode).<br />
10
Changing <strong>Camera</strong> Mode<br />
Your camera has three main modes:<br />
1) Photo Capture Mode - Use this mode to capture photos with your camera.<br />
2) Video Capture Mode - Use this mode to capture videos with your camera.<br />
3) Playback Mode (for photos and videos) - Use this mode to view the photos and videos<br />
you have already taken with your camera.<br />
<br />
<br />
When the camera is first powered ON, the Photo Capture Mode will be active.<br />
The icons that appear on the LCD screen are the best default settings so that you can begin to<br />
capture and enjoy clear quality photos.<br />
To change the active camera mode, make sure the camera is powered ON and press the MODE<br />
button.<br />
When in Photo Capture Mode, this icon will display on the top-left corner of the LCD display<br />
When in Video Capture Mode, this icon will display on the top-left corner of the LCD display<br />
When in Playback Mode, this icon will display on the top-left corner of the LCD display<br />
11
Navigating the Menus<br />
Each camera mode has a set of menus specific to that mode.<br />
1) Press the SET button to open the menus for the current mode.<br />
2) Press the LEFT or RIGHT direction control buttons to scroll between the various menus for<br />
the current mode.<br />
3) Press the UP or DOWN direction control buttons to highlight the desired menu selection.<br />
4) Press the SET button to confirm and save the highlighted menu option.<br />
5) If the selection can be remembered by the camera, a selection icon will appear to the<br />
right of the selected menu option. Changes made to these options will remain as is until you<br />
decide to change them again at a later time.<br />
6) Some menu options are single-use functions that are not remembered by the camera and<br />
do not display this icon when selected.<br />
7) At any time you can press the MODE button to exit the menus and return to the previous<br />
screen.<br />
12
Photo Capture Mode<br />
The Photo Capture mode allows you to capture pictures with your digital camera.<br />
Taking a Picture<br />
1) While in Photo Capture mode, use the LCD display on the back of the camera to direct the<br />
camera at the scene you would like to capture.<br />
2) Press the T/Zoom In and W/Zoom Out buttons to zoom in/out if desired.<br />
Note: The actual shape of the zoom buttons may vary per camera model.<br />
You can magnify your subject up to 4 times using the digital zoom.<br />
The following Digital Zoom Indicator appears on the right side of the LCD screen:<br />
3) Click the Shutter button to take the picture.<br />
4) The picture will automatically be saved to the camera‟s internal memory (limit one photo) or<br />
SD memory card.<br />
13
Taking a Self Portrait Picture<br />
You can also capture your photos using the flip screen which opens to 180 degrees.<br />
1) Before taking the photo, ensure that the Macro Switch on the side of the camera is up and in<br />
the ON position<br />
. The flower icon will appear on the LCD display.<br />
2) When you would like to quickly include yourself in the photo, simply flip the LCD display out<br />
and hold the camera steady facing towards you at arm‟s length (30~45cm).<br />
3) Make sure you can see yourself on the LCD screen.<br />
4) Look at the camera lens.<br />
5) Click the Shutter button to take the picture.<br />
It‟s as easy as twist and shoot!<br />
NOTE: Self Portrait photos taken without Macro mode ON may not be properly focused.<br />
14
Photo Capture Mode Quick Function Buttons<br />
Your digital camera has a four-directional pad that functions as Quick Function buttons:<br />
Button<br />
Left<br />
Up<br />
Function<br />
Scene Selection – Opens the Scene menu<br />
Flash Options – Toggles the Flash options appearing on the LCD<br />
Right<br />
Down<br />
Delete – Opens the „Delete This Photo‟ option and allows you to view and<br />
delete the last photo taken<br />
ViviLink – Opens the ViviLink for Photos menu<br />
Other<br />
Shutter<br />
Captures the photo<br />
SET<br />
MODE<br />
<br />
<br />
<br />
<br />
Opens the menu options for Photo Capture Mode<br />
Saves your selected menu option<br />
Note: To navigate through the Menus, use the UP/DOWN/LEFT/RIGHT<br />
direction control buttons.<br />
Toggles between the Photo Capture Mode, Video Capture Mode and<br />
Playback Mode<br />
Exits the menu screen<br />
T<br />
W<br />
Zooms In<br />
Zooms Out<br />
15
Flash Options<br />
There are several Flash options available on your camera. The options appear on the Photo<br />
Capture Mode LCD screen in sequence.<br />
To change the Flash mode, press the UP Quick Function button until you arrive at your desired<br />
settings.<br />
Important: When using Flash, stand between 8 to 10 feet away from the scene you would like to<br />
capture.<br />
Note: The MACRO mode must be turned OFF when you want to use the Flash.<br />
To turn off MACRO mode: Slide the MACRO Switch down to the mountain icon .<br />
When MACRO is OFF, the mountain icon appears on the LCD display.<br />
Flash Type<br />
Description<br />
<br />
No flash will appear.<br />
Forced Off (Default)<br />
A<br />
Auto Flash<br />
Forced On<br />
Red Eye Reduction<br />
<br />
<br />
<br />
<br />
<br />
<br />
<br />
Use this when you do not want to activate Flash.<br />
NOTE: A „Turn On Flash‟ message appears when the camera<br />
detects a need for flash. When this message appears, it is<br />
recommended to press the Flash/Up button and select one of the<br />
flash options: Auto Flash, Forced On or Red-Eye Reduction.<br />
When you want the camera to determine if Flash is needed, select<br />
Auto Flash.<br />
The flash will automatically turn on according to the lighting<br />
conditions.<br />
When the LED light stops blinking, the Flash is ready for use.<br />
Note: In some cameras, an initial flash appears to test your<br />
lighting conditions. If flash is needed, a second flash will appear<br />
upon taking the photo.<br />
The flash is enabled for each photo.<br />
Note: If you use this option in a well lit environment, your photo<br />
may be appear too bright/light (overexposed).<br />
Eliminates the red-eye effect in a photo caused by flash.<br />
16
Macro Switch /<br />
MACRO ON:<br />
Your camera contains a Macro Switch that allows you to manually enable or disable the Macro<br />
mode on your camera. While using the Macro mode, you can capture images at close range (15<br />
~ 30 cm). To turn the Macro mode ON, slide the Macro Switch on the side of your camera UP to<br />
the flower icon .<br />
<br />
When enabled, the Macro mode will allow your camera to focus on an object that is close to<br />
the camera.<br />
The flower icon will appear on the LCD and indicates that the Macro mode is ON.<br />
MACRO OFF:<br />
To turn the Macro mode OFF-<br />
Slide the Macro Switch on the side of the camera DOWN to the mountain icon.<br />
The mountain<br />
icon will appear on the LCD display.<br />
<br />
When Macro mode is off, images can be captured from 1.5m - ∞ (infinity).<br />
Note:<br />
<br />
The Macro mode must be turned OFF when you want to use the following features of your<br />
camera: Flash and Face Detect.<br />
To Turn the Macro mode OFF: Slide the Macro Switch down to the mountain icon to turn<br />
Macro mode OFF.<br />
The mountain<br />
icon will appear on the LCD display.<br />
Hide/Show the LCD Icons<br />
The display of the icons on the LCD screen can be hidden or visible as desired.<br />
1) Hold the MODE button for 2 seconds to hide the display of the icons on the screen.<br />
2) Press the MODE button again to redisplay the icons on the screen.<br />
17
Photo Capture Mode Menus<br />
The following are the menus that appear in your camera‟s Photo Capture Mode:<br />
18
Scene Menu<br />
The Scene Menu allows you to choose scene settings that let your camera to adapt properly to<br />
your current environment.<br />
Note: When selecting the HIGH SENSITIVITY Option, by default the camera switches off the<br />
FLASH automatically (if it‟s ON) to optimize the picture quality. If however, you would like to<br />
override it and manually turn ON the flash – you can do so.<br />
1) Press the SET button to open the menus for the current mode.<br />
2) Press the LEFT or RIGHT direction control buttons to scroll and select the Scene menu.<br />
3) Press the UP or DOWN direction control buttons to scroll through the menu options.<br />
4) Press the SET button to select and save the desired option.<br />
5) A selected option icon will appear on the selected item.<br />
6) Press the LEFT or RIGHT button to select the next menu item.<br />
7) Press the MODE button to exit the menu and return to your previous mode.<br />
8) An icon reflecting your selection will display on the LCD screen.<br />
9) Remember that this setting will be saved by your camera until you manually change the<br />
setting or restore the camera‟s default factory settings.<br />
Image Resolution Menu<br />
The Image Resolution menu allows you to choose the desired size of the images taken by your<br />
camera. Keep in mind that images with a higher resolution will also take up more of your<br />
camera‟s memory.<br />
1) Press the SET button to open the menus for the current mode.<br />
2) Press the LEFT or RIGHT direction control buttons to scroll and select the Image Resolution<br />
menu.<br />
3) Press the UP or DOWN direction control buttons to scroll through the menu options.<br />
4) Press the SET button to select and save the desired option.<br />
5) A selected option icon will appear on the selected item.<br />
6) Press the LEFT or RIGHT button to select the next menu item.<br />
19
7) Press the MODE button to exit the menu and return to your previous mode.<br />
8) An icon reflecting your selection will display on the LCD screen.<br />
9) Remember that this setting will be saved by your camera until you manually change the<br />
setting or restore the camera‟s default factory settings.<br />
Image Quality Menu<br />
The Image Quality menu allows you to select the desired quality level of the images taken by your<br />
camera. Keep in mind that images with a higher image quality level will also take up more<br />
memory on your camera.<br />
1) Press the SET button to open the menus for the current mode.<br />
2) Press the LEFT or RIGHT direction control buttons to scroll and select the Image Quality<br />
menu.<br />
3) Press the UP or DOWN direction control buttons to scroll through the menu options.<br />
4) Press the SET button to select and save the desired option.<br />
5) A selected option icon will appear on the selected item.<br />
6) Press the LEFT or RIGHT button to select the next menu item.<br />
7) Press the MODE button to exit the menu and return to your previous mode.<br />
8) An icon reflecting your selection will display on the LCD screen.<br />
9) Remember that this setting will be saved by your camera until you manually change the<br />
setting or restore the camera‟s default factory settings.<br />
Self-Timer Menu<br />
The Self-Timer menu allows you to set a delay between the time that the camera‟s Shutter button<br />
is pressed and the actual capture of the picture.<br />
This is an optimal feature if you don‟t just want to take the picture but would also like to be in the<br />
picture yourself. Just set the desired Self-Timer delay, press the Shutter button on your camera<br />
and position yourself in front of the camera as desired.<br />
1) Press the SET button to open the menus for the current mode.<br />
20
2) Press the LEFT or RIGHT direction control buttons to scroll and select the Self-Timer menu.<br />
3) Press the UP or DOWN direction control buttons to scroll through the menu options.<br />
4) Press the SET button to select and save the desired option.<br />
5) A selected option icon will appear on the selected item.<br />
6) Press the LEFT or RIGHT button to select the next menu item.<br />
7) Press the MODE button to exit the menu and return to your previous mode.<br />
8) An icon reflecting your selection will display on the LCD screen.<br />
9) Remember that this setting will be saved by your camera until you manually change the<br />
setting or restore the camera‟s default factory settings.<br />
Anti-Shake Menu<br />
The Anti-Shake feature reduces image distortion that can be caused by movement of the camera<br />
while capturing the image.<br />
1) Press the SET button to open the menus for the current mode.<br />
2) Press the LEFT or RIGHT direction control buttons to scroll and select the Anti-Shake menu.<br />
3) Press the UP or DOWN direction control buttons to scroll through the menu options.<br />
4) Press the SET button to select and save the desired option.<br />
5) A selected option icon will appear on the selected item.<br />
6) Press the LEFT or RIGHT button to select the next menu item.<br />
7) Press the MODE button to exit the menu and return to your previous mode.<br />
8) An icon reflecting your selection will display on the LCD screen.<br />
9) Remember that this setting will be saved by your camera until you manually change the<br />
setting or restore the camera‟s default factory settings.<br />
21
Face Detect Menu<br />
The Face Detect feature when set to „On‟ allows the camera to use a subject‟s face as the basis<br />
for balancing the other colors and focus in the camera‟s display. This feature is meant to ensure<br />
that the color and focus of your pictures will be consistently sharp and high-quality.<br />
Note: To properly use the Face Detect option, please ensure the following:<br />
<br />
<br />
MACRO Mode OFF - Face Detect will not work if the camera is in Macro mode.<br />
To turn MACRO Mode OFF: Push the Macro Switch on the side of the camera down for the<br />
mountain icon to appear on the LCD.<br />
Anti-Shake - Ensure that the Anti-Shake option is set to „On‟. The Anti-Shake option is „On‟ by<br />
default when you start using your camera and assists you in properly focusing the image.<br />
Distance from the camera – The subject‟s face must be no further than 8 to 9 feet (3.5<br />
meters) from the camera and the face must cover at least 20% (1/5 th ) of the picture as seen<br />
on the LCD screen.<br />
<br />
Facing the camera - The face of the subject(s) you are photographing must be facing the<br />
camera and must hold the pose for at least 4 to 5 seconds until the green square(s) appears<br />
around the subject‟s face.<br />
Face Detect will not work with a side shot of the subject‟s head.<br />
1) Press the SET button to open the menus for the current mode.<br />
2) Press the LEFT or RIGHT direction control buttons to scroll and select the Face Detect<br />
menu.<br />
3) Press the UP or DOWN direction control buttons to scroll through the menu options.<br />
4) Press the SET button to select and save the desired option.<br />
5) A selected option icon will appear on the selected item.<br />
6) Press the LEFT or RIGHT button to select the next menu item.<br />
7) Press the MODE button to exit the menu and return to your previous mode.<br />
8) An icon reflecting your selection will display on the LCD screen.<br />
9) Remember that this setting will be saved by your camera until you manually change the<br />
setting or restore the camera‟s default factory settings.<br />
22
White Balance Menu<br />
The White Balance feature allows your camera to adjust the coloring of the captured images<br />
depending on the type of light source in the current environment.<br />
Properly adjusting the White Balance setting to match your current environment will allow the<br />
camera to properly balance the colors in the images that are taken with your camera.<br />
1) Press the SET button to open the menus for the current mode.<br />
2) Press the LEFT or RIGHT direction control buttons to scroll and select the White Balance<br />
menu.<br />
3) Press the UP or DOWN direction control buttons to scroll through the menu options.<br />
4) Press the SET button to select and save the desired option.<br />
5) A selected option icon will appear on the selected item.<br />
6) Press the LEFT or RIGHT button to select the next menu item.<br />
7) Press the MODE button to exit the menu and return to your previous mode.<br />
8) An icon reflecting your selection will display on the LCD screen<br />
9) Remember that this setting will be saved by your camera until you manually change the<br />
setting or restore the camera‟s default factory settings.<br />
Color Effect Menu<br />
You can choose to add a color effect to the images taken with your camera.<br />
1) Press the SET button to open the menus for the current mode.<br />
2) Press the LEFT or RIGHT direction control buttons to scroll and select the Color Effect<br />
menu.<br />
3) Press the UP or DOWN direction control buttons to scroll through the menu options.<br />
4) Press the SET button to select and save the desired option.<br />
5) A selected option icon will appear on the selected item.<br />
6) Press the LEFT or RIGHT button to select the next menu item.<br />
7) Press the MODE button to exit the menu and return to your previous mode.<br />
8) Remember that this setting will be saved by your camera until you manually change the<br />
setting or restore the camera‟s default factory settings.<br />
23
Multi SnapShots Menu<br />
When enabled, the Multi SnapShots feature allows you to take six rapid snapshots in a row with a<br />
single click of the shutter button.<br />
This feature can be effective when trying to capture a particular moment in a sporting event or<br />
other scenes with quick movements.<br />
1) Press the SET button to open the menus for the current mode.<br />
2) Press the LEFT or RIGHT direction control buttons to scroll and select the Multi SnapShots<br />
menu.<br />
3) Press the UP or DOWN direction control buttons to scroll through the menu options.<br />
4) Press the SET button to select and save the desired option.<br />
5) A selected option icon will appear on the selected item.<br />
6) Press the LEFT or RIGHT button to select the next menu item.<br />
7) Press the MODE button to exit the menu and return to your previous mode.<br />
8) An icon reflecting your selection will display on the LCD screen<br />
9) Remember that this setting will be saved by your camera until you manually change the<br />
setting or restore the camera‟s default factory settings.<br />
Image Sharpness Menu<br />
You can set the level of sharpness in the images taken with your camera. The sharpness level<br />
dictates if the edges of objects in the image are more or less distinct.<br />
1) Press the SET button to open the menus for the current mode.<br />
2) Press the LEFT or RIGHT direction control buttons to scroll and select the Image Sharpness<br />
menu.<br />
3) Press the UP or DOWN direction control buttons to scroll through the menu options.<br />
4) Press the SET button to select and save the desired option.<br />
5) A selected option icon will appear on the selected item.<br />
6) Press the LEFT or RIGHT button to select the next menu item.<br />
7) Press the MODE button to exit the menu and return to your previous mode.<br />
24
8) An icon reflecting your selection will display on the LCD screen<br />
9) Remember that this setting will be saved by your camera until you manually change the<br />
setting or restore the camera‟s default factory settings.<br />
Light Exposure Menu<br />
The Light Exposure setting helps you control the amount of light that enters your camera‟s lens.<br />
This setting should be adjusted when the environment is lighter or darker than normal.<br />
When the environment has more light than is needed, reduce the exposure setting (by using the<br />
negative - count) to reduce the amount of light allowed into the lens by your camera.<br />
If the environment has less light (darker) than is needed, increase the exposure setting (by using<br />
the positive + count) to increase the amount of light allowed into the lens by your camera.<br />
1) Press the SET button to open the menus for the current mode.<br />
2) Press the LEFT or RIGHT direction control buttons to scroll and select the Light Exposure<br />
menu.<br />
3) Press the UP or DOWN direction control buttons to scroll through the menu options.<br />
4) Press the SET button to select and save the desired option.<br />
5) A selected option icon will appear on the selected item.<br />
6) Press the LEFT or RIGHT button to select the next menu item.<br />
7) Press the MODE button to exit the menu and return to your previous mode.<br />
8) An icon reflecting your selection will display on the LCD screen<br />
9) Remember that this setting will be saved by your camera until you manually change the<br />
setting or restore the camera‟s default factory settings.<br />
ISO Menu<br />
The ISO menu allows you to set the level of sensitivity that your camera has to light in the<br />
surrounding environment. When the ISO level is increased, the image sensor in your camera will<br />
be more sensitive to light and allow you to capture images in lower-light situations. The higher<br />
sensitivity to light however, may reduce the quality of the images that are taken.<br />
25
When the ISO is reduced, the image sensor in your camera will be less sensitive to light and will<br />
optimize the image quality in environments with bright lighting.<br />
1) Press the SET button to open the menus for the current mode.<br />
2) Press the LEFT or RIGHT direction control buttons to scroll and select the ISO menu.<br />
3) Press the UP or DOWN direction control buttons to scroll through the menu options.<br />
4) Press the SET button to select and save the desired option.<br />
5) A selected option icon will appear on the selected item.<br />
6) Press the LEFT or RIGHT button to select the next menu item.<br />
7) Press the MODE button to exit the menu and return to your previous mode.<br />
8) An icon reflecting your selection will display on the LCD screen<br />
9) Remember that this setting will be saved by your camera until you manually change the<br />
setting or restore the camera‟s default factory settings.<br />
Metering Menu<br />
The Metering setting will affect how your camera focuses when capturing an image. Depending<br />
on your selection, the camera will be more sensitive to focusing on particular areas in the display<br />
and adjust the image color and lighting accordingly.<br />
Center – Averages the light metered from the entire frame, but giving greater weight to the<br />
subject in the center<br />
Multi – Used in standard conditions the camera divides and adjusts the settings of the image into<br />
several zones for light metering such as complex light conditions, position of subject, brightness,<br />
background, direct light and scenes<br />
Spot – Meters the area within the spot point frame at the center of the LCD to set the exposure<br />
on the subject in the center of the monitor.<br />
1) Press the SET button to open the menus for the current mode.<br />
2) Press the LEFT or RIGHT direction control buttons to scroll and select the Metering menu.<br />
3) Press the UP or DOWN direction control buttons to scroll through the menu options.<br />
4) Press the SET button to select and save the desired option.<br />
5) A selected option icon will appear on the selected item.<br />
26
6) Press the LEFT or RIGHT button to select the next menu item.<br />
7) Press the MODE button to exit the menu and return to your previous mode.<br />
8) An icon reflecting your selection will display on the LCD screen.<br />
9) Remember that this setting will be saved by your camera until you manually change the<br />
setting or restore the camera‟s default factory settings.<br />
Language Menu<br />
You can select your camera‟s language setting by selecting the desired language from the<br />
Language menu.<br />
1) Press the SET button to open the menus for the current mode.<br />
2) Press the LEFT or RIGHT direction control buttons to scroll and select the Language menu.<br />
3) Press the UP or DOWN direction control buttons to scroll through the menu options.<br />
4) Press the SET button to select and save the desired option.<br />
5) A selected option icon will appear on the selected item.<br />
6) Press the LEFT or RIGHT button to select the next menu item.<br />
7) Press the MODE button to exit the menu and return to your previous mode.<br />
8) Remember that this setting will be saved by your camera until you manually change the<br />
setting or restore the camera‟s default factory settings.<br />
Date/Time Menu<br />
When you capture an image with your camera, the image will include a time stamp with the date<br />
and time that the image was taken.<br />
The Date/Time menu allows you to set your camera‟s date and time as desired. You can also<br />
disable the timestamp for future images that will be taken with your camera.<br />
On – The timestamp will appear on photos taken<br />
Off – The date stamp will not appear on photos taken<br />
27
To Enable/Disable the Timestamp:<br />
1) Press the SET button to open the menus for the current mode.<br />
2) Press the LEFT or RIGHT direction control buttons to scroll and select the Date/Time menu.<br />
3) Press the UP or DOWN direction control buttons to scroll through the menu options.<br />
4) Press the SET button to select and save the desired option.<br />
5) A selected option icon will appear on the selected item.<br />
6) Press the LEFT or RIGHT button to select the next menu item.<br />
7) Press the MODE button to exit the menu and return to your previous mode.<br />
8) Remember that this setting will be saved by your camera until you manually change the<br />
setting or restore the camera‟s default factory settings.<br />
To Set the Date and Time:<br />
1) Press the SET button to open the menus for the current mode.<br />
2) Press the LEFT or RIGHT direction control buttons to scroll and select the Date/Time menu.<br />
3) Press the UP or DOWN direction control buttons to highlight the “Date Setup” menu option,<br />
then press the SET button to select the option.<br />
4) The “Date Setup” submenu will open.<br />
5) Scroll through the window with the RIGHT and LEFT navigation buttons.<br />
6) For each field in the menu, use the UP and DOWN navigation buttons to set the date and time.<br />
7) When you have finished setting the date and time, press the SET button to save your<br />
settings and return to the previous mode.<br />
8) Press the MODE button to exit the menu without saving your settings and return to your<br />
previous screen.<br />
Silent Mode Menu<br />
You have the option of activating the camera‟s Silent mode to disable all of the sound effects<br />
(except for beeps heard during the Self-Timer countdown) that the camera emits when<br />
performing camera functions.<br />
1) Press the SET button to open the menus for the current mode.<br />
2) Press the LEFT or RIGHT direction control buttons to scroll and select the Silent Mode menu.<br />
28
3) Press the UP or DOWN direction control buttons to scroll through the menu options.<br />
4) Press the SET button to select and save the desired option.<br />
5) A selected option icon will appear on the selected item.<br />
6) Press the LEFT or RIGHT button to select the next menu item.<br />
7) Press the MODE button to exit the menu and return to your previous mode.<br />
8) Remember that this setting will be saved by your camera until you manually change the<br />
setting or restore the camera‟s default factory settings.<br />
Auto Power Off Menu<br />
You can use the Auto Power Off feature in order to conserve you camera‟s battery life. The<br />
designated time represents when your camera will automatically power off.<br />
When the camera sits idle for the designated period of time, the camera will shut off completely<br />
and will need to be powered on again with the power button before the next use.<br />
1) Press the SET button to open the menus for the current mode.<br />
2) Press the LEFT or RIGHT direction control buttons to scroll and select the Auto Power Off menu.<br />
3) Press the UP or DOWN direction control buttons to scroll through the menu options.<br />
4) Press the SET button to select and save the desired option.<br />
5) A selected option icon will appear on the selected item.<br />
6) Press the LEFT or RIGHT button to select the next menu item.<br />
7) Press the MODE button to exit the menu and return to your previous mode.<br />
8) Remember that this setting will be saved by your camera until you manually change the<br />
setting or restore the camera‟s default factory settings.<br />
29
Frequency Menu<br />
The options in the Frequency menu represent the frequency of the electrical current in<br />
fluorescent lighting sources in your locale. If your camera is set to a frequency that does not<br />
match your country‟s electric current, you may see waves on the images taken by your camera.<br />
50Hz – UK, Europe and Australia<br />
60Hz – US, Canada and South America<br />
1) Press the SET button to open the menus for the current mode.<br />
2) Press the LEFT or RIGHT direction control buttons to scroll and select the Frequency menu.<br />
3) Press the UP or DOWN direction control buttons to scroll through the menu options.<br />
4) Press the SET button to select and save the desired option.<br />
5) A selected option icon will appear on the selected item<br />
6) Press the LEFT or RIGHT button to select the next menu item.<br />
7) Press the MODE button to exit the menu and return to your previous mode.<br />
8) Remember that this setting will be saved by your camera until you manually change the<br />
setting or restore the camera‟s default factory settings.<br />
Format Memory Card Menu<br />
You can use the Format Memory Card menu to delete all of the content that is currently on your<br />
camera‟s memory card.<br />
Keep in mind that formatting the memory card will permanently delete all of the content on<br />
your camera’s memory card.<br />
This option will delete all of the content at one time. If you would like to delete individual images,<br />
use the delete menu in the camera‟s Playback mode.<br />
1) Press the SET button to open the menus for the current mode.<br />
2) Press the LEFT or RIGHT direction control buttons to scroll and select the Format Memory<br />
Card menu.<br />
3) Press the UP or DOWN direction control buttons to highlight the menu options.<br />
4) To exit without formatting the card, select „Cancel‟ and press the SET button.<br />
5) To proceed with the format, select “Yes” and press the SET button.<br />
30
You will be asked to confirm the formatting of the memory card.<br />
Select “No” to exit without formatting.<br />
Select “Yes” and press the SET button to begin the format.<br />
The memory card will be completely formatted.<br />
Firmware (Factory Default Settings) Menu<br />
Use this menu to view the Firmware version on your camera or to reset your camera settings to<br />
the Factory Default Settings.<br />
1) Press the SET button to open the menus for the current mode.<br />
2) Press the LEFT or RIGHT direction control buttons to scroll and select the Firmware menu.<br />
3) The “Default Setting” is selected.<br />
4) Press the SET button to reset the camera to the factory default settings.<br />
5) You will be asked to confirm the resetting to the factory default settings.<br />
Select “No” to exit the menu and return to the previous mode without resetting to the<br />
default settings.<br />
Select “Yes” and press the SET button to proceed with the reset.<br />
You will then automatically exit the menu and return to the previous mode with the digital<br />
camera settings set to the Factory Default Settings.<br />
Note: After RESETTING to the default settings, it is recommended to select your system<br />
Language, Date/Time and ViviLink for Photos and Videos. If you do not, the next time your<br />
camera is powered on, you will be prompted to define those settings.<br />
31
Photo Playback Mode<br />
The Playback Mode allows you to review and edit photos and videos that you‟ve already taken<br />
with you camera.<br />
<br />
<br />
<br />
When you first turn on the camera, the camera will be in Photo Capture mode by default.<br />
Press the MODE button twice to open the Playback Mode.<br />
The latest captured image appears on the LCD screen. If there are no images stored, a<br />
message (No File) appears.<br />
Viewing Photos on Your <strong>Camera</strong><br />
1) Select your Photo:<br />
Once in Playback Mode, press the LEFT or RIGHT direction buttons to scroll through the<br />
images on your camera‟s memory card until you find the image you would like to view.<br />
Each captured image (video and photo) is displayed on the LCD screen.<br />
Photos appear with a „JPG‟ icon on the top left of the LCD screen.<br />
2) Zooming In/Out of your selected Photo:<br />
Press the T / Zoom In button to Zoom In and magnify the selected photo.<br />
Use the UP / DOWN / LEFT / RIGHT direction buttons to navigate around the photo.<br />
Press the W/Zoom Out button to Zoom Out of the selected photo.<br />
Use the UP / DOWN / LEFT / RIGHT direction buttons to navigate around the photo.<br />
Thumbnail View<br />
Easily navigate and select the image you wish to view by using the Thumbnail View.<br />
The images on your camera will be displayed in a 3 X 3 matrix where you can use the direction<br />
buttons to scroll and select images from the thumbnails.<br />
1) Press the W/Zoom Out button.<br />
All the images on your camera will appear in the Thumbnail View.<br />
2) Use the UP / DOWN / LEFT / RIGHT direction buttons to scroll and select the image you<br />
wish to view.<br />
3) Press the SET button to enlarge the selected image full size.<br />
32
Photo Playback Mode Quick Function Buttons<br />
Your digital camera has a four-directional pad that functions as Quick Function buttons.<br />
Quick Function Button<br />
Left<br />
Up<br />
Right<br />
Down<br />
Function<br />
Displays the PREVIOUS image<br />
Views all the Photos as a Slide Show with 3, 5 or 10 second<br />
intervals. To exit the Slide Show, press any button.<br />
Displays the NEXT image<br />
ViviLink – Opens the ViviLink for Photos menu<br />
Other<br />
Opens Thumbnail View<br />
W/Zoom out<br />
To Navigate in the Thumbnail View: press the UP / DOWN /<br />
LEFT / RIGHT direction buttons<br />
SET<br />
<br />
<br />
<br />
To select a JPG in the Thumbnail View: press the SET button<br />
Opens the menu options for Photo Playback Mode<br />
Saves your selected menu option<br />
Note: To navigate through the Menus, use the<br />
UP/DOWN/LEFT/RIGHT direction control buttons.<br />
33
Photo Playback Mode Menus<br />
The following are the menus that appear in your camera‟s Photo Playback Mode:<br />
Delete Menu<br />
While in the Playback Mode, you can delete pictures from your camera through the Delete menu.<br />
1) View the photo you would like to delete.<br />
2) Press the SET button to open the menus for the Photo Playback mode.<br />
3) Press the LEFT or RIGHT direction control buttons to scroll and select the Delete menu.<br />
4) Press the UP or DOWN direction control buttons to scroll through the menu options.<br />
5) To delete the selected photo:<br />
Select “Delete This Photo” and press SET button.<br />
You will be asked to confirm the deletion of the photo.<br />
If you would like to proceed with deleting the current image: select „Yes‟ and press the<br />
SET button to confirm. The photo will be deleted and you will exit the menu and return to<br />
the Playback mode.<br />
If you do not want to delete the current image, select „No‟ and press the SET button. The<br />
photo will not be deleted and you will exit the menu and return to the Playback mode.<br />
6) To delete all the images (videos and photos) you have saved on your SD Memory card:<br />
Select „Delete All Images‟ and press the SET button.<br />
If you would like to proceed with deleting all the videos and photos, select „Yes‟ and press<br />
the SET button to confirm.<br />
34
All of your images will be permanently deleted.<br />
A blank „No Files Exist‟ screen will appear.<br />
Press the MODE button to exit the „No Files Exist‟ screen and return to Photo Capture<br />
mode.<br />
Remember: All images will be deleted except images that are Protected/Locked. To<br />
delete a locked image, first unlock the image, then select delete.<br />
If you do not want to delete all of your videos and photos, select „No‟ and press the SET<br />
button. All images will remain on your SD card and you will exit the menu and return to<br />
the Playback mode.<br />
ViviLink for Photos Menu<br />
The ViviLink technology allows you to quickly and easily upload your camera‟s photos and videos<br />
to the social networks of your choice with the accompanying <strong>Vivitar</strong> Experience Image Manager<br />
application.<br />
1) Press the SET button to open the menus for the current mode.<br />
2) Press the LEFT or RIGHT direction control buttons to scroll and select the ViviLink menu.<br />
3) Press the UP or DOWN direction control buttons to scroll through the menu options.<br />
4) Press the SET button to select the desired option.<br />
5) A selected option icon will appear on the selected item.<br />
6) An icon will appear on the image with the selected ViviLink destination site when you return<br />
to the Playback display.<br />
7) Remember that the ViviLink feature is deactivated by default. A ViviLink destination will only<br />
be assigned to a photo or video if you manually set it from this menu or from the ViviLink<br />
menu in Capture mode (accessible with the ViviLink Quick-Function button in Capture<br />
mode).<br />
8) Changing the ViviLink destination site will also make the selected site the new default<br />
ViviLink option. A new default can be selected at any time through this menu.<br />
9) Press the LEFT or RIGHT button to select the next menu item.<br />
10) Press the MODE button to exit the menu and return to your previous mode.<br />
35
Rotate Menu<br />
Use this menu to rotate the pictures that you‟ve taken with your camera.<br />
1) Press the SET button to open the menus for the current mode.<br />
2) Press the LEFT or RIGHT direction control buttons to scroll and select the Rotate menu.<br />
3) Press the UP or DOWN direction control buttons to scroll through the menu options.<br />
4) Press the SET button to select and save the desired option.<br />
5) The selected picture will now appear rotated in the Playback mode.<br />
6) Press the LEFT or RIGHT button to select the next menu item.<br />
7) Press the MODE button to exit the menu and return to your previous mode.<br />
Crop Image Menu<br />
You can crop any picture on your camera with the Crop feature.<br />
1) Press the SET button to open the menus for the current mode.<br />
2) Press the LEFT or RIGHT direction control buttons to scroll and select the chosen menu.<br />
3) Press the UP or DOWN to highlight the Crop option.<br />
4) Press the SET button to open the Crop option.<br />
5) The Crop window will open on the selected picture.<br />
6) Use the directional buttons to move the Crop box to define the desired crop area.<br />
7) Use the W/T Zoom buttons on the camera to enlarge or shrink the Crop box.<br />
8) When you are ready to crop, press the Shutter button.<br />
9) When you see the cropped picture appear, press the Shutter button again to save or press<br />
the SET button to cancel and return to the previous menu.<br />
10) If you selected to save, the cropped picture will now be saved as a new picture to your<br />
memory card.<br />
36
Protect/Lock Menu<br />
Pictures and Videos taken with your camera can be protected or “locked” to prevent any deletion<br />
or alteration being made to the files.<br />
1) Press the SET button to open the menus for the current mode.<br />
2) Press the LEFT or RIGHT direction control buttons to scroll and select the Protect/Lock<br />
menu.<br />
3) Press the UP or DOWN direction control buttons to scroll through the menu options.<br />
4) Press the SET button to select the desired option.<br />
5) Press the LEFT or RIGHT button to select the next menu item.<br />
6) Press the MODE button to exit the menu and return to your previous mode.<br />
7) Any image that is locked will display a lock symbol on the LCD screen when viewing that<br />
image in the playback mode. Photos that are not locked will not display the lock symbol.<br />
8) Remember that you cannot delete or edit photos while they are locked.<br />
Print This Photo Menu<br />
You can use the Print Photos menu to print the photos that are on your camera directly to a<br />
Pictbridge compatible printer.<br />
1) Scroll through your pictures and find the one you would like to print.<br />
2) Press the SET button to open the menus for the current mode.<br />
3) Press the LEFT or RIGHT direction control buttons to scroll and select the Print This Photo<br />
menu.<br />
4) Press the UP or DOWN direction control buttons to scroll through the menu options.<br />
5) Press the SET button when highlighting the “Print This Photo” option to print the selected<br />
photo.<br />
6) You will be asked to connect the camera to the Pictbridge printer.<br />
7) Connect the USB cable provided in the package from the camera to the Pictbridge port of<br />
the printer.<br />
8) Once connected, follow the instructions on the printer to proceed with the printing process.<br />
9) Select the “Cancel” option to exit the menu and return to the previous mode.<br />
37
Slide Show Menu<br />
You can view a Slide Show of all the pictures taken with your camera by pressing the UP Quick<br />
Function button while in Playback mode. The Slide Show menu allows you to set the interval<br />
length of time that each picture will display during the slide show.<br />
1) Press the SET button to open the menus for the current mode.<br />
2) Press the LEFT or RIGHT direction control buttons to scroll and select the Slide Show menu.<br />
3) Press the UP or DOWN direction control buttons to scroll through the menu options.<br />
4) Press the SET button to select and save the desired option.<br />
5) A selected option icon will appear on the selected item.<br />
6) Press the LEFT or RIGHT button to select the next menu item.<br />
7) Press the MODE button to exit the menu and return to your previous mode.<br />
8) While in Playback mode, press the UP Quick Function button to initiate the slide show.<br />
9) Press any button to exit the slide show and return to the previous mode.<br />
38
Video Capture Mode<br />
The Video Capture Mode allows you to capture videos with your digital camera.<br />
When the camera is first powered ON, the camera will be in Photo Capture Mode.<br />
Press the MODE button once to access the Video Capture Mode.<br />
Taking a Video<br />
1) While in Video Capture Mode use the LCD display to direct the camera at the scene you<br />
would like to capture.<br />
2) Click the T/Zoom In and W/Zoom Out buttons to better set the camera display if<br />
desired.<br />
Note: The actual shape of these buttons may vary per camera model.<br />
3) Press the Shutter button on the top of the camera to START the video capture.<br />
4) You will see a red icon at the top of the LCD indicating that the record is in progress.<br />
5) To STOP the video record, press the Shutter button again.<br />
6) The video will automatically be saved to the camera‟s memory or SD card.<br />
7) You can also capture your videos using the Flip Screen.<br />
When you would like to quickly and easily include yourself in the video, simply flip the LCD<br />
display out and hold the camera facing towards you. Make sure you can see yourself within<br />
the scene on the LCD screen, look at the lens, then click the Shutter button to begin<br />
recording.<br />
It‟s as easy as twist and shoot!<br />
NOTE: Before taking the video, ensure that the Macro Switch on the side of the camera is<br />
up and in the ON position<br />
. The flower icon will appear on the LCD display.<br />
Videos using the Flip screen without Macro mode ON may not be properly focused.<br />
39
Video Capture Mode Quick Function Buttons<br />
Your digital camera has a four-directional pad that functions as Quick Function buttons.<br />
Quick Function Button<br />
Left<br />
Up<br />
Function<br />
Scene Selection - Opens the Scene menu<br />
Light Exposure – Opens the Light Exposure menu<br />
Right<br />
Delete - Opens the „Delete This Video‟ option and allows you<br />
to view and delete the last video taken as well as previously<br />
captured videos<br />
Down<br />
ViviLink - Opens the ViviLink for Videos menu<br />
Other<br />
Shutter<br />
STARTS/STOPS the video capture<br />
SET<br />
MODE<br />
<br />
<br />
<br />
<br />
Opens the menu options for Video Capture Mode<br />
Saves your selected menu option<br />
Note: To navigate through the Menus, use the<br />
UP/DOWN/LEFT/RIGHT direction control buttons.<br />
Toggles between the Video Capture Mode, Photo Capture<br />
Mode, and Playback Mode<br />
Exits the menu screen<br />
T<br />
W<br />
Zooms In<br />
Zooms Out<br />
Macro Switch /<br />
See Photo Capture Mode ‘Macro Mode Switch’ section, page 16.<br />
Hide/Show the LCD Icons<br />
The display of the icons on the LCD screen can be hidden or visible as desired.<br />
1) Hold the MODE button for 2 seconds to hide the display of the icons on the screen.<br />
2) Press the MODE button again to redisplay the icons on the screen.<br />
40
Video Capture Mode Menus<br />
The following are the menus that appear in your camera‟s Video Capture Mode:<br />
41
Scene Menu<br />
The Scene Menu allows you to choose scene settings that let your camera to adapt properly to<br />
your current environment.<br />
1) Press the SET button to open the menus for the current mode.<br />
2) Press the LEFT or RIGHT direction control buttons to scroll and select the Scene menu.<br />
3) Press the UP or DOWN direction control buttons to scroll through the menu options.<br />
4) Press the SET button to select and save the desired option.<br />
5) A selected option icon will appear on the selected item.<br />
6) Press the LEFT or RIGHT button to select the next menu item.<br />
7) Press the MODE button to exit the menu and return to your previous mode.<br />
8) An icon reflecting your selection will display on the LCD screen.<br />
9) Remember that this setting will be saved by your camera until you manually change the<br />
setting or restore the camera‟s default factory settings.<br />
Image Size Menu<br />
The Image Size menu allows you to choose the desired size of the images taken by your camera.<br />
Keep in mind that images with a larger size will also take up more of your camera‟s memory.<br />
1) Press the SET button to open the menus for the current mode.<br />
2) Press the LEFT or RIGHT direction control buttons to scroll and select the Image Size<br />
menu.<br />
3) Press the UP or DOWN direction control buttons to scroll through the menu options.<br />
4) Press the SET button to select and save the desired option.<br />
5) A selected option icon will appear on the selected item.<br />
6) Press the LEFT or RIGHT button to select the next menu item.<br />
7) Press the MODE button to exit the menu and return to your previous mode.<br />
8) An icon reflecting your selection will display on the LCD screen.<br />
9) Remember that this setting will be saved by your camera until you manually change the<br />
setting or restore the camera‟s default factory settings.<br />
42
Image Quality Menu<br />
The Image Quality menu allows you to select the desired quality level of the images taken by your<br />
camera. Keep in mind that images with a higher image quality level will also take up more<br />
memory on your camera.<br />
1) Press the SET button to open the menus for the current mode.<br />
2) Press the LEFT or RIGHT direction control buttons to scroll and select the Image Quality<br />
menu.<br />
3) Press the UP or DOWN direction control buttons to scroll through the menu options.<br />
4) Press the SET button to select and save the desired option.<br />
5) A selected option icon will appear on the selected item.<br />
6) Press the LEFT or RIGHT button to select the next menu item.<br />
7) Press the MODE button to exit the menu and return to your previous mode.<br />
8) An icon reflecting your selection will display on the LCD screen.<br />
9) Remember that this setting will be saved by your camera until you manually change the<br />
setting or restore the camera‟s default factory settings.<br />
White Balance Menu<br />
The White Balance feature allows your camera to adjust the coloring of the captured images<br />
depending on the type of light source in the current environment.<br />
Properly adjusting the White Balance setting to match your current environment will allow the<br />
camera to properly balance the colors in the images that are taken with your camera.<br />
1) Press the SET button to open the menus for the current mode.<br />
2) Press the LEFT or RIGHT direction control buttons to scroll and select the White Balance<br />
menu.<br />
3) Press the UP or DOWN direction control buttons to scroll through the menu options.<br />
4) Press the SET button to select and save the desired option.<br />
5) A selected option icon will appear on the selected item.<br />
6) Press the LEFT or RIGHT button to select the next menu item.<br />
7) Press the MODE button to exit the menu and return to your previous mode.<br />
43
8) An icon reflecting your selection will display on the LCD screen.<br />
9) Remember that this setting will be saved by your camera until you manually change the<br />
setting or restore the camera‟s default factory settings.<br />
Color Effect Menu<br />
You can choose to add a color effect to the images taken with your camera.<br />
1) Press the SET button to open the menus for the current mode.<br />
2) Press the LEFT or RIGHT direction control buttons to scroll and select the Color Effect<br />
menu.<br />
3) Press the UP or DOWN direction control buttons to scroll through the menu options.<br />
4) Press the SET button to select and save the desired option.<br />
5) A selected option icon will appear on the selected item.<br />
6) Press the LEFT or RIGHT button to select the next menu item.<br />
7) Press the MODE button to exit the menu and return to your previous mode.<br />
8) Remember that this setting will be saved by your camera until you manually change the<br />
setting or restore the camera‟s default factory settings.<br />
Image Sharpness Menu<br />
You can set the level of sharpness in the images taken with your camera. The sharpness level<br />
dictates if the edges of objects in the image are more or less distinct.<br />
1) Press the SET button to open the menus for the current mode.<br />
2) Press the LEFT or RIGHT direction control buttons to scroll and select the Image Sharpness<br />
menu.<br />
3) Press the UP or DOWN direction control buttons to scroll through the menu options.<br />
4) Press the SET button to select and save the desired option.<br />
5) A selected option icon will appear on the selected item.<br />
6) Press the LEFT or RIGHT button to select the next menu item.<br />
7) Press the MODE button to exit the menu and return to your previous mode.<br />
44
8) An icon reflecting your selection will display on the LCD screen<br />
9) Remember that this setting will be saved by your camera until you manually change the<br />
setting or restore the camera‟s default factory settings.<br />
Light Exposure Menu<br />
The Light Exposure setting helps you control the amount of light that enters your camera‟s lens.<br />
This setting should be adjusted when the environment is lighter or darker than normal.<br />
When the environment has more light than is needed, reduce the exposure setting (by using the<br />
negative - count) to reduce the amount of light allowed into the lens by your camera.<br />
If the environment has less light (darker) than is needed, increase the exposure setting (by using<br />
the positive + count) to increase the amount of light allowed into the lens by your camera.<br />
1) Press the SET button to open the menus for the current mode.<br />
2) Press the LEFT or RIGHT direction control buttons to scroll and select the Light Exposure menu.<br />
3) Press the UP or DOWN direction control buttons to scroll through the menu options.<br />
4) Press the SET button to select and save the desired option.<br />
5) A selected option icon will appear on the selected item.<br />
6) Press the LEFT or RIGHT button to select the next menu item.<br />
7) Press the MODE button to exit the menu and return to your previous mode.<br />
8) An icon reflecting your selection will display on the LCD screen.<br />
9) Remember that this setting will be saved by your camera until you manually change the<br />
setting or restore the camera‟s default factory settings.<br />
ISO Menu<br />
The ISO menu allows you to set the level of sensitivity that your camera has to light in the<br />
surrounding environment. When the ISO level is increased, the image sensor in your camera will<br />
be more sensitive to light and allow you to capture images in lower-light situations. The higher<br />
45
sensitivity to light however, may reduce the quality of the images that are taken.<br />
When the ISO is reduced, the image sensor in your camera will be less sensitive to light and will<br />
optimize the image quality in environments with bright lighting.<br />
1) Press the SET button to open the menus for the current mode.<br />
2) Press the LEFT or RIGHT direction control buttons to scroll and select the ISO menu.<br />
3) Press the UP or DOWN direction control buttons to scroll through the menu options.<br />
4) Press the SET button to select and save the desired option.<br />
5) A selected option icon will appear on the selected item.<br />
6) Press the LEFT or RIGHT button to select the next menu item.<br />
7) Press the MODE button to exit the menu and return to your previous mode.<br />
8) An icon reflecting your selection will display on the LCD screen.<br />
9) Remember that this setting will be saved by your camera until you manually change the<br />
setting or restore the camera‟s default factory settings.<br />
Metering Menu<br />
The Metering setting will affect how your camera focuses when capturing an image. Depending<br />
on your selection, the camera will be more sensitive to focusing on particular areas in the display<br />
and adjust the image color and lighting accordingly.<br />
Center – Averages the light metered from the entire frame, but giving greater weight to the<br />
subject in the center<br />
Multi – Used in standard conditions the camera divides and adjusts the settings of the image into<br />
several zones for light metering such as complex light conditions, position of subject, brightness,<br />
background, direct light and scenes<br />
Spot – Meters the area within the spot point frame at the center of the LCD to set the exposure<br />
on the subject in the center of the monitor.<br />
1) Press the SET button to open the menus for the current mode.<br />
2) Press the LEFT or RIGHT direction control buttons to scroll and select the Metering menu.<br />
46
3) Press the UP or DOWN direction control buttons to scroll through the menu options.<br />
4) Press the SET button to select and save the desired option.<br />
5) A selected option icon will appear on the selected item.<br />
6) Press the LEFT or RIGHT button to select the next menu item.<br />
7) Press the MODE button to exit the menu and return to your previous mode.<br />
8) An icon reflecting your selection will display on the LCD screen.<br />
9) Remember that this setting will be saved by your camera until you manually change the<br />
setting or restore the camera‟s default factory settings.<br />
Language Menu<br />
You can select your camera‟s language setting by selecting the desired language from the<br />
Language menu.<br />
1) Press the SET button to open the menus for the current mode.<br />
2) Press the LEFT or RIGHT direction control buttons to scroll and select the Language menu.<br />
3) Press the UP or DOWN direction control buttons to scroll through the menu options.<br />
4) Press the SET button to select and save the desired option.<br />
5) A selected option icon will appear on the selected item.<br />
6) Press the LEFT or RIGHT button to select the next menu item.<br />
7) Press the MODE button to exit the menu and return to your previous mode.<br />
8) Remember that this setting will be saved by your camera until you manually change the<br />
setting or restore the camera‟s default factory settings.<br />
47
Date/Time Menu<br />
When you capture an image with your camera, the image will include a time stamp with the date<br />
and time that the image was taken.<br />
The Date/Time menu allows you to set your camera‟s date and time as desired. You can also<br />
disable the timestamp for future images that will be taken with your camera.<br />
On – The timestamp will appear on photos taken<br />
Off – The date stamp will not appear on photos taken<br />
To Enable/Disable the Timestamp:<br />
1) Press the SET button to open the menus for the current mode.<br />
2) Press the LEFT or RIGHT direction control buttons to scroll and select the Date/Time menu.<br />
3) Press the UP or DOWN direction control buttons to scroll through the menu options.<br />
4) Press the SET button to select and save the desired option.<br />
5) A selected option icon will appear on the selected item.<br />
6) Press the LEFT or RIGHT button to select the next menu item.<br />
7) Press the MODE button to exit the menu and return to your previous mode.<br />
8) Remember that this setting will be saved by your camera until you manually change the<br />
setting or restore the camera‟s default factory settings.<br />
To Set the Date and Time:<br />
1) Press the SET button to open the menus for the current mode.<br />
2) Press the LEFT or RIGHT direction control buttons to scroll and select the Date/Time menu.<br />
3) Press the UP or DOWN direction control buttons to highlight the “Date Setup” menu option<br />
then press the SET button to select the option.<br />
4) The “Date Setup” submenu will open.<br />
5) Scroll through the window with the RIGHT and LEFT navigation buttons.<br />
6) For each field in the menu, use the UP and DOWN navigation buttons to set the date and time.<br />
7) When you have finished setting the date and time, press the SET button to save your<br />
settings and return to the previous mode.<br />
8) Press the MODE button to exit the menu without saving your settings and return to your<br />
previous screen.<br />
48
Auto Power Off Menu<br />
You can use the Auto Power Off feature in order to conserve you camera‟s battery life. The<br />
designated time represents when your camera will automatically power off.<br />
When the camera sits idle for the designated period of time, the camera will shut off completely<br />
and will need to be turned on again with the power button before the next use.<br />
1) Press the SET button to open the menus for the current mode.<br />
2) Press the LEFT or RIGHT direction control buttons to scroll and select the Auto Power Off menu.<br />
3) Press the UP or DOWN direction control buttons to scroll through the menu options.<br />
4) Press the SET button to select and save the desired option.<br />
5) A selected option icon will appear on the selected item.<br />
6) Press the LEFT or RIGHT button to select the next menu item.<br />
7) Press the MODE button to exit the menu and return to your previous mode.<br />
8) Remember that this setting will be saved by your camera until you manually change the<br />
setting or restore the camera‟s default factory settings.<br />
Frequency Menu<br />
The options in the Frequency menu represent the frequency of the electrical current in<br />
fluorescent lighting sources in your locale. If your camera is set to a frequency that does not<br />
match your country‟s electric current, you may see flickering or waves on the images taken by<br />
your camera.<br />
50Hz – UK, Europe and Australia<br />
60Hz – US, Canada and South America<br />
1) Press the SET button to open the menus for the current mode.<br />
2) Press the LEFT or RIGHT direction control buttons to scroll and select the Frequency menu.<br />
3) Press the UP or DOWN direction control buttons to scroll through the menu options.<br />
4) Press the SET button to select and save the desired option.<br />
5) A selected option icon will appear on the selected item.<br />
6) Press the LEFT or RIGHT button to select the next menu item.<br />
49
7) Press the MODE button to exit the menu and return to your previous mode.<br />
8) Remember that this setting will be saved by your camera until you manually change the<br />
setting or restore the camera‟s default factory settings.<br />
Format Memory Card Menu<br />
You can use the Format Memory Card menu to delete all of the content that is currently on your<br />
camera‟s memory card.<br />
Keep in mind that formatting the memory card will permanently delete all of the content on<br />
your camera’s memory card.<br />
This option will delete all of the content at one time. If you would like to delete individual images,<br />
use the delete menu in the camera‟s Playback mode.<br />
1) Press the SET button to open the menus for the current mode.<br />
2) Press the LEFT or RIGHT direction control buttons to scroll and select the Format Memory<br />
Card menu.<br />
3) Press the UP or DOWN direction control buttons to highlight the menu options.<br />
4) To exit without formatting the card, select „Cancel‟ and press the SET button.<br />
5) To proceed with the format, select “Yes” and press the SET button.<br />
You will be asked to confirm the formatting of the memory card.<br />
Select “No” to exit without formatting.<br />
Select “Yes” and press the SET button to begin.<br />
The memory card will be completely formatted.<br />
Firmware (Factory Default Settings) Menu<br />
Use this menu to view the Firmware version on your camera or to reset your camera settings to<br />
the Factory Default Settings.<br />
1) Press the SET button to open the menus for the current mode.<br />
2) Press the LEFT or RIGHT direction control buttons to scroll and select the Firmware menu.<br />
3) The “Default Setting” is selected.<br />
50
4) Press the SET button to reset the camera to the factory default settings.<br />
5) You will be asked to confirm the resetting to the factory default settings.<br />
Select “No” to exit the menu and return to the previous mode without resetting to the<br />
default settings.<br />
Select “Yes” and press the SET button to proceed with the reset.<br />
You will then automatically exit the menu and return to the previous mode with the digital<br />
camera settings set to the Factory Default Settings.<br />
Note: After RESETTING to the default settings, it is recommended to select your system<br />
Language, Date/Time and ViviLink for Photos and Videos. If you do not, the next time your<br />
camera is powered on, you will be prompted to define those settings.<br />
51
Video Playback Mode<br />
The Playback Mode allows you to review and edit photos and videos that you‟ve already taken<br />
with you camera.<br />
<br />
<br />
<br />
When you first turn on the camera, the camera will be in Photo Capture mode by default.<br />
Press the MODE button twice to open the Playback Mode.<br />
The latest captured image appears on the LCD screen. If there are no images stored, a<br />
message (No File) appears.<br />
Playing Videos on Your <strong>Camera</strong><br />
1) Select your Video:<br />
Once in Playback mode, press the LEFT or RIGHT direction buttons to scroll through the<br />
images on your camera‟s memory card until you find the video you would like to view.<br />
Each captured image (video and photo) is displayed on the LCD screen.<br />
Videos appear with an „AVI‟ icon on the top left of the LCD screen.<br />
2) Play your selected video:<br />
Press the Shutter button to START playing the video.<br />
Press the Shutter button again to PAUSE the video and to continue playing and pausing<br />
as needed.<br />
To fully STOP the video and restore the icons to the LCD, press the UP button.<br />
While the Video is playing all the icons on the top section of the LCD disappear.<br />
Thumbnail View<br />
Easily navigate and select the image you wish to view by using the Thumbnail View.<br />
The images on your camera will be displayed in a 3 X 3 matrix where you can use the direction<br />
buttons to scroll and select images from the thumbnails.<br />
1) Press the W/Zoom Out button<br />
All the images on your camera will appear in the Thumbnail View.<br />
2) Use the UP / DOWN / LEFT / RIGHT direction buttons to scroll and select the image you<br />
wish to view.<br />
52
3) Press the SET button to enlarge the image full size.<br />
4) Once the selected video is full size you can play and view the video.<br />
Video Playback Mode Quick Function Buttons<br />
Your digital camera has a four-directional pad that functions as Quick Function buttons.<br />
Quick Function Button<br />
Left<br />
Function<br />
Displays the PREVIOUS image<br />
Up<br />
Right<br />
Down<br />
STOPS a playing video<br />
Displays the NEXT image<br />
ViviLink - Opens the ViviLink for Videos menu<br />
Other<br />
Shutter<br />
PLAYS and PAUSES a playing video<br />
Opens Thumbnail View<br />
W/Zoom out<br />
To Navigate in the Thumbnail View: press the UP / DOWN / LEFT /<br />
RIGHT direction buttons<br />
SET<br />
<br />
<br />
<br />
To select a JPG/AVI in the Thumbnail View: press the SET button<br />
Opens the menu options for Photo Playback Mode<br />
Saves your selected menu option<br />
Note: To navigate through the Menus, use the<br />
UP/DOWN/LEFT/RIGHT direction control buttons.<br />
53
Video Playback Mode Menus<br />
The following are the menus that appear in your camera‟s Video Playback Mode:<br />
Delete Menu<br />
While in the Playback Mode, you can delete videos from your camera through the Delete menu.<br />
1) View the video you would like to delete.<br />
2) Press the SET button to open the menus for the Video Playback mode.<br />
3) Press the LEFT or RIGHT direction control buttons to scroll and select the Delete menu.<br />
4) Press the UP or DOWN direction control buttons to scroll through the menu options.<br />
5) To delete the selected photo:<br />
Select “Delete This Video” and press SET button.<br />
You will be asked to confirm the deletion of the photo.<br />
If you would like to proceed with deleting the current image: select „Yes‟ and press the<br />
SET button to confirm. The video will be deleted and you will exit the menu and return to<br />
the Playback mode.<br />
If you do not want to delete the current image, select „No‟ and press the SET button. The<br />
video will not be deleted and you will exit the menu and return to the Playback mode.<br />
6) To delete all the images (videos and photos) you have saved on your SD Memory card:<br />
Select „Delete All Images‟ and press the SET button.<br />
If you would like to proceed with deleting all the videos and photos, select „Yes‟ and press<br />
the SET button to confirm.<br />
All of your images will be permanently deleted.<br />
A blank „No Files Exist‟ screen will appear.<br />
Press the MODE button to exit the „No Files Exist‟ screen and return to Photo Capture<br />
mode.<br />
Remember: All images will be deleted except images that are Protected/Locked. To<br />
54
delete a locked image, first unlock the image, then select delete.<br />
If you do not want to delete all of your videos and photos, select „No‟ and press the SET<br />
button. All images will remain on your SD card and you will exit the menu and return to<br />
the Playback mode.<br />
ViviLink Menu<br />
The ViviLink technology allows you to quickly and easily upload your camera‟s photos and videos<br />
to the social networks of your choice with the accompanying <strong>Vivitar</strong> Experience Image Manager<br />
application.<br />
1) Press the SET button to open the menus for the current mode.<br />
2) Press the LEFT or RIGHT direction control buttons to scroll and select the ViviLink menu.<br />
3) Press the UP or DOWN direction control buttons to scroll through the menu options.<br />
4) Press the SET button to select and save the desired option.<br />
5) A selected option icon will appear on the selected item<br />
6) Press the MODE button to exit the menu and return to your previous mode.<br />
7) An icon will appear on the image with the selected ViviLink destination site.<br />
8) Remember that the ViviLink feature is deactivated by default. A ViviLink destination will only<br />
be assigned to a photo or video if you manually set it from this menu or from the ViviLink<br />
menu in Capture mode (accessible with the ViviLink Quick-Function button in Capture<br />
mode).<br />
9) Changing the ViviLink destination site will also make the selected site the new default<br />
ViviLink option. A new default can be selected at any time through this menu.<br />
Protect/Lock Menu<br />
Pictures and Videos taken with your camera can be protected or “locked” to prevent any deletion<br />
or alteration being made to the files.<br />
1) Press the SET button to open the menus for the current mode.<br />
2) Press the LEFT or RIGHT direction control buttons to scroll and select the Protect/Lock<br />
55
menu.<br />
3) Press the UP or DOWN direction control buttons to scroll through the menu options.<br />
4) Press the SET button to select and save the desired option.<br />
5) Press the MODE button to exit the menu and return to your previous mode.<br />
6) Any image that is locked will display a lock symbol on the LCD screen when viewing that<br />
image in the playback mode. Videos that are not locked will not display the lock symbol.<br />
7) Remember that you cannot delete locked videos.<br />
56
Installing the Software<br />
You must be connected to the internet to install and run the <strong>Vivitar</strong> Experience Image<br />
Manager software.<br />
1) Insert the installation CD into your CD-ROM drive. The installation screen should<br />
automatically open.<br />
2) On PC: The <strong>Vivitar</strong> Experience Image Manager Installer window appears. If the window<br />
does not appear, open the application‟s CD/DVD drive and click on “Setup.exe” to launch<br />
the installer.<br />
3) On Macintosh: Click the icon that appears on the desktop to install the <strong>Vivitar</strong> Experience<br />
Image Manager.<br />
4) If you do not have internet access at the time of inserting the CD-ROM, connect to the<br />
internet and then click the “Install <strong>Vivitar</strong> Experience Image Manager” button to begin the<br />
installation.<br />
Note: If you do not have internet access, you can still download media from the camera. Click the<br />
“How to transfer photos and videos from my camera to my computer” button for instructions.<br />
57
5) If you have internet access, the “Choose your language” window opens, choose your<br />
language and click “Next” to open the next window.<br />
6) Select your camera model from the list and click “Next” to open the next window.<br />
7) Click “Next” to confirm your camera model selection and to install the application.<br />
8) Please wait while the application is being installed on your computer.<br />
9) Please review the license terms.<br />
On PC and Macintosh: Click the “I accept the terms of this license agreement” and then click<br />
“Next” to continue.<br />
10) On PC only: Let the “<strong>Vivitar</strong> Experience Image Manager” installer create the folder to where<br />
the program will be installed, and then click “Install”.<br />
11) Please wait while the application continues the installation process on your computer.<br />
12) On PC: Click the “Close” button when the installation is complete.<br />
Click the “Launch <strong>Vivitar</strong> Experience Image Manager” to open the application.<br />
13) On Macintosh: Click the “Quit” button when the installation is complete.<br />
Click the “Launch <strong>Vivitar</strong> Experience Image Manager” to open the application.<br />
14) If you close the application you can run the <strong>Vivitar</strong> Experience Image Manager from the<br />
Programs (PC) or Applications (Mac) menu on your computer.<br />
Connecting the <strong>Camera</strong> to the Computer<br />
1) Use the USB cable that came with your camera to connect your camera to your computer.<br />
2) Power the camera ON.<br />
3) The first time you connect the device to the computer you will have to wait a few seconds<br />
until the computer recognizes the device.<br />
58
Getting Photos and Videos from your <strong>Camera</strong> to Your Computer<br />
An SD card needs to be inserted. Do not disconnect the cable during transfer. Doing so will<br />
cancel the transfer of any files on their way to your computer.<br />
1) Select the “Get Images” button from the Main menu.<br />
2) The “Get Images from device” window opens.<br />
3) You can select to download photos, videos or both.<br />
4) Select your camera (removable disk) from the device window. If your camera is the only<br />
USB device connected then it will be selected automatically.<br />
5) Select a location on the computer where to place the new photo and video files.<br />
6) Add the new photo and video files to albums if desired.<br />
7) Select to remove the media files from the selected device (removable disk) after the import.<br />
8) Click the “Get Images” button to transfer the photos and videos from your camera to your computer.<br />
9) A media download progress bar appears on the bottom left showing the number of media<br />
files downloading to your computer. A message appears when the download is complete.<br />
10) The photo and video files that you selected are now downloaded to your computer to the<br />
selected folder and albums ready for your use.<br />
59
Get Started!<br />
Using the <strong>Vivitar</strong> Experience Image Manager, you can:<br />
<br />
Upload and manage photos and videos to and from the most popular photo sharing and social<br />
networking sites - Facebook, Flickr, Picasa, MySpace, Photobucket, Twitpic, Twitgoo and<br />
YouTube<br />
<br />
<br />
<br />
<br />
Seamlessly transfer photos and videos from one social network to another<br />
Organize your images by creating offline and online albums<br />
Edit images using automatic and manual tools<br />
Use automatic “Geotagging” with built in Google Maps<br />
For more details on how to use the <strong>Vivitar</strong> Experience Image Manager open the Help file or<br />
click the “Take a Tour” button on the application’s Home page.<br />
Transferring Images from my <strong>Camera</strong> to my Computer <strong>Manual</strong>ly<br />
Transferring Photos and Videos: WINDOWS<br />
1) Use the USB cable that came with your camera to connect your camera to your computer.<br />
2) MSDC appears on the LCD.<br />
3) A window appears with a list of options, select “Open folder to view files” and click OK.<br />
4) Open the DCIM folder and the folder inside to view the media files.<br />
5) Select the media and copy the files from this folder into your computer. Optionally, select the<br />
files and choose Copy from the Edit menu. Then select a folder and choose Paste from the<br />
Edit menu.<br />
6) We recommend that you copy the images into the Pictures/My Pictures folder and the<br />
videos into the Videos/My Videos folder.<br />
7) Do not disconnect the cable during transfer. Doing so will cancel the transfer of any files on<br />
their way to your computer.<br />
60
Transferring Photos and Videos: MACINTOSH<br />
1) Use the USB cable that came with your camera to connect your camera to your computer.<br />
2) MSDC appears on the LCD.<br />
3) The camera‟s device icon appears on the desktop.<br />
4) Click on the device icon and open the DCIM folder and the folder inside to view the media<br />
files.<br />
5) Select the files and drag them into your computer. Optionally, select the files and choose<br />
Copy from the Finder‟s Edit menu. Then select a folder and choose Paste from the Edit<br />
menu.<br />
6) We recommend that you copy the images into the Pictures folder and the videos into the<br />
Movies folder.<br />
7) Do not disconnect the cable during transfer. Doing so will cancel the transfer of any files on<br />
their way to your computer.<br />
<strong>Camera</strong> Maintenance<br />
The digital camera is a delicate device. Please handle your camera with care to avoid damaging it.<br />
Do not expose your camera to heat sources.<br />
Do not use you camera in wet or moist conditions.<br />
61
Sakar Warranty Card<br />
This warranty covers for the original consumer purchaser only and is not transferable. Products<br />
that fail to function properly UNDER NORMAL USAGE, due to defects in material or<br />
workmanship will be repaired at no charge for parts or labor for a period of one year from the time<br />
of purchase.<br />
What Is Not Covered By Warranty:<br />
Damages or malfunctions not resulting from defects in material or workmanship and damages or<br />
malfunctions from other than normal use, including but limited to, repair by unauthorized parties,<br />
tampering, modification or accident.<br />
What To Do When Service Is Required:<br />
When returning your defective product (postage pre-paid) for service, your package should<br />
include:<br />
1) Copy of original bill of sale<br />
2) A detailed written description of the problem.<br />
3) Your return address and telephone number (Daytime)<br />
MAIL TO ADDRESS BELOW:<br />
Sakar US<br />
Sakar International<br />
Attention: Service Department<br />
195 Carter Drive<br />
Edison, NJ<br />
08817<br />
Sakar UK/Europe<br />
Attention: Service Department<br />
2D, Siskin Parkway East<br />
4020 Middlemarch Business<br />
Park<br />
Coventry, CV3 4PE<br />
Sakar Australia<br />
Return faulty camera to the<br />
Refund Counter at the store<br />
where purchased<br />
62
Technical Support<br />
For technical support issues please visit our website at www.vivitar.com. You can find manuals,<br />
software and FAQ‟s at the website. Can‟t find what you are looking for E-mail us at<br />
support@vivitar.com and one of our technical support team members will answer your<br />
questions. For phone support in the US please call 1-800-592-9541, in the UK call 0800 917 4831,<br />
in Australia call 1800-006-614. If you would like to call from anywhere else, please visit<br />
www.vivitar.com for your local toll free number.<br />
Troubleshooting<br />
Q: I have taken photos and selected the “Get Images” button. I get a message that the<br />
images were successfully transferred but the photos do not appear on my computer.<br />
What do I do<br />
First ensure that you have in fact taken photos. Press the Shutter button to take some sample<br />
photos and then try downloading them again.<br />
With test photos if the camera powers off before you upload them to the computer the photos are<br />
not stored in the camera‟s memory. These photos should be uploaded quickly before the camera<br />
powers off. If the photos are saved to the SD memory card then all the photos should appear.<br />
Q: How do I make sure I don't lose important pictures<br />
This camera requires an SD card for normal use. If the camera powers off nothing will happen to<br />
the images stored on the SD memory card. We recommend always downloading your photos to<br />
your computer as soon as possible to prevent unintentional data loss.<br />
Q: I deleted images using the <strong>Vivitar</strong> Experience Image Manager. The images were also<br />
deleted from my computer. How do I recover images that I accidently deleted<br />
All images deleted using the <strong>Vivitar</strong> Experience Image Manager are sent to your computer‟s<br />
Recycle or Trash Bin and can be retrieved from there.<br />
V<strong>T028</strong> ver2-TA-061411 FW 1500FUGNMH41F29SA0<br />
63