DVR 920HD Digital Video Camera - Vivitar
DVR 920HD Digital Video Camera - Vivitar
DVR 920HD Digital Video Camera - Vivitar

You also want an ePaper? Increase the reach of your titles
YUMPU automatically turns print PDFs into web optimized ePapers that Google loves.
Students are expected to lead a blackboard discussion once during the semester andparticipate in 10 out of 11 discussions. Blackboard discussions are intended to be acontinuation of the class discussion. They should address areas of student interest that wewere unable to explore in class. Specific expectations will be provided in class.Major assignments include one moderate length paper, a midterm and a final exam. Thepaper will focus on a policy response to an undesirable court decision. Students shoulduses class materials and at least three outside sources, and the paper should be five toeight pages in length. Specifics on the assignments will be distributed in class.The midterm exam will cover all material from the first portion of the course with aparticular emphasis on the Equal Protection Clause of the 14 th Amendment. Students willbe permitted to have a 1 page, one sided “cheat” sheet.The final will be a comprehensive in-class exam. Students will be permitted to have a 1page, two sided “cheat” sheet.Attendance and class participation 15%Leading and participating on Blackboard 15%Midterm 20%Policy Response Paper 20%Final 30%REQUIRED TEXTSMarriage, a History: How Love Conquered Marriage, by Stephanie CoontzSex Equality, by Catharine MacKinnon (2 nd Edition)RECOMMENDED TEXTFeminist Legal Theory: A Primer, by Nancy LevitCOURSE CONTENT AND ASSIGNMENTSI. Introduction to Women and the Lawa. Week One: Anatomy of a Case & Understanding Discriminationb. Week Two: Equal ProtectionII. Educationa. Week Three: Affirmative Actionb. Week Four: Single Sex Education & AthleticsIII. Employment
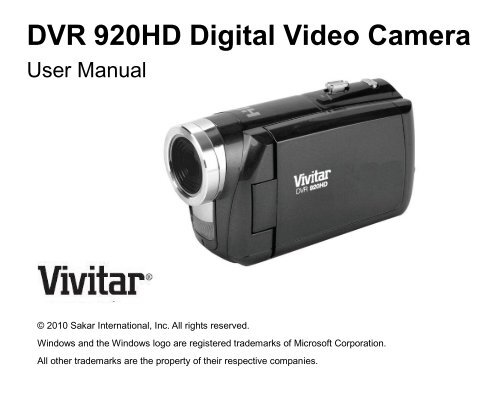
IntroductionThank you for purchasing this camera. Everything you need to take quality digital photos and videos isincluded with your camera.<strong>Vivitar</strong> makes capturing those special moments as easy as possible.Note: Your camera needs an SD Memory card (up to 32GB) for normal use.SD Memory cards are not included and need to be purchased separately.Please read this manual carefully first in order to get the most out of your digital camera.What Your <strong>Camera</strong> Includes<strong>Digital</strong> <strong>Camera</strong><strong>Vivitar</strong> Experience Image Manager software Installation CDUSB cableTV CableEasy GuideStrapWarranty Certificate2
<strong>Camera</strong> Technical SpecificationsImage SensorCMOS SensorImage Resolution3264x2448(8M) / 3648x2048(7M-HD) / 2592x1944(5M) / 2048x1536(3M) /1920x1080(2M-HD) / 640x480(VGA)<strong>Video</strong> Resolution 1280x720(HD:15/30fps) / 640x480(VGA:15/30/60fps) 320x240(QVGA:15/30/60fps)File FormatJPEG (Still Image), AVI (<strong>Video</strong>)Internal Memory LimitedExternal Memory SD Card (up to 32GB)LCD Display 2.4 Inch TFT (270º)Lens f=7mm, F3.0ZoomExposureWhite BalanceISOSceneLanguage4X <strong>Digital</strong> ZoomEV-2.0~EV+2.0Auto/Daylight/Cloudy/Fluorescent/TungstenISO100/200/400/800Auto/Landscape/Portrait/NightPortrait/Beach/Sport/Dinner/High SensitivityEnglish / French / Spanish / Portuguese / German / Dutch / Italian / Russian / TurkishFlashLEDSelf-Timer5S/10SAnti-ShakeYesTV OutYesMicrophoneYesSpeakerYesPictBridgeYesMSDCYesMulti SnapShots YesInterfaceUSB 2.0 High SpeedSystem Requirements Windows XP/Vista and above / Mac OSX 10.5 and aboveBattery4 * AAA (1.5V) batteriesAccessoriesSoftware CD, User Manual, USB Cable, TV-CableWorking Temperature 0~40 ℃3
Computer System Requirements – WindowsTo be able to download photos and videos to your PC, you will need the following minimum configuration: Pentium 4 processor or above with Windows XP service pack 2, Windows Vista or Windows 7512 MB RAM, with 100MB of free disk space1024 x 768 Recommended screen resolution16-bit color or higher display adaptorCD-ROM DriveQuickTime 6 or higherMicrosoft Internet Explorer 7 or higherWindows Media Player 10 or higherInternet connection requiredComputer System Requirements – MacintoshMacintosh with Intel processor running Mac OS X v10.5 or later256 MB RAM, 100 MB free disk spaceDisplay: 1024 x 768 or higher-resolution monitorQuickTime 6 or higherInternet connection required4
A Quick Look at your <strong>Digital</strong> <strong>Camera</strong>1. Power button2. Zoom In (Vol+) /Zoom Out (Vol-)3. Photo Shutter Button4. Playback Button5. <strong>Video</strong> Record Button6. MODE Dial7. Macro Button8. DISP Button9. MENU Button10. Control Joystick/LED Light / Up /Down / OK Button11. USB/AV Slot12. <strong>Digital</strong> Lens13. LCD Screen14. Microphone15. Memory Card Slot16. Battery Compartment17. Speaker18. Wrist Strap19. LED20. Tripod Socket21. Night Vision LED5
Preparing Your <strong>Camera</strong> for UseBattery InstallationMake sure the 4 AAA batteries have been inserted properly into your digital camera with the correct polarity.The use of rechargeable batteries is not recommended. Please see illustration below.SD Memory Card InstallationAn SD compatible memory card of up to 32GB (not included) should be inserted into your <strong>DVR</strong> camera andis needed for normal use.SD Memory cards expand the amount of memory thus allowing an increase in the number of videos andphotos that can be captured before transferring them to a computer.6
1) Locate the SD card slot located on the bottom, inside of the camera.2) Insert a compatible SD memory card correctly in the direction shown.3) Press the memory card until you hear a “Click” sound. The memory card when properly inserted will sitflush with the camera.4) If you captured images with the internal memory, a „Move to Card” message will appear on the LCDscreen. Select „Yes‟ and press the OK/LED button on the control joystick to move the images to theSD Memory card inserted.Note: Images captured in internal memory will be erased when the camera powers off if they are notsaved.Note: After you insert an SD memory card, theicon will appear on the LCD, indicating that your SDmemory card has been installed successfully, and the media you capture will now be stored on the card and7
not in the limited internal memory. This product supports SD cards of up to 32GB. SD Memory Card not included. Formatting will delete all data on the SD Memory Card including protected data. Do not remove the SD memory Card during formatting as this may damage the card and render itunusable.Powering Your <strong>Camera</strong> ON/OFFMake sure the batteries and SD Memory card have been inserted properly into your digital camera.To power on the camera you need to flip open the LCD Screen.The Power button is situated on the inside of the camera.Powering the camera ONPress the Power buttonto turn your camera ON.The LCD monitor will light up indicating that your <strong>DVR</strong> is ready for use.8
Powering the <strong>Camera</strong> OFFWhile the camera is on, you can press the Power buttonagain at any point to turn your camera OFF.You will see a “Goodbye” splash screen and then the camera will power off completely.Note: Your digital camera also has an Auto Power Off feature that will automatically turn off your cameraafter a specific period of time that your camera is left idle. The Auto Power Off settings can be set from theAuto Power Off options in the Setup menu.Using Your <strong>Camera</strong>Changing <strong>Camera</strong> ModesYour camera has four main modes:1) <strong>Video</strong> Capture Mode - Use this mode to capture videos with your camera.To select <strong>Video</strong> Capture Mode, turn the Mode Dial to the <strong>Video</strong> Capture Setting:2) Photo Capture Mode - Use this mode to capture photos with your camera.To select Photo Capture Mode turn the Mode Dial to the Photo Capture Setting:3) Playback Mode (for photos and videos) - Use this mode to view the photos and videos you havealready taken with your camera.To select Playback Mode press the Playback button above the Mode Dial:9
4) Setup Mode – Use this mode to change your general camera settings.To select Setup Mode turn the Mode Dial to the „SET‟ icon.The icons that appear on the LCD screen are the best default settings so that you can begin to capture andenjoy clear quality videos and photos.When in <strong>Video</strong> Capture Mode, this icon will display on the top-left corner of the LCD displayWhen in Photo Capture Mode, this icon will display on the top-left corner of the LCD displayWhen in Playback Mode, this icon will display on the top-left corner of the LCD displayNavigating the MenusEach camera mode has a set of menus specific to that mode.1) Press the MENU button to open the menus for the current mode.2) Press the UP or DOWN on the control joystick to scroll between and highlight the various menus forthe current mode.3) Press the OK/LED button on the control joystick to confirm and select the highlighted menu option.10
4) At any time you can press the MENU button to exit the menus and return to the previous screen.Macro Switch /Your camera contains a Macro Switch that allows you to manually enable or disable the Macro mode onyour camera. While using the Macro mode, you can capture videos and photos at close range (30 – 45 cm).To enable the Macro mode, slide the Macro Switch on the side of your camera to the flowericon.When enabled, the Macro mode will allow your camera to focus on an object that is close to the camera.The iconwill appear on the LCD and indicates that the Macro mode is on.To capture videos and photos in the regular mode (from 1.5 meters), slide the Macro Switch to themountainicon.<strong>Video</strong> Capture ModeThe <strong>Video</strong> Capture Mode allows you to capture videos with your digital camera.To select <strong>Video</strong> Capture Mode turn the Mode Dial to the <strong>Video</strong> Capture Mode Icon:Taking a <strong>Video</strong>1) While in <strong>Video</strong> Capture Mode use the LCD display to direct the camera at the scene you would like tocapture.11
2) Move the T/Zoom In and W/Zoom Out to better set the camera display if desired.Note: The actual shape of these buttons may vary per camera model.3) Press the red <strong>Video</strong> Record button in the middle of the Mode Dial to start the video capture.4) You will see a red blinking circle and „REC‟ text, , at the top of the LCD indicating that therecord is in progress.5) To stop the video record, press the <strong>Video</strong> Record button again.6) The video will automatically be saved to the internal camera memory or SD Memory card.<strong>Video</strong> Capture Mode Quick Function ButtonsButtonFunctionUP(on the control joystick)DOWN(on the control joystick)OK/LED(on the control joystick)Light Exposure +Light Exposure -Turns the LED Flash On / Off12
High Definition (HD) 1280x720 pixels, VGA 640x480 pixels, QVGA 320x240 pixels1) Press the MENU button to enter the <strong>Video</strong> Capture Menus.2) Press the Up or Down on the control joystick to highlight the Resolution Menu.3) Press the OK/LED button to select the Resolution Menu.4) Press the Up or Down on the control joystick to select your desired option.5) Press the OK/LED button to confirm, save your choice and exit back to the <strong>Video</strong> Menu.6) Select „Exit‟ or press the MENU button to exit the <strong>Video</strong> Menu and return to the <strong>Video</strong> Capture Mode.Note: After saving your selection and exiting the Menu screen, the corresponding icon will appear on theLCD screen.Frame Rate MenuThe frame rate is the number of frames or images that are displayed per second during video playback.The higher the number of frames playing per second, the smoother the video playback appears.Keep in mind that videos taken with a higher frame rate will also take up more of your camera‟s memory.You can select different Frame Rates:30 fps, 15 fps1) Press the MENU button to enter the <strong>Video</strong> Capture Menus.2) Press the Up or Down on the control joystick to highlight the Frame Rate Menu.3) Press the OK/LED button to select the Frame Rate Menu.4) Press the Up or Down on the control joystick to select your desired option.14
5) Press the OK/LED button to confirm, save your choice and exit back to the <strong>Video</strong> Menu.6) Select „Exit‟ or press the MENU button to exit the <strong>Video</strong> Menu and return to the <strong>Video</strong> Capture Mode.Anti-Shake MenuThe Anti-Shake feature reduces image corruption that can be caused by movement of the camera whilecapturing the image.Your AntiShake options are: On, Off.1) Press the MENU button to enter the <strong>Video</strong> Capture Menus.2) Press the Up or Down on the control joystick to highlight the AntiShake Menu.3) Press the OK/LED button to select the AntiShake Menu.4) Press the Up or Down on the control joystick to select your desired option.5) Press the OK/LED button to confirm, save your choice and exit back to the <strong>Video</strong> Menu.6) Select „Exit‟ or press the MENU button to exit the <strong>Video</strong> Menu and return to the <strong>Video</strong> Capture Mode.Note: After saving your selection and exiting the Menu screen, the corresponding icon will appear on theLCD screen.White Balance MenuThe White Balance feature allows your camera to adjust the coloring of the captured images depending onthe type of light source in the current environment.Properly adjusting the White Balance setting to match your current environment will allow the camera to15
properly balance the colors in the images that are taken with your camera.You can select from the following White Balance options:Auto, Daylight, Cloudy, Fluorescent, Tungsten1) Press the MENU button to enter the <strong>Video</strong> Capture Menus.2) Press the Up or Down on the control joystick to highlight the White Balance Menu.3) Press the OK/LED button to select the White Balance Menu.4) Press the Up or Down on the control joystick to select your desired option.5) Press the OK/LED button to confirm, save your choice and exit back to the <strong>Video</strong> Menu.6) Select „Exit‟ or press the MENU button to exit the <strong>Video</strong> Menu and return to the <strong>Video</strong> Capture Mode.Note: After saving your selection and exiting the Menu screen, the corresponding icon will appear on theLCD screen.Exposure MenuThe Exposure setting helps you control the amount of light that enters your camera‟s lens. This settingshould be adjusted when the environment is lighter or darker than normal.When the environment has more light than is needed, reduce the exposure setting (by using the negative -count) to reduce the amount of light allowed into the lens by your camera.If the environment has less light (darker) than is needed, increase the exposure setting (by using thepositive + count) to increase the amount of light allowed into the lens by your camera.1) Press the MENU button to enter the <strong>Video</strong> Capture menus.16
2) Press the Up or Down on the control joystick to highlight the Exposure Menu.3) Press the OK/LED button to select the Exposure Menu.4) Press the Up or Down on the control joystick to select your desired option.5) Press the OK/LED button to confirm, save your choice and exit back to the <strong>Video</strong> Menu.6) Select „Exit‟ or press the MENU button to exit the <strong>Video</strong> Menu and return to the <strong>Video</strong> Capture Mode.Note: After saving your selection and exiting the Menu screen, the corresponding icon will appear on theLCD screen.Scene MenuThe Scene Menu allows you to choose scene settings that allow your camera to adapt properly to yourcurrent environment.You can select from the different Scene Menu options:Auto, Landscape, Night Scenery, Portrait, Night Portrait, Beach, Sport, Dinner1) Press the MENU button to enter the <strong>Video</strong> Capture Menus.2) Press the Up or Down on the control joystick to highlight the Scene Menu.3) Press the OK/LED button to select the Scene Menu.4) Press the Up or Down on the control joystick to select your desired option.5) Press the OK/LED button to confirm, save your choice and exit back to the <strong>Video</strong> Menu.6) Select „Exit‟ or press the MENU button to exit the <strong>Video</strong> Menu and return to the <strong>Video</strong> Capture Mode.Note: After saving your selection and exiting the Menu screen, the corresponding icon will appear on the17
LCD screen.<strong>Video</strong> Playback ModeThe <strong>Video</strong> Playback Mode allows you to review and edit videos and photos that you‟ve already taken withyou camera.To access <strong>Video</strong> Playback Mode, press the Playback button , above the Mode Dial.To exit <strong>Video</strong> Playback Mode and return to your previous screen, press the Playback button again.<strong>Video</strong>s in Playback Mode appear with a <strong>Video</strong> Icon on the bottom left of the LCD screen.Playing <strong>Video</strong>s on Your <strong>Camera</strong>Once in Playback mode, press the Up or Down on the control joystick to scroll through the images on yourcamera‟s memory card. Each image will display on the LCD screen.When you find a video that you would like to play, press the red <strong>Video</strong> Record button, at the center of theMode Dial, to start playing the video.To pause the video playback, press the OK/LED button on the control joystick. To continue playing pressthe OK/LED button again.Press the red <strong>Video</strong> Record button again to fully stop the video playback.18
To increase or decrease the volume of the playback sound track of the video press the Zoom controlsT / Vol+ or W / Vol -.Thumbnail ViewThe images on your camera can be displayed in a 3 X 3 matrix where you can scroll and select imagesnormally from the thumbnails.All videos in the Thumbnail View will appear with a „V‟ icon.1) Use the W/Zoom Out button to display the images on your camera in Thumbnail View.2) All the images on your camera will appear in the Thumbnail View.3) Use the Up and Down on the control joystick to scroll and select the image you wish to view.4) Press the OK/LED button to enlarge the image full size.<strong>Video</strong> Playback Mode Quick Function ButtonsButtonActionUp(on the controlSelects the PREVIOUS imageIn Thumbnail Display: Allows you to scroll through the thumbnailjoystick)images.19
Down(on the controljoystick)<strong>Video</strong> Record ButtonW/Zoom OutT/Zoom InOK/LED(on the controljoystick)Selects the NEXT imageIn Thumbnail Display: Allows you to scroll through the thumbnailimages.Plays the selected video.Stops playing the selected video.Opens Thumbnail DisplayDuring <strong>Video</strong> Playback: Lowers the VolumeDuring <strong>Video</strong> Playback: Increases the VolumePauses and restarts your selected video that is being viewed.<strong>Video</strong> Playback Mode MenusTo access the <strong>Video</strong> Playback Mode Menus, press the MENU button while in the <strong>Video</strong> Playback Mode.The following are the menus that appear in your camera‟s <strong>Video</strong> Playback Mode:Protect, DeleteProtect MenuPictures and <strong>Video</strong>s taken with your camera can be protected or “locked” to prevent any deletion or20
alteration being made to the files.The following are the Protect Menu options:Lock One, Unlock One, Lock All, Unlock All1) Press the MENU button to enter the <strong>Video</strong> Playback Menus.2) Press the Up or Down on the control joystick to highlight the Protect Menu.3) Press the OK/LED button to select the Protect Menu.4) Press the Up or Down on the control joystick to select your desired option.5) Press the OK/LED button to confirm, save your choice and exit back to the <strong>Video</strong> Playback Menu.6) Select „Exit‟ or press the MENU button to exit the <strong>Video</strong> Playback Menu and return to the <strong>Video</strong>Playback Mode.Note: Any image that is locked will display a lock symbol on the LCD screen when viewing that image in theplayback mode. <strong>Video</strong>s that are not locked will not display the lock symbol.Remember that you cannot delete locked videos.Delete MenuWhile in the playback mode, you can delete videos from your camera through the delete menu.1) View the image you would like to delete.2) Press the MENU button to enter the <strong>Video</strong> Playback Menus.3) Press the Up or Down on the control joystick to highlight the Delete Menu.4) Press the OK/LED button to select the Delete Menu.21
5) Press the Up or Down on the control joystick to select your desired option.6) To Delete the current video select “One” and press the OK/LED button.You will be asked:”Delete This File?”.Select „Yes‟ or‟ No‟ and push the OK/LED button to confirm your selection.7) To Delete all images select „All‟. All images on your SD Memory Card (including photos and videos)will be deleted. Remember that locked images will not be deleted. Also remember that once imagesare deleted, this cannot be reversed.After you select „All‟, You will be asked:”Delete All Files?”.Select „Yes‟ or‟ No‟ and push the OK/LED button to confirm your selection.8) Select „Exit‟ or press the MENU button to exit the <strong>Video</strong> Playback Menu and return to the <strong>Video</strong>Playback Mode.22
Photo Capture ModeThe Photo Capture mode allows you to capture pictures with your digital camera.To select Photo Capture Mode, turn the Mode Dial to the <strong>Video</strong> Capture Mode Icon:Taking a Picture1) While in Photo Capture mode, use the LCD display on the back of the camera to direct the camera atthe scene you would like to capture.2) Click the T/Zoom In and W/Zoom Out buttons to zoom in/out if desired.Note: The actual shape of these buttons may vary per camera model.3) Click the Shutter button on the top of the camera to take the picture.4) The picture will automatically be saved to the camera memory or SD card.23
Photo Capture Mode Quick Function ButtonsButtonUP(on the control joystick)DOWN(on the control joystick)OK/LED(on the control joystick)FunctionLight Exposure +Light Exposure -Turns the LED Flash On / OffHide/Show the LCD IconsThe display of the icons on the LCD screen can be hidden or visible as desired.1) Press the DISP button to hide the display of the icons on the screen.2) Press the DISP button again for the LCD screen to go blank thus helping to save battery consumption.3) Press the DISP button again to redisplay the icons on the screen.24
Night Vision: LED Flash OptionTo increase the lighting in dark situations, press the OK/LED button to activate the LED Flash Light on thefront of the camera below the lens. Press the OK/LED button again to turn the LED off.When the LED light is on, an icon on the bottom right of the LCD screen appears.Photo Capture Mode MenusTo access the Menus for the Photo Capture Mode, press the MENU button while you are in Photo CaptureMode.The following are the menus that appear in your camera‟s Photo Capture Mode:Resolution, Quality, White Balance, Exposure, Selftimer, Multi-Snapshots, AntiShake, Date & Time Stamp,Scene, ISO, Sharpness.Resolution MenuThe Resolution menu allows you to choose the desired size of the images taken by your camera. Keep inmind that images with a higher resolution will also take up more of your camera‟s memory.The following are the Resolution Menu options:3264x2448(8M) / 3648x2048(7M-HD) / 2592x1944(5M) / 2048x1536(3M) / 1920x1080(2M-HD) /640x480(VGA)1) Press the MENU button to enter the Photo Capture Menus.2) Press the Up or Down on the control joystick to highlight the Resolution Menu.25
3) Press the OK/LED button to select the Resolution Menu.4) Press the Up or Down on the control joystick to select your desired option.5) Press the OK/LED button to confirm, save your choice and exit back to the Photo Menu.6) Select „Exit‟ or press the MENU button to exit the Photo Menu and return to the Photo Capture Mode.Note: After saving your selection and exiting the Menu screen, the corresponding icon will appear on theLCD screen.Quality MenuThe Quality Menu allows you to select the desired quality level of the images taken by your camera. Keep inmind that images with a higher image quality level will also take up more memory on your camera.The following are the options for Quality Menu:Super Fine (you can take fewer photos with this option, but the photos will be of better quality)FineNormal1) Press the MENU button to enter the Photo Capture Menus.2) Press the Up or Down on the control joystick to highlight the Quality Menu.3) Press the OK/LED button to select the Quality Menu.4) Press the Up or Down on the control joystick to select your desired option.5) Press the OK/LED button to confirm, save your choice and exit back to the Photo Menu.6) Select „Exit‟ or press the MENU button to exit the Photo Menu and return to the Photo Capture Mode.26
Exposure MenuThe Exposure setting helps you control the amount of light that enters your camera‟s lens. This settingshould be adjusted when the environment is lighter or darker than normal.When the environment has more light than is needed, reduce the exposure setting (by using the negative -count) to reduce the amount of light allowed into the lens by your camera.If the environment has less light (darker) than is needed, increase the exposure setting (by using thepositive + count) to increase the amount of light allowed into the lens by your camera.1) Press the MENU button to enter the Photo Capture Menus.2) Press the Up or Down on the control joystick to highlight the Exposure Menu.3) Press the OK/LED button to select the Exposure Menu.4) Press the Up or Down on the control joystick to select your desired option.5) Press the OK/LED button to confirm, save your choice and exit back to the Photo Menu.6) Select „Exit‟ or press the MENU button to exit the Photo Menu and return to the Photo Capture Mode.Note: After saving your selection and exiting the Menu screen, the corresponding icon will appear on theLCD screen.Self-Timer MenuThe Self-Timer menu allows you to set a delay between the time that the camera‟s shutter button is pressedand the actual capture of the picture.This is an optimal feature if you don‟t just want to take the picture but would also like to be in the picture28
yourself. Just set the desired self-timer delay, press the shutter button on your camera and position yourselfin front of the camera as desired.The options for Self-Timer are: Off, 5 seconds, 10 seconds.1) Press the MENU button to enter the Photo Capture Menus.2) Press the Up or Down on the control joystick to highlight the Self-Timer Menu.3) Press the OK/LED button to select the Self-Timer Menu.4) Press the Up or Down on the control joystick to select your desired option.5) Press the OK/LED button to confirm, save your choice and exit back to the Photo Menu.6) Select „Exit‟ or press the MENU button to exit the Photo Menu and return to the Photo Capture Mode.Note: After saving your selection and exiting the Menu screen, the corresponding icon will appear on theLCD screen.Multi-Snapshot MenuWhen enabled, the Multi-Snapshots feature allows you to take three rapid snapshots in a row with a singleclick of the shutter button.This feature can be effective when trying to capture a particular moment in a sporting event or other sceneswith quick movements.1) Press the MENU button to enter the Photo Capture Menus.2) Press the Up or Down on the control joystick to highlight the Multi-Snapshots Menu.3) Press the OK/LED button to select the Multi-Snapshots Menu.29
4) Press the Up or Down on the control joystick to select your desired option.5) Press the OK/LED button to confirm, save your choice and exit back to the Photo Menu.6) Select „Exit‟ or press the MENU button to exit the Photo Menu and return to the Photo Capture Mode.Note: After saving your selection and exiting the Menu screen, the corresponding icon will appear on theLCD screen.Anti-Shake MenuThe Anti-Shake feature reduces image corruption that can be caused by movement of the camera whilecapturing the image.Your AntiShake options are: On, Off.1) Press the MENU button to enter the Photo Capture Menus.2) Press the Up or Down on the control joystick to highlight the AntiShake Menu.3) Press the OK/LED button to select the AntiShake Menu.4) Press the Up or Down on the control joystick to select your desired option.5) Press the OK/LED button to confirm, save your choice and exit back to the Photo Menu.6) Select „Exit‟ or press the MENU button to exit the Photo Menu and return to the Photo Capture Mode.Note: After saving your selection and exiting the Menu screen, the corresponding icon will appear on theLCD screen.30
Date & Time Stamp MenuWhen you capture an image with your camera, the image will include a time stamp with the date and timethat the image was taken.You can also disable the timestamp for future images that will be taken with your camera.On – The timestamp will appear on photos takenOff – The date stamp will not appear on photos taken1) Press the MENU button to enter the Photo Capture Menus.2) Press the Up or Down on the control joystick to highlight the Date & Time Stamp Menu.3) Press the OK/LED button to select the Date & Time Stamp Menu.4) Press the Up or Down on the control joystick to select your desired option.5) Press the OK/LED button to confirm, save your choice and exit back to the Photo Menu.6) Select „Exit‟ or press the MENU button to exit the Photo Menu and return to the Photo Capture Mode.Scene MenuThe Scene Menu allows you to choose scene settings that allow your camera to adapt properly to yourcurrent environment.You can select from the different Scene Menu options:Auto, Landscape, Portrait, Night Portrait, Beach, Sport, Dinner, Hi-Sensitivity1) Press the MENU button to enter the Photo Capture Menus.2) Press the Up or Down on the control joystick to highlight the Scene Menu.31
3) Press the OK/LED button to select the Scene Menu.4) Press the Up or Down on the control joystick to select your desired option.5) Press the OK/LED button to confirm, save your choice and exit back to the Photo Menu.6) Select „Exit‟ or press the MENU button to exit the Photo Menu and return to the Photo Capture Mode.Note: After saving your selection and exiting the Menu screen, the corresponding icon will appear on theLCD screen.ISO MenuThe ISO menu allows you to set the level of sensitivity that your camera has to light in the surroundingenvironment. When the ISO level is increased, the image sensor in your camera will be more sensitive tolight and allow you to capture images in lower-light situations. The higher sensitivity to light however, mayreduce the quality of the images that are taken.When the ISO is reduced, the image sensor in your camera will be less sensitive to light and will optimizethe image quality in environments with bright lighting.The ISO options are: ISO100, ISO200, ISO400, ISO8001) Press the MENU button to enter the Photo Capture Menus.2) Press the Up or Down on the control joystick to highlight the ISO Menu.3) Press the OK/LED button to select the ISO Menu.4) Press the Up or Down on the control joystick to select your desired option.5) Press the OK/LED button to confirm, save your choice and exit back to the Photo Menu.32
6) Select „Exit‟ or press the MENU button to exit the Photo Menu and return to the Photo Capture Mode.Note: After saving your selection and exiting the Menu screen, the corresponding icon will appear on theLCD screen.Sharpness MenuYou can set the level of sharpness in the images taken with your camera. The sharpness level dictates ifthe edges of objects in the image are more or less distinct.The Sharpness options are: Soft, Normal, and Sharp.1) Press the MENU button to enter the Photo Capture Menus.2) Press the Up or Down on the control joystick to highlight the Sharpness Menu.3) Press the OK/LED button to select the Sharpness Menu.4) Press the Up or Down on the control joystick to select your desired option.5) Press the OK/LED button to confirm, save your choice and exit back to the Photo Menu.6) Select „Exit‟ or press the MENU button to exit the Photo Menu and return to the Photo Capture Mode.Note: After saving your selection and exiting the Menu screen, the corresponding icon will appear on theLCD screen.33
Photo Playback ModeThe Photo Playback Mode allows you to review and edit videos and photos that you‟ve already taken withyou camera.To access Photo Playback Mode, press the Playback button , above the Mode Dial.To exit Photo Playback Mode and return to your previous screen, press the Playback button again.Viewing Photos on Your <strong>Camera</strong>Once in Playback mode, press the Up or Down on the control joystick to scroll through the images on yourcamera‟s memory card. Each image will display on the LCD screen.Thumbnail ViewThe images on your camera can be displayed in a 3 X 3 matrix where you can scroll and select imagesnormally from the thumbnails.All photos do not appear with an icon in Thumbnail View.All videos in the Thumbnail View will appear with a „V‟ icon.1) Use the W/Zoom Out button to display the images on your camera in Thumbnail View.2) All the images on your camera will appear in the Thumbnail View.3) Use the Up and Down on the control joystick to scroll and select the image you wish to view.4) Press the OK/LED button to enlarge the image full size.34
Photo Playback Mode Quick Function ButtonsButtonActionUpSelects the PREVIOUS imageIn Thumbnail Display: Allows you to scroll through the thumbnailimages.DownSelects the NEXT imageIn Thumbnail Display: Allows you to scroll through the thumbnailimages.Photo Playback Mode MenusTo access the Photo Playback Mode Menus, press the MENU button while in the Photo Playback Mode.The following are the menus that appear in your camera‟s Photo Playback Mode:Protect, Delete, Rotate, PictBridge.Protect MenuPictures and <strong>Video</strong>s taken with your camera can be protected or “locked” to prevent any deletion oralteration being made to the files.The following are the Protect Menu options:Lock One, Unlock One, Lock All, Unlock All35
1) Press the MENU button to enter the Photo Playback Menus.2) Press the Up or Down on the control joystick to highlight the Protect Menu.3) Press the OK/LED button to select the Protect Menu.4) Press the Up or Down on the control joystick to select your desired option.5) Press the OK/LED button to confirm, save your choice and exit back to the Photo Playback Menu.6) Select „Exit‟ or press the MENU button to exit the Photo Playback Menu and return to the PhotoPlayback Mode.Note: Any image that is locked will display a lock symbol on the LCD screen when viewing that image in theplayback mode. <strong>Video</strong>s that are not locked will not display the lock symbol.Remember that you cannot delete locked videos.Delete MenuWhile in the Playback Mode, you can delete videos from your camera through the delete menu.1) View the image you would like to delete.2) Press the MENU button to enter the Photo Playback Menus.3) Press the Up or Down on the control joystick to highlight the Delete Menu.4) Press the OK/LED button to select the Delete Menu.5) Press the Up or Down on the control joystick to select your desired option.6) To Delete the current video select “One” and press the OK/LED button.You will be asked:”Delete This File?”.36
Select „Yes‟ or‟ No‟ and push the OK/LED button to confirm your selection.7) To Delete all images select „All‟. All images on your SD Memory Card (including photos and videos)will be deleted. Remember that locked images will not be deleted. Also remember that once imagesare deleted, this cannot be reversed.After you select „All‟, You will be asked:”Delete All Files?”.Select „Yes‟ or‟ No‟ and push the OK/LED button to confirm your selection.8) Select „Exit‟ or press the MENU button to exit the Photo Playback Menu and return to the PhotoPlayback Mode.Rotate MenuUse this menu to rotate the pictures that you‟ve taken with your camera.You can rotate your photos: 90, 180, or 270 degrees.1) Press the MENU button to enter the Photo Playback Menus.2) Press the Up or Down on the control joystick to highlight the Rotate Menu.3) Press the OK/LED button to select the Rotate Menu.1) Press the UP or DOWN direction control buttons to scroll through the menu options.2) Press the OK/LED button to select the desired option.3) Select „Save‟ and push the OK/LED button to save the rotated photo.4) The selected picture will now appear rotated in the Playback mode.5) If you wish not to save the image with the selected rotation, do not select „Save‟ - select „Exit‟ or press37
the MENU button to return to the Photo Playback Mode.PictBridge MenuYou can use the PictBridge Menu to print the photos that are on your camera directly to a Pictbridgecompatible printer.1) Select a photo you want to print.2) Press the MENU button to enter the Photo Playback Menus.3) Press the Up or Down on the control joystick to highlight the PictBridge Menu.4) Press the OK/LED button to select the PictBridge Menu.5) Press the OK/LED button to select the PictBridge option.If you are not connected to a printer the following message will appear on the LCD “Waiting for printer”.6) Connect your camcorder to a compatible printer with the provided USB cable to allow for directprinting.7) Once connected, follow the instructions on the printer to proceed with the printing process.8) Press the MENU button if you do not wish to print now – and to return to the Photo Playback Mode.38
Setup ModeThe Setup mode allows you to change your general camera settings.To select Setup Mode turn the Mode Dial to the „SET‟ icon.The Setup Mode opens to the following menu options:Buzzer, Power Frequency, Auto Power Off, Date & Time, Language, TV Out, Format, Default SetBuzzer MenuWhen you press any button, a beep or buzzer sound is emitted.The default setting is on. You can choose to set the buzzer On or Off.1) Press the Up or Down on the control joystick to highlight the Buzzer Menu.2) Press the OK/LED button to select the Buzzer Menu.3) Press the Up or Down on the control joystick to select your desired option.4) To save the selected option:Press the OK/LED button to confirm, save your choice and exit back to the Setup Menu.5) To continue without changing or saving the option:Select „Exit‟ and press the OK/LED button or press the MENU button to return to the Setup Menu.39
Power Frequency MenuThe options in the Power Frequency menu represent the frequency of the electrical current in fluorescentlighting sources in your locale. If your camera is set to a frequency that does not match your country‟selectric current, you may see waves on the images taken by your camera.50Hz – UK, Europe and Australia60Hz – US, Canada and South America1) Press the Up or Down on the control joystick to highlight the Power Frequency Menu.2) Press the OK/LED button to select the Power Frequency Menu.3) Press the Up or Down on the control joystick to select your desired option.4) To save the selected option:Press the OK/LED button to confirm, save your choice and exit back to the Setup Menu.5) To continue without changing or saving the option:Select „Exit‟ and press the OK/LED button or press the MENU button to return to the Setup Menu.Auto Power Off MenuYou can use the Auto Power Off feature in order to conserve you camera‟s battery life. The designated timerepresents when your camera will automatically power off.When the camera sits idle for the designated period of time, the camera will shut off completely and willneed to be turned on again with the power button before the next use.40
You can select from the following options as to when the camera will turn off automatically after not being inuse: 60 seconds, 120 seconds or off (which will keep the camera on and not turn off automatically).1) Press the Up or Down on the control joystick to highlight the Auto Power Off Menu.2) Press the OK/LED button to select the Auto Power Off Menu.3) Press the Up or Down on the control joystick to select your desired option.4) To save the selected option:Press the OK/LED button to confirm, save your choice and exit back to the Setup Menu.5) To continue without changing or saving the option:Select „Exit‟ and press the OK/LED button or press the MENU button to return to the Setup Menu.Date & Time MenuThe Date & Time Menu allows you to set your camera‟s date and time as desired. The date and time willappear on the LCD screen as well as in the metadata of the images.1) Press the Up or Down on the control joystick to highlight the Date & Time Menu.2) Press the OK/LED button to select the Date & Time Menu.3) Press the Up or Down on the control joystick to scroll through the specific options for each selection.4) Press the OK/LED button to confirm, save your information and move to the next part of the Date &Time.5) To return to the Setup Menu, press the OK/LED button until you go through each of the date and time41
options or press the MENU button.Language MenuYou can select your camera‟s language setting by selecting the desired language from the Language Menu.1) Press the Up or Down on the control joystick to highlight the Language Menu.2) Press the OK/LED button to select the Language Menu.3) Press the Up or Down on the control joystick to scroll through the specific options for each selection.4) To save the selected option:Press the OK/LED button to confirm, save your choice and exit back to the Setup Menu.5) To continue without changing or saving the option:Select „Exit‟ and press the OK/LED button or press the MENU button to return to the Setup Menu.TV Out MenuTV Out menu allows you to select the desired television system according to your region.You can select between NTSC and PAL.The image of the picture you wish to capture on the LCD can also be displayed on your TV screen. Use theTV cable provided. Plug one end into the TV and the other into the TV slot found next to the USB slot onyour camera.1) Press the Up or Down on the control joystick to highlight the TV Out Menu.42
2) Press the OK/LED button to select the TV Out Menu.3) Press the Up or Down on the control joystick to scroll through the specific options for each selection.4) To save the selected option:Press the OK/LED button to confirm, save your choice and exit back to the Setup Menu.5) To continue without changing or saving the option:Select „Exit‟ and press the OK/LED button or press the MENU button to return to the Setup Menu.Format MenuYou can use the Format Menu to delete all of the content that is currently on your camera‟s memory card.Keep in mind that formatting the memory card will permanently delete all of the content on yourcamera‟s memory card.This option will delete all of the content at one time. If you would like to delete individual images, use thedelete menu in the camera‟s Playback mode.1) Press the Up or Down on the control joystick to highlight the Format Menu.2) Press the OK/LED button to select the Format Menu.3) Press the Up or Down on the control joystick to scroll through the specific options for each selection.4) To save the selected option:43
Press the OK/LED button to confirm, save your choice and exit back to the Setup Menu.Remember: If you select and confirm „Yes‟, formatting the memory card will immediately andpermanently delete all of the content on your camera‟s memory card. This action cannot bereversed.5) To continue without changing or saving the option:Select „Exit‟ and press the OK/LED button or press the MENU button to return to the Setup Menu.Default Set MenuUse this menu to reset your camera settings to the Factory Default Settings.1) Press the Up or Down on the control joystick to highlight the Default Set Menu.2) Press the OK/LED button to select the Default Set Menu.3) Press the Up or Down on the control joystick to select your desired option.4) To save the selected option:Press the OK/LED button to confirm, save your choice and exit back to the Setup Menu.5) To continue without changing or saving the option:Select „Exit‟ and press the OK/LED button or press the MENU button to return to the Setup Menu.44
Connecting the <strong>Camera</strong> to a TVThe camera has a AV port to use your larger TV screen in place of the camera`s LCD screen. Onplugging the TV-out cable (supplied) to the cameras AV out jack, the LCD screen will turns blank. Usethe camera as you would to capture and playback photos and videos. The images will appear on theTV instead of on the LCD screen.Note: The only limitation of using the TV screen is that the camera is now not portable.1) Connect the camcorder to a TV via the TV-out cable (supplied).2) Turn on the TV and the camera, and then set the TV to “AV” mode.3) You will need to set the TV format on the camera to suit the TV format of your TV set.4) Make sure the camera is set to the correct TV Output setting. On plugging in the TV out cable amessage will appear on the LCD screen to select NTSC or PAL for the type of TV you are using.5) Select the option as per the format of the TV set you are using and press the OK/LED button.6) When the camera is set to record mode, you can preview the subjects you want to record on theTV screen.7) When the camera is set to Playback mode, you can review all the photos and videos stored inthe SD memory card on the TV.45
Installing the SoftwareYou must be connected to the internet to install and run the <strong>Vivitar</strong> Experience Image Managersoftware.1) Insert the installation CD into your CD-ROM drive. The installation screen should automatically open.2) On PC: The <strong>Vivitar</strong> Experience Image Manager Installer window appears. If the window does notappear, open the application‟s CD/DVD drive and click on “Setup.exe” to launch the installer.3) On Macintosh: Click the icon that appears on the desktop to install the <strong>Vivitar</strong> Experience ImageManager.46
4) If you do not have internet access at the time of inserting the CD-ROM, connect to the internet andthen click the “Install <strong>Vivitar</strong> Experience Image Manager” button to begin the installation.Note: If you do not have internet access, you can still download media from the camera. Click the “How totransfer photos and videos from my camera to my computer” button for instructions.5) If you have internet access, the “Choose your language” window opens, choose your language andclick “Next” to open the next window.6) Select your camera model from the list and click “Next” to open the next window.7) Click “Next” to confirm your camera model selection and to install the application.47
8) Please wait while the application is being installed on your computer.9) Please review the license terms.On PC and Macintosh: Click the “I accept the terms of this license agreement” and then click “Next” tocontinue.10) On PC only: Let the “<strong>Vivitar</strong> Experience Image Manager” installer create the folder to where theprogram will be installed, and then click “Install”.11) Please wait while the application continues the installation process on your computer.12) On PC: Click the “Close” button when the installation is complete.The application will automatically open.13) On Macintosh: Click the “Quit” button when the installation is complete.Click the “Launch <strong>Vivitar</strong> Experience Image Manager” to open the application14) If you close the application you can run the <strong>Vivitar</strong> Experience Image Manager from the Programs (PC)or Application (Mac) menu on your computer.48
Connecting the <strong>Camera</strong> to the Computer1) Use the USB cable that came with your camera to connect your camera to your computer.2) Power the camera on.3) The first time you connect the device to the computer you will have to wait a few seconds until thecomputer recognizes the device.Getting Photos and <strong>Video</strong>s from Your <strong>Camera</strong> to Your ComputerAn SD card needs to be inserted. Do not disconnect the cable during transfer. Doing so will cancel thetransfer of any files on their way to your computer.1) Select the “Get Images” button from the Main menu.49
2) The “Get Images from device” window opens.3) You can select to download photos, videos or both.4) Select your camera (removable disk) from the device window. If your camera is the only USB deviceconnected then it will be selected automatically.5) Select a location on the computer where to place the new photo and video files.6) Add the new photo and video files to albums if desired.7) Select to remove the media files from the selected device (removable disk) after the import.50
8) Click the “Get Image” button to transfer the photos and videos from your camera to your computer.9) A media download progress bar appears on the bottom left showing the number of media filesdownloading to your computer. A message appears when the download is complete.10) The photo and video files that you selected are now downloaded to your computer to the selectedfolder and albums ready for your use.Get started!Using the <strong>Vivitar</strong> Experience Image Manager, you can:Upload and manage photos and videos to and from the most popular photo sharing and socialnetworking sites - Facebook, Flickr, Picasa, MySpace, Photobucket, Twitpic, Twitgoo and YouTubeSeamlessly transfer photos and videos from one social network to anotherOrganize your images by creating offline and online albumsEdit images using automatic and manual toolsUse automatic “Geotagging” with built in Google MapsFor more details on how to use the <strong>Vivitar</strong> Experience Image Manager open the Help file or click the“Take the Tour” button on the application`s Home page.51
Transfer media from my camera to my computer manually (UsingWindows)1) Use the USB cable that came with your camera to connect your camera to your computer.2) MSDC appears on the LCD.3) A window appears with a list of options, select “Open folder to view files” and click OK.4) Open the DCIM folder and the folder inside to view the media files.5) Select the media and copy the files from this folder into your computer. Optionally, select the files andchoose Copy from the Edit menu. Then select a folder and choose Paste from the Edit menu.6) We recommend that you copy the images into the Pictures/My Pictures folder and the videos into the<strong>Video</strong>s/My <strong>Video</strong>s folder.7) Do not disconnect the cable during transfer. Doing so will cancel the transfer of any files on their wayto your computer.Transfer media from my camera to my computer manually (UsingMacintosh)1) Use the USB cable that came with your camera to connect your camera to your computer.2) MSDC appear on the LCD.3) The camera‟s device icon appears on the desktop.52
4) Click on the device icon and open the DCIM folder and the folder inside to view the media files.5) Select the files and drag them into your computer. Optionally, select the files and choose Copy fromthe Finder‟s Edit menu. Then select a folder and choose Paste from the Edit menu.6) We recommend that you copy the images into the Pictures folder and the videos into the Moviesfolder.7) Do not disconnect the cable during transfer. Doing so will cancel the transfer of any files on their wayto your computer.<strong>Camera</strong> MaintenanceThe digital camera is a delicate device. Please handle your camera with care to avoid damaging it.Do not expose your camera to heat sources.Do not use you camera in wet or moist conditions.53
Sakar Warranty CardThis warranty covers for the original consumer purchaser only and is not transferable. Products that fail tofunction properly UNDER NORMAL USAGE, due to defects in material or workmanship will be repaired atno charge for parts or labor for a period of one year.What Is Not Covered By Warranty:Damages or malfunctions not resulting from defects in material or workmanship and damages ormalfunctions from other than normal use, including but not limited to, repair by unauthorized parties,tampering, modification or accident.What to Do When Service Is Required:When returning your defective product (postage pre-paid) for service, your package should include:1) Copy of original bill of sale2) A detailed written description of the problem.3) Your return address and telephone number (Daytime)54
MAIL TO ADDRESS BELOW:Sakar USSakar InternationalAttention: Service Department195 Carter DriveEdison, NJ08817Sakar UK/EuropeAttention: Service Department2D, Siskin Parkway East4020 Middlemarch Business ParkCoventry, CV3 4PESakar AustraliaReturn faulty camera to theRefund Counter at the storewhere purchasedTechnical SupportFor technical support issues please visit our website at www.vivitar.com. You can find manuals, softwareand FAQ‟s at the website. Can‟t find what you are looking for? E-mail us at support@vivitar.com and oneof our technical support team members will answer your questions. For phone support in the US please call1-800-592-9541, in the UK call 0800 917 4831, in Australia call 1800-006-614. If you would like to call fromanywhere else, please visit www.vivitar.com for your local toll free number.55
TroubleshootingQ: I have taken photos and selected the “Get Images” button. I get a message that the images weresuccessfully transferred but the photos do not appear on my computer. What do I do?First ensure that you have in fact taken photos. Press the Shutter button to take some sample photos andthen try downloading them again.With test photos if the camera powers off before you upload them to the computer the photos are not storedin the camera`s memory. These photos should be uploaded quickly before the camera powers off.If the photos are saved to the SD memory card then all the photos should appear.Q: How do I make sure I don't lose important pictures?This camera requires an SD card for normal use. If the camera powers off nothing will happen to the imagesstored on the SD memory card. We recommend always downloading your photos to your computer as soonas possible to prevent unintentional data loss.Q: I deleted images using the <strong>Vivitar</strong> Experience Image Manager. The images were also deleted frommy computer. How do I recover images that I accidently deleted?All images deleted using the <strong>Vivitar</strong> Experience Image Manager are sent to your computer`s Recycle orTrash Bin and can be retrieved from there.<strong>DVR</strong><strong>920HD</strong>-060710-TA56