

group 18 Trim, Seats and Convertible Top.pdf
group 18 Trim, Seats and Convertible Top.pdf
group 18 Trim, Seats and Convertible Top.pdf

You also want an ePaper? Increase the reach of your titles
YUMPU automatically turns print PDFs into web optimized ePapers that Google loves.
<strong>18</strong>-10<br />
GROUP la-<strong>Trim</strong>, <strong>Seats</strong>, And <strong>Convertible</strong> <strong>Top</strong><br />
headlining material over the retaining<br />
strips <strong>and</strong> bend the retainer tabs<br />
down.<br />
7. Apply trim cement to the roof<br />
header <strong>and</strong> to the mating surface<br />
around the front of the headlining.<br />
8. Position the headlining to the<br />
roof header <strong>and</strong> pullout any wrinkles.<br />
9. Apply trim cement around the<br />
door openings <strong>and</strong> mating surface of<br />
the headlining. Steam between the<br />
headlining panels as required to help<br />
remove any wrinkles <strong>and</strong> secure the<br />
headlining perimeter.<br />
10. <strong>Trim</strong> the excess headlining<br />
material.<br />
11. Install the package tray <strong>and</strong><br />
quarter trim panels.<br />
12. Install the coat hooks <strong>and</strong><br />
dome light lens.<br />
13. Install the windshield upper<br />
<strong>and</strong> side interior mouldings.<br />
14. Install the windlace around<br />
the door openings.<br />
15. Install the rear view mirror<br />
<strong>and</strong> sun visors.<br />
16. Install the rear seat back <strong>and</strong><br />
rear seat cushion.<br />
17. Clean the interior <strong>and</strong> headlining.<br />
MUSTANG (MODEL 63)<br />
1. Remove the sun visors <strong>and</strong> the<br />
inside rear view mirror.<br />
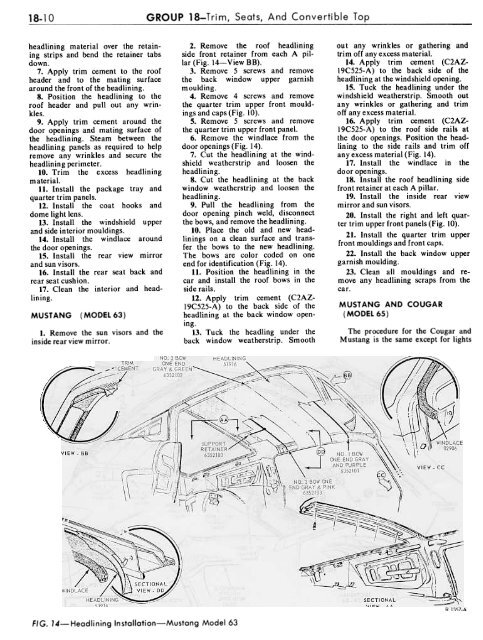
2. Remove the roof headlining<br />
side front retainer from each A pillar<br />
(Fig. l4-View BB).<br />
3. Remove 5 screws <strong>and</strong> remove<br />
the back window upper garnish<br />
moulding.<br />
4. Remove 4 screws <strong>and</strong> remove<br />
the quarter trim upper front mouldings<br />
<strong>and</strong> caps (Fig. 10).<br />
5. Remove 5 screws <strong>and</strong> remove<br />
the quarter trim upper front panel.<br />
6. Remove the windlace from the<br />
door openings (Fig. 14).<br />
7. Cut the headlining at the windshield<br />
weatherstrip <strong>and</strong> loosen the<br />
headlining.<br />
8. Cut the headlining at the back<br />
window weatherstrip <strong>and</strong> loosen the<br />
headlining.<br />
9. Pull the headlining from the<br />
door opening pinch weld, disconnect<br />
the bows, <strong>and</strong> remove the headlining.<br />
10. Place the old <strong>and</strong> new headlinings<br />
on a clean surface <strong>and</strong> transfer<br />
the bows to the new headlining.<br />
The bows are color coded on one<br />
end for identification (Fig. 14).<br />
11. Position the headlining in the<br />
car <strong>and</strong> install the roof bows in the<br />
side rails.<br />
12. Apply trim cement (C2AZ-<br />
19C525-A) to the back side of the<br />
headlining at the back window opening.<br />
13. Tuck the headling under the<br />
back window weatherstrip. Smooth<br />
out any wrinkles or gathering <strong>and</strong><br />
trim off any excess material.<br />
14. Apply trim cement (C2AZ-<br />
19C525-A) to the back side of the<br />
headlining at the windshield opening.<br />
15. Tuck the headlining under the<br />
windshield weatherstrip. Smooth out<br />
any wrinkles or gathering <strong>and</strong> trim<br />
off any excess material.<br />
16. Apply trim cement (C2AZ-<br />
19C525-A) to the roof side rails at<br />
the door openings. Position the headlining<br />
to the side rails <strong>and</strong> trim off<br />
any excess material (Fig. 14).<br />
17. Install the windlace in the<br />
door openings.<br />
<strong>18</strong>. Install the roof headlining side<br />
front retainer at each A pillar.<br />
19. Install the inside rear view<br />
mirror <strong>and</strong> sun visors.<br />
20. Install the right <strong>and</strong> left quarter<br />
trim upper front panels (Fig. 10).<br />
21. Install the quarter trim upper<br />
front mouldings <strong>and</strong> front caps.<br />
22. Install the back window upper<br />
garnish moulding.<br />
23. Clean all mouldings <strong>and</strong> remove<br />
any headlining scraps from the<br />
car.<br />
MUSTANG AND COUGAR<br />
(MODEL 65)<br />
The procedure for the Cougar <strong>and</strong><br />
Mustang is the same except for lights<br />
FIG. 14-Headlining Installation-Mustang Model 63


