

group 18 Trim, Seats and Convertible Top.pdf
group 18 Trim, Seats and Convertible Top.pdf
group 18 Trim, Seats and Convertible Top.pdf

You also want an ePaper? Increase the reach of your titles
YUMPU automatically turns print PDFs into web optimized ePapers that Google loves.
1 8-48<br />
GROUP <strong>18</strong>-<strong>Trim</strong>, <strong>Seats</strong>, And <strong>Convertible</strong> <strong>Top</strong><br />
in the bow. Mark the tape indicating<br />
the centerline.<br />
14. Measure <strong>and</strong> mark the center<br />
between the bond seams of the top<br />
center deck at the No.4 bow on the<br />
underside of the material. Install a<br />
6-inch piece of masking tape on the<br />
top material inner surface at the<br />
centerline of the No.4 bow. Mark<br />
the centerline along the entire length<br />
of tape. (Refer to Fig. 13.)<br />
15. With the bow locating gauge<br />
in place (refer to Step 13 under Removal<br />
<strong>and</strong> Fig. 15), install the belt<br />
center tack ing strip attaching screws<br />
to approximately 1/4 to 1/2-inch<br />
from the bottoming out position. Install<br />
the belt side front tacking strip<br />
attaching screws <strong>and</strong> tighten to<br />
within 1/4 to I /2-inch of bottoming.<br />
16. Center the top material on<br />
the No.4 bow <strong>and</strong> pull it forward<br />
sufficiently to center the outboard<br />
bond seam on the No.4 bow (Fig.<br />
13). Secure the top material to the<br />
No.4 bow with staples.<br />
17. Install the two retainers in the<br />
No.2 <strong>and</strong> No.3 bow listings (Fig.<br />
13).<br />
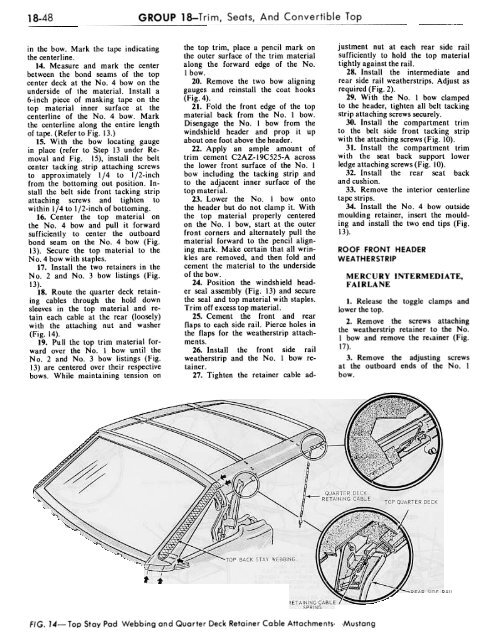
<strong>18</strong>. Route the quarter deck retaining<br />
cables through the hold down<br />
sleeves in the top material <strong>and</strong> retain<br />
each cable at the rear (loosely)<br />
with the attaching nut <strong>and</strong> washer<br />
(Fig. 14).<br />
19. Pull the top trim material forward<br />
over the No. I bow until the<br />
No.2 <strong>and</strong> No.3 bow listings (Fig.<br />
13) are centered over their respective<br />
bows. While maintaining tension on<br />
the top trim, place a pencil mark on<br />
the outer surface of the trim material<br />
along the forward edge of the No.<br />
I bow.<br />
20. Remove the two bow aligning<br />
gauges <strong>and</strong> reinstall the coat hooks<br />
(Fig. 4).<br />
21. Fold the front edge of the top<br />
material back from the No.1 bow.<br />
Disengage the No.1 bow from the<br />
windshield header <strong>and</strong> prop it up<br />
about one foot above the header.<br />
22. Apply an ample amount of<br />
trim cement C2AZ-19C525-A across<br />
the lower front surface of the No.1<br />
bow including the tacking strip <strong>and</strong><br />
to the adjacent inner surface of the<br />
top material.<br />
23. Lower the No.1 bow onto<br />
the header but do not clamp it. With<br />
the top material properly centered<br />
on the No.1 bow, start at the outer<br />
front corners <strong>and</strong> alternately pull the<br />
material forward to the pencil aligning<br />
mark. Make certain that all wrinkles<br />
are removed, <strong>and</strong> then fold <strong>and</strong><br />
cement the material to the underside<br />
of the bow.<br />
24. Position the windshield header<br />
seal assembly (Fig. 13) <strong>and</strong> secure<br />
the seal <strong>and</strong> top material with staples.<br />
<strong>Trim</strong> off excess top material.<br />
25. Cement the front <strong>and</strong> rear<br />
flaps to each side rail. Pierce holes in<br />
the flaps for the weatherstrip attachments.<br />
26. Install the front side rail<br />
weatherstrip <strong>and</strong> the No.1 bow retainer.<br />
27. Tighten the retainer cable ad-<br />
justment nut at each rear side rail<br />
sufficiently to hold the top material<br />
tightly against the rail.<br />
28. Install the intermediate <strong>and</strong><br />
rear side rail weatherstrips. Adjust as<br />
required (Fig. 2).<br />
29. With the No.1 bow clamped<br />
to the header, tighten all belt tacking<br />
strip attaching screws securely.<br />
30. Install the compartment trim<br />
to the belt side front tacking strip<br />
with the at~aching screws (Fig. 10).<br />
31. Install the compartment trim<br />
with the seat back support lower<br />
ledge attaching screws (Fig. 10).<br />
32. Install the rear seat back<br />
<strong>and</strong> cushion.<br />
33. Remove the interior centerline<br />
tape strips.<br />
34. Install the No.4 bow outside<br />
moulding retainer, insert the moulding<br />
<strong>and</strong> install the two end tips (Fig.<br />
13).<br />
ROOF FRONT HEADER<br />
WEATHERSTRIP<br />
MERCURY<br />
FAIRLANE<br />
INTERMEDIATE,<br />
1. Release the toggle clamps <strong>and</strong><br />
lower the top.<br />
2. Remove the screws attaching<br />
the weatherstrip retainer to the No.<br />
I bow <strong>and</strong> remove the reo:ainer (Fig.<br />
17).<br />
3. Remove the adjusting screws<br />
at the outboard ends of the No. I<br />
bow.<br />
FIG. 14-<strong>Top</strong> Stay Pad Webbing <strong>and</strong> Quarter Deck Retainer Cable Attachments- .Mustang


