

group 18 Trim, Seats and Convertible Top.pdf
group 18 Trim, Seats and Convertible Top.pdf
group 18 Trim, Seats and Convertible Top.pdf

Create successful ePaper yourself
Turn your PDF publications into a flip-book with our unique Google optimized e-Paper software.
, '. '1<br />
fh ~C<br />
..-:~'<br />
I<br />
-';'~<br />
~\~I<br />
2. Remove the retainer pins retaining<br />
the folding top rear compartment<br />
trim to the tacking strips <strong>and</strong><br />
position the trim away from the tacking<br />
strips.<br />
3. Remove the bolts <strong>and</strong> lock<br />
washers that retain the curtain tacking<br />
strip to the body panel.<br />
4. Open the back curtain window<br />
slide fastener <strong>and</strong> remove the curtain<br />
assembly.<br />
5. Pull the tacking strips from the<br />
curtain <strong>and</strong> remove the staples from<br />
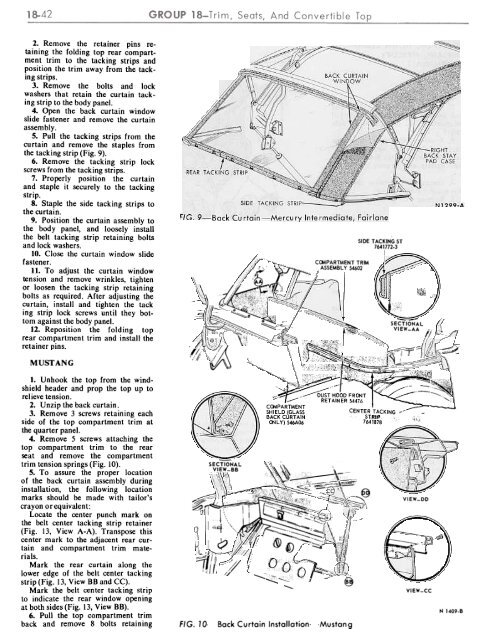
the tacking strip (Fig. 9).<br />
6. Remove the tacking strip lock<br />
screws from the tacking strips.<br />
7. Properly position the curtain<br />
<strong>and</strong> staple it securely to the tacking<br />
strip.<br />
8. Staple the side tacking strips to<br />
the curtain.<br />
9. Position the curtain assembly to<br />
the body panel, <strong>and</strong> loosely install<br />
the belt tacking strip retaining bolts<br />
<strong>and</strong> lock washers.<br />
10. Close the curtain window slide<br />
fastener.<br />
II. To adjust the curtain window<br />
tension <strong>and</strong> remove wrinkles, tighten<br />
or loosen the tacking strip retaining<br />
bolts as required. After adjusting the<br />
curtain, install <strong>and</strong> tighten the tack<br />
ing strip lock screws until they bottom<br />
against the body panel.<br />
12. Reposition the folding top<br />
rear compartment trim <strong>and</strong> install the<br />
retainer pins.<br />
MUSTANG<br />
1. Unhook the top from the windshield<br />
header <strong>and</strong> prop the top up to<br />
relieve tension.<br />
2. Unzip the back curtain.<br />
3. Remove 3 screws retaining each<br />
side of the top compartment trim at<br />
the quarter panel.<br />
4. Remove 5 screws attaching the<br />
top compartment trim to the rear<br />
seat <strong>and</strong> remove the compartment<br />
trim tension springs (Fig. 10).<br />
5. To assure the proper location<br />
of the back curtain assembly during<br />
installation, the following location<br />
marks should be made with tailor's<br />
crayon or equivalent:<br />
Locate the center punch mark on<br />
the belt center tacking strip retainer<br />
(Fig. 13, View A-A). Transpose this<br />
center mark to the adjacent rear curtain<br />
<strong>and</strong> compartment trim materials.<br />
Mark the rear curtain along the<br />
lower edge of the belt center tacking<br />
strip (Fig. 13, View BB <strong>and</strong> CC).<br />
Mark the belt center tacking strip<br />
to indicate the rear window opening<br />
at both sides (Fig. 13, View BB).<br />
6. Pull the top compartment trim<br />
back <strong>and</strong> remove 8 bolts retaining<br />
'/I;:<br />
':'/j<br />
~<br />
'~f<br />
~Ilp<br />
SECTIONAL<br />
VIEW-BB<br />
,.-<br />
j- 1','["" -',<br />
~<br />
~<br />
~I - -~! ~<br />
Ca.4PARTMENT TRIM<br />
A55EMBL Y 54602<br />
~<br />
SIDE TACKING ST<br />
7641772.3<br />
'Q,'i<br />
~~f<br />
--~<br />
SECTIONAL<br />
VIEW-AA<br />
T<br />
1/<br />
~<br />
,:...J}i.q;\~~<br />
~ ~ , '"...<br />
.- ==-<br />
~<br />
"-<br />
~ .~:~"~OD FRDNT~:~:


