

group 18 Trim, Seats and Convertible Top.pdf
group 18 Trim, Seats and Convertible Top.pdf
group 18 Trim, Seats and Convertible Top.pdf

You also want an ePaper? Increase the reach of your titles
YUMPU automatically turns print PDFs into web optimized ePapers that Google loves.
PART <strong>18</strong>-1-lnterior <strong>Trim</strong> And Roof Outside Cover<br />
<strong>18</strong>-<br />
in the roof quarters on the Cougar<br />
models.<br />
1. Remove the rear seat cushion<br />
<strong>and</strong> seat back <strong>and</strong> remove the quarter<br />
trim panels.<br />
2. Remove 2 clips <strong>and</strong> retainers<br />
<strong>and</strong> remove the package tray.<br />
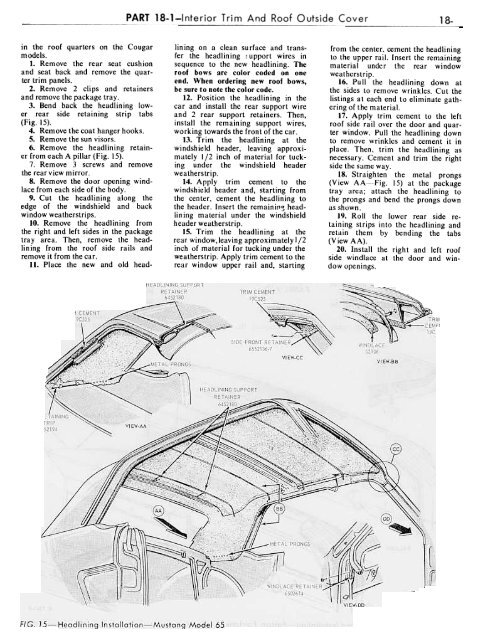
3. Bend back the headlining lower<br />
rear side retaining strip tabs<br />
(Fig. 15).<br />
4. Remove the coat hanger hooks.<br />
5. Remove the sun visors.<br />
6. Remove the headlining retainer<br />
from each A pillar (Fig. 15).<br />
7. Remove 3 screws <strong>and</strong> remove<br />
the rear view mirror.<br />
8. Remove the door opening windlace<br />
from each side of the body.<br />
9. Cut the headlining along the<br />
edge of the windshield <strong>and</strong> back<br />
window weatherstrips.<br />
10. Remove the headlining from<br />
the right <strong>and</strong> left sides in the package<br />
tray area. Then, remove the headlining<br />
from the roof side rails <strong>and</strong><br />
remove it from the car.<br />
11. Place the new <strong>and</strong> old head-<br />
lining on a clean surface <strong>and</strong> transfer<br />
the headlining: upport wires in<br />
sequence to the new headlining. The<br />
roof bows are color coded on one<br />
end. When ordering new roof bows,<br />
be sure to note the color code.<br />
12. Position the headlining in the<br />
car <strong>and</strong> install the rear support wire<br />
<strong>and</strong> 2 rear support retainers. Then,<br />
install the remaining support wires,<br />
working towards the front of the car.<br />
13. <strong>Trim</strong> the headlining at the<br />
windshield header, leaving approximately<br />
1/2 inch of material for tucking<br />
under the windshield header<br />
weatherstrip.<br />
14. Apply trim cement to the<br />
windshield header <strong>and</strong>, starting from<br />
the center, cement the he&dlining to<br />
the header. Insert the remainip'J headlining<br />
material under the windshield<br />
header weatherstrip.<br />
15. <strong>Trim</strong> the headlining at the<br />
rear window, leaving approximately I /2<br />
inch of material for tucking under the<br />
weatherstrip. Apply trim cement to the<br />
rear window upper rail <strong>and</strong>, starting<br />
from the center, cementhe headlining<br />
to the upper rail. Insert the remaining<br />
material under the rear window<br />
weatherstrip.<br />
16. Pull the headlining down at<br />
the sides to remove wrinkles. Cut the<br />
listings at each end to eliminate gathering<br />
of the material.<br />
17. Apply trim cement to the left<br />
roof side rail over the door <strong>and</strong> quarter<br />
window. Pull the headlining down<br />
to remove wrinkles <strong>and</strong> cement it in<br />
place. Then, trim the headlining as<br />
necessary. Cement <strong>and</strong> trim the right<br />
side the same way.<br />
<strong>18</strong>. Straighten the metal prongs<br />
(V iew A A Fig. 15) at the package<br />
tray area; attach the headlining to<br />
the prongs <strong>and</strong> bend the prongs down<br />
as shown.<br />
19. Roll the lower rear side retaining<br />
strips into the headlining <strong>and</strong><br />
retain them by bending the tabs<br />
(V iew AA).<br />
20. Install the right <strong>and</strong> left roof<br />
side windlace at the door <strong>and</strong> windowopenings.


