

group 18 Trim, Seats and Convertible Top.pdf
group 18 Trim, Seats and Convertible Top.pdf
group 18 Trim, Seats and Convertible Top.pdf

You also want an ePaper? Increase the reach of your titles
YUMPU automatically turns print PDFs into web optimized ePapers that Google loves.
<strong>18</strong>.40 GROUP l8-<strong>Trim</strong>, <strong>Seats</strong>, And <strong>Convertible</strong> <strong>Top</strong><br />
S. Remove the attaching nuts,<br />
<strong>and</strong> remove the motor <strong>and</strong> pump<br />
assembly from the floor pan. Do not<br />
lose the rubber grommets.<br />
6. Vent the reservoir by removing<br />
the filler plug, <strong>and</strong> then install the<br />
filler plug. The reservoir must be<br />
vented in order to equalize the pressure.<br />
This lessens the possibility of<br />
fluid spraying on the trim <strong>and</strong> paint<br />
when the hoses are disconnected.<br />
7. Place absorbent cloths beneath<br />
the hose connections, disconnect the<br />
hoses, <strong>and</strong> then plug the open fittings<br />
<strong>and</strong> lines.<br />
DISASSEMBLY<br />
1. Remove the filler plug, <strong>and</strong><br />
drain the fluid from the reservoir<br />
into a clean container.<br />
2. Scribe lines on the reservoir<br />
<strong>and</strong> pump body so that these parts<br />
can be positioned properly upon assembly.<br />
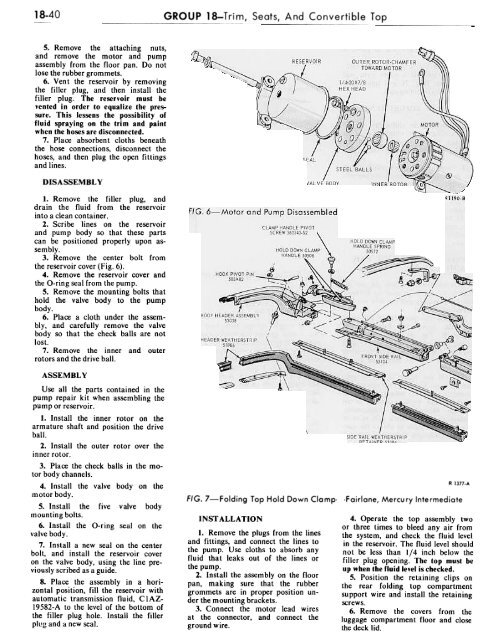
3. Remove the center bolt from<br />
the reservoir cover (Fig. 6).<br />
4. Remove the reservoir cover <strong>and</strong><br />
the a-ring seal from the pump.<br />
5. Remove the mounting bolts that<br />
hold the valve body to the pump<br />
body.<br />
6. Place a cloth under the assembly,<br />
<strong>and</strong> carefully remove the valve<br />
body so that the check balls are not<br />
lost.<br />
7. Remove the inner <strong>and</strong> outer<br />
rotors <strong>and</strong> the drive ball.<br />
ASSEMBL Y<br />
Use all the parts contained in the<br />
pump repair kit when assembling the<br />
pump or reservoir.<br />
1. Install the inner rotor on the<br />
armature shaft <strong>and</strong> position the drive<br />
ball.<br />
2. Install the outer rotor over the<br />
inner rotor.<br />
3. Place the check balls in the motor<br />
body channels.<br />
4. Install the valve body on the<br />
motor body.<br />
5. Install the five valve body<br />
mounting bolts.<br />
6. Install the a-ring seal on the<br />
valve body.<br />
7. Install a new seal on the center<br />
bolt, <strong>and</strong> install the reservoir cover<br />
on the valve body, using the line previously<br />
scribed as a guide.<br />
8. Place the assembly in a horizontal<br />
position, fill the reservoir with<br />
automatic transmission fluid, ClAZ-<br />
19582-A to the level of the bottom of<br />
the filler plug hole. Install the filler<br />
plug <strong>and</strong> a new seal.<br />
FIG. 7-Folding <strong>Top</strong> Hold Down Clamp. .Fairlane, Mercu ry Inte rmediate<br />
INSTALLATION<br />
I. Remove the plugs from the lines<br />
<strong>and</strong> fittings, <strong>and</strong> connect the lines to<br />
the pump. Use cloths to absorb any<br />
fluid that leaks out of the lines or<br />
the pump.<br />
2. Install the assembly on the floor<br />
pan, making sure that the rubber<br />
grommets are in proper position under<br />
the mounting brackets.<br />
3. Connect the motor lead wires<br />
at the connector, <strong>and</strong> connect the<br />
ground wire.<br />
R 1377-A<br />
4. Operate the top assembly two<br />
or three times to bleed any air from<br />
the system, <strong>and</strong> check the fluid level<br />
in the reservoir. The fluid level should<br />
not be less than 1/4 inch below the<br />
filler plug opening. The top must be<br />
up when the fluid level is checked.<br />
5. Position the retaining clips on<br />
the rear folding top compartment<br />
support wire <strong>and</strong> install the retaining<br />
screws.<br />
6. Remove the covers from the<br />
luggage compartment floor <strong>and</strong> close<br />
the deck lid.


