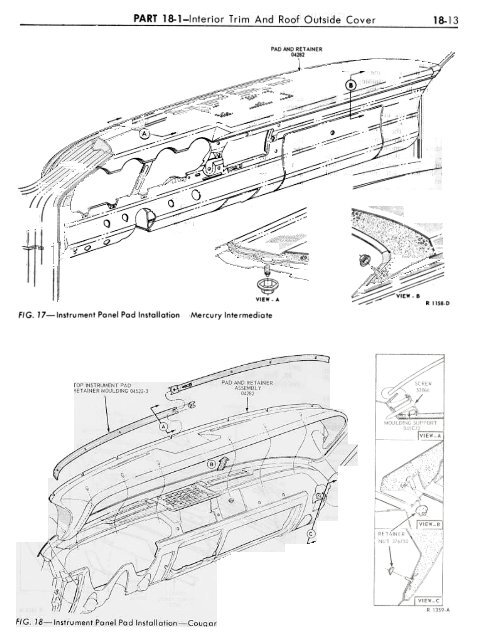
F () - :~ ;: <strong>18</strong>-12 GROUP l8-<strong>Trim</strong>, <strong>Seats</strong>, And <strong>Convertible</strong> <strong>Top</strong> 21. Install the headlining retainer at the A pillar (View 00). 22. Install the rear view mirror, sun visors, <strong>and</strong> coat hooks. 23. Slide the package tray into position <strong>and</strong> install the retainers <strong>and</strong> clips. Then, install the quarter trim panels <strong>and</strong> rear seat back <strong>and</strong> cushion. INSTRUMENT PANEL PAD FALCON, FAIRLANE, MERCURY INTERMEDIATE REMOVAL 1. Open the glove box door. Remove the glove box liner retaining screws <strong>and</strong> remove the glove box liner. 2. Fairlane: Remove the radio control knobs <strong>and</strong> the control shaft retaining nuts. 3. Remove the instrument cluster retaining screws. 4. Pull the instrument cluster out far enough to disconnect the speedometer cable, light sockets <strong>and</strong> wiring connectors from the instrument cluster. Remove the instrument cluster. 5. Remove the nuts retaining the safety cover to the instrument panel. 6. Pry up <strong>and</strong> remove the safety cover. INSTALLATION 1. Position the new safety cover to the instrument panel (Figs. 16 <strong>and</strong> 17). 2. Install the safety cover retaining nuts. 3. Position the instrument cluster to the instrument panel. Connect the wiring connectors <strong>and</strong> the speedometer cable. Install the light sockets. 4. Install the instrument cluster retaining screws. 5. Fairlane: Install the radio control shaft retaining nuts <strong>and</strong> the radio control knobs. 6. Position the glove box liner in place <strong>and</strong> install the glove box liner retaining screws. COUGAR INSTRUMENT PANEL PAD REMOVAL I. Disconnect the battery ground cable. 2. Remove the thirteen (13) retaining screws from the front of the instrument panel pad assembly (Fig. <strong>18</strong>). 3. Remove the four retaining screws from the heater control assembly <strong>and</strong> position the control out of the instrument panel. Thru the heater control opening, disconnect the ~peedometer cable. 4. Remove the three retaining screws from the ash receptacle <strong>and</strong> disconnect the connector to the cigar lighter. Remove the receptacle assembly from the instrument panel. 5. Thru the receptacle opening, remove the nut <strong>and</strong> washer retaining the inboard edge of the instrument cluster to the instrument panel. 6. Remove the seven retaining screws from the instrument cluster. Position the cluster out of the panel <strong>and</strong> disconnect the windshield wiper switch, the multiple connector <strong>and</strong> the push on connector to the constant voltage regulator <strong>and</strong> then remove the cluster. ~ PAD I ! :Y-- h ~ ' ~:7< ~", A '~~--- ~~;~::Z::"""'Q -:~ ~~~: . ~ (I' 11" ::::::--~ . J' , ; I . '\: \ i .. ",+~.. i i! I, . 0 " ,::.;-1' 1 AND RETAINER ASSEMBL Y -04282 " "" , ';104 ;; :::::::::::::::::;::::::::::::::" _.-:::::::~ "-~ :; ] FALCON ~, ~ _r ' ~..:.~ ;;::;"'~~:::~,,::,,~ lit ~:~ 0 ..~.k---/~ ~ ,C:::~~\ ' , -~""'~:::=~ -::::;.- ._~- ./- -~~/ ' ~:~;jJ) r' - ~ ./~~Zij"~ ;~9- :::.' .~- -::::::---11 .;.- );;;;'1 FIG. 16 FAIRLANE i ' : 'V::;::;;:;:: -~ R 1261-D Instru ment Pane! Pad Installation .Falcon, Fairlane ~~
~ :.;;.;.; ~c,:::~ "--:- r;:;:~ -:--.:.~ -~~"i-;~' ,oP 'g';;;;oo. PAD AND RETAINER 04282 ~ ~ "--- ~ -='='1~ .. ,i :;;;: 'O~~' - ..-~::::::::::::::~;;';/; ~_.,; ,~ _..~~ (J - - ; ~;,;~ -.-:::::: .. ' :.::;;::::::... ... III' /,~~ .r_~' ~ ~ -' 0 ::.~ ,- ~ .-::::::::;. :::;"::'-"';:: ~- ~.-:::; & -" ;;~ . I FIG. 17-lnstrument Panel Pod Installation ~~ Mercury Intermediate ~VIEW. A ~- ~ jM~~~t!;r;;iilt[ r,:;i;;:::,..~ ::;:;;;::;: VIEW - B c R 1158.D
- Page 1: PART 18-1 PAG E Interior Trim And R
- Page 4 and 5: 1352-A FIG. 5. Typical Door Trim Pa
- Page 6 and 7: 18-6 GROUP l8-Trim, Seats, And Conv
- Page 8 and 9: 18-8 GROUP l8-Trim, Seats, And Conv
- Page 10 and 11: 18-10 GROUP la-Trim, Seats, And Con
- Page 14 and 15: 18-14 GROUP 18-Trim, Seats, And Con
- Page 16 and 17: 18-16 GROUP l8-Trim, Seats, And Con
- Page 18 and 19: 18-18 GROUP l8-Trim, Seats, And Con
- Page 20 and 21: 18~20 GROUP l8-Trim, Seats, And Con
- Page 22 and 23: turnbuckle or eye bolt enough turns
- Page 24: 18-24 GROUP l8-Trim, Seats, And Con
- Page 27 and 28: PART 18-2-Seats 1 8-27 9. Sec.ure t
- Page 29 and 30: PART 18-2-Seats 18-29 A C \ JUTE BO
- Page 31 and 32: the retaining screws. Also install
- Page 33 and 34: PART 18-2-Seats 18-33 FIG. 16-Front
- Page 35 and 36: 21 Care of Top Fabric , 3 Adjustmen
- Page 37 and 38: PART 18-3-Convertible Top 1 8-37 )/
- Page 39 and 40: PART 18-3-Convertible Top 18-39 obt
- Page 41 and 42: ~ PART 18-3-Convertible Top 18-4 RO
- Page 43 and 44: PART 18-3-Convertible Top 18-43 the
- Page 45 and 46: ~ ~ m M -0 '" ~ il \\\tf) :\/ u \\\
- Page 47 and 48: PART 18-3-Convertible Top 18-47 rea
- Page 49 and 50: ~ PART 18-3-Convertible Top 18-49 4
- Page 51: PART 18-3-Convertible Top 1 8-5 1 T