

FH950 User Manual English - Hachflow
FH950 User Manual English - Hachflow
FH950 User Manual English - Hachflow

Create successful ePaper yourself
Turn your PDF publications into a flip-book with our unique Google optimized e-Paper software.
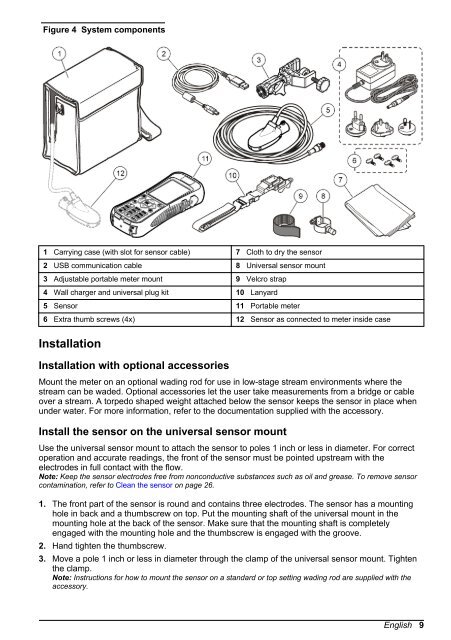
Figure 4 System components<br />
1 Carrying case (with slot for sensor cable) 7 Cloth to dry the sensor<br />
2 USB communication cable 8 Universal sensor mount<br />
3 Adjustable portable meter mount 9 Velcro strap<br />
4 Wall charger and universal plug kit 10 Lanyard<br />
5 Sensor 11 Portable meter<br />
6 Extra thumb screws (4x) 12 Sensor as connected to meter inside case<br />
Installation<br />
Installation with optional accessories<br />
Mount the meter on an optional wading rod for use in low-stage stream environments where the<br />
stream can be waded. Optional accessories let the user take measurements from a bridge or cable<br />
over a stream. A torpedo shaped weight attached below the sensor keeps the sensor in place when<br />
under water. For more information, refer to the documentation supplied with the accessory.<br />
Install the sensor on the universal sensor mount<br />
Use the universal sensor mount to attach the sensor to poles 1 inch or less in diameter. For correct<br />
operation and accurate readings, the front of the sensor must be pointed upstream with the<br />
electrodes in full contact with the flow.<br />
Note: Keep the sensor electrodes free from nonconductive substances such as oil and grease. To remove sensor<br />
contamination, refer to Clean the sensor on page 26.<br />
1. The front part of the sensor is round and contains three electrodes. The sensor has a mounting<br />
hole in back and a thumbscrew on top. Put the mounting shaft of the universal mount in the<br />
mounting hole at the back of the sensor. Make sure that the mounting shaft is completely<br />
engaged with the mounting hole and the thumbscrew is engaged with the groove.<br />
2. Hand tighten the thumbscrew.<br />
3. Move a pole 1 inch or less in diameter through the clamp of the universal sensor mount. Tighten<br />
the clamp.<br />
Note: Instructions for how to mount the sensor on a standard or top setting wading rod are supplied with the<br />
accessory.<br />
<strong>English</strong> 9


