Aspire Mail - Support - NEC Unified Solutions
Aspire Mail - Support - NEC Unified Solutions
Aspire Mail - Support - NEC Unified Solutions

You also want an ePaper? Increase the reach of your titles
YUMPU automatically turns print PDFs into web optimized ePapers that Google loves.
The <strong>Aspire</strong> <strong>Mail</strong>, <strong>Aspire</strong> <strong>Mail</strong> FMS+, <strong>Aspire</strong> <strong>Mail</strong> Plus, and <strong>Aspire</strong> <strong>Mail</strong> DMS are for <strong>Aspire</strong> only.<br />
• <strong>Aspire</strong> <strong>Mail</strong> and <strong>Aspire</strong> <strong>Mail</strong> FMS+ use a compact flash card. <strong>Aspire</strong> <strong>Mail</strong> Plus and <strong>Aspire</strong> <strong>Mail</strong><br />
DMS use a hard disk.<br />
Turn the page for a complete list of part numbers.<br />
If you are not familiar with the <strong>Aspire</strong> <strong>Mail</strong> Features, read the<br />
Feature Glossary in the <strong>Aspire</strong> <strong>Mail</strong> and Ultra<strong>Mail</strong> System Guide.<br />
Default <strong>Mail</strong>box List<br />
[ ] Indicates <strong>Aspire</strong> <strong>Mail</strong>, <strong>Aspire</strong> <strong>Mail</strong> FMS+, and Ultra<strong>Mail</strong> capacities.<br />
<strong>Mail</strong>box Type<br />
<strong>Mail</strong>box Numbers<br />
ACD Announcement<br />
None<br />
Announcement 800-809<br />
Call Routing 810-814<br />
821-824<br />
831-834<br />
841-844<br />
Directory Dialing<br />
None<br />
Distribution 851-860<br />
Future Delivery 861<br />
Guest 819, 820<br />
829, 830<br />
839, 840<br />
849, 850<br />
Interactive<br />
None<br />
Message Center 815-818<br />
825-828<br />
835-838<br />
845-848<br />
Modem 862<br />
Network<br />
None<br />
Subscriber 301-499 [301-396]<br />
Trunk 001-072 [001-024]<br />
Undefined 666 (1666 in DMS) [17]<br />
Total 1000 (2,000 in DMS) [200]<br />
Answering Tables=16 (50 in DMS) Dial Action Tables=100 (500 in DMS)<br />
Throughout this guide, <strong>Aspire</strong> <strong>Mail</strong> options marked<br />
with < brackets > do not apply to <strong>Aspire</strong> <strong>Mail</strong> DMS.<br />
There is no database compatibility between<br />
<strong>Aspire</strong> <strong>Mail</strong>, <strong>Aspire</strong> <strong>Mail</strong> FMS+, <strong>Aspire</strong> <strong>Mail</strong><br />
Plus, and <strong>Aspire</strong> <strong>Mail</strong> DMS.<br />
Be sure the telephone system time and date is<br />
correct before installing the voice mail system.<br />
• If you set the phone system date and time after installing voice<br />
mail, be sure to shut down and then reset the voice mail PCB.<br />
<strong>Aspire</strong> <strong>Mail</strong><br />
Including <strong>Aspire</strong> <strong>Mail</strong> DMS and FMS+<br />
Quick Setup Guide<br />
For additional resources, certified <strong>Aspire</strong> technicians can visit our Technical <strong>Support</strong><br />
Site on the web at ws1.necii.com (registration required).
This manual has been developed by <strong>NEC</strong> <strong>Unified</strong> <strong>Solutions</strong>, Inc. It is intended for the use of its customers and service<br />
personnel, and should be read in its entirety before attempting to install or program the system. Any comments or suggestions<br />
for improving this manual would be appreciated. Forward your remarks to:<br />
<strong>NEC</strong> <strong>Unified</strong> <strong>Solutions</strong>, Inc.<br />
4 Forest Parkway<br />
Shelton, CT 06484<br />
www.necunifiedsolutions.com<br />
Nothing contained in this manual shall be deemed to be, and this manual does not constitute, a warranty of, or representation<br />
with respect to, any of the equipment covered. This manual is subject to change without notice and <strong>NEC</strong> <strong>Unified</strong> <strong>Solutions</strong>,<br />
Inc. has no obligation to provide any updates or corrections to this manual. Further, <strong>NEC</strong> <strong>Unified</strong> <strong>Solutions</strong>, Inc. also reserves<br />
the right, without prior notice, to make changes in equipment design or components as it deems appropriate. No<br />
representation is made that this manual is complete or accurate in all respects and <strong>NEC</strong> <strong>Unified</strong> <strong>Solutions</strong>, Inc. shall not be<br />
liable for any errors or omissions. In no event shall <strong>NEC</strong> <strong>Unified</strong> <strong>Solutions</strong>, Inc. be liable for any incidental or consequential<br />
damages in connection with the use of this manual. This document contains proprietary information that is protected by<br />
copyright. All rights are reserved. No part of this document may be photocopied or reproduced without prior written consent<br />
of <strong>NEC</strong> <strong>Unified</strong> <strong>Solutions</strong>, Inc.<br />
©2006 by <strong>NEC</strong> <strong>Unified</strong> <strong>Solutions</strong>, Inc. All Rights Reserved.<br />
Printed in U.S.A.
Part Numbers<br />
(Includes Ultra<strong>Mail</strong>, Ultra<strong>Mail</strong> 2000, <strong>Aspire</strong> <strong>Mail</strong>, <strong>Aspire</strong> <strong>Mail</strong> FMS+, <strong>Aspire</strong> <strong>Mail</strong> Plus, and <strong>Aspire</strong> <strong>Mail</strong> DMS)<br />
Part Number<br />
Description<br />
Voice <strong>Mail</strong> PCBs<br />
<strong>Aspire</strong> <strong>Mail</strong>/<strong>Aspire</strong> <strong>Mail</strong> FMS+/<strong>Aspire</strong> <strong>Mail</strong> Plus<br />
<strong>Aspire</strong> <strong>Mail</strong> DMS<br />
0891032 <strong>Aspire</strong> <strong>Mail</strong> (Flash-based), 2 Port, 3 Hour, 200 <strong>Mail</strong>boxes, 1400 Messages (max.)<br />
0891037 <strong>Aspire</strong> <strong>Mail</strong> (Flash-based), 4 Port, 3 Hour, 200 <strong>Mail</strong>boxes, 1400 Messages (max.)<br />
0891052 <strong>Aspire</strong> <strong>Mail</strong> FMS+ (Flash-based), 4 Port, 30 Hour, 200 <strong>Mail</strong>boxes, 7000 Messages (max.)<br />
0891033 <strong>Aspire</strong> <strong>Mail</strong> Plus (Hard disk), 4 Port, 1400 Hours (approximate) 1000 <strong>Mail</strong>boxes, 7000 Messages (max.)<br />
0891056 <strong>Aspire</strong> <strong>Mail</strong> Plus (Hard disk), 8 Port, 1400 Hours (approximate) 1000 <strong>Mail</strong>boxes, 7000 Messages (max.)<br />
0891030 <strong>Aspire</strong> <strong>Mail</strong> DMS (Hard disk), 4 Port, 1400 Hours (minimum) 2000 <strong>Mail</strong>boxes, 14,000 Messages (max.)<br />
0891031 <strong>Aspire</strong> <strong>Mail</strong> DMS (Hard disk), 8 Port, 1400 Hours (minimum) 2000 <strong>Mail</strong>boxes, 14,000 Messages (max.)<br />
Port Expansion<br />
Port Expansion PCBs<br />
0891045 4 Port Expansion PCB for <strong>Aspire</strong> <strong>Mail</strong> (P/Ns 0891032 and 0891037)<br />
0891034 4 Port Expansion PCB for <strong>Aspire</strong> <strong>Mail</strong> Plus 4 Port (P/N 0891033)<br />
0891057 8 Port Expansion PCB for <strong>Aspire</strong> <strong>Mail</strong> Plus 8 Port (P/N 0891056)<br />
0891036 8 Port Expansion PCB for <strong>Aspire</strong> <strong>Mail</strong> DMS<br />
Port Expansion Software Upgrades<br />
0891044 <strong>Aspire</strong> <strong>Mail</strong> (P/N 0891032) 2 Port to 4 Port Software Upgrade<br />
0891066 <strong>Aspire</strong> <strong>Mail</strong> FMS+ (P/N 0891052) 4 Port to 8 Port Software Upgrade<br />
0891010 <strong>Aspire</strong> <strong>Mail</strong> DMS (P/N 0891030) 4 Port to 8 Port Software Upgrade<br />
License Expansion and Feature Activation<br />
0891020 10 Seat Desktop Messaging/Call Control License Expansion for <strong>Aspire</strong> <strong>Mail</strong> DMS<br />
(25 seats provided standard, 205 total)<br />
0891059 AMIS Networking for <strong>Aspire</strong> <strong>Mail</strong>, <strong>Aspire</strong> <strong>Mail</strong> FMS+,<br />
and <strong>Aspire</strong> <strong>Mail</strong> Plus (Feature standard in <strong>Aspire</strong> <strong>Mail</strong> DMS)
Table of Contents<br />
Table of Contents<br />
Introduction . . . . . . . . . . . . . . . . . . . . . . . . . . . . . . . . . . . . . . . . . . . . . . . . . . . . . . . . . . . 1<br />
How To Use This Quick Setup Guide . . . . . . . . . . . . . . . . . . . . . . . . . . . . . . . . . . . . .1<br />
Specifications . . . . . . . . . . . . . . . . . . . . . . . . . . . . . . . . . . . . . . . . . . . . . . . . . . . . . . .1<br />
<strong>Aspire</strong> <strong>Mail</strong> PCB Installation . . . . . . . . . . . . . . . . . . . . . . . . . . . . . . . . . . . . . . . . . . . . . 2<br />
Installation in <strong>Aspire</strong> . . . . . . . . . . . . . . . . . . . . . . . . . . . . . . . . . . . . . . . . . . . . . . . . . . . . . .2<br />
<strong>Aspire</strong> System Requirements . . . . . . . . . . . . . . . . . . . . . . . . . . . . . . . . . . . . . . . . . . .2<br />
Installation . . . . . . . . . . . . . . . . . . . . . . . . . . . . . . . . . . . . . . . . . . . . . . . . . . . . . . . . . .3<br />
Shutting Down the <strong>Aspire</strong> <strong>Mail</strong>/<strong>Aspire</strong> <strong>Mail</strong> FMS+/<strong>Aspire</strong> <strong>Mail</strong> Plus<br />
/<strong>Aspire</strong> <strong>Mail</strong> DMS PCB . . . . . . . . . . . . . . . . . . . . . . . . . . . . . . . . . . . . . . . . . . . 4<br />
Shutting Down then Resetting the <strong>Aspire</strong> <strong>Mail</strong>/<strong>Aspire</strong> <strong>Mail</strong> FMS+<br />
/<strong>Aspire</strong> <strong>Mail</strong> Plus/<strong>Aspire</strong> <strong>Mail</strong> DMS PCB . . . . . . . . . . . . . . . . . . . . . . . . . . . . . 4<br />
Adding Ports to the <strong>Aspire</strong> <strong>Mail</strong>/<strong>Aspire</strong> <strong>Mail</strong> Plus/<strong>Aspire</strong> <strong>Mail</strong> DMS PCBs . . . 5<br />
Replacing a 4 Port <strong>Aspire</strong> <strong>Mail</strong>/<strong>Aspire</strong> <strong>Mail</strong> FMS+/<strong>Aspire</strong> <strong>Mail</strong> Plus PCB<br />
with an 8 Port <strong>Aspire</strong> <strong>Mail</strong> Plus/<strong>Aspire</strong> <strong>Mail</strong> DMS PCB . . . . . . . . . . . . . . . . . . 6<br />
<strong>Aspire</strong> <strong>Mail</strong>/<strong>Aspire</strong> <strong>Mail</strong> FMS+/<strong>Aspire</strong> <strong>Mail</strong> Plus/<strong>Aspire</strong> <strong>Mail</strong> DMS LEDs . . . . . . .8<br />
Connecting <strong>Aspire</strong> <strong>Mail</strong> Plus/<strong>Aspire</strong> <strong>Mail</strong> DMS to a LAN . . . . . . . . . . . . . . . . . . . .9<br />
. . . . . . . .10<br />
Programming. . . . . . . . . . . . . . . . . . . . . . . . . . . . . . . . . . . . . . . . . . . . . . . . . . . . . . . . . 11<br />
<strong>Aspire</strong>. . . . . . . . . . . . . . . . . . . . . . . . . . . . . . . . . . . . . . . . . . . . . . . . . . . . . . . . . . . . . . . . .11<br />
<strong>Aspire</strong> Start-Up Programming . . . . . . . . . . . . . . . . . . . . . . . . . . . . . . . . . . . . . . . . . .11<br />
Additional <strong>Aspire</strong> Programming . . . . . . . . . . . . . . . . . . . . . . . . . . . . . . . . . . . . . . . .12<br />
Default Automated Attendant Answering . . . . . . . . . . . . . . . . . . . . . . . . . . . . . . . . . . . . .13<br />
Automated Attendant Block Diagram . . . . . . . . . . . . . . . . . . . . . . . . . . . . . . . . . . . .13<br />
Admin Installation . . . . . . . . . . . . . . . . . . . . . . . . . . . . . . . . . . . . . . . . . . . . . . . . . . . . . 14<br />
System Requirements . . . . . . . . . . . . . . . . . . . . . . . . . . . . . . . . . . . . . . . . . . . . . . . . . . . .14<br />
<strong>Aspire</strong> <strong>Mail</strong>, <strong>Aspire</strong> <strong>Mail</strong> FMS+, and <strong>Aspire</strong> <strong>Mail</strong> Plus Requirements . . . . . . . . . .14<br />
<strong>Aspire</strong> <strong>Mail</strong> DMS Requirements . . . . . . . . . . . . . . . . . . . . . . . . . . . . . . . . . . . . . . . .14<br />
Setting IP Addresses . . . . . . . . . . . . . . . . . . . . . . . . . . . . . . . . . . . . . . . . . . . . . . . . . . . . .14<br />
Setting the IP Address for Network Communication . . . . . . . . . . . . . . . . . . . . . . . .15<br />
Setting the Gateway Address for Network Communication . . . . . . . . . . . . . . . . . . .17<br />
. . . . . . . . . . . . . .17<br />
Setting the Domain Name Server (DMS Only) . . . . . . . . . . . . . . . . . . . . . . . . . . . . .18<br />
. . . . . . . . . . . . . . . . . . . . . . . . . . . . . . . . . . . . . . . . . . . . .19<br />
<strong>Aspire</strong> <strong>Mail</strong>, <strong>Aspire</strong> <strong>Mail</strong> FMS+, and <strong>Aspire</strong> <strong>Mail</strong> Plus . . . . . . . . . . . . . . . . . . . . . .19<br />
. . . . . . . . . . . . . . . . . . . . . . . . . . . . . . . . . . . . . . . . .23<br />
. . . . . . . . . . . . . . . . . . . . . . . . . . . . . . . . . . . . . . . .24<br />
<strong>Aspire</strong> <strong>Mail</strong> DMS Admin Installation . . . . . . . . . . . . . . . . . . . . . . . . . . . . . . . . . . . . . . . .25<br />
Installing and Starting the Admin Program for <strong>Aspire</strong> <strong>Mail</strong> DMS . . . . . . . . . . . . . .25<br />
Accessing the <strong>Aspire</strong> <strong>Mail</strong> DMS Options . . . . . . . . . . . . . . . . . . . . . . . . . . . . . . . . .26<br />
Administrator Log On . . . . . . . . . . . . . . . . . . . . . . . . . . . . . . . . . . . . . . . . . . . . 26<br />
User Log On . . . . . . . . . . . . . . . . . . . . . . . . . . . . . . . . . . . . . . . . . . . . . . . . . . . 27<br />
Log Out . . . . . . . . . . . . . . . . . . . . . . . . . . . . . . . . . . . . . . . . . . . . . . . . . . . . . . . 30<br />
Navigating the <strong>Aspire</strong> <strong>Mail</strong> DMS Admin Program . . . . . . . . . . . . . . . . . . . . . . . . . .30<br />
Remote Programming Setup (Not for <strong>Aspire</strong> <strong>Mail</strong> DMS) . . . . . . . . . . . . . . . . . . . . . . 31<br />
Windows 2000/XP. . . . . . . . . . . . . . . . . . . . . . . . . . . . . . . . . . . . . . . . . . . . . . . . . . . . . . .31<br />
Overview . . . . . . . . . . . . . . . . . . . . . . . . . . . . . . . . . . . . . . . . . . . . . . . . . . . . . . . . . .31<br />
Making a New Dial-Up Connection with Windows 2000 . . . . . . . . . . . . . . . . . . . .31<br />
Making a New Dial-Up Connection with Windows XP . . . . . . . . . . . . . . . . . . . . . .33<br />
<strong>Aspire</strong> <strong>Mail</strong> Quick Setup Guide Table of Contents ◆ i
Table of Contents<br />
Calling the Remote System in Ultra<strong>Mail</strong> 2000, <strong>Aspire</strong> <strong>Mail</strong>, and <strong>Aspire</strong><br />
<strong>Mail</strong> Plus . . . . . . . . . . . . . . . . . . . . . . . . . . . . . . . . . . . . . . . . . . . . . . . . . . . . . . . . . .37<br />
Setting Up an External Modem in Ultra<strong>Mail</strong> and Calling the Remote System . . . . .41<br />
Part 1: Set up a New Dial-Up Connection on the office PC that you will<br />
use to remotely program Ultra<strong>Mail</strong>. . . . . . . . . . . . . . . . . . . . . . . . . . . . . . . . . . 41<br />
Part 2: Initialize and Set Up the Remote Modem and the Installation Site. . . . 41<br />
Part 3: Call the Remote Modem and Start the Admin Program . . . . . . . . . . . . 42<br />
Part 4: Ending the Admin Programming session. . . . . . . . . . . . . . . . . . . . . . . . 42<br />
Upgrading the Hardware . . . . . . . . . . . . . . . . . . . . . . . . . . . . . . . . . . . . . . . . . . . . . . . 43<br />
Installing the Port Expansion Software Upgrade. . . . . . . . . . . . . . . . . . . . . . . . . . . . . . . .43<br />
Overview . . . . . . . . . . . . . . . . . . . . . . . . . . . . . . . . . . . . . . . . . . . . . . . . . . . . . . . . . .43<br />
Entering the Port Expansion Authorization Code . . . . . . . . . . . . . . . . . . . . . . . . . . .43<br />
Part 1: Obtaining the Port Expansion Authorization Code . . . . . . . . . . . . . . . . 43<br />
Part 2: Entering the Port Expansion Authorization Code . . . . . . . . . . . . . . . . . 44<br />
Emailing the Port Expansion Authorization Code to Customer Service . . . . . . . . . .45<br />
. . . . . . . . . . . . . . . . . . . . . . . . . . . . . . . . . . . . . . . . . . . . . . . . . . . . . 45<br />
Emailing the Code in <strong>Aspire</strong> <strong>Mail</strong> DMS. . . . . . . . . . . . . . . . . . . . . . . . . . . . . . 45<br />
Upgrading the Software . . . . . . . . . . . . . . . . . . . . . . . . . . . . . . . . . . . . . . . . . . . . . . . . 46<br />
. . . . . . . . . . . . . .46<br />
. . . . . . . . . . . . . . . . . . . . . . . . . . . . . . . . . . . . . .46<br />
. . . . . . . . 46<br />
. . . . . . . . . . . . . . . . . . . . . . . . . . . . . . . . . . . . . . . . . . . . . . . . . 47<br />
. . . . . . . . . . . . . . . . . . . . . . . . . . . . . . . . . . . . . . . . . . . . . . . . . 47<br />
. . . . 47<br />
. . . . . . . . . . . . . . . . . . . . . . . . . . . . . . . . . .48<br />
. . . . . . . . . . . . . . . . . . . . . . . . . . . . . . . . . .48<br />
. . . . . . . . . . . . . . . . . . 48<br />
. . . . . . . . . . . . . . . . . . . . . . . . . . . . . . . 48<br />
. . . . . . . . . . . . . . . . . . . . . 48<br />
. . . . . . . . . . . . . . . . . . 48<br />
Upgrading <strong>Aspire</strong> <strong>Mail</strong> DMS . . . . . . . . . . . . . . . . . . . . . . . . . . . . . . . . . . . . . . . . . . . . . .49<br />
<strong>Aspire</strong> <strong>Mail</strong> DMS Software Upgrade Procedure . . . . . . . . . . . . . . . . . . . . . . . . . . . .49<br />
Part 1: Upload the Software Update Files to <strong>Aspire</strong> <strong>Mail</strong> DMS. . . . . . . . . . . . 49<br />
Part 2: Decompressing the Uploaded Software Update Files . . . . . . . . . . . . . . 50<br />
Activating Features and Upgrading Licenses . . . . . . . . . . . . . . . . . . . . . . . . . . . . . . . . . .51<br />
Overview . . . . . . . . . . . . . . . . . . . . . . . . . . . . . . . . . . . . . . . . . . . . . . . . . . . . . . . . . .51<br />
Entering the Authorization Code . . . . . . . . . . . . . . . . . . . . . . . . . . . . . . . . . . . . . . . .51<br />
Part 1: Obtaining the Authorization Code. . . . . . . . . . . . . . . . . . . . . . . . . . . . . 51<br />
Part 2: Entering the Feature or Option Authorization Code . . . . . . . . . . . . . . . 52<br />
Emailing the Feature Activation or License Expansion Code to<br />
Customer Service . . . . . . . . . . . . . . . . . . . . . . . . . . . . . . . . . . . . . . . . . . . . . . . . . . . .53<br />
. . . . . . . . . . . . . . . . . . . . . . . . . . . . . . . . . . . . . . . . . . . . . . . . . . . . . 53<br />
Emailing the Code in <strong>Aspire</strong> <strong>Mail</strong> DMS. . . . . . . . . . . . . . . . . . . . . . . . . . . . . . 53<br />
ii ◆ Table of Contents <strong>Aspire</strong> <strong>Mail</strong> Quick Setup Guide
Table of Contents<br />
. . . . . . . . . . . . . . . . . . . . . . . . . . . . . . . . . . . . . . . . . . . . . . . . . . . . . . . . . 54<br />
. . . . . . . . . . . . . . . . . . . . . . . . . . . . . . . . . . . . . . . . . . . . . . .54<br />
. . . . . . . . . . . . . . . . . . . . . . . . . . . . . . . . . . . 56<br />
. . . . . . . . . . . . . . . . . . . . . . . . . . . . . . . . . . .56<br />
. . . . . . . . . . . . . . . .56<br />
. . . . . . . . . . . . . . . . . . . . . . . . . . . . . . . . . . . . .60<br />
. . . . . . . . . . . . . . . . . . . . . . . .60<br />
<strong>Aspire</strong> <strong>Mail</strong> Quick Setup Guide Table of Contents ◆ iii
Table of Contents<br />
iv ◆ Table of Contents <strong>Aspire</strong> <strong>Mail</strong> Quick Setup Guide
Introduction<br />
Introduction<br />
Introduction<br />
How To Use This Quick Setup Guide<br />
Specifications<br />
Ports<br />
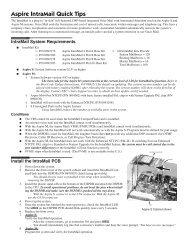
Use this Quick Setup Guide to:<br />
■ Install the <strong>Aspire</strong> <strong>Mail</strong>/<strong>Aspire</strong> <strong>Mail</strong> Plus/<strong>Aspire</strong> <strong>Mail</strong> DMS PCB. <strong>Aspire</strong> <strong>Mail</strong>/<strong>Aspire</strong> <strong>Mail</strong> Plus/<strong>Aspire</strong><br />
<strong>Mail</strong> DMS is compatible only with the <strong>Aspire</strong> system.<br />
■ Program the telephone system to work with the <strong>Aspire</strong> <strong>Mail</strong>/<strong>Aspire</strong> <strong>Mail</strong> Plus/<strong>Aspire</strong> <strong>Mail</strong> DMS PCB.<br />
■ Install the Admin Program. This is a Windows-based administrative program that provides access to all the<br />
voice mail application software options.<br />
The following table shows the basic capacities of the <strong>Aspire</strong> <strong>Mail</strong>/<strong>Aspire</strong> <strong>Mail</strong> FMS+/<strong>Aspire</strong> <strong>Mail</strong> Plus/<br />
<strong>Aspire</strong> <strong>Mail</strong> DMS systems.<br />
<strong>Aspire</strong> <strong>Mail</strong> Specifications<br />
<strong>Aspire</strong> <strong>Mail</strong> (Flash-based) <strong>Aspire</strong> <strong>Mail</strong> Plus (Hard disk) <strong>Aspire</strong> <strong>Mail</strong> DMS (Hard disk)<br />
<strong>Aspire</strong> <strong>Mail</strong>: 2, 4, 6, 8<br />
<strong>Aspire</strong> <strong>Mail</strong> FMS+: 4,8<br />
4 Port PCB: 4, 8<br />
8 Port PCB: 8, 16<br />
4 Port PCB: 4, 8, 12<br />
8 Port PCB: 8, 16<br />
<strong>Mail</strong>boxes 200 1000 2000<br />
Storage Hours<br />
Maximum Messages<br />
TCPIP Ports<br />
<strong>Aspire</strong> <strong>Mail</strong>: 3<br />
<strong>Aspire</strong> <strong>Mail</strong> FMS+: 30<br />
<strong>Aspire</strong> <strong>Mail</strong>:1400<br />
<strong>Aspire</strong> <strong>Mail</strong> FMS+: 7000<br />
Admin Program: 2000 (programmable)<br />
1400 (Approximate) 1400 (minimum)<br />
7000 14,000<br />
Admin Program: 80 (fixed)<br />
Call Control: 200 (fixed)<br />
<strong>Aspire</strong> <strong>Mail</strong> Quick Setup Guide 1
<strong>Aspire</strong> <strong>Mail</strong> PCB Installation<br />
Installation in <strong>Aspire</strong><br />
<strong>Aspire</strong> <strong>Mail</strong> PCB Installation<br />
Installation in <strong>Aspire</strong><br />
<strong>Aspire</strong> System Requirements<br />
Installation in <strong>Aspire</strong> requires the following:<br />
■ System Software version 0.26 or higher.<br />
■ Review the following <strong>Aspire</strong> Port Requirements table. It shows the number of station ports (and corresponding<br />
extensions) required for each <strong>Aspire</strong> <strong>Mail</strong>/<strong>Aspire</strong> <strong>Mail</strong> FMS+/<strong>Aspire</strong> <strong>Mail</strong> Plus/<strong>Aspire</strong> <strong>Mail</strong><br />
DMS configuration.<br />
<strong>Aspire</strong> Port Requirements<br />
Part Number Description Consecutive Extension<br />
Ports<br />
0891032 2 Port <strong>Aspire</strong> <strong>Mail</strong> (Flash-based) 4 1<br />
0891037 4 Port <strong>Aspire</strong> <strong>Mail</strong> (Flash-based) 4<br />
0891032 with 0891045 2 Port <strong>Aspire</strong> <strong>Mail</strong> (Flash-based) with 4 Port<br />
Expansion PCB<br />
8 1<br />
0891037 with 0891045 4 Port <strong>Aspire</strong> <strong>Mail</strong> (Flash-based) with 4 Port<br />
8<br />
Expansion PCB<br />
0891052 4 Port <strong>Aspire</strong> <strong>Mail</strong> FMS+ (Flash-based) 4<br />
0891052 with 0891066 4 Port <strong>Aspire</strong> <strong>Mail</strong> FMS+ (Flash-based) with 4<br />
Port to 8 Port Software Upgrade<br />
8<br />
0891033 4 Port <strong>Aspire</strong> <strong>Mail</strong> Plus (Hard disk) 4<br />
0891033 with 0891034 4 Port <strong>Aspire</strong> <strong>Mail</strong> Plus (Hard disk) with 4 Port<br />
8<br />
Expansion PCB<br />
0891056 8 Port <strong>Aspire</strong> <strong>Mail</strong> Plus (Hard disk) 8<br />
0891056 and 0891057 8 Port <strong>Aspire</strong> <strong>Mail</strong> Plus (Hard disk) with 8 Port<br />
16<br />
Expansion PCB<br />
0891030 4 Port <strong>Aspire</strong> <strong>Mail</strong> DMS (Hard disk) 4<br />
0891030 and 0891036 4 Port <strong>Aspire</strong> <strong>Mail</strong> DMS (Hard disk) with 8 Port<br />
Expansion PCB<br />
16 1<br />
0891031 8 Port <strong>Aspire</strong> <strong>Mail</strong> Plus (Hard disk) 8<br />
0891031 and 0891036 8 Port <strong>Aspire</strong> <strong>Mail</strong> Plus (Hard disk) with 8 Port<br />
16<br />
Expansion<br />
1<br />
The excess ports cannot be used by any other device.<br />
2 <strong>Aspire</strong> <strong>Mail</strong> Quick Setup Guide
<strong>Aspire</strong> <strong>Mail</strong> PCB Installation<br />
Installation in <strong>Aspire</strong><br />
Installation<br />
Important<br />
■ To prevent static damage, use a grounded wrist strap when handling the <strong>Aspire</strong> <strong>Mail</strong>/<strong>Aspire</strong> <strong>Mail</strong><br />
FMS+/<strong>Aspire</strong> <strong>Mail</strong> Plus/<strong>Aspire</strong> <strong>Mail</strong> DMS PCB.<br />
■ The boot time for <strong>Aspire</strong> <strong>Mail</strong>/<strong>Aspire</strong> <strong>Mail</strong> FMS+/<strong>Aspire</strong> <strong>Mail</strong> Plus is approximately 3 minutes.<br />
■ The boot time for <strong>Aspire</strong> <strong>Mail</strong> DMS is 5-10 minutes, depending on the tasks the <strong>Aspire</strong> <strong>Mail</strong> DMS<br />
PCB has to perform during startup.<br />
Before installing the <strong>Aspire</strong> <strong>Mail</strong>/<strong>Aspire</strong> <strong>Mail</strong> FMS+/<strong>Aspire</strong> <strong>Mail</strong> Plus/<strong>Aspire</strong> <strong>Mail</strong> DMS PCB, be sure the<br />
phone system is powered up and functioning normally. In addition, make a record of your system’s extension<br />
numbers. Once installed, <strong>Aspire</strong> <strong>Mail</strong>/<strong>Aspire</strong> <strong>Mail</strong> FMS+/<strong>Aspire</strong> <strong>Mail</strong> Plus/<strong>Aspire</strong> <strong>Mail</strong> DMS will use the<br />
next consecutive set of 4, 8, or 16 extension numbers (depending on the capacity of the PCB).<br />
■ <strong>Aspire</strong> <strong>Mail</strong> PCBs (P/Ns 0891032 and 0891037) and the 4 Port <strong>Aspire</strong> <strong>Mail</strong> Plus PCB (P/N 0891033)<br />
without the Expansion PCB use 4 extension numbers. These PCBs with the Expansion PCB installed use<br />
8 extension numbers.<br />
■ The <strong>Aspire</strong> <strong>Mail</strong> FMS+ PCB (P/N 0891052) without the 4 port software upgrade uses 4 extension numbers.<br />
The PCB with the 4 port software upgrade uses 8 extension numbers.<br />
■ The 8 Port <strong>Aspire</strong> <strong>Mail</strong> Plus PCB (P/N 0891056) without an Expansion PCB uses 8 extension numbers.<br />
This PCB with the Expansion PCB installed uses 16 extension numbers.<br />
■ The 4 Port <strong>Aspire</strong> <strong>Mail</strong> DMS PCB (P/N 0891030) without an Expansion PCB uses 4 extension numbers.<br />
This PCB with the Expansion PCB installed uses 16 extension numbers.<br />
■ The 8 Port <strong>Aspire</strong> <strong>Mail</strong> DMS PCB (P/N 0891031) without an Expansion PCB uses 8 extension numbers.<br />
This PCB with the Expansion PCB installed uses 16 extension numbers.<br />
Before installing the <strong>Aspire</strong> <strong>Mail</strong>/<strong>Aspire</strong> <strong>Mail</strong> FMS+/<strong>Aspire</strong> <strong>Mail</strong> Plus/<strong>Aspire</strong> <strong>Mail</strong> DMS PCB:<br />
1. Slide the RUN/BLOCK switch (if installed) to the RUN position.<br />
2. Insert the battery into the battery clips. It provides battery back-up for the PCB’s Real Time Clock.<br />
- For a replacement battery, use <strong>NEC</strong> P/N EX0254-0040 (Sony CR2032).<br />
3. Check the position of jumper TP8.<br />
- For <strong>Aspire</strong> <strong>Mail</strong> FMS+ (i.e., without a hard disk), place the TP8 jumper on pins 1 and 2.<br />
- For <strong>Aspire</strong> <strong>Mail</strong> Plus/<strong>Aspire</strong> <strong>Mail</strong> DMS (i.e., hard disk version), place the TP8 jumper on pins 2 and 3.<br />
4. Check the position of jumper TP16.<br />
- Place the TP16 jumper on pins 1 and 2.<br />
5. Check the position of the SW3 switches.<br />
- All four SW3 switches must be in the Off position (i.e., pushed away from the PCB).<br />
To install the <strong>Aspire</strong> <strong>Mail</strong>/<strong>Aspire</strong> <strong>Mail</strong> FMS+/<strong>Aspire</strong> <strong>Mail</strong> Plus/<strong>Aspire</strong> <strong>Mail</strong> DMS PCB:<br />
1. Plug <strong>Aspire</strong> <strong>Mail</strong>/<strong>Aspire</strong> <strong>Mail</strong> FMS+/<strong>Aspire</strong> <strong>Mail</strong> Plus/<strong>Aspire</strong> <strong>Mail</strong> DMS into any available universal<br />
slot (S1-S8).<br />
2. For <strong>Aspire</strong> <strong>Mail</strong>/<strong>Aspire</strong> <strong>Mail</strong> FMS+/<strong>Aspire</strong> <strong>Mail</strong> Plus, allow about 3 minutes for the PCB and voice mail<br />
application software to load. For <strong>Aspire</strong> <strong>Mail</strong> DMS, allow about 5-10 minutes.<br />
3. Check the <strong>Aspire</strong> LEDs for proper operation. See Figure 2: <strong>Aspire</strong> <strong>Mail</strong>/<strong>Aspire</strong> <strong>Mail</strong> FMS+/<strong>Aspire</strong> <strong>Mail</strong><br />
Plus/<strong>Aspire</strong> <strong>Mail</strong> DMS LEDs on page 8 for more.<br />
4. Go to <strong>Aspire</strong> Start-Up Programming on page 11 to set up your <strong>Aspire</strong> <strong>Mail</strong>/<strong>Aspire</strong> <strong>Mail</strong> FMS+/<strong>Aspire</strong><br />
<strong>Mail</strong> Plus/<strong>Aspire</strong> <strong>Mail</strong> DMS programming.<br />
<strong>Aspire</strong> <strong>Mail</strong> Quick Setup Guide 3
<strong>Aspire</strong> <strong>Mail</strong> PCB Installation<br />
Installation in <strong>Aspire</strong><br />
Shutting Down the <strong>Aspire</strong> <strong>Mail</strong>/<strong>Aspire</strong> <strong>Mail</strong> FMS+/<strong>Aspire</strong> <strong>Mail</strong> Plus/<strong>Aspire</strong> <strong>Mail</strong> DMS<br />
PCB<br />
You should always shut down the <strong>Aspire</strong> <strong>Mail</strong>/<strong>Aspire</strong> <strong>Mail</strong> FMS+/<strong>Aspire</strong> <strong>Mail</strong> Plus/<strong>Aspire</strong> <strong>Mail</strong> DMS<br />
PCB before unplugging it, resetting it, or powering down the <strong>Aspire</strong> system. Shutting down the PCB will<br />
also shut down the associated voice mail application program.<br />
To shut down the <strong>Aspire</strong> <strong>Mail</strong>/<strong>Aspire</strong> <strong>Mail</strong> FMS+/<strong>Aspire</strong> <strong>Mail</strong> Plus/<strong>Aspire</strong> <strong>Mail</strong> DMS PCB:<br />
1. Momentarily press (tap) the Reset button.<br />
2. Verify that the Shut Down LED is On (green or red). See Figure 2: <strong>Aspire</strong> <strong>Mail</strong>/<strong>Aspire</strong> <strong>Mail</strong> FMS+/<strong>Aspire</strong><br />
<strong>Mail</strong> Plus/<strong>Aspire</strong> <strong>Mail</strong> DMS LEDs on page 8 for more.<br />
Shutting Down then Resetting the <strong>Aspire</strong> <strong>Mail</strong>/<strong>Aspire</strong> <strong>Mail</strong> FMS+/<strong>Aspire</strong> <strong>Mail</strong> Plus/<br />
<strong>Aspire</strong> <strong>Mail</strong> DMS PCB<br />
You may need to shut down and then reset the PCB for maintenance purposes. Resetting the PCB will also<br />
restart the associated voice mail application program.<br />
■ If you reset the <strong>Aspire</strong> system using the Reset button on the CPRU PCB, you must shut down and<br />
then reset the <strong>Aspire</strong> <strong>Mail</strong>/<strong>Aspire</strong> <strong>Mail</strong> FMS+/<strong>Aspire</strong> <strong>Mail</strong> Plus/<strong>Aspire</strong> <strong>Mail</strong> DMS PCB after the<br />
phone system restarts.<br />
To shut down and then reset the <strong>Aspire</strong> <strong>Mail</strong>/<strong>Aspire</strong> <strong>Mail</strong> FMS+/<strong>Aspire</strong> <strong>Mail</strong> Plus/<strong>Aspire</strong> <strong>Mail</strong><br />
DMS PCB:<br />
1. Momentarily press (tap) the Reset button and wait for the PCB to shut down (i.e., Shut Down LED On).<br />
2. Press the Reset button for about 6 seconds.<br />
■ (Wait for the LIVE, APP and SDOWN LEDs to come on green.)<br />
3. The PCB and voice mail application program will restart.<br />
4 <strong>Aspire</strong> <strong>Mail</strong> Quick Setup Guide
<strong>Aspire</strong> <strong>Mail</strong> PCB Installation<br />
Installation in <strong>Aspire</strong><br />
Adding Ports to the <strong>Aspire</strong> <strong>Mail</strong>/<strong>Aspire</strong> <strong>Mail</strong> Plus/<strong>Aspire</strong> <strong>Mail</strong> DMS PCBs<br />
The Port Expansion PCBs add additional voice mail ports to your <strong>Aspire</strong> <strong>Mail</strong>/<strong>Aspire</strong> <strong>Mail</strong> Plus PCB.<br />
■ Expansion PCB P/N 0891045 adds 4 additional ports to <strong>Aspire</strong> <strong>Mail</strong> PCB P/Ns 0891032 and<br />
0891037.<br />
■ Expansion PCB P/N 0891034 adds 4 additional ports to <strong>Aspire</strong> <strong>Mail</strong> Plus PCB P/N 0891033.<br />
■ Expansion PCB P/N 0891057 adds 8 additional ports to <strong>Aspire</strong> <strong>Mail</strong> Plus PCB P/N 0891056.<br />
■ Expansion PCB P/N 0891036 adds 8 additional ports to <strong>Aspire</strong> <strong>Mail</strong> DMS PCBs P/Ns 0891030 and<br />
0891031.<br />
Important!<br />
■ Only install 8 Port Expansion PCB P/N 0891057 on 8 Port <strong>Aspire</strong> <strong>Mail</strong> Plus PCB P/N 0891056.<br />
■ Only install 4 Port Expansion PCB P/N 0891034 on 4 Port <strong>Aspire</strong> <strong>Mail</strong> Plus PCB P/N 0891033.<br />
■ Only install 4 Port Expansion PCB P/N 0891045 on <strong>Aspire</strong> <strong>Mail</strong> PCBs P/Ns 0891032 and 0891037.<br />
■ Only install 8 Port Expansion PCB P/N 0891036 on <strong>Aspire</strong> <strong>Mail</strong> DMS PCBs P/Ns 0891030 and<br />
0891031.<br />
To install the Port Expansion PCB:<br />
1. Shut down the <strong>Aspire</strong> <strong>Mail</strong>/<strong>Aspire</strong> <strong>Mail</strong> Plus/<strong>Aspire</strong> <strong>Mail</strong> DMS PCB.<br />
2. Unplug the <strong>Aspire</strong> <strong>Mail</strong>/<strong>Aspire</strong> <strong>Mail</strong> Plus/<strong>Aspire</strong> <strong>Mail</strong> DMS PCB and place it on a flat, clean, staticfree<br />
surface.<br />
3. Snap in the plastic standoffs as in shown Figure 1: <strong>Aspire</strong> <strong>Mail</strong>/<strong>Aspire</strong> <strong>Mail</strong> FMS+/<strong>Aspire</strong> <strong>Mail</strong> Plus/<br />
<strong>Aspire</strong> <strong>Mail</strong> DMS PCB on page 7, then plug in the Port Expansion PCB.<br />
4. Use 90-05: Slot Control to delete the slot from which you removed the <strong>Aspire</strong> <strong>Mail</strong>/<strong>Aspire</strong> <strong>Mail</strong> Plus/<br />
<strong>Aspire</strong> <strong>Mail</strong> DMS PCB.<br />
5. Plug the <strong>Aspire</strong> <strong>Mail</strong>/<strong>Aspire</strong> <strong>Mail</strong> Plus/<strong>Aspire</strong> <strong>Mail</strong> DMS PCB back into the same slot from which you<br />
removed it.<br />
6. The <strong>Aspire</strong> <strong>Mail</strong>/<strong>Aspire</strong> <strong>Mail</strong> Plus/<strong>Aspire</strong> <strong>Mail</strong> DMS PCB and voice mail application program will automatically<br />
restart.<br />
■ In <strong>Aspire</strong> <strong>Mail</strong> DMS, shut down and then reset the <strong>Aspire</strong> <strong>Mail</strong> DMS PCB again.<br />
7. Use the following programs to set up the additional voice mail ports added by the expansion PCB.<br />
■ 16-02-01: Department Group Assignment for Extensions<br />
■ 15-03-01: Single Line Telephone Basic Data Setup - SLT Signaling Type<br />
■ 15-03-03: Single Line Telephone Basic Data Setup - Terminal Type<br />
■ 15-03-09: Single Line Telephone Basic Data Setup, Caller ID Function for External Module<br />
8. If you are adding ports to the 8 Port <strong>Aspire</strong> <strong>Mail</strong> Plus PCB (P/N 0891056):<br />
■ Go to File: Install: Ports to add the additional 8 ports on the Expansion PCB.<br />
■ Go to View: Installation Settings to verify that the additional ports are properly installed.<br />
9. If you are adding ports to the 8 Port <strong>Aspire</strong> <strong>Mail</strong> DMS PCB (P/N):<br />
■ Go to Installation: Ports and <strong>Mail</strong>box Security Code to add the additional 8 ports on the Expansion<br />
PCB.<br />
<strong>Aspire</strong> <strong>Mail</strong> Quick Setup Guide 5
<strong>Aspire</strong> <strong>Mail</strong> PCB Installation<br />
Installation in <strong>Aspire</strong><br />
Replacing a 4 Port <strong>Aspire</strong> <strong>Mail</strong>/<strong>Aspire</strong> <strong>Mail</strong> FMS+/<strong>Aspire</strong> <strong>Mail</strong> Plus PCB with an 8 Port<br />
<strong>Aspire</strong> <strong>Mail</strong> Plus/<strong>Aspire</strong> <strong>Mail</strong> DMS PCB<br />
Review the following instructions if you want to upgrade your telephone system by replacing a 4 Port PCB<br />
(P/N 0891032, 0891033, 0891052, or 0891037) with an 8 Port <strong>Aspire</strong> <strong>Mail</strong> Plus PCB (P/N 0891056) or<br />
<strong>Aspire</strong> <strong>Mail</strong> DMS PCB (P/N 0891031).<br />
To replace a 4 Port PCB with an 8 Port <strong>Aspire</strong> <strong>Mail</strong> Plus/<strong>Aspire</strong> <strong>Mail</strong> DMS PCB:<br />
1. Shut down the 4 Port PCB.<br />
2. Unplug the existing 4 Port PCB.<br />
3. Use 90-05: Slot Control to delete the slot from which you removed the 4 Port PCB.<br />
4. Plug the new 8 Port <strong>Aspire</strong> <strong>Mail</strong> Plus/<strong>Aspire</strong> <strong>Mail</strong> DMS PCB into the same slot from which you removed<br />
the old PCB.<br />
5. The new <strong>Aspire</strong> <strong>Mail</strong> Plus/<strong>Aspire</strong> <strong>Mail</strong> DMS PCB and voice mail application program will automatically<br />
restart.<br />
6. Use the following programs to set up the additional voice mail ports added by the new PCB.<br />
■ 16-02-01: Department Group Assignment for Extensions<br />
■ 15-03-01: Single Line Telephone Basic Data Setup - SLT Signaling Type<br />
■ 15-03-03: Single Line Telephone Basic Data Setup - Terminal Type<br />
■ 15-03-09: Single Line Telephone Basic Data Setup, Caller ID Function for External Module<br />
7. To verify the installation:<br />
■ In <strong>Aspire</strong> <strong>Mail</strong> Plus, in the System Guide go to View: Installation Settings to verify that all the ports on<br />
the new PCB are properly installed.<br />
■ In <strong>Aspire</strong> <strong>Mail</strong> DMS, in the System Guide go to Installation: Ports and <strong>Mail</strong>box Security Code to verify<br />
that all the ports on the new PCB are properly installed.<br />
6 <strong>Aspire</strong> <strong>Mail</strong> Quick Setup Guide
0893100 - 129<br />
<strong>Aspire</strong> <strong>Mail</strong> PCB Installation<br />
Installation in <strong>Aspire</strong><br />
(Not for<br />
<strong>Aspire</strong> <strong>Mail</strong> FMS+)<br />
Shut Down/Reset button<br />
Port Expansion<br />
PCB<br />
Flash card<br />
(<strong>Aspire</strong> <strong>Mail</strong>/<br />
<strong>Aspire</strong> <strong>Mail</strong> FMS+<br />
only)<br />
Switch SW3<br />
RS232 port<br />
LAN connector<br />
(<strong>Aspire</strong> <strong>Mail</strong> FMS+/<br />
<strong>Aspire</strong> <strong>Mail</strong> Plus/<br />
<strong>Aspire</strong> <strong>Mail</strong> DMS only)<br />
1<br />
CAUTION<br />
TP16<br />
Do not press<br />
on the hard<br />
disk cover<br />
Hard disk<br />
(<strong>Aspire</strong> <strong>Mail</strong> Plus/<br />
<strong>Aspire</strong> <strong>Mail</strong> DMS only)<br />
1 2 3<br />
3<br />
2<br />
TP8<br />
Not for <strong>Aspire</strong> <strong>Mail</strong><br />
Figure 1: <strong>Aspire</strong> <strong>Mail</strong>/<strong>Aspire</strong> <strong>Mail</strong> FMS+/<strong>Aspire</strong> <strong>Mail</strong> Plus/<strong>Aspire</strong> <strong>Mail</strong> DMS PCB<br />
<strong>Aspire</strong> <strong>Mail</strong> Quick Setup Guide 7
<strong>Aspire</strong> <strong>Mail</strong> PCB Installation<br />
Installation in <strong>Aspire</strong><br />
<strong>Aspire</strong> <strong>Mail</strong>/<strong>Aspire</strong> <strong>Mail</strong> FMS+/<strong>Aspire</strong> <strong>Mail</strong> Plus/<strong>Aspire</strong> <strong>Mail</strong> DMS LEDs<br />
The LEDs show the status of the <strong>Aspire</strong> <strong>Mail</strong>/<strong>Aspire</strong> <strong>Mail</strong> FMS+/<strong>Aspire</strong> <strong>Mail</strong> Plus/<strong>Aspire</strong> <strong>Mail</strong> DMS PCB. Refer<br />
to the table below for LED flash rates.<br />
<strong>Aspire</strong> <strong>Mail</strong>/<strong>Aspire</strong> <strong>Mail</strong> FMS+/<strong>Aspire</strong> <strong>Mail</strong> Plus PCB LEDs<br />
Name Description Flash Rates<br />
LIVE PCB Alive ■ Fast flash green while running.<br />
■ On green while PCB is starting up.<br />
■ Off if PCB is not communicating with system.<br />
APP Voice <strong>Mail</strong> Application Status ■ Fast flash green while application is starting up.<br />
■ Slow flash green while application is running.<br />
■ On red when voice mail application is shut down.<br />
SDOWN Voice <strong>Mail</strong> Application Shut Down Status ■ Normally off.<br />
■ Fast flash green while reset button is depressed.<br />
■ Slow flash green during shutdown process.<br />
■ On green when normal shut down is complete.<br />
■ On red when forced shut down is complete (allow<br />
approximately 3 minutes for forced shut down).<br />
BL1-BL8 Voice <strong>Mail</strong> Port Activity ■ On red when port is active.<br />
CF POW Compact Flash Power ■ On red when Compact Flash is powered up.<br />
DRIVE ACT Hard Drive Activity ■ Flashing green during hard drive or Compact Flash<br />
activity.<br />
HDD POW Hard Drive Power ■ On red when hard drive is powered up.<br />
LIVE<br />
APP<br />
(Application)<br />
SDOWN<br />
(Shut Down)<br />
BL1-BL8<br />
CF POW<br />
(Compact Flash Power)<br />
DRIVE ACT<br />
(Drive Activity)<br />
HDD POW<br />
(Hard Drive Power)<br />
Figure 2: <strong>Aspire</strong> <strong>Mail</strong>/<strong>Aspire</strong> <strong>Mail</strong> FMS+/<strong>Aspire</strong> <strong>Mail</strong> Plus/<strong>Aspire</strong> <strong>Mail</strong> DMS LEDs<br />
8 <strong>Aspire</strong> <strong>Mail</strong> Quick Setup Guide
<strong>Aspire</strong> <strong>Mail</strong> PCB Installation<br />
Installation in <strong>Aspire</strong><br />
Connecting <strong>Aspire</strong> <strong>Mail</strong> Plus/<strong>Aspire</strong> <strong>Mail</strong> DMS to a LAN<br />
You can use the <strong>Aspire</strong> <strong>Mail</strong> Plus/<strong>Aspire</strong> <strong>Mail</strong> DMS LAN (Local Area Network) connection for local and<br />
remote programming. The Admin program can use this connection for programming the voice mail application<br />
on the PCB.<br />
To connect <strong>Aspire</strong> <strong>Mail</strong> Plus/<strong>Aspire</strong> <strong>Mail</strong> DMS to a LAN:<br />
1. Be sure the <strong>Aspire</strong> <strong>Mail</strong> Plus/<strong>Aspire</strong> <strong>Mail</strong> DMS PCB is properly plugged in and running.<br />
2. Following the manufacturer’s instructions, install your hub, router, or switch.<br />
3. Using standard CAT5 straight-through cables, connect the <strong>Aspire</strong> <strong>Mail</strong> Plus/<strong>Aspire</strong> <strong>Mail</strong> DMS and your<br />
PC to LAN connections on your hub, router, or switch.<br />
■ (Optional) To directly connect to the LAN connector, use a CAT5 cross-over cable.<br />
4. Verify that the green LED on the <strong>Aspire</strong> <strong>Mail</strong> Plus/<strong>Aspire</strong> <strong>Mail</strong> DMS PCB LAN connector is flashing.<br />
■ If this LED is off, your LAN connection is not functioning.<br />
5. Optionally connect your hub, router, or switch to your WAN (Wide Area Network).<br />
0893100 - 133<br />
Flash card<br />
(<strong>Aspire</strong> <strong>Mail</strong>/<br />
<strong>Aspire</strong> <strong>Mail</strong> FMS+<br />
only)<br />
LAN connector<br />
(<strong>Aspire</strong> <strong>Mail</strong> FMS+/<br />
<strong>Aspire</strong> <strong>Mail</strong> Plus/<br />
<strong>Aspire</strong> <strong>Mail</strong> DMS only)<br />
CAUTION<br />
Do not press<br />
on the hard<br />
disk cover<br />
Typical hub, router, or switch<br />
Straight-through<br />
CAT5 cables<br />
Power<br />
supply<br />
Figure 3: Connecting <strong>Aspire</strong> <strong>Mail</strong> FMS+/<strong>Aspire</strong> <strong>Mail</strong> Plus/<strong>Aspire</strong> <strong>Mail</strong> DMS to a LAN<br />
<strong>Aspire</strong> <strong>Mail</strong> Quick Setup Guide 9
<strong>Aspire</strong> <strong>Mail</strong> PCB Installation<br />
Installation in <strong>Aspire</strong><br />
<br />
You can directly connect your PC to the <strong>Aspire</strong> <strong>Mail</strong>/<strong>Aspire</strong> <strong>Mail</strong> FMS+/<strong>Aspire</strong> <strong>Mail</strong> Plus RS232 port for<br />
local programming. The Admin program can use this connection for programming the voice mail application<br />
on the PCB.<br />
To connect <strong>Aspire</strong> <strong>Mail</strong>/<strong>Aspire</strong> <strong>Mail</strong> FMS+/<strong>Aspire</strong> <strong>Mail</strong> Plus to your PC:<br />
1. Be sure the <strong>Aspire</strong> <strong>Mail</strong>/<strong>Aspire</strong> <strong>Mail</strong> FMS+/<strong>Aspire</strong> <strong>Mail</strong> Plus PCB is properly plugged in and running.<br />
2. Verify that the TP16 jumper is on pins 1 and 2.<br />
3. Plug one end of a 9-pin female to 9-pin female null modem cable into the RS232 port on the <strong>Aspire</strong> <strong>Mail</strong>/<br />
<strong>Aspire</strong> <strong>Mail</strong> FMS+/<strong>Aspire</strong> <strong>Mail</strong> Plus PCB.<br />
4. Plug the other end of the same cable into the RS232 port on the back of your PC.<br />
■ Your PC may require adaptors or a different cable configuration.<br />
0893100 - 131<br />
Flash card<br />
(<strong>Aspire</strong> <strong>Mail</strong>/<br />
<strong>Aspire</strong> <strong>Mail</strong> FMS+<br />
only)<br />
RS232 port<br />
DTE<br />
CAUTION<br />
Do not press<br />
on the hard<br />
disk cover<br />
DTE<br />
RS232 port<br />
<strong>Aspire</strong> <strong>Mail</strong><br />
9-pin to 9-pin Null Modem Cable<br />
To <strong>Aspire</strong> <strong>Mail</strong><br />
Serial Port<br />
To PC<br />
Serial Port<br />
LAN connector<br />
(<strong>Aspire</strong> <strong>Mail</strong> FMS+/<br />
<strong>Aspire</strong> <strong>Mail</strong> Plus/<br />
<strong>Aspire</strong> <strong>Mail</strong> DMS only)<br />
9 pin female to<br />
9 pin female<br />
null modem cable<br />
P/N 0892004<br />
2<br />
3<br />
5<br />
7<br />
3<br />
2<br />
5<br />
8<br />
8<br />
7<br />
5 4 3 2 1<br />
9 8 7 6<br />
6<br />
1<br />
4<br />
4<br />
1<br />
6<br />
9<br />
9<br />
Figure 4: Connecting <strong>Aspire</strong> <strong>Mail</strong>/<strong>Aspire</strong> <strong>Mail</strong> FMS+/<strong>Aspire</strong> <strong>Mail</strong> Plus to a PC<br />
10 <strong>Aspire</strong> <strong>Mail</strong> Quick Setup Guide
Programming<br />
<strong>Aspire</strong><br />
Programming<br />
<strong>Aspire</strong><br />
<strong>Aspire</strong> Start-Up Programming<br />
Step 1<br />
Step 2<br />
Step 3<br />
Step 4<br />
Step 5<br />
Step 6<br />
Step 7<br />
Assign the <strong>Aspire</strong> <strong>Mail</strong>/<strong>Aspire</strong> <strong>Mail</strong> FMS+/<strong>Aspire</strong> <strong>Mail</strong> Plus/<strong>Aspire</strong> <strong>Mail</strong> DMS extension numbers<br />
to a unique Department Group.<br />
1.1 16-02-01: Department Group Assignment for Extensions<br />
- Assign the <strong>Aspire</strong> <strong>Mail</strong>/<strong>Aspire</strong> <strong>Mail</strong> FMS+/<strong>Aspire</strong> <strong>Mail</strong> Plus/<strong>Aspire</strong> <strong>Mail</strong> DMS extensions to<br />
a unique Department Group (e.g., 2).<br />
- No other extensions should be in this group.<br />
- These extensions are the extensions the system assigns to the <strong>Aspire</strong> <strong>Mail</strong>/<strong>Aspire</strong> <strong>Mail</strong><br />
FMS+/<strong>Aspire</strong> <strong>Mail</strong> Plus/<strong>Aspire</strong> <strong>Mail</strong> DMS PCB.<br />
- Do not use Department Group 1.<br />
- The extensions should be consecutive.<br />
- Be sure to set up the Department Group in order. (For example, the first extension should<br />
be order 1, the second order 2, etc.)<br />
✔By default, all extensions are in Department Group 1.<br />
Assign a master number to the <strong>Aspire</strong> <strong>Mail</strong>/<strong>Aspire</strong> <strong>Mail</strong> FMS+/<strong>Aspire</strong> <strong>Mail</strong> Plus/<strong>Aspire</strong> <strong>Mail</strong><br />
DMS Department Group.<br />
2.1 11-07-01: Department Group Pilot Numbers<br />
- Assign the Pilot Number for the <strong>Aspire</strong> <strong>Mail</strong>/<strong>Aspire</strong> <strong>Mail</strong> FMS+/<strong>Aspire</strong> <strong>Mail</strong> Plus/<strong>Aspire</strong><br />
<strong>Mail</strong> DMS Department Group (e.g., 700).<br />
✔By default, there are no Pilot Numbers assigned.<br />
Specify the Department Group used for <strong>Aspire</strong> <strong>Mail</strong>/<strong>Aspire</strong> <strong>Mail</strong> FMS+/<strong>Aspire</strong> <strong>Mail</strong> Plus/<strong>Aspire</strong><br />
<strong>Mail</strong> DMS.<br />
3.1 45-01-01: Voice <strong>Mail</strong> Integration Options, Voice <strong>Mail</strong> Department Group Number<br />
- Enter the Department Group you assigned in step 1 above (e.g., 2).<br />
✔By default, there is no Department Group assigned.<br />
Set the dialing type to Dial Pulse (DP) for each <strong>Aspire</strong> <strong>Mail</strong>/<strong>Aspire</strong> <strong>Mail</strong> FMS+/<strong>Aspire</strong> <strong>Mail</strong> Plus/<br />
<strong>Aspire</strong> <strong>Mail</strong> DMS extension.<br />
4.1 15-03-01: Single Line Telephone Basic Data Setup - SLT Signaling Type<br />
- For each <strong>Aspire</strong> <strong>Mail</strong>/<strong>Aspire</strong> <strong>Mail</strong> FMS+/<strong>Aspire</strong> <strong>Mail</strong> Plus/<strong>Aspire</strong> <strong>Mail</strong> DMS extension,<br />
enter 0 (DP).<br />
✔By default, this option is 1 (DTMF).<br />
Set the terminal type for each <strong>Aspire</strong> <strong>Mail</strong>/<strong>Aspire</strong> <strong>Mail</strong> FMS+/<strong>Aspire</strong> <strong>Mail</strong> Plus/<strong>Aspire</strong> <strong>Mail</strong> DMS<br />
extension.<br />
5.1 15-03-03: Single Line Telephone Basic Data Setup - Terminal Type<br />
- For each <strong>Aspire</strong> <strong>Mail</strong>/<strong>Aspire</strong> <strong>Mail</strong> FMS+/<strong>Aspire</strong> <strong>Mail</strong> Plus/<strong>Aspire</strong> <strong>Mail</strong> DMS extension,<br />
enter 1.<br />
- This allows <strong>Aspire</strong> <strong>Mail</strong>/<strong>Aspire</strong> <strong>Mail</strong> FMS+/<strong>Aspire</strong> <strong>Mail</strong> Plus/<strong>Aspire</strong> <strong>Mail</strong> DMS to receive<br />
voice mail commands dialed from system extensions.<br />
✔By default, this option is 0.<br />
Program Voice <strong>Mail</strong> keys on system extensions.<br />
6.1 15-07-01: Programming Function Keys<br />
- Voice <strong>Mail</strong> keys are code 77.<br />
- Normally, the additional data is the number of the extension you are programming.<br />
- Keysets can also have Voice <strong>Mail</strong> keys for Virtual Extensions, a co-worker, or an uninstalled<br />
extension (for Message Center operation).<br />
- Extension users can use Service Code 851 to set up their own Voice <strong>Mail</strong> keys.<br />
✔By default, there are no Voice <strong>Mail</strong> keys assigned.<br />
Optionally set up the MSG key for Voice <strong>Mail</strong> operation.<br />
7.1 15-02-26: Multi-Line Telephone Basic Data Setup, MSG Key Operation Mode<br />
- For each keyset, enter 1 to optionally have the MSG key function as a Voice <strong>Mail</strong> key<br />
(rather than a Message Waiting key).<br />
✔By default, a keyset’s MSG key is assigned for Message Waiting (0).<br />
<strong>Aspire</strong> <strong>Mail</strong> Quick Setup Guide 11
Programming<br />
<strong>Aspire</strong><br />
Step 8<br />
To have the <strong>Aspire</strong> <strong>Mail</strong>/<strong>Aspire</strong> <strong>Mail</strong> FMS+/<strong>Aspire</strong> <strong>Mail</strong> Plus/<strong>Aspire</strong> <strong>Mail</strong> DMS Automated<br />
Attendant answer outside calls, set up DILs to voice mail.<br />
8.1 22-02-01: Incoming Call Trunk Setup<br />
- Assign Service Type 4 to each trunk you want to be a DIL. Make a separate entry for each<br />
Night Service mode.<br />
✔By default, trunks are Service Type 0 (Normal).<br />
8.2 22-07-01: DIL Assignment<br />
- For each trunk you designated in step 8.1, enter the first (lowest) voice mail extension number<br />
as the DIL destination. (These are the extensions you assigned to the <strong>Aspire</strong> <strong>Mail</strong>/<br />
<strong>Aspire</strong> <strong>Mail</strong> FMS+/<strong>Aspire</strong> <strong>Mail</strong> Plus/<strong>Aspire</strong> <strong>Mail</strong> DMS Department Group in step 1<br />
above.) Make a separate entry for each Night Service mode.<br />
✔By default, there are no DIL destinations programmed.<br />
Additional <strong>Aspire</strong> Programming<br />
1. Disable External Reverse for each voice mail port.<br />
1.1 15-03-05: Single Line Telephone Basic Data Setup, External Reverse<br />
- This option must be disabled (0).<br />
✔By default, this option is disabled (0).<br />
2. Disable Extension Reverse for each voice mail port.<br />
2.1 15-03-06: Single Line Telephone Basic Data Setup, Extension Reverse<br />
- This option must be disabled (0).<br />
✔By default, this option is disabled (0).<br />
3. Disable External Module Caller ID for each voice mail port.<br />
3.1 15-03-09: Single Line Telephone Basic Data Setup, Caller ID Function for External Module<br />
- This option must be disabled (0).<br />
✔By default, this option is disabled (0).<br />
4. Set up the proper queuing when all voice mail ports are busy.<br />
4.1 16-01-08: Department Group Basic Data Setup, Minimum Queuing Number of Extension<br />
Group Call<br />
- Set this option to 1 (unlimited queuing).<br />
✔By default, this option is 0 (no queuing).<br />
Refer to Voice <strong>Mail</strong> in the <strong>Aspire</strong> Software Manual for more programming.<br />
12 <strong>Aspire</strong> <strong>Mail</strong> Quick Setup Guide
Programming<br />
Default Automated Attendant Answering<br />
Default Automated Attendant Answering<br />
Automated Attendant Block Diagram<br />
DIL to Voice <strong>Mail</strong><br />
Master (700)<br />
The following block diagram shows the default Automated Attendant setup.<br />
■ See Automated Attendant in the System Guide for more.<br />
Default Automated Attendant Answering<br />
Port Options<br />
Answering<br />
Table 1<br />
Customize:<br />
Port Options:<br />
Answering Table<br />
Customize:<br />
Answering Tables<br />
From the System<br />
Administrator’s mailbox (300),<br />
record a Welcome Message (SA +<br />
W) and Instruction Menu (SA + I) for<br />
the active Call Routing <strong>Mail</strong>box.<br />
Monday-Friday<br />
8:00AM<br />
Call Routing<br />
<strong>Mail</strong>box 811<br />
Customize:<br />
<strong>Mail</strong>box Options<br />
Edit 811<br />
Dial Action<br />
Table 1<br />
Customize:<br />
Dial Action Table<br />
Monday-Friday<br />
Noon<br />
Monday-Thursday<br />
5:00PM<br />
Call Routing<br />
<strong>Mail</strong>box 812<br />
Call Routing<br />
<strong>Mail</strong>box 813<br />
Customize:<br />
<strong>Mail</strong>box Options<br />
Edit 812<br />
Customize:<br />
<strong>Mail</strong>box Options<br />
Edit 813<br />
Dial Action Table 1 and 2<br />
Dialing Options<br />
Dial an extension number, or<br />
0 for the operator<br />
All ports<br />
Dial Action<br />
Table 2<br />
Customize:<br />
Dial Action Table<br />
Friday<br />
5:00PM<br />
Call Routing<br />
<strong>Mail</strong>box 814<br />
Customize:<br />
<strong>Mail</strong>box Options<br />
Edit 814<br />
Use Answering<br />
Table 1<br />
Which chooses Call<br />
Routing <strong>Mail</strong>boxes 811-814<br />
(depending on day/time).<br />
And Dial Action<br />
Tables 1 or 2<br />
With these dialing<br />
options<br />
<strong>Aspire</strong> <strong>Mail</strong> Quick Setup Guide 13
Admin Installation<br />
System Requirements<br />
Admin Installation<br />
System Requirements<br />
<strong>Aspire</strong> <strong>Mail</strong>, <strong>Aspire</strong> <strong>Mail</strong> FMS+, and <strong>Aspire</strong> <strong>Mail</strong> Plus Requirements<br />
Important<br />
After installing the Admin program, do not change the name of the computer on which the program is<br />
installed (i.e., do not right click My Computer + Properties + Computer Name). This will disable the<br />
Admin program.<br />
■<br />
■<br />
■<br />
■<br />
■<br />
■<br />
■<br />
■<br />
Operating System<br />
Windows 2000 or Windows XP<br />
Processor<br />
Pentium 166 MHz or higher, mouse required<br />
Memory (RAM)<br />
72 MBytes (84 MBytes recommended)<br />
Hard Drive Space<br />
120 MBytes empty space prior to installation<br />
Video<br />
VGA (16-bit or 24-bit SVGA recommended)<br />
Network Adapter<br />
Required for LAN connection (10-baseT minimum)<br />
Modem<br />
Required for remote modem connection<br />
Com port<br />
Required for direct (serial) connection<br />
<strong>Aspire</strong> <strong>Mail</strong> DMS Requirements<br />
■<br />
■<br />
■<br />
■<br />
■<br />
■<br />
■<br />
Operating System<br />
Use one of the following or higher:<br />
- Windows 98 (Service Pack 2)<br />
- Windows NT 4.0<br />
- Windows 2000<br />
- Windows XP<br />
Processor<br />
Pentium 400 MHZ or higher, mouse required<br />
Memory (RAM)<br />
256 MBytes (minimum)<br />
Video<br />
VGA (16-bit or 24-bit SVGA recommended)<br />
Network Adapter<br />
Required for LAN connection (10-baseT minimum)<br />
Modem<br />
Required for remote modem connection<br />
Browser<br />
Internet Explorer 5.00 or higher with JavaScript and cookies enabled<br />
Setting IP Addresses<br />
14 <strong>Aspire</strong> <strong>Mail</strong> Quick Setup Guide
Admin Installation<br />
Setting IP Addresses<br />
Setting the IP Address for Network Communication<br />
The Admin program uses TCP/IP protocol to communicate with the voice mail application over the LAN.<br />
For <strong>Aspire</strong> <strong>Mail</strong> Plus/<strong>Aspire</strong> <strong>Mail</strong> DMS, to communicate over the LAN you must set the IP address and<br />
subnet mask before installing the Admin Program. These options do not apply to <strong>Aspire</strong> <strong>Mail</strong> (Flashbased)<br />
PCBs (or if you are connected to the PCB’s serial port). Check with your IT Manager before entering<br />
data for this option.<br />
■ The IP Address is the TCP/IP identity of the <strong>Aspire</strong> <strong>Mail</strong> Plus/<strong>Aspire</strong> <strong>Mail</strong> DMS PCB on your LAN.<br />
■ The subnet mask distinguishes addresses of computers on your LAN from those outside your network<br />
(e.g., on the internet or a private WAN).<br />
- For example, in the default TCP/IP address (192.168.1.250) with a 24-bit subnet mask, 192.168.1 is<br />
the “masked” part of the address and describes the IP address of your network. The <strong>Aspire</strong> <strong>Mail</strong><br />
PCB address is 250.<br />
- If Admin sends a message to a computer with an IP address that is on your network (i.e., its<br />
address begins with 192.168.1), it communicates directly with it (peer to peer).<br />
- If Admin sends a message to a computer with an IP address that is not on your network (i.e., its<br />
address does not begin with 192.168.1), it forwards its response to your router’s Gateway address.<br />
See Setting the Gateway Address for Network Communication on page 17 for more.<br />
■<br />
Compatibility Guidelines:<br />
■ Entering an IP address that contains a succession of nines (e.g., 999) requires voice mail software version<br />
11.07 or higher. In earlier versions, the voice mail would hang up in the middle of data entry if<br />
the code contained a succession of nines.<br />
8 Bit Mask<br />
(Class A)<br />
16 Bit Mask<br />
(Class B)<br />
24 Bit Mask<br />
(Class C)<br />
Subnet Mast Example<br />
Octet 1 Octet 2 Octet 3 Octet 4 Network IP Range<br />
10. 168. 1 250 10.***.***.***<br />
172. 16. 1 250 172.16.***.***<br />
192. 168. 1 250 192.168.1.***<br />
If there is no router at the installation site, leave the <strong>Aspire</strong> <strong>Mail</strong> Plus/<strong>Aspire</strong> <strong>Mail</strong> DMS IP address at its<br />
default value (192.168.1.250) and set the IP address of your PC to 192.168.1.1.<br />
Setting the TCP/IP Address<br />
[Default = 192.168.1.250 with 24 bit subnet mask]<br />
Log onto System Administrator’s mailbox (301)<br />
SA (72) Access the System Administrator options<br />
TCPIP (82747) Select the TCP/IP address option<br />
■ The voice prompts will announce your default IP address (followed by an<br />
additional digit for the subnet mask - see below).<br />
Enter the desired TCP/IP address and subnet mask option<br />
■ Check with your network administrator.<br />
<strong>Aspire</strong> <strong>Mail</strong> Quick Setup Guide 15
Admin Installation<br />
Setting IP Addresses<br />
0 Plays Help message<br />
Setting the TCP/IP Address<br />
[Default = 192.168.1.250 with 24 bit subnet mask]<br />
The entry format is x*x*x*x*y#, where:<br />
■ x represents each octet of the TCP/IP address.<br />
■ y is the subnet mask option (0, 16, or 24).<br />
0 = No subnet mask<br />
16 = 255.255.0.0 (16 bits in subnet mask)<br />
24 = 255.255.255.0 (24 bits in subnet mask)<br />
The default subnet mask option is 0 (no mask)<br />
For example, the entry for TCP/IP address 208.141.100.40 with a<br />
24 bit subnet mask is: 208*141*100*40*24#<br />
You must shut down and then reset the PCB after changing the<br />
IP address.<br />
# to exit to the System Administrator menu<br />
16 <strong>Aspire</strong> <strong>Mail</strong> Quick Setup Guide
Admin Installation<br />
Setting IP Addresses<br />
Setting the Gateway Address for Network Communication<br />
Compatibility Guidelines:<br />
■ Entering a gateway address that contains a succession of nines (e.g., 999) requires voice mail software<br />
version 11.07 or higher. In earlier versions, the voice mail would hang up in the middle of data entry if<br />
the code contained succession of nines.<br />
The gateway address is the address in the site router to which all outbound traffic is routed. The gateway<br />
address is required in order for the Admin Program to communicate with computers not on your LAN (i.e.,<br />
over the internet or a private WAN). With <strong>Aspire</strong> <strong>Mail</strong> Plus/<strong>Aspire</strong> <strong>Mail</strong> DMS, to communicate over the<br />
LAN you must set the gateway address, even if you don’t want to remotely program <strong>Aspire</strong> <strong>Mail</strong> Plus/<br />
<strong>Aspire</strong> <strong>Mail</strong> DMS. If there is no router at the installation site, use the Admin TCP/IP address entered above<br />
(see Setting the IP Address for Network Communication on page 15). This gateway address option does not<br />
apply to <strong>Aspire</strong> <strong>Mail</strong> (flash-based) PCBs (or if you are connected to the PCBs serial port). Check with your<br />
IT Manager before entering data for this option.<br />
Setting the Gateway Address<br />
[Default = 192.168.1.1]<br />
Log onto System Administrator’s mailbox (301)<br />
SA (72) Access the System Administrator options<br />
GATE (4283) Select the gateway address option<br />
■ The voice prompts will announce the current gateway address.<br />
Enter the desired gateway address<br />
The entry format is x*x*x*x#, where:<br />
■ x represents each octet of the gateway address.<br />
For example, the entry for gateway address 208.141.100.40 is:<br />
208*141*100*40#<br />
You must shut down and then reset the <strong>Aspire</strong> <strong>Mail</strong> Plus/<strong>Aspire</strong><br />
<strong>Mail</strong> DMS PCB after changing the gateway address.<br />
# to exit to the System Administrator menu<br />
0 Plays Help message<br />
<br />
The IP address of the <strong>Aspire</strong> <strong>Mail</strong> and <strong>Aspire</strong> <strong>Mail</strong> Plus RS-232 (serial) port is fixed at 200.0.0.1. You cannot<br />
change this assignment. When connecting the PC running the Admin Program directly to the PCB’s<br />
serial port, you must use this fixed IP address.<br />
<strong>Aspire</strong> <strong>Mail</strong> Quick Setup Guide 17
Admin Installation<br />
Setting IP Addresses<br />
Setting the Domain Name Server (DMS Only)<br />
Compatibility Guidelines:<br />
■ This option is only available on <strong>Aspire</strong> <strong>Mail</strong> DMS.<br />
The Domain Name Server (DNS or name server) is the computer connected to the internet that converts a<br />
domain name (such as necunifiedsolutions.com) to a specific IP address for routing on the internet. If you<br />
want to use domain names to identify your SMTP and IMAP4 servers when setting up Desktop Messaging,<br />
you must make an entry for this option. The entry is the IP address of your name server. Check with your<br />
email administrator. Larger companies frequently have their own name server, while smaller enterprises may<br />
have their name server hosted by a third party.<br />
Setting the Domain Name Server<br />
Log onto System Administrator’s mailbox (301 by default)<br />
SA (72) Access the System Administrator options<br />
NS (67) Select the name server option<br />
■ The voice prompts will announce the current name server address.<br />
Enter the name server address<br />
The entry format is x*x*x*x#, where:<br />
■ x represents each octet of the name server address.<br />
For example, the entry for gateway address 208.141.100.40 is:<br />
208*141*100*40#<br />
You must shut down and then reset the <strong>Aspire</strong> <strong>Mail</strong> DMS PCB<br />
after changing the name server address.<br />
# to exit to the System Administrator menu<br />
0 Plays Help message<br />
18 <strong>Aspire</strong> <strong>Mail</strong> Quick Setup Guide
Admin Installation<br />
<br />
<br />
<strong>Aspire</strong> <strong>Mail</strong>, <strong>Aspire</strong> <strong>Mail</strong> FMS+, and <strong>Aspire</strong> <strong>Mail</strong> Plus<br />
To install the Admin Program:<br />
1. Insert your Admin CD. You should see the Administration Installation start-up screen:<br />
For Dial-Up (Direct Serial) Connections<br />
Print these instructions.<br />
OR<br />
Instead of printing, optionally turn to:<br />
■ on<br />
page 56.<br />
■ on page 60.<br />
■ If you don’t see this screen:<br />
- Click Start + Run + Browse, then click the ULTRAMAILADMIN icon.<br />
- In the File name box, type Ultra<strong>Mail</strong>AdminInstall.htm.<br />
- Click OK.<br />
2. Read and print this screen.<br />
■ There are additional links in this screen to supplemental instructions which are used for setting up<br />
dial-up (direct serial) connections. Print, read, and follow these instructions.<br />
OR<br />
■ Instead of printing, you can optionally turn to:<br />
- on page 56.<br />
- on page 60.<br />
<strong>Aspire</strong> <strong>Mail</strong> Quick Setup Guide 19
Admin Installation<br />
<br />
3. Scroll down in this window and double-click the Install link. You see:<br />
4. Double-click setup.exe. You see:<br />
5. Click Next>. You see:<br />
20 <strong>Aspire</strong> <strong>Mail</strong> Quick Setup Guide
Admin Installation<br />
<br />
6. Click Yes. You see:<br />
7. Enter SQL data as follows:<br />
- For Computer, enter the name you want to assign to your Admin PC.<br />
- For User Name, enter a name of your choosing (such as the site name).<br />
- For Password, enter ctl (lower case).<br />
8. Click Next>. You see:<br />
9. Click Next>. The install program will copy the required files to your PC hard disk. When you see:<br />
10. Click Create and follow the installation notes you printed in step 2 for your specific Windows version.<br />
<strong>Aspire</strong> <strong>Mail</strong> Quick Setup Guide 21
Admin Installation<br />
<br />
When you see:<br />
11. Click Finish to complete the installation.<br />
12. Restart your PC.<br />
22 <strong>Aspire</strong> <strong>Mail</strong> Quick Setup Guide
Admin Installation<br />
<br />
<br />
To start the Admin Program:<br />
1. Double-click the Ultra<strong>Mail</strong> shortcut on your desktop.<br />
OR<br />
Click Start + Programs + Ultra<strong>Mail</strong> + Ultra<strong>Mail</strong> Admin. In either case, you see:<br />
■ If your installation did not automatically create a shortcut on your PC desktop, optionally create one<br />
for the following:<br />
- C:/Program Files/vm/CTL Inc/Ultra<strong>Mail</strong> Administration/vsDosGui.exe<br />
2. Do the following:<br />
- For IP Address: Enter the voice mail PCB IP Address.<br />
■ For networked connections, this is the address you entered in Setting the IP Address for Network<br />
Communication on page 15.<br />
■ For direct connections, use 200.0.0.1<br />
- For Service Number: Enter 2000<br />
- For Password: Enter CTL (all caps)<br />
■ Optionally select Save password so you don’t have to re-enter your password each time.<br />
■ Select Use serial link if connected directly to a PC or external modem.<br />
3. Click Connect. You should see the Admin opening screen.<br />
<strong>Aspire</strong> <strong>Mail</strong> Quick Setup Guide 23
Admin Installation<br />
<br />
<br />
Use the following programmable options to customize the Admin interface. See the System Guide for more.<br />
■ Tools: [Options]: Field Validation Warning: Error Beep.<br />
Enable or disable an audible beep when you make an invalid program entry.<br />
■ Tools: [Options]: Field Validation Warning: Error Message Box.<br />
Enable or disable an error message box when you make an invalid program entry. You can enable either<br />
this option or Error Beep above.<br />
■ Tools: Autosave.<br />
Enable or disable Autosave. If enabled, Admin saves your program entries whenever you click OK to exit<br />
an option. If disabled, you must use File: Save Database to save your entries.<br />
■ Tools: Cancel Warning.<br />
Enable or disable the warning that occurs when you make an invalid program entry. This warning can be<br />
either an audible beep or a warning dialing box, depending on the setting of Field Validation Warning:<br />
Error Beep and Field Validation Warning: Error Message Box above.<br />
■ Tools: Auto Correct Invalid Field.<br />
Enable this option to have Admin automatically correct illegal program entries. Disable this option to<br />
have Admin enter the illegal program entry into the voice mail database without checking is validity.<br />
■ Tools: Info Text Color.<br />
Set the color of text in the Information box on each tab.<br />
■ Customize: System Options: [General2]: System Password: Password.<br />
Change the system password (normally CTL) (all caps) required for Admin to log onto voice mail.<br />
24 <strong>Aspire</strong> <strong>Mail</strong> Quick Setup Guide
Admin Installation<br />
<strong>Aspire</strong> <strong>Mail</strong> DMS Admin Installation<br />
<strong>Aspire</strong> <strong>Mail</strong> DMS Admin Installation<br />
Installing and Starting the Admin Program for <strong>Aspire</strong> <strong>Mail</strong> DMS<br />
The Admin program for <strong>Aspire</strong> <strong>Mail</strong> DMS uses Internet Explorer installed on your PC and the built-in web<br />
server on the <strong>Aspire</strong> <strong>Mail</strong> DMS PCB.<br />
To start the <strong>Aspire</strong> <strong>Mail</strong> DMS Admin Program:<br />
1. Set the <strong>Aspire</strong> <strong>Mail</strong> DMS IP and gateway addresses. Turn back to the following for more:<br />
■ Setting the IP Address for Network Communication on page 15.<br />
■ Setting the Gateway Address for Network Communication on page 17.<br />
2. In the Internet Explorer Address Line, type in the <strong>Aspire</strong> <strong>Mail</strong> DMS IP address and press Enter.<br />
3. You’ll see the Admin program opening screen:<br />
<strong>Aspire</strong> <strong>Mail</strong> Quick Setup Guide 25
Admin Installation<br />
<strong>Aspire</strong> <strong>Mail</strong> DMS Admin Installation<br />
Accessing the <strong>Aspire</strong> <strong>Mail</strong> DMS Options<br />
Administrator Log On<br />
If you log on as an administrator, you can access and customize all the options available through the <strong>Aspire</strong><br />
<strong>Mail</strong> DMS Admin program.<br />
To log on as an Administrator:<br />
1. Click . You see:<br />
2. Type ctl (lower case) in the Pass entry box.<br />
3. Click or press Enter. You log in and see the Admin Main Menu.<br />
4. Click a link in the Main Menu to access the screen(s) for that option.<br />
26 <strong>Aspire</strong> <strong>Mail</strong> Quick Setup Guide
Admin Installation<br />
<strong>Aspire</strong> <strong>Mail</strong> DMS Admin Installation<br />
User Log On<br />
Any user that knows the IP address of the <strong>Aspire</strong> <strong>Mail</strong> DMS can program a limited set of options for their<br />
Subscriber <strong>Mail</strong>box. The user must have a Security Code enabled for their mailbox.<br />
To log on as a user:<br />
1. Click . You see:<br />
2. In the Box entry box, type your Subscriber <strong>Mail</strong>box number.<br />
3. In the Pass entry box, type your mailbox Security Code.<br />
4. Click or press Enter. You see the Admin user opening screen.<br />
<strong>Aspire</strong> <strong>Mail</strong> Quick Setup Guide 27
Admin Installation<br />
<strong>Aspire</strong> <strong>Mail</strong> DMS Admin Installation<br />
5. Click the User <strong>Mail</strong>box Options link. You see the Admin user options screen.<br />
28 <strong>Aspire</strong> <strong>Mail</strong> Quick Setup Guide
Admin Installation<br />
<strong>Aspire</strong> <strong>Mail</strong> DMS Admin Installation<br />
Admin User Options<br />
You can customize the following options from the Admin user options screen:<br />
Admin User Options<br />
Menu Item <strong>Mail</strong>box Option Feature<br />
<strong>Mail</strong>box Options Tab<br />
Security Code OP + S Security Code<br />
Auto Help OP + AH Auto Help<br />
Auto Time Stamp OP + AT Auto Time Stamp<br />
Call Waiting OP + CW Call Waiting<br />
Auto Forward and Auto Forward <strong>Mail</strong>box OP + AF Auto Forward<br />
Message Notification OP + N Message Notification<br />
Greetings/Paging Message Tab<br />
Active Greeting G Greeting<br />
Auto Attendant DND G Auto Attendant Do Not Disburb<br />
Email Account Tab<br />
Consult with your email administrator for more on what you should enter for these options.<br />
Email Name N/A <strong>Unified</strong> Messaging / Email Integration<br />
Smtp Server<br />
Domain Name<br />
Smtp Port<br />
Smtp SSL<br />
Smtp Authentication<br />
Smtp Account<br />
Smtp Password<br />
Imap4 Server<br />
Imap4 Port<br />
Imap4 SSL<br />
Imap4 Account<br />
Imap4 Password<br />
Imap4 Authentication<br />
(DMS<br />
Only)<br />
See the <strong>Aspire</strong> <strong>Mail</strong> Quick Reference Guide (P/N 0893410) and <strong>Aspire</strong> <strong>Mail</strong> Feature Handbook (P/N<br />
0893412) for more on the options you can customize using the <strong>Mail</strong>box Options and Greetings/Paging<br />
Message tabs.<br />
<strong>Aspire</strong> <strong>Mail</strong> Quick Setup Guide 29
Admin Installation<br />
<strong>Aspire</strong> <strong>Mail</strong> DMS Admin Installation<br />
Log Out<br />
When you are done using the Admin program, you should log out of programming. This prevents unauthorized<br />
personnel from using your Admin program session to make unauthorized changes to the system.<br />
To log out of Admin programming:<br />
1. Click . You see one of the following screens (depending on how you initially logged in.<br />
User login screen<br />
Administrator’s login screen<br />
Navigating the <strong>Aspire</strong> <strong>Mail</strong> DMS Admin Program<br />
The following drawing shows you the basics of navigating the <strong>Aspire</strong> <strong>Mail</strong> DMS Admin Program.<br />
Click to go to the<br />
previous mailbox.<br />
Click to jump to<br />
different mailbox.<br />
Click to use the<br />
Copy Command.<br />
Click to select the type of mailbox<br />
you want to view.<br />
Click a tab to access the options<br />
under that tab.<br />
Before leaving the current tab, click<br />
to send your changes to the system.<br />
30 <strong>Aspire</strong> <strong>Mail</strong> Quick Setup Guide
Remote Programming Setup (Not for <strong>Aspire</strong> <strong>Mail</strong> DMS)<br />
Windows 2000/XP<br />
Remote Programming Setup (Not for <strong>Aspire</strong> <strong>Mail</strong> DMS)<br />
Windows 2000/XP<br />
Overview<br />
To use your Admin PC for Remote Programming:<br />
■ Set up a new dial-up connection for Admin remote programming.<br />
■ Dial into the remote system’s Automated Attendant and access it’s Modem <strong>Mail</strong>box.<br />
■ After connecting, start the Admin program.<br />
Important Remote Programming Notes (except for <strong>Aspire</strong> <strong>Mail</strong> DMS)<br />
■ If the Admin program is already connected to the voice mail (through either the serial port or LAN<br />
connection), Remote Programming is not available.<br />
■ If the voice mail is left in the Line Editor mode, Remote Programming is not available, See on page 54 for more.<br />
■ Remote Programming using the Line Editor is not available. You can only do Remote Programming<br />
using the Admin program.<br />
See Modem <strong>Mail</strong>box and Remote Programming in the System Guide for more.<br />
Making a New Dial-Up Connection with Windows 2000<br />
To make Remote Programming easier, you should set up a new Admin program dial-up connection.<br />
To set up a new dial-up connection:<br />
1. Make sure your modem is properly installed, connected, and initialized.<br />
2. Click Start + Settings + Network and Dial-up Connections + Make New Connection. You see:<br />
<strong>Aspire</strong> <strong>Mail</strong> Quick Setup Guide 31
Remote Programming Setup (Not for <strong>Aspire</strong> <strong>Mail</strong> DMS)<br />
Windows 2000/XP<br />
3. Click Next>. You see a screen similar to:<br />
4. Be sure Dial-up to private network is selected, then click Next>. You see:<br />
Your modem selections will<br />
be different than shown.<br />
5. Select the modem you want to use for your Admin dial-up connections and click Next>. You see:<br />
6. What you enter for this screen depends on how you intend to use Remote Programming.<br />
■ If maintaining several sites, you might want to just click Next> without making any entries. You<br />
would then enter a site telephone number for each maintenance session.<br />
■ If maintaining a single site, enter the dialing information in this screen and click Next>.<br />
32 <strong>Aspire</strong> <strong>Mail</strong> Quick Setup Guide
Remote Programming Setup (Not for <strong>Aspire</strong> <strong>Mail</strong> DMS)<br />
Windows 2000/XP<br />
■ In either case, you then see:<br />
7. Choose who should have access to this new connection:<br />
■ To all users of your computer to use the new connection, select For all users.<br />
■ To allow only you to use the connection, click Only for myself.<br />
■ In either case, click Next>. You see:<br />
8. Enter a name for this connection and click Finish.<br />
■ Windows can optionally add a shortcut for this connection to your desktop.<br />
9. You will see the log on screen for your new connection. Go to Calling the Remote System below.<br />
Making a New Dial-Up Connection with Windows XP<br />
To make Remote Programming easier, you should set up a new Admin dial-up connection.<br />
To set up a new dial-up connection:<br />
1. Make sure your modem is properly installed, connected, and initialized.<br />
2. Click Start + Connect To + Show all connections, then double-click New Connection Wizard.<br />
<strong>Aspire</strong> <strong>Mail</strong> Quick Setup Guide 33
Remote Programming Setup (Not for <strong>Aspire</strong> <strong>Mail</strong> DMS)<br />
Windows 2000/XP<br />
You see:<br />
3. Click Next>. You see:<br />
4. Select Connect to the network at my workplace and click Next>. You see:<br />
34 <strong>Aspire</strong> <strong>Mail</strong> Quick Setup Guide
Remote Programming Setup (Not for <strong>Aspire</strong> <strong>Mail</strong> DMS)<br />
Windows 2000/XP<br />
5. Select Dial-up connection and click Next>. You see:<br />
6. Enter a name for this connection (such as Remote Maintenance) and click Next>. You see:<br />
7. What you enter for this screen depends on how you intend to use Remote Programming.<br />
■ If maintaining several sites, you might want to just click Next> without making a phone number entry.<br />
You would then enter a site telephone number for each maintenance session.<br />
■ If maintaining a single site, enter the dialing information in this screen and click Next>.<br />
<strong>Aspire</strong> <strong>Mail</strong> Quick Setup Guide 35
Remote Programming Setup (Not for <strong>Aspire</strong> <strong>Mail</strong> DMS)<br />
Windows 2000/XP<br />
■ In either case, you then see:<br />
■ Click Finish. You see:<br />
8. Click Finish.<br />
■ Windows can optionally add a shortcut for this connection to your desktop.<br />
9. You will see the log on screen for your new connection. Go to Calling the Remote System below.<br />
36 <strong>Aspire</strong> <strong>Mail</strong> Quick Setup Guide
Remote Programming Setup (Not for <strong>Aspire</strong> <strong>Mail</strong> DMS)<br />
Windows 2000/XP<br />
Calling the Remote System in Ultra<strong>Mail</strong> 2000, <strong>Aspire</strong> <strong>Mail</strong>, and <strong>Aspire</strong> <strong>Mail</strong><br />
Plus<br />
To call the remote system:<br />
1. Start up your new Admin dial-up connection.<br />
■ Windows 2000:<br />
Click Start + Settings + Network and Dial-up Connections + Your new connection name.<br />
■ Windows XP:<br />
Click Start + Connect To + Show all connections + Double-click Your new connection name.<br />
■ Optionally, click the shortcut on your desktop for your new connection.<br />
■ You see:<br />
Windows 2000<br />
Windows XP<br />
2. Before making any entries on this screen, click Properties so you can check your networking settings.<br />
You see a screen similar to:<br />
Your modem selections will<br />
be different than shown.<br />
<strong>Aspire</strong> <strong>Mail</strong> Quick Setup Guide 37
Remote Programming Setup (Not for <strong>Aspire</strong> <strong>Mail</strong> DMS)<br />
Windows 2000/XP<br />
3. Click the Networking tab. You see a screen similar to:<br />
4. In the previous screen, be sure only Internet Protocol (TCP/IP) is selected, then click OK. (In Windows XP,<br />
QoS Packet Scheduler will also be selected if installed.) You go back to the log on screen:<br />
Windows 2000<br />
Windows XP<br />
5. Enter data for this screen.<br />
■ For User name, enter Ultra<strong>Mail</strong>2. (Make sure the U and M are capitalized.)<br />
■ For Password, enter ctl (lower case).<br />
■ Click in Save password if you want your connection to automatically remember the password.<br />
■ In <strong>Aspire</strong> <strong>Mail</strong> and <strong>Aspire</strong> <strong>Mail</strong> Plus, for Dial enter the following:<br />
- The telephone number of any trunk in the remote phone system that the voice mail Automated<br />
Attendant answers.<br />
- Enough pauses (commas) to provide time for the call to go through and the remote Automated<br />
Attendant to answer.<br />
- #862 (the logon code for the remote voice mail Modem <strong>Mail</strong>box).<br />
6. Click Dial.<br />
■ You will be prompted to optionally save the telephone number you entered.<br />
■ Your modem will call the remote system, negotiate a connection speed, and verify your user name<br />
and password.<br />
38 <strong>Aspire</strong> <strong>Mail</strong> Quick Setup Guide
Remote Programming Setup (Not for <strong>Aspire</strong> <strong>Mail</strong> DMS)<br />
Windows 2000/XP<br />
7. When the connection is set up, you see:<br />
Windows 2000<br />
Windows XP<br />
8. Click OK.<br />
To start the Admin program in Ultra<strong>Mail</strong>, Ultra<strong>Mail</strong> 2000, <strong>Aspire</strong> <strong>Mail</strong>, and <strong>Aspire</strong> <strong>Mail</strong> Plus:<br />
1. Within 2 minutes:<br />
■ Click Start + Programs + Ultra<strong>Mail</strong> + Ultra<strong>Mail</strong> Admin.<br />
■ Double click the Ultra<strong>Mail</strong> Admin icon on your desktop.<br />
■ In either case, you see:<br />
2. Enter data for this screen.<br />
- For IP Address, enter 200.0.0.2.<br />
- For Service Number, enter 2000.<br />
- For Password, enter CTL (all caps).<br />
- Do not select Use serial link.<br />
- Optionally select Save password to remember your password.<br />
<strong>Aspire</strong> <strong>Mail</strong> Quick Setup Guide 39
Remote Programming Setup (Not for <strong>Aspire</strong> <strong>Mail</strong> DMS)<br />
Windows 2000/XP<br />
3. Click Connect. You should see the Admin opening screen.<br />
To start the Admin program in <strong>Aspire</strong> <strong>Mail</strong> DMS<br />
1. Right click the remote connection icon in the System Tray to get the IP address of the connection (e.g.,<br />
200.0.0.9).<br />
2. Launch your browser, then drop down to the address listed in step 1 above.<br />
40 <strong>Aspire</strong> <strong>Mail</strong> Quick Setup Guide
Remote Programming Setup (Not for <strong>Aspire</strong> <strong>Mail</strong> DMS)<br />
Windows 2000/XP<br />
Setting Up an External Modem in Ultra<strong>Mail</strong> and Calling the Remote System<br />
Part 1: Set up a New Dial-Up Connection on the office PC that you will use to remotely<br />
program Ultra<strong>Mail</strong><br />
1. Make a copy of your existing Ultra<strong>Mail</strong> dial-up connection.<br />
■ Windows 2000<br />
- Click Start + Settings + Network and Dial-up Connections.<br />
- Right click the existing Ultra<strong>Mail</strong> connection + Click Create Copy.<br />
■ Windows XP<br />
- Click Start + Connect to.<br />
- Right click the existing Ultra<strong>Mail</strong> connection + Click Create Copy.<br />
2. For the new (copy) dial-up connection, enable the “Show Terminal Window” option.<br />
■ Windows 2000<br />
- Click Start + Settings + Network and Dial-up Connections.<br />
- Right click the Copy of Ultra<strong>Mail</strong> connection + Click Properties.<br />
- Click Configure + Select “Show terminal window” + OK + OK to exit.<br />
■ Windows XP<br />
- Click Start + Connect to.<br />
- Right click the Copy of Ultra<strong>Mail</strong> connection + Click Properties.<br />
- Click Configure + Select “Show terminal window” + OK + OK to exit.<br />
3. On the office PC, open a HyperTerminal session on the same serial (COM) port used for the direct Ultra-<br />
<strong>Mail</strong> connection at 38400, 8, N, 1.<br />
4. Plug a V.90 compliant modem into that serial port using a compatible straight-through cable.<br />
5. In HyperTerminal, type AT&F + Enter to initialize the office modem. (You should see OK on your office<br />
PC screen.)<br />
6. Close the HyperTerminal session but leave the modem connected and powered-up.<br />
7. In the Phone and Modem Options Control Panel, make sure your direct connections is set to 38400.<br />
■ Windows 2000<br />
- Click Start + Settings + Control Panel + Double-click Phone and Modem Options.<br />
- Click the Modems tab + Click Communications cable between two computers (COM1) + Right<br />
click + Click Properties.<br />
- Under the General Tab, be sure Maximum Port Speed is set to 38400.<br />
■ Windows XP<br />
- Click Start + Control Panel + Double-click Phone and Modem Options.<br />
- Click the Modems tab + Click Communications cable between two computers (COM1) + Right<br />
click + Click Properties.<br />
- Under the Modem Tab, be sure Maximum Port Speed is set to 38400.<br />
Part 2: Initialize and Set Up the Remote Modem and the Installation Site<br />
1. At a PC close to the site's Ultra<strong>Mail</strong> PC, open a HyperTerminal session on an available serial (COM) port<br />
at 38400, 8, N, 1.<br />
2. Plug the V.90 compliant modem to intend to use at the site into the serial using a compatible straightthrough<br />
cable.<br />
3. In HyperTerminal, type AT&F + Enter to initialize the modem. (You should see OK on your PC screen.)<br />
4. In HyperTerminal, type ATE0Q1S0=1&W + Enter to set up the modem.<br />
5. Be sure the Ultra<strong>Mail</strong> PCB is running and jumper J5 is on pins 1 and 2.<br />
6. Without turning off the modem, follow the instructions in the Ultra<strong>Mail</strong> Quick Setup Guide (P/N<br />
17710QSET**) and connect the modem to the Ultra<strong>Mail</strong> PCB serial port.<br />
<strong>Aspire</strong> <strong>Mail</strong> Quick Setup Guide 41
Remote Programming Setup (Not for <strong>Aspire</strong> <strong>Mail</strong> DMS)<br />
Windows 2000/XP<br />
Part 3: Call the Remote Modem and Start the Admin Program<br />
1. At the office PC, be sure the modem you initialized in Part 1 above is connected to the serial (COM) port<br />
set up for the Ultra<strong>Mail</strong> direct connection.<br />
2. At the office PC, start up the Copy of Ultra<strong>Mail</strong> connection.<br />
■ Windows 2000<br />
- Click Start + Settings + Network and Dial-up Connections + Copy of Ultra<strong>Mail</strong><br />
■ Windows XP<br />
- Click Start + Connect to + Copy of Ultra<strong>Mail</strong><br />
3. For User Name, enter Ultra<strong>Mail</strong>. For password, enter ctl (lower case). You can optionally save the password<br />
for future sessions.<br />
4. Click Connect.<br />
5. When you see the Pre-Dial Terminal Screen, click its title bar to activate it (i.e., bring it to the front).<br />
6. Type ATDT + The remote modem's telephone number + Enter.<br />
7. When the modems connect and you see the CON<strong>NEC</strong>T message, click Continue in the Pre-dial Terminal<br />
Screen.<br />
8. After Ultra<strong>Mail</strong> validates the connection, the communications link between the office PC and the remote<br />
Ultra<strong>Mail</strong> will be set up.<br />
9. Double-click the Ultra<strong>Mail</strong> icon on your desktop to start the Admin Program. (Be sure to select “Use<br />
serial link”, just as you would for a direct connection.)<br />
Part 4: Ending the Admin Programming session.<br />
1. Click File + Close to exit the Admin program.<br />
2. Disconnect the remote connection.<br />
■ Windows 2000<br />
- Click Start + Settings + Network and Dial-up Connections + Right click Copy of Ultra<strong>Mail</strong> +<br />
Click Disconnect.<br />
■ Windows XP<br />
- Click Start + Connect to + Right click Copy of Ultra<strong>Mail</strong> + Click Disconnect.<br />
42 <strong>Aspire</strong> <strong>Mail</strong> Quick Setup Guide
Upgrading the Hardware<br />
Installing the Port Expansion Software Upgrade<br />
Upgrading the Hardware<br />
Installing the Port Expansion Software Upgrade<br />
Overview<br />
This procedure allows you to expand the number of voice mail ports on your Ultra<strong>Mail</strong>, <strong>Aspire</strong> <strong>Mail</strong>, or<br />
<strong>Aspire</strong> <strong>Mail</strong> DMS PCB. The following upgrades are available.They are software upgrade procedures and do<br />
not require that you purchase and install any additional hardware.<br />
To install a Port Expansion Software Upgrade:<br />
■<br />
■<br />
■<br />
■<br />
■<br />
■<br />
Compatibility Guidelines (Ultra<strong>Mail</strong> and <strong>Aspire</strong> <strong>Mail</strong> only):<br />
■ Entering an Authorization Code that contains a succession of nines (e.g., 999) requires voice mail<br />
software version 11.07 or higher. In earlier versions, the voice mail would hang up in the middle of<br />
data entry if the code contained a succession of nines.<br />
Port Expansion Software Upgrades<br />
Upgrade Part Number<br />
Description<br />
0891044 Upgrades your 2 port <strong>Aspire</strong> <strong>Mail</strong> (P/N 0891032) PCB to<br />
4 voice mail ports.<br />
0891066 Upgrades your 4 port <strong>Aspire</strong> <strong>Mail</strong> FMS+ (P/N 0891052)<br />
to 8 voice mail ports.<br />
0891010 Upgrades your 4 port <strong>Aspire</strong> <strong>Mail</strong> DMS (P/N 0891030) to<br />
8 voice mail ports.<br />
Following normal procedures, purchase the Port Expansion Software Upgrade.<br />
Go to Part 1 below and get your voice mail Configuration Code.<br />
Contact <strong>NEC</strong> <strong>Unified</strong> <strong>Solutions</strong> Customer Service (800-365-1928 or elynch@necunified.com) with this<br />
code. They will provide you with your Port Expansion Authorization Code.<br />
- To email your Configuration Code, go to Emailing the Port Expansion Authorization Code to Customer<br />
Service on page 45.<br />
Go to Part 2 below and enter your Port Expansion Authorization Code. This will unlock the additional<br />
ports on your PCB.<br />
Shut down and then reset the PCB. Refer to Installation in <strong>Aspire</strong> on page 2 for more.<br />
Program the telephone system to include the 2 new ports in your voice mail setup. See Programming for<br />
more.<br />
Entering the Port Expansion Authorization Code<br />
Part 1: Obtaining the Port Expansion Authorization Code<br />
To obtain the Port Expansion Authorization Code:<br />
1. Log onto the System Administrator’s mailbox (301).<br />
2. Dial SA to access the System Administrator options.<br />
3. Dial UPGRADE (8747233) to select the Upgrade option and write down the announced voice mail Configuration<br />
Code. (In <strong>Aspire</strong> <strong>Mail</strong> DMS, you can also get this code from View: Misc Options: Upgrade ID.)<br />
■ This code is a sequence of up to 6 numbers. When you hear the code, each number is separated by 2<br />
short beeps.<br />
■ An example of a sample code is: 26624 10561 33716 9772 18881 54160<br />
4. Dial # twice, then X twice to exit your mailbox.<br />
5. Contact <strong>NEC</strong> <strong>Unified</strong> <strong>Solutions</strong> Customer Service (800-365-1928 or elynch@necunified.com) and<br />
obtain the Port Expansion Authorization Code for your voice mail system that corresponds to your Configuration<br />
Code.<br />
<strong>Aspire</strong> <strong>Mail</strong> Quick Setup Guide 43
Upgrading the Hardware<br />
Installing the Port Expansion Software Upgrade<br />
- To email your Configuration Code, go to Emailing the Port Expansion Authorization Code to Customer<br />
Service on page 45.<br />
Part 2: Entering the Port Expansion Authorization Code<br />
To enter the Port Expansion Authorization Code:<br />
1. Log onto the System Administrator’s mailbox (301).<br />
2. Dial SA to access the System Administrator options.<br />
3. Dial UPGRADE (8747233).<br />
4. After the voice prompt starts, enter your Port Expansion Authorization Code + #.<br />
■ When entering this code, be sure to dial # at the end of the sequence.<br />
■ An example of an entry is: 08471 26878 26522 62376 17436 36039 #<br />
5. Dial # twice, then X twice to exit your mailbox.<br />
6. Shut down and then reset the PCB. Refer to Installation in <strong>Aspire</strong> on page 2 for more.<br />
■ You can optionally use the Shutdown command from the System Administrator’s <strong>Mail</strong>box (SA + SD)<br />
to reset the voice mail PCB.<br />
7. Program the telephone system to include the new ports in your voice mail setup. See Programming for<br />
more.<br />
44 <strong>Aspire</strong> <strong>Mail</strong> Quick Setup Guide
Upgrading the Hardware<br />
Installing the Port Expansion Software Upgrade<br />
Emailing the Port Expansion Authorization Code to Customer Service<br />
<br />
1. From the Admin program, click Reports: Activity to run the Activity Log.<br />
2. Scroll to the bottom of the log. You should see a section of the report similar to the following which<br />
shows your Configuration Code.<br />
3. Click Save Report and save the Activity Log as a text (.txt) file to a convenient location on your hard drive.<br />
4. Open the saved report in your text editor (such as Notepad), copy the Configuration Code, and then paste<br />
the code into a new (blank) email.<br />
5. Send the email to <strong>NEC</strong> <strong>Unified</strong> <strong>Solutions</strong> Customer Service (elynch@necunified.com), along with whatever<br />
other information they may require to process your upgrade.<br />
6. Customer Service will send you a return email containing your Port Expansion Authorization Code.<br />
Emailing the Code in <strong>Aspire</strong> <strong>Mail</strong> DMS<br />
1. From the Main Menu, click View: Misc Options. You see:<br />
1. Copy the sequence of numbers in the Upgrade ID and paste the code into a new (blank) email.<br />
2. Send the email to <strong>NEC</strong> <strong>Unified</strong> <strong>Solutions</strong> Customer Service (elynch@necunified.com), along with whatever<br />
other information they may require to process your upgrade.<br />
3. Customer Service will send you a return email containing your Port Expansion Authorization Code.<br />
<strong>Aspire</strong> <strong>Mail</strong> Quick Setup Guide 45
Upgrading the Software<br />
<br />
Upgrading the Software<br />
<br />
<br />
Compatibility Guidelines:<br />
■ This option requires voice mail software version 11.05 or higher and Admin version 3.0.1.7 or higher.<br />
■ In voice mail software version 11.07 or higher, inadvertently selecting the Feature Files option will<br />
not cause the backup to fail.<br />
■<br />
■<br />
■<br />
Important Steps Prior to Upgrading<br />
Be sure the telephone system’s Date and Time is set correctly.<br />
Use a grounded wrist strap to prevent static damage to the <strong>Aspire</strong> <strong>Mail</strong> PCB.<br />
Enable System Options: [General 2] Miscellaneous: Auto Disk Maintenance Time to ensure your flash<br />
card always has enough room to perform a backup.<br />
<br />
You should always back up the site database, recorded names, messages, and greetings before upgrading the<br />
voice mail software. If you don’t, all recordings and programmed options will be lost after the upgrade.<br />
1. From the admin Program, click Tools: Backup. You see:<br />
2. Select the options as shown above.<br />
■ The backup files will be stored on the Admin PC’s C drive in the folder Ultra<strong>Mail</strong> Backup.<br />
■ Optionally click Browse and select another location for the backup files.<br />
Backup Tips for Systems with Full Flash Cards<br />
If your flash card is full (i.e., you cannot store any more voice messages), use the following procedure to back<br />
up your system.<br />
■ Backup your voice messages first. (Be sure to deselect System Database.) Please be patient; the backup<br />
may take a long time (several hours).<br />
■ After the voice message backup completes, delete some mailbox messages. (You will not lose these messages<br />
since you will restore them in step 4 of these instructions.)<br />
■ Backup your system database<br />
Enable System Options: [General 2] Miscellaneous: Auto Disk Maintenance Time to ensure your flash card<br />
always has enough room to perform a backup.<br />
46 <strong>Aspire</strong> <strong>Mail</strong> Quick Setup Guide
Upgrading the Software<br />
<br />
3. Click OK. Admin will back up the site database, recorded names, messages, and greetings to the directory<br />
you specify. The backup may take several minutes. When the backup completes, you see:<br />
4. Click Close to exit.<br />
<br />
1. Briefly press (i.e., tap) the <strong>Aspire</strong> <strong>Mail</strong> PCB Reset button.<br />
2. Wait about 20 seconds for the CF POW (compact flash power) LED to go out.<br />
3. When the CF POW LED goes out, remove the flash card.<br />
<br />
1. Plug in the new flash card (with the label facing up).<br />
2. Hold down the Reset button for about 6 seconds.<br />
3. When the top 3 LEDs on the <strong>Aspire</strong> <strong>Mail</strong> PCB light solid green, release the Reset button.<br />
■ The voice mail application will restart and the soft keys will function.<br />
■ Your <strong>Aspire</strong> <strong>Mail</strong> will now be running with the new software and default programming. Go to Part 4 to<br />
restore your system database, greetings, announcements, names, and messages.<br />
<br />
1. From the Admin Program, click Tools: Restore. You see:<br />
2. Select the options as shown above.<br />
■ If you backed-up to an alternate directory in Part 1, click Browse and select that directory.<br />
3. Click OK. Admin will restore the site database, recorded names, messages, and greetings from the directory<br />
you specify. The restore may take several minutes. When the restore completes, you see:<br />
4. Click Close to exit.<br />
<strong>Aspire</strong> <strong>Mail</strong> Quick Setup Guide 47
Upgrading the Software<br />
<br />
<br />
<br />
Important<br />
Before upgrading, make a note of the system’s IP address (SA + TCPIP) and Gateway<br />
address (SA + GATE). You should verify these addresses after upgrading the software.<br />
<br />
1. Connect your PC to the system’s RS232 port.<br />
■ See on page 10 for more.<br />
2. Launch HyperTerminal and set up a new HyperTerminal connection for the <strong>Aspire</strong> <strong>Mail</strong> Plus PCB.<br />
■ The communications parameters should be 38400 bps, 8 bits, no parity, and 1 stop bit (38400, 8, N, 1).<br />
<br />
1. Briefly press (i.e., tap) the <strong>Aspire</strong> <strong>Mail</strong> Plus Reset button.<br />
2. Wait about 20 seconds for the APP LED to light solid (red).<br />
3. Using proper static precautions, unplug the <strong>Aspire</strong> <strong>Mail</strong> Plus PCB.<br />
4. Insert the Update Flash Card into the <strong>Aspire</strong> <strong>Mail</strong> Plus PCB Flash Card socket.<br />
5. Plug in the <strong>Aspire</strong> <strong>Mail</strong> Plus PCB and watch your HyperTerminal screen. When you see a screen similar to<br />
the one below, immediately press Enter.<br />
■ You should then see: C:\><br />
6. Type D:\INSTALL and press Enter to start the Upgrade Utility.<br />
■ When the upgrade completes (after about 5 or 6 minutes), you should see C:\> again.<br />
<br />
1. Once the Update Utility completes, shut down and then reset the <strong>Aspire</strong> <strong>Mail</strong> Plus PCB by holding down<br />
the Reset button for about 6 seconds.<br />
2. Immediately remove the Update Flash Card and release the Reset button.<br />
■ The <strong>Aspire</strong> <strong>Mail</strong> Plus will restart with the new voice mail software installed.<br />
■ All recordings and site programming will be retained.<br />
<br />
1. When the <strong>Aspire</strong> <strong>Mail</strong> Plus restarts, log onto the System Administrator’s mailbox and verify the IP address<br />
(SA + TCPIP) and Gateway address (SA + GATE).<br />
48 <strong>Aspire</strong> <strong>Mail</strong> Quick Setup Guide
Upgrading the Software<br />
Upgrading <strong>Aspire</strong> <strong>Mail</strong> DMS<br />
Upgrading <strong>Aspire</strong> <strong>Mail</strong> DMS<br />
<strong>Aspire</strong> <strong>Mail</strong> DMS Software Upgrade Procedure<br />
Part 1: Upload the Software Update Files to <strong>Aspire</strong> <strong>Mail</strong> DMS<br />
To upload the <strong>Aspire</strong> <strong>Mail</strong> DMS software update files:<br />
1. Copy the software update file to a convenient location on your PC hard disk.<br />
■ Normally, you receive this file on CD from <strong>NEC</strong> <strong>Unified</strong> <strong>Solutions</strong> Customer Service or download it<br />
from the UBSD <strong>Support</strong> Site (http://ws1.necii.com).<br />
■ These are compressed files that must be decompressed in Part 2.<br />
2. From the Main Menu, click Tools: Updates. You see the Update Window.<br />
Sample Only<br />
3. Click Import. You see the Upload Service Window.<br />
Shows previously installed Admin (Gui),<br />
Voice <strong>Mail</strong> (VM), and DSP updates (if any).<br />
4. Click Browse and locate the update files you downloaded to your PC hard disk.<br />
5. Double-click the file you want to upload.<br />
■ Since there are two Browse buttons, you can upload two files at the same time.<br />
6. Click Upload Now to upload the software update file to <strong>Aspire</strong> <strong>Mail</strong> DMS. When the upload completes,<br />
you see an alert similar to the following:<br />
7. Click OK to dismiss the alert box and return to the Upload Service Window.<br />
■ The Upload Summary box shows a summary of the update files you uploaded to <strong>Aspire</strong> <strong>Mail</strong> DMS.<br />
8. Repeat steps 4 -6 until you have uploaded all the software update files.<br />
9. Click Close Window to close the Upload Service Window and return to the Update Window.<br />
<strong>Aspire</strong> <strong>Mail</strong> Quick Setup Guide 49
Upgrading the Software<br />
Upgrading <strong>Aspire</strong> <strong>Mail</strong> DMS<br />
Part 2: Decompressing the Uploaded Software Update Files<br />
1. Now that the software update files are uploaded to the <strong>Aspire</strong> <strong>Mail</strong> DMS, click the Update Window<br />
Refresh button. You see the Local Archives and Backups window.<br />
Click to decompress<br />
the file.<br />
Click to optionally<br />
erase the file.<br />
2. The files you uploaded will appear in the file list. If the update consists of multiple software update files,<br />
you must decompress the files in the following order:<br />
■ *.web<br />
■ *.ssl<br />
■ *.dsp<br />
■ *.vm<br />
■ *.vmsp<br />
3. To decompress a software update file, in the Action field click Update. You see an alert similar to the<br />
following:<br />
4. Click OK to dismiss the alert and install the selected file.<br />
5. When the install completes, you return to the Local Archives and Backups window.<br />
6. Scroll to the bottom of the window and click Refresh. The Local Archives and Backups window<br />
refreshes.<br />
7. When you are done decompressing the software update files, click Tools: Post Update check to compete<br />
the procedure.<br />
■ Your browser will refresh (click) every few seconds until the check completes.<br />
8. When the Post Update Check completes, shut down and then reset voice mail PCB.<br />
50 <strong>Aspire</strong> <strong>Mail</strong> Quick Setup Guide
Upgrading the Software<br />
Activating Features and Upgrading Licenses<br />
Activating Features and Upgrading Licenses<br />
Overview<br />
Compatibility Guidelines:<br />
■ In <strong>Aspire</strong> <strong>Mail</strong>, <strong>Aspire</strong> <strong>Mail</strong> FMS+, and <strong>Aspire</strong> <strong>Mail</strong> Plus, voice mail software version higher than<br />
11.08 is recommended for AMIS Networking. No additional hardware is required.<br />
■ AMIS networking is a standard feature in all versions of <strong>Aspire</strong> <strong>Mail</strong> DMS.<br />
This procedure allows you activate features (such as AMIS Networking in <strong>Aspire</strong> <strong>Mail</strong>, <strong>Aspire</strong> <strong>Mail</strong> FMS+<br />
and <strong>Aspire</strong> <strong>Mail</strong> Plus) and expand licenses (for Desktop Messaging and Call Control in <strong>Aspire</strong> <strong>Mail</strong> DMS).<br />
The following features and licenses are available. They are software upgrade procedures and do not require<br />
that you purchase and install any additional hardware.<br />
To activate a feature or expand a license:<br />
■<br />
■<br />
■<br />
■<br />
■<br />
■<br />
Enabling Features and Upgrading Licenses<br />
Upgrade Part Number<br />
Description<br />
0891059 AMIS Networking for <strong>Aspire</strong> <strong>Mail</strong>, <strong>Aspire</strong> <strong>Mail</strong> FMS+,<br />
and <strong>Aspire</strong> <strong>Mail</strong> Plus.<br />
0891020 10 Seat Desktop Messaging/Call Control License Expansion<br />
for <strong>Aspire</strong> <strong>Mail</strong> DMS.<br />
Following normal procedures, purchase the feature option or license expansion.<br />
Go to Part 1 below and get your voice mail Configuration Code.<br />
Call <strong>NEC</strong> <strong>Unified</strong> <strong>Solutions</strong> Customer Service (800-365-1928 or elynch@necunified.com) with this<br />
code. They will provide you with your Authorization Code.<br />
- To email your Configuration Code, go to Emailing the Feature Activation or License Expansion<br />
Code to Customer Service on page 53.<br />
Go to Part 2 below and enter your Authorization Code. This will unlock the feature or expand the license<br />
on your PCB.<br />
Shut down and then reset the PCB.<br />
Set up the feature options.<br />
Entering the Authorization Code<br />
Part 1: Obtaining the Authorization Code<br />
To obtain the feature activation or license Authorization Code:<br />
1. Log onto the System Administrator’s mailbox (301).<br />
2. Dial SA to access the System Administrator options.<br />
3. Dial UPGRADE (8747233) to select the Upgrade option and write down the announced voice mail Configuration<br />
Code. (In <strong>Aspire</strong> <strong>Mail</strong> DMS, you can also get this code from View: Misc Options: Upgrade ID.)<br />
■ This code is a sequence of up to 6 numbers. When you hear the code, each number is separated by 2<br />
short beeps.<br />
■ An example of a sample code is: 26624 10561 33716 9772 18881 54160<br />
4. Dial # twice, then X twice to exit your mailbox.<br />
5. Call <strong>NEC</strong> <strong>Unified</strong> <strong>Solutions</strong> Customer Service (800-365-1928 or elynch@necunified.com) and obtain<br />
the Authorization Code for your voice mail system that corresponds with your Configuration Code.<br />
- To email your Configuration Code, go to Emailing the Port Expansion Authorization Code to Customer<br />
Service on page 45.<br />
<strong>Aspire</strong> <strong>Mail</strong> Quick Setup Guide 51
Upgrading the Software<br />
Activating Features and Upgrading Licenses<br />
Part 2: Entering the Feature or Option Authorization Code<br />
To enter the Authorization Code:<br />
1. Log onto the System Administrator’s mailbox (301).<br />
2. Dial SA to access the System Administrator options.<br />
3. Dial UPGRADE (8747233).<br />
4. After the voice prompt starts, enter your Authorization Code + #.<br />
■ When entering this code, be sure to dial # at the end of the sequence.<br />
■ An example of an entry is: 08471 26878 26522 62376 17436 36039 #<br />
5. Dial # twice, then X twice to exit your mailbox.<br />
6. Shut down and then reset the PCB. Refer to Installation in <strong>Aspire</strong> on page 2 for more.<br />
■ You can optionally use the Shutdown command from the System Administrator’s <strong>Mail</strong>box (SA + SD)<br />
to reset the voice mail PCB.<br />
7. Set up the feature options.<br />
52 <strong>Aspire</strong> <strong>Mail</strong> Quick Setup Guide
Upgrading the Software<br />
Activating Features and Upgrading Licenses<br />
Emailing the Feature Activation or License Expansion Code to Customer Service<br />
<br />
1. From the Admin program, click Reports: Activity to run the Activity Log.<br />
2. Scroll to the bottom of the log. You should see a section of the report similar to the following which<br />
shows your Configuration Code.<br />
3. Click Save Report and save the Activity Log as a text (.txt) file to a convenient location on your hard drive.<br />
4. Open the saved report in your text editor (such as Notepad), copy the Configuration Code, and then paste<br />
the code into a new (blank) email.<br />
5. Send the email to <strong>NEC</strong> <strong>Unified</strong> <strong>Solutions</strong> Customer Service (elynch@necunified.com), along with whatever<br />
other information they may require to process your upgrade.<br />
6. Customer Service will send you a return email with your Feature Activation or License Expansion Code.<br />
Emailing the Code in <strong>Aspire</strong> <strong>Mail</strong> DMS<br />
1. From the Main Menu, click View: Misc Options. You see:<br />
2. Copy the sequence of numbers in the Upgrade ID and paste the code into a new (blank) email.<br />
3. Send the email to <strong>NEC</strong> <strong>Unified</strong> <strong>Solutions</strong> Customer Service (elynch@necunified.com), along with whatever<br />
other information they may require to process your upgrade.<br />
4. Customer Service will send you a return email with your Feature Activation or License Expansion Code.<br />
<strong>Aspire</strong> <strong>Mail</strong> Quick Setup Guide 53
<br />
<br />
<br />
<br />
The voice mail PCB’s RS232 port can optionally support the Line Editor, which is a text-only editor program<br />
that runs in a HyperTerminal session. This may be an option if you are an expert user of the Line Editor<br />
in NVM-2000 and VANGARD <strong>Mail</strong> products. You can set up the RS232 port to work with either the Line<br />
Editor or the Admin Program, but not both.<br />
To activate the Line Editor:<br />
1. Connect your PC to the system’s RS232 port.<br />
■ See on page 10 for more.<br />
2. Launch HyperTerminal and set up a new HyperTerminal connection for the <strong>Aspire</strong> <strong>Mail</strong> Plus PCB.<br />
■ The communications parameters should be 38400 bps, 8 bits, no parity, and 1 stop bit (38400, 8, N, 1).<br />
3. Momentarily press (tap) the Reset button to shut down the voice mail.<br />
4. Reset the <strong>Aspire</strong> <strong>Mail</strong> Plus PCB by holding down the Reset button for about 6 seconds.<br />
5. When the top 3 LEDs on the <strong>Aspire</strong> <strong>Mail</strong> Plus PCB light solid green, release the Reset button.<br />
6. When you see the following HyperTerminal screen, immediately press Enter.<br />
7. You then see:<br />
54 <strong>Aspire</strong> <strong>Mail</strong> Quick Setup Guide
<br />
8. Immediately type 1 + Enter to enable the Line Editor.<br />
9. The boot process will continue. When you see the following screen, you can use the Line Editor.<br />
To deactivate the Line Editor (and enable the Admin program):<br />
1. Repeat the procedure above, but type 2 + Enter in step 7.<br />
<strong>Aspire</strong> <strong>Mail</strong> Quick Setup Guide 55
<br />
<br />
<br />
<br />
1. When you see the following screen, click Create.<br />
2. For the screen below, select Connect directly to another computer and click Next.<br />
3. In the following screen, select the serial port you intend to use and click Next.<br />
56 <strong>Aspire</strong> <strong>Mail</strong> Quick Setup Guide
4. For the following screen, click Next.<br />
<br />
<br />
5. In the screen that follows, enter Ultra<strong>Mail</strong> and click Finish.<br />
6. Select Configure below.<br />
<strong>Aspire</strong> <strong>Mail</strong> Quick Setup Guide 57
<br />
7. Make the settings as shown below and click OK.<br />
8. Make the settings as shown below on the Security tab.<br />
58 <strong>Aspire</strong> <strong>Mail</strong> Quick Setup Guide
<br />
9. Make the settings as shown below on the Networking tab. Make sure that only Internet Protocol (TCP/<br />
IP) is selected. Click OK.<br />
10.When you see the following, click the Close button.<br />
<strong>Aspire</strong> <strong>Mail</strong> Quick Setup Guide 59
<br />
<br />
<br />
1. When you see the screen below, click Create.<br />
2. Enter your area code in the following screen and click OK.<br />
3. When you see the screen below, click OK.<br />
60 <strong>Aspire</strong> <strong>Mail</strong> Quick Setup Guide
<br />
4. Select Connect directly to another computer in the following screen, then click Next.<br />
5. In the following screen, select the Communications Port you intend to use and click Next.<br />
6. Type in Ultra<strong>Mail</strong> for the connection name below, then click Finish.<br />
<strong>Aspire</strong> <strong>Mail</strong> Quick Setup Guide 61
<br />
7. Make sure the device is the communication port you selected and click Configure below.<br />
8. For the following configuration options, select 38400 for the speed, check the hardware features selections,<br />
and click OK.<br />
62 <strong>Aspire</strong> <strong>Mail</strong> Quick Setup Guide
<br />
9. In the Security tab below, select Advanced and keep the default setting.<br />
10. In the Networking tab, only select Internet Protocol (TCP/IP) and QoS Packet Scheduler, then click OK.<br />
11. When you see the following screen, click Close to close the dialog.<br />
<strong>Aspire</strong> <strong>Mail</strong> Quick Setup Guide 63
<br />
64 <strong>Aspire</strong> <strong>Mail</strong> Quick Setup Guide
<strong>NEC</strong> <strong>Unified</strong> <strong>Solutions</strong>, Inc.<br />
4 Forest Parkway, Shelton, CT 06484<br />
Tel: 800-365-1928 Fax: 203-926-5458<br />
www.necunifiedsolutions.com<br />
Other Important Telephone Numbers<br />
Sales: . . . . . . . . . . . . . . . . . . . . . . . . . . . . . . . . . . . .203-926-5450<br />
Customer Service: . . . . . . . . . . . . . . . . . . . . . . . . . . .203-926-5444<br />
Customer Service FAX: . . . . . . . . . . . . . . . . . . . . . . .203-926-5454<br />
Technical Service: . . . . . . . . . . . . . . . . . . . . . . . . . . .203-925-8801<br />
Discontinued Product Service: . . . . . . . . . . . . . . . . . .900-990-2541<br />
Technical Training: . . . . . . . . . . . . . . . . . . . . . . . . . . .203-926-5430<br />
Emergency Technical Service (After Hours) . . . . . . . .203-929-7920<br />
(Excludes discontinued products)
*0893110*<br />
0893110<br />
<strong>NEC</strong> <strong>Unified</strong> <strong>Solutions</strong>, Inc.<br />
4 Forest Parkway, Shelton, CT 06484<br />
TEL: 203-926-5400 FAX: 203-929-0535<br />
www.necunifiedsolutions.com<br />
April 3, 2006<br />
Printed in U.S.A.