IntraMail System Guide - Support - NEC Unified Solutions
IntraMail System Guide - Support - NEC Unified Solutions
IntraMail System Guide - Support - NEC Unified Solutions

You also want an ePaper? Increase the reach of your titles
YUMPU automatically turns print PDFs into web optimized ePapers that Google loves.
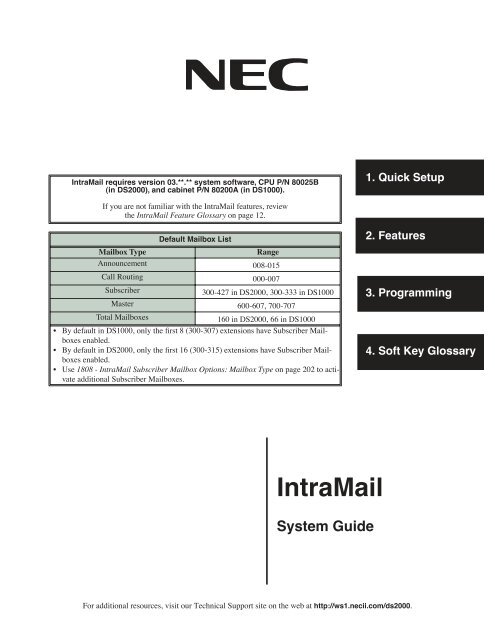
<strong>IntraMail</strong> requires version 03.**.** system software, CPU P/N 80025B(in DS2000), and cabinet P/N 80200A (in DS1000).1. Quick SetupIf you are not familiar with the <strong>IntraMail</strong> features, reviewthe <strong>IntraMail</strong> Feature Glossary on page 12.Default Mailbox ListMailbox TypeRangeAnnouncement 008-015 1Call Routing 000-007 1Subscriber300-427 in DS2000, 300-333 in DS1000Master 600-607, 700-707 1Total Mailboxes 160 in DS2000, 66 in DS1000 1• By default in DS1000, only the first 8 (300-307) extensions have Subscriber Mailboxesenabled.• By default in DS2000, only the first 16 (300-315) extensions have Subscriber Mailboxesenabled.• Use 1808 - <strong>IntraMail</strong> Subscriber Mailbox Options: Mailbox Type on page 202 to activateadditional Subscriber Mailboxes.2. Features3. Programming4. Soft Key Glossary<strong>IntraMail</strong><strong>System</strong> <strong>Guide</strong>For additional resources, visit our Technical <strong>Support</strong> site on the web at http://ws1.necii.com/ds2000.
This manual has been developed by <strong>NEC</strong> <strong>Unified</strong> <strong>Solutions</strong>, Inc. It is intended for the use of its customers and servicepersonnel, and should be read in its entirety before attempting to install or program the system. Any comments or suggestionsfor improving this manual would be appreciated. Forward your remarks to:<strong>NEC</strong> <strong>Unified</strong> <strong>Solutions</strong>, Inc.,4 Forest ParkwayShelton, CT 06484www.necunifiedsolutions.comNothing contained in this manual shall be deemed to be, and this manual does not constitute, a warranty of, or representationwith respect to, any of the equipment covered. This manual is subject to change without notice and <strong>NEC</strong> <strong>Unified</strong> <strong>Solutions</strong>,Inc. has no obligation to provide any updates or corrections to this manual. Further, <strong>NEC</strong> <strong>Unified</strong> <strong>Solutions</strong>, Inc. also reservesthe right, without prior notice, to make changes in equipment design or components as it deems appropriate. Norepresentation is made that this manual is complete or accurate in all respects and <strong>NEC</strong> <strong>Unified</strong> <strong>Solutions</strong>, Inc. shall not beliable for any errors or omissions. In no event shall <strong>NEC</strong> <strong>Unified</strong> <strong>Solutions</strong>, Inc. be liable for any incidental or consequentialdamages in connection with the use of this manual. This document contains proprietary information that is protected bycopyright. All rights are reserved. No part of this document may be photocopied or reproduced without prior written consentof <strong>NEC</strong> <strong>Unified</strong> <strong>Solutions</strong>, Inc.©2004 by <strong>NEC</strong> <strong>Unified</strong> <strong>Solutions</strong>, Inc. All Rights Reserved.Printed in U.S.A.<strong>IntraMail</strong> Part Numbers and CapacitiesP/N 80044P/N 80088<strong>IntraMail</strong> 4 Port/4 Hour<strong>IntraMail</strong> 8 Port/8 HourMailboxes Announcement: 8Call Routing: 8Subscriber (DS1000): 34Subscriber (DS2000): 128Master: 16Total (DS1000): 66Total (DS2000): 160Ports: 4 or 8Storage Hours: 4 or 8
Table of ContentsCentrex Transfer . . . . . . . . . . . . . . . . . . . . . . . . . . . . . . . . . . . . . . . . . . . . . . . . . . . . . . . . . . . . . . 59Conversation Record . . . . . . . . . . . . . . . . . . . . . . . . . . . . . . . . . . . . . . . . . . . . . . . . . . . . . . . . . . . 61Conversation Record Key for a Co-worker’s Mailbox . . . . . . . . . . . . . . . . . . . . . . . . . . 61Dial Action Table. . . . . . . . . . . . . . . . . . . . . . . . . . . . . . . . . . . . . . . . . . . . . . . . . . . . . . . . . . . . . . 64Dial Action Table Options. . . . . . . . . . . . . . . . . . . . . . . . . . . . . . . . . . . . . . . . . . . . . . . . 65Directory Dialing . . . . . . . . . . . . . . . . . . . . . . . . . . . . . . . . . . . . . . . . . . . . . . . . . . . . . . . . . . . . . . 68Using a Routing Mailbox for Directory Dialing . . . . . . . . . . . . . . . . . . . . . . . . . . . . . . . 68Using a Master Mailbox for Directory Dialing . . . . . . . . . . . . . . . . . . . . . . . . . . . . . . . . 71Dialing Options Available while Entering a Name . . . . . . . . . . . . . . . . . . . . . . . . . . . . . 74Dialing Options Available when more than one Employee has the Entered Name . . . . 75Directory Dialing Mailbox. . . . . . . . . . . . . . . . . . . . . . . . . . . . . . . . . . . . . . . . . . . . . . . . . . . . . . . 76Erasing All Messages. . . . . . . . . . . . . . . . . . . . . . . . . . . . . . . . . . . . . . . . . . . . . . . . . . . . . . . . . . . 77Exiting a Mailbox. . . . . . . . . . . . . . . . . . . . . . . . . . . . . . . . . . . . . . . . . . . . . . . . . . . . . . . . . . . . . . 78Extension Hunting to Voice Mail . . . . . . . . . . . . . . . . . . . . . . . . . . . . . . . . . . . . . . . . . . . . . . . . . 79Extension Hunting to Voice Mail Routing Charts. . . . . . . . . . . . . . . . . . . . . . . . . . . . . . 79Ring No Answer Trunk (Type 1) Hunting to Voice Mail . . . . . . . . . . . . . . . . . . . . . . . . 81Ring No Answer / Busy Trunk (Type 2) Hunting to Voice Mail . . . . . . . . . . . . . . . . . . 82Ring No Answer / Busy All (Type 3) Hunting to Voice Mail. . . . . . . . . . . . . . . . . . . . . 82Busy Trunk (Type 4) Hunting to Voice Mail . . . . . . . . . . . . . . . . . . . . . . . . . . . . . . . . . 83External Transfer . . . . . . . . . . . . . . . . . . . . . . . . . . . . . . . . . . . . . . . . . . . . . . . . . . . . . . . . . . . . . . 84Fax Detection . . . . . . . . . . . . . . . . . . . . . . . . . . . . . . . . . . . . . . . . . . . . . . . . . . . . . . . . . . . . . . . . . 86Flexible Answering Schedules. . . . . . . . . . . . . . . . . . . . . . . . . . . . . . . . . . . . . . . . . . . . . . . . . . . . 87Flexible Call Routing . . . . . . . . . . . . . . . . . . . . . . . . . . . . . . . . . . . . . . . . . . . . . . . . . . . . . . . . . . . 88Flexible Mailbox Numbering Plan. . . . . . . . . . . . . . . . . . . . . . . . . . . . . . . . . . . . . . . . . . . . . . . . . 89Flexible Numbering Plan Example . . . . . . . . . . . . . . . . . . . . . . . . . . . . . . . . . . . . . . . . . 89Forced Unscreened Transfer . . . . . . . . . . . . . . . . . . . . . . . . . . . . . . . . . . . . . . . . . . . . . . . . . . . . . 90Getting Recorded Help. . . . . . . . . . . . . . . . . . . . . . . . . . . . . . . . . . . . . . . . . . . . . . . . . . . . . . . . . . 91Go To A Mailbox. . . . . . . . . . . . . . . . . . . . . . . . . . . . . . . . . . . . . . . . . . . . . . . . . . . . . . . . . . . . . . 92Greeting . . . . . . . . . . . . . . . . . . . . . . . . . . . . . . . . . . . . . . . . . . . . . . . . . . . . . . . . . . . . . . . . . . . . . 94Remote Greetings . . . . . . . . . . . . . . . . . . . . . . . . . . . . . . . . . . . . . . . . . . . . . . . . . . . . . . 94Multiple Greetings. . . . . . . . . . . . . . . . . . . . . . . . . . . . . . . . . . . . . . . . . . . . . . . . . . . . . . 94Group Mailbox. . . . . . . . . . . . . . . . . . . . . . . . . . . . . . . . . . . . . . . . . . . . . . . . . . . . . . . . . . . . . . . . 98Understanding Group Mailbox Types . . . . . . . . . . . . . . . . . . . . . . . . . . . . . . . . . . . . . . . 98Guest Mailbox . . . . . . . . . . . . . . . . . . . . . . . . . . . . . . . . . . . . . . . . . . . . . . . . . . . . . . . . . . . . . . . 101Enhanced Guest Mailbox. . . . . . . . . . . . . . . . . . . . . . . . . . . . . . . . . . . . . . . . . . . . . . . . 101Hang Up . . . . . . . . . . . . . . . . . . . . . . . . . . . . . . . . . . . . . . . . . . . . . . . . . . . . . . . . . . . . . . . . . . . . 104Instruction Menu . . . . . . . . . . . . . . . . . . . . . . . . . . . . . . . . . . . . . . . . . . . . . . . . . . . . . . . . . . . . . 105Leaving a Message. . . . . . . . . . . . . . . . . . . . . . . . . . . . . . . . . . . . . . . . . . . . . . . . . . . . . . . . . . . . 107Additional Options While Leaving a Message . . . . . . . . . . . . . . . . . . . . . . . . . . . . . . . 107Listening to Messages . . . . . . . . . . . . . . . . . . . . . . . . . . . . . . . . . . . . . . . . . . . . . . . . . . . . . . . . . 109Telephone Display while Listening to a Message . . . . . . . . . . . . . . . . . . . . . . . . . . . . . 110Log Onto Voice Mail . . . . . . . . . . . . . . . . . . . . . . . . . . . . . . . . . . . . . . . . . . . . . . . . . . . . . . . . . . 112Local (On-site) Logon . . . . . . . . . . . . . . . . . . . . . . . . . . . . . . . . . . . . . . . . . . . . . . . . . . 112Remote Log On . . . . . . . . . . . . . . . . . . . . . . . . . . . . . . . . . . . . . . . . . . . . . . . . . . . . . . . 112Mailbox Name . . . . . . . . . . . . . . . . . . . . . . . . . . . . . . . . . . . . . . . . . . . . . . . . . . . . . . . . . . . . . . . 114Mailbox Options Menu . . . . . . . . . . . . . . . . . . . . . . . . . . . . . . . . . . . . . . . . . . . . . . . . . . . . . . . . 116Mailbox Security Code Delete. . . . . . . . . . . . . . . . . . . . . . . . . . . . . . . . . . . . . . . . . . . . . . . . . . . 117Main Menu. . . . . . . . . . . . . . . . . . . . . . . . . . . . . . . . . . . . . . . . . . . . . . . . . . . . . . . . . . . . . . . . . . 118Make Call. . . . . . . . . . . . . . . . . . . . . . . . . . . . . . . . . . . . . . . . . . . . . . . . . . . . . . . . . . . . . . . . . . . 120Master Mailbox . . . . . . . . . . . . . . . . . . . . . . . . . . . . . . . . . . . . . . . . . . . . . . . . . . . . . . . . . . . . . . 122Using Master Mailboxes for UCD Hunting Group Overflow. . . . . . . . . . . . . . . . . . . . 123Using Master Mailboxes for Group Ring Automated Attendant Recall . . . . . . . . . . . . 124ii ◆ Table of Contents <strong>IntraMail</strong> <strong>System</strong> <strong>Guide</strong>
Table of ContentsUsing Master Mailboxes as Additional Call Routing Mailboxes . . . . . . . . . . . . . . . . . 124Using Master Mailboxes as Additional Announcement Mailboxes . . . . . . . . . . . . . . . 125Using Master Mailboxes as Guest Mailboxes . . . . . . . . . . . . . . . . . . . . . . . . . . . . . . . . 125Using Master Mailboxes for Directory Dialing. . . . . . . . . . . . . . . . . . . . . . . . . . . . . . . 125Message Count Display . . . . . . . . . . . . . . . . . . . . . . . . . . . . . . . . . . . . . . . . . . . . . . . . . . . . . . . . 126Message Delete . . . . . . . . . . . . . . . . . . . . . . . . . . . . . . . . . . . . . . . . . . . . . . . . . . . . . . . . . . . . . . 128Message Forward . . . . . . . . . . . . . . . . . . . . . . . . . . . . . . . . . . . . . . . . . . . . . . . . . . . . . . . . . . . . . 129Message Length . . . . . . . . . . . . . . . . . . . . . . . . . . . . . . . . . . . . . . . . . . . . . . . . . . . . . . . . . . . . . . 131Message Listen Mode . . . . . . . . . . . . . . . . . . . . . . . . . . . . . . . . . . . . . . . . . . . . . . . . . . . . . . . . . 132Message Notification . . . . . . . . . . . . . . . . . . . . . . . . . . . . . . . . . . . . . . . . . . . . . . . . . . . . . . . . . . 133How Message Notification Works to Normal Telephone Numbers . . . . . . . . . . . . . . . 133How Message Notification Works to Digital Pager Numbers. . . . . . . . . . . . . . . . . . . . 133Programming that Applies to All Types of Message Notification . . . . . . . . . . . . . . . . 134Unique Programming for Non-pager Message Notification . . . . . . . . . . . . . . . . . . . . . 135Unique Programming for Digital Pager Message Notification . . . . . . . . . . . . . . . . . . . 136Message On Hold. . . . . . . . . . . . . . . . . . . . . . . . . . . . . . . . . . . . . . . . . . . . . . . . . . . . . . . . . . . . . 139Message Playback Direction . . . . . . . . . . . . . . . . . . . . . . . . . . . . . . . . . . . . . . . . . . . . . . . . . . . . 141Message Record . . . . . . . . . . . . . . . . . . . . . . . . . . . . . . . . . . . . . . . . . . . . . . . . . . . . . . . . . . . . . . 142Message Reply . . . . . . . . . . . . . . . . . . . . . . . . . . . . . . . . . . . . . . . . . . . . . . . . . . . . . . . . . . . . . . . 143Message Retention . . . . . . . . . . . . . . . . . . . . . . . . . . . . . . . . . . . . . . . . . . . . . . . . . . . . . . . . . . . . 144Message Retention Guard Time . . . . . . . . . . . . . . . . . . . . . . . . . . . . . . . . . . . . . . . . . . 144Message Storage Limit. . . . . . . . . . . . . . . . . . . . . . . . . . . . . . . . . . . . . . . . . . . . . . . . . . . . . . . . . 145Message Waiting Lamp . . . . . . . . . . . . . . . . . . . . . . . . . . . . . . . . . . . . . . . . . . . . . . . . . . . . . . . . 146Multiple Company Greetings. . . . . . . . . . . . . . . . . . . . . . . . . . . . . . . . . . . . . . . . . . . . . . . . . . . . 147Next Call Routing Mailbox . . . . . . . . . . . . . . . . . . . . . . . . . . . . . . . . . . . . . . . . . . . . . . . . . . . . . 148Subscriber Mailbox Options . . . . . . . . . . . . . . . . . . . . . . . . . . . . . . . . . . . . . . . . . . . . . 148Announcement Mailbox Options. . . . . . . . . . . . . . . . . . . . . . . . . . . . . . . . . . . . . . . . . . 150Programming Subscriber Mailboxes . . . . . . . . . . . . . . . . . . . . . . . . . . . . . . . . . . . . . . . 152Programming Announcement Mailboxes . . . . . . . . . . . . . . . . . . . . . . . . . . . . . . . . . . . 152Programming Voice Mail. . . . . . . . . . . . . . . . . . . . . . . . . . . . . . . . . . . . . . . . . . . . . . . . . . . . . . . 154Quick Message. . . . . . . . . . . . . . . . . . . . . . . . . . . . . . . . . . . . . . . . . . . . . . . . . . . . . . . . . . . . . . . 156Record and Send a Message. . . . . . . . . . . . . . . . . . . . . . . . . . . . . . . . . . . . . . . . . . . . . . . . . . . . . 158Recording Options. . . . . . . . . . . . . . . . . . . . . . . . . . . . . . . . . . . . . . . . . . . . . . . . . . . . . 158Remote Programming . . . . . . . . . . . . . . . . . . . . . . . . . . . . . . . . . . . . . . . . . . . . . . . . . . . . . . . . . 160Screened Transfer. . . . . . . . . . . . . . . . . . . . . . . . . . . . . . . . . . . . . . . . . . . . . . . . . . . . . . . . . . . . . 161Screened vs. Unscreened Transfer. . . . . . . . . . . . . . . . . . . . . . . . . . . . . . . . . . . . . . . . . 161Screened Transfer and Inactive Mailboxes . . . . . . . . . . . . . . . . . . . . . . . . . . . . . . . . . . 161Security Code. . . . . . . . . . . . . . . . . . . . . . . . . . . . . . . . . . . . . . . . . . . . . . . . . . . . . . . . . . . . . . . . 164Single Digit Dialing . . . . . . . . . . . . . . . . . . . . . . . . . . . . . . . . . . . . . . . . . . . . . . . . . . . . . . . . . . . 166Subscriber Mailbox . . . . . . . . . . . . . . . . . . . . . . . . . . . . . . . . . . . . . . . . . . . . . . . . . . . . . . . . . . . 168<strong>System</strong> Administrator . . . . . . . . . . . . . . . . . . . . . . . . . . . . . . . . . . . . . . . . . . . . . . . . . . . . . . . . . 171<strong>System</strong> Administrator Mailbox . . . . . . . . . . . . . . . . . . . . . . . . . . . . . . . . . . . . . . . . . . . . . . . . . . 173<strong>System</strong> Re-initialization. . . . . . . . . . . . . . . . . . . . . . . . . . . . . . . . . . . . . . . . . . . . . . . . . . . . . . . . 174Time and Date . . . . . . . . . . . . . . . . . . . . . . . . . . . . . . . . . . . . . . . . . . . . . . . . . . . . . . . . . . . . . . . 175Time and Date Stamp. . . . . . . . . . . . . . . . . . . . . . . . . . . . . . . . . . . . . . . . . . . . . . . . . . . . . . . . . . 176Time and Date Stamp with Caller ID . . . . . . . . . . . . . . . . . . . . . . . . . . . . . . . . . . . . . . 176Transfer to a Mailbox. . . . . . . . . . . . . . . . . . . . . . . . . . . . . . . . . . . . . . . . . . . . . . . . . . . . . . . . . . 177Enhanced Mailbox Transfer . . . . . . . . . . . . . . . . . . . . . . . . . . . . . . . . . . . . . . . . . . . . . 177Transfer to a UCD Group. . . . . . . . . . . . . . . . . . . . . . . . . . . . . . . . . . . . . . . . . . . . . . . . . . . . . . . 178Undefined Routing. . . . . . . . . . . . . . . . . . . . . . . . . . . . . . . . . . . . . . . . . . . . . . . . . . . . . . . . . . . . 179Unscreened Transfer . . . . . . . . . . . . . . . . . . . . . . . . . . . . . . . . . . . . . . . . . . . . . . . . . . . . . . . . . . 180Screened vs. Unscreened Transfer. . . . . . . . . . . . . . . . . . . . . . . . . . . . . . . . . . . . . . . . . 180<strong>IntraMail</strong> <strong>System</strong> <strong>Guide</strong> Table of Contents ◆ iii
Table of ContentsUnscreened Transfer and Inactive Mailboxes . . . . . . . . . . . . . . . . . . . . . . . . . . . . . . . . 180Voice Mail Overflow . . . . . . . . . . . . . . . . . . . . . . . . . . . . . . . . . . . . . . . . . . . . . . . . . . . . . . . . . . 183Programming Group Ring DIL Overflow . . . . . . . . . . . . . . . . . . . . . . . . . . . . . . . . . . . 183Programming UCD Hunting Group Overflow . . . . . . . . . . . . . . . . . . . . . . . . . . . . . . . 184Programming DIL Overflow . . . . . . . . . . . . . . . . . . . . . . . . . . . . . . . . . . . . . . . . . . . . . 184Programming Key Ring Overflow. . . . . . . . . . . . . . . . . . . . . . . . . . . . . . . . . . . . . . . . . 185Voice Prompting Messages . . . . . . . . . . . . . . . . . . . . . . . . . . . . . . . . . . . . . . . . . . . . . . . . . . . . . 186Volume Control . . . . . . . . . . . . . . . . . . . . . . . . . . . . . . . . . . . . . . . . . . . . . . . . . . . . . . . . . . . . . . 187Chapter 3: Programming. . . . . . . . . . . . . . . . . . . . . . . . . . . . . . . . . . . . . . . . .189Introduction to Programming . . . . . . . . . . . . . . . . . . . . . . . . . . . . . . . . . . . . . . . . . . 189Before You Start Programming. . . . . . . . . . . . . . . . . . . . . . . . . . . . . . . . . . . . . . . . . . . .189How To Use This Chapter . . . . . . . . . . . . . . . . . . . . . . . . . . . . . . . . . . . . . . . . . . . .1890101 - Class of Service . . . . . . . . . . . . . . . . . . . . . . . . . . . . . . . . . . . . . . . . . . . . . . . . 1900101 - Class of Service Options . . . . . . . . . . . . . . . . . . . . . . . . . . . . . . . . . . . . . . . . . . .190Options . . . . . . . . . . . . . . . . . . . . . . . . . . . . . . . . . . . . . . . . . . . . . . . . . . . . . . . . . .190Conversation Record . . . . . . . . . . . . . . . . . . . . . . . . . . . . . . . . . . . . . . . . . . . . 190Unsupervised Conference . . . . . . . . . . . . . . . . . . . . . . . . . . . . . . . . . . . . . . . . 190Call Screening . . . . . . . . . . . . . . . . . . . . . . . . . . . . . . . . . . . . . . . . . . . . . . . . . 1900101 Program Entry . . . . . . . . . . . . . . . . . . . . . . . . . . . . . . . . . . . . . . . . . . . . . . . .1910200 - Tenant Options. . . . . . . . . . . . . . . . . . . . . . . . . . . . . . . . . . . . . . . . . . . . . . . . . 1930201 - Tenant Option Programming . . . . . . . . . . . . . . . . . . . . . . . . . . . . . . . . . . . . . . . .193Options . . . . . . . . . . . . . . . . . . . . . . . . . . . . . . . . . . . . . . . . . . . . . . . . . . . . . . . . . .193Name Format. . . . . . . . . . . . . . . . . . . . . . . . . . . . . . . . . . . . . . . . . . . . . . . . . . 1930201 Program Entry . . . . . . . . . . . . . . . . . . . . . . . . . . . . . . . . . . . . . . . . . . . . . . . .1941000 - Trunk Programming. . . . . . . . . . . . . . . . . . . . . . . . . . . . . . . . . . . . . . . . . . . . . 1951003 - Trunk Options. . . . . . . . . . . . . . . . . . . . . . . . . . . . . . . . . . . . . . . . . . . . . . . . . . . .195Options . . . . . . . . . . . . . . . . . . . . . . . . . . . . . . . . . . . . . . . . . . . . . . . . . . . . . . . . . .195Direct Termination (Day) . . . . . . . . . . . . . . . . . . . . . . . . . . . . . . . . . . . . . . . . 195Direct Termination (Night) . . . . . . . . . . . . . . . . . . . . . . . . . . . . . . . . . . . . . . . 195MOH Source . . . . . . . . . . . . . . . . . . . . . . . . . . . . . . . . . . . . . . . . . . . . . . . . . . 196Tandem Trunk . . . . . . . . . . . . . . . . . . . . . . . . . . . . . . . . . . . . . . . . . . . . . . . . . 196Answer Table . . . . . . . . . . . . . . . . . . . . . . . . . . . . . . . . . . . . . . . . . . . . . . . . . 1961003 Program Entry . . . . . . . . . . . . . . . . . . . . . . . . . . . . . . . . . . . . . . . . . . . . . . . .1971800 - Extension Options . . . . . . . . . . . . . . . . . . . . . . . . . . . . . . . . . . . . . . . . . . . . . . 1981801 - Extension Port Description. . . . . . . . . . . . . . . . . . . . . . . . . . . . . . . . . . . . . . . . . .198Options . . . . . . . . . . . . . . . . . . . . . . . . . . . . . . . . . . . . . . . . . . . . . . . . . . . . . . . . . .198Extension Name . . . . . . . . . . . . . . . . . . . . . . . . . . . . . . . . . . . . . . . . . . . . . . . 198Name Programming Chart . . . . . . . . . . . . . . . . . . . . . . . . . . . . . . . . . . . . . . . . . . . .1991801 Program Entry . . . . . . . . . . . . . . . . . . . . . . . . . . . . . . . . . . . . . . . . . . . . . . . .2011808 - <strong>IntraMail</strong> Subscriber Mailbox Options. . . . . . . . . . . . . . . . . . . . . . . . . . . . . . . . .202Options . . . . . . . . . . . . . . . . . . . . . . . . . . . . . . . . . . . . . . . . . . . . . . . . . . . . . . . . . .202Extension Number. . . . . . . . . . . . . . . . . . . . . . . . . . . . . . . . . . . . . . . . . . . . . . 202Mailbox Type . . . . . . . . . . . . . . . . . . . . . . . . . . . . . . . . . . . . . . . . . . . . . . . . . 202Mailbox Active . . . . . . . . . . . . . . . . . . . . . . . . . . . . . . . . . . . . . . . . . . . . . . . . 202Number of Messages. . . . . . . . . . . . . . . . . . . . . . . . . . . . . . . . . . . . . . . . . . . . 203Message Playback . . . . . . . . . . . . . . . . . . . . . . . . . . . . . . . . . . . . . . . . . . . . . . 203Auto Erase/Save of Messages . . . . . . . . . . . . . . . . . . . . . . . . . . . . . . . . . . . . . 203Message Retention . . . . . . . . . . . . . . . . . . . . . . . . . . . . . . . . . . . . . . . . . . . . . 204iv ◆ Table of Contents <strong>IntraMail</strong> <strong>System</strong> <strong>Guide</strong>
Table of ContentsRecording Conversation Beep. . . . . . . . . . . . . . . . . . . . . . . . . . . . . . . . . . . . . 204Message Waiting Lamp. . . . . . . . . . . . . . . . . . . . . . . . . . . . . . . . . . . . . . . . . . 204Auto Attendant Do Not Disturb . . . . . . . . . . . . . . . . . . . . . . . . . . . . . . . . . . . 204Forced Unscreened Transfer . . . . . . . . . . . . . . . . . . . . . . . . . . . . . . . . . . . . . . 205Auto Time Stamp . . . . . . . . . . . . . . . . . . . . . . . . . . . . . . . . . . . . . . . . . . . . . . 205<strong>System</strong> Administrator . . . . . . . . . . . . . . . . . . . . . . . . . . . . . . . . . . . . . . . . . . . 205Dialing Option. . . . . . . . . . . . . . . . . . . . . . . . . . . . . . . . . . . . . . . . . . . . . . . . . 205Next Call Routing Mailbox . . . . . . . . . . . . . . . . . . . . . . . . . . . . . . . . . . . . . . . 206Directory List Number . . . . . . . . . . . . . . . . . . . . . . . . . . . . . . . . . . . . . . . . . . 2061808 Program Entry . . . . . . . . . . . . . . . . . . . . . . . . . . . . . . . . . . . . . . . . . . . . . . . .2078000 - Voice Mail . . . . . . . . . . . . . . . . . . . . . . . . . . . . . . . . . . . . . . . . . . . . . . . . . . . . . 2088001 - Voice Mail Setup . . . . . . . . . . . . . . . . . . . . . . . . . . . . . . . . . . . . . . . . . . . . . . . . .208Options . . . . . . . . . . . . . . . . . . . . . . . . . . . . . . . . . . . . . . . . . . . . . . . . . . . . . . . . . .208Voice Mail Type . . . . . . . . . . . . . . . . . . . . . . . . . . . . . . . . . . . . . . . . . . . . . . . 208Voice Mail Master Extension Number . . . . . . . . . . . . . . . . . . . . . . . . . . . . . . 2088001 Program Entry . . . . . . . . . . . . . . . . . . . . . . . . . . . . . . . . . . . . . . . . . . . . . . . .2088002 - Voice Mail Port Options (Part 1) . . . . . . . . . . . . . . . . . . . . . . . . . . . . . . . . . . . . .209Options . . . . . . . . . . . . . . . . . . . . . . . . . . . . . . . . . . . . . . . . . . . . . . . . . . . . . . . . . .209Name . . . . . . . . . . . . . . . . . . . . . . . . . . . . . . . . . . . . . . . . . . . . . . . . . . . . . . . . 209Class of Service. . . . . . . . . . . . . . . . . . . . . . . . . . . . . . . . . . . . . . . . . . . . . . . . 209Toll Restriction Level (Day) . . . . . . . . . . . . . . . . . . . . . . . . . . . . . . . . . . . . . . 209Toll Restriction Level (Night). . . . . . . . . . . . . . . . . . . . . . . . . . . . . . . . . . . . . 209Operator. . . . . . . . . . . . . . . . . . . . . . . . . . . . . . . . . . . . . . . . . . . . . . . . . . . . . . 210Dial 9 Group . . . . . . . . . . . . . . . . . . . . . . . . . . . . . . . . . . . . . . . . . . . . . . . . . . 210Outgoing Trunk Group Access . . . . . . . . . . . . . . . . . . . . . . . . . . . . . . . . . . . . 2108002 Program Entry . . . . . . . . . . . . . . . . . . . . . . . . . . . . . . . . . . . . . . . . . . . . . . . .2118003 - Voice Mail Port Options (Part 2) . . . . . . . . . . . . . . . . . . . . . . . . . . . . . . . . . . . . .212Options . . . . . . . . . . . . . . . . . . . . . . . . . . . . . . . . . . . . . . . . . . . . . . . . . . . . . . . . . .212Trunk Number . . . . . . . . . . . . . . . . . . . . . . . . . . . . . . . . . . . . . . . . . . . . . . . . . 212Trunk Access Type . . . . . . . . . . . . . . . . . . . . . . . . . . . . . . . . . . . . . . . . . . . . . 2128003 Program Entry . . . . . . . . . . . . . . . . . . . . . . . . . . . . . . . . . . . . . . . . . . . . . . . .2128004 - <strong>IntraMail</strong> <strong>System</strong> Options . . . . . . . . . . . . . . . . . . . . . . . . . . . . . . . . . . . . . . . . . .213Options . . . . . . . . . . . . . . . . . . . . . . . . . . . . . . . . . . . . . . . . . . . . . . . . . . . . . . . . . .213Subscriber Message Length . . . . . . . . . . . . . . . . . . . . . . . . . . . . . . . . . . . . . . 213Non-Subscriber Message Length . . . . . . . . . . . . . . . . . . . . . . . . . . . . . . . . . . 213Message Backup/Go Ahead Time. . . . . . . . . . . . . . . . . . . . . . . . . . . . . . . . . . 213Fax Extension . . . . . . . . . . . . . . . . . . . . . . . . . . . . . . . . . . . . . . . . . . . . . . . . . 214Digital Pager Callback Number . . . . . . . . . . . . . . . . . . . . . . . . . . . . . . . . . . . 214Delay in Dialing Digital Pager Callback Number. . . . . . . . . . . . . . . . . . . . . . 214Wait Between Digital Pager Callout Attempts . . . . . . . . . . . . . . . . . . . . . . . . 215Wait Between Non-Pager Callout Attempts . . . . . . . . . . . . . . . . . . . . . . . . . . 215Wait Between Busy Non-Pager Callout Attempts . . . . . . . . . . . . . . . . . . . . . 215Wait Between RNA Non-Pager Callout Attempts . . . . . . . . . . . . . . . . . . . . . 215Wait for Answer Non-Pager Callout Attempts . . . . . . . . . . . . . . . . . . . . . . . . 216Number of Callout Attempts . . . . . . . . . . . . . . . . . . . . . . . . . . . . . . . . . . . . . . 216Send Pager Callout Until Acknowledged . . . . . . . . . . . . . . . . . . . . . . . . . . . . 2168004 Program Entry . . . . . . . . . . . . . . . . . . . . . . . . . . . . . . . . . . . . . . . . . . . . . . . .2178005 - <strong>IntraMail</strong> Master Mailbox Options. . . . . . . . . . . . . . . . . . . . . . . . . . . . . . . . . . . .218Options . . . . . . . . . . . . . . . . . . . . . . . . . . . . . . . . . . . . . . . . . . . . . . . . . . . . . . . . . .218Mailbox Number . . . . . . . . . . . . . . . . . . . . . . . . . . . . . . . . . . . . . . . . . . . . . . . 218Mailbox Type . . . . . . . . . . . . . . . . . . . . . . . . . . . . . . . . . . . . . . . . . . . . . . . . . 218Mailbox Active . . . . . . . . . . . . . . . . . . . . . . . . . . . . . . . . . . . . . . . . . . . . . . . . 219<strong>IntraMail</strong> <strong>System</strong> <strong>Guide</strong> Table of Contents ◆ v
Table of ContentsOptions for Call Routing Mailboxes (1) . . . . . . . . . . . . . . . . . . . . . . . . . . . . . . . . .219Options for Announcement Mailboxes (2) . . . . . . . . . . . . . . . . . . . . . . . . . . . . . . .219Options for Subscriber Mailboxes (3) . . . . . . . . . . . . . . . . . . . . . . . . . . . . . . . . . . .219Options for Directory Dialing Mailboxes (4) . . . . . . . . . . . . . . . . . . . . . . . . . . . . .220Minimum Number of Letters Required. . . . . . . . . . . . . . . . . . . . . . . . . . . . . . 220Directory List Number to Use. . . . . . . . . . . . . . . . . . . . . . . . . . . . . . . . . . . . . 220Extension Name Match . . . . . . . . . . . . . . . . . . . . . . . . . . . . . . . . . . . . . . . . . . 220Unscreened or Screened Transfer . . . . . . . . . . . . . . . . . . . . . . . . . . . . . . . . . . 221Screened Transfer Timeout . . . . . . . . . . . . . . . . . . . . . . . . . . . . . . . . . . . . . . . 221Time Limit for Dialing Commands. . . . . . . . . . . . . . . . . . . . . . . . . . . . . . . . . 221Fax Detection . . . . . . . . . . . . . . . . . . . . . . . . . . . . . . . . . . . . . . . . . . . . . . . . . 221Next Call Routing Mailbox . . . . . . . . . . . . . . . . . . . . . . . . . . . . . . . . . . . . . . . 2228005 Program Entry (03.20.07 or Higher) . . . . . . . . . . . . . . . . . . . . . . . . . . . . . . .2238005 Program Entry . . . . . . . . . . . . . . . . . . . . . . . . . . . . . . . . . . . . . . . . . . . . . . . .2258006 - <strong>IntraMail</strong> Routing Mailboxes . . . . . . . . . . . . . . . . . . . . . . . . . . . . . . . . . . . . . . . .227Options . . . . . . . . . . . . . . . . . . . . . . . . . . . . . . . . . . . . . . . . . . . . . . . . . . . . . . . . . .227Mailbox Number . . . . . . . . . . . . . . . . . . . . . . . . . . . . . . . . . . . . . . . . . . . . . . . 227Mailbox Type . . . . . . . . . . . . . . . . . . . . . . . . . . . . . . . . . . . . . . . . . . . . . . . . . 227Mailbox Active . . . . . . . . . . . . . . . . . . . . . . . . . . . . . . . . . . . . . . . . . . . . . . . . 227Options for Call Routing Mailboxes . . . . . . . . . . . . . . . . . . . . . . . . . . . . . . . . . . . .228Dial Action Table . . . . . . . . . . . . . . . . . . . . . . . . . . . . . . . . . . . . . . . . . . . . . . 228Screened Transfer Timeout . . . . . . . . . . . . . . . . . . . . . . . . . . . . . . . . . . . . . . . 228Time Limit for Dialing Commands. . . . . . . . . . . . . . . . . . . . . . . . . . . . . . . . . 228Fax Detection . . . . . . . . . . . . . . . . . . . . . . . . . . . . . . . . . . . . . . . . . . . . . . . . . 229Options for Announcement Mailboxes . . . . . . . . . . . . . . . . . . . . . . . . . . . . . . . . . .229Next Call Routing Mailbox . . . . . . . . . . . . . . . . . . . . . . . . . . . . . . . . . . . . . . . 229Repeat Count . . . . . . . . . . . . . . . . . . . . . . . . . . . . . . . . . . . . . . . . . . . . . . . . . . 229Hang Up After. . . . . . . . . . . . . . . . . . . . . . . . . . . . . . . . . . . . . . . . . . . . . . . . . 229Options for Directory Dialing Mailboxes . . . . . . . . . . . . . . . . . . . . . . . . . . . . . . . .230Minimum Number of Letters Required. . . . . . . . . . . . . . . . . . . . . . . . . . . . . . 230Directory List Number to Use. . . . . . . . . . . . . . . . . . . . . . . . . . . . . . . . . . . . . 230Extension Name Match . . . . . . . . . . . . . . . . . . . . . . . . . . . . . . . . . . . . . . . . . . 230Unscreened or Screened Transfer . . . . . . . . . . . . . . . . . . . . . . . . . . . . . . . . . . 231Screened Transfer Timeout . . . . . . . . . . . . . . . . . . . . . . . . . . . . . . . . . . . . . . . 231Time Limit for Dialing Commands. . . . . . . . . . . . . . . . . . . . . . . . . . . . . . . . . 231Fax Detection . . . . . . . . . . . . . . . . . . . . . . . . . . . . . . . . . . . . . . . . . . . . . . . . . 231Next Call Routing Mailbox . . . . . . . . . . . . . . . . . . . . . . . . . . . . . . . . . . . . . . . 2328006 Program Entry (03.20.07 or Higher) . . . . . . . . . . . . . . . . . . . . . . . . . . . . . . .2338006 Program Entry (Prior to 03.20.07) . . . . . . . . . . . . . . . . . . . . . . . . . . . . . . . . .2348007 - <strong>IntraMail</strong> Answer Tables . . . . . . . . . . . . . . . . . . . . . . . . . . . . . . . . . . . . . . . . . . .235Options . . . . . . . . . . . . . . . . . . . . . . . . . . . . . . . . . . . . . . . . . . . . . . . . . . . . . . . . . .235Answer Table . . . . . . . . . . . . . . . . . . . . . . . . . . . . . . . . . . . . . . . . . . . . . . . . . 235Answer Schedule Override . . . . . . . . . . . . . . . . . . . . . . . . . . . . . . . . . . . . . . . 235Override Mailbox . . . . . . . . . . . . . . . . . . . . . . . . . . . . . . . . . . . . . . . . . . . . . . 235Default Mailbox . . . . . . . . . . . . . . . . . . . . . . . . . . . . . . . . . . . . . . . . . . . . . . . 236Next Answer Table . . . . . . . . . . . . . . . . . . . . . . . . . . . . . . . . . . . . . . . . . . . . . 236Schedule Entry . . . . . . . . . . . . . . . . . . . . . . . . . . . . . . . . . . . . . . . . . . . . . . . . 236Schedule Type . . . . . . . . . . . . . . . . . . . . . . . . . . . . . . . . . . . . . . . . . . . . . . . . . 236Type 1 (Day of the Week) Answer Schedule Options . . . . . . . . . . . . . . . . . . . . . .238Routing Mailbox Number . . . . . . . . . . . . . . . . . . . . . . . . . . . . . . . . . . . . . . . . 238Day of the Week . . . . . . . . . . . . . . . . . . . . . . . . . . . . . . . . . . . . . . . . . . . . . . . 238Schedule Start Time . . . . . . . . . . . . . . . . . . . . . . . . . . . . . . . . . . . . . . . . . . . . 238vi ◆ Table of Contents <strong>IntraMail</strong> <strong>System</strong> <strong>Guide</strong>
Table of ContentsSchedule Stop Time . . . . . . . . . . . . . . . . . . . . . . . . . . . . . . . . . . . . . . . . . . . . 238Type 1 (Day of Week) Example . . . . . . . . . . . . . . . . . . . . . . . . . . . . . . . . . . . 239Type 2 (Range of Days) Answer Schedule Options . . . . . . . . . . . . . . . . . . . . . . . .240Routing Mailbox Number . . . . . . . . . . . . . . . . . . . . . . . . . . . . . . . . . . . . . . . . 240Schedule Start Day . . . . . . . . . . . . . . . . . . . . . . . . . . . . . . . . . . . . . . . . . . . . . 240Schedule End Day . . . . . . . . . . . . . . . . . . . . . . . . . . . . . . . . . . . . . . . . . . . . . . 240Schedule Start Time . . . . . . . . . . . . . . . . . . . . . . . . . . . . . . . . . . . . . . . . . . . . 241Schedule Stop Time . . . . . . . . . . . . . . . . . . . . . . . . . . . . . . . . . . . . . . . . . . . . 241Type 2 (Range of Days) Example . . . . . . . . . . . . . . . . . . . . . . . . . . . . . . . . . . 241Type 3 (Date) Answer Schedule Options . . . . . . . . . . . . . . . . . . . . . . . . . . . . . . . .242Routing Mailbox Number . . . . . . . . . . . . . . . . . . . . . . . . . . . . . . . . . . . . . . . . 242Schedule Run Date . . . . . . . . . . . . . . . . . . . . . . . . . . . . . . . . . . . . . . . . . . . . . 242Schedule Start Time . . . . . . . . . . . . . . . . . . . . . . . . . . . . . . . . . . . . . . . . . . . . 242Schedule Stop Time . . . . . . . . . . . . . . . . . . . . . . . . . . . . . . . . . . . . . . . . . . . . 243Type 3 (Date) Example . . . . . . . . . . . . . . . . . . . . . . . . . . . . . . . . . . . . . . . . . . 2448007 Program Entry . . . . . . . . . . . . . . . . . . . . . . . . . . . . . . . . . . . . . . . . . . . . . . . .2458008 - <strong>IntraMail</strong> Dial Action Tables . . . . . . . . . . . . . . . . . . . . . . . . . . . . . . . . . . . . . . . .246Dial Action Table Actions . . . . . . . . . . . . . . . . . . . . . . . . . . . . . . . . . . . . . . . . . . . .247TRF Action - Screened Transfer (1) . . . . . . . . . . . . . . . . . . . . . . . . . . . . . . . . 247UTRF Action - Unscreened Transfer (2) . . . . . . . . . . . . . . . . . . . . . . . . . . . . 247REC1 Action - Quick Message With Greeting (3) . . . . . . . . . . . . . . . . . . . . . 248REC2 Action - Quick Message Without Greeting (4) . . . . . . . . . . . . . . . . . . 248LOGON Action - Log Onto Voice Mail (5) . . . . . . . . . . . . . . . . . . . . . . . . . . 248Hang Up Action (6). . . . . . . . . . . . . . . . . . . . . . . . . . . . . . . . . . . . . . . . . . . . . 249GOTO Action - Go to Mailbox (7) . . . . . . . . . . . . . . . . . . . . . . . . . . . . . . . . . 249UND Action - Undefined Routing (0). . . . . . . . . . . . . . . . . . . . . . . . . . . . . . . 249Dial Action Table Numbers (Data) . . . . . . . . . . . . . . . . . . . . . . . . . . . . . . . . . . . . .250Digits . . . . . . . . . . . . . . . . . . . . . . . . . . . . . . . . . . . . . . . . . . . . . . . . . . . . . . . . 250Caller Dialed Digits. . . . . . . . . . . . . . . . . . . . . . . . . . . . . . . . . . . . . . . . . . . . . 250Ignore Digits . . . . . . . . . . . . . . . . . . . . . . . . . . . . . . . . . . . . . . . . . . . . . . . . . . 250No Routing . . . . . . . . . . . . . . . . . . . . . . . . . . . . . . . . . . . . . . . . . . . . . . . . . . . 251Pause . . . . . . . . . . . . . . . . . . . . . . . . . . . . . . . . . . . . . . . . . . . . . . . . . . . . . . . . 2518008 Program Entry . . . . . . . . . . . . . . . . . . . . . . . . . . . . . . . . . . . . . . . . . . . . . . . .252Chapter 4: Soft Key Glossary. . . . . . . . . . . . . . . . . . . . . . . . . . . . . . . . . . . . .255<strong>IntraMail</strong> <strong>System</strong> <strong>Guide</strong> Table of Contents ◆ vii
Table of Contentsviii ◆ Table of Contents <strong>IntraMail</strong> <strong>System</strong> <strong>Guide</strong>
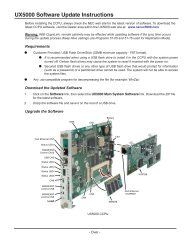
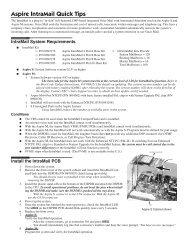
InstallationChapter 1:Quick Setup1InstallationDS1000 InstallationDS1000 InstallationInstalling <strong>IntraMail</strong> in DS1000Step 1 Power down the system (Figure 1: Powering Down the DS1000).- Turn off the system power.- Unplug the system’s AC power cord.80200 -28Power SwitchFigure 1: Powering Down the DS1000<strong>IntraMail</strong> <strong>System</strong> <strong>Guide</strong> Chapter 1: Quick Setup ◆ 1
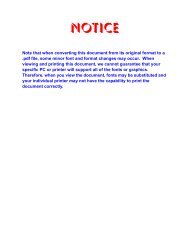
InstallationDS1000 InstallationStep 2 Remove the cover (Figure 2: Removing the DS1000 Cover).- Unlock and remove the cover.80200 - 2-01Push buttonto "OPEN" positionFigure 2: Removing the DS1000 CoverStep 3 Label and unplug all extension, trunk, and auxiliary cabling.- This will make reinstallation easier.- If possible, leave the ground wire connected. This will help prevent static damage when plugging inthe <strong>IntraMail</strong> PCB.Step 4 Remove the DS1000 cabinet from wall.Step 5 Remove the cabinet top panel (Figure 3: Removing the DS1000 Top Panel).- Unscrew the 2 captive screws that secure the cabinet top panel to the base.- Lift up and remove the top panel.80200 - 4-01231Figure 3: Removing the DS1000 Top Panel2 ◆ Chapter 1: Quick Setup <strong>IntraMail</strong> <strong>System</strong> <strong>Guide</strong>
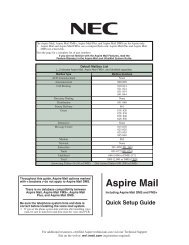
Step 6 Install the <strong>IntraMail</strong> PCB (Figure 4: Installing the <strong>IntraMail</strong> PCB in DS1000).- Attach a grounded wrist strap to a known earth ground.■ Use the cabinet ground lug if the ground wire is still connected.- Discharge any built-up static electricity by touching the cabinet ground lug.- Plug in the <strong>IntraMail</strong> PCB as shown below.■ Be sure to snap the PCB into the supplied plastic standoffs.InstallationDS1000 Installation180044 - 2Figure 4: Installing the <strong>IntraMail</strong> PCB in DS1000Step 7 Replace and re-secure the top panel.Step 8 Complete the reinstallation.- Hang the cabinet back on the wall.- Reinstall all extension, trunk, and auxiliary cabling.- Replace and lock the cover.- Plug in the system and turn on the system power.Step 9 Verify <strong>IntraMail</strong> operation.- After the system restarts, go to any keyset and press MW.■ You should immediately log into that extension’s mailbox and hear the voice prompt, “You haveno new messages.”<strong>IntraMail</strong> <strong>System</strong> <strong>Guide</strong> Chapter 1: Quick Setup ◆ 3
InstallationDS2000 InstallationDS2000 InstallationInstalling <strong>IntraMail</strong> in DS2000Step 1 Power down the system.Step 2 Remove the cover (Figure 5: Removing the DS2000 Cover).- Unscrew the two captive screws on the front cabinet cover.- Lift up slightly on the front of the cover — then gently slide the cover back to remove it.80000 - 124 Slot Cabinet ShownFigure 5: Removing the DS2000 CoverStep 3 Remove the CPU PCB (Figure 6: Removing the DS2000 CPU).- Attach a grounded wrist strap to a known earth ground.- Discharge any built-up static electricity by touching the cabinet ground lug.- Unplug and label the CPU cabling (if installed).- Remove the CPU and place it on a flat, anti-static surface.80000 - 304 Slot Cabinet ShownFigure 6: Removing the DS2000 CPU4 ◆ Chapter 1: Quick Setup <strong>IntraMail</strong> <strong>System</strong> <strong>Guide</strong>
Step 4 Install the <strong>IntraMail</strong> PCB (Figure 7: Installing the <strong>IntraMail</strong> PCB in DS2000)- Plug in the <strong>IntraMail</strong> PCB as shown below.■ Be sure to snap the PCB into the supplied plastic standoffs.InstallationDS2000 Installation80088 - 11Figure 7: Installing the <strong>IntraMail</strong> PCB in DS2000Step 5 Reinstall the CPU PCB.Step 6 Power up the system.Step 7 Verify <strong>IntraMail</strong> operation.- After the system restarts, go to any keyset and press MW.■ You should immediately log into that extension’s mailbox and hear the voice prompt, “You haveno new messages.”Step 8 Replace the cover (Figure 8: Replacing the DS2000 Cover).- Hook the tabs on the rear of the cover into their associated slots, then push the front cover into place.- Screw in the 2 captive screws that secure the cover to the cabinet.80000 - 12 A4 Slot Cabinet ShownFigure 8: Replacing the DS2000 Cover<strong>IntraMail</strong> <strong>System</strong> <strong>Guide</strong> Chapter 1: Quick Setup ◆ 5
ProgrammingInitial Configuration and ProgrammingProgrammingInitial Configuration and ProgrammingStart-Up ProgrammingStart-up (Default) <strong>IntraMail</strong> Configuration<strong>IntraMail</strong> automatically assigns a mailbox to each extension in the number plan.■ By default in DS1000, only the first 8 (300-307) Subscriber Mailboxes are active/enabled.■ By default in DS2000, only the first 16 (300-315) subscriber mailboxes are active/enabled.■ The <strong>IntraMail</strong> Automated Attendant does not answer outside calls.Start-up <strong>IntraMail</strong> ProgrammingStep 1 Enable the mailboxes for all installed extensions.1.1 (Prior to 03.20.07) 1808 - <strong>IntraMail</strong> Subscriber Mailbox Options: Mailbox Active on page 202.Enter Y (9) to enable the <strong>IntraMail</strong> mailbox for each installed extension.- If disabled (N), a user pressing MW will be asked to enter their mailbox number. A voiceprompt then announces, “That mailbox does not exist.”1.2 (03.20.07 or higher) 1808 - <strong>IntraMail</strong> Subscriber Mailbox Options: Mailbox Type on page 202.Enter 1 (Personal) to enable a Personal <strong>IntraMail</strong> mailbox for each installed extension.- If disabled (0), a user pressing MW will be asked to enter their mailbox number. A voiceprompt then announces, “That mailbox does not exist.”Step 2 Set up the Automated Attendant to answer outside calls during the day and at night.2.1 1003 - Trunk Options: Direct Termination (Day) on page 195.- Enter the <strong>IntraMail</strong> master number (700) for each trunk that you want <strong>IntraMail</strong> to answer.Step 3 Set up the Automated Attendant to answer outside calls only at night.3.1 1003 - Trunk Options: Direct Termination (Night) on page 195.- Enter the <strong>IntraMail</strong> master number (700) for each trunk that you want <strong>IntraMail</strong> to answeronly when the system is in the night mode.Step 4 Check the Answer Table assignment.4.1 1003 - Trunk Options: Answer Table on page 196.- Initially, you should leave all trunks assigned to Answer Table 1.Step 5 Review the default Automated Attendant setup.DIL to Voice MailMaster (700)● 1003 - Direct Termination (Day)● 1003 - Direct Termination (Night)Trunks Route toAnswer Table 1● 1003 - Answer TableDefault Automated Attendant AnsweringAnswer Table 1Schedule 1 orDefault Mailbox● 8007 - Answer Tables● 8007 - Schedule Entry● 8007 - Default MailboxCalls always route to Call Routing Mailbox 000- Schedule 1 active M-F 8:30AM-5:00PM.- Default Mailbox active all other times.Dial Action Table 1Dialing OptionsDial an extension number, or0 for the operatorAll trunksCall RoutingMailbox 000● 8006 - Routing Mailboxes (000)Dial ActionTable 1● 8008 - Dial Action TablesFrom a <strong>System</strong> Administrator'smailbox, record an InstructionMenu (SA + I) for the active CallRouting Mailbox.Use AnswerTable 1Which chooses CallRouting Mailbox 000.And Dial ActionTable 1With thesedialing options6 ◆ Chapter 1: Quick Setup <strong>IntraMail</strong> <strong>System</strong> <strong>Guide</strong>
ProgrammingInitial Configuration and ProgrammingNote: The following programs are preset. Normally, you should not change their default values.- 8001 - Voice Mail Setup: Voice Mail Type on page 208.- 8001 - Voice Mail Setup: Voice Mail Master Extension Number on page 208.- 8002 - Voice Mail Port Options (Part 1): Name on page 209.<strong>IntraMail</strong> <strong>System</strong> RequirementsSpecifications■ DS1000/2000 <strong>System</strong> Software version 03.**.** or higher.■ CPU PCB P/N 80025B (in DS2000)■ Cabinet P/N 80200A (in DS1000)1<strong>IntraMail</strong> Part Numbers and CapacitiesP/N 80044P/N 80088<strong>IntraMail</strong> 4 Port/4 Hour<strong>IntraMail</strong> 8 Port/8 HourMailboxes Announcement: 8Call Routing: 8Subscriber (DS1000): 34Subscriber (DS2000): 128Master: 16Total (DS1000): 66Total (DS2000): 160Ports: 4 or 8Storage Hours: 4 or 8<strong>IntraMail</strong> <strong>System</strong> <strong>Guide</strong> Chapter 1: Quick Setup ◆ 7
ProgrammingApplication ExamplesApplication ExamplesExamples of Some Common ApplicationsThe examples below show some common applications. The chart in the beginning of each example shows:■ How the relevant programmable options work by default.■ The Application Summary, which provides the basic steps you need to take to set up the application.Following the chart are the step-by-step instructions for setting up the application.Example 1: Set Up Separate Day and Night GreetingsDefault Automated Attendant Answering■ All trunks answered by the Automated Attendant route to Answer Table 1.- Answer Table 1 uses Schedule 1 to answer calls from 8:30 AM -5:00 PM Monday through Friday with CallRouting Mailbox 000.- The Default Mailbox for Answer Table 1 picks up Automated Attendant calls at all other times. The DefaultMailbox for Answer Table 1 is also Call Routing Mailbox 000.■ The greeting that plays to outside callers is the Instruction Menu for the Call Routing Mailbox that answers thecall.■ Since Schedule 1 and the Default Mailbox both use Call Routing Mailbox 000, the Automated Attendantanswers all calls the same way day and night, with the Instruction Menu for Call Routing Mailbox 000.Application Summary■ Change the Default Mailbox from Call Routing Mailbox 000 to 001.■ Record a night Instruction Menu for Call Routing Mailbox 001.Step 1 Change the Default Mailbox to Call Routing Mailbox 001.1.1 In 8007 - <strong>IntraMail</strong> Answer Tables: Default Mailbox, change the Default Mailbox assignmentto 001.- See 8007 - <strong>IntraMail</strong> Answer Tables: Default Mailbox on page 236 for more.Step 2 Record the daytime and night Instruction Menus.2.1 At extension 300, press MW.2.2 Dial SA (72) + I (4).2.3 Dial 000 (for Call Routing Mailbox 000) + R (7).2.4 Record the daytime Instruction Menu message + # twice.2.5 Dial I (4).2.6 Dial 001 (for Call Routing Mailbox 001) + R (7).2.7 Record the night Instruction Menu message + # + hang up.- See Instruction Menu on page 105 for more.8 ◆ Chapter 1: Quick Setup <strong>IntraMail</strong> <strong>System</strong> <strong>Guide</strong>
ProgrammingApplication ExamplesExample 2: Provide Unique Day and Night Dialing Options for CallersDefault Dial Action Table Options■ All Call Routing Mailboxes (000-007 by default) use Dial Action Table 1.■ Dial Action Table 1 provides the following dial options:- Dial extension number (300-427).- Dial 0 for the operator.- Dial * + extension to leave a Quick Message.- Dial # + extension to do a Remote Logon to the mailbox.- Timeout to operator if no digits dialed.Application Summary■ Allow callers at night to dial 0 to leave a message for the operator.1Step 1 Set up separate day and night greetings.1.1 Following example 1, set up separate day and night Instruction Menus using Call RoutingMailboxes 000 and 001.- The day Instruction Menu can say something like:Thank you for calling. For Sales, dial 301. For Technical <strong>Support</strong>, dial 302. To talk to anoperator, dial 0. If you know your party’s extension number, please dial it now.- The night Instruction menu can say something like:Thank you for calling. Our normal business hours are 8:30 to 5:00, Monday through Friday.To leave us a message, please dial 0 now.Step 2 Assign a unique Dial Action Table (2) to the night time Call Routing Mailbox (001).2.1 In 8006 - <strong>IntraMail</strong> Routing Mailboxes: Dial Action Table, assign Dial Action Table 2 to CallRouting Mailbox 001.- See 8006 - <strong>IntraMail</strong> Routing Mailboxes: Dial Action Table on page 228 for more.Step 3 Change the dialing options for the night time Dial Action Table (2).3.1 In 8008 - Dial Action Table Actions for Dial Action Table 2, make the following changes:- For the digits 3 and 4, enter 0 for the Action entry to prevent callers from dialing extensionsat night.- For the digit 0, change the Action entry to REC1 (by dialing 3) and the Data entry to 300.This allows night time callers to dial 0 to leave a message for the operator.- Note that the * and # entries were left unchanged so that experienced users could still leaveQuick Messages or do Remote Logons at night.- See 8008 - <strong>IntraMail</strong> Dial Action Tables on page 246 for more.<strong>IntraMail</strong> <strong>System</strong> <strong>Guide</strong> Chapter 1: Quick Setup ◆ 9
ProgrammingApplication Examples10 ◆ Chapter 1: Quick Setup <strong>IntraMail</strong> <strong>System</strong> <strong>Guide</strong>
Chapter 2:Features2Introduction to <strong>IntraMail</strong> FeaturesIntroduction to <strong>IntraMail</strong> FeaturesIf you are not familiar with the <strong>IntraMail</strong> features, reviewthe <strong>IntraMail</strong> Feature Glossary on page 12.This chapter provides detailed information on the <strong>IntraMail</strong> features. The features in this chapter are inalphabetical order, like a dictionary. This chapter subdivides each feature definition into headings as follows:■ DescriptionRead Description to get an overview of the feature, its benefit, any special considerations you should beaware of, and how it works in the default system.■ Related FeaturesRelated Features shows you at a glance how the feature interacts with other <strong>IntraMail</strong> features.■ ProgrammingHere you’ll find easy to follow step-by-step programming instructions for the feature. If you need moredetail about a program, just follow the page reference to the program in Chapter 3, Programming.■ OperationOperation provides charts that show you how the feature operates.<strong>IntraMail</strong> <strong>System</strong> <strong>Guide</strong> Chapter 2: Features ◆ 11
<strong>IntraMail</strong> Feature Glossary<strong>IntraMail</strong> Feature GlossaryFeature GlossaryName Description UsageAdministrator Security CodeControlAlternate Next Call RoutingMailbox■ See Security Code in this glossary. Voice Mail■ See Next Call Routing Mailbox in this Glossary. Voice MailAnnouncement MailboxAnnouncement MessageAnswer TableAnswering Machine EmulationAnswering Schedule OverrideAuto Attendant Do Not DisturbAuto Erase or SaveAuto Time StampAutomated AttendantAutomated Attendant TransferMailbox that allows a prerecorded greeting to play to callers.■ See Announcement Mailbox on page 22 for more.The message that the <strong>System</strong> Administrator records for aspecific Announcement Mailbox.■ See Announcement Message on page 27 for more.Determines how the Automated Attendant answers outsidecalls on each trunk, according to the time of the day andday of the week that the call is ringing.■ See Answer Tables on page 30 for more.A keyset on the connected telephone system can work likea home answering machine.■ See Answering Machine Emulation on page 35 formore.Enables an alternate greeting and alternate dialing optionsfor callers.■ See Answer Schedule Override on page 28 for more.Auto Attendant Do Not Disturb sends Automated Attendantcalls directly to an extension user’s mailbox. Their phonewill not ring for calls from the Automated Attendant.■ See Auto Attendant Do Not Disturb on page 37 formore. Also see Greeting in this glossary.When a mailbox user completely listens to a new messageand then exits their mailbox, <strong>IntraMail</strong> will either automaticallysave or erase the message.■ See Auto Erase or Save on page 40 for more.After a user listens to a message, <strong>IntraMail</strong> can optionallyannounce the time and date the message was left.■ See Auto Time Stamp on page 41 for more.The Automated Attendant can automatically answer thetelephone system’s incoming calls, play an InstructionMenu message, and provide dialing options to callers.■ See Automated Attendant on page 42 for more.While on a trunk call, an extension user can transfer theirtrunk call to the Automated Attendant so the caller can usethe Automated Attendant dialing options.■ See Automated Attendant Transfer on page 45 formore.Automated AttendantAutomated AttendantAutomated AttendantVoice MailAutomated AttendantAutomated AttendantVoice MailAutomated AttendantVoice Mail12 ◆ Chapter 2: Features <strong>IntraMail</strong> <strong>System</strong> <strong>Guide</strong>
<strong>IntraMail</strong> Feature GlossaryName Description UsageAutomatic Call Routing to aMailbox■ See Go to a Mailbox in this glossary. Automated AttendantAutomatic Message Erase/Save ■ See Auto Erase or Save in this glossary. Voice MailAutomatic Routing for RotaryDial CallersIf an Automated Attendant caller doesn’t dial any digits,<strong>IntraMail</strong> will automatically route them to a specifiedoption (such as the operator or a mailbox).■ See Automatic Routing for Rotary Dial Callers onpage 46 for more.Automated AttendantCall Forward to a MailboxAn extension user can forward their calls to their mailbox.■ See Call Forward to a Mailbox on page 47 for more.Voice MailCall ScreeningCall Screening allows a display keyset extension user tolisten to (screen) a voice mail message as it is being left intheir mailbox. Unlike Personal Answering Machine emulation,Call Screening does not require the extension userto forward their calls immediately to voice mail.■ See Call Screening on page 53 for more.Voice Mail2Call Routing MailboxThe mailbox associated with an Answer Table that specifieswhich dialing options (Dial Action Table) andannouncements are available to Automated Attendant callers.■ See Call Routing Mailbox on page 49 for more.Automated AttendantCaller IDA telephone company service that provides a caller’s numberand optional name. The telephone system can pass this informationto <strong>IntraMail</strong> to enable Caller ID with Return Call.■ See Caller ID on page 56 for more.<strong>System</strong>Caller ID with Return Call ■ See Make Call and Time and Date Stamp in this glossary.Voice MailCalling (Logging Onto) a Mailbox ■ See Log Onto Voice Mail in this glossary. Voice MailCalling the Automated AttendantCentrex TransferConversation RecordAutomated Attendant callers can use various <strong>IntraMail</strong>features and then return to the Automated Attendant foradditional dialing options.■ See Calling the Automated Attendant on page 58 formore.The Automated Attendant to transfer a caller from a Centrextrunk to an outside number using the features of thatCentrex trunk.■ See Centrex Transfer on page 59 for more.Allows an extension user to record their active call as amessage in their mailbox. <strong>IntraMail</strong> will broadcast a beepand a voice prompt to the callers as Conversation Recordbegins.■ See Conversation Record on page 61 for more.Automated AttendantAutomated AttendantVoice MailDay, Night, and HolidayGreetings■ See Flexible Answering Schedules in this glossary. Automated Attendant<strong>IntraMail</strong> <strong>System</strong> <strong>Guide</strong> Chapter 2: Features ◆ 13
<strong>IntraMail</strong> Feature GlossaryName Description UsageDeleting a Message ■ See Message Delete in this glossary. Voice MailDeleting Mailbox Security Code ■ See Mailbox Security Code Delete in this glossary. MaintenanceDial Action TableDirectory DialingErasing All MessagesExiting a MailboxExternal TransferFax DetectionFlexible Answering SchedulesFlexible Call RoutingDefines the dialing options for a Call Routing Mailboxchosen by the active Answer Table, which in turn providesthose dialing options to Automated Attendant callers.■ See Dial Action Table on page 64 for more.Directory Dialing allows an Automated Attendant caller toreach an extension by dialing the first few letters in theextension user’s name.■ See Directory Dialing on page 68 for more.Lets the <strong>System</strong> Administrator delete mailbox messagessystem-wide.■ See Erasing All Messages on page 77 for more.An extension user can exit their mailbox by dialing a codeor by hanging up.■ See Exiting a Mailbox on page 78 for more.An Automated Attendant caller can automatically route toan outside telephone number.■ See External Transfer on page 84 for more.The Automated Attendant can detect incoming fax callsand transfer them to a fax machine.■ See Fax Detection on page 86 for more.The Automated Attendant can answer outside calls withdifferent announcements and dialing options, dependingon the time of day and day of week.■ See Flexible Answering Schedules on page 87 formore.The Automated Attendant can provide outside callers witha wide variety of dialing (routing) options. There are 3components to Flexible Call Routing.Answer TableDetermines how the Automated Attendant answers outsidecalls on each Voice Mail port, according to the time of theday and day of the week that the call is ringing.Call Routing MailboxThe mailbox associated with an Answer Table that specifieswhich dialing options (Dial Action Table) andannouncements are available to Automated Attendant callers.Dial Action TableDefines the dialing options for the Call Routing Mailboxchosen by the active Answer Table, which in turn providesthose dialing options to Automated Attendant callers.■ See Flexible Call Routing on page 88 for more.Automated AttendantAutomated AttendantMaintenanceVoice MailAutomated Attendant<strong>System</strong>Automated AttendantAutomated Attendant14 ◆ Chapter 2: Features <strong>IntraMail</strong> <strong>System</strong> <strong>Guide</strong>
<strong>IntraMail</strong> Feature GlossaryName Description UsageFlexible Mailbox Numbering PlanForced Unscreened TransferIf the telephone system extension numbers are customized,the <strong>IntraMail</strong> mailbox numbers can be customized tomatch.■ See Flexible Mailbox Numbering Plan on page 89 formore.A Subscriber Mailbox can optionally convert AutomatedAttendant Screened Transfers to Unscreened Transfers.■ See Forced Unscreened Transfer on page 90 for more.<strong>System</strong>Automated AttendantForwarding Calls to a Mailbox See Call Forward to a Mailbox in this glossary. Voice MailGetting Recorded HelpGo to a MailboxIf an extension user dials an incorrect code or forgets whatto dial while in their mailbox, they can request help fromthe <strong>IntraMail</strong> voice prompts.■ See Getting Recorded Help on page 91 for more.An Automated Attendant caller can dial a digit and routedirectly into a mailbox.■ See Go To A Mailbox on page 92 for more.Voice MailAutomated Attendant2GreetingA Subscriber Mailbox user can record a personalizedgreeting for their mailbox. Caller’s to the user’s mailboxhear the greeting.With Remote Greeting, an extension user can call into theAutomated Attendant, access their mailbox, and remotelyrecord their mailbox greeting.DS1000/2000 software versions 03.20.07 and higher provideMultiple Greetings. With Multiple Greetings, themailbox subscriber can record up to three separate greetingsand make any one of the three active.■■See Greeting on page 94 for more.Also see Auto Attendant Do Not Disturb in thisglossary.Voice MailGroup MailboxA Group Mailbox is a Subscriber Mailbox shared by agroup of co-workers.■ See Group Mailbox on page 98 for more.Voice MailGuest MailboxAn outside party can have their own mailbox for receivingand sending messages.■ See Guest Mailbox on page 101 for more.Voice MailHang UpAn Automated Attendant option that immediately hangsup the outside call.■ See Hang Up on page 104 for more.Automated AttendantHelp ■ See Getting Recorded Help in this glossary. Voice MailIndividual Trunk Greetings ■ See Multiple Company Greetings in this glossary. Automated Attendant<strong>IntraMail</strong> <strong>System</strong> <strong>Guide</strong> Chapter 2: Features ◆ 15
<strong>IntraMail</strong> Feature GlossaryName Description UsageInstruction MenuLeaving a MessageThe Instruction Menu is the announcement that plays toAutomated Attendant callers. Normally, the InstructionMenu provides callers with the Automated Attendant dialingoptions.■ See Instruction Menu on page 105.An extension user can leave a voice message in aco-worker’s mailbox if that extension is busy, unanswered,or in Do Not Disturb.■ See Leaving a Message on page 107 for more.Automated AttendantVoice MailLeaving a Message at a Busy/DND Extension■ See Leaving a Message in this glossary. Voice MailLeave a Quick Message ■ See Quick Message in this glossary. Automated AttendantListening Options ■ See Listening to Messages in this glossary. Voice MailListening to MessagesWhile or after listening to a message, an extension user hasmany message handling options from which to choose.■ See Listening to Messages on page 109 for more.Voice MailLocal Notification ■ See Message Notification in this glossary. Voice MailLog Onto Voice MailAn extension user can press a key to log onto (access)their <strong>IntraMail</strong> mailbox.With Remote Logon, an employee calling through the AutomatedAttendant can dial a single digit followed by theirown mailbox number to remotely log onto their mailbox.■ See Log Onto Voice Mail on page 112 for more.Voice MailMailbox Greeting ■ See Greeting in this glossary. Voice MailMailbox Logon ■ See Log Onto Voice Mail in this glossary. Voice MailMailbox NameMailbox Options MenuMailbox Security Code DeleteA mailbox caller can hear the extension user’s prerecordedname instead of their mailbox number.■ See Mailbox Name on page 114 for more.Sub-menu of a subscriber’s Main Menu that providesaccess to the Auto Time Stamp, Mailbox Security CodeDelete, and Message Notification features.■ See Mailbox Options Menu on page 116 for more.The <strong>System</strong> Administrator can delete the security code forany mailbox, effectively unlocking it.■ See Mailbox Security Code Delete on page 117 formore.■ Also see Security Code in this glossary.Voice MailVoice MailMaintenanceMailbox Transfer ■ See Transfer to a Mailbox in this glossary. Voice MailMain MenuThe <strong>IntraMail</strong> options available to an extension user whenthey log onto their mailbox.■ See Main Menu on page 118 for more.Voice Mail16 ◆ Chapter 2: Features <strong>IntraMail</strong> <strong>System</strong> <strong>Guide</strong>
<strong>IntraMail</strong> Feature GlossaryName Description UsageMake Call ■ A Subscriber Mailbox user can listen to a voice messageand dial MC to return the call without knowingtheir caller’s phone number.■ See Make Call on page 120 for more.Voice MailMaster MailboxesAdditional mailboxes used for Ring Group and UCDHunting Group overflow. Can also be used for Guest Mailboxes,as well as additional Call Routing, Announcement,and Directory Dialing Mailboxes.■ See Master Mailbox on page 122 for more.Message Count DisplayMessage DeleteThe telephone display can show the number of new messageswaiting in a user’s mailbox.■ See Message Count Display on page 126 for more.An extension user can delete any messages left in theirmailbox.■ See Message Delete on page 128 for more.Voice MailVoice Mail2Message ForwardA subscriber can forward a message in their mailbox to aco-worker. They can optionally record a comment beforethe forwarded message.■ See Message Forward on page 129 for more.Voice MailMessage LengthThe <strong>System</strong> Administrator can set the maximum length ofa message that can be left in a user’s voice mailbox.■ See Message Length on page 131 for more.Voice MailMessage Listen ModeWhen a user calls their mailbox, they can dial a code tolisten to all their messages, their new messages, theirsaved messages, or their held messages.■ See Message Listen Mode on page 132 for more.Voice MailMessage NotificationOnce activated by the mailbox user, dials a telephonenumber to let the recipient know there are new messagesin the mailbox. Notification can call extensions, localnumbers, long distance numbers and pagers.■ See Message Notification on page 133 for more.Voice MailMessage On HoldThe <strong>System</strong> Administrator can record a message that willplay to callers while they wait on Hold■ See Message On Hold on page 139 for more.Voice MailMessage Playback DirectionAn extension user can listen to their messages in eitherLIFO (last-in-first-out) or FIFO (first-in-first-out) order.■ See Message Playback Direction on page 141 formore.Voice MailMessage Record ■ See Record and Send a Message in this glossary. Voice MailMessage ReplyAn extension user can reply to a message in their mailboxby dialing a simple code, without knowing the caller’sextension number.■ See Message Reply on page 143 for more.Voice Mail<strong>IntraMail</strong> <strong>System</strong> <strong>Guide</strong> Chapter 2: Features ◆ 17
<strong>IntraMail</strong> Feature GlossaryName Description UsageMessage Retention<strong>IntraMail</strong> will save a mailbox’s new, held, or saved messagesfor the Message Retention interval, and then deletethem.■ See Message Retention on page 144 for more.Voice MailMessage Send ■ See Record and Send a Message in this glossary. Voice MailMessage Storage LimitMessage Waiting LampMultiple Company GreetingsSets how many messages a mailbox can store.■ See Message Storage Limit on page 145 for more.An extension’s Message Waiting lamp flashes on the telephoneindicating that they have new messages waiting intheir mailbox.■ See Message Waiting Lamp on page 146 for more.By assigning a unique Answer Table to each trunk, a single<strong>IntraMail</strong> system can provide individual greetings anddialing options for several companies.■ See Multiple Company Greetings on page 147 formore.Voice MailVoice MailAutomated AttendantName ■ See Mailbox Name in this glossary. Voice MailNext Call Routing MailboxProvides callers with additional dialing options after theyleave a message in an extension’s mailbox (depending onthe setting of the Next Call Routing Mailbox Dial Mode).■ See Next Call Routing Mailbox on page 148 for more.Voice MailOne-Touch Forwarding ■ See Call Forward to a Mailbox and Message Forwardin this glossary.Voice MailOne-Touch Mailbox Access ■ See Mailbox Logon in this glossary. Voice MailOne-Touch Mailbox Retrieval ■ See Mailbox Logon in this glossary. Voice MailPersonal Answering MachineEmulation■ See Answering Machine Emulation in this glossary. Voice MailPersonalized Mailbox Greeting ■ See Greeting in this glossary. Voice MailProgrammable Security Code ■ See Security Code and Mailbox Security Code Deletein this glossary.Voice MailProgramming Voice MailQuick Message<strong>IntraMail</strong> is programmed via a Window-based PC runningthe Admin program. The PC is connected to the <strong>IntraMail</strong>serial port. Limited programming can also be done from a<strong>System</strong> Administrator’s mailbox.■■See Programming Voice Mail on page 154 for more.Also see <strong>System</strong> Administrator Mailbox in this glossary.Automated Attendant callers can dial a digit followed byan extension number to leave a message directly in auser’s mailbox.■ See Quick Message on page 156 for more.MaintenanceAutomated Attendant18 ◆ Chapter 2: Features <strong>IntraMail</strong> <strong>System</strong> <strong>Guide</strong>
<strong>IntraMail</strong> Feature GlossaryName Description UsageRecord and Send a MessageA Subscriber Mailbox user can record and send a messageto any other Subscriber Mailbox.■ See Record and Send a Message on page 158 formore.Voice MailRecorded Help ■ Pre-recorded voice prompts guide the user through theIntramail features.Voice MailRecording a Conversation ■ See Conversation Record in this glossary. Voice MailRecording a Message ■ See Record and Send a Message in this glossary. Voice MailRecording Conversation Beep ■ See Conversation Record in this glossary. Voice MailRecording Options ■ See Record and Send a Message in this glossary. Voice MailRemote Log On ■ See Log Onto Voice Mail in this glossary. Voice MailRemote Greetings ■ See Greeting in this glossary. Voice Mail2Remote Message Notification ■ See Message Notification in this glossary. Voice MailRemote Programming<strong>IntraMail</strong> programming is available remotely via a modemconnected to the <strong>IntraMail</strong> serial port.■ See Remote Programming on page 160 for more.MaintenanceReturn Call (with Caller ID) ■ See Make Call in this glossary. Voice MailRotary Dial Telephones ■ See Automatic Routing for Rotary Dial Callers in thisglossary.Automated AttendantScreened TransferSecurity CodeSimilar to telephone system screened transfers in whichthe transferring party controls the transfer.After an Automated Attendant caller dials an extension,<strong>IntraMail</strong> calls (screens) the destination extension to see ifthe transfer can go through.■ If the destination is busy or in DND, the AutomatedAttendant doesn’t extend the call and immediatelyprovides the caller with additional options.■ If the destination is available, the Automated Attendantrings it. If the destination answers, the call goesthrough. If the destination doesn’t answer within a presetinterval, the Automated Attendant doesn’t extendthe call and provides the caller with additional options.■ See Screened Transfer on page 161 for more.■ Also see Unscreened Transfer in this glossary.An extension user’s mailbox can have a security code toprotect the mailbox from unauthorized access.■ See Security Code on page 164 for more.■ Also see Mailbox Security Code Delete in this glossary.Automated AttendantVoice MailSelect Listen Mode ■ See Message Listen Mode in this glossary. Voice Mail<strong>IntraMail</strong> <strong>System</strong> <strong>Guide</strong> Chapter 2: Features ◆ 19
<strong>IntraMail</strong> Feature GlossaryName Description UsageSingle Digit DialingSubscriber Mailbox<strong>System</strong> Administrator<strong>System</strong> Administrator Mailbox<strong>System</strong> Re-initializationTime and DateTime and Date StampTime and Date Stamp (with CallerID StorageAn Automated Attendant caller can press a single key toroute to an extension, route to another destination, or usean <strong>IntraMail</strong> feature.■ See Single Digit Dialing on page 166 for more.The mailbox type normally used for telephone systemextensions.■ See Subscriber Mailbox on page 168 for more.The extension user that has <strong>IntraMail</strong> system administrationcapabilities.■ See <strong>System</strong> Administrator on page 171 for more.A Subscriber Mailbox option that enables the systemadministration capabilities.■ See <strong>System</strong> Administrator Mailbox on page 173 formore.■ Also see <strong>System</strong> Administrator in this glossary.Re-initializing <strong>IntraMail</strong> returns all programmed optionsto their default values.■ See <strong>System</strong> Re-initialization on page 174 for more.After listening to a message, an extension user can dial acode to hear what time the message was sent.■ See Time and Date on page 175 for more.■ Also see Auto Time Stamp in this glossary.With caller ID installed, an extension can listen to a messageand dial a code to hear the time the message was sent,as well as the caller’s number.■■See Time and Date Stamp on page 176 for more.Also see Caller ID with Return Call and Time andDate in this glossary.See Time and Date Stamp in this glossary.Automated AttendantVoice MailMaintenanceVoice MailMaintenanceVoice MailVoice MailTransfer by Extension ■ See Screened Transfer and Unscreened Transfer in thisglossary.Automated AttendantTransfer Calls to a FAX Machine ■ See Fax Detection in this glossary. Automated AttendantTransfer to a MailboxTransfer to an ACD/UCD GroupAn extension user can transfer their active call to a coworker’smailbox.■ See Transfer to a Mailbox on page 177 for more.The Automated Attendant can transfer outside callers toACD/UCD Group master numbers.■ See Transfer to a UCD Group on page 178 for more.Voice MailAutomated AttendantTransfer to an Extension ■ See Screened Transfer and Unscreened Transfer in thisglossary.Automated AttendantTransfer to the AutomatedAttendant■ See Automated Attendant Transfer in this glossary. Voice Mail20 ◆ Chapter 2: Features <strong>IntraMail</strong> <strong>System</strong> <strong>Guide</strong>
<strong>IntraMail</strong> Feature GlossaryName Description UsageUndefined RoutingA dialpad digit for which the Automated Attendant has norouting defined. When an Automated Attendant callerdials a digit for which there is no routing assigned, Intra-Mail plays a brief error message and then repeats the dialingoptions.■ See Undefined Routing on page 179 for more.Automated AttendantUndefined Routing Intercept ■ See Undefined Routing in this glossary. Automated AttendantUnscreened TransferVoice Mail OverflowVoice PromptsVolume ControlSimilar to telephone system unscreened transfers in whichthe transferring party immediately extends the call.After an Automated Attendant caller dials an extension,<strong>IntraMail</strong> immediately transfers the call to the destinationand hangs up. Any recalls or additional routing are handledby the telephone system – just as with any otherunscreened transfer.■ See Unscreened Transfer on page 180 for more.■ Also see Screened Transfer in this glossary.Ensures that <strong>IntraMail</strong> will pick up calls that don’t gothrough.■ See Voice Mail Overflow on page 183 for more.<strong>IntraMail</strong> provides Voice Prompts that tell the extensionuser the status or progress of their call.■ See Voice Prompting Messages on page 186 for more.A mailbox user can turn the volume up or down while listeningto their messages.■ See Volume Control on page 187 for more.Automated Attendant<strong>System</strong><strong>System</strong>Voice Mail2<strong>IntraMail</strong> <strong>System</strong> <strong>Guide</strong> Chapter 2: Features ◆ 21
Announcement MailboxAnnouncement MailboxDescriptionAn Announcement Mailbox plays a pre-recorded announcement to Automated Attendant callers withoutproviding dialing options. The Announcement Mailbox is typically set up to provide information to callers(such as company directions) and then route back to the Automated Attendant. For example:■ The Automated Attendant instructs the caller to dial a digit (e.g., 1) for company directions.- Record this in the Instruction Menu message for the active Call Routing Mailbox. See InstructionMenu on page 105 for more.- Set the dialing options in the Dial Action Table associated with the active Call Routing Mailbox.See Dial Action Table on page 64 for more.■ The caller dials the digit and listens to the prerecorded Announcement Mailbox message for directions.■ After playing the directions, the caller routes back to the Automated Attendant for additional dialingoptions.- See the Hang Up and Next Call Routing Mailbox options in Programming below.The Next Call Routing Mailbox OptionsThe charts beginning on the following page show how an Announcement Mailbox handles AutomatedAttendant calls.■ The first chart explains what happens when the outside call is directly answered by the AnnouncementMailbox. This happens when the Answer Table uses an Announcement Mailbox for routing instead ofa Call Routing Mailbox.■ The second chart explains what happens when the outside call is answered by a Call Routing Mailboxand then routed to the Announcement Mailbox. This can happen, for example, when a caller dials adigit to hear an announcement of company directions.■ See Answer Tables on page 30 for more on setting up Answer Tables.22 ◆ Chapter 2: Features <strong>IntraMail</strong> <strong>System</strong> <strong>Guide</strong>
Announcement MailboxDirect Announcement Mailbox Routing(If the outside caller routes directly to the Announcement Mailbox)8006-Next CallRouting Mailbox8006-RepeatCount8006-Hang UpAfterActionUndefined 0 (No repeats) Yes or No ■ If the caller doesn’t dial, after theannouncement <strong>IntraMail</strong> hangs up.■ If the caller dials a digit during theannouncement, <strong>IntraMail</strong> says “That is aninvalid entry” and hangs up.0-15 (valid CallRouting Mailbox)Undefined0-15 (valid CallRouting Mailbox)0 (No repeats) No ■ If the caller doesn’t dial, after theannouncement they route to the Next CallRouting Mailbox.■ If the caller dials a digit during theannouncement, they route to the Next CallRouting Mailbox.Yes ■ If the caller doesn’t dial, after theannouncement <strong>IntraMail</strong> hangs up.■ If the caller dials a digit during theannouncement, they route to the Next CallRouting Mailbox.x (x number ofrepeats)x (x number ofrepeats)Yes or No ■ If caller doesn’t dial, they hear theannouncement x number of times and then<strong>IntraMail</strong> hangs up.■ If the caller dials a digit during theannouncement, <strong>IntraMail</strong> says “That is aninvalid entry” and aborts the announcement.The announcement repeats (ifallowed by the Repeat Count) and then<strong>IntraMail</strong> hangs up.No ■ If caller doesn’t dial, they hear theannouncement x number of times and thenroute to the Next Call Routing Mailbox.■ If the caller dials a digit during theannouncement, they route to the Next CallRouting Mailbox.Yes ■ If caller doesn’t dial, they hear theannouncement x number of times and then<strong>IntraMail</strong> hangs up.■ If the caller dials a digit during theannouncement, they route to the Next CallRouting Mailbox.2<strong>IntraMail</strong> <strong>System</strong> <strong>Guide</strong> Chapter 2: Features ◆ 23
Announcement Mailbox8006-Next CallRouting MailboxRouted Announcement Mailbox Routing (Page 1 of 2)(If the outside caller routes to the Announcement Mailbox from a Call Routing Mailbox)8006-RepeatCount8006-Hang UpAfterActionUndefined 0 (No repeats) No ■ If the caller doesn’t dial, after theannouncement the caller goes back to theinitial Call Routing Mailbox.■ If the caller dials a digit during theannouncement, <strong>IntraMail</strong> says “That is aninvalid entry” and routes the caller goesback to the initial Call Routing Mailbox.Yes ■ If the caller doesn’t dial, after theannouncement <strong>IntraMail</strong> hangs up.■ If the caller dials a digit during theannouncement, <strong>IntraMail</strong> says “That is aninvalid entry” and hangs up.0-15 (valid CallRouting Mailbox)Undefined0 (No repeats) No ■ If the caller doesn’t dial, after theannouncement they route to the Next CallRouting Mailbox.■ If the caller dials a digit during theannouncement, they route to the Next CallRouting Mailbox.Yes ■ If the caller doesn’t dial, after theannouncement <strong>IntraMail</strong> hangs up.■ If the caller dials a digit during theannouncement, they route to the Next CallRouting Mailbox.x (x number ofrepeats)No ■ If caller doesn’t dial, they hear theannouncement x number of times and thengo back to the initial Call Routing Mailbox.■ If the caller dials a digit during theannouncement, <strong>IntraMail</strong> says “That is aninvalid entry” and aborts the announcement.The announcement repeats (ifallowed by the Repeat Count) and then<strong>IntraMail</strong> routes back to the initial CallRouting Mailbox.Yes ■ If caller doesn’t dial, they hear theannouncement x number of times and then<strong>IntraMail</strong> hangs up.■ If the caller dials a digit during theannouncement, <strong>IntraMail</strong> says “That is aninvalid entry” and aborts the announcement.The announcement repeats (ifallowed by the Repeat Count) and then<strong>IntraMail</strong> hangs up.24 ◆ Chapter 2: Features <strong>IntraMail</strong> <strong>System</strong> <strong>Guide</strong>
Announcement MailboxRouted Announcement Mailbox Routing (Page 2 of 2)(If the outside caller routes to the Announcement Mailbox from a Call Routing Mailbox)8006-Next CallRouting Mailbox0-15 (valid CallRouting Mailbox)Related Features8006-RepeatCountx (x number ofrepeats)8006-Hang UpActionAfterNo ■ If caller doesn’t dial, they hear theannouncement x number of times and thenroute to the Next Call Routing Mailbox.■ If the caller dials a digit during theannouncement, they route to the Next CallRouting Mailbox.Yes ■ If caller doesn’t dial, they hear theannouncement x number of times and then<strong>IntraMail</strong> hangs up.■ If the caller dials a digit during theannouncement, they route to the Next CallRouting Mailbox.Automated Attendant (page 42)The Automated Attendant can route callers to an Announcement Mailbox.Call Routing Mailbox (page 49)A Call Routing Mailbox (and the associated Dial Action Table) provides dialing options to AutomatedAttendant callers.Master Mailbox (page 122)You can set up Master Mailboxes as additional Announcement Mailboxes.Next Call Routing Mailbox (page 148)The Next Call Routing mailbox provides additional routing options to Announcement Mailbox callers.<strong>System</strong> Administrator (page 171)The <strong>System</strong> Administrator can record the Announcement Mailbox message.2ProgrammingStep 1Step 2Step 3Set up the Announcement Mailbox.1.1 8006 - <strong>IntraMail</strong> Routing Mailboxes: Mailbox Number on page 227.- Select the Routing Mailbox you want to use as an Announcement Mailbox.✔By default, Routing Mailboxes 008-015 are Announcement Mailboxes.1.2 8006 - <strong>IntraMail</strong> Routing Mailboxes: Mailbox Type on page 227.- Enter 2 to make the selection mailbox an Announcement Mailbox.✔By default, Routing Mailboxes 008-015 are Announcement Mailboxes.1.3 8006 - <strong>IntraMail</strong> Routing Mailboxes: Mailbox Active on page 227.- Enter Y (9) to make the Announcement Mailbox active.To record the Announcement Message:2.1 See Operation below.✔By default, a message is not recorded.To have <strong>IntraMail</strong> hang up after playing the Announcement Mailbox message (without providingadditional dialing options):3.1 8006 - <strong>IntraMail</strong> Routing Mailboxes: Hang Up After on page 229.- Enter Y (9) to have <strong>IntraMail</strong> hang up after the announcement.✔By default, this option is disabled (N).<strong>IntraMail</strong> <strong>System</strong> <strong>Guide</strong> Chapter 2: Features ◆ 25
Announcement MailboxStep 4Step 5Step 6To provide Announcement Mailbox callers with more dialing options (instead of hanging up):4.1 8006 - <strong>IntraMail</strong> Routing Mailboxes: Hang Up After on page 229.- Enter N (6) to prevent <strong>IntraMail</strong> from hanging up after the announcement.✔By default, this option is disabled (N).4.2 Review Next Call Routing Mailbox on page 148 to set up additional dialing options forAnnouncement Mailbox callers.To have the Announcement Mailbox message repeat while the caller listens:5.1 8006 - <strong>IntraMail</strong> Routing Mailboxes: Repeat Count on page 229.- Enter the Repeat Count (0-10).✔By default, the count is 0 (no repeats).Set the maximum length of the Announcement Mailbox message.6.1 8004 - <strong>IntraMail</strong> <strong>System</strong> Options: Subscriber Message Length on page 213.- Enter the maximum length of the Announcement Mailbox message (1-4095 seconds).✔By default, this interval is 120 seconds.OperationLog onto <strong>System</strong> Administrator’s mailbox.SA (72)Recording an Announcement Mailbox Message[Super Display Soft Key] - [Keyset Soft Key]Access <strong>System</strong> Administrator options.[SYS ADMIN] - [N/A]A (2)Select Announcement Mailbox message.[ANNOUNCEMENT] - [ANN]Enter the Announcement Mailbox number.L (5)R (7)Listen to current Announcement Mailbox message.[LISTEN] - [LSTN]# Exit listen mode.Record a new Announcement Mailbox message.[RECORD] - [REC]Record message.* Pause or restart recording.[RESUME] - [RESUME][PAUSE] - [PAUSE]E (3) Erase recording.[CANCEL] - [CNCL]# Exit recording mode.[DONE] - [DONE]E (3) Erase the Announcement Mailbox message.[ERASE] - [ERASE]# Go back to the <strong>System</strong> Administrator options.[EXIT] - [EXIT]# Go back to the <strong>System</strong> Administrator options.[EXIT] - [EXIT]0 Plays Help message.26 ◆ Chapter 2: Features <strong>IntraMail</strong> <strong>System</strong> <strong>Guide</strong>
Announcement MessageAnnouncement MessageDescriptionThe Announcement Message is the voice message that the <strong>System</strong> Administrator records for a specificAnnouncement Mailbox. See Announcement Mailbox on page 22 for more.Related FeaturesProgrammingSee Announcement Mailbox on page 22.See Announcement Mailbox on page 22.OperationSee Announcement Mailbox on page 22.2<strong>IntraMail</strong> <strong>System</strong> <strong>Guide</strong> Chapter 2: Features ◆ 27
Answer Schedule OverrideAnswer Schedule OverrideDescriptionAnswer Schedule Override provides alternate answering for Automated Attendant calls. When enabled,Answer Schedule Override sends calls to the specified Override Mailbox. The Override Mailbox can be anAnnouncement, Call Routing, or Subscriber mailbox. You can use Answering Schedule Override to provideholiday and bad weather closing announcements, for example. Enable override when you want callers tohear the special announcements; disable override to have the Automated Attendant answer normally. You canenable Answer Schedule Override from system programming or from the <strong>System</strong> Administrator Mailbox.■ If the Override Mailbox is an Announcement Mailbox, the outside caller will hear the recordedannouncement. Depending on how the Announcement Mailbox is programmed, <strong>IntraMail</strong> will then hangup, reroute the call, or provide additional dialing options.■ If the Override Mailbox is a Call Routing Mailbox, the outside caller will hear the instruction menu andcan dial any options allowed by the associated Dial Action Table.■ If the Override Mailbox is a Subscriber Mailbox, the outside caller hears the mailbox greeting (ifrecorded) and can leave a message.Related FeaturesProgrammingAnnouncement Mailbox (page 22)The Override Mailbox can be an Announcement Mailbox.Call Routing Mailbox (page 49)The Override Mailbox can be a Call Routing Mailbox.Subscriber Mailbox (page 168)The Override Mailbox can be a Subscriber Mailbox.<strong>System</strong> Administrator (page 171)Optionally enable Answer Schedule Override from the <strong>System</strong> Administrator Mailbox.Step 1Step 2Step 3Optionally Enable Answer Schedule Override from system programming.1.1 8007 - <strong>IntraMail</strong> Answer Tables: Answer Schedule Override on page 235.- Enter Y (9) to enable Answer Schedule Override.- You can also enable Answer Schedule Override from the <strong>System</strong> Administrator Mailbox.See Operation below.✔By default, Answer Schedule Override is disabled (N).Specify the Override Mailbox.2.1 8007 - <strong>IntraMail</strong> Answer Tables: Override Mailbox on page 235.- For the selected Answer Table, choose the mailbox to use as the Override Mailbox. TheOverride Mailbox can be an:Announcement Mailbox number (000-015)Call Routing Mailbox number (000-015)Master Mailbox number (600-607, 700-707)Subscriber Mailbox number (300-427)UND (Undefined - entered by pressing CLEAR)✔By default, the Override Mailbox is UND (Undefined - entered by pressing CLEAR).Optionally enable Answer Schedule Override from the <strong>System</strong> Administrator Mailbox.- See Operation below.28 ◆ Chapter 2: Features <strong>IntraMail</strong> <strong>System</strong> <strong>Guide</strong>
Answer Schedule OverrideOperationLog onto <strong>System</strong> Administrator’s Mailbox.SA (72)Enabling Answer Schedule Override[Super Display Soft Key] - [Keyset Soft Key]Access <strong>System</strong> Administrator options.[SYS ADMIN] - [N/A]O (6) Access Answer Schedule Override.[ANS SCHEDULE] - [N/A]1-8 Enter the number of the Answer Table you want to override.• You go to the Answer Schedule Override Menu.O (6) Turn Answer Schedule Override on or off.[ON] - [ON][OFF] - [OFF]C (2) Select the Override Mailbox.[MAILBOX] - [MBOX]Enter the Override Mailbox number.• The Override Mailbox can be an Announcement, Call Routing,Master, or Subscriber Mailbox.# Go back to the Answer Schedule OverrideMenu without entering an Override Mailbox.[EXIT] - [EXIT]0 Plays Answer Schedule Override Menu Help message.# Go back to the <strong>System</strong> Administrator Menu.[EXIT] - [EXIT]# Go back to the <strong>System</strong> Administrator Menu.[EXIT] - [EXIT]# Go back to the Main Menu.[EXIT] - [EXIT]0 Plays Help message.2<strong>IntraMail</strong> <strong>System</strong> <strong>Guide</strong> Chapter 2: Features ◆ 29
Answer TablesAnswer TablesDescriptionThe Answer Table determines how the Automated Attendant answers outside calls on each trunk, accordingto the time of the day and day of the week that the call is ringing. <strong>IntraMail</strong> provides 8 Answer Tables. TheAnswer Table is an integral part of the Automated Attendant. The Automated Attendant can automaticallyanswer the telephone system’s incoming calls, play an Instruction Menu message, and provide dialingoptions to callers.There are 3 major Automated Attendant components:■ Answer TablesThe Answer Table determines how the Automated Attendant answers outside calls on each trunk, accordingto the time of the day and day of the week that the call is ringing. The Answer Table divides the timeof day and day of the week into individual schedules, which in turn assign a Call Routing Mailbox toeach call. When a specific schedule is not in effect, the Answer Table uses its Default Mailbox to determinerouting.✔By default, all trunks use Answer Table 1. Answer Table 1 has a single schedule that runs Mondaythrough Friday from 8:30AM to 5:00PM.■ Call Routing Mailbox (page 49)A Call Routing Mailbox is a mailbox associated with an individual Answer Table schedule or the DefaultMailbox. It specifies which dialing options (Dial Action Table) are available to callers. It also providesthe Instruction Menu to callers which typically greets the callers and describes the dialing options.✔By default, Answer Table 1 has a single schedule that runs Monday through Friday from 8:30AM to5:00PM. This schedule and the Default Mailbox both use Call Routing Mailbox 000.■ Dial Action Table (page 64)Once the Automated Attendant answers, the Dial Action Table provides the dialing options to callers.Each digit a caller can dial is assigned a specific action (function) in the Dial Action Table. The dialaction used depends on the setting in the active Call Routing Mailbox, which in turn depends on theAnswer Table setup.✔By default, Call Routing Mailbox 000 uses Dial Action Table 1.The block diagram below shows the default <strong>IntraMail</strong> Automated Attendant configuration.DIL to Voice MailMaster (700)● 1003 - Direct Termination (Day)● 1003 - Direct Termination (Night)Trunks Route toAnswer Table 1● 1003 - Answer TableDefault Automated Attendant AnsweringAnswer Table 1Schedule 1 orDefault Mailbox● 8007 - Answer Tables● 8007 - Schedule Entry● 8007 - Default MailboxCalls always route to Call Routing Mailbox 000- Schedule 1 active M-F 8:30AM-5:00PM.- Default Mailbox active all other times.Dial Action Table 1Dialing OptionsDial an extension number, or0 for the operatorAll trunksCall RoutingMailbox 000● 8006 - Routing Mailboxes (000)Dial ActionTable 1● 8008 - Dial Action TablesFrom a <strong>System</strong> Administrator'smailbox, record an InstructionMenu (SA + I) for the active CallRouting Mailbox.Use AnswerTable 1Which chooses CallRouting Mailbox 000.And Dial ActionTable 1With thesedialing options30 ◆ Chapter 2: Features <strong>IntraMail</strong> <strong>System</strong> <strong>Guide</strong>
The Default Mailbox and Routing HierarchyAnswer TablesThe Default Mailbox provides routing for an Answer Table during periods when a schedule is not in effect.By default, for example, Answer Table 1 Schedule 1 is active Monday through Friday from 8:30 AM to 5:00PM. The Default Mailbox for Answer Table 1 is active during all other times (i.e., evenings and weekends).Since Schedule 1 and the Default Mailbox both use Call Routing Mailbox 000, initially the routing is thesame 24 hours a day, 7 days a week. See Customizing an Answer Table below for more.When setting up your Answer Tables, keep in mind that a more specific type of routing has priority over aless specific type of routing. When selecting which routing to follow when there is more than one choice fora specific time, <strong>IntraMail</strong> will choose in the following order:■ Date Schedule■ Day of Week Schedule■ Range of Days Schedule■ Default MailboxFor example, a Date Schedule set up for Christmas day will have priority over any other schedules in effecton December 25.Customizing an Answer TableUse the following examples as a guide when customizing your Answer Tables to meet specific site requirements.Refer to Programming below for the specifics.2To set up daytime and evening/weekend answering (2 schedules):In this example, use the Default Mailbox (Call Routing Mailbox 000) for evening/weekend answering andspecify a new Call Routing Mailbox for daytime answering.1. Change the Call Routing Mailbox for Answer Table 1, Schedule 1.■ In 8007 - <strong>IntraMail</strong> Answer Tables, assign Call Routing Mailbox 001 to Answer Table 1, Schedule 1.You will use this for daytime answering.2. From a <strong>System</strong> Administrator’s Mailbox, record an evening/weekend Instruction Menu message for CallRouting mailbox 000.■ This message will play to callers Monday through Friday from 5:00 PM to 8:30 AM and on weekends.3. From a <strong>System</strong> Administrator’s Mailbox, record a daytime Instruction Menu message for Call RoutingMailbox 001.■ This message will play to callers Monday through Friday from 8:30 AM to 5:00 PM.To set up daytime, evening, and weekend answering (3 schedules):This example builds on the example above, but adds a third schedule that will play just on weekday evenings.1. Change the Call Routing Mailbox for Answer Table 1, Schedule 1.■ In 8007 - <strong>IntraMail</strong> Answer Tables, assign Call Routing Mailbox 001 to Answer Table 1, Schedule 1.As in the 2 schedule example, you will use this for daytime answering.2. Create a new schedule that will run only in the evenings.■ In 8007 - <strong>IntraMail</strong> Answer Tables, create Schedule 2 for Answer Table 1 that will run Mondaythrough Friday from 5:00 PM to 11:00 PM. Assign Call Routing Mailbox 002 to this new schedule.3. From a <strong>System</strong> Administrator’s Mailbox, record a late night/weekend Instruction Menu Message for CallRouting mailbox 000.■ This message will play Monday through Friday from 11:00 PM to 8:30 AM, as well as on weekends.4. From a <strong>System</strong> Administrator’s mailbox, record the weekday Instruction Menu Message for Call RoutingMailbox 001.■ This message will play Monday through Friday from 8:30 AM to 5:00 PM.5. From a <strong>System</strong> Administrator’s Mailbox, record the weekday evening Instruction Menu Message forCall Routing Mailbox 002.■ This message will play Monday through Friday from 5:00 PM to 1:00 PM<strong>IntraMail</strong> <strong>System</strong> <strong>Guide</strong> Chapter 2: Features ◆ 31
Answer TablesRelated FeaturesProgrammingAutomated Attendant (page 42)The Answer Table determines how the Automated Attendant answers calls.Call Routing Mailbox (page 49)The Call Routing Mailbox provides the dialing instructions (Dial Action Table) and announcements toAutomated Attendant Callers.Dial Action Table (page 64)The Dial Action Table defines the dialing options for the Call Routing Mailbox chosen by the AnswerTable, which in turn provides those options to Automated Attendant callers.Step 1Step 2Step 3Step 4Assign Answer Tables to trunks.1.1 1003 - Trunk Options: Answer Table on page 196.- Assign an Answer Table (1-8) to each trunk that the Automated Attendant should answer.✔By default, all trunks are assigned to Answer Table 1.Set up the Automated Attendant to answer trunk calls.2.1 1003 - Trunk Options: Direct Termination (Day) on page 195.- Enter 700 to have the Automated Attendant answer calls on the trunk during the day.✔By default, all trunks are set to Key Ring during the day.2.2 1003 - Trunk Options: Direct Termination (Night) on page 195.- Enter 700 to have the Automated Attendant answer calls on the trunk at night.✔By default, all trunks are set to Key Ring at night.Select the Answer Table you want to customize.3.1 8007 - <strong>IntraMail</strong> Answer Tables: Answer Table on page 235.- Select the Answer Table you want to customize (1-8).3.2 8007 - <strong>IntraMail</strong> Answer Tables: Next Answer Table on page 236.- If 10 Answer Schedules within an Answer Table are not sufficient, enter the number of theAnswer Table to which you want to link the selected table. <strong>IntraMail</strong> treats the two linkedtables as a single 20 entry Answer Table.✔By default, Answer Tables are not linked.3.3 8007 - <strong>IntraMail</strong> Answer Tables: Default Mailbox on page 236.- Set the mailbox the Answer Table will use if no Answer Schedule is in effect.- By default, this option is 000 for Answer Table 1 and UND (Undefined - entered by pressingCLEAR) for all others.Setting up a Type 1 (Day of Week) schedule.4.1 8007 - Answer Tables: Schedule Entry on page 236.- Select the Schedule Entry you want to customize.4.2 8007 - <strong>IntraMail</strong> Answer Tables: Schedule Type on page 236.- Enter 1 to make the Schedule Entry a Day of Week Schedule.✔By default, Schedule Entry 1 of Answer Table 1 is a Range of Days (Type 2) schedule. Allother Schedule Entries are undefined.4.3 8007 - <strong>IntraMail</strong> Answer Tables: Routing Mailbox Number on page 238.- Select the Routing Mailbox (000-015) that will answer calls when this Schedule Entry isactive.- You can optionally assign a Subscriber Mailbox for this option. This will route outside callersdirectly to a subscriber’s mailbox so they can leave a message.✔By default, there are no Type 1 (Day of Week) schedules enabled.4.4 8007 - Answer Tables: Day of the Week on page 238.32 ◆ Chapter 2: Features <strong>IntraMail</strong> <strong>System</strong> <strong>Guide</strong>
Step 5Step 6- Specify the day of the week the Schedule Entry should be active.✔By default, there are no Type 1 (Day of Week) schedules enabled.4.5 8007 - <strong>IntraMail</strong> Answer Tables: Schedule Start Time on page 238.- Set the time of day the Schedule Entry should start on the day specified.✔By default, there are no Type 1 (Day of Week) schedules enabled.4.6 8007 - <strong>IntraMail</strong> Answer Tables: Schedule Stop Time on page 238.- Set the time of day the Schedule Entry should stop on the day specified.✔By default, there are no Type 1 (Day of Week) schedules enabled.4.7 8007 - <strong>IntraMail</strong> Answer Tables: Type 1 (Day of Week) Example on page 239.- Review this example if you need help setting up your Schedule Entry.Answer TablesSetting up a Type 2 (Range of Days) schedule.5.1 8007 - <strong>IntraMail</strong> Answer Tables: Schedule Entry on page 236.- Select the Schedule Entry you want to customize.5.2 8007 - <strong>IntraMail</strong> Answer Tables: Schedule Type on page 236.- Enter 2 to make the Schedule Entry a Range of Days Schedule.✔By default, Schedule Entry 1 of Answer Table 1 is a Range of Days (Type 2) schedule. Allother Schedule Entries are undefined.5.3 8007 - <strong>IntraMail</strong> Answer Tables: Routing Mailbox Number on page 240.- Select the Routing Mailbox (000-015) that will answer calls when this Schedule Entry isactive.- You can optionally assign a Subscriber Mailbox for this option. This will route outside callersdirectly to a subscriber’s mailbox so they can leave a message.✔By default, Schedule 1 of Answer Table 1 uses Call Routing Mailbox 000. All other schedulesare undefined.5.4 8007 - <strong>IntraMail</strong> Answer Tables: Schedule Start Day on page 240.- Specify the day of the week the Schedule Entry should be become active (start).✔By default, Schedule 1 of Answer Table 1 starts on Monday (2). All other schedules areundefined.5.5 8007 - Answer Tables: Schedule End Day on page 240- Specify the day of the week the Schedule Entry should become inactive (stop).✔By default, Schedule 1 of Answer Table 1 ends on Friday (6). All other schedules are undefined.5.6 8007 - <strong>IntraMail</strong> Answer Tables: Schedule Start Time on page 241.- Set the time of day the Schedule Entry should start on the day specified.✔By default, Schedule 1 of Answer Table 1 starts at 8:30AM (08:30). All other schedules areundefined.5.7 8007 - Answer Tables: Schedule Stop Time on page 241.- Set the time of day the Schedule Entry should stop on the day specified.✔By default, Schedule 1 of Answer Table 1 ends at 5:00PM (17:00). All other schedules areundefined.5.8 8007 - Answer Tables: Type 2 (Range of Days) Example on page 241.- Review this example if you need help setting up your Schedule Entry.Setting up a Type 3 (Date) schedule.6.1 8007 - <strong>IntraMail</strong> Answer Tables: Schedule Entry on page 236.- Select the Schedule Entry you want to customize.6.2 8007 - <strong>IntraMail</strong> Answer Tables: Schedule Type on page 236.- Enter 3 to make the Schedule Entry a Date Schedule.✔By default, Schedule Entry 1 of Answer Table 1 is a Range of Days (Type 2) schedule. Allother Schedule Entries are undefined.6.3 8007 - <strong>IntraMail</strong> Answer Tables: Routing Mailbox Number on page 242.- Select the Routing Mailbox (000-015) that will answer calls when this Schedule Entry isactive.- You can optionally assign a Subscriber Mailbox for this option. This will route outside callersdirectly to a subscriber’s mailbox so they can leave a message.2<strong>IntraMail</strong> <strong>System</strong> <strong>Guide</strong> Chapter 2: Features ◆ 33
Answer Tables✔By default, there are no Type 3 (Date) schedules defined.6.4 8007 - <strong>IntraMail</strong> Answer Tables: Schedule Run Date on page 242.- Specify the date on which the Schedule Entry should become active (start).✔By default, there are no Type 3 (Date) schedules defined.6.5 8007 - <strong>IntraMail</strong> Answer Tables: Schedule Start Time on page 242.- Set the time of day the Schedule Entry should start on the date specified.✔By default, there are no Type 3 (Date) schedules defined.6.6 8007 - Answer Tables: Schedule Stop Time on page 243.- Set the time of day the Schedule Entry should stop on the date specified.✔By default, there are no Type 3 (Date) schedules defined.6.7 8007 - Answer Tables: Type 3 (Date) Example on page 244.- Review this example if you need help setting up your Schedule Entry.OperationN/A34 ◆ Chapter 2: Features <strong>IntraMail</strong> <strong>System</strong> <strong>Guide</strong>
Answering Machine EmulationAnswering Machine EmulationDescriptionSoftwareNote:Operation is enhanced in software version 03.20.07 or higher when Call Screening is enabled.A user’s keyset can work like a home answering machine. This lets <strong>IntraMail</strong> screen their calls, just like theiranswering machine at home. If activated, the extension’s incoming calls route to the user’s Subscriber Mailbox.Once the mailbox answers, the user hears two alert tones followed by the caller’s incoming message.The keyset user can then:■ Let the call go through to their mailbox, or■ Intercept the call.Related FeaturesProgrammingSubscriber Mailbox (page 168)Subscriber Mailbox users can take advantage of Answering Machine Emulation.No additional programming required.2OperationPersonal Answering Machine Emulation (All Versions when Call Screening is Disabled)To enable Personal Answering Machine Emulation:1. Press ICM and dial *37.2. Dial 2 to have AME pick up all calls.ORDial 8 to have AME pick up just outside calls.To cancel Personal Answering Machine Emulation:1. Press ICM and dial *30.When Personal Answering Machine Emulation broadcasts your caller’s voice, you can:■ Do nothing to have the caller’s message automatically recorded in your mailbox.■ Press SPK or lift the handset to intercept the call.■ Press MW to stop the broadcast and send the call directly to your mailbox.<strong>IntraMail</strong> <strong>System</strong> <strong>Guide</strong> Chapter 2: Features ◆ 35
Answering Machine EmulationPersonal Answering Machine Emulation (03.20.07 or Higher when Call Screening is Enabled)[Super Display Soft Key] - [Keyset Soft Key]When Personal Answering Machine Emulation broadcasts your caller’s voice, you can:■ While you are listening to the broadcast, SPK flashes and MW lights steadily on.1. Do nothing to have the caller’s voice automatically recorded in your mailbox.OR1. Press SPK or lift the handset to intercept the call. (If you extension is in the headset mode, you can onlypress SPK).OR1. Press MW to switch to the Call Screening mode.After switching to the Call Screening modeTo intercept the call (and stop recording the message):1. Press flashing MW key.[ANSWER] - [ANSW]To hear your caller’s message as it is recorded in your mailbox:1. [SCREEN] - [SCRN]To intercept the call (and stop recording the message):1. Press SPK, lift the handset, or press MW.[ANSWER] - [ANSW]To continue listening to your caller’s message as it is being recorded:1. Do nothing.To exit Call Screening and allow the message to continue recording in private:1. N/A[EXIT] - [EXIT]To use another feature or process another call:1. Press any other feature key.To exit Call Screening and allow the message to continue being recorded in private:1. N/A[EXIT] - [EXIT]To use another feature or process another call:1. Lift the handset, press SPK, or press any other feature key.■ Call Screening is only functional while the telephone is on-hook.36 ◆ Chapter 2: Features <strong>IntraMail</strong> <strong>System</strong> <strong>Guide</strong>
Auto Attendant Do Not DisturbAuto Attendant Do Not DisturbDescriptionWhen a subscriber enables Auto Attendant Do Not Disturb, Automated Attendant calls to their extension godirectly to their mailbox. Their phone will not ring for calls from the Automated Attendant. You can optionallyenable Auto Attendant Do Not Disturb from system programming. A subscriber typically turns on AutoAttendant Do Not Disturb when they need to work uninterrupted at their desk by outside callers sent fromthe Automated Attendant.Keep in mind that Auto Attendant Do Not Disturb will not block Intercom calls from co-workers or any othertype of outside call not routed through the Automated Attendant. For example, with Automated Attendant DoNot Disturb enabled, Direct Inwards Lines and transferred outside calls to an extension work normally.Related FeaturesCall Forward to a Mailbox (page 47)If a subscriber has their calls forwarded immediately to their mailbox, Auto Attendant Do Not Disturb isnot necessary (i.e., the operations are redundant).Greeting (page 94)A subscriber does not have to have their greeting recorded to activate Auto Attendant Do Not Disturb.2ProgrammingStep 1Step 2Enable Auto Attendant Do Not Disturb From Your Subscriber Mailbox.1.1 See Operation below.Optionally enable Auto Attendant Do Not Disturb from <strong>System</strong> Programming.2.1 1808 - <strong>IntraMail</strong> Subscriber Mailbox Options: Auto Attendant Do Not Disturb on page 204.- Enter Y (9) to enable Auto Attendant Do Not Disturb.✔By default, this option is disabled (N).<strong>IntraMail</strong> <strong>System</strong> <strong>Guide</strong> Chapter 2: Features ◆ 37
Auto Attendant Do Not DisturbOperationSetting Up Auto Attendant Do Not Disturb and Recording a Greeting (Prior to software version 03.20.07)[Super Display Soft Key] - [Keyset Soft Key]Log onto Subscriber Mailbox.G (4)Access the Mailbox Greeting options.[GREETING] - [GREET]<strong>IntraMail</strong> plays a summary of your current settings.L (5)Listen to the active greeting (if recorded).[LISTEN] - [LSTN]# Exit listen mode.O (6) Turn Auto Attendant Do Not Disturb off or on.[DND ON] - [N/A][DND OFF] - [N/A]R (7) Record a new greeting (if not recorded), or rerecord the current greeting.[RECORD] - [REC]Record at the tone, then press # when done.* Pause or restart recording.[RESUME] - [RESUME][PAUSE] - [PAUSE]E (3) Erase the greeting.[CANCEL] - [CNCL]# End the recording.[DONE] - [DONE]E (3) Erase the currently recorded greeting (if any).[ERASE] - [ERASE]# Go back to mailbox Main Menu.[EXIT] - [EXIT]0 Plays Help message.38 ◆ Chapter 2: Features <strong>IntraMail</strong> <strong>System</strong> <strong>Guide</strong>
Auto Attendant Do Not DisturbRecording a Multiple Greeting and Setting Up Auto Attendant Do Not Disturb (Software 03.20.07 or higher)[Super Display Soft Key] - [Keyset Soft Key]Log onto Subscriber Mailbox.G (4)Access the Mailbox Greeting options.[GREETING] - [GREET]<strong>IntraMail</strong> does the following:• Plays a summary of your current settings.• Displays the status of your active Greeting (1-3).[GREETING n: RECORDED] - [GREETING n: RECORDED], or[GREETING n: NOT REC] - [GREETING n: NOT REC]• Shows the Auto Attendant Do Not Disturb status.[AUTO-ATT DND:OFF] - [N/A], or[AUTO-ATT DND:ON] - [N/A]• Provides soft keys for each of the 3 greetings.[GREETING 1] - [GR1][GREETING 2] - [GR2][GREETING 3] - [GR3]Select a Greeting (which also makes it active).(1) [GREETING 1] - [GR1](2) [GREETING 2] - [GR2](3) [GREETING 3] - [GR3]L (5) Listen to the active greeting (if recorded).[LISTEN] - [LSTN]R (7) Record a new greeting (if not recorded), or rerecord thecurrent greeting.[RECORD] - [REC]Record at the tone, then press # when done.* Pause or restart recording.[RESUME] - [RESUME][PAUSE] - [PAUSE]E (3) Erase the greeting.[CANCEL] - [CNCL]# End the recording.[DONE] - [DONE]Erase the currently recorded greeting (if any).[ERASE] - [ERASE]# Go back to the Mailbox Greeting options.[EXIT] - [EXIT]Change Auto Attendant Do Not Disturb.O (6) Turn Auto Attendant Do Not Disturb off or on.[DND ON] - [N/A][DND OFF] - [N/A]# Go back to mailbox Main Menu.[EXIT] - [EXIT]0 Plays Help message.2<strong>IntraMail</strong> <strong>System</strong> <strong>Guide</strong> Chapter 2: Features ◆ 39
Auto Erase or SaveAuto Erase or SaveDescriptionWhen a mailbox user completely listens to a new message and then exits their mailbox, <strong>IntraMail</strong> will eitherautomatically save or erase the message. The setting of this option depends on how the subscriber would prefertheir mailbox to operate. When set to erase, the subscriber can review their messages and retain only thosethey specifically save use the SA option. This is a good choice for a subscriber that receives frequent unessentialmessages. When set to save, the subscriber has the assurance of knowing that every message they listenedto was saved in their mailbox. This is a good choice for those that must carefully review and consider eachnew message.Notes:■ If a subscriber’s mailbox is set to Auto Save messages, <strong>IntraMail</strong> saves partially listened-to messagesbut does not relamp the keyset for those messages. For example:- A subscriber with new messages calls their mailbox.- The subscriber presses L to listen to a portion of each message and then exits their mailbox.- <strong>IntraMail</strong> saves all the messages, turns off the message waiting lamp, and resets the telephone displayto V-MAIL 00 (VM00).■ If you hang up while listening to a new message, <strong>IntraMail</strong> automatically retains the message as anew message.Related FeaturesN/AProgrammingStep 1To set up Auto Erase or Save for a Subscriber Mailbox:1.1 1808 - <strong>IntraMail</strong> Subscriber Mailbox Options: Auto Erase/Save of Messages on page 203.- Select S (7) to save the message; E (3) to erase the message.✔By default, the Subscriber Mailbox will save (S) the message.OperationN/A40 ◆ Chapter 2: Features <strong>IntraMail</strong> <strong>System</strong> <strong>Guide</strong>
Auto Time StampAuto Time StampDescriptionAfter a Subscriber Mailbox user listens to a message, <strong>IntraMail</strong> can optionally announce the time and datethe message was left. The Subscriber can enable Auto Time Stamp from their mailbox, or you can optionallyenable in from system programming. Auto Time Stamp helps if the subscriber needs to know the time anddate of each message they receive without taking any extra steps. With Auto Time Stamp turned on, Intra-Mail automatically announces the date, time, and (optionally) the caller’s number at the end of each message.With Auto Time Stamp turned off, the subscriber must dial TI while listening to a message to get thesame information.Related FeaturesMailbox Options Menu (page 116)Auto Time Stamp is available on the Mailbox Options Menu.Time and Date (page 175)<strong>IntraMail</strong> uses the DS1000/2000 Time and Date.Time and Date Stamp (page 176)An extension can listen to a message and dial a code to hear the time the message was sent.2ProgrammingStep 1Step 2Enable Auto Time Stamp from your Subscriber Mailbox.1.1 See Operation below.Optionally Enable Auto Time Stamp from <strong>System</strong> Programming.2.1 1808 - <strong>IntraMail</strong> Subscriber Mailbox Options: Auto Time Stamp on page 205.- Enter Y (9) to enable Auto Time Stamp.✔By default, Auto Time Stamp is disabled (N).OperationTurning Auto Time Stamp On or Off[Super Display Soft Key] - [Keyset Soft Key]Log onto Subscriber Mailbox.OP (67) Access the Mailbox Options Menu.[MBOX OPTS] - [N/A]AT (28) Access Auto Time Stamp.[TIME STAMP] - [TIME]<strong>IntraMail</strong> plays a summary of your Auto Time Stamp setting.-By default, Auto Time Stamp is turned off.O (6) Turn Auto Time Stamp on or off.[ON] - [ON][OFF] - [OFF]# Go back to the Mailbox Options Menu.[EXIT] - [EXIT]0 Plays Help message.<strong>IntraMail</strong> <strong>System</strong> <strong>Guide</strong> Chapter 2: Features ◆ 41
Automated AttendantAutomated AttendantDescriptionThe Automated Attendant answers outside calls on each trunk, according to the time of the day and day ofthe week that the call is ringing. The Answer Table is an integral part of the Automated Attendant. The AutomatedAttendant can automatically answer the telephone system’s incoming calls, play an Instruction Menumessage, and provide dialing options to callers. There are 3 major Automated Attendant components:■ Answer Tables (page 30)The Answer Table determines how the Automated Attendant answers outside calls on each trunk, accordingto the time of the day and day of the week that the call is ringing. The Answer Table divides the timeof day and day of the week into individual schedules, which in turn assign a Call Routing Mailbox toeach call. When a specific schedule is not in effect, the Answer Table uses its Default Mailbox to determinerouting.✔By default, all trunks use Answer Table 1. Answer Table 1 has a single schedule that runs Mondaythrough Friday from 8:30AM to 5:00PM.■ Call Routing Mailbox (page 49)A Call Routing Mailbox is a mailbox associated with an individual Answer Table schedule or the DefaultMailbox. It specifies which dialing options (Dial Action Table) are available to callers. It also providesthe Instruction Menu to callers which typically greets the callers and describes the dialing options.✔By default, Answer Table 1 has a single schedule that runs Monday through Friday from 8:30AM to5:00PM. This schedule and the Default Mailbox both use Call Routing Mailbox 000.■ Dial Action Table (page 64)Once the Automated Attendant answers, the Dial Action Table provides the dialing options to callers.Each digit a caller can dial is assigned a specific action (function) in the Dial Action Table. The dialaction used depends on the setting in the active Call Routing Mailbox, which in turn depends on theAnswer Table setup.✔By default, Call Routing Mailbox 000 uses Dial Action Table 1.42 ◆ Chapter 2: Features <strong>IntraMail</strong> <strong>System</strong> <strong>Guide</strong>
Automated AttendantThe block diagram below shows the default <strong>IntraMail</strong> Automated Attendant configuration.DIL to Voice MailMaster (700)● 1003 - Direct Termination (Day)● 1003 - Direct Termination (Night)Trunks Route toAnswer Table 1● 1003 - Answer TableDefault Automated Attendant AnsweringAll trunksAnswer Table 1Schedule 1 orDefault Mailbox● 8007 - Answer TablesCall RoutingMailbox 000● 8007 - Schedule Entry● 8007 - Default Mailbox● 8006 - Routing Mailboxes (000)Dial ActionTable 1Calls always route to Call Routing Mailbox 000- Schedule 1 active M-F 8:30AM-5:00PM.- Default Mailbox active all other times.● 8008 - Dial Action TablesFrom a <strong>System</strong> Administrator'smailbox, record an InstructionMenu (SA + I) for the active CallRouting Mailbox.Dial Action Table 1Dialing OptionsDial an extension number, or0 for the operator2Use AnswerTable 1Which chooses CallRouting Mailbox 000.And Dial ActionTable 1With thesedialing optionsRelated FeaturesProgrammingAnswer Tables (page 30)Determines how the Automated Attendant answers outside calls on each trunk.Call Routing Mailbox (page 49)The mailbox associated with an Answer Table that specifies the dialing options (Dial Action Table) andInstruction Menu that announcements are available to Automated Attendant callers.Dial Action Table (page 64)Defines the dialing options for the Call Routing Mailbox chosen by the active Answer Table.Fax Detection (page 86)The Automated Attendant can route outside calls to the company fax machine.Multiple Company Greetings (page 147)One <strong>IntraMail</strong> system can provide individual greetings and dialing options for several companies.Step 1Step 2Assign Answer Tables to trunks.1.1 1003 - Trunk Options: Answer Table on page 196.- Assign an Answer Table (1-8) to each trunk that the Automated Attendant should answer.✔By default, all trunks are assigned to Answer Table 1.Set up the Automated Attendant to answer trunk calls.2.1 1003 - Trunk Options: Direct Termination (Day) on page 195.- Enter 700 to have the Automated Attendant answer calls on the trunk during the day.✔By default, all trunks are set to Key Ring during the day.<strong>IntraMail</strong> <strong>System</strong> <strong>Guide</strong> Chapter 2: Features ◆ 43
Automated Attendant2.2 1003 - Trunk Options: Direct Termination (Night) on page 195.- Enter 700 to have the Automated Attendant answer calls on the trunk at night.✔By default, all trunks are set to Key Ring at night.Step 3Step 4Step 5Step 6Set up the Answer Tables.3.1 Turn to Answer Tables on page 30 for more.✔By default, all trunks use Answer Table 1. Answer Schedule 1 is active and runs continuously.Set up the Call Routing Mailboxes.4.1 Turn to Call Routing Mailbox on page 49 for more.✔The active schedule (Answer Table 1, Answer Schedule 1) uses Call Routing Mailbox 000.Set up the Dial Action Tables.5.1 Turn to Dial Action Table on page 64 for more.✔By default, Call Routing Mailbox 000 uses Dial Action Table 1.Set the maximum message length for Automated Attendant callers leaving a message in amailbox.6.1 1808 - <strong>IntraMail</strong> Subscriber Mailbox Options: Subscriber Message Length on page 213.- This sets the maximum message length (1-4095 seconds) for outside Automated Attendantcallers accessing a mailbox via a LOGON or GOTO command.✔The default setting is 120 seconds.6.2 1808 - <strong>IntraMail</strong> Subscriber Mailbox Options: Non-Subscriber Message Length on page 213.- This sets the maximum message length (1-4095 seconds) for outside Automated Attendantcallers leaving a message in a Subscriber Mailboxes.✔The default setting is 120 seconds.OperationUsing the Automated AttendantFor the outside caller:1. After Automated Attendant answers, the voice prompts will instruct you on which digits to dial.44 ◆ Chapter 2: Features <strong>IntraMail</strong> <strong>System</strong> <strong>Guide</strong>
Automated Attendant TransferAutomated Attendant TransferDescriptionAn extension user can transfer their trunk call to the Automated Attendant so the outside caller can use theAutomated Attendant dialing options. This helps an outside caller, for example, that wants to return to theAutomated Attendant so they can dial another co-worker or use a different Automated Attendant option.Note: Extensions cannot call or be transferred to the <strong>IntraMail</strong> Automated Attendant.Related FeaturesProgrammingAutomated Attendant (page 42)The Automated Attendant can automatically answer the telephone system’s incoming calls, play anInstruction Menu message, and provide dialing options to callers.No additional programming required.2OperationAutomated Attendant TransferTo transfer an outside call to the Automated Attendant:1. While on an outside call, press ICM.2. Dial the voice mail master number (e.g., 700).3. Hang up.<strong>IntraMail</strong> <strong>System</strong> <strong>Guide</strong> Chapter 2: Features ◆ 45
Automatic Routing for Rotary Dial CallersAutomatic Routing for Rotary Dial CallersDescriptionIf an Automated Attendant caller doesn’t dial any digits, <strong>IntraMail</strong> will automatically route them to a specifiedoption (such as the operator or a mailbox). This lets rotary telephone users stay on the line to leave amessage or have their call processed. Without Automatic Routing for Rotary Dial Callers, rotary callerswould not be able to use the Automated Attendant.Related FeaturesProgrammingGuest Mailbox (page 101)Consider routing rotary dial callers to a Guest Mailbox to collect messages.Step 1Program the Dial Action Table TIMEOUT function.1.1 8008 - <strong>IntraMail</strong> Dial Action Tables on page 246.- Since rotary dial callers can’t dial DTMF digits, the TIMEOUT function provides routing.✔By default, TIMEOUT is an Unscreened Transfer (UTRF) to the operator (300).OperationN/A46 ◆ Chapter 2: Features <strong>IntraMail</strong> <strong>System</strong> <strong>Guide</strong>
Call Forward to a MailboxCall Forward to a MailboxDescriptionA subscriber can easily forward calls to their Subscriber Mailbox. Instead of dialing an extension as the forwardingdestination, the user just presses their MW key instead. With Call Forward to a Mailbox, the subscriberis assured that their calls don’t get forgotten when they are busy or unavailable to pick up their calls. Unlike withExtension Hunting to Voice Mail, forwarding lets the subscriber choose when and how they want their unansweredcalls to go to voice mail (rather than have the telephone system reroute their calls automatically).Call Forwarding a Subscriber’s Direct Inward Line to their MailboxThe following table describes how <strong>IntraMail</strong> handles a subscriber’s Direct Inward Line when it is Call Forwardedto their mailbox. The routing occurs when the caller dials a digit while listening to the recorded ordefault mailbox greeting.1808-Next CallRouting MailboxDialing Options while Listening to a Subscriber Mailbox Greeting1808 - Dialing Option DigitDialedActionUndefined No 0 Caller hears, “That is an invalid entry,” and1-9the greeting repeats.# <strong>IntraMail</strong> hangs up.* Caller skips greeting and can immediatelystart recording.0-15 (valid CallRouting Mailbox)0-15 (valid CallRouting Mailbox)No 0 Caller follows 0 action in Next Call RoutingMailbox.1-9 Caller hears, “That is an invalid entry,” thegreeting repeats, and the caller is asked toleave a message.# Caller routes to the Next Call Routing Mailboxand hears its Instruction Menu.* Caller skips greeting and can immediatelystart recording.Yes 0 Caller follows key’s action in Next Call Routing1-9Mailbox.# Caller routes to the Next Call Routing Mailboxand hears its Instruction Menu.* Caller skips greeting and can immediatelystart recording.2Logging Onto a Subscriber Mailbox while Listening to the GreetingA subscriber who wishes to log onto their mailbox while listening to their greeting must have the option setin their Next Call Routing Mailbox. To allow this capability, for example:■ Program the Next Call Routing Mailbox # digit as LOGON to IXXX.■ While listening to their greeting, the subscriber can dial:# (to route to their Next Call Routing Mailbox), then# and their mailbox number to log onto their mailbox.By default, this option is provided in Call Routing Mailbox 000. Additionally, the subscriber should enable aSecurity Code for their mailbox to prevent unauthorized logons.<strong>IntraMail</strong> <strong>System</strong> <strong>Guide</strong> Chapter 2: Features ◆ 47
Call Forward to a MailboxRelated FeaturesAuto Attendant Do Not Disturb (page 37)When enabled, Auto Attendant Do Not Disturb automatically sends all calls from the Automated Attendantto the subscriber’s mailbox.Extension Hunting to Voice Mail (page 79)Extension Hunting to Voice Mail automatically sends calls to an extension’s mailbox without the userhaving to set up Call Forwarding.Message Forward (page 129)A subscriber can forward a message in their Subscriber Mailbox to a co-worker.Next Call Routing Mailbox (page 148)The setting of the Next Call Routing Mailbox and Dialing Option options determine the digits a callercan dial while listening to the recorded or default mailbox greeting.ProgrammingStep 1Set how long an unanswered call will ring before forwarding.1.1 0403 - Call Forward Ring No Answer- For type 2 (Not Answered) and type 6 (Busy or Not Answered) forwarding, an unansweredcall will forward after this interval.- This timer applies to transferred trunk calls, Direct Inward Lines, and Intercom calls.✔By default, this interval is 10 seconds.1.2 For more on timers that may affect Call Forwarding, see the DS1000/2000 Software Manual.OperationCall Forward to your MailboxTo forward your calls to your mailbox:1. Press ICM.2. Dial *3.3. Dial the Call Forwarding type:0 = Cancel your extension’s forwarding2 = Call Forwarding Busy/No Answer 14 = Call Forwarding Immediate6 = Call Forwarding No Answer 14. Press MW.5. Dial 2 to forward all calls.ORDial 8 to forward just outside calls.1 Call Forwarding options 2 and 4 will not forward voice-announced Intercom calls.48 ◆ Chapter 2: Features <strong>IntraMail</strong> <strong>System</strong> <strong>Guide</strong>
Call Routing MailboxCall Routing MailboxDescriptionSoftwareNote: ■ Routing Mailbox programming is simplified in software version 03.20.07 or higher.The Call Routing Mailbox, associated with an Answer Table, specifies which dialing options (Dial ActionTable) and announcements are available to Automated Attendant callers. <strong>IntraMail</strong> provides up to 16 CallRouting Mailboxes. The Call Routing Mailbox is an integral part of the Automated Attendant. The AutomatedAttendant can automatically answer the telephone system’s incoming calls, play an Instruction Menumessage, and provide dialing options to callers. There are 3 major Automated Attendant components:■ Answer Tables (page 30)The Answer Table determines how the Automated Attendant answers outside calls on each trunk, accordingto the time of the day and day of the week that the call is ringing. The Answer Table divides the time of dayand day of the week into individual schedules, which in turn assign a Call Routing Mailbox to each call.When a specific schedule is not in effect, the Answer Table uses its Default Mailbox to determine routing.✔By default, all trunks use Answer Table 1. Answer Table 1 has a single schedule that runs Mondaythrough Friday from 8:30AM to 5:00PM.■ Call Routing MailboxA Call Routing Mailbox is a mailbox associated with an individual Answer Table schedule or the DefaultMailbox. It specifies which dialing options (Dial Action Table) are available to callers. It also providesthe Instruction Menu to callers which typically greets the callers and describes the dialing options.✔By default, Answer Table 1 has a single schedule that runs Monday through Friday from 8:30AM to5:00PM. This schedule and the Default Mailbox both use Call Routing Mailbox 000.■ Dial Action Table (page 64)Once the Automated Attendant answers, the Dial Action Table provides the dialing options to callers.Each digit a caller can dial is assigned a specific action (function) in the Dial Action Table. The dialaction used depends on the setting in the active Call Routing Mailbox, which in turn depends on theAnswer Table setup.✔By default, Call Routing Mailbox 000 uses Dial Action Table 1.2<strong>IntraMail</strong> <strong>System</strong> <strong>Guide</strong> Chapter 2: Features ◆ 49
Call Routing MailboxThe block diagram below shows the default <strong>IntraMail</strong> Automated Attendant configuration.DIL to Voice MailMaster (700)● 1003 - Direct Termination (Day)● 1003 - Direct Termination (Night)Trunks Route toAnswer Table 1● 1003 - Answer TableDefault Automated Attendant AnsweringAnswer Table 1Schedule 1 orDefault Mailbox● 8007 - Answer Tables● 8007 - Schedule Entry● 8007 - Default MailboxCalls always route to Call Routing Mailbox 000- Schedule 1 active M-F 8:30AM-5:00PM.- Default Mailbox active all other times.Dial Action Table 1Dialing OptionsDial an extension number, or0 for the operatorAll trunksCall RoutingMailbox 000● 8006 - Routing Mailboxes (000)Dial ActionTable 1● 8008 - Dial Action TablesFrom a <strong>System</strong> Administrator'smailbox, record an InstructionMenu (SA + I) for the active CallRouting Mailbox.Use AnswerTable 1Which chooses CallRouting Mailbox 000.And Dial ActionTable 1With thesedialing optionsRelated FeaturesProgrammingAnswer Tables (page 30)■ The Call Routing Mailbox associates a specific set of dialing options (Dial Action Table) with anAnswer Table.Automated Attendant (page 42)The Automated Attendant can automatically answer the telephone system’s incoming calls, play anInstruction Menu message, and provide dialing options to callers.Call Routing Mailbox (page 49)The Call Routing Mailbox provides the dialing instructions (Dial Action Table) and announcements toAutomated Attendant Callers.Dial Action Table (page 64)Defines the dialing options for the Call Routing Mailbox chosen by the active Answer Table.Master Mailbox (page 122)Master Mailboxes can provide an additional 16 Call Routing Mailboxes.<strong>System</strong> Administrator (page 171)The <strong>System</strong> Administrator can record the Instruction Menu for a Call Routing Mailbox. See Operation below.Step 1Set up the Call Routing Mailbox.1.1 8006 - <strong>IntraMail</strong> Routing Mailboxes: Mailbox Number on page 227.- Select the Routing Mailbox (000-015) you want to program.✔By default, Call Routing Mailboxes are 000-007.1.2 8006 - <strong>IntraMail</strong> Routing Mailboxes: Mailbox Type on page 227.- Enter 1 to make the selected mailbox a Call Routing Mailbox.50 ◆ Chapter 2: Features <strong>IntraMail</strong> <strong>System</strong> <strong>Guide</strong>
Call Routing Mailbox✔By default, Call Routing Mailboxes are 000-007.1.3 8006 - <strong>IntraMail</strong> Routing Mailboxes: Mailbox Active on page 227.- Enter Y (9) to make the mailbox active.✔By default, all Routing Mailboxes are active.Step 2Step 3Step 4Step 5To record an Instruction Menu for the Call Routing Mailbox:2.1 See Operation below.✔The default Instruction Menu is: If you are calling from a touch tone phone . . .To assign which Dial Action Table will provide dialing options for this Call routing Mailbox:3.1 8006 - <strong>IntraMail</strong> Routing Mailboxes: Dial Action Table on page 228.- Enter the Dial Action Table (e.g., 1) that will provide the dialing options.✔By default, all Call Routing Mailboxes use Dial Action Table 1.To change the amount of time Automated Attendant callers have to dial options:4.1 Automated Attendant on page 42 for more.4.2 8006 - <strong>IntraMail</strong> Routing Mailboxes: Time Limit for Dialing Commands on page 228.- Enter the new timeout duration (0-99 seconds).✔By default, Automated Attendant callers have 5 seconds to dial commands.4.3 If the caller waits too long to dial:- When the associated Dial Action Table has a Timeout action programmed, the caller routesto that destination.- When the associated Dial Action Table does not have a Timeout action programmed, theInstruction Menu repeats 3 times and then <strong>IntraMail</strong> hangs up.To set the Maximum Length of Instruction Menus:5.1 8004 - <strong>IntraMail</strong> <strong>System</strong> Options: Non-Subscriber Message Length on page 213.5.2- This sets the maximum message length (1-4095 seconds) for Instruction Menus.✔The default setting is 120 seconds.2<strong>IntraMail</strong> <strong>System</strong> <strong>Guide</strong> Chapter 2: Features ◆ 51
Call Routing MailboxOperationLog onto <strong>System</strong> Administrator’s mailbox.SA (72)Recording an Instruction Menu for a Call Routing Mailbox[Super Display Soft Key] - [Keyset Soft Key]Access <strong>System</strong> Administrator options.[SYS ADMIN] - [N/A]I (4)Select Instruction Menus.[INSTRUCTION] - [INST]Enter the Call Routing Mailbox number.L (5)R (7)Listen to the current Instruction Menu (if any).[LISTEN] - [LSTN]# Exit listen mode.Record a new Instruction Menu.[RECORD] - [REC]Record message.* Pause or restart recording.[RESUME] - [RESUME][PAUSE] - [PAUSE]E (3) Erase recording.[CANCEL] - [CNCL]# Exit recording mode.[DONE] - [DONE]E (3) Erase the Instruction Menu.[ERASE] - [ERASE]# Go back to the <strong>System</strong> Administrator options.[EXIT] - [EXIT]# Go back to the <strong>System</strong> Administrator options.[EXIT] - [EXIT]0 Plays Help message.52 ◆ Chapter 2: Features <strong>IntraMail</strong> <strong>System</strong> <strong>Guide</strong>
Call ScreeningCall ScreeningDescriptionSoftwareNote:Call Screening requires software version 03.20.07 or higher and <strong>IntraMail</strong> voice prompts version 1.2.Call Screening allows a display keyset extension user to listen to (screen) a voice mail message as it is beingleft in their mailbox. Call Screening emulates a standard home answering machine — in addition to providingmore control when handling incoming messages. Similar to Personal Answering Machine Emulation, theextension user can listen as the message is being left, intercept the call, or end the screen and have the messagerecorded privately. Unlike Personal Answering Machine emulation, Call Screening does not require theextension user to forward their calls immediately to voice mail. The telephone display automatically showsthe Call Screening soft key options as soon as the recording begins.When enabled, Call Screening will broadcast the caller’s message as soon as the mailbox Greeting completes.Additionally, if the extension user intercepts (answers) the screened call, the first portion of the messageis automatically erased from the extension’s mailbox.Any caller that can leave a message can have their call screened by the extension user.Call Screening and Group MailboxesIf extensions share a Group Mailbox, any number of extensions in the group can screen an incoming message.The group extensions can monitor the incoming message simultaneously. If any group member answers thecall (i.e., intercepts the incoming message), the remaining group members are immediately disconnected.2Automatic Call ScreeningWith Automatic Call Screening enabled, an extension will immediately screen (broadcast) an incoming messageas soon as the caller starts to leave it in the extension’s mailbox. The extension user hears two beeps followedby the caller’s voice.MW LED Operation ChangeWith the introduction of Call Screening, only the Ring/Message Lamp flashes for new messages. The MWLED is used for Call Screening only.Note that if more than one caller is leaving a message in a mailbox simultaneously, Call Screening will listento the first message.Related FeaturesAnswering Machine Emulation (page 35)In software versions 03.21.07 and higher, the operation of Answering Machine Emulation is changed tomatch the operation of Call Screening.Group Mailbox (page 98)Any number of extensions in the group can screen an incoming message.Message Waiting Lamp (page 146)With the introduction of Call Screening in software versions 03.20.07 and higher, only the Ring/MessageLamp flashes for new messages. The MW LED is used for Call Screening only.<strong>IntraMail</strong> <strong>System</strong> <strong>Guide</strong> Chapter 2: Features ◆ 53
Call ScreeningProgrammingStep 1To enable Call Screening in an extension’s Class of Service:1.1 0101 - Call Screening on page 190- Enter Y (9) to enable this option.✔By default, this option is disabled.1.2 1801 - Extension Class of Service Assignment- Assign an extension’s Class of Service.✔By default, the attendant (extension 300) has Class of Service 1. All other extensions haveClass of Service 2.OperationManual Call Screening Operation[Super Display Soft Key] - [Keyset Soft Key]■ When Automatic Call Screening is off, you hear a single beep and MW flashes fast while <strong>IntraMail</strong> recordsyour caller’s message. Your telephone display automatically changes to show the Call Screening soft keyoptions.■ Call Screening is only available while your telephone is idle.To intercept the call (and stop recording the message):1. Press flashing MW key.[ANSWER] - [ANSW]To hear your caller’s message as it is recorded in your mailbox (i.e., activate the Call Screening mode):1. [SCREEN] - [SCRN]To intercept the call (and stop recording the message):1. Press SPK, lift the handset, or press MW.[ANSWER] - [ANSW]To continue listening to your caller’s message as it is being recorded:1. Do nothing.To exit Call Screening and allow the message to continue recording in private:1. N/A[EXIT] - [EXIT]To use another feature or process another call:1. Press any other feature key.To exit Call Screening and allow the message to continue being recorded in private:1. N/A[EXIT] - [EXIT]To use another feature or process another call:1. Lift the handset, press SPK, or press any other feature key.■ Call Screening is only functional while the telephone is on-hook.54 ◆ Chapter 2: Features <strong>IntraMail</strong> <strong>System</strong> <strong>Guide</strong>
Call ScreeningAutomatic Call Screening Operation[Super Display Soft Key] - [Keyset Soft Key]■ When Automatic Call Screening is on, your idle telephone automatically goes into the screen mode while yourcaller leaves a message.■ Call Screening is only available while your telephone is idle.To turn Automatic Call Screening on or off:N/A[PROGRAM + SCREEN] + [PGM + MORE + MORE + SCRN]N/A[ON] + [ON]N/A[OFF] + [OFF]N/A[EXIT] + [EXIT]Turn Automatic Call Screening on.■ The top line of the display shows the Automatic Call Screeningstatus.Turn Automatic Call Screening off.■ The top line of the display shows the Automatic Call Screeningstatus.ExitTo intercept the call (and stop recording the message):Press SPK, MW, or lift the handset.[ANSWER] + [ANSW]To continue listening to your caller’s message as it is being recorded:Do nothing.To exit Call Screening and allow the message to continue recording in private:N/A[EXIT] + [EXIT]To use another feature or process another call:N/A[EXIT] + [EXIT]Lift the handset or press any other feature key.2<strong>IntraMail</strong> <strong>System</strong> <strong>Guide</strong> Chapter 2: Features ◆ 55
Caller IDCaller IDDescriptionCaller ID is a telephone company service that provides an extension with a caller’s number and optionalname. With Caller ID, the display keyset user knows who’s calling before they pick up the call. Caller IDLogging stores a record of the call on the user’s telephone which they can review and use to easily return thecall. When used with <strong>IntraMail</strong>, Caller ID enables the Make Call feature for outside calls. After listening to avoice message, the subscriber can dial MC to return the call without knowing the callers phone number.Related FeaturesProgrammingMake Call (page 120)An extension user can listen to a voice message and dial a code to return the call without knowing thecaller’s phone number. Make call to an outside telephone number requires Caller ID.Screened Transfer (page 161)Screened Transfers from the Automated Attendant provide Caller ID data only after the user answers the call.Unscreened Transfer (page 180)Unscreened Transfers from the Automated Attendant provide Caller ID data while the call is ringing.Be sure the telephone system is configured to passCaller ID to the <strong>IntraMail</strong> voice mail ports.No additional programming is required to enable Caller ID in <strong>IntraMail</strong>. Following is a list of the basicCaller ID programs.Step 1Step 2Step 3Be sure the telco provides Caller ID to the connected telephone system.Check your telephone system programming to be sure the telephone system is set up toreceive Caller ID and pass it to the <strong>IntraMail</strong> voice mail ports.2.1 1001 - Caller ID- For each trunk that should receive Caller ID, enter 1 (for DSP).- Is DS2000, DSP Caller ID requires 4ATRU PCB P/N 80010B or 8ATRU PCB P/N 80011Bor higher.- If your DS2000 is using older PCBs with Caller ID daughter boards, enter 2 (for daughterboard) for this option.✔By default, Caller ID is not enabled for trunks.2.2 1001 - Voice Mail Caller ID- Enter Y (9) to enable this option.✔By default, this option is enabled for all trunks.Set up your basic Caller ID Logging programming.3.1 1302 - Caller ID Outbound Line/Group- Specify the trunk (1-6 in DS1000, 1-64 in DS2000) or trunk group (90-98) that the systemwill use when redialing Caller ID calls.✔By default, there is no outbound route specified.3.2 Check the Caller ID Logging feature in the telephone system Software Manual for additionalprogramming that may be required.OperationN/A56 ◆ Chapter 2: Features <strong>IntraMail</strong> <strong>System</strong> <strong>Guide</strong>
Caller ID with Return CallCaller ID with Return CallDescriptionRelated FeaturesProgrammingSee Make Call on page 120.See Make Call on page 120.See Make Call on page 120.OperationSee Make Call on page 120.2<strong>IntraMail</strong> <strong>System</strong> <strong>Guide</strong> Chapter 2: Features ◆ 57
Calling the Automated AttendantCalling the Automated AttendantDescriptionAutomated Attendant callers can use various <strong>IntraMail</strong> features and then return to the Automated Attendantfor additional dialing options. This lets the caller dial other extensions, leave messages for co-workers, oruse other Automated Attendant features. The features below describe several ways to return to the AutomatedAttendant.■ Automated Attendant Transfer (page 45)An extension user can transfer their trunk call to the Automated Attendant so the outside caller can usethe Automated Attendant dialing options.■ Next Call Routing Mailbox (page 148)The Next Call Routing Mailbox provides callers with additional dialing options after they leave a messagein a mailbox (depending on the setting of the Dialing Option).Related FeaturesProgrammingOperationRefer to the features referenced in Description above.Refer to the features referenced in Description above.Refer to the features referenced in Description above.58 ◆ Chapter 2: Features <strong>IntraMail</strong> <strong>System</strong> <strong>Guide</strong>
Centrex TransferCentrex TransferDescriptionCentrex Transfer is a Dial Action Table option that can transfer an Automated Attendant call from a Centrextrunk to an outside number using the features of that Centrex trunk. With Centrex Transfer, the AutomatedAttendant answers an outside call and then transfers the caller back to the telco using the same trunk onwhich the call initially rang. To set this up, assign a Dial Action Table action as a UTRF to a <strong>System</strong> SpeedDial bin (e.g., #200P). The bin should contain the complete dial string (preceded by a Flash command)required to initiate the Centrex Transfer. When the Automated Attendant answers, the caller dials the digitand <strong>IntraMail</strong> automatically routes them to the outside number.Centrex Transfer is only available if the telephone system connects to Centrex trunks that provide the featuresrequired to complete the transfer. Similar to External Transfer, Centrex Transfer allows your callers toeasily reach branch offices and important off-site associates. Unlike External Transfer, Centrex Transferrequires unique telco features.Related FeaturesDial Action Table (page 64)Centrex Transfer uses the active Dial Action Table to route transfer an Automated Attendant caller backto the telco using the same Centrex trunk.External Transfer (page 84)External Transfer allows an Automated Attendant caller to automatically route to an outside telephonenumber.2ProgrammingStep 1Step 2Step 3Assign a Dial Action Table to each active Call Routing Mailbox.1.1 8006 - <strong>IntraMail</strong> Routing Mailboxes: Dial Action Table on page 228.- The Call Routing Mailbox uses the Dial Action Table assignment to provide dialing optionsto callers.✔The default Call Routing Mailboxes (000-007) use Dial Action Table 1.For an available key, set up a UTRF Dial Action Table option for Centrex Transfer.2.1 8008 - <strong>IntraMail</strong> Dial Action Tables: UTRF Action - Unscreened Transfer (2) on page 247.- The corresponding Number option should be # followed by the <strong>System</strong> Speed Dial bin, followedby a pause. (The pause gives the system time to dial the stored number.)- Press MIC to enter a Pause.- For example, to have Centrex Transfer dial <strong>System</strong> Speed Dial bin 200, enter #200P(entered by pressing MIC).✔This capability is not assigned by default.Program the <strong>System</strong> Speed Dial bin for Centrex Transfer.3.1 1101 - <strong>System</strong> Speed Dial Numbers or #77 User Programmable Feature.- The stored number should flash the Centrex trunk and dial the number required to initiatethe transfer- The stored number should be in the format FXXX (Flash + Number), and contain the completedial string required to process a Centrex Transfer.- Press FLASH to enter a Flash.- Number is the number you want the system to dial into the Centrex to initiate thetransfer.- Refer to the DS1000/2000 Software Manual for more.✔There are no <strong>System</strong> Speed Dial numbers stored by default.<strong>IntraMail</strong> <strong>System</strong> <strong>Guide</strong> Chapter 2: Features ◆ 59
Centrex TransferStep 4Step 5Set the Flash timer for compatibility with the connected Centrex trunks.4.1 0402 - PBX/Centrex Flash- Set the flash interval for compatibility with the connected Centrex.✔By default, this timer is 800 mS.Set the Pause timer for compatibility with the Centrex Transfer feature.5.1 0401 - Dialing Pause- Set the pause interval for compatibility with the Centrex Transfer feature.- Normally, you can leave this timer at its default setting.✔By default, this timer is 1 second.OperationOperation is automatic once set up in programming.60 ◆ Chapter 2: Features <strong>IntraMail</strong> <strong>System</strong> <strong>Guide</strong>
Conversation RecordConversation RecordDescriptionSoftwareNote:Conversation Record for a co-worker’s mailbox requires software version 03.20.07 or higher.Conversation Record allows a subscriber to record their active call as a new message in their mailbox, whichthey can review later on. Conversation Record can be helpful when an extension user is on a call thatinvolves a lot of detail (such as a technical discussion or extensive directions). Rather than taking notes asthe call progresses, the user can record the conversation and carefully review it later on. <strong>IntraMail</strong> broadcastsa beep and a voice prompt to the callers as Conversation Record begins. After calling their mailbox, the subscribercan save, edit, or delete the recorded conversation.CautionThe use of monitoring, recording, or listening devices to eavesdrop, monitor, retrieve, or recordtelephone conversations or other sound activities, whether or not contemporaneous with transmission,may be illegal in certain circumstances under federal or state laws. Legal advice shouldbe sought prior to implementing any practice that monitors or records any telephone conversation.Some federal and state laws require some form of notification to all parties to a telephoneconversation, such as using a beep tone or other notification methods or requiring the consent ofall parties to the telephone conversation, prior to monitoring or recording the telephone conversation.Some of these laws incorporate strict penalties.2Conversation Record Key for a Co-worker’s MailboxSoftware version 03.20.07 or higher provides Conversation Record key for a co-worker’s mailbox. While ona call, you can press the key to record your conversation directly into your co-worker’s mailbox. You can setup the key to record into any valid Subscriber Mailbox (including Group Mailboxes and Master Mailboxesprogrammed as Subscriber Mailboxes). This could help a dispatcher, for example, that wants to record aconversation with a client right into the responsible technician’s mailbox.Your extension can have multiple Conversation Record keys, each associated with a different mailbox.Setting up a Record key for a co-worker’s mailbox is also available on DSS Consoles.Related FeaturesProgrammingSubscriber Mailbox (page 168)Conversation Record is only available to subscriber extensions.Step 1Step 2In DS1000/2000 programming, enable Conversation Record in the extension’s Class of Service.1.1 In 0101 - Conversation Record on page 190, enable Conversation Record.- Enable (Y) Conversation Record in the extension’s Class of Service.✔By default, Conversation Record is disabled (N).1.2 1801 - Extension Class of Service Assignment- Assign an extension’s Class of Service.✔By default, the attendant (extension 300) has Class of Service 1. All other extensions haveClass of Service 2.In DS1000/2000 programming, assign a Conversation Record key.2.1 In 1701 - Voice Mail Record Key, assign a keyset programmable key as a record key.- Prior to 03.20.07: Enter Voice Mail Record Key code 17.<strong>IntraMail</strong> <strong>System</strong> <strong>Guide</strong> Chapter 2: Features ◆ 61
Conversation Record- 03.20.07 or higher: Enter Voice Mail Record Key code 17 + the mailbox number.- The mailbox number can be your own, a co-worker’s, or any valid Subscriber Mailbox.- You can optionally use the RECORD soft key instead.✔By default, a keyset does not have a Voice Mail Record Key.Step 3Step 4Enable the Conversation Record Beep and Warning.3.1 1808 - <strong>IntraMail</strong> Subscriber Mailbox Options: Recording Conversation Beep on page 204.- If enabled (Y), all parties on a call being recorded will hear the voice prompt Recordingfollowed by a beep when the extension user initiates Conversation Record. If disabled (N),the voice prompt and beep will not occur.- Disabling this option may be interpreted as an invasion of privacy.✔By default, this option is enabled (Y).Set the maximum length of recorded conversations.4.1 8004: <strong>IntraMail</strong> <strong>System</strong> Options: Subscriber Message Length on page 213.- The length of a recorded conversation is 10 times this interval.- The range for this option is 1-4095 seconds.- Since the Conversation Record time cannot exceed 4095 seconds, any settings in thisoption larger than 409 have no effect on the length of recorded conversations.✔By default, this option is 120 seconds. This means the default length of recorded conversationsis 1200 seconds (20 minutes).62 ◆ Chapter 2: Features <strong>IntraMail</strong> <strong>System</strong> <strong>Guide</strong>
Conversation RecordOperationConversation Record[Super Display Soft Key] - [Keyset Soft Key]To record your active call in your mailbox:■ Only one party on a call can use Conversation Record at any one time. This includes Intercom calls andConference calls.1. Press your Voice Mail Record key or RECORD soft key.■ The key lights green while the system calls your mailbox. Once recording begins, the key flashes. You andyour caller hear the voice prompt “Recording.” Your display shows one of the following:- Prior to 03.20.07: CONFERENCE- 03.20.07 or higher: RECORDING MAILBOX XXX (where XXX is the number of the mailbox into whichthe conversation is recording)■ You can also have a Record key on your DSS Console. It lights red while the system calls your mailbox andflashes fast once recording begins.To turn conversation record off:1. Press MW.■ Recording stops.■ There are no options available while recording (such as pause, resume, and exit).2Setting Up Conversation Record for a Co-worker’s MailboxUser-Programmable FeatureTo set up a Conversation Record key for a co-worker’s mailbox:1. While your telephone is idle, dial #KP.2. Press the key you want to program + HOLD.3. Dial 17.4. Enter the mailbox number or 0 for your own mailbox.5. Press + HOLD + CONF + SPK to exit.<strong>IntraMail</strong> <strong>System</strong> <strong>Guide</strong> Chapter 2: Features ◆ 63
Dial Action TableDial Action TableDescriptionDIL to Voice MailMaster (700)The Dial Action Table defines the dialing options for the Call Routing Mailbox chosen by the active AnswerTable, which in turn provides those dialing options to Automated Attendant callers. <strong>IntraMail</strong> provides 16Dial Action Tables. The Dial Action Table is an integral part of the Automated Attendant. The AutomatedAttendant can automatically answer the telephone system’s incoming calls, play an Instruction Menu message,and provide dialing options to callers. There are 3 major Automated Attendant components:■ Answer Tables (page 30)The Answer Table determines how the Automated Attendant answers outside calls on each trunk, accordingto the time of the day and day of the week that the call is ringing. The Answer Table divides the time of dayand day of the week into individual schedules, which in turn assign a Call Routing Mailbox to each call.When a specific schedule is not in effect, the Answer Table uses its Default Mailbox to determine routing.✔By default, all trunks use Answer Table 1. Answer Table 1 has a single schedule that runs Mondaythrough Friday from 8:30AM to 5:00PM.■ Call Routing Mailbox (page 49)A Call Routing Mailbox is a mailbox associated with an individual Answer Table schedule or the DefaultMailbox. It specifies which dialing options (Dial Action Table) are available to callers. It also providesthe Instruction Menu to callers which typically greets the callers and describes the dialing options.✔By default, Answer Table 1 has a single schedule that runs Monday through Friday from 8:30AM to5:00PM. This schedule and the Default Mailbox both use Call Routing Mailbox 000.■ Dial Action TableOnce the Automated Attendant answers, the Dial Action Table provides the dialing options to callers.Each digit a caller can dial is assigned a specific action (function) in the Dial Action Table. The dialaction used depends on the setting in the active Call Routing Mailbox, which in turn depends on theAnswer Table setup.✔By default, Call Routing Mailbox 000 uses Dial Action Table 1.The block diagram below shows the default <strong>IntraMail</strong> Automated Attendant configuration.● 1003 - Direct Termination (Day)● 1003 - Direct Termination (Night)Trunks Route toAnswer Table 1● 1003 - Answer TableDefault Automated Attendant AnsweringAnswer Table 1Schedule 1 orDefault Mailbox● 8007 - Answer Tables● 8007 - Schedule Entry● 8007 - Default MailboxCalls always route to Call Routing Mailbox 000- Schedule 1 active M-F 8:30AM-5:00PM.- Default Mailbox active all other times.Dial Action Table 1Dialing OptionsDial an extension number, or0 for the operatorAll trunksCall RoutingMailbox 000● 8006 - Routing Mailboxes (000)Dial ActionTable 1● 8008 - Dial Action TablesFrom a <strong>System</strong> Administrator'smailbox, record an InstructionMenu (SA + I) for the active CallRouting Mailbox.Use AnswerTable 1Which chooses CallRouting Mailbox 000.And Dial ActionTable 1With thesedialing options64 ◆ Chapter 2: Features <strong>IntraMail</strong> <strong>System</strong> <strong>Guide</strong>
Dial Action TableDial Action Table OptionsThe following table summarizes the Dial Action Table dial (key) actions and their associated features.Dial Action Table Key Action SummaryAction Description Feature Reference For more, see:TRFScreened Transfer (1)Allows an Automated Attendant caller to placea Screened Transfer to an extension. <strong>IntraMail</strong>calls (screens) the destination to see if the callcan go through.Unscreened Transfer (2)Allows an Automated Attendant caller to placean Unscreened Transfer to an extension.Intra-Mail transfers the call the destination and thenhangs up.Quick Message with Greeting (3)Allows an Automated Attendant caller to leavea Quick Message at an extension. The callerwill hear the extension’s personal greeting.Quick Message without Greeting (4)Allows an Automated Attendant caller to leavea Quick Message at an extension. The callerwill not hear the extension’s personal greetingLog Onto Voice Mail (5)Allows an Automated Attendant caller to logonto a mailbox, either directly or one of theirchoosing.Hang Up (6)<strong>IntraMail</strong> says “Goodbye” and hangs up.Screened Transfer (page 161) Page 247UTRFREC1Unscreened Transfer (page 180) Page 247Quick Message (page 156) Page 2482REC2Quick Message (page 156) Page 248LOGONLog Onto Voice Mail (page 112) Page 248HangUpHang Up (page 104) Page 249GOTOGo to a Mailbox, (7)Allows an Automated Attendant caller to routeto another mailbox.Undefined Routing (0)This action provides no routing.Go To A Mailbox (page 92) Page 249UNDN/A Page 249Related FeaturesAutomated Attendant (page 42)The Automated Attendant can automatically answer the telephone system’s incoming calls, play anInstruction Menu message, and provide dialing options to callers.Answer Tables (page 30)Determines how the Automated Attendant answers outside calls on each trunk.Call Routing Mailbox (page 49)The mailbox associated with an Answer Table that specifies which dialing options (Dial Action Table)and announcement are available to Automated Attendant callers.<strong>IntraMail</strong> <strong>System</strong> <strong>Guide</strong> Chapter 2: Features ◆ 65
Dial Action TableProgrammingStep 1Step 2Assign a Dial Action Table to each active Call Routing Mailbox.1.1 8006 - <strong>IntraMail</strong> Routing Mailboxes: Dial Action Table on page 228.- The Call Routing Mailbox uses the Dial Action Table assignment to provide dialing optionsto callers.✔The default Call Routing Mailboxes (000-007) use Dial Action Table 1.Customize the Dial Action Table options.2.1 Turn to 8008 - <strong>IntraMail</strong> Dial Action Tables on page 246 for a description of all the DialAction Table options and the features to which they apply.✔The default Dial Action Table dialing options are:Dial Action Table Default SettingsKey Dial Action Table 1 Dial Action Tables 2-160 UTRF to 300(Unscreened Transfer to operator)1 UND(Undefined)2 UND(Undefined)3 UTRF to XXX(Unscreened Transfer to user-dialedextension)4 UTRF to XXX(Unscreened Transfer to user-dialedextension)5 UND(Undefined)6 UND(Undefined)7 UND(Undefined)8 UND(Undefined)9 HNGUP(Hangup)* REC1 to IXXX(Quick Message with Greeting to userdialedextension)# LOGON to IXXX(Logon to user-dialed mailbox)Timeout UTRF to 300(Unscreened Transfer to operator)UND(Undefined)UND(Undefined)UND(Undefined)UND(Undefined)UND(Undefined)UND(Undefined)UND(Undefined)UND(Undefined)UND(Undefined)UND(Undefined)UND(Undefined)UND(Undefined)UND(Undefined)Step 3Set how long Automated Attendant caller have to dial commands.3.1 8006 - <strong>IntraMail</strong> Routing Mailboxes: Time Limit for Dialing Commands on page 228.- Enter the Time Limit for Dialing Commands interval (0-5 seconds).✔By default, the interval is 5 seconds.66 ◆ Chapter 2: Features <strong>IntraMail</strong> <strong>System</strong> <strong>Guide</strong>
Dial Action Table- If the caller waits too long to dial:- When the associated Dial Action Table has a Timeout action programmed, the callerroutes to that destination.- When the associated Dial Action Table does not have a Timeout action programmed,the Instruction Menu repeats 3 times and then <strong>IntraMail</strong> hangs up.Step 4Set the extension called when the a voice mail port dials 0.This doens’t work and may notapply to <strong>IntraMail</strong>.4.1 8002 - Voice Mail Port Options (Part 1): Operator on page 210.- Enter the operator’s extension number (300-333 in DS1000, 300-427 in DS2000).- By default, this entry is 300.OperationN/A2<strong>IntraMail</strong> <strong>System</strong> <strong>Guide</strong> Chapter 2: Features ◆ 67
Directory DialingDirectory DialingDescriptionSoftwareNote:Directory Dialing requires software version 03.20.07 or higher and <strong>IntraMail</strong> voice prompts version 1.2..Directory Dialing allows an Automated Attendant caller to reach an extension by dialing the first few lettersin the extension user’s name. With Directory Dialing, the caller does not have to remember the extensionnumber of the person they wish to reach — just their name. Here’s how Directory Dialing works:1. When the Automated Attendant answers, it sends the call to a Directory Dialing Mailbox. (Optionally,the caller may be asked to dial a digit to access Directory Dialing.)2. The Directory Dialing Mailbox plays the Directory Dialing Message (recorded by the <strong>System</strong> Administrator)which asks the caller to dial letters for the name of the person they wish to reach.3. The caller dials the letters for the person’s name plus #. They can dial by first name or last name, dependingon how the Directory Dialing Message was recorded and the Directory Dialing Mailbox was set up.4. <strong>IntraMail</strong> searches the list of programmed extension names for a match of the caller-entered letters.5. Voice prompts announce the first three matches, and allow the caller to dial a digit (1-3) to reach one ofthe announced matches. Additionally, the caller can dial 4 to hear additional matches (if any).6. The caller dials the digit for the extension they wish to reach, and <strong>IntraMail</strong> sends the call to that extension.The call is sent as a Screened or Unscreened transfer, depending on programming.For callers to use Directory Dialing, the system must have a name programmed for each extension (up to 15characters, A-Z, using upper and lower case letters). Each extension should also have a name recorded intheir Subscriber Mailbox. In addition, each extension used by Directory Dialing must be installed and musthave their Subscriber Mailbox active (Personal or Group).The Directory Dialing Mailbox can be a Routing Mailbox assigned as a Directory Dialing Mailbox or aMaster Mailbox assigned as a Directory Dialing Mailbox. See Using a Routing Mailbox for Directory Dialingbelow or Using a Master Mailbox for Directory Dialing on page 71 for more.Related FeaturesProgrammingDirectory Dialing Mailbox (page 76)A Directory Dialing Mailbox is the type of mailbox required to implement Directory Dialing.<strong>System</strong> Administrator (page 171)Only the <strong>System</strong> Administrator can record the Directory Dialing Message.Using a Routing Mailbox for Directory DialingStep 1Set up the Directory Dialing Mailbox.1.1 8006 - <strong>IntraMail</strong> Routing Mailboxes: Mailbox Number on page 227.- Select the Routing Mailbox (000-015) you want to assign as a Directory Dialing Mailbox.✔By default, there are no Routing Mailboxes assigned as Directory Dialing Mailboxes.1.2 8006 - <strong>IntraMail</strong> Routing Mailboxes: Mailbox Type on page 227.- Enter 4 to make the selected Routing Mailbox a Directory Dialing Mailbox.✔By default, there are no Routing Mailboxes assigned as Directory Dialing Mailboxes.1.3 8006 - <strong>IntraMail</strong> Routing Mailboxes: Mailbox Active on page 227.- Enter Y (9) to make the mailbox active.✔By default, all Routing Mailboxes are active.68 ◆ Chapter 2: Features <strong>IntraMail</strong> <strong>System</strong> <strong>Guide</strong>
Directory DialingStep 2Step 3Step 4Step 5Set up the name programming and enter names.2.1 0201 - Tenant Option Programming: Name Format on page 193.- Determine how extension names should be entered in 1801 - Extension Name or via thetelephone. The options are 1 (first name followed by last name) or 2 (last name followed byfirst name).✔By default, the system expects names to be entered as first name followed by last name (1).2.2 1801 - Extension Port Description: Extension Name on page 198.- Enter the name for each extension. The format you use should follow the setting of0201 - Name Format.✔By default, there are no names entered.2.3 8006 - <strong>IntraMail</strong> Routing Mailboxes: Extension Name Match on page 230.- Select the portion of the extension name on which the Directory Dialing Mailbox shouldroute. Enter 1 for first; 2 for last. This option allows for dial-by-first-name and dial-by-lastnameDirectory Dialing.- For example, if 0201 - Name Format is 1 and the name in 1802 - Extension Name isentered as first name followed by last name, enter 2 in this option to set up last name dialing.✔By default, the Directory Dialing Mailbox routes on the first portion of the name (1).Set up Directory Lists to control which extensions Directory Dialing can access.3.1 1808 - <strong>IntraMail</strong> Subscriber Mailbox Options: Directory List Number on page 206.- Select the Directory List to which the extension belongs. The entries are 1-8 (for lists 1-8), 0 (for no list), or * (for all lists). Directory Dialing to the extension can occur only ifthe list entry matches the setting in 8006 - Directory List Number to Use for the DirectoryDialing Mailbox.✔By default, extensions are not included in a Directory List (0).3.2 8006 - <strong>IntraMail</strong> Routing Mailboxes: Directory List Number to Use on page 230.- The Directory Dialing Mailbox can route calls only to the members of the Directory Listspecified in this option. The entries are 1-8 ( for lists 1-8).✔By default, the Directory Dialing Mailbox uses list 1.How many letters of the employee’s name must the caller dial?4.1 8006 - <strong>IntraMail</strong> Routing Mailboxes: Minimum Number of Letters Required on page 230.- Specify how many letters of an employee’s name the caller must dial to use Directory Dialing.If the caller dials less than the specified minimum number of letters, <strong>IntraMail</strong> cannotroute the call. The entries are 1-3 (1-3 letters).✔By default, callers must dial at least 1 letter of the employee’s name (1).When Directory Dialing finds a name match, should it route the call as a Screened orUnscreened Transfer?Unscreened Transfer5.1 8006 - <strong>IntraMail</strong> Routing Mailboxes: Unscreened or Screened Transfer on page 231.- Enter 2 to route the call as an Unscreened Transfer.✔By default, <strong>IntraMail</strong> routes the call as a Screened Transfer (1).Screened Transfer5.2 8006 - <strong>IntraMail</strong> Routing Mailboxes: Unscreened or Screened Transfer on page 231.- Enter 1 to route the call as a Screened Transfer.✔By default, <strong>IntraMail</strong> routes the call as a Screened Transfer (1).5.3 8006 - <strong>IntraMail</strong> Routing Mailboxes: Screened Transfer Timeout on page 231.- Set how long a Screened Transfer from the Directory Dialing Mailbox will ring an unansweredextension before recalling. The entries are 1-255 seconds or 0 for no recall.✔By default, the Screened Transfer Timeout interval is 15 seconds.2<strong>IntraMail</strong> <strong>System</strong> <strong>Guide</strong> Chapter 2: Features ◆ 69
Directory DialingStep 6Step 7Step 8Step 9To change the amount of time Directory Dialing callers have to dial letters:6.1 8006 - <strong>IntraMail</strong> Routing Mailboxes: Time Limit for Dialing Commands on page 231.- Enter the new timeout duration (0-99 seconds).- If the caller waits too long to dial, the Directory Dialing Message repeats.✔By default, Directory Dialing callers have 5 seconds to dial letters.To record a Directory Dialing Message:7.1 See Operation below.- The Directory Dialing Message is the Instruction Menu for the Routing Mailbox programmedas a Directory Dialing Mailbox.✔By default (without a custom message recorded), the Directory Dialing Message is,“Please enter one or more letters of the person’s name, then press the pound key.”7.2 8004 - <strong>IntraMail</strong> <strong>System</strong> Options: Non-Subscriber Message Length on page 213.- This option sets the maximum message length (1-4095 seconds) for Instruction Menus.✔By default, this option is 120 seconds.Enable or disable the ability of the Directory Dialing Mailbox to detect and route incomingfaxes.8.1 8006 - <strong>IntraMail</strong> Routing Mailboxes: Fax Detection on page 231.- Enter Y to enable Fax Detection; N to disable. If enabled, when the Directory DialingMailbox detects incoming fax CNG tone, it routes the call to the fax extension specifiedin 8004 - Fax Extension.- See Fax Detection on page 86 for more.✔By default, Fax Detection is disabled (N).To allow the Directory Dialing Mailbox caller to dial 0 for other options or # to return to theAutomated Attendant:9.1 8006 - <strong>IntraMail</strong> Routing Mailboxes: Next Call Routing Mailbox on page 232.- Assign a Next Call Routing Mailbox (000-015) to the Directory Dialing Mailbox.- To remove an assignment, press CLEAR.- Once assigned, dialing # returns to the Automated Attendant. Dialing 0 follows the 0 actionof the Next Call Routing Mailbox.✔By default, there is no Next Call Routing Mailbox assigned.Step 10 To have an outside call be directly answered by the Directory Dialing Mailbox:10.1 Make sure the active Answer Table uses the Call Routing Mailbox programmed as a DirectoryDialing Mailbox.- See Answer Tables on page 30 for more.✔By default, Answer Table 1 routes to Routing Mailbox 000, with is a Call Routing Mailbox.Step 11 To allow callers to access Directory Dialing from a Dial Action Table action:11.1 Make sure you have an action in the active Dial Action Table that is a GOTO to the DirectoryDialing Mailbox.- See Dial Action Table on page 64 for more.✔By default, there are no actions assigned as a GOTO to a Directory Dialing Mailbox.70 ◆ Chapter 2: Features <strong>IntraMail</strong> <strong>System</strong> <strong>Guide</strong>
Directory DialingUsing a Master Mailbox for Directory DialingStep 1Step 2Step 3Step 4Step 5Set up the Directory Dialing Mailbox.1.1 8005 - <strong>IntraMail</strong> Master Mailbox Options: Mailbox Number on page 218.- Select the Master Mailbox (e.g., 607) you want to assign as a Directory Dialing Mailbox.✔By default, there are no Master Mailboxes assigned as Directory Dialing Mailboxes.1.2 8005 - <strong>IntraMail</strong> Master Mailbox Options: Mailbox Type on page 218.- Enter 4 to make the selected Master Mailbox a Directory Dialing Mailbox.✔By default, there are no Master Mailboxes assigned as Directory Dialing Mailboxes.1.3 8005 - <strong>IntraMail</strong> Master Mailbox Options: Mailbox Active on page 219.- Enter Y (9) to make the mailbox active.- By default, all Master Mailboxes are active.Set up the name programming and enter names.2.1 0201 - Tenant Option Programming: Name Format on page 193.- Determine how extension names should be entered in 1801 - Extension Name or via thetelephone. The options are 1 (first name followed by last name) or 2 (last name followed byfirst name).✔By default, the system expects names to be entered as first name followed by last name (1).2.2 1801 - Extension Port Description: Extension Name on page 198.- Enter the name for each extension. The format you use should follow the setting of 0201 -Name Format.✔By default, there are no names entered.2.3 8005 - <strong>IntraMail</strong> Master Mailbox Options: Extension Name Match on page 220.- Select the portion of the extension name on which the Directory Dialing Mailbox shouldroute. Enter 1 for first; 2 for last. This option allows for dial-by-first-name and dial-by-lastnameDirectory Dialing.- For example, if 0201 - Name Format is 1 and the name in 1802 - Extension Name isentered as first name followed by last name, enter 2 in this option to set up last name dialing.✔By default, the Directory Dialing Mailbox routes on the first portion of the name (1).Set up Directory Lists to control which extensions Directory Dialing can access.3.1 1808 - <strong>IntraMail</strong> Subscriber Mailbox Options: Directory List Number on page 206.- Select the Directory List to which the extension belongs. The entries are 1-8 (for lists 1-8), 0 (for no list), or * (for all lists). Directory Dialing to the extension can occur only ifthe list entry matches the setting in 8005 - Directory List Number to Use for the DirectoryDialing Mailbox.✔By default, extensions are not included in a Directory List (0).3.2 8005 - <strong>IntraMail</strong> Master Mailbox Options: Directory List Number to Use on page 220.- The Directory Dialing Mailbox can route calls only to the members of the Directory Listspecified in this option. The entries are 1-8 ( for lists 1-8).✔By default, the Directory Dialing Mailbox uses list 1.How many letters of the employee’s name must the caller dial?4.1 8005 - <strong>IntraMail</strong> Master Mailbox Options: Minimum Number of Letters Required onpage 220.- Specify how many letters of an employee’s name the caller must dial to use Directory Dialing.If the caller dials less than the specified minimum number of letters, <strong>IntraMail</strong> cannotroute the call. The entries are 1-3 (1-3 letters).✔By default, callers must dial at least 1 letter of the employee’s name (1).When Directory Dialing finds a name match, should it route the call as a Screened orUnscreened Transfer?Unscreened Transfer5.1 8005 - <strong>IntraMail</strong> Master Mailbox Options: Unscreened or Screened Transfer on page 221.- Enter 2 to route the call as an Unscreened Transfer.2<strong>IntraMail</strong> <strong>System</strong> <strong>Guide</strong> Chapter 2: Features ◆ 71
Directory Dialing✔By default, <strong>IntraMail</strong> routes the call as a Screened Transfer (1).Screened Transfer5.2 8005 - <strong>IntraMail</strong> Master Mailbox Options: Unscreened or Screened Transfer on page 221.- Enter 1 to route the call as a Screened Transfer.✔By default, <strong>IntraMail</strong> routes the call as a Screened Transfer (1).5.3 8005 - <strong>IntraMail</strong> Master Mailbox Options: Screened Transfer Timeout on page 221.- Set how long a Screened Transfer from the Directory Dialing Mailbox will ring an unansweredextension before recalling. The entries are 1-255 seconds or 0 for no recall.✔By default, the Screened Transfer Timeout interval is 15 seconds.Step 6Step 7Step 8Step 9To change the amount of time Directory Dialing callers have to dial letters:6.1 8005 - <strong>IntraMail</strong> Master Mailbox Options: Time Limit for Dialing Commands on page 221.- Enter the new timeout duration (0-99 seconds).- If the caller waits too long to dial, the Directory Dialing Message repeats.✔By default, Directory Dialing callers have 5 seconds to dial letters.To record a Directory Dialing Message:7.1 See Operation below.- The Directory Dialing Message is the Instruction Menu for the Master Mailbox programmedas a Directory Dialing Mailbox.✔By default (without a custom message recorded), the Directory Dialing Message is,“Please enter one or more letters of the person’s name, then press the pound key.”7.2 8004 - <strong>IntraMail</strong> <strong>System</strong> Options: Non-Subscriber Message Length on page 213.- This option sets the maximum message length (1-4095 seconds) for Instruction Menus.✔By default, this option is 120 seconds.Enable or disable the ability of the Directory Dialing Mailbox to detect and route incomingfaxes.8.1 8005 - <strong>IntraMail</strong> Master Mailbox Options: Fax Detection on page 221.- Enter Y to enable Fax Detection; N to disable. If enabled, when the Directory DialingMailbox detects incoming fax CNG tone, it routes the call to the fax extension specifiedin 8004 - Fax Extension.- See Fax Detection on page 86 for more.✔By default, Fax Detection is disabled (N).To allow the Directory Dialing Mailbox caller to dial 0 for other options or # to return to theAutomated Attendant:9.1 8005 - <strong>IntraMail</strong> Master Mailbox Options: Next Call Routing Mailbox on page 222.- Assign a Next Call Routing Mailbox (000-015) to the Directory Dialing Mailbox.- To remove an assignment, press CLEAR.- Once assigned, dialing # returns to the Automated Attendant. Dialing 0 follows the 0 actionof the Next Call Routing Mailbox.✔By default, there is no Next Call Routing Mailbox assigned.Step 10 To have an outside call be directly answered by the Directory Dialing Mailbox:10.1 Make sure the active Answer Table uses the Master Mailbox programmed as a Directory DialingMailbox.- See Answer Tables on page 30 for more.✔By default, Answer Table 1 routes to Routing Mailbox 000, with is a Call Routing Mailbox.Step 11 To allow callers to access Directory Dialing from a Dial Action Table action:11.1 Make sure you have an action in the active Dial Action Table that is a GOTO to the DirectoryDialing Mailbox.- See Dial Action Table on page 64 for more.✔By default, there are no actions assigned as a GOTO to a Directory Dialing Mailbox.72 ◆ Chapter 2: Features <strong>IntraMail</strong> <strong>System</strong> <strong>Guide</strong>
Directory DialingOperationLog onto <strong>System</strong> Administrator’s mailbox.SA (72)Access <strong>System</strong> Administrator options.[SYS ADMIN] - [N/A]I (4)Recording a Directory Dialing Message[Super Display Soft Key] - [Keyset Soft Key]Select Instruction Menus.[INSTRUCTION] - [INST]Enter the Directory Dialing Mailbox number.L (5)R (7)Listen to the current Directory Dialing Message (if any).[LISTEN] - [LSTN]# Exit listen mode.Record a new Directory Dialing Message.[RECORD] - [REC]Record message.* Pause or restart recording.[RESUME] - [RESUME][PAUSE] - [PAUSE]E (3) Erase recording.[CANCEL] - [CNCL]# Exit recording mode.[DONE] - [DONE]E (3) Erase the Directory Dialing Message.[ERASE] - [ERASE]# Go back to the <strong>System</strong> Administrator options.[EXIT] - [EXIT]# Go back to the <strong>System</strong> Administrator options.[EXIT] - [EXIT]0 Plays Help message.2To use Directory Dialing:Using Directory Dialing1. After the Automated Attendant answers, wait for the Directory Dialing Message.■ The Automated Attendant may ask you to dial a digit for Directory Dialing.2. Dial the letters that correspond to the name of the person you wish to reach + #.■ The Directory Dialing Message will tell you how many letters you need to dial, and whether youshould enter the person’s first name or last name.■ To exit Directory Dialing without selecting a name, just dial #.3. The Automated Attendant will announce the name matches, and tell you which digit to dial (1-3) toreach each of the announced names.■ To hear additional name matches (if any), dial 4 instead.4. Once you make your selection, the Automated Attendant will route your call to the name you select.<strong>IntraMail</strong> <strong>System</strong> <strong>Guide</strong> Chapter 2: Features ◆ 73
Directory DialingDialing Options Available while Entering a NameThe following table shows the dialing options available to the caller while they are entering a name into aDirectory Dialing Mailbox.■ By default, the caller can dial the digts 2-9 to enter the name or dial # to return to the Automated Attendant.■ If a Next Call Routing Mailbox is specified, the caller can dial the digits 2-9 to enter a name, dial 0 to followthe 0 action of the Next Call Routing Mailbox, or dial # to route directly to the Next Call Routing Mailbox.DialedDigitDirectory Dialing Mailbox Name Entry Options(Options available while entering a name)8006-Next Call RoutingMailbox SettingAction1 N/A Entry is ignored.2-9 N/A Interprets the digit as a letter and waits 6 secondsfor additional input (i.e., more letters or a # to concludename entry). If no additional digits aredialed, repeats the Directory Dialing Message (tomake a new name entry) up to three times and thenhangs up.0 UND (Not assigned) Repeats the Directory Dialing Message (to make anew name entry) each time the caller dials the digit.000-015 (valid Call RoutingMailbox)Caller routes according to the 0 action of the NextCall Routing Mailbox’s Dial Action Table.* N/A Repeats the Directory Dialing Message (to make anew name entry) each time the caller dials the digit.# UND (Not assigned) Routes to the Automated Attendant (i.e., back tothe Call Routing Mailbox that initially answeredthe call).000-015 (valid Call RoutingMailbox)Routes to the Next Call Routing Mailbox and playsthat mailbox’s Instruction Menu.Timeout UND (Not assigned) Repeats the Directory Dialing Message (to make anew name entry) up to three times and then hangs up.74 ◆ Chapter 2: Features <strong>IntraMail</strong> <strong>System</strong> <strong>Guide</strong>
Directory DialingDialing Options Available when more than one Employee has the Entered NameIf the name the caller enters is used by more than one employee, <strong>IntraMail</strong> lets the caller select the employeeto which they want to talk. The caller can dial 1, 2 or 3 to select the employee from the first three namematches, or dial 4 to hear additional name matches.■ By default, the caller can also dial * to make a new entry or dial # to return to the Automated Attendant.■ If a Next Call Routing Mailbox is specified, the caller can also dial * to make a new entry, dial 0 to follow the0 action of the Next Call Routing Mailbox, or dial # to route directly to the Next Call Routing Mailbox.Directory Dialing Mailbox Routing Options(Options available after a name is entered)DialedDigit8006-Next Call RoutingMailbox SettingAction1-3 N/A Route to the respective extension from the list ofup to three announced matches.4 N/A If more than three matches for the entered nameare found, provides access to the next set of threematches.5-9 N/A Plays “That is an invalid entry” and repeats thelist of announced matches each time the callerdials the digit.0 UND (Not assigned) Plays “That is an invalid entry” and repeats thelist of announced matches each time the callerdials the digit.000-015 (valid Call RoutingMailbox)Caller routes according to the 0 action of the NextCall Routing Mailbox’s Dial Action Table.* N/A Repeats the Directory Dialing Message (to make anew name entry) each time the caller dials the digit.# UND (Not assigned) Routes to the Automated Attendant (i.e., back tothe Call Routing Mailbox that initially answeredthe call).000-015 (valid Call RoutingMailbox)Routes to the Next Call Routing Mailbox and playsthat mailbox’s Instruction Menu.Timeout UND (Not assigned) Repeats the list of announced matches (up to threetimes). If no response, repeats the Directory DialingMessage (to make a new name entry) up to threetimes and then hangs up.2<strong>IntraMail</strong> <strong>System</strong> <strong>Guide</strong> Chapter 2: Features ◆ 75
Directory Dialing MailboxDirectory Dialing MailboxDescriptionA Directory Dialing Mailbox is the type of mailbox required to implement Directory Dialing. A DirectoryDialing Mailbox can be either a Routing Mailbox or a Master Mailbox. The type you choose depends onlyon available resources and your programming preference, since they work identically. See Directory Dialingon page 68 for more on how to set up a Directory Dialing Mailbox.Related FeaturesProgrammingDirectory Dialing (page 68)Directory Dialing allows an Automated Attendant caller to reach an extension by dialing the first few lettersin the extension user’s name.<strong>System</strong> Administrator (page 171)Only the <strong>System</strong> Administrator can record the Directory Dialing Message.Step 1Step 2To assign a Routing Mailbox as a Directory Dialing Mailbox:1.1 8006 - <strong>IntraMail</strong> Routing Mailboxes: Mailbox Type on page 227.- Enter 4 to make the selected Routing Mailbox a Directory Dialing Mailbox.✔By default, there are no Routing Mailboxes assigned as Directory Dialing Mailboxes.To assign a Master Mailbox as a Directory Dialing Mailbox:2.1 8005 - <strong>IntraMail</strong> Master Mailbox Options: Mailbox Type on page 218.- Enter 4 to make the selected Master Mailbox a Directory Dialing Mailbox.✔By default, there are no Master Mailboxes assigned as Directory Dialing Mailboxes.Turn to Directory Dialing on page 68 for more on how to program Directory Dialing.OperationTurn to Directory Dialing on page 68 for more on how to use Directory Dialing and record a Directory DialingMessage.76 ◆ Chapter 2: Features <strong>IntraMail</strong> <strong>System</strong> <strong>Guide</strong>
Erasing All MessagesErasing All MessagesDescriptionThe <strong>System</strong> Administrator can delete all messages in a Subscriber Mailbox. Erasing All Messages in anadministrator’s maintenance tool. The administrator may need to use this tool if an employee has left thecompany or has an excessive number of messages stored in their mailbox. By deleting the unwanted messages,the administrator can prevent the <strong>IntraMail</strong> recording capacity from being reached (which would disablemany of the <strong>IntraMail</strong> messaging features).Related FeaturesProgrammingMessage Delete (page 128)A Subscriber Mailbox user can delete any messages left in their mailbox.<strong>System</strong> Administrator (page 171)Only the <strong>System</strong> Administrator can delete messages in a co-worker’s mailbox.No additional programming required.2OperationErasing All Messages <strong>System</strong>-Wide[Super Display Soft Key] - [Keyset Soft Key]Log onto <strong>System</strong> Administrator’s mailbox.SA (72) Access <strong>System</strong> Administrator options.[SYS ADMIN] - [N/A]S (7) Select Subscriber Mailbox Maintenance options.[SUBSCRIBER] - [SUBS]Enter the number of the Subscriber Mailbox you want to maintain.EA (32) Erase all Subscriber Mailbox messages.[ERASE ALL MSGS] - [EA]# Go back to <strong>System</strong> Administrator options.[EXIT] - [EXIT]0 Plays Help message.<strong>IntraMail</strong> <strong>System</strong> <strong>Guide</strong> Chapter 2: Features ◆ 77
Exiting a MailboxExiting a MailboxDescriptionA Subscriber Mailbox user can exit their mailbox by dialing a code or by hanging up. After exiting, the subscribercan use their extension for normal call processing.Related FeaturesN/AProgrammingOperationTo exit your mailbox.No additional programming required.Log onto Subscriber Mailbox.XX (99) Exit your mailbox.[EXIT + EXIT] - [EXIT + EXIT]To exit and immediately return to your mailbox:Log onto Subscriber Mailbox.X# (9#) Exit and return to your mailbox.[EXIT + RETURN] - [EXIT + RETN]0 Plays Help messageExiting a Mailbox[Super Display Soft Key] - [Keyset Soft Key]78 ◆ Chapter 2: Features <strong>IntraMail</strong> <strong>System</strong> <strong>Guide</strong>
Extension Hunting to Voice MailExtension Hunting to Voice MailDescriptionExtension Hunting to Voice Mail automatically sends calls to an extension’s mailbox without the user havingto set up Call Forwarding. For example, Extension Hunting to Voice Mail can send unanswered transferredcalls to an extension’s mailbox rather than recalling the transferring party. In addition, Extension Hunting toVoice Mail can send an unanswered Direct Inward Line to the extension’s mailbox instead of diverting toKey Ring. Hunting can also reroute calls from the Automated Attendant as well as ringing Intercom calls(depending on the hunt type). Unlike Call Forwarding, Extension Hunting to Voice Mail requires no actionby the extension user to redirect calls; the system reroutes them automatically.There are 4 types of Extension Hunting to Voice Mail:■ Ring No Answer Trunk (Type 1)Type 1 hunting reroutes trunk calls to the extension’s mailbox after a preset interval. Type 1 huntingreroutes trunk calls when the extension is idle, busy, or in Do Not Disturb but does not reroute ringingIntercom calls. See the Routing Charts below for more.■ Ring No Answer / Busy Trunk (Type 2)Type 2 hunting also reroutes trunk calls to the extension user’s mailbox. When the extension is idle, Type 2hunting reroutes calls after an interval. Type 2 hunting reroutes trunk calls immediately while the extensionis busy or in Do Not Disturb. Like Type 1 hunting, Type 2 hunting does not reroute ringing Intercom calls.See the Routing Charts below for more.■ Ring No Answer / Busy All (Type 3)Type 3 hunting reroutes trunk calls and ringing Intercom calls. If the extension is idle, calls reroute to theuser’s mailbox after an interval. Type 3 hunting reroutes calls immediately when the extension is busy orin Do Not Disturb. See the Routing Charts below for more.■ Busy Trunk (Type 4)Type 4 hunting is similar to Type 2 hunting except that transferred trunk calls to an idle extension do notreroute. Transferred trunk calls, Direct Inward Lines, and calls from the Automated Attendant go immediatelyto the mailbox when the extension is busy or in Do Not Disturb. This type of hunting neverreroutes ringing Intercom calls. See the Routing Charts below for more.Notes:■ Extension Hunting to Voice Mail does not reroute voice-announced Intercom calls.■ Extension Hunting to Voice Mail does not reroute Key Ring calls. See the DS1000/2000 Software Manualfor more on Key Ring.Extension Hunting to Voice Mail Routing ChartsThe following charts show in detail how each type of hunting handles incoming calls.2Ring No Answer Trunk (Type 1) Hunting to Voice Mail Routing ChartCall Type Extension Idle Extension Busy Extension in DNDIntercom Does not hunt (use Call Forwarding instead).Transferred Trunk CallUTRF from AutomatedAttendantTRF from AutomatedAttendant 1Rings for 0401 - TransferRecall interval, then routesto mailbox.Rings for 8006 - ScreenedTransfer Timeout interval,then Automated Attendantprompts caller to leave amessage.Flashes line key for 0403 - Call Forward Ring No Answerinterval, then routes to mailbox.Automated Attendant immediately prompts caller to leave amessage.Direct Inward Line Rings for 0401-DIL No Answer Time interval, then routes to mailbox.1 See Screened Transfer on page 161 for more.<strong>IntraMail</strong> <strong>System</strong> <strong>Guide</strong> Chapter 2: Features ◆ 79
Extension Hunting to Voice MailRing No Answer / Busy Trunk (Type 2) Hunting to Voice Mail Routing ChartCall Type Extension Idle Extension Busy Extension in DNDIntercomTransferred Trunk CallUTRF from AutomatedAttendantTRF from AutomatedAttendant 1Direct Inward LineDoes not hunt (use Call Forwarding instead).Rings for 0401 - TransferRecall interval, then routesto mailbox.Rings for 8006 - ScreenedTransfer Timeout interval,then Automated Attendantprompts caller to leave amessage.Rings for 0401-DIL NoAnswer Time interval, thenroutes to mailbox.1 See Screened Transfer on page 161 for more.Call goes immediately to mailbox.Automated Attendant immediately prompts caller to leave amessage.Call goes immediately to mailbox.Ring No Answer / Busy All (Type 3) Hunting to Voice Mail Routing ChartCall Type Extension Idle Extension Busy Extension in DNDIntercom Ringing Intercom call ringsfor 0403 - Call ForwardRing No Answer intervalthen routes to mailbox.Voice-announced Intercomcalls do not hunt.Call goes immediately to mailbox.Transferred Trunk CallUTRF from AutomatedAttendantTRF from AutomatedAttendant 1Direct Inward LineRings for 0401 - TransferRecall interval, then routesto mailbox.Rings for 8006 - ScreenedTransfer Timeout interval,then Automated Attendantprompts caller to leave amessage.Rings for 0401-DIL NoAnswer Time interval, thenroutes to mailbox.1 See Screened Transfer on page 161 for more.Automated Attendant immediately prompts caller to leave amessage.Call goes immediately to mailbox.80 ◆ Chapter 2: Features <strong>IntraMail</strong> <strong>System</strong> <strong>Guide</strong>
Extension Hunting to Voice MailBusy Trunk (Type 4) Hunting to Voice Mail Routing ChartCall Type Extension Idle Extension Busy Extension in DNDIntercom Does not hunt (use Call Forwarding instead).Transferred Trunk Call Does not hunt (use Call Forwardinginstead).Call goes immediately to mailbox.UTRF from AutomatedAttendantTRF from AutomatedAttendant 1Direct Inward LineRings for 0401 - TransferRecall interval, then routesto mailbox.Rings for 8006 - ScreenedTransfer Timeout interval,then Automated Attendantprompts caller to leave amessage.Does not hunt (use Call Forwardinginstead).1 See Screened Transfer on page 161 for more.Automated Attendant immediately prompts caller to leave amessage.Call goes immediately to mailbox.2Related FeaturesCall Forward to a Mailbox (page 47)A subscriber can forward calls to their mailbox calls don’t go unanswered when they are unavailable.Voice Mail Overflow (page 183)The telephone system can automatically reroute unanswered outside calls to the <strong>IntraMail</strong> AutomatedAttendant.ProgrammingRing No Answer Trunk (Type 1) Hunting to Voice MailStep 1Step 2Set up the hunt type and destination for Type 1 hunting.1.1 1807 - Hunt Type- Enter 1 for Ring No Answer Trunk (Type 1).- Refer to the Extension Hunting in the DS1000/2000 Software Manual for more.✔By default, the entry is 0 (no hunting).1.2 1807 - Hunt Destination- Enter 700 (the <strong>IntraMail</strong> master extension number).- Refer to the Extension Hunting in the DS1000/2000 Software Manual for more.✔By default, this entry is undefined (entered by pressing CLEAR).Set the system timers used for Type 1 hunting.2.1 0401 - Transfer Recall- This timer sets how long a transferred trunk call or a UTRF from the Automated Attendantrings an idle extension before routing to the extension’s mailbox.- Refer to <strong>System</strong> Timers in the DS1000/2000 Software Manual for more.✔By default, this timer is 20 seconds.2.2 0401 - DIL No Answer Time- This timer sets how long a DIL waits at an extension before routing to the extension’s mailbox.- Refer to <strong>System</strong> Timers in the DS1000/2000 Software Manual for more.✔By default, this timer is 15 seconds.<strong>IntraMail</strong> <strong>System</strong> <strong>Guide</strong> Chapter 2: Features ◆ 81
Extension Hunting to Voice Mail2.3 0403 - Call Forward Ring No Answer- Set how long a transferred trunk call or UTRF from the Automated Attendant waits at abusy or DND extension before routing to the extension’s mailbox.- Refer to <strong>System</strong> Timers, Station in the DS1000/2000 Software Manual for more.✔By default, this timer is 10 seconds.2.4 8006 - <strong>IntraMail</strong> Routing Mailboxes: Customize: Screened Transfer Timeout on page 228.- Set how long a TRF from the Automated Attendant rings an idle extension before promptingthe caller to leave a message.✔By default, the timer is 15 seconds.Ring No Answer / Busy Trunk (Type 2) Hunting to Voice MailStep 1Set up the hunt type and destination for Type 2 hunting.1.1 1807 - Hunt Type- Enter 2 for Ring No Answer / Busy Trunk (Type 2).- Refer to the Extension Hunting in the DS1000/2000 Software Manual for more.✔By default, the entry is 0 (no hunting).1.2 1807 - Hunt Destination- Enter 700 (the <strong>IntraMail</strong> master extension number).- Refer to the Extension Hunting in the DS1000/2000 Software Manual for more.✔By default, this entry is undefined (entered by pressing CLEAR).Step 2Set the system timers used for Type 2 hunting.2.1 0401 - Transfer Recall- This timer sets how long a transferred trunk call or a UTRF from the Automated Attendantrings an idle extension before routing to the extension’s mailbox.- Refer to <strong>System</strong> Timers in the DS1000/2000 Software Manual for more.✔By default, this timer is 20 seconds.2.2 0401 - DIL No Answer Time- This timer sets how long a DIL waits at an idle extension before routing to the extension’smailbox.- Refer to <strong>System</strong> Timers in the DS1000/2000 Software Manual for more.✔By default, this timer is 15 seconds.2.3 8006 - <strong>IntraMail</strong> Routing Mailboxes: Customize: Screened Transfer Timeout on page 228.- Set how long a TRF from the Automated Attendant rings an idle extension before promptingthe caller to leave a message.✔By default, the timer is 15 seconds.Ring No Answer / Busy All (Type 3) Hunting to Voice MailStep 1Step 2Set up the hunt type and destination for Type 3 hunting.1.1 1807 - Hunt Type- Enter 3 for Ring No Answer / Busy All (Type 3).- Refer to the Extension Hunting in the DS1000/2000 Software Manual for more.✔By default, the entry is 0 (no hunting).1.2 1807 - Hunt Destination- Enter 700 (the <strong>IntraMail</strong> master extension number).- Refer to the Extension Hunting in the DS1000/2000 Software Manual for more.✔By default, this entry is undefined (entered by pressing CLEAR).Set the system timers used for Type 3 hunting.2.1 0401 - Transfer Recall- This timer sets how long a transferred trunk call or a UTRF from the Automated Attendantrings an idle extension before routing to the extension’s mailbox.- Refer to <strong>System</strong> Timers in the DS1000/2000 Software Manual for more.✔By default, this timer is 20 seconds.82 ◆ Chapter 2: Features <strong>IntraMail</strong> <strong>System</strong> <strong>Guide</strong>
Extension Hunting to Voice Mail2.2 0401 - DIL No Answer Time- This timer sets how long a DIL waits at an idle extension before routing to the extension’smailbox.- Refer to <strong>System</strong> Timers in the DS1000/2000 Software Manual for more.✔By default, this timer is 15 seconds.2.3 0403 - Call Forward Ring No Answer- Set how long an Intercom call rings an idle extension routing to the extension’s mailbox.- Refer to <strong>System</strong> Timers, Station in the DS1000/2000 Software Manual for more.✔By default, this timer is 10 seconds.2.4 8006 - <strong>IntraMail</strong> Routing Mailboxes: Customize: Screened Transfer Timeout on page 228.- Set how long a TRF from the Automated Attendant rings an idle extension before promptingthe caller to leave a message.✔By default, the timer is 15 seconds.Busy Trunk (Type 4) Hunting to Voice MailStep 1Step 2Set up the hunt type and destination for Type 4 hunting.1.1 1807 - Hunt Type- Enter 4 for Busy Trunk (Type 4).- Refer to the Extension Hunting in the DS1000/2000 Software Manual for more.✔By default, the entry is 0 (no hunting).1.2 1807 - Hunt Destination- Enter 700 (the <strong>IntraMail</strong> master extension number).- Refer to the Extension Hunting in the DS1000/2000 Software Manual for more.✔By default, this entry is undefined (entered by pressing CLEAR).Set the system timers used for Type 3 hunting.2.1 0401 - Transfer Recall- This timer sets how long a UTRF from the Automated Attendant rings an idle extensionbefore routing to the extension’s mailbox.- Refer to <strong>System</strong> Timers in the DS1000/2000 Software Manual for more.✔By default, this timer is 20 seconds.2.2 8006 - <strong>IntraMail</strong> Routing Mailboxes: Customize: Screened Transfer Timeout on page 228.- Set how long a TRF from the Automated Attendant rings an idle extension before promptingthe caller to leave a message.✔By default, the timer is 15 seconds.2OperationExtension Hunting to Voice MailTo force Extension Hunting to Voice Mail to redirect all your calls to your mailbox:1. Press DND.■ Type 1 hunting will not redirect Intercom calls.<strong>IntraMail</strong> <strong>System</strong> <strong>Guide</strong> Chapter 2: Features ◆ 83
External TransferExternal TransferDescriptionExternal Transfer allows an Automated Attendant caller to automatically route to an outside telephone number.To set this up, assign a Dial Action Table action as a UTRF to a <strong>System</strong> Speed Dial bin (e.g., #200 +Pause for system bin 200). When the Automated Attendant answers, the caller dials the digit and <strong>IntraMail</strong>automatically routes them to the outside number contained in the bin. Similar to Centrex Transfer, ExternalTransfer allows your callers to easily reach branch offices and important off-site associates. Unlike CentrexTransfer, External Transfer does not require unique telco features.Related FeaturesProgrammingCentrex Transfer (page 59)Centrex Transfer allows the Automated Attendant to transfer a caller over a Centrex trunk using the featuresof that Centrex trunk.Dial Action Table (page 64)External Transfer uses the active Dial Action Table to route an Automated Attendant caller to an outsidetelephone number.Step 1Step 2Step 3Step 4Assign a Dial Action Table to each active Call Routing Mailbox.1.1 8006 - <strong>IntraMail</strong> Routing Mailboxes: Dial Action Table on page 228.- The Call Routing Mailbox uses the Dial Action Table assignment to provide dialing optionsto callers.✔The default Call Routing Mailboxes (000-007) use Dial Action Table 1.For an available key, set up a UTRF Dial Action Table option for External Transfer.2.1 8008 - <strong>IntraMail</strong> Dial Action Tables: UTRF Action - Unscreened Transfer (2) on page 247.- The corresponding Number option should be # followed by the <strong>System</strong> Speed Dial bin, followedby a pause (entered by pressing MIC).- For example, to have External Transfer dial <strong>System</strong> Speed Dial bin 200, enter # 200 MIC.- Add additional pauses if the entire common bin does not dial out.✔This capability is not assigned by default.Program the <strong>System</strong> Speed Dial bin for External Transfer.3.1 1101 - <strong>System</strong> Speed Dial Numbers or #77 User Programmable Feature.- The bin should contain just the outside telephone number you want External Transfer to dial.- Refer to the DS1000/2000 Software Manual for more.✔There are no <strong>System</strong> Speed Dial numbers stored by default.Enable Tandem Trunking/Unsupervised Conference.4.1 1003 - Tandem Trunk on page 196- At least one trunk on the call must have Tandem Trunking enabled (Y).- Refer to the DS1000/2000 Software Manual for more.✔By default, Tandem Trunking is disabled (N).4.2 1801 - Extension Class of Service Assignment- Assign an extension’s Class of Service.✔By default, the attendant (extension 300) has Class of Service 1. All other extensions haveClass of Service 2.4.3 8002 - Voice Mail Port Options (Part 1): Class of Service- Check the Class of Service assignments for the <strong>IntraMail</strong> ports.84 ◆ Chapter 2: Features <strong>IntraMail</strong> <strong>System</strong> <strong>Guide</strong>
External TransferOperationOperation is automatic once set up in programming.2<strong>IntraMail</strong> <strong>System</strong> <strong>Guide</strong> Chapter 2: Features ◆ 85
Fax DetectionFax DetectionDescriptionThe Automated Attendant can detect incoming fax calls and transfer them to a fax machine. With Fax Detectionenabled, after the Automated Attendant answers a call it listens for incoming fax CNG tone. If it detectsthe tone, it does an unscreened transfer of the call to the specified company fax machine. The incoming faxthen prints out on the company fax machine. If you disable Fax Detection, the Automated Attendant will notdetect incoming fax calls.Related FeaturesNoneProgrammingStep 1Step 2Enable Fax Detection for the active Call Routing Mailbox.1.1 8006 - <strong>IntraMail</strong> Routing Mailboxes: Fax Detection on page 229.- Enter Y (9) to enable Fax Detection for the Call Routing Mailbox.✔By default, this option is disabled (N).Specify the extension to which <strong>IntraMail</strong> should send a fax call when the Automated Attendantdetects fax CNG tone.2.1 8004 - <strong>IntraMail</strong> <strong>System</strong> Options: Fax Extension on page 214.- Normally, this is the extension number of the analog port to which the fax machine is connected(e.g., 320).✔By default, this option is UND (Undefined, entered by pressing CLEAR).OperationN/A86 ◆ Chapter 2: Features <strong>IntraMail</strong> <strong>System</strong> <strong>Guide</strong>
Flexible Answering SchedulesFlexible Answering SchedulesDescriptionThe Automated Attendant can answer outside calls with different announcements and dialing options,depending on the time of day and day of week. For example, a company can set up separate schedules forweekdays, evenings, weekends, and specific holidays. Each schedule can plan a different announcement tocallers, as well as provide them with unique dialing options. Once set up in programming, the schedule operationis automatic.The Flexible Answering Schedules are determined by the set up of the <strong>IntraMail</strong> Answer Tables. See AnswerTables on page 30 for more.Related FeaturesAnswer Tables (page 30)Determines how the Automated Attendant answers outside calls on each trunk.Automated Attendant (page 42)The Automated Attendant can automatically answer the telephone system’s incoming calls, play anInstruction Menu message, and provide dialing options to callers.Call Routing Mailbox (page 49)The mailbox associated with an Answer Table that specifies which dialing options (Dial Action Table)and announcements are available to Automated Attendant callers.Dial Action Table (page 64)Defines the dialing options for the Call Routing Mailbox chosen by the active Answer Table.2ProgrammingStep 1Determine which Answer Table answers each trunk.1.1 1003 - Trunk Options: Answer Table on page 196.- For each trunk, enter the number of the Answer Table that should handle that trunk’s AutomatedAttendant calls. See Answer Tables on page 30 for more.✔By default, all trunks use Answer Table 1.OperationN/A<strong>IntraMail</strong> <strong>System</strong> <strong>Guide</strong> Chapter 2: Features ◆ 87
Flexible Call RoutingFlexible Call RoutingDescriptionThe Automated Attendant can provide outside callers with a wide variety of dialing (routing) options. Youcan customize the announcements and routing options to exactly meet the site requirements. Use FlexibleCall Routing to eliminate or minimize the need for an operator or receptionist to handle outside calls.There are 3 components to Flexible Call Routing.■ Answer Tables (page 30)Determines how the Automated Attendant answers outside calls on each trunk, according to the time ofthe day and day of the week that the call is ringing.■ Call Routing Mailbox (page 49)The mailbox associated with an Answer Table that specifies which dialing options (Dial Action Table)and announcement are available to Automated Attendant callers.■ Dial Action Table (page 64)Defines the dialing options for the Call Routing Mailbox chosen by the active Answer Table, which inturn provides those dialing options to Automated Attendant callers.Related FeaturesProgrammingOperationAnswer Tables (page 30)Determines how the Automated Attendant answers outside calls on each trunk.Automated Attendant (page 42)The Automated Attendant can automatically answer the telephone system’s incoming calls, play anInstruction Menu message, and provide dialing options to callers.Call Routing Mailbox (page 49)The mailbox associated with an Answer Table that specifies which dialing options (Dial Action Table)and announcement are available to Automated Attendant callers.Dial Action Table (page 64)Defines the dialing options for the Call Routing Mailbox chosen by the active Answer Table.Refer to Automated Attendant on page 42 for more on how to set up your Flexible Answering Schedules.N/A88 ◆ Chapter 2: Features <strong>IntraMail</strong> <strong>System</strong> <strong>Guide</strong>
Flexible Mailbox Numbering PlanFlexible Mailbox Numbering PlanDescriptionIf the telephone system extension numbers are changed or swapped, <strong>IntraMail</strong> will automatically change theSubscriber Mailbox numbers to match. There is no extensive reprogramming required. After the swap, all ofthe subscriber’s messages and options are available at their new extension number. Flexible Mailbox NumberingPlan lets you customize a site’s extension numbers and be assured that <strong>IntraMail</strong> will automaticallyadapt to the new configuration.Two-digit extension/mailbox numbering is not supported in <strong>IntraMail</strong>.Related FeaturesDial Action Table (page 64)Be sure the Dial Action Table actions accommodate the revised telephone system numbering.ProgrammingFlexible Numbering Plan ExampleThe following example illustrates how to accommodate extension number 800 assigned to station number 2.2Step 1 In DS1000/2000 programming, assign extension number 800 to station 2.1.1 In 0501 - Numbering Plan, be sure the Digit 8 Options Function Type is 2 (Extension) and theExpected Digits is 3.1.2 In 0502 - Extension Numbering, select station 2 and assign extension number 800.Step 2Customize the active Dial Action Tables to allow Automated Attendant callers to dial the newextension.2.1 8008 - <strong>IntraMail</strong> Dial Action Tables on page 246.- For key 8 enter UTRF (or TRF) for the Action and XXX for the corresponding Number.✔By default, key 8 is UND (undefined).OperationN/A<strong>IntraMail</strong> <strong>System</strong> <strong>Guide</strong> Chapter 2: Features ◆ 89
Forced Unscreened TransferForced Unscreened TransferDescriptionA Subscriber Mailbox can optionally convert Automated Attendant Screened Transfers to UnscreenedTransfers. Enable this option for a mailbox if the subscriber prefers to receive all calls sent by the AutomatedAttendant as Unscreened Transfers. With Unscreened Transfers,■ Calls from the Automated Attendant ring like other transferred calls and display the incoming Caller IDdata (if provided by telco and enabled in programming) as the call is ringing.■ As with Screened Transfers, unanswered calls route to the subscriber’s greeting (recorded or default) sothe caller can leave a message. However, with Unscreened Transfer the caller cannot dial 2 to reach theNext Call Routing Mailbox options (if programmed).Related FeaturesProgrammingDial Action Table (page 64)If enabled in the Subscriber Mailbox, <strong>IntraMail</strong> automatically converts any Screened Transfers (TRFs) tothe subscriber’s extension to Unscreened Transfers (UTRFs).Screened Transfer (page 161)After the Automated Attendant caller dials an extension, <strong>IntraMail</strong> calls (screens) the destination extensionto see if the transfer can go through.Unscreened Transfer (page 180)After an Automated Attendant caller dials an extension, <strong>IntraMail</strong> immediately transfers the call to theextension and hangs up.Step 1Enable Forced Unscreened Transfer for the Subscriber Mailbox.1.1 1808 - <strong>IntraMail</strong> Subscriber Mailbox Options: Forced Unscreened Transfer on page 205.- Enter Y (9) to enable this option to automatically convert Automated Attendant ScreenedTransfers to Unscreened Transfers.✔By default, this option is disabled (N).OperationN/A90 ◆ Chapter 2: Features <strong>IntraMail</strong> <strong>System</strong> <strong>Guide</strong>
Getting Recorded HelpGetting Recorded HelpDescriptionIf a Subscriber Mailbox user dials an incorrect code or forgets what to dial while in their mailbox, they canrequest help from the <strong>IntraMail</strong> voice prompts. Recorded Help provides the user with a built-in, interactiveuser’s guide. To get recorded help, the user dials 0.Related FeaturesVoice Prompting Messages (page 186)Voice Prompts provide real-time instructions on how to use the <strong>IntraMail</strong> features.ProgrammingOperationNo additional programming required.2Getting Recorded HelpLog onto your mailbox0 Get recorded help.■ Recorded help is always available from the Main Menu.■ Recorded help may not be available at all levels.<strong>IntraMail</strong> <strong>System</strong> <strong>Guide</strong> Chapter 2: Features ◆ 91
Go To A MailboxGo To A MailboxDescriptionAn Automated Attendant caller can dial a digit to route to a Call Routing or Announcement Mailbox. This iscalled the Go To (GOTO) action. The GOTO action can route directly to a specific Call Routing orAnnouncement Mailbox, or allow the Automated Attendant caller to go to a mailbox of their own choosing.Use the GOTO action to set up a “tree” of Automated Attendant options.The block diagram below shows how the Automated Attendant can provide the caller with a “tree” of dialingoptions. Dialing 1 (GOTO 008) routes to Announcement Mailbox 008, which plays the company directions.Dialing 2 (GOTO 001) routes to Call Routing Mailbox 001, which is set up to give the caller single-digitdialing to Tech Service technicians.■ The Announcement Message for Announcement Mailbox 008 tells the caller how to locate the company.■ The Instruction Menu for Call Routing Mailbox 001 instructs the caller which digits to dial for each technician.The Dial Action Table for Call Routing Mailbox 001 contains the TRF or UTRF actions to eachtechnician’s extension.Automated Attendant1GOTO 008CompanyDirections2Announcement Mailbox 008Call Routing Mailbox 000GOTO 001Tech ServiceTechniciansCall Routing Mailbox 001The GOTO action can also log into a Subscriber Mailbox, although the LOGON action is normally reservedfor this function.Related FeaturesAutomated Attendant (page 42)The Automated Attendant can automatically answer the telephone system’s incoming calls, play anInstruction Menu message, and provide dialing options to callers.Dial Action Table (page 64)The GOTO action is a Dial Action Table option.Instruction Menu (page 105)Be sure the Instruction Menu for the active Call Routing Mailbox describes how to use the GOTO action.92 ◆ Chapter 2: Features <strong>IntraMail</strong> <strong>System</strong> <strong>Guide</strong>
Go To A MailboxProgrammingOperationStep 1Assign a GOTO action to the active Dial Action Table.1.1 8008 - <strong>IntraMail</strong> Dial Action Tables: GOTO Action - Go to Mailbox (7) on page 249.- To have Automated Attendant callers dial a single digit to go to a Call Routing orAnnouncement Mailbox, enter the mailbox number in the corresponding Number option.- For example, to have key 1 go to Call Routing Mailbox 001, for key 1 enter GOTOfor the Action and 001 for the corresponding Number.- To have <strong>IntraMail</strong> require Automated Attendant callers to enter a Call Routing orAnnouncement Mailbox to go to, enter XXX in the corresponding Number option. The keyyou choose must represent the first digit in the mailbox numbers.- For example, to allow callers to go to mailboxes 000-015, for key 0 enter GOTO forthe Action and XXX for the corresponding Number.- To log into any valid Call Routing or Subscriber Mailbox, enter IXXX in the correspondingNumber option.- For example, to allow callers to dial 1 plus any Call Routing or Announcement Mailboxnumber to go to, for key 1 enter GOTO for the Action and IXXX for the correspondingNumber.✔By default, there are no GOTO actions assigned.Using the Automated Attendant GOTO Action2For the outside caller:1. After Automated Attendant answers, the voice prompts will instruct you on which digits to dial.<strong>IntraMail</strong> <strong>System</strong> <strong>Guide</strong> Chapter 2: Features ◆ 93
GreetingGreetingDescriptionSoftwareNote:Multiple Greetings requires software version 03.20.07 or higher and <strong>IntraMail</strong> voice prompts version 1.2.A Subscriber Mailbox user can record a personalized greeting for their mailbox. Caller’s to the user’s mailboxhear the prerecorded personalized greeting rather than a default message. The greeting can announce thesubscriber’s name, provide a personal message (such as “Hello - I am on vacation this week”), or instruct thecaller how to leave a message or use other mailbox options. A greeting that provides mailbox instructions isvery helpful if the mailbox has a Next Call Routing Mailbox set up that provides additional dialing options.Without the greeting, the caller would not know which digits to dial.While listening to a mailbox greeting, a caller can dial * to immediately leave a message.Remote GreetingsA Subscriber Mailbox user can call into the Automated Attendant, access their mailbox, and remotely recordtheir mailbox greeting. Following are two of the ways a user can do this:■ After the Automated Attendant answers, dial a digit (typically #) followed by their mailbox number. Thismethod allows outside callers to log into their Subscriber Mailboxes from outside the company. Oncethey log into their mailbox, the user can dial G to record a greeting.■ If an extension has a Direct Inward Line that is forwarded to voice mail, the caller can dial # and log intotheir mailbox (instead of leaving a message). Once they log into their mailbox, the user can dial G torecord a greeting. This option must be set up in the Next Call Routing Mailbox. To allow this capability,for example:- Program the Next Call Routing Mailbox # digit as LOGON to IXXX.- While listening to their greeting, the subscriber can dial:# (to route to their Next Call Routing Mailbox), then# and their mailbox number to log onto their mailbox.- By default, this option is provided in Call Routing Mailbox 000. Additionally, the subscriber shouldenable a Security Code for their mailbox to prevent unauthorized logons.Multiple GreetingsIn systems with Multiple Greetings, the mailbox subscriber can record up to three separate greetings andmake any one of the three active. When a caller leaves a message in the subscriber’s mailbox, they hear theactive greeting. This allows the subscriber, for example, to record separate greetings for work hours, afterwork, and during vacation. Instead of rerecording their greeting when they leave the office, they can justactivate the “after work” greeting instead.If the active greeting has not been recorded, a caller leaving a message in the subscriber mailbox will hear,“At the tone, you can leave your message for (extension number or name).”Related FeaturesAuto Attendant Do Not Disturb (page 37)Auto Attendant Do Not Disturb sends Automated Attendant calls directly to a subscriber’s mailbox. Theirphone will not ring for calls from the Automated Attendant.Dial Action Table (page 64)The active Dial Action Table must have a LOGON action assigned to a key to enable Remote Greeting.Log Onto Voice Mail (page 112)A Subscriber Mailbox user can record their greeting after remotely logging onto <strong>IntraMail</strong>.Security Code (page 164)To prevent unauthorized tampering, the subscriber should enable a Security Code for their mailbox.94 ◆ Chapter 2: Features <strong>IntraMail</strong> <strong>System</strong> <strong>Guide</strong>
Greeting<strong>System</strong> Administrator (page 171)With Multiple Greetings, the <strong>System</strong> Administrator’s Subscriber Maintenance EG (34) option simultaneouslyerases all recorded greetings in a Subscriber Mailbox. Additionally, the active greeting is reset to 1.ProgrammingStep 1Step 2Set the maximum length of Subscribe Mailbox greetings.1.1 8004 - <strong>IntraMail</strong> <strong>System</strong> Options: Subscriber Message Length on page 213.- Set the maximum length of Subscriber Mailbox greetings (1-4095 seconds).- This option also sets the maximum length of recorded messages for the following:- This option also sets the maximum length of recorded messages for the following:- Subscriber Mailbox users dialing RS to record and send a message.- Extension users leaving a message in a Subscriber Mailbox.- Outside callers transferred by an extension user to a Subscriber Mailbox.(this maybelong in non-subsriber)- Outside Automated Attendant callers accessing a Subscriber Mailbox via a GOTOcommand.✔By default, Subscriber Mailbox greetings are 120 seconds long maximum.To enable Remote Greeting, program a LOGON action in the active Dial Action Table.2.1 8008 - <strong>IntraMail</strong> Dial Action Tables on page 246.- To log directly into a specific Subscriber Mailbox, enter the mailbox number in the correspondingNumber option.- For example, to have key 4 log directly into Subscriber Mailbox 305, for key 4 enterLOGON for the Action and 305 for the corresponding Number.- To have <strong>IntraMail</strong> request Automated Attendant callers to select a Subscriber Mailbox tolog into, enter N in the corresponding Number option. The key you choose must representthe first digit in the Subscriber Mailbox numbers.- For example, to have the Automated Attendant request callers to enter the number ofthe Subscriber Mailbox into which they wish to log, for key 3 enter LOGON for theAction and N for the corresponding Number. When callers dial 3, they hear, “Pleaseenter your mailbox number.”- To have <strong>IntraMail</strong> require Automated Attendant callers to enter a Subscriber Mailbox to loginto (without playing an announcement), enter XXX in the corresponding Number option.The key you choose must represent the first digit in the Subscriber Mailbox numbers.- For example, to allow callers to log onto mailboxes 300-399, for key 3 enterLOGON for the Action and XXX for the corresponding Number.- To log into any valid Subscriber Mailbox, enter IXXX in the corresponding Numberoption.- For example, to allow callers to dial 1 plus any Subscriber Mailbox number to logon, for key 1 enter LOGON for the Action and IXXX for the corresponding Number.✔By default, key # Action = LOGON and Number = IXXX.2<strong>IntraMail</strong> <strong>System</strong> <strong>Guide</strong> Chapter 2: Features ◆ 95
GreetingOperationSetting Up Auto Attendant Do Not Disturb and Recording a Greeting (Prior to software version 03.20.07)[Super Display Soft Key] - [Keyset Soft Key]Log onto Subscriber Mailbox.G (4)Access the Mailbox Greeting options.[GREETING] - [GREET]<strong>IntraMail</strong> plays a summary of your current settings.L (5)Listen to the active greeting (if recorded).[LISTEN] - [LSTN]# Exit listen mode.O (6) Turn Auto Attendant Do Not Disturb off or on.[DND ON] - [N/A][DND OFF] - [N/A]R (7) Record a new greeting (if not recorded), or rerecord the current greeting.[RECORD] - [REC]Record at the tone, then press # when done.* Pause or restart recording.[RESUME] - [RESUME][PAUSE] - [PAUSE]E (3) Erase the greeting.[CANCEL] - [CNCL]# End the recording.[DONE] - [DONE]E (3) Erase the currently recorded greeting (if any).[ERASE] - [ERASE]# Go back to mailbox Main Menu.[EXIT] - [EXIT]0 Plays Help message.96 ◆ Chapter 2: Features <strong>IntraMail</strong> <strong>System</strong> <strong>Guide</strong>
GreetingRecording a Multiple Greeting and Setting Up Auto Attendant Do Not Disturb (Software 03.20.07 or higher)[Super Display Soft Key] - [Keyset Soft Key]Log onto Subscriber Mailbox.G (4)Access the Mailbox Greeting options.[GREETING] - [GREET]<strong>IntraMail</strong> does the following:• Plays a summary of your current settings.• Displays the status of your active Greeting (1-3).[GREETING n: RECORDED] - [GREETING n: RECORDED], or[GREETING n: NOT REC] - [GREETING n: NOT REC]• Shows the Auto Attendant Do Not Disturb status.[AUTO-ATT DND:OFF] - [N/A], or[AUTO-ATT DND:ON] - [N/A]• Provides soft keys for each of the 3 greetings.[GREETING 1] - [GR1][GREETING 2] - [GR2][GREETING 3] - [GR3]Select a Greeting (which also makes it active).(1) [GREETING 1] - [GR1](2) [GREETING 2] - [GR2](3) [GREETING 3] - [GR3]L (5) Listen to the active greeting (if recorded).[LISTEN] - [LSTN]R (7) Record a new greeting (if not recorded), or rerecord thecurrent greeting.[RECORD] - [REC]Record at the tone, then press # when done.* Pause or restart recording.[RESUME] - [RESUME][PAUSE] - [PAUSE]E (3) Erase the greeting.[CANCEL] - [CNCL]# End the recording.[DONE] - [DONE]Erase the currently recorded greeting (if any).[ERASE] - [ERASE]# Go back to the Mailbox Greeting options.[EXIT] - [EXIT]Change Auto Attendant Do Not Disturb.O (6) Turn Auto Attendant Do Not Disturb off or on.[DND ON] - [N/A][DND OFF] - [N/A]# Go back to mailbox Main Menu.[EXIT] - [EXIT]0 Plays Help message.2<strong>IntraMail</strong> <strong>System</strong> <strong>Guide</strong> Chapter 2: Features ◆ 97
Group MailboxGroup MailboxDescriptionSoftwareNote:Group Mailbox requires software version 03.20.07 or higher.A Group Mailbox is a Subscriber Mailbox shared by a group of co-workers. If a caller leaves a message atany extension within the group, the system stores the message in the Group Mailbox. The Ring/Messagelamp at all keyset extensions in the group flashes to indicate that there is a new voice mail message waiting.Any extension user in the group can log onto their mailbox to hear and process the shared message. Themessage count on all keyset displays increments and decrements as group messages are received, listened to,or deleted.Group Mailboxes are helpful in both residential installations and larger business workgroups, since extensionsshare a common voice mailbox. Messages in the Group Mailbox can be listened to, forwarded, deleted,and otherwise processed by any member of the group.Group Mailbox uses Ring Group and Master Mailbox programming. You can separately set up Ring Groupmembers to have the same Group Mailbox. Since the system provides 8 Ring Groups, there are a total of 8Group Mailboxes available.Understanding Group Mailbox TypesIf the Group (Master) Mailbox is a Call Routing Mailbox (1):■ A co-worker attempting to leave a message at an extension assigned to the Group Mailbox hears: “Yourcall cannot go through. Goodbye.” <strong>IntraMail</strong> then hangs up.■ An outside caller attempting to leave a message at an extension assigned to the Group Mailbox hears theprerecorded Instruction Menu message and can dial options allowed by the associated Dial Action Table.■ If the Group Mailbox user presses MW, they are asked to enter their mailbox number. After entering thenumber, they hear, “That mailbox does not exist.”■ An Automated Attendant caller attempting to leave a Quick Message or do a Remote Logon at an extensionassigned to the Group mailbox hears, “That mailbox does not exist.” They then return to the AutomatedAttendant.If the Group (Master) Mailbox is an Announcement Mailbox (2):■ A co-worker attempting to leave a message at an extension assigned to the Group Mailbox hears: “Yourcall cannot go through. Goodbye.” <strong>IntraMail</strong> then hangs up.■ An outside caller attempting to leave a message at an extension assigned to the Group Mailbox hears theprerecorded announcement and can use all other Announcement Mailbox features.■ If the Group Mailbox user presses MW, they are asked to enter their mailbox number. After entering thenumber, they hear: “That mailbox does not exist.”■ An Automated Attendant caller attempting to leave a Quick Message or do a Remote Logon at an extensionassigned to the Group mailbox hears, “That mailbox does not exist.” They then return to the AutomatedAttendant.If the Group (Master) Mailbox is a Subscriber Mailbox (3):■ The Group Mailbox has all the features of any other personal Subscriber Mailbox.If the Group (Master) Mailbox is a Directory Dialing Mailbox (4):■ A co-worker attempting to leave a message at an extension assigned to the Group Mailbox hears: “Yourcall cannot go through. Goodbye.” <strong>IntraMail</strong> then hangs up.■ An outside caller attempting to leave a message at an extension assigned to the Group Mailbox hears theDirectory Dialing message and can use any of the options programmed for the Directory Dialing Mailbox.98 ◆ Chapter 2: Features <strong>IntraMail</strong> <strong>System</strong> <strong>Guide</strong>
Group Mailbox■■If the Group Mailbox user presses MW, they are asked to enter their mailbox number. After entering thenumber, they hear: “That mailbox does not exist.”An Automated Attendant caller attempting to leave a Quick Message or do a Remote Logon at an extensionassigned to the Group mailbox hears, “That mailbox does not exist.” They then return to the AutomatedAttendant.Related FeaturesProgrammingMaster Mailbox (page 122)A Group Mailbox uses a Master Mailbox. You can set up the Master Mailbox as a Call Routing,Announcement, Subscriber, or Directory Dialing Mailbox.Step 1Step 2Step 3Assign the extension you want to have a Group Mailbox to a Ring Group.1.1 1802 - Extension Options (Part 1): Ring Group Number.- Enter the Ring Group to which the extension belongs (1-8). The Ring Group assignmentdetermines which Master Mailbox the system uses as the Group Mailbox.Ring Group Assignments for Group Mailboxes1802-Ring Group Entry Ring Group Master Number 8005-Master Mailbox1 600 6002 601 6013 602 6024 602 6035 604 6046 605 6057 606 6068 607 607- If 1808-Mailbox Type = 2 (Group) and there is no Ring Group assignment, the extensionhas no mailbox, just as if 1808-Mailbox Type was 0 (None).✔ By default, this entry is 0 (no Ring Group assigned).Set the extension’s mailbox type to Group.2.1 1808 - <strong>IntraMail</strong> Subscriber Mailbox Options: Mailbox Type on page 202.- If an extension should have a Group Mailbox, enter 2.- Other entries for this option are 1 (Personal Mailbox) and 0 (no mailbox enabled).✔By default, this option is 1 (Personal Mailbox).For the Master Mailbox that corresponds to the extension’s Ring Group, assign the mailboxtype.3.1 8005 - <strong>IntraMail</strong> Master Mailbox Options: Mailbox Type on page 218.- Use this option to set the mailbox type for the Master Mailbox used as the Group Mailbox. Theentries are 1 (Call Routing), 2 (Announcement), 3 (Subscriber), and 4 (Directory Dialing).- See Understanding Group Mailbox Types on page 98 for more on choosing the extension’sGroup Mailbox type.✔ By default, this option is 3 (Subscriber).2<strong>IntraMail</strong> <strong>System</strong> <strong>Guide</strong> Chapter 2: Features ◆ 99
Group Mailbox3.2 8005 - <strong>IntraMail</strong> Master Mailbox Options: Mailbox Active on page 219.- Enter Y to enable each Master Mailbox used as a Group Mailbox.✔By default, this option is Y (enabled).OperationSee the following features for operation of the specific Group Mailbox type:■ Announcement Mailbox on page 22.■ Call Routing Mailbox on page 49.■ Directory Dialing on page 68.■ Subscriber Mailbox on page 168.100 ◆ Chapter 2: Features <strong>IntraMail</strong> <strong>System</strong> <strong>Guide</strong>
Guest MailboxGuest MailboxDescriptionSoftwareNote:Enhanced Guest Mailbox requires software version 03.20.07 or higher.An outside party can have their own Guest Mailbox mailbox for receiving and sending messages. A GuestMailbox is a Subscriber Mailbox that does not have an extension associated with it. A Guest Mailbox canalso be a Master Mailbox assigned as a Subscriber Mailbox. A Guest Mailbox has many of the <strong>IntraMail</strong> featuresof a Subscriber Mailbox. A company visitor with a Guest Mailbox could, for example:■ Go to any extension, press ICM + 700, then dial their mailbox number.■ Review their messages, leave messages for associates, or record a new greeting for their mailbox.■ Use many other features available to a Subscriber Mailbox.For a brief overview of the features available at a Guest Mailbox, review the Related Features below. Then,go to the individual feature to find out how it operates and any programming required to make it work.Enhanced Guest MailboxWith Enhanced Guest Mailbox, you can set up a Guest Mailbox just by activating the Subscriber Mailbox atany uninstalled extension. In 1808-Mailbox Type, set up the mailbox as Personal (1) or Group (2). Whenyou do this:■ A Screened Transfer (TRF) or Unscreened Transfer (UTRF) from the Automated Attendant goes directlyto the Subscriber Mailbox, even though there is no extension installed.■ An Intercom call to the uninstalled extension goes directly to the Subscriber Mailbox.■ A transferred call to the uninstalled extension also goes directly to the Subscriber Mailbox.2Related FeaturesAutomated Attendant (page 42)The Automated Attendant GOTO and LOGON actions (assigned to the active Dial Action Table) canroute callers to a Guest Mailbox.Auto Erase or Save (page 40)After a guest listens to a message in their Guest Mailbox, <strong>IntraMail</strong> can automatically erase or save themessage.Greeting (page 94)A Guest Mailbox can have a recorded greeting that plays to callers leaving a message.Listening to Messages (page 109)Review this feature to learn which features are available to the guest while listening to messages.Mailbox Name (page 114)A Guest Mailbox can have a recorded name.Make Call (page 120)■ A Guest Mailbox user can use Make Call to return a call left in the Guest Mailbox.■ A Subscriber Mailbox user cannot use Make Call to return a call left by a Guest Mailbox, since theGuest Mailbox does not have an associated extension.Main Menu (page 118)The Main Menu provides assess to the features available to a Guest Mailbox.Message Listen Mode (page 132)Set the type of messages a guest will listen to when they dial L (5) after logging into their Guest Mailbox.Message Notification (page 133)Once activated, Message Notification dials a telephone number to let the user know they have new messagesin the Guest Mailbox.<strong>IntraMail</strong> <strong>System</strong> <strong>Guide</strong> Chapter 2: Features ◆ 101
Guest MailboxMessage Playback Direction (page 141)Set the Guest Mailbox message playback order.Message Record (page 142)Review this feature to learn which features are available to the Guest Mailbox while recording and sendinga message.Message Storage Limit (page 145)Set the maximum number of messages that can be left in the mailbox.Next Call Routing Mailbox (page 148)The Next Call Routing Mailbox provides additional dialing options after a caller leaves a message in aGuest Mailbox.Security Code (page 164)If enabled, a Guest Mailbox caller must enter a security code before logging onto the mailbox.Transfer to a Mailbox (page 177)To transfer an outside call to a Guest Mailbox, the extension user presses ICM, MW, and then dials theGuest Mailbox number.ProgrammingStep 1Step 2Step 3Assign a Master Mailbox as a Subscriber Mailbox.1.1 8005 - <strong>IntraMail</strong> Master Mailbox Options on page 218.- Enter 3 to assign a Master Mailbox as a Subscriber Mailbox.✔By default, all Master Mailboxes are Subscriber Mailboxes (entry 3).Optionally set up an Enhanced Guest Mailbox.2.1 1808 - <strong>IntraMail</strong> Subscriber Mailbox Options: Mailbox Type on page 202.- Program the mailbox for any uninstalled extension as 1 (Personal) or 2 (Group).✔By default in DS1000, Subscriber Mailboxes 300-307 are Personal (1). All others are disabled(0). DS1000 has 34 Subscriber Mailboxes (300-333).✔By default in DS2000, Subscriber Mailboxes 300-315 are Personal (1). All others are disabled(0). DS2000 has 128 Subscriber Mailboxes (300-427).Refer to Subscriber Mailbox on page 168 for additional details on Guest Mailbox setup andoperation.OperationLogging Onto a Guest MailboxTo log onto a Guest Mailbox:1. Press ICM + Dial the <strong>IntraMail</strong> master number (e.g., 700).■ You can optionally press a Call Coverage key assigned to the <strong>IntraMail</strong> master number.2. When <strong>IntraMail</strong> answers, dial the Guest Mailbox number.Logging Onto a Guest Mailbox from the Automated AttendantTo log onto a Guest Mailbox from the Automated Attendant:1. After the Automated Attendant answers, dial # + The Guest Mailbox number.■ This capability may be disabled in the Automated Attendant.■ Your automated attendant may have GOTO or LOGON actions assigned to the Guest Mailbox. Check withyour Communications Manager.102 ◆ Chapter 2: Features <strong>IntraMail</strong> <strong>System</strong> <strong>Guide</strong>
Guest MailboxTransferring your call to a Guest MailboxTo transfer your active call to a co-worker’s mailbox:1. Press ICM.2. Press MW.3. Dial the Guest Mailbox number.4. Press SPK to hang up.■ To transfer a call to a co-worker’s mailbox from a single line telephone, use the following procedure:Hookflash + Dial *8 + Dial the co-worker’s mailbox + Hang up.2<strong>IntraMail</strong> <strong>System</strong> <strong>Guide</strong> Chapter 2: Features ◆ 103
Hang UpHang UpDescriptionHang Up is an Automated Attendant option that immediately hangs up the outside call. When setting up aDial Action Table, you may want to use Hang Up for unused actions (rather than the caller hearing the standarderror message). You might also want to use the Hang Up action as the Timeout destination for callersthat wait too long to dial after the Automated Attendant answers.Related FeaturesProgrammingAutomated Attendant (page 42)The Automated Attendant can automatically answer the telephone system’s incoming calls, play anInstruction Menu message, and provide dialing options to callers.Dial Action Table (page 64)The Hang Up action is a Dial Action Table option.Step 1Assign the Hang Up action to an available Dial Action Table key.1.1 8008 - <strong>IntraMail</strong> Dial Action Tables: Hang Up Action (6) on page 249.- When the outside caller dials the key programmed with the Hang Up action, the AutomatedAttendant immediately hangs up.✔By default, the digit 9 is assigned as a Hang Up action.OperationN/A104 ◆ Chapter 2: Features <strong>IntraMail</strong> <strong>System</strong> <strong>Guide</strong>
Instruction MenuInstruction MenuDescriptionThe Instruction Menu is the announcement that plays to Automated Attendant callers. Normally, the InstructionMenu greets callers and provides them with the Automated Attendant dialing options. The InstructionMenu is associated with the active Call Routing Mailbox. Normally, you should have the <strong>System</strong> Administratorcustomize (rerecord) the Instruction Menu to match the dialing options enabled in the site’s DialAction Table. If a custom Instruction Menu is not recorded, the Automated Attendant callers hear:“If you are calling from a touch tone phone, please dial the extension number you wish to reach, or dial0 for assistance. If you are calling from a rotary dial phone, please stay on the line for assistance.”Related FeaturesAnswer Tables (page 30)Determines how the Automated Attendant answers outside calls on each trunk.Automated Attendant (page 42)The Answer Table determines how the Automated Attendant answers calls, and assigns the Call RoutingMailbox to the call.Call Routing Mailbox (page 49)The mailbox associated with an Answer Table that specifies which dialing options (Dial Action Table)and Instruction Menu are available to Automated Attendant callers.Dial Action Table (page 64)Defines the dialing options for the Call Routing Mailbox chosen by the active Answer Table.Single Digit Dialing (page 166)An Automated Attendant caller can press a single key to route to an extension, route to another destination,or use an <strong>IntraMail</strong> feature.<strong>System</strong> Administrator (page 171)Only the <strong>System</strong> Administrator can record the Instruction Menu.2ProgrammingN/A<strong>IntraMail</strong> <strong>System</strong> <strong>Guide</strong> Chapter 2: Features ◆ 105
Instruction MenuOperationLog onto <strong>System</strong> Administrator’s mailbox.SA (72)Recording an Instruction Menu for a Call Routing Mailbox[Super Display Soft Key] - [Keyset Soft Key]Access <strong>System</strong> Administrator options.[SYS ADMIN] - [N/A]I (4)Select Instruction Menus.[INSTRUCTION] - [INST]Enter the Call Routing Mailbox number.L (5)R (7)Listen to the current Instruction Menu (if any).[LISTEN] - [LSTN]# Exit listen mode.Record a new Instruction Menu.[RECORD] - [REC]Record message.* Pause or restart recording.[RESUME] - [RESUME][PAUSE] - [PAUSE]E (3) Erase recording.[CANCEL] - [CNCL]# Exit recording mode.[DONE] - [DONE]E (3) Erase the Instruction Menu.[ERASE] - [ERASE]# Go back to the <strong>System</strong> Administrator options.[EXIT] - [EXIT]# Go back to the <strong>System</strong> Administrator options.[EXIT] - [EXIT]0 Plays Help message.106 ◆ Chapter 2: Features <strong>IntraMail</strong> <strong>System</strong> <strong>Guide</strong>
Leaving a MessageLeaving a MessageDescriptionAn extension user or outside caller can leave a voice message in a co-worker’s mailbox if that extension isbusy, unanswered, or in Do Not Disturb. Leaving a voice message is a handy and efficient way to communicatewith co-workers that avoids post-it notes, message pads, and unnecessary email.Additional Options While Leaving a MessageThe following chart shows the additional dialing options a caller may have while listening to the mailboxgreeting prior to leaving a message. What happens depends on the setting of the Next Call Routing and DialingOption options.Dialing Options While Leaving a Message1808-Next CallRouting Mailbox1808 - DialingOptionDigitDialedTrunk CallActionIntercom CallUndefined No 0 Caller hears, “That is an invalid entry,” and the1-9greeting repeats.# <strong>IntraMail</strong> hangs up.* Caller skips greeting and can immediately startrecording.0-15 (valid CallRouting Mailbox)0-15 (valid CallRouting Mailbox)No 0 Caller follows 0 actionin Next Call RoutingMailbox.Caller hears, “That isan invalid entry,” andthe greeting repeats.1-9 Caller hears, “That is an invalid entry,” and thegreeting repeats.# Caller routes to the <strong>IntraMail</strong> hangs up.Next Call RoutingMailbox and hears itsInstruction Menu.* Caller skips greeting and can immediately startrecording.Yes 01-9Caller follows key’saction in Next CallRouting Mailbox.# Caller routes to theNext Call RoutingMailbox and hears itsInstruction Menu.Caller hears, “That isan invalid entry,” andthe greeting repeats.<strong>IntraMail</strong> hangs up.* Caller skips greeting and can immediately startrecording.2Related FeaturesNext Call Routing Mailbox (page 148)The Next Call Routing Mailbox provides callers with additional dialing options after they leave a messagein a mailbox (depending on the setting of the Dialing Option option).Quick Message (page 156)Quick Message allows Automated Attendant callers to leave a message in a Subscriber Mailbox.<strong>IntraMail</strong> <strong>System</strong> <strong>Guide</strong> Chapter 2: Features ◆ 107
Leaving a MessageProgrammingOperationNo additional programming required.Leaving a Message for a Co-workerTo leave a message in the mailbox of an unanswered extension:1. Press MW.2. Leave message and hang up.ORLeave message and dial #.■ Dialing # sends the message and hangs up.Leaving a Message from Outside the CompanyTo leave a message in a mailbox:1. Leave message and hang up.ORLeave message and dial #.■ Dialing # may provide you with additional dialing options. This depends on how the called mailbox’s NextCall Routing Mailbox is set up.To leave a message in an extension’s mailbox, you can be:■ Transferred to an extension’s mailbox by another user.■ Automatically routed to a mailbox when the called party doesn’t answer or is unavailable.■ Sent to the mailbox from the Automated Attendant after dialing * plus the called party’s mailbox number.■ Routed from the Automated Attendant after dialing a uniquely programmed digit set up to send you to anextension’s mailbox.108 ◆ Chapter 2: Features <strong>IntraMail</strong> <strong>System</strong> <strong>Guide</strong>
Listening to MessagesListening to MessagesDescriptionWhile or after listening to a message, a Subscriber Mailbox user has many message handling options fromwhich to choose. The listening options let you quickly and efficiently manage your voice mail messages,respond to the message sender, or forward the message to a co-worker for additional handling. The followingtable shows these options.Message Listen Options[Super Display Soft Key] - [Keyset Soft Key]OptionRE (73)[REPLY] - [N/A]MF (63)[FORWARD] - [N/A]MC (62)[CALLBACK] - [N/A]TI (84)SA (72)E (3)[ERASE] - [ERASE]L (5)[NEXT MSG] - [NEXT]B (2)BB (22)[REPEAT] - [RPT]G (4)DescriptionRecord a reply.See Message Reply on page 143.Forward the message to another mailbox.See Message Forward on page 129.Make a call to the message sender.See Make Call on page 120.Hear the time and date the message was sent.■ See Time and Date on page 175.Save the message in your mailbox.Erase the message.■ See Message Delete on page 128 for more.Listen to the next message.Back up a few seconds.Back up to the beginning of the message.Go ahead a few seconds.* Pause/resume recording.1N (16)[MSG LIST + NEW MSGS] - [N/A]1S (17)[MSG LIST + SAVED MSGS] - [N/A]1A (12)[MSG LIST + ALL MSGS] - [N/A]#[EXIT] - [EXIT]X (9)Exit your mailbox.Dial 0 while listening to hear the list of options.Select New Message List■ See Message Listen Mode on page 132.Select Saved Message List■ See Message Listen Mode on page 132.Select All Message List■ See Message Listen Mode on page 132.Exit the listen mode.2Notes:■ If a subscriber’s mailbox is set to Auto Save messages, <strong>IntraMail</strong> saves partially listened-to messagesbut does not relamp the keyset for those messages. For example:- A subscriber with new messages calls their mailbox.- The subscriber presses L to listen to a portion of each message and then exits their mailbox.- <strong>IntraMail</strong> saves all the messages, turns off the message waiting lamp, and resets the telephone displayto V-MAIL 00 (VM00).■ If you hang up while listening to a new message, <strong>IntraMail</strong> automatically retains the message as anew message.<strong>IntraMail</strong> <strong>System</strong> <strong>Guide</strong> Chapter 2: Features ◆ 109
Listening to MessagesTelephone Display while Listening to a MessageWhile listening to a message, your Super Display Telephone display shows you important information aboutthe message. This includes:■ The caller’s telephone number (if available).■ The selected Message List.■ The message number in the selected list.■ The date and time the message was left.Super DisplayCaller’s phone number(requires Caller ID)Currently selectedMessage ListMessage number (inselected Message List)Date message was leftTime message was left22-Button and 34-Button DisplayDate message was leftTime message was leftPress CHECK and CLEAR toswitch between the displays.Currently selectedMessage ListCaller’s phone number(requires Caller ID)Message number (inselected Message List)110 ◆ Chapter 2: Features <strong>IntraMail</strong> <strong>System</strong> <strong>Guide</strong>
Listening to MessagesRelated FeaturesProgrammingAuto Erase or Save (page 40)When a mailbox user completely listens to a new message and then exits their mailbox, <strong>IntraMail</strong> willeither automatically save or erase the message.Message Record (page 142)While recording a message, an Subscriber Mailbox user has many recording options from which to choose.OperationStep 1Set the Message Backup/Go Ahead Time.1.1 1808 - <strong>IntraMail</strong> Subscriber Mailbox Options: Message Backup/Go Ahead Time on page 213.- This interval sets how far <strong>IntraMail</strong> backs up (1-60 seconds) when a mailbox user dials Bwhile recording or listening to their messages.- This interval also sets how far <strong>IntraMail</strong> jumps ahead (1-60 seconds) when a user dials Gwhile listening to messages.✔By default, this interval is 5 seconds.2Log onto Subscriber MailboxL (5) Access the Message Listen mode[LISTEN] - [LSTN]■■Listening to Messages[Super Display Soft Key] - [Keyset Soft Key]See Message Listen Options on page 109 for an explanation of the available options.While listening to a message at a 22-Button or 34-Button Display Telephone, press CHECK andCLEAR to switch between the date/time and Caller ID information for the message.0 Plays Help message<strong>IntraMail</strong> <strong>System</strong> <strong>Guide</strong> Chapter 2: Features ◆ 111
Log Onto Voice MailLog Onto Voice MailDescriptionA subscriber can log onto their mailbox using a method that best suits their needs and location. While attheir own phone, the subscriber just presses a single key to log onto their mailbox. To use their mailboxwhile at a co-worker’s phone, the subscriber dials the <strong>IntraMail</strong> master number, followed by their mailboxnumber (which is normally the same as their extension number). If they are away from the office, the subscribercan still use their mailbox by calling in through the Automated Attendant.Local (On-site) LogonAn extension user can log onto their mailbox in the following ways:■ Press their MW key to log onto their Subscriber Mailbox.■ Dial the <strong>IntraMail</strong> master number (e.g., 700), followed by their mailbox number. This method is typicallyused by Guest Mailbox users, as well as subscribers attempting to log into their Subscriber Mailbox froma co-worker’s phone.Remote Log OnA Subscriber Mailbox user can call into the Automated Attendant and log onto their mailbox. Following aretwo of the ways a user can do this:■ After the Automated Attendant answers, dial a digit (typically #) followed by their mailbox number. Thismethod allows outside callers to log into their mailboxes from outside the company. Once they log intotheir mailbox, they can use the allowed features in the mailbox main menu. To avoid unauthorizedaccess to their mailbox, the user should enable their own unique Security Code.■ If an extension has a Direct Inward Line that voice mail picks up, the caller can dial # during their greetingto log into their mailbox (instead of leaving a message). This method allows subscribers to dial theirown number and then use the features of their mailbox. This capability must be set up in the user’s NextCall Routing Mailbox. For example:- Program the Next Call Routing Mailbox # digit as LOGON to IXXX.- While listening to their greeting, the subscriber can dial:# (to route to their Next Call Routing Mailbox), then# and their mailbox number to log onto their mailbox.By default, this option is provided in Call Routing Mailbox 000. Additionally, the subscriber shouldenable a Security Code for their mailbox to prevent unauthorized logons.Related FeaturesAutomated Attendant (page 42)The Automated Attendant allows Subscriber Mailbox users to log into their mailboxes.Greeting (page 94)After remotely logging onto their mailbox, a subscriber mailbox user can remotely record their greeting.Guest Mailbox (page 101)A guest can log onto their mailbox by dialing the <strong>IntraMail</strong> master number followed by the Guest Mailboxnumber.Security Code (page 164)To avoid unauthorized access to their mailbox (particularily with Remote Log On), the user shouldenable their own unique Security Code.Subscriber Mailbox (page 168)A subscriber can log into their mailbox by pressing a key on their telephone, dialing the <strong>IntraMail</strong> masternumber (followed by their mailbox number), or logging on through the Automated Attendant.112 ◆ Chapter 2: Features <strong>IntraMail</strong> <strong>System</strong> <strong>Guide</strong>
Log Onto Voice MailProgrammingOperationStep 1To log onto a mailbox through the Automated Attendant:1.1 8008 - <strong>IntraMail</strong> Dial Action Tables: LOGON Action - Log Onto Voice Mail (5) on page 248.- To log directly into a specific Subscriber Mailbox, enter the mailbox number in the correspondingNumber option.- For example, to have key 4 log directly into Subscriber Mailbox 305, for key 4 enterLOGON for the Action and 305 for the corresponding Number.- To have <strong>IntraMail</strong> request Automated Attendant callers to select a Subscriber Mailbox tolog into, enter N in the corresponding Number option. The key you choose must representthe first digit in the Subscriber Mailbox numbers.- For example, to have the Automated Attendant request callers to enter the number ofthe Subscriber Mailbox into which they wish to log, for key 3 enter LOGON for theAction and N for the corresponding Number. When callers dial 3, they hear, “Pleaseenter your mailbox number.”- To have <strong>IntraMail</strong> require Automated Attendant callers to enter a Subscriber Mailbox to loginto (without playing an announcement), enter XXX in the corresponding Number option.The key you choose must represent the first digit in the Subscriber Mailbox numbers.- For example, to allow callers to log onto mailboxes 300-399, for key 3 enterLOGON for the Action and XXX for the corresponding Number.- To log into any valid Subscriber Mailbox, enter IXXX in the corresponding Numberoption.- For example, to allow callers to dial 1 plus any Subscriber Mailbox number to logon, for key 1 enter LOGON for the Action and IXXX for the corresponding Number.- See Automated Attendant on page 42 for more on how to set up <strong>IntraMail</strong> to answer outsidecalls.✔By default, key # Action = LOGON and Number = None.Logging Onto Your Mailbox2To log onto your Subscriber Mailbox:1. Press MW.■ From an on-premise single line telephone, lift handset and dial *8.To log onto your Guest Mailbox or your Subscriber Mailbox from a co-worker’s extension:1. Press ICM + Dial the <strong>IntraMail</strong> master number (e.g., 700) + Dial your mailbox number.■ You can optionally press a Call Coverage key assigned to the <strong>IntraMail</strong> master number.To log onto your Subscriber Mailbox from the Automated Attendant:1. Wait for the Automated Attendant to answer.2. Dial # and your mailbox number.■ This option may be different in your system. Check with your Communications Manager.■ After you remotely log onto your mailbox, you can optionally dial 9 then * to return to the Automated Attendant.<strong>IntraMail</strong> <strong>System</strong> <strong>Guide</strong> Chapter 2: Features ◆ 113
Mailbox NameMailbox NameDescriptionA caller leaving a message in a Subscriber Mailbox can hear the mailbox’s prerecorded name instead of themailbox number. The prerecorded Mailbox Name gives the subscriber’s mailbox that personal touch. Priorto leaving a message, caller’s will hear the name instead of the default “extension xxx” prompt. The recordedname can be up to 10 seconds long.Related FeaturesProgrammingSubscriber Mailbox (page 168)A subscriber can record a name for their mailbox, or have the <strong>System</strong> Administrator record one for them.<strong>System</strong> Administrator (page 171)The <strong>System</strong> Administrator can record names for Subscriber Mailboxes.N/AOperationRecording Your Mailbox Name[Super Display Soft Key] - [Keyset Soft Key]Log onto Subscriber Mailbox.RN (76) Access the Mailbox Name Menu.[NAME] - [N/A]L (5) Listen to the currently recorded name (if any).[LISTEN] - [LISTN]# Exit listen mode.R (7) Record a new name.[RECORD] - [REC]Record message.* Pause or restart recording.[RESUME] - [RESUME][PAUSE] - [PAUSE]E (3) Erase recording.[CANCEL] - [CNCL]# Exit recording mode.[DONE] - [DONE]E (3) Erase the currently recorded name.[ERASE] - [ERASE]# Go back to the Mailbox Main Menu.[EXIT] - [EXIT]0 Plays Help message.114 ◆ Chapter 2: Features <strong>IntraMail</strong> <strong>System</strong> <strong>Guide</strong>
Mailbox NameRecording or Erasing Co-worker’s Names from a <strong>System</strong> Administrator’s Mailbox[Super Display Soft Key] - [Keyset Soft Key]Log onto <strong>System</strong> Administrator’s Mailbox.SA (72)Access <strong>System</strong> Administrator options.[SYS ADMIN] - [N/A]S (7)0 Plays Help message.Select Subscriber Mailbox Maintenance options.[SUBSCRIBER] - [SUBS]Enter the number of the Subscriber Mailbox you want to maintain.EN (36)N (6)Erase the mailbox name.[ERASE NAME] - [EN]Record a new mailbox name.[RECORD MBOX NAME] - [N/A]L (5)R (7)Listen to the currently recorded name (if any).[LISTEN] - [LISTN][# Exit listen mode.Record a new name.[RECORD] - [REC]Record message.* Pause or restart recording.[RESUME] - [RESUME][PAUSE] - [PAUSE]E (3) Erase recording.[CANCEL] - [CNCL]# Exit recording mode.[DONE] - [DONE]E (3) Erase the currently recorded name.[ERASE] - [ERASE]# Go back to the Subscriber Maintenance Menu.[EXIT] - [EXIT]# Go back to <strong>System</strong> Administrator options.[EXIT] - [EXIT]2<strong>IntraMail</strong> <strong>System</strong> <strong>Guide</strong> Chapter 2: Features ◆ 115
Mailbox Options MenuMailbox Options MenuDescriptionThe Mailbox Options Menu is a sub-menu of a subscriber’s Main Menu that provides access to the AutoTime Stamp, Mailbox Security Code Delete, and Message Notification features. The chart below summarizesthese options. Auto Time Stamp helps if the subscriber needs to know the time and date of each messagethey receive without taking any extra steps. If mailbox security is not an issue, the subscriber can deletetheir security code to simplify logging onto their mailbox.OptionS (7)[SEC CODE] - [SEC]N (6)[NOTIFICATION] - [NTFY]AT (28)[TIME STAMP] - [TIME]Mailbox Options Menu[Super Display Soft Key] - [Keyset Soft Key]DescriptionErase the mailbox’s Security Code.■ See Mailbox Security Code Delete on page 117.Set up Message Notification.■ See Message Notification on page 133.Enable or disable Auto Time Stamp.■ See Auto Time Stamp on page 41.To hear the list of Mailbox Options, dial 0.Related FeaturesProgrammingOperationAuto Time Stamp (page 41)<strong>IntraMail</strong> can optionally announce the time and date the message was left.Mailbox Security Code Delete (page 117)The <strong>System</strong> Administrator can delete the security code for any Subscriber Mailbox.Message Notification (page 133)Message Notification dials a telephone or pager number to let the user know they have new messages intheir mailbox.No additional programming required.Log onto Subscriber Mailbox.OP (67) Access the Mailbox Options Menu.[MBOX OPTS] - [N/A]0 Plays Help message.Accessing the Mailbox Options Menu[Super Display Soft Key] - [Keyset Soft Key]116 ◆ Chapter 2: Features <strong>IntraMail</strong> <strong>System</strong> <strong>Guide</strong>
Mailbox Security Code DeleteMailbox Security Code DeleteDescriptionThe <strong>System</strong> Administrator can delete the security code for any Subscriber Mailbox. This effectively unlocksthe mailbox. If mailbox security is not necessary, deleting a mailbox’s security code speeds up mailbox logon.Without a security code, the subscriber just presses their MW key to immediately log onto their mailbox.Related FeaturesProgrammingMailbox Options Menu (page 116)Mailbox Security Code Delete is available on the Mailbox Options Menu.Security Code (page 164)Subscriber Mailboxes can have Security Codes.<strong>System</strong> Administrator (page 171)The <strong>System</strong> Administrator can delete a mailbox’s security code.No additional programming required.2OperationDeleting a Mailbox Security Code[Super Display Soft Key] - [Keyset Soft Key]Log onto <strong>System</strong> Administrator’s Mailbox.SA (72) Access <strong>System</strong> Administrator options.[SYS ADMIN] - [N/A]S (7) Select Subscriber Mailbox Maintenance options.[SUBSCRIBER] - [SUBS]Enter the number of the Subscriber Mailbox you want to maintain.S (7) Erase the mailbox Security Code.[ERASE SECURITY CODE] - [N/A]# Go to the <strong>System</strong> Administrator Menu.[EXIT] - [EXIT]0 Plays Help message.<strong>IntraMail</strong> <strong>System</strong> <strong>Guide</strong> Chapter 2: Features ◆ 117
Main MenuMain MenuDescriptionAfter a Subscriber Mailbox user logs into their mailbox, <strong>IntraMail</strong> provides them with the Main Menu ofoptions. The Main Menu provides quick access to the most commonly used mailbox features in a centrallocation. It includes listening and recording options, as well as additional selections for recording mailboxnames and greetings. The chart below summarizes these options.OptionL (5)[LISTEN] - [LSTN]RS (77)[RECORD] - [REC]G (4)[GREETING] - [GREET]RN (76)[NAME] - [N/A][MSG LIST] - [N/A]1N (16)[MSG LIST + NEW MSGS] - [N/A]1S (17)MSG LIST + SAVED MSGS] - [N/A]1A (12)[MSG LIST + ALL MSGS] - [N/A]OP (67)[MBOX OPTS] - [N/A]SA (72)[SYS ADMIN] - [N/A]TI (84)X (9)[EXIT] - [EXIT]Mailbox Main Menu[Super Display Soft Key] - [Keyset Soft Key]DescriptionListen to messages.■ See Listening to Messages on page 109.Record and send a message.■ See Message Record on page 142.Record a mailbox greeting.■ See Greeting on page 94.Record a mailbox name.■ See Mailbox Name on page 114.Select the active Message List.■ See Message Listen Mode on page 132.Select the New Message List.■ See Message Listen Mode on page 132.Select the Saved Message List.■ See Message Listen Mode on page 132.Select the All Message List.■ See Message Listen Mode on page 132.Use the Mailbox Options. See the following:■ See Security Code on page 164.■ Message Notification on page 133.■ Auto Time Stamp on page 41.Access the <strong>System</strong> Administrator options.■ See <strong>System</strong> Administrator on page 171.Check the current time and date.■ See Time and Date on page 175.Exit your mailbox.■ See Exiting a Mailbox on page 78.To hear the complete Main Menu of options, dial 0 while in the Main Menu.Related FeaturesProgrammingSee the Mailbox Main Menu chart above.No additional programming required.118 ◆ Chapter 2: Features <strong>IntraMail</strong> <strong>System</strong> <strong>Guide</strong>
Main MenuOperationLog onto Subscriber Mailbox.■ You automatically go to the mailbox Main Menu.Accessing the Mailbox Main Menu0 Plays Help message which summarizes the Main Menu options.■ See Mailbox Main Menu on page 118 for the Main Menu options.2<strong>IntraMail</strong> <strong>System</strong> <strong>Guide</strong> Chapter 2: Features ◆ 119
Make CallMake CallDescriptionMake Call lets a Subscriber Mailbox user listen to a voice message and dial MC to return the call withoutknowing their caller’s phone number. Make Call automates returning messages since you don’t have to dialthe message sender’s telephone number. Make Call is always available for messages received from co-workers.Make call is available for messages received from outside callers if the system has Caller ID enabled(and provided by the connected telco).While listening to a message at a Super Display Telephone, first 2 lines of the display show the callers number(or extension) in addition to the date and time the message was left. At a 22-Button or 34-Button Telephone,the first line of the display shows the date and time the message was left.Related FeaturesProgrammingCaller ID (page 56)Make Call for outside calls is available only if the telco provides Caller ID to the telephone system andthe telephone system passes that Caller ID data to the <strong>IntraMail</strong> voice mail ports.Message Reply (page 143)Message Reply can not automatically reply to a message left by an outside caller. Use Caller ID withReturn Call instead.Step 1Step 2Step 3Step 4Be sure the telco provides Caller ID to the connected telephone system.Check your telephone system programming to be sure the telephone system is set up toreceive Caller ID and pass it to the <strong>IntraMail</strong> voice mail ports.2.1 1001 - Caller ID- For each trunk that should receive Caller ID, enter 1 (for DSP).- Is DS2000, DSP Caller ID requires 4ATRU PCB P/N 80010B or 8ATRU PCB P/N 80011Bor higher.- If your DS2000 is using older PCBs with Caller ID daughter boards, enter 2 (for daughterboard) for this option.✔By default, Caller ID is not enabled for trunks.2.2 1001 - Voice Mail Caller ID- Enter Y (9) to enable this option.✔By default, this option is enabled for all trunks.Set up your basic Caller ID Logging programming.3.1 1302 - Caller ID Outbound Line/Group- Specify the trunk (1-6 in DS1000, 1-64 in DS2000) or trunk group (90-98) that the systemwill use when redialing Caller ID calls.✔By default, there is no outbound route specified.3.2 Check the Caller ID Logging feature in the telephone system Software Manual for additionalprogramming that may be required.To enable Make Call for remote logons (i.e., subscriber’s logging onto their mailbox throughthe Automated Attendant), enable Tandem Trunking.4.1 1003 - Tandem Trunk- Enable this option for either the inbound or outbound trunks (or both).✔By default, this option is disabled.120 ◆ Chapter 2: Features <strong>IntraMail</strong> <strong>System</strong> <strong>Guide</strong>
Make CallOperationLog onto Subscriber Mailbox.L (5)Using Make Call from your Mailbox[Super Display Soft Key] - [Keyset Soft Key]Listen to the message for which you want to make a return call.[LISTEN] - [LSTN]MC (62)Dial this code while listening to the message you want to return.[CALLBACK] - [N/A]■■■■Make Call automatically places a return call to the co-worker that left you the message.If your system has Caller ID, Make Call can automatically place a return call to youroutside caller.If you hear “Your call cannot go through,” your system’s Caller ID is not properly setup. You go right back to the listen mode for the message you were listening to whenyou tried the Make Call.While listening to a message at a 22-Button or 34-Button Display Telephone, pressCHECK and CLEAR to switch between the date/time and Caller ID information for themessage.2<strong>IntraMail</strong> <strong>System</strong> <strong>Guide</strong> Chapter 2: Features ◆ 121
Master MailboxMaster MailboxDescriptionSoftwareNote:■■■Master Mailboxes are enabled by default in software version 03.20.07 or higher. They are disabled bydefault in prior versions.Master Mailbox programming is simplified in software version 03.20.07 or higher.Assigning a Master Mailbox as a Directory Dialing Mailbox requires software version 03.20.07 or higher.Master Mailboxes are 16 additional mailboxes that you can assign as Announcement, Call Routing, Subscriber,or Directory Dialing Mailboxes. Use Master Mailboxes when setting up Group Ring AutomatedAttendant Recall and UCD Hunting Group Overflow to Voice Mail. You can also use Master Mailboxesassigned as Subscriber Mailboxes for Guest Mailboxes, which are Subscriber Mailboxes without associatedextensions. Since Master Mailboxes are a separate set of mailboxes, you don’t have to worry about undefiningor redefining Subscriber Mailboxes when setting up these unique features. You can also use Master Mailboxesfor Directory Dialing.When setting up Group Ring Automated Attendant Recall and UCD Hunting Group Overflow, the MasterMailbox type you choose depends on how you want <strong>IntraMail</strong> to handle the overflow:■ If you want recall/overflow to provide routing for callers, make the associated Master Mailbox a CallRouting Mailbox.■ If you want recall/overflow to provide an announcement to callers, make the associated Master Mailboxan Announcement Mailbox.■ If you want recall/overflow to collect messages like any other extension’s mailbox, make the associatedMaster Mailbox a Subscriber Mailbox.■ If you want recall/overflow to provide dial-by-name, make the associated Master Mailbox a DirectoryDialing Mailbox.! Important !■ Group Ring Automated Attendant Recall to a master mailbox only occurs for Automated AttendantUnscreened Transfers routed to the Ring Group master number. For other types of Group Ring recall,turn to Voice Mail Overflow on page 183.■ All Master Mailboxes are disabled by default in software versions prior to 03.20.07..Related FeaturesAnnouncement Mailbox (page 22)A Master Mailbox assigned as an Announcement Mailbox provides an announcement to Group Ring andUCD Hunting Group callers when they overflow to Voice Mail.Call Routing Mailbox (page 49)A Master Mailbox assigned as a Call Routing Mailbox provides routing options to Group Ring and UCDHunting Group callers when they overflow to Voice Mail.Directory Dialing (page 68)You can use Master Mailboxes for Directory Dialing.Group Mailbox (page 98)Group Mailbox uses the Master Mailbox for the extension’s Ring Group.Guest Mailbox (page 101)You can use a Master Mailbox assigned as a Subscriber Mailbox for a Guest Mailbox, which is a SubscriberMailbox without an associated extension.Subscriber Mailbox (page 168)A Master Mailbox assigned as a Subscriber Mailbox collects messages for Group Ring and UCD HuntingGroup callers when they overflow to Voice Mail.Voice Mail Overflow (page 183)The telephone system can automatically reroute unanswered outside calls to the <strong>IntraMail</strong> AutomatedAttendant. This includes:122 ◆ Chapter 2: Features <strong>IntraMail</strong> <strong>System</strong> <strong>Guide</strong>
Master Mailbox■ Direct Inward Lines.■ Group Ring calls (that are not UTRFs)■ Key Ring calls■ UCD Hunting callsProgrammingUsing Master Mailboxes for UCD Hunting Group OverflowStep 1Step 2Step 3Step 4Assign the UCD Hunting Group overflow destination.1.1 0510 - ACD/UCD Master Extension Numbers and Names: Overflow Destination.- Enter the <strong>IntraMail</strong> master number (700).- Refer to the DS1000/2000 Software Manual for more on this option.✔By default, this option is NONE (entered by pressing CLEAR)Set the UCD Hunting Group overflow interval.2.1 0401 - <strong>System</strong> Timers: ACD/UCD Overflow.- When all UCD Hunting Group agents are busy, a call will overflow to the destination programmedin step 1 after this interval (1-9999 seconds).- Refer to the DS1000/2000 Software Manual for more on this option.✔By default, this option is 60 seconds.Set up the <strong>IntraMail</strong> Master Mailbox Options.3.1 8005 - <strong>IntraMail</strong> Master Mailbox Options: Mailbox Number on page 218.- Select the Master Mailbox number that corresponds to the UCD Hunting Group you areprogramming.- For example, select Master Mailbox 701 if setting up overflow for UCD HuntingGroup 701.✔By default, UCD Hunting master numbers are 700-707.3.2 8005 - <strong>IntraMail</strong> Master Mailbox Options: Mailbox Type on page 218.- Select the type of Master Mailbox (1-3) that will provide the desired overflow operation.- Enter 1 (Call Routing Mailbox) to have overflow provide routing options to callers.- Enter 2 (Announcement Mailbox) to have overflow play an announcement to callers.- Enter 3 (Subscriber Mailbox) to allow overflow callers to leave a message.- Enter 4 (Directory Dialing Mailbox( to allow overflow callers to use dial-by-name.✔By default, all Master Mailboxes are Subscriber Mailboxes (entry 3).3.3 8005 - <strong>IntraMail</strong> Master Mailbox Options: Mailbox Active on page 219.- Enter Y (9) to enable the Master Mailbox you choose for overflow.✔By default:- Software versions prior to 03.20.07: Master Mailboxes are inactive (N).- Software version 03.20.07 or higher: Master Mailboxes are active (Y).Refer to the following for programming details on each Master Mailbox type.4.1 For Subscriber Mailboxes:- 1808 - <strong>IntraMail</strong> Subscriber Mailbox Options on page 202.4.2 For Call Routing and Announcement Mailboxes:- 8006 - <strong>IntraMail</strong> Routing Mailboxes on page 2272<strong>IntraMail</strong> <strong>System</strong> <strong>Guide</strong> Chapter 2: Features ◆ 123
Master MailboxUsing Master Mailboxes for Group Ring Automated Attendant RecallStep 1Set up the <strong>IntraMail</strong> Master Mailbox Options.1.1 8005 - <strong>IntraMail</strong> Master Mailbox Options: Mailbox Number on page 218.- Select the Master Mailbox number that corresponds to the Ring Group you are programming.- For example, select Master Mailbox 601 if setting up recall for Ring Group 601.✔By default, Ring Group master numbers are 600-607.1.2 8005 - <strong>IntraMail</strong> Master Mailbox Options: Mailbox Type on page 218.- Select the type of Master Mailbox (1-4) that will provide the desired recall operation.- Enter 1 (Call Routing Mailbox) to have recall provide routing options to callers.- Enter 2 (Announcement Mailbox) to have recall play an announcement to callers.- Enter 3 (Subscriber Mailbox) to allow recall callers to leave a message.- Enter 4 (Directory Dialing Mailbox) to provide dial-by-name to callers.✔By default, all Master Mailboxes are Subscriber Mailboxes (entry 3).1.3 8005 - <strong>IntraMail</strong> Master Mailbox Options: Mailbox Active on page 219.- Enter Y (9) to enable the Master Mailbox you choose for recall.✔By default:- Software versions prior to 03.20.07: Master Mailboxes are inactive (N).- Software version 03.20.07 or higher: Master Mailboxes are active (Y).Step 2Refer to the following for programming details on each Master Mailbox type.2.1 For Subscriber Mailboxes:- 1808 - <strong>IntraMail</strong> Subscriber Mailbox Options on page 202.2.2 For Call Routing and Announcement Mailboxes:- 8006 - <strong>IntraMail</strong> Routing Mailboxes on page 2272.3 For Directory Dialing Mailboxes:- 8005 - <strong>IntraMail</strong> Master Mailbox Options: Options for Directory Dialing Mailboxes (4) onpage 220.Using Master Mailboxes as Additional Call Routing MailboxesStep 1Step 2Step 3Step 4Select an unused Master Mailbox.1.1 8005 - <strong>IntraMail</strong> Master Mailbox Options: Mailbox Number on page 218.- Select a Master Mailbox number (600-607 or 700-707) not currently used for overflow.Assign the unused Master Mailbox as a Call Routing Mailbox.2.1 8005 - <strong>IntraMail</strong> Master Mailbox Options: Mailbox Type on page 218.- Enter 1 (Call Routing Mailbox).✔By default, all Master Mailboxes are Subscriber Mailboxes (entry 3).Enable the Master Mailbox.3.1 8005 - <strong>IntraMail</strong> Master Mailbox Options: Mailbox Active on page 219.- Enter Y (9) to enable the Master Mailbox .✔By default:- Software versions prior to 03.20.07: Master Mailboxes are inactive (N).- Software version 03.20.07 or higher: Master Mailboxes are active (Y).Refer to the following for programming details on Call Routing Mailboxes.4.1 8006 - <strong>IntraMail</strong> Routing Mailboxes on page 227124 ◆ Chapter 2: Features <strong>IntraMail</strong> <strong>System</strong> <strong>Guide</strong>
Master MailboxUsing Master Mailboxes as Additional Announcement MailboxesStep 1Step 2Step 3Step 4Select an unused Master Mailbox.1.1 8005 - <strong>IntraMail</strong> Master Mailbox Options: Mailbox Number on page 218.- Select a Master Mailbox number (600-607 or 700-707) not currently used for overflow.Assign the unused Master Mailbox as an Announcement Mailbox.2.1 8005 - <strong>IntraMail</strong> Master Mailbox Options: Mailbox Type on page 218.- Enter 2 (Announcement Mailbox).✔By default, all Master Mailboxes are Subscriber Mailboxes (entry 3).Enable the Master Mailbox.3.1 8005 - <strong>IntraMail</strong> Master Mailbox Options: Mailbox Active on page 219.- Enter Y (9) to enable the Master Mailbox .✔By default:- Software versions prior to 03.20.07: Master Mailboxes are inactive (N).- Software version 03.20.07 or higher: Master Mailboxes are active (Y).Refer to the following for programming details on Announcement Mailboxes.4.1 8006 - <strong>IntraMail</strong> Routing Mailboxes on page 227.Problem with reference here.2Using Master Mailboxes as Guest MailboxesStep 1Step 2Step 3Step 4Step 5Select an unused Master Mailbox.1.1 8005 - <strong>IntraMail</strong> Master Mailbox Options: Mailbox Number on page 218.- Select a Master Mailbox number (600-607 or 700-707) not currently used for overflow.Assign the unused Master Mailbox as a Subscriber Mailbox.2.1 8005 - <strong>IntraMail</strong> Master Mailbox Options: Mailbox Type on page 218.- Enter 3 (Subscriber Mailbox).✔By default, all Master Mailboxes are Subscriber Mailboxes (entry 3).Enable the Master Mailbox.3.1 8005 - <strong>IntraMail</strong> Master Mailbox Options: Mailbox Active on page 219.- Enter Y (9) to enable the Master Mailbox .✔By default:- Software versions prior to 03.20.07: Master Mailboxes are inactive (N).- Software version 03.20.07 or higher: Master Mailboxes are active (Y).Refer to the following for programming details on Subscriber Mailboxes.4.1 1808 - <strong>IntraMail</strong> Subscriber Mailbox Options on page 202.Refer to Subscriber Mailbox on page 168 for additional details on Guest Mailbox setup andoperation.Using Master Mailboxes for Directory DialingTurn to Directory Dialing on page 68.OperationRefer to the following:■ Announcement Mailbox (page 22).■ Call Routing Mailbox (page 49).■ Subscriber Mailbox (page 168).<strong>IntraMail</strong> <strong>System</strong> <strong>Guide</strong> Chapter 2: Features ◆ 125
Message Count DisplayMessage Count DisplayDescriptionThe telephone display provides interactive status updates for the subscriber’s mailbox. The subscriberdoesn’t have to call their mailbox and wait for the voice prompts to find out the number of new and savedmessages in their mailbox. Then can just look at the display instead. While idle, the telephone display showsthe number of new messages waiting in a subscriber’s mailbox. The message count automatically updates asthe subscriber receives new messages and processes older messages. While logged into the mailbox, the telephonedisplay shows the number of both new and saved messages.22-Button and 34-Button DisplayWhile IdleOne new message waitingin the Subscriber MailboxWhile Logged-inSuper DisplayOne new message waitingin the Subscriber MailboxWhile IdleWhile Logged-inRelated FeaturesN/A126 ◆ Chapter 2: Features <strong>IntraMail</strong> <strong>System</strong> <strong>Guide</strong>
Message Count DisplayProgrammingOperationNo additional programming required.Operation is automatic.Using the Message Count Display2<strong>IntraMail</strong> <strong>System</strong> <strong>Guide</strong> Chapter 2: Features ◆ 127
Message DeleteMessage DeleteDescriptionA Subscriber Mailbox user can delete any messages left in their mailbox. Message Delete lets the subscriberdo their own mailbox maintenance. They can delete messages they no longer need and save messages thatcontain essential information. With Message Delete, the subscriber doesn’t have to rely on the <strong>System</strong>Administrator to perform these routine mailbox maintenance functions.Related FeaturesProgrammingOperationErasing All Messages (page 77)The <strong>System</strong> Administrator can delete all messages in a Subscriber Mailbox.Subscriber Mailbox (page 168)A subscriber can log into their mailbox and delete any of their messages.No additional programming required.Deleting a Message[Super Display Soft Key] - [Keyset Soft Key]Log onto Subscriber Mailbox.L (5) Access the Message Listen mode (to listen to the message that you want to delete).[LISTEN] - [LSTN]E (3) Erase the message.[ERASE] - [ERASE]■ You automatically return to the Message Listen mode.128 ◆ Chapter 2: Features <strong>IntraMail</strong> <strong>System</strong> <strong>Guide</strong>
Message ForwardMessage ForwardDescriptionSoftwareNote:Simplified forwarding of a list of messages requires software version 03.20.07 or higher.A Subscriber Mailbox user can forward a message in their mailbox to a co-worker. Forwarding is helpfulwhen a subscriber receives a message with which a co-worker can assist them. Rather than sending a newmessage, the subscriber can just forward the message with which they need help. They can also optionallyrecord a comment before the forwarded message. Typically, the comment would describe the reason for themessage forwarding.<strong>IntraMail</strong> erases the message in the subscriber’s mailbox after they forward it. The Message Forward destinationreceives the forwarded message as a new message.Related FeaturesCall Forward to a Mailbox (page 47)An extension user can easily forward calls to their mailbox.2ProgrammingOperationNo additional programming required.Forwarding a Message[Super Display Soft Key] - [Keyset Soft Key]Log onto Subscriber Mailbox.L (5) Access the Message Listen mode (to listen to the message that you want to forward).[LISTEN] - [LSTN]MF (63) Access the Message Forward Menu.[FORWARD] - [N/A]Enter the number of the mailbox to which you want to forward the message.■ In software versions 03.20.07 or higher, when a subscriber forwards a list of messages,they automatically listen to the next message in the list once forwarding completes. Inprior software versions, they would always return to the top of the message list. Thisrequired the subscriber to listen to the messages that had already been forwarded beforebeing allowed to forward the next message in the list.# Start recording.[CONTINUE] - [CONT]Record a comment that will precede the forwarded message, ORDial # to forward without a comment.While recording a comment for your forwarded message.* Pause or restart recording.[RESUME] - [RESUME][PAUSE] - [PAUSE]E (3) Cancel the forwarding and exit your mailbox.[CANCEL] - [CNCL]# End the recording.[DONE] - [DONE]<strong>IntraMail</strong> <strong>System</strong> <strong>Guide</strong> Chapter 2: Features ◆ 129
Message Forward* Back up and re-enter the mailbox number.[MAILBOX] - [MBOX]# Go back to the Message Listen mode.[EXIT] - [EXIT]# Exit the Message Listen mode and go to the Mailbox Main Menu.[EXIT] - [EXIT]0 Plays Help message.Forwarding a Message[Super Display Soft Key] - [Keyset Soft Key]130 ◆ Chapter 2: Features <strong>IntraMail</strong> <strong>System</strong> <strong>Guide</strong>
Message LengthMessage LengthDescriptionYou can set the maximum length of a message that can be left in a Subscriber Mailbox. When a caller tries toleave a message that exceeds the limit, they hear, “You have reached the recording limit.” <strong>IntraMail</strong> sends theportion of the message that fits within the allowed Message Length and hangs up. The Message Lengthoption helps you maximize the storage space reserved for messages. If you find that callers are leavingunusually long messages, shorten the Message Length. <strong>IntraMail</strong> will cut off the message once the callerreaches the Message Length limit. On the other hand, if you hear that <strong>IntraMail</strong> is cutting off caller’s messagesprematurely, increase the Message Length to give callers more time.Related FeaturesN/AProgrammingStep 1Set the maximum length of recorded messages.1.1 8004 - <strong>IntraMail</strong> <strong>System</strong> Options: Subscriber Message Length on page 213.- This option sets the maximum length (1-4095 seconds) of recorded messages for:- Subscriber Mailbox users dialing RS to record and send a message.- Extension users leaving a message in a Subscriber Mailbox.- Outside callers transferred by an extension user to a Subscriber Mailbox.- Outside Automated Attendant callers accessing a mailbox via a GOTO command.- Subscriber Mailbox Greetings.- Mailbox Names.✔By default, these types of messages are 120 seconds long maximum.2Step 2Set the maximum length of recorded Quick Messages.2.1 8004 - <strong>IntraMail</strong> <strong>System</strong> Options: Non-Subscriber Message Length on page 213.- This option sets the maximum length (1-4095 seconds) of recorded messages for:- Automated Attendant callers leaving a message or Quick Message in a SubscriberMailbox.- Call Routing Mailbox Instruction Menus.✔By default, these types of messages are 120 seconds long maximum.OperationN/A<strong>IntraMail</strong> <strong>System</strong> <strong>Guide</strong> Chapter 2: Features ◆ 131
Message Listen ModeMessage Listen ModeDescriptionAfter logging onto their mailbox, the subscriber can select the category of messages to which they want tolisten. Then can listen to just new messages, just saved messages, or all messages. Message Listen Mode letsthe subscriber customize their mailbox to initially play just the list of message to which they want to listen.For example, if a subscriber has many saved messages and just a few new messages, then can log onto theirmailbox and dial 1N to select the new message list. When they press L, they will then cycle through just theirnew message.Initially, a Subscriber Mailbox uses the All Message List. If they select a different message list, <strong>IntraMail</strong>reinstates the all Message List the next time they log onto their mailbox.Related FeaturesProgrammingMain Menu (page 118)The Message Listen mode options are mailbox Main Menu selections.N/AOperationLog onto Subscriber Mailbox.[MSG LIST] - [N/A]Message Listen Mode[Super Display Soft Key] - [Keyset Soft Key]1N (16) Listen to new messages.[MSG LIST + NEW MSGS] - [N/A]1S (17) Listen to saved messages.[MSG LIST + SAVED MSGS] - [N/A]1A (12) Listen to all messages.[MSG LIST + ALL MSGS] - [N/A]0 Plays Help message.132 ◆ Chapter 2: Features <strong>IntraMail</strong> <strong>System</strong> <strong>Guide</strong>
Message NotificationMessage NotificationDescriptionOnce activated by the Subscriber Mailbox user, Message Notification dials a telephone number to let theuser know when there are new messages in their mailbox. With Message Notification, a subscriber who isout of the office does not have keep calling their mailbox remotely to find out if they have new messages.<strong>IntraMail</strong> will let them know automatically. Notification can call extensions, local numbers, long distancenumbers and digital pagers. When a Subscriber Mailbox user sets up Message Notification, they choosefrom the following options:■ If Message Notification is enabled or disabled.(Message Notification can only occur if it is enabled.)■ The time of day Message Notification should begin and end.(Callouts will only occur between the begin and end times.)■ The type of device to which Message Notification will be calling.(Message Notification can call a normal telephone number or a digital pager.)■ The telephone or pager service phone number.Note: To protect your mailbox from unauthorized access, be sure to record a security code for your mailboxbefore enabling Message Notification.How Message Notification Works to Normal Telephone Numbers1. The subscriber activates Message Notification for their mailbox (see Operation below).2. When the subscriber receives a new message, <strong>IntraMail</strong> immediately dials the destination that shouldreceive the Message Notification.- <strong>IntraMail</strong> waits up to 30 seconds for ringback, reorder, busy or voice activity from the called number.If nothing is detected, the callout is considered unanswered.3. If the recipient answers, <strong>IntraMail</strong> plays the notification message (“Hello, I have a message for”) andasks the recipient to dial 1 to log onto their mailbox. The recipient hears the notification message if:■ They say “Hello” after answering the callout, or■ The system receives answer supervision from the telco after the recipient answers the call.(Note that the recipient can skip the announcement by dialing 1 to log onto their mailbox after answeringthe callout – without saying “Hello”.)■ The notification is to a system extension.4. Once the recipient logs onto the mailbox, the notification is considered acknowledged and will not reoccuruntil the subscriber receives new messages.5. If the recipient doesn’t answer, the system will retry the callout number. After completing the programmednumber of callout attempts, Message Notification will stop.6. Once the notification process begins, a new message does not restart the process if it is already inprogress. Once the process ends (e.g., if the message is acknowledged or the maximum number of calloutattempts is reached), the next new message will restart the process.2How Message Notification Works to Digital Pager Numbers1. The subscriber activates Message Notification for their mailbox (see Operation below).2. When subscriber receives a new message, <strong>IntraMail</strong> immediately dials the pager service.- <strong>IntraMail</strong> waits up to 30 seconds for ringback, reorder, busy or voice activity from the called number.If nothing is detected, the callout is considered unanswered.3. After the pager service answers, <strong>IntraMail</strong> sends a dial string which causes the pager display to show thesubscriber’s mailbox number as well as the number of new messages in the mailbox.■ The notification is considered acknowledged if the recipient logs onto the mailbox. Notification willnot reoccur until the subscriber receives new messages.<strong>IntraMail</strong> <strong>System</strong> <strong>Guide</strong> Chapter 2: Features ◆ 133
Message Notification■ If the pager service doesn’t answer, <strong>IntraMail</strong> will retry the callout number. Message Notification mayeventually cancel if the callout remains unacknowledged.Related FeaturesProgrammingSecurity Code (page 164)To protect their mailbox from unauthorized access, the subscriber should be sure to record a SecurityCode for your mailbox before enabling Message Notification.Programming that Applies to All Types of Message NotificationStep 1Step 2Step 3Step 4Assign the trunk group the system uses for Message Notification callouts.1.1 8002 - Dial 9 Group.- Select the trunk group (90-98) Message Notification will use for callouts. You must makethis assignment and have trunks in the designated group for Message Notification calloutsto work.✔By default, this option is 90.Check to be sure the following Voice Mail port options do not restrict Message Notificationcallouts.2.1 8002 - Voice Mail Port Options (Part 1): Class of Service on page 209.2.2 8002 - Voice Mail Port Options (Part 1): Toll Restriction Level (Day) on page 209.2.3 8002 - Voice Mail Port Options (Part 1): Toll Restriction Level (Night) on page 209.2.4 8002 - Voice Mail Port Options (Part 1): Dial 9 Group on page 210.2.5 8002 - Voice Mail Port Options (Part 1): Outgoing Trunk Group Access on page 210.2.6 8003 - Voice Mail Port Options (Part 2): Trunk Access Type on page 212.Set the maximum number on incomplete callout attempts.3.1 8004 - <strong>IntraMail</strong> <strong>System</strong> Options: Number of Callout Attempts on page 216.- Set how many times (1-99 attempts) <strong>IntraMail</strong> will retry an incomplete Message Notificationcallout. This total includes unacknowledged callouts, callouts to a busy destination,and callouts to an unanswered destination. This option applies to pager and non-pager callouts.The default setting for this option is 5.✔The default setting for this option is 5 attempts.Be sure Message Waiting lamping for Subscriber Mailboxes is on.4.1 1808 - <strong>IntraMail</strong> Subscriber Mailbox Options: Message Waiting Lamp on page 204.- Enter Y (9) to enable Message Waiting lamping.- If Message Waiting lamping is disabled (N), Message Notification will not function.✔By default, this option is Y (9).134 ◆ Chapter 2: Features <strong>IntraMail</strong> <strong>System</strong> <strong>Guide</strong>
Unique Programming for Non-pager Message NotificationMessage NotificationStep 1Step 2Set the intervals <strong>IntraMail</strong> will wait between incomplete non-pager Message Notificationcallouts.1.1 8004 - <strong>IntraMail</strong> <strong>System</strong> Options: Wait Between Non-Pager Callout Attempts on page 215.- Set the minimum time (1-255 minutes) between non-pager Message Notification callouts inwhich the destination answers, says “Hello,” dials 1 to acknowledge and then enters thewrong security code.✔The default for this option is 20 minutes.1.2 8004 - <strong>IntraMail</strong> <strong>System</strong> Options: Wait Between Busy Non-Pager Callout Attempts onpage 215.- Set how long <strong>IntraMail</strong> will wait (1-255 minutes), after it dials a busy non-pager calloutdestination, before retrying the callout number.✔The default for this option is 15 minutes.1.3 8004 - <strong>IntraMail</strong> <strong>System</strong> Options: Wait Between RNA Non-Pager Callout Attempts onpage 215.1.4- Set how long <strong>IntraMail</strong> will wait (1-255 minutes), after it dials an unanswered non-pagercallout destination, before retrying the callout number. The default setting for this option is30 minutes.- There are three types of unanswered non-pager callouts:- If the callout rings the destination longer than the 8004-Wait for Answer Non-PagerCallout Attempts.- If the destination answers, says “Hello” (or the system detects answer supervision)and then hangs up without dialing 1 to log onto their mailbox. This typically happensif someone unfamiliar with notification answers the callout, or if the callout ispicked up by an answering machine.- If the destination answers and then hangs up without saying “Hello.” This typicallyhappens if someone unfamiliar with the notification answers the callout (like theabove example), or if the call is picked up by an answering machine which insufficientoutgoing message volume.✔The default for this option is 30 minutes.Set how <strong>IntraMail</strong> determines when a non-pager callout rings without being answered.2.1 8004 - <strong>IntraMail</strong> <strong>System</strong> Options: Wait for Answer Non-Pager Callout Attempts on page 216.- If a non-pager callout rings the destination longer than this option (1-99 rings), <strong>IntraMail</strong>marks the call as unanswered (Ring No Answer) and hangs up.✔The default for this option is 5 rings.2<strong>IntraMail</strong> <strong>System</strong> <strong>Guide</strong> Chapter 2: Features ◆ 135
Message NotificationUnique Programming for Digital Pager Message NotificationStep 1Step 2Set up the system-wide options that apply to the digital pager callback number.1.1 8004 - <strong>IntraMail</strong> <strong>System</strong> Options: Digital Pager Callback Number on page 214.- Set the Digital Pager Callback Number portion of the Message Notification callout numberfor a digital pager. This is the portion of the callout number that is appended to the pagerservice telephone number.✔By default, this option is X*M#, where:- X is the number of the extension that generated the notification.- * is a visual delimiter (to make the pager display easier to read).- M is the number of new messages in the extension’s mailbox.- # is the digit normally used by the pager service for positive disconnect.1.2 8004 - <strong>IntraMail</strong> <strong>System</strong> Options: Delay in Dialing Digital Pager Callback Number onpage 214.- Set the delay (0-99 seconds) that occurs just before <strong>IntraMail</strong> dials the Digital Pager CallbackNumber portion of the Message Notification callout number for a digital pager. Setthis delay so the pager service has enough time to connect to the digital pager before sendingthe callback number. Your pager service may be able to help you determine the bestvalue for this option (0-99 seconds). When placing a digital pager notification, the system:- Seizes the trunk specified in 8002 - Dial 9 Group.- Dials the user-entered notification number (in MW + OP + N).- Waits the 8004 - Delay in Dialing Digital Pager Callback Number interval.- Dials the number entered in 8004 - Digital Pager Callback Number.- The system assumes that the notification number will complete dialing approximately 4seconds after trunk seizure. This means that, by default, the Digital Pager Callback Numberwill be dialed into the pager service about 13 seconds after trunk seizure.- Your pager service may be able to help you determine the best value for this option.✔By default, this option is 9 seconds.Set up the system-wide options that apply to digital pager callouts/2.1 8004 - <strong>IntraMail</strong> <strong>System</strong> Options: Wait Between Digital Pager Callout Attempts on page 215.- Set the minimum time (1-255 minutes) between unacknowledged or unanswered digitalpager Message Notification callouts. (A subscriber acknowledges a digital pager notificationby logging onto their mailbox.) After this interval expires, <strong>IntraMail</strong> will try the calloutagain (for up to the number of times set in 8004 - Number of Callout Attempts).- If the system dials the callout number and the pager service is busy, it will retry the numberin one minute.✔By default, this option is 15 minutes.2.2 8004 - <strong>IntraMail</strong> <strong>System</strong> Options: Send Pager Callout Until Acknowledged on page 216.- When this option is enabled (Y), <strong>IntraMail</strong> will continue to retry a digital pager MessageNotification callout until the notification is acknowledged. If this option is disabled (No),<strong>IntraMail</strong> will retry a digital pager Message Notification the number of times specified in8004 - Number of Callout Attempts. This option does not apply to Message Notificationcallouts to telephone numbers.- A digital pager notification is considered acknowledged when the recipient logs onto themailbox.✔By default, this option is disabled (N).136 ◆ Chapter 2: Features <strong>IntraMail</strong> <strong>System</strong> <strong>Guide</strong>
Message NotificationOperationLog onto Subscriber Mailbox.OP (67)Access the Mailbox Options menu.[MBOX OPTS] - [N/A]N (6)Setting Up Message Notification(Page 1 of 2)[Super Display Soft Key] - [Keyset Soft Key]Access the Message Notification Options Menu.[NOTIFICATION] - [NTFY]<strong>IntraMail</strong> plays a summary of your Message Notification settings.• The your telephone display shows your current notification settings (see sample below).• The second line of the display is not available on 22- and 32-button display telephones.For telephone numbersNOTIFY ON 8AM- 5PMNUM: 12039265400ORFor pager numbersNOTIFY ON 8AM- 5PMPGR: 12039265400O (6) Turn Message Notification on or off.[ON] - [ON][OFF] - [OFF]C (2) Change your Message Notification setup.[CHANGE] - [CHNG]When you see: START TIMEEnter the hour you want Message Notification to begin.• Enter 2 digits for the hourA (2) Select AM[AM] - [AM]P (7) Select PM[PM] - [PM]* Skip this option without changing your entry.[NEXT] - [NEXT]# Back up to the previous level without changing yourentry.[EXIT] - [EXIT]When you see: END TIMEEnter the hour you want Message Notification to end.• Enter 2 digits for the hour.• For 24-hour notification, make the End Time the same as theStart Time.A (2) Select AM[AM] - [AM]P (7) Select PM[PM] - [PM]* Skip this option without changing your entry.[NEXT] - [NEXT]# Back up to the previous level without changing yourentry.[EXIT] - [EXIT]When you see: NOTIFY AT2<strong>IntraMail</strong> <strong>System</strong> <strong>Guide</strong> Chapter 2: Features ◆ 137
Message NotificationSetting Up Message Notification(Page 2 of 2)[Super Display Soft Key] - [Keyset Soft Key]N (6) The notification destination is a telephone number.[NUMBER] - [NUM]D (3) The notification destination is a digital pager.[PAGER] - [PAGE]* Skip this option without changing your entry.[NEXT] - [NEXT]# Back up to the previous level without changing yourentry.[EXIT] - [EXIT]When you see: NUMEnter the Message Notification callout number (16 digits max).• Enter the number exactly as you want the system to dial it(including a leading 1 for toll calls, if required).• If the number you enter is 4 digits or less, it will be an Intercomcall. If it is more than 4 digits, it will be an outside call.# Accept the number entered and back up tothe previous level.[OK] - [OK][CLEAR] Erase the number you just entered.* Skip this option without changing your entry.[NEXT] - [NEXT]# Back up to the previous level without changing yourentry.[EXIT] - [EXIT]# Go back to the Mailbox Options menu.[EXIT] - [EXIT]# Go back to the Main Menu.[EXIT] - [EXIT]0 Plays Help message.Answering a Message Notification Callout to a TelephoneTo answer a Message Notification to a telephone:1. Answer the callout at the programmed destination.■ If <strong>IntraMail</strong> doesn’t hear your voice (or you don’t speak), just go to the next step and dial 1 to proceed.2. Dial 1 to accept the Message Notification.ORhang up to have the Message Notification call back later.3. When you dial 1, you automatically log onto the subscriber mailbox that left you the Message Notification.■ If you don’t log onto your mailbox, <strong>IntraMail</strong> will re-send your notification.Answering a Digital Pager Message Notification CalloutTo answer a Digital Pager notification:1. Operation is automatic.■ If you don’t call and log onto your mailbox, <strong>IntraMail</strong> will re-send your pager notification.138 ◆ Chapter 2: Features <strong>IntraMail</strong> <strong>System</strong> <strong>Guide</strong>
Message On HoldMessage On HoldDescriptionSoftwareNote:Message On Hold requires software version 03.20.07 or higher and <strong>IntraMail</strong> voice prompts version 1.2.Message On Hold allows the <strong>System</strong> Administrator to record a message that will play to callers while theywait on Hold. For example, you can record a message summarizing available services or hours of operation.This message will play to callers as soon as you put them on Hold, and continually repeat as long as theyremain on Hold. Message On Hold recording is only available from the <strong>System</strong> Administrator’s Mailbox. <strong>IntraMail</strong>provides a single Message On Hold. Any number of callers can simultaneously listen to the MessageOn Hold recording.Related FeaturesMusic On HoldMessage On Hold is an alternative to the telephone system’s Music On Hold.<strong>System</strong> Administrator (page 171)Only the <strong>System</strong> Administrator can record the Message On Hold.2ProgrammingStep 1Step 2Enable Message On Hold for the trunk.1.1 1003 - Trunk Options: MOH Source on page 196.- To enable Message On Hold for the trunk, enter 4.✔By default, all trunks are set to 1 (external source).Optionally set the Message On Hold message length.2.1 8004 - <strong>IntraMail</strong> <strong>System</strong> Options: Subscriber Message Length on page 213.- The Message On Hold cannot exceed the setting of this option (1-4095 seconds).- By default, the Subscriber Message Length is 120 seconds.<strong>IntraMail</strong> <strong>System</strong> <strong>Guide</strong> Chapter 2: Features ◆ 139
Message On HoldOperationLog onto <strong>System</strong> Administrator’s mailbox.SA (72)Access <strong>System</strong> Administrator options.[SYS ADMIN] - [N/A]1 Select Message On Hold.[MSG ON HOLD] - [N/A]L (5)R (7)Recording the Message On Hold[Super Display Soft Key] - [Keyset Soft Key]Listen to the current Message On Hold (if any).[LISTEN] - [LSTN]# Exit listen mode.Record a new Message On Hold.[RECORD] - [REC]Record message.* Pause or restart recording.[RESUME] - [RESUME][PAUSE] - [PAUSE]E (3) Erase recording.[CANCEL] - [CNCL]# Exit recording mode.[DONE] - [DONE]E (3) Erase the Message On Hold.[ERASE] - [ERASE]# Go back to the <strong>System</strong> Administrator options.[EXIT] - [EXIT]0 Plays Help message.# Go back to the Main Menu options.[EXIT] - [EXIT]0 Plays Help message.140 ◆ Chapter 2: Features <strong>IntraMail</strong> <strong>System</strong> <strong>Guide</strong>
Message Playback DirectionMessage Playback DirectionDescriptionWhen a user dials L (5) after logging into their mailbox, <strong>IntraMail</strong> will play their messages in either LIFO(last-in-first-out) or FIFO (first-in-first-out) order. Since Message Playback Direction lets a subscriber listen tomessages in the order they find most helpful, check with them to find out how they want this option set. If thesubscriber prefers to hear their new messages first, enable LIFO (last-in-first-out) listening order. The newest(last-in) messages are at the top of the message list and the oldest messages are at the bottom of the list. If thesubscriber wants to be reminded of their oldest messages first, enable FIFO (first-in-first-out) listening order.The oldest (first-in) messages are at the top of the message list and the newest messages are at the bottom.Related FeaturesProgrammingListening to Messages (page 109)While listening to messages, Message Playback Direction lets the user change the playback order of themessages in the mailbox.2Step 1Set the Message Playback Direction for a Subscriber Mailbox.1.1 1808 - <strong>IntraMail</strong> Subscriber Mailbox Options: Message Playback on page 203.- The options are:F (3) - FIFO (first-in-first-out, or oldest messages first).L (5) - LIFO (last-in-first-out, or newest messages first).✔By default, the setting for this option is F (FIFO, or first-in-first-out).OperationN/A<strong>IntraMail</strong> <strong>System</strong> <strong>Guide</strong> Chapter 2: Features ◆ 141
Message RecordMessage RecordDescriptionRelated FeaturesProgrammingOperationSee Record and Send a Message on page 158.See Record and Send a Message on page 158.See Record and Send a Message on page 158.See Record and Send a Message on page 158.142 ◆ Chapter 2: Features <strong>IntraMail</strong> <strong>System</strong> <strong>Guide</strong>
Message ReplyMessage ReplyDescriptionA Subscriber Mailbox user can reply to a message from a co-worker by dialing RE, without knowing thecaller’s extension or mailbox number. Message Reply saves the subscriber valuable time since they don’tneed to know the sender’s extension number or send a separate message to respond. The subscriber can justlisten to the co-worker’s message, dial a code, and record their answer. The message sender receives thereply as a new message.Related FeaturesProgrammingMake Call (page 120)Message Reply does not apply to outside calls. If the telephone system provides Caller ID information to<strong>IntraMail</strong>, a subscriber may be able to use Make Call (MC) to call the person back.No additional programming required.2OperationMessage ReplyLog onto Subscriber Mailbox.L (5) Listen to your messages.[LISTEN] - [LSTN]While listening to a message.RE (73) Reply to the message.[REPLY] - [N/A]■ If the mailbox does not exist, you will be prompted to enter the mailbox number toreceive the reply. This can occur if you dial RE while listening to a message from anoutside caller.# Start recording.[CONTINUE] - [CONT]Options available while recording.* Pause or restart recording.[RESUME] - [RESUME][PAUSE] - [PAUSE]E (3) Erase recording.[CANCEL] - [CNCL]# End the recording.[DONE] - [DONE]* Back up and re-enter the mailbox number.[MAILBOX] - [MBOX][EXIT] - [EXIT] Exit without recording and go back to the Message Listen menu.# Exit and go back to the mailbox Main Menu.[EXIT] - [EXIT]0 Plays Help message<strong>IntraMail</strong> <strong>System</strong> <strong>Guide</strong> Chapter 2: Features ◆ 143
Message RetentionMessage RetentionDescriptionThis feature is currently not available.<strong>IntraMail</strong> will save a Subscriber Mailbox’s new, held, or saved messages for the Message Retention intervaland then delete them. You’ll find Message Retention to be an invaluable tool for managing <strong>IntraMail</strong>’s voicemessage storage space. If subscribers are letting old, unwanted messages build up in their mailboxes, shortenthe Message Retention time. Be sure to let the subscribers know how long <strong>IntraMail</strong> will retain their messages.By default, <strong>IntraMail</strong> retains all messages indefinitely.<strong>IntraMail</strong> performs its Message Retention deletions at midnight of the day the message was marked for deletion.For example, if the mailbox has 1 day Message Retention, any messages left on Wednesday are deletedat midnight on Thursday.Message Retention Guard Time<strong>IntraMail</strong> has a Message Retention Guard Time that automatically starts when you change the date and timein the telephone system. Message deletion can occur only after the Message Retention Guard Time expires.This prevents Message Retention from inadvertently deleting messages when you change the telephone systemtime and date. The guard time is fixed at 4 days.Related FeaturesProgrammingErasing All Messages (page 77)The <strong>System</strong> Administrator can delete all messages in a Subscriber Mailbox.Message Delete (page 128)A Subscriber Mailbox user can delete any messages left in their mailbox.Step 1Set the Message Retention Interval for a Subscriber Mailbox.1.1 1808 - <strong>IntraMail</strong> Subscriber Mailbox Options: Message Retention on page 204.- The choices are:1-90 days.Indefinite (entered by pressing CLEAR).✔The default setting is Indefinite (entered by pressing CLEAR).OperationN/A144 ◆ Chapter 2: Features <strong>IntraMail</strong> <strong>System</strong> <strong>Guide</strong>
Message Storage LimitMessage Storage LimitDescriptionMessage Storage Limit sets how many messages can be left in a Subscriber Mailbox. Message Storage Limitis another invaluable tool for managing <strong>IntraMail</strong>’s voice message storage space. To conserve storage spaceand make it available for new messages, decrease the Message Storage Limit. If storage space is not an issue,increase the Message Storage Limit so subscribers can store additional messages. Be sure to let the subscribersknow how many messages their mailboxes can hold. By default, <strong>IntraMail</strong> can store up to 99 messages ineach Subscriber Mailbox.Related FeaturesProgrammingErasing All Messages (page 77)The <strong>System</strong> Administrator can delete all messages in a Subscriber Mailbox.Message Delete (page 128)A Subscriber Mailbox user can delete any messages left in their mailbox.2Step 1Set the maximum number of messages that can be left in a Subscriber Mailbox.1.1 1808 - <strong>IntraMail</strong> Subscriber Mailbox Options: Number of Messages on page 203.- Enter the maximum number of messages the mailbox can store (0-99).- If a caller tries to leave a message once the maximum number is reached, they hear, “Thatmailbox is full.” <strong>IntraMail</strong> then hangs up.✔By default, the maximum number of messages that can be left is 99 for extension 300 and20 for all others.OperationN/A<strong>IntraMail</strong> <strong>System</strong> <strong>Guide</strong> Chapter 2: Features ◆ 145
Message Waiting LampMessage Waiting LampDescriptionSoftwareNote:In software version 03.20.07 and higher, the MW LED is used only for Call Screening. In software versionsprior to 03.20.07, an extension’s MW LED would flash when there were new messages waiting inthe mailbox.An extension’s Ring/Message Lamp flashes on the telephone to indicate that the user has new messageswaiting in their mailbox. Once <strong>IntraMail</strong> is properly installed and programmed, telephone Ring/MessageLamp operation is automatic. The Ring/Message Lamp will flash fast when there are new messages in theextension user’s mailbox. The Ring/Message Lamp is a visual reminder of new messages. The subscriberdoes not have to call their mailbox and listen to the voice prompts to find out when they have new messages.In software versions prior to 03.20.07, an extension’s MW LED would also flash when there were new messageswaiting in the mailbox. In software version 03.20.07 and higher, the MW LED is used only for Call Screening.Related FeaturesProgrammingCall Screening (page 53)With the introduction of Call Screening in software versions 03.20.07 and higher, only the Ring/MessageLamp flashes for new messages. The MW LED is used for Call Screening only.Step 1Turn Message Waiting lamping for Subscriber Mailboxes on or off.1.1 1808 - <strong>IntraMail</strong> Subscriber Mailbox Options: Message Waiting Lamp on page 204.- Enter N (6) to disable Message Waiting lamping.- Enter Y (9) to enable Message Waiting lamping.- If Message Waiting lamping is disabled (N), Message Notification will not function.✔By default, this option is Y (9).OperationN/A146 ◆ Chapter 2: Features <strong>IntraMail</strong> <strong>System</strong> <strong>Guide</strong>
Multiple Company GreetingsMultiple Company GreetingsDescriptionThe Automated Attendant can answer each individual trunk (outside line) with a unique greeting and uniqueset of dialing options. Since there are a total of 8 Answer Tables, this allows up to 8 companies or departmentsto share a single <strong>IntraMail</strong>. Callers to each company hear that company’s greeting (Instruction Menu)and can dial options that may be only available to that specific company. You set this up as follows:■ Assign a unique Answer Table (1-8) to each trunk that you want to have an individual greeting.■ For each Answer Table, assign the Call Routing Mailbox that will handle the call.■ For each of the assigned Call Routing Mailboxes, set up the dialing options (Dial Action Table) andrecord an Instruction Menu.Note: If multiple companies or departments share an <strong>IntraMail</strong>, messaging and calling between the workersof each company or department are not restricted.Related FeaturesAnswer Tables (page 30)Determines how the Automated Attendant answers outside calls on each trunk.Automated Attendant (page 42)The Automated Attendant can automatically answer the telephone system’s incoming calls, play anInstruction Menu message, and provide dialing options to callers.Call Routing Mailbox (page 49)The mailbox associated with an Answer Table that specifies which dialing options (Dial Action Table)and announcements are available to Automated Attendant callers.Dial Action Table (page 64)Defines the dialing options for the Call Routing Mailbox chosen by the active Answer Table.2ProgrammingStep 1Assign an Answer Table to each trunk.1.1 1003 - Trunk Options: Answer Table on page 196.- Assign an Answer Table (1-8) to each trunk that the Automated Attendant should answer.✔By default, all trunks are assigned to Answer Table 1.1.2 See the following features for more:- Answer Tables on page 30.- Automated Attendant on page 42.- Call Routing Mailbox on page 49.- Dial Action Table on page 64.OperationN/A<strong>IntraMail</strong> <strong>System</strong> <strong>Guide</strong> Chapter 2: Features ◆ 147
Next Call Routing MailboxNext Call Routing MailboxDescriptionThe Next Call Routing Mailbox provides callers with additional dialing options while listening to a SubscriberMailbox recorded or default greeting. It also provides additional dialing options to callers routed to anAnnouncement Mailbox. Next Call Routing Mailbox lets the caller choose how <strong>IntraMail</strong> should handle theircall. For example, if an Automated Attendant caller dials a subscriber’s extension and hears the greeting, NextCall Routing Mailbox (if programmed) allows them to dial other options instead of hanging up.Subscriber Mailbox OptionsThe following chart shows the additional dialing options a caller may have while listening to a SubscriberMailbox recorded or default greeting. The digits the caller can dial depends on the setting of the Next CallRouting Mailbox and Dialing Option options. For an explanation of the options a caller can dial whilerecording, see Record and Send a Message on page 158.1808-Next CallRouting MailboxDialing Options while Listening to a Subscriber Mailbox Greeting1808 - DialingOptionDigitDialedTrunk CallActionIntercom CallUndefined No 0 Caller hears, “That is an invalid entry,” and the1-9greeting repeats.# <strong>IntraMail</strong> hangs up.* Caller skips greeting and can immediately startrecording.0-15 (valid CallRouting Mailbox)0-15 (valid CallRouting Mailbox)No 0 Caller follows 0 actionin Next Call RoutingMailbox.Caller hears, “That isan invalid entry,” andthe greeting repeats.1-9 Caller hears, “That is an invalid entry,” and thegreeting repeats.# Caller routes to the <strong>IntraMail</strong> hangs up.Next Call RoutingMailbox and hears itsInstruction Menu.* Caller skips greeting and can immediately startrecording.Yes 01-9Caller follows key’saction in Next CallRouting Mailbox.# Caller routes to theNext Call RoutingMailbox and hears itsInstruction Menu.Caller hears, “That isan invalid entry,” andthe greeting repeats.<strong>IntraMail</strong> hangs up.* Caller skips greeting and can immediately startrecording.148 ◆ Chapter 2: Features <strong>IntraMail</strong> <strong>System</strong> <strong>Guide</strong>
Next Call Routing MailboxLogging Onto a Subscriber Mailbox while Listening to the GreetingA subscriber who wishes to log onto their mailbox while listening to their greeting must have the option setin their Next Call Routing Mailbox. To allow this capability, for example:■ Program the Next Call Routing Mailbox # digit as LOGON to IXXX.■ While listening to their greeting, the subscriber can dial:# (to route to their Next Call Routing Mailbox), then# and their mailbox number to log onto their mailbox.By default, this option is provided in Call Routing Mailbox 000. Additionally, the subscriber should enable aSecurity Code for their mailbox to prevent unauthorized logons.2<strong>IntraMail</strong> <strong>System</strong> <strong>Guide</strong> Chapter 2: Features ◆ 149
Next Call Routing MailboxAnnouncement Mailbox OptionsThe following charts show how an Announcement Mailbox handles Automated Attendant calls.■ The first chart explains what happens when the outside call is directly answered by the AnnouncementMailbox. This happens when the Answer Table uses an Announcement Mailbox for routing instead ofa Call Routing Mailbox.■ The second chart explains what happens when the outside call is answered by a Call Routing Mailboxand then routed to the Announcement Mailbox. This can happen, for example, when a caller dials adigit to hear an announcement of company directions.■ See Answer Tables on page 30 for more on setting up Answer Tables.8006-Next CallRouting MailboxDirect Announcement Mailbox Routing(If the outside caller routes directly to the Announcement Mailbox)8006-RepeatCount8006-Hang UpAfterActionUndefined 0 (No repeats) Yes or No ■ If the caller doesn’t dial, after theannouncement <strong>IntraMail</strong> hangs up.■ If the caller dials a digit during theannouncement, <strong>IntraMail</strong> says “Thatis an invalid entry” and hangs up.0-15 (valid CallRouting Mailbox)Undefined0-15 (valid CallRouting Mailbox)0 (No repeats) No ■ If the caller doesn’t dial, after theannouncement they route to the NextCall Routing Mailbox.■ If the caller dials a digit during theannouncement, they route to the NextCall Routing Mailbox.Yes ■ If the caller doesn’t dial, after theannouncement <strong>IntraMail</strong> hangs up.■ If the caller dials a digit during theannouncement, they route to the NextCall Routing Mailbox.x (x number ofrepeats)x (x number ofrepeats)Yes or No ■ If caller doesn’t dial, they hear theannouncement x number of times andthen <strong>IntraMail</strong> hangs up.■ If the caller dials a digit during theannouncement, <strong>IntraMail</strong> says “Thatis an invalid entry” and aborts theannouncement. The announcementrepeats (if allowed by the RepeatCount) and then <strong>IntraMail</strong> hangs up.No ■ If caller doesn’t dial, they hear theannouncement x number of times andthen route to the Next Call RoutingMailbox.■ If the caller dials a digit during theannouncement, they route to the NextCall Routing Mailbox.Yes ■ If caller doesn’t dial, they hear theannouncement x number of times andthen <strong>IntraMail</strong> hangs up.■ If the caller dials a digit during theannouncement, they route to the NextCall Routing Mailbox.150 ◆ Chapter 2: Features <strong>IntraMail</strong> <strong>System</strong> <strong>Guide</strong>
Next Call Routing MailboxRouted Announcement Mailbox Routing (Page 1 of 2)(If the outside caller routes to the Announcement Mailbox from a Call Routing Mailbox)8006-Next CallRouting Mailbox8006-RepeatCount8006-Hang UpAfterActionUndefined 0 (No repeats) No ■ If the caller doesn’t dial, after theannouncement the caller goes back tothe initial Call Routing Mailbox.■ If the caller dials a digit during theannouncement, <strong>IntraMail</strong> says “Thatis an invalid entry” and routes thecaller goes back to the initial CallRouting Mailbox.Yes ■ If the caller doesn’t dial, after theannouncement <strong>IntraMail</strong> hangs up.■ If the caller dials a digit during theannouncement, <strong>IntraMail</strong> says “Thatis an invalid entry” and hangs up.0-15 (valid CallRouting Mailbox)Undefined0 (No repeats) No ■ If the caller doesn’t dial, after theannouncement they route to the NextCall Routing Mailbox.■ If the caller dials a digit during theannouncement, they route to the NextCall Routing Mailbox.Yes ■ If the caller doesn’t dial, after theannouncement <strong>IntraMail</strong> hangs up.■ If the caller dials a digit during theannouncement, they route to the NextCall Routing Mailbox.x (x number ofrepeats)No ■ If caller doesn’t dial, they hear theannouncement x number of times andthen go back to the initial Call RoutingMailbox.■ If the caller dials a digit during theannouncement, <strong>IntraMail</strong> says “Thatis an invalid entry” and aborts theannouncement. The announcementrepeats (if allowed by the RepeatCount) and then <strong>IntraMail</strong> routes backto the initial Call Routing Mailbox.Yes ■ If caller doesn’t dial, they hear theannouncement x number of times andthen <strong>IntraMail</strong> hangs up.■ If the caller dials a digit during theannouncement, <strong>IntraMail</strong> says “Thatis an invalid entry” and aborts theannouncement. The announcementrepeats (if allowed by the RepeatCount) and then <strong>IntraMail</strong> hangs up.2<strong>IntraMail</strong> <strong>System</strong> <strong>Guide</strong> Chapter 2: Features ◆ 151
Next Call Routing MailboxRouted Announcement Mailbox Routing (Page 2 of 2)(If the outside caller routes to the Announcement Mailbox from a Call Routing Mailbox)8006-Next CallRouting Mailbox0-15 (valid CallRouting Mailbox)8006-RepeatCountx (x number ofrepeats)8006-Hang UpActionAfterNo ■ If caller doesn’t dial, they hear theannouncement x number of times andthen route to the Next Call RoutingMailbox.■ If the caller dials a digit during theannouncement, they route to the NextCall Routing Mailbox.Yes ■ If caller doesn’t dial, they hear theannouncement x number of times andthen <strong>IntraMail</strong> hangs up.■ If the caller dials a digit during theannouncement, they route to the NextCall Routing Mailbox.Related FeaturesProgrammingCall Forward to a Mailbox (page 47)The Next Call Routing Mailbox dial options also apply to a subscriber’s Direct Inward Line while it isforwarded to their mailbox.Record and Send a Message (page 158)Turn to this feature for an explanation of the options a caller can dial while recording.Programming Subscriber MailboxesStep 1Assign the Next Call Routing Mailbox to a Subscriber Mailbox (if required).1.1 1808 - <strong>IntraMail</strong> Subscriber Mailbox Options: Next Call Routing Mailbox on page 206.- Specify the Routing Mailbox (000-015) that should provide the caller leaving a messagewith additional dialing options.✔By default, this option is 0 (Call Routing Mailbox 000).Step 2Optionally allow the caller to dial additional digits (not just 0) once in the Next Call RoutingMailbox.2.1 1808 - <strong>IntraMail</strong> Subscriber Mailbox Options: Dialing Option on page 205.- Enter Y (9) to enable additional dialing options.✔By default, this option is N (6).Programming Announcement MailboxesStep 1Assign the Next Call Routing Mailbox for the Announcement Mailbox (if required).1.1 8006 - <strong>IntraMail</strong> Routing Mailboxes: Next Call Routing Mailbox on page 229.- Specify the Routing Mailbox (000-015) to which the caller should route after hearing theAnnouncement Mailbox message.✔By default, this option is UND (Undefined - entered by pressing CLEAR).152 ◆ Chapter 2: Features <strong>IntraMail</strong> <strong>System</strong> <strong>Guide</strong>
Next Call Routing MailboxStep 2Step 3Enter the number of times the Announcement Mailbox message should repeat before routingto the Next Call Routing Mailbox.2.1 8006 - <strong>IntraMail</strong> Routing Mailboxes: Repeat Count on page 229.- Specify the number of Announcement Mailbox message repeats (1-10, or 0 for no repeats).✔By default, this option is 0 (no repeats).Be sure the Announcement Mailbox does not hang up after playing its message.3.1 8006 - <strong>IntraMail</strong> Routing Mailboxes: Hang Up After on page 229.- Enter N (6) to disable this option.✔By default, this option is disabled (N).OperationN/A2<strong>IntraMail</strong> <strong>System</strong> <strong>Guide</strong> Chapter 2: Features ◆ 153
Programming Voice MailProgramming Voice MailDescriptionYou program (customize) <strong>IntraMail</strong> by using the DS1000/2000 telephone programming or the Windows TM -based DS1000/2000 PC Program running on a PC or laptop. You can also do limited programming from the<strong>System</strong> Administrator’s mailbox. By using the many programmable options available with <strong>IntraMail</strong>, youshould be able to set up the system to accurately meet the customer’s requirements.■ To customize <strong>IntraMail</strong> using the telephone programming, use this manual along with the DS1000/2000Software Manual.■ To customize <strong>IntraMail</strong> using the PC program, see the DS1000/2000 PC Program User <strong>Guide</strong>.Related Features<strong>System</strong> Administrator (page 171)The <strong>System</strong> Administrator can do limited <strong>IntraMail</strong> programming, such as recording Automated Attendantannouncements, recording mailbox names, and deleting messages from mailboxes.154 ◆ Chapter 2: Features <strong>IntraMail</strong> <strong>System</strong> <strong>Guide</strong>
Programming Voice MailProgrammingOperationSee Description above.See Description above.2<strong>IntraMail</strong> <strong>System</strong> <strong>Guide</strong> Chapter 2: Features ◆ 155
Quick MessageQuick MessageDescriptionQuick Message is a Dial Action Table action that allows Automated Attendant callers to dial a digit (normally*) followed by a mailbox number to leave a message in a Subscriber Mailbox. Since Quick Message isenabled by default, it is an efficient way for experienced Automated Attendant callers to leave messages.There is no need to dial an extension first. To make this option more readily available to all Automated Attendantcallers, consider having the active Instruction Menu describe how to use the Quick Message option.There are two Quick Message Dial Action Table actions:■ Quick Message with Greeting (REC1)The caller hears the mailbox greeting followed by a beep and can leave message. If the greeting is notrecorded, the caller hears, “At the tone, you can leave your message for extension xxx (or name ifrecorded). Start recording at the tone. When you are done, press the # key or hang up.”■ Quick Message without Greeting (REC2)The caller bypasses the mailbox greeting (hearing “Recording” and a beep instead) and can leave a message.This is typically used with a Next Call Routing Mailbox when the caller is asked to dial a digit(e.g., 1) to leave a message. Otherwise, the mailbox greeting (if recorded) would be heard again.Related FeaturesProgrammingDial Action Table (page 64)Once the Automated Attendant answers, the Dial Action Table provides the dialing options to callers.Each digit a caller can dial is assigned a specific action (function) in the Dial Action Table. The dialaction used depends on the setting in the active Call Routing Mailbox, which in turn depends on theAnswer Table setup.Next Call Routing Mailbox (page 148)The Quick Message without Greeting option (REC2) is typically used when the mailbox’s Next CallRouting Mailbox option allows the caller to dial a digit to leave a message. Otherwise, the caller wouldhear the mailbox greeting twice (once when initially accessing the mailbox and again when routed by theNext Call Routing Mailbox).Step 1Step 2Optionally set up a Quick Message with Greeting (REC1) Action.1.1 8008 - <strong>IntraMail</strong> Dial Action Tables: REC1 Action - Quick Message With Greeting (3) onpage 248.- To have the caller leave a Quick Message at a specific extension, the corresponding Numberoption should be the extension number.- To have the caller leave a Quick Message at any caller-dialed extension, the correspondingNumber option should be IXXX.- To have the caller leave a Quick Message at a caller-dialed extension in a specific range, thecorresponding Number option should be XXX.- For example, to allow callers to leave a Quick Message extensions 300-399, for key3 enter REC1 for the Action and XXX for the corresponding Number.✔By default, key * Action is REC1 and Number is IXXX.Optionally set up a Quick Message without Greeting (REC2) Action.2.1 8008 - <strong>IntraMail</strong> Dial Action Tables: REC2 Action - Quick Message Without Greeting (4) onpage 248.156 ◆ Chapter 2: Features <strong>IntraMail</strong> <strong>System</strong> <strong>Guide</strong>
OperationStep 3Quick Message- To have the caller leave a Quick Message at a specific extension, the corresponding Numberoption should be the extension number.- To have the caller leave a Quick Message at any caller-dialed extension, the correspondingNumber option should be IXXX.- To have the caller leave a Quick Message at a caller-dialed extension in a specific range, thecorresponding Number option should be XXX.- For example, to allow callers to leave a Quick Message extensions 300-399, for key3 enter REC2 for the Action and XXX for the corresponding Number.✔By default, key * Action is REC1 and Number is IXXX.Set the maximum message length for callers leaving a Quick Message in a mailbox.3.1 8004 - <strong>IntraMail</strong> <strong>System</strong> Options: Non-Subscriber Message Length on page 213.- Set the maximum length (1-4095 seconds) of recorded messages for:- Automated Attendant callers leaving a message or Quick Message in a SubscriberMailbox.- Outside callers transferred by an extension user to a Subscriber Mailbox.✔By default, this option is 120 seconds.Leaving a Quick Message2To leave a Quick Message after the Automated Attendant answers:1. Dial *.2. Dial the Subscriber Mailbox number.3. Leave message and hang up.ORLeave message and dial #.■ Dialing # may provide you with additional dialing options. This depends on how the called mailbox’s NextCall Routing Mailbox is set up.<strong>IntraMail</strong> <strong>System</strong> <strong>Guide</strong> Chapter 2: Features ◆ 157
Record and Send a MessageRecord and Send a MessageDescriptionA Subscriber Mailbox user can record and send a message to any other Subscriber Mailbox. Record andSend a Message is the heart of <strong>IntraMail</strong>’s voice messaging system. It allows co-workers to efficiently stay intouch and exchange essential information without relying on message slips, memos, or email.Recording OptionsWhile recording a message, a Subscriber Mailbox user has many recording options from which to choose.The following table shows these options.Message Recording OptionsOptionDescriptionOptions available while recording:* Pause/resume recording.E (3) Erase the recording.# End recording.Dial 0 while recording to hear the list of options.Related FeaturesProgrammingListening to Messages (page 109)While or after listening to a message, an extension user has many message handling options from whichto choose.N/AOperationSee the chart on the following page.158 ◆ Chapter 2: Features <strong>IntraMail</strong> <strong>System</strong> <strong>Guide</strong>
Record and Send a MessageLog onto Subscriber Mailbox.RS (77)Record and send a message.[RECORD] - [REC]Record and Send a Message[Super Display Soft Key] - [Keyset Soft Key]Enter the number of the mailbox to receive the message.# Start recording.[CONTINUE] - [CONT]Options available while recording.* Pause or restart recording.[RESUME] - [RESUME][PAUSE] - [PAUSE]E (3) Erase recording.[CANCEL] - [CNCL]# End the recording.[DONE] - [DONE]* Back up and re-enter the mailbox number.[MAILBOX] - [MBOX][EXIT] Exit without recording and go back to the mailbox Main Menu.# Exit without recording and go back to the mailbox Main Menu.[EXIT] - [EXIT]2<strong>IntraMail</strong> <strong>System</strong> <strong>Guide</strong> Chapter 2: Features ◆ 159
Remote ProgrammingRemote ProgrammingDescriptionYou can remotely program <strong>IntraMail</strong> by using the Windows TM -based DS1000/2000 PC Program running ona PC or laptop. After the initial installation, Remote Programming allows you to customize <strong>IntraMail</strong> to meetthe customer’s requirements without being on-site. See the DS1000/2000 PC Program User <strong>Guide</strong> for more.Related FeaturesTBDProgrammingTBDOperationTBD160 ◆ Chapter 2: Features <strong>IntraMail</strong> <strong>System</strong> <strong>Guide</strong>
Screened TransferScreened TransferDescriptionScreened Transfer is an Automated Attendant option that allows callers to directly dial system extensions.Screened Transfer (and its related feature Unscreened Transfer) allow the <strong>IntraMail</strong> Automated Attendant totransfer outside calls to system extension’s without the need for a live receptionist or operator. It is similar totelephone system screened transfers in which the transferring party controls the transfer. After an AutomatedAttendant caller dials an extension, <strong>IntraMail</strong> calls (screens) the destination extension to see if the transfercan go through.■ If the destination is busy or in DND, the Automated Attendant doesn’t extend the call and immediatelyprovides the caller with additional options.■ If the destination is available, the Automated Attendant rings it. If the destination answers, the call goesthrough. If the destination doesn’t answer within a preset interval, the Automated Attendant doesn’textend the call and provides the caller with additional options.Screened vs. Unscreened TransferBoth Screened and Unscreened Transfer allow Automated Attendant callers to directly dial system extensions.The following summarizes the differences between these two types of Automated Attendant transfer.■ With Unscreened Transfer, calls from the Automated Attendant ring like other transferred calls and displaythe incoming Caller ID data (if provided by telco and enabled in programming). Screened Transfersring like Intercom calls and do not display Caller ID until the call is answered.■ Both Screened and Unscreened Transfers route unanswered calls to the subscriber’s greeting (recordedor default) so the caller can leave a message. However, only Screened Transfer allows the caller to dial 2to reach the Next Call Routing Mailbox options (if programmed).Screened Transfer and Inactive MailboxesScreened Transfer to an extension can only occur if the destination extension has an active mailbox. If theextension’s mailbox is inactive, the Automated Attendant caller hears, “That is an invalid entry,” and thenreturns to the Automated Attendant.2The table on the next page shows in detail how Screened Transfer operates.<strong>IntraMail</strong> <strong>System</strong> <strong>Guide</strong> Chapter 2: Features ◆ 161
Screened Transfer■■Screened Transfer (TRF) OperationCall = Call answered by the Automated Attendant.Extension = Extension dialed by Automated Attendant caller.If Auto Attendant Do Not Disturb is off (see page 37 for more on this feature):With ActiveGreeting RecordedWith Active GreetingNot RecordedExtension Idle Extension Busy Extension in DND1. Places a screened (Intercom)call to extension.-If answered, transfers call.2. If unanswered 1 :-With no Next Call RoutingMailbox, caller hears greetingand can leave a message.-With a Next Call RoutingMailbox, caller can dial 1to leave a message or 2 2 forother options.1. Places a screened (Intercom)call to extension.-If answered, transfers call.2. If unanswered 1 :-With no Next Call RoutingMailbox, <strong>IntraMail</strong> promptscaller to leave a message.-With a Next Call RoutingMailbox, caller can dial 1to leave a message or 2 2 forother options.1. When busy:-With no Next Call RoutingMailbox, caller hears greetingand can leave a message.-With a Next Call RoutingMailbox, caller can dial 1to leave a message or 2 2 forother options.1. When busy:-With no Next Call RoutingMailbox, <strong>IntraMail</strong>prompts caller to leave amessage.1. With a Next Call RoutingMailbox, caller can dial 1to leave a message or 2 2 forother options.1. When in DND:-With no Next Call RoutingMailbox, caller hears greetingand can leave a message.-With a Next Call RoutingMailbox, caller can dial 1to leave a message or 2 2 forother options.1. When in DND:-With no Next Call RoutingMailbox, caller hears greetingand can leave a message.-With a Next Call RoutingMailbox, caller can dial 1to leave a message or 2 2 forother options.If Auto Attendant Do Not Disturb is on (see page 37 for more on this feature):Extension Idle Extension Busy Extension in DNDWith Active GreetingRecorded ornot recorded1. Sends call immediately to mailbox:-Plays greeting.-Prompts caller to start recording.1 After 8006 - Screened Transfer Timeout interval.2 Dialing 2 routes the call to the Next Call Routing Mailbox for additional dialing options. See Next Call Routing Mailboxon page 148 for more.Related FeaturesAnswer Tables (page 30)Determines how the Automated Attendant answers outside calls on each trunk.Automated Attendant (page 42)The Answer Table determines how the Automated Attendant answers calls.Call Routing Mailbox (page 49)■ The mailbox associated with an Answer Table that specifies which dialing options (Dial Action Table)and announcements are available to Automated Attendant callers.■ You cannot program a Call Routing Mailbox as a Screened Transfer (TRF) Dial Action Table destination.Caller ID (page 56)<strong>IntraMail</strong> provides Caller ID data for a Screened Transfer call after it is answered.162 ◆ Chapter 2: Features <strong>IntraMail</strong> <strong>System</strong> <strong>Guide</strong>
Screened TransferDial Action Table (page 64)Defines the dialing options for the Call Routing Mailbox chosen by the active Answer Table.Forced Unscreened Transfer (page 90)The Subscriber Mailbox can optionally convert Automated Attendant Screened Transfers to UnscreenedTransfers.Unscreened Transfer (page 180)After an Automated Attendant caller dials an extension, <strong>IntraMail</strong> immediately transfers the call to thedestination and hangs up.ProgrammingStep 1Step 2Assign the TRF action to a key on the active Dial Action Table.1.1 8008 - <strong>IntraMail</strong> Dial Action Tables: TRF Action - Screened Transfer (1) on page 247.- Normally, the corresponding Number option should be XXX. Note that the key you choosefor this action is the first digit of the called extension number.- For example, to allow callers to place Screened Transfers to extensions 300-399, forkey 3 enter TRF for the Action and XXX for the corresponding Number.- To have Screened Transfer call a specific extension, the corresponding Number option shouldbe that extension’s number. The caller then dials that single digit to reach the extension.- For example, to have callers dial 8 to reach extension 303, for key 8 enter TRF forthe Action and 303 for the corresponding Number.✔By default, key 3 Action is UTRF and Number is XXX. This means that Automated Attendantcallers can place Unscreened Transfers to extensions 300-399.Set how long a Screened Transfer will ring an unanswered extension before recalling to theAutomated Attendant.2.1 8006 - <strong>IntraMail</strong> Routing Mailboxes: Screened Transfer Timeout on page 228.- Set how long a Screened Transfer (TRF) from the Automated Attendant will ring (0-255seconds) an unanswered extension before recalling.- Be sure that the 0401 - <strong>System</strong> Timers: Transfer Recall interval is longer than the setting ofthis option. If the Transfer Recall interval is shorter, Screened Transfers will recall the sameas Unscreened Transfers.✔By default, this option is 15 seconds.2OperationN/A<strong>IntraMail</strong> <strong>System</strong> <strong>Guide</strong> Chapter 2: Features ◆ 163
Security CodeSecurity CodeDescriptionA mailbox can have a security code to protect it from unauthorized access. A Security Code must be 4 digitslong, using 0-9. If a subscriber wants to keep their mailbox private, they can enter a Security Code. No oneelse can use the subscriber’s mailbox unless they know the code.Related FeaturesProgramming<strong>System</strong> Administrator (page 171)The <strong>System</strong> Administrator can delete a mailbox’s security code.N/AOperationChanging or Deleting a Security Code (From your Subscriber Mailbox)[Super Display Soft Key] - [Keyset Soft Key]Log onto Subscriber Mailbox.OP (67) Access the Mailbox Options Menu.[MBOX OPTS] - [N/A]S (7) Access the Security Code options.[SEC CODE] - [SEC]Enter new Security Code (4 digits).C (2) Accept Security Code entry and go back to the Mailbox OptionsMenu.I (4)Do not accept Security Code entry and go back to the SecurityCode options Menu.* Optionally erase your Security Code and go back to the Mailbox OptionsMenu.[ERASE] - [ERASE]# Exit to the Mailbox Options Menu without making any changes to your SecurityCode.[EXIT] - [EXIT]0 Plays Help message164 ◆ Chapter 2: Features <strong>IntraMail</strong> <strong>System</strong> <strong>Guide</strong>
Security CodeDeleting a Security Code (From your <strong>System</strong> Administrator’s Mailbox)[Super Display Soft Key] - [Keyset Soft Key]Log onto <strong>System</strong> Administrator’s mailbox.SA (72)Access <strong>System</strong> Administrator options.[SYS ADMIN] - [N/A]S (7)0 Plays Help message.Select Subscriber Mailbox Maintenance options.[SUBSCRIBER] - [SUBS]Enter the number of the Subscriber Mailbox you want to maintain.S (7)Erase mailbox’s Security Code.[ERASE SECURITY CODE] - [N/A]# Go back to <strong>System</strong> Administrator options.[EXIT] - [EXIT]2<strong>IntraMail</strong> <strong>System</strong> <strong>Guide</strong> Chapter 2: Features ◆ 165
Single Digit DialingSingle Digit DialingDescriptionAn Automated Attendant caller can press a single key to route to an extension, route to another destination, oruse an <strong>IntraMail</strong> feature. Single Digit Dialing simplifies the Automated Attendant since the caller just dials asingle digit to reach an extension or use an option. If you set up Single Digit Dialing, be sure to customize theactive Instruction menu so it describes which digits the caller should dial to use the available options.All of the features in the following Dial Action Table Key Action Summary table are accessible from a singleDial Action Table digit.Dial Action Table Key Action SummaryAction Description Feature Reference For more, see:TRFUTRFREC1REC2LOGONHangUpGOTOUNDScreened Transfer (1)Allows an Automated Attendant caller to placea Screened Transfer to an extension. <strong>IntraMail</strong>calls (screens) the destination to see if the callcan go through.Unscreened Transfer (2)Allows an Automated Attendant caller to placean Unscreened Transfer to an extension.Intra-Mail transfers the call the destination and thenhangs up.Quick Message with Greeting (3)Allows an Automated Attendant caller to leavea Quick Message at an extension. The callerwill hear the extension’s personal greeting.Quick Message without Greeting (4)Allows an Automated Attendant caller to leavea Quick Message at an extension. The callerwill not hear the extension’s personal greetingLog Onto Voice Mail (5)Allows an Automated Attendant caller to logonto a mailbox, either directly or one of theirchoosing.Hang Up (6)<strong>IntraMail</strong> says “Goodbye” and hangs up.Go to a Mailbox, (7)Allows an Automated Attendant caller to routeto another mailbox.Undefined Routing (0)This action provides no routing.Screened Transfer (page 161) Page 247Unscreened Transfer (page 180) Page 247Quick Message (page 156) Page 248Quick Message (page 156) Page 248Log Onto Voice Mail (page 112) Page 248Hang Up (page 104) Page 249Go To A Mailbox (page 92) Page 249N/A Page 249Related FeaturesInstruction Menu (page 105)The active Instruction Menu should describe the Single Digit Dialing options.Also refer to the Dial Action Table Key Action Summary Table beginning on page 166.166 ◆ Chapter 2: Features <strong>IntraMail</strong> <strong>System</strong> <strong>Guide</strong>
Single Digit DialingProgrammingOperationRefer to the Dial Action Table Key Action Summary Table beginning on page 166.Refer to the Dial Action Table Key Action Summary Table beginning on page 166.2<strong>IntraMail</strong> <strong>System</strong> <strong>Guide</strong> Chapter 2: Features ◆ 167
Subscriber MailboxSubscriber MailboxDescriptionA Subscriber Mailbox is the type of mailbox assigned to a telephone system extension. The telephoneassigned to the Subscriber Mailbox is called the subscriber’s extension. When an extension user accessestheir voice mail, they are using their Subscriber Mailbox. It provides the <strong>IntraMail</strong> voice messaging services.For a brief overview of the features available at a Subscriber Mailbox, review the Related Features below.Then, go to the individual feature to find out how it operates and any programming required to make it work.<strong>IntraMail</strong> automatically assigns a mailbox to each extension in the number plan. By default in DS1000, onlythe first 8 (300-307) Subscriber Mailboxes are active. By default in DS2000, only the first 16 (300-315) SubscriberMailboxes are active. See Programming below for more. DS1000 has 34 Subscriber Mailboxes (300-333). DS2000 has 128 Subscriber Mailboxes (300-427).Related FeaturesAutomated Attendant (page 42)The Automated Attendant can route callers to a Subscriber Mailbox.Auto Attendant Do Not Disturb (page 37)Auto Attendant Do Not Disturb sends Automated Attendant calls directly to a subscriber’s mailbox. Theirphone will not ring for calls from the Automated Attendant.Auto Erase or Save (page 40)After a subscriber listens to a message in their Subscriber Mailbox, <strong>IntraMail</strong> can automatically erase orsave the message.Conversation Record (page 61)Enable or disable the Conversation Record beep for the Subscriber Mailbox.Greeting (page 94)A Subscriber Mailbox user can record a personalized greeting for their mailbox. Callers to the user’smailbox hear the prerecorded personalized greeting.Listening to Messages (page 109)Review this feature to learn which features are available to a subscriber while listening to messages.Make Call (page 120)To simplify returning outside calls, <strong>IntraMail</strong> can ask the caller leaving a message to enter their phonenumber prior to leaving the message. The subscriber can then dial MC to call the person back.Main Menu (page 118)The Main Menu provides access to the features available to a Subscriber Mailbox.Message Listen Mode (page 132)Set the type of messages a subscriber will listen to when they dial L (5) after logging into their SubscriberMailbox.Message Notification (page 133)Once activated, Message Notification dials up to 3 telephone numbers to let the user know they have newmessages in their Subscriber Mailbox.Message Playback Direction (page 141)Set the subscriber Mailbox message playback order.Message Record (page 142)Review this feature to learn which features are available to a subscriber while recording and sending amessage.Message Retention (page 144)Set how long a Subscriber Mailbox will retain held and saved messages.Message Storage Limit (page 145)Set the maximum number of messages that can be left in the mailbox.168 ◆ Chapter 2: Features <strong>IntraMail</strong> <strong>System</strong> <strong>Guide</strong>
Subscriber MailboxNext Call Routing Mailbox (page 148)The Next Call Routing Mailbox provides additional dialing options after a caller leaves a message in aSubscriber Mailbox.Security Code (page 164)If enabled, a subscriber must enter a security code before logging onto their Subscriber Mailbox.<strong>System</strong> Administrator (page 171)A Subscriber Mailbox designated as a <strong>System</strong> Administrator provides the subscriber with unique systemadministration capabilities through the SA menu.Unscreened Transfer (page 180)The Subscriber Mailbox can optionally convert Automated Attendant Screened Transfers to UnscreenedTransfers.ProgrammingStep 1Step 2Step 3Step 4Set up a Subscriber Mailbox.1.1 1808 - <strong>IntraMail</strong> Subscriber Mailbox Options: Extension Number on page 202.- Select the Subscriber Mailbox you want to program.1.2 (Prior to 03.20.07) 1808 - <strong>IntraMail</strong> Subscriber Mailbox Options: Mailbox Active onpage 202.- Enter Y (9) to activate each required Subscriber Mailbox.✔By default in DS1000, Subscriber Mailboxes 300-307 are active (Y). All others are inactive(N).✔By default in DS2000, Subscriber Mailboxes 300-314 are active (Y). All others are inactive(N).1.3 (03.20.07 or higher) 1808 - <strong>IntraMail</strong> Subscriber Mailbox Options: Mailbox Type onpage 202.- Enter 1 (Personal) to enable a Personal <strong>IntraMail</strong> mailbox for each required extension.✔By default in DS1000, Subscriber Mailboxes 300-307 are Personal (1). All others are disabled(0).✔By default in DS2000, Subscriber Mailboxes 300-314 are Personal (1). All others are disabled(0).Check to be sure message waiting lamping is enabled for the Subscriber Mailbox.2.1 1808 - <strong>IntraMail</strong> Subscriber Mailbox Options: Message Waiting Lamp on page 204.- Enter Y (9) to enable Message Waiting lamping for each Subscriber Mailbox.✔By default, this option is Y (9).Set the maximum length of recorded messages left in the Subscriber Mailbox3.1 8004 - <strong>IntraMail</strong> <strong>System</strong> Options - Subscriber Message Length on page 213.- Set the maximum length (1-4095 seconds) of recorded messages for:- Subscriber Mailbox users dialing RS to record and send a message.- Extension users leaving a message in a Subscriber Mailbox.- Outside Automated Attendant callers accessing a mailbox via a GOTO commandand then dialing RS to record and send a message.- Subscriber Mailbox Greetings.- Announcement Messages.- Call Routing Mailbox Instruction Menus.✔By default, these types of messages are 120 seconds long maximum.Set the maximum length of recorded Quick Messages left in the Subscriber Mailbox.4.1 8004 - <strong>IntraMail</strong> <strong>System</strong> Options - Non-Subscriber Message Length on page 213.- Set the maximum length (1-4095 seconds) of recorded messages for:- Automated Attendant callers leaving a message or Quick Message in a SubscriberMailbox.- Outside callers transferred by an extension user to a Subscriber Mailbox.2<strong>IntraMail</strong> <strong>System</strong> <strong>Guide</strong> Chapter 2: Features ◆ 169
Subscriber Mailbox✔By default, these types of messages are 120 seconds long maximum.OperationN/A170 ◆ Chapter 2: Features <strong>IntraMail</strong> <strong>System</strong> <strong>Guide</strong>
<strong>System</strong> Administrator<strong>System</strong> AdministratorDescriptionThe <strong>System</strong> Administrator is a Subscriber Mailbox that has unique system administration features such asrecording Welcome Messages and Instruction Menus, and deleting messages in a co-worker’s mailbox. The<strong>System</strong> Administrator features are an essential part of <strong>IntraMail</strong> setup since they allow the recording of thesystem-wide messages and provide Subscriber Mailbox maintenance. After logging onto their SubscriberMailbox, the <strong>System</strong> Administrator can use all of the features in the SA menu. The <strong>System</strong> AdministratorOptions table below shows these options.<strong>System</strong> Administrator Options[Super Display Soft Key] - [Keyset Soft Key]Option Description For more, see:SA (72)[SYS ADMIN] - [N/A]I (4)[INSTRUCTION] - [INST]A (2)[ANNOUNCEMENT] - [ANN]S (7)[SUBSCRIBER] - [SUBS]EA (32)[ERASE ALL MSGS] - [EA]EG (34)[ERASE GREETING] - [EG]EN (36)[ERASE NAME] - [EN]S (7)[ERASE SECURITY CODE] - [N/A]N (6)[RECORD MAILBOX NAME] - [N/A]O (6)[ANS SCHEDULE] - [N/A]V (8)[N/A] - [N/A]Access the <strong>System</strong> Administrator options.Record an Instruction Menu. Instruction Menu on page 105.Record an Announcement Message. Announcement Message on page 27.Access the Subscriber Maintenance options (see the following features).Erase all messages in a mailbox. Erasing All Messages on page 77.Erase a mailbox greeting.Greeting on page 94.■ With Multiple Greetings, thisoption simultaneously erases allrecorded greetings in a SubscriberMailbox. Additionally, the activegreeting is reset to 1.Erase a mailbox name. Mailbox Name on page 114.Delete a mailbox Security Code. Mailbox Security Code Delete on page 117.Record Mailbox Name. Mailbox Name on page 114.Override the active Answer Schedule. Answer Schedule Override on page 28Hear the version number of the <strong>IntraMail</strong> stored voice prompts.2Related FeaturesProgrammingSubscriber Mailbox (page 168)Only a Subscriber Mailbox can be a <strong>System</strong> Administrator.Step 1Designate a Subscriber Mailbox as a <strong>System</strong> Administrator.1.1 1808 - <strong>IntraMail</strong> Subscriber Mailbox Options: <strong>System</strong> Administrator on page 205.- Enter Y (9) to designate the Subscriber Mailbox as a <strong>System</strong> Administrator.✔By default, this option is Y (9) at extension 300 and N (6) at all other extensions..<strong>IntraMail</strong> <strong>System</strong> <strong>Guide</strong> Chapter 2: Features ◆ 171
<strong>System</strong> AdministratorOperationRefer to the individual features referenced in the <strong>System</strong> Administrator Options on page 171.Log onto <strong>System</strong> Administrator’s Mailbox.SA (72)Accessing the <strong>System</strong> Administrator OptionsAccess the <strong>System</strong> Administrator Menu.[SYS ADMIN] - [N/A]■ Turn to <strong>System</strong> Administrator Options on page 171 for more.0 Plays Help message.172 ◆ Chapter 2: Features <strong>IntraMail</strong> <strong>System</strong> <strong>Guide</strong>
<strong>System</strong> Administrator Mailbox<strong>System</strong> Administrator MailboxDescriptionA <strong>System</strong> Administrator Mailbox is a Subscriber Mailbox in which you have enabled the <strong>System</strong> Administratoroption. This provides the subscriber with system administration capabilities. <strong>IntraMail</strong> can have multiple<strong>System</strong> Administrator Mailboxes. Turn to <strong>System</strong> Administrator on page 171 for more.Related FeaturesProgrammingSubscriber Mailbox (page 168)Only a Subscriber Mailbox can be a <strong>System</strong> Administrator.<strong>System</strong> Administrator (page 171)The <strong>System</strong> Administrator has unique system administration functions, such as recording Welcome Messagesand Instruction Menus, and deleting messages in a co-worker’s mailbox.Step 1Designate a Subscriber Mailbox as a <strong>System</strong> Administrator.1.1 1808 - <strong>IntraMail</strong> Subscriber Mailbox Options: <strong>System</strong> Administrator on page 205.- Enter Y (9) to designate the Subscriber Mailbox as a <strong>System</strong> Administrator.✔By default, this option is Y (9) at extension 300 and N (6) at all other extensions..2Step 2Refer to <strong>System</strong> Administrator on page 171 for more programming details.OperationSee Accessing the <strong>System</strong> Administrator Options on page 172.<strong>IntraMail</strong> <strong>System</strong> <strong>Guide</strong> Chapter 2: Features ◆ 173
<strong>System</strong> Re-initialization<strong>System</strong> Re-initializationDescriptionInitializing the telephone system automatically initializes all <strong>IntraMail</strong> programming. You may want to dothis if the site requirements significantly change and it is easier to start over from default than remove allyour custom programming. Re-initializing <strong>IntraMail</strong> returns all programmed options to their default values.Re-initializing the telephone system returns all programmed options totheir factory set (default) values. Any site specific programmingyou have done will be erased following re-initialization.To initialize (erase) Subscriber Mailbox Security Codes and all recordings, use a <strong>System</strong> AdministratorMailbox.Related FeaturesProgramming<strong>System</strong> Administrator (page 171)The <strong>System</strong> Administrator can delete Subscriber Mailbox security codes as well as <strong>IntraMail</strong> recordedmessages.Step 1Step 2To re-initialize the telephone system data base:1.1 Press ICM and dial #*#* + 372000 + HOLD.1.2 Dial 9999 + HOLD.1.3 Dial Y (9) + HOLD.- The telephone system data base initializes.- To cancel initialization, dial N (6) + HOLD instead.To erase recorded messages and Subscriber Mailbox Security Codes:2.1 See <strong>System</strong> Administrator on page 171.- The recorded messages include:Instruction MenusAnnouncement Mailbox messagesMessages left in a Subscriber MailboxSubscriber Mailbox greetingsSubscriber Mailbox namesOperationN/A174 ◆ Chapter 2: Features <strong>IntraMail</strong> <strong>System</strong> <strong>Guide</strong>
Time and DateTime and DateDescriptionSince <strong>IntraMail</strong> is completely integrated with the telephone system software, the <strong>IntraMail</strong> time and date isthe same as the phone system time and date. Since time and date is used on telephone displays and with theAuto Time Stamp and Time and Date Stamp features, be sure to set it accurately. To change the time and date,use either the system programmable options or the User Programmable features. See Programming below.The Time and Date is retained if the telephone system power should fail or the system resets.In addition, a Subscriber Mailbox user can hear the time and date when they call their mailbox.Related FeaturesAuto Time Stamp (page 41)After a user listens to a message, <strong>IntraMail</strong> can optionally announce the time and date the message was left.Time and Date Stamp (page 176)An extension can listen to a message and dial TI to hear the time the message was sent.2ProgrammingStep 1Step 2To set the system time and date from system programming:1.1 Press ICM and dial #*#* + 372000 + HOLD.1.2 Dial 0302 + HOLD.1.3 Press Vol ▲ until you see: TIME?1.4 Enter the new time in 24-hour format + HOLD.- For example, for 5:00 PM enter 17:00:00.1.5 Press Vol ▲ until you see: DATE?1.6 Enter the new date in MMDDYYYY format.- For example, for February 27, 2003 enter 02272003 + HOLD.1.7 Press CONF 3 times to exit the programming mode.To set the system time and date from the User-Programmable Features:2.1 From extension 300, dial # TD (# 83). You see: TIME?2.2 Enter the new time in 24-hour format + HOLD.- For example, for 5:00 PM enter 17:00:00.2.3 When you see: DATE?, enter the new date in MMDDYYYY format.- For example, for February 27, 2003 enter 02272003 + HOLD.2.4 Press SPK to exit.OperationHearing the Current Time and DateLog onto Subscriber Mailbox.TI (84) Access the Time and Date option.■ <strong>IntraMail</strong> plays the time and date, and then returns you to the mailbox Main Menu.0 Plays Help message.<strong>IntraMail</strong> <strong>System</strong> <strong>Guide</strong> Chapter 2: Features ◆ 175
Time and Date StampTime and Date StampDescriptionWhile listening to a message, a Subscriber Mailbox user can dial TI to hear the Time and Date the messagewas left. This is a handy option while reviewing messages. The subscriber can just dial a code to find outwhen the message arrived.Time and Date Stamp with Caller IDWith caller ID installed, a mailbox user can dial TI while listening to a message to hear the time the messagewas sent, as well as the caller’s number.Related FeaturesProgrammingOperationAuto Time Stamp (page 41)After a user listens to a message, <strong>IntraMail</strong> can optionally announce the time and date the message was left.Caller ID (page 56)With Caller ID installed and programmed, the Time and Date Stamp also includes the caller’s number.Listening to Messages (page 109)Turn to this feature for additional listening options.Time and Date (page 175)You can set the system Time and Date from the telephone system programming or using the User-ProgrammableFeatures.To get Time and Date Stamp with Caller ID, be sure Caller ID is properly installed and programmed in theconnected telephone system.Hearing the Time and Date a Message was LeftLog onto Subscriber Mailbox.L (5) Access the Message Listen mode.[LISTEN] - [LSTN]TI (84) Hear the time and date the message was sent.■ Turn to Listening to Messages on page 109 for more on your listening options.0 Plays Help message176 ◆ Chapter 2: Features <strong>IntraMail</strong> <strong>System</strong> <strong>Guide</strong>
Transfer to a MailboxTransfer to a MailboxDescriptionSoftwareNote:Enhanced Mailbox Transfer requires software version 03.20.07 or higher.An extension user can transfer their active call to a co-worker’s mailbox. This lets the caller leave a personalmessage for the co-worker. Transfer to a Mailbox is one of the big conveniences of <strong>IntraMail</strong> since the callercan state their business and not have to call back later. It saves the caller time and cuts down on unnecessarytelephone system call processing. Transfer to a Mailbox is frequently used by attendants and receptionists aswell as other co-workers.Enhanced Mailbox TransferWith Enhanced Mailbox Transfer, when the transferring extension leaves a message before hanging up thesystem will record two separate messages. One message will be from the transferring extension; the otherfrom the transferred caller. Each message has the correct Caller ID assigned.Additionally, if a caller is transferred to an extension and Voice Mail picks up, the caller will hear the entiregreeting for the called extension’s mailbox. The greeting will restart as soon as the system connects thecaller to the Transfer destination’s mailbox. Without Enhanced Mailbox Transfer, the caller would hear apartial greeting (depending on the timing of the transfer).2Related FeaturesProgrammingAuto Attendant Do Not Disturb (page 37)When enabled, Auto Attendant Do Not Disturb automatically sends all calls from the Automated Attendantto the subscriber’s mailbox.Screened Transfer (page 161)Automated Attendant Screened Transfers can automatically transfer an outside caller to an extension.Unscreened Transfer (page 180)Automated Attendant Unscreened Transfers can automatically transfer an outside caller to an extension.N/AOperationTransferring your call to a Co-Worker’s MailboxTo transfer your active call to a co-worker’s mailbox:1. Press ICM.2. Dial your co-worker’s mailbox number (e.g., 301 for extension 301).■ You can optionally press a Hotline or Call Coverage key instead of pressing ICM and dialing a mailbox.3. Press MW.4. Press SPK to hang up.■ To optionally transfer a call to co-worker’s mailbox without first ringing their phone, press MW before dialingtheir mailbox number. (This is the only procedure you can use to transfer to a Guest Mailbox.)■ To transfer a call to a co-worker’s mailbox from a single line telephone, use the following procedure:Hookflash + Dial *8 + Dial the co-worker’s mailbox + Hang up.<strong>IntraMail</strong> <strong>System</strong> <strong>Guide</strong> Chapter 2: Features ◆ 177
Transfer to a UCD GroupTransfer to a UCD GroupDescriptionThe Automated Attendant can transfer outside callers to a UCD Hunting Group master number. If a customerhas a UCD group set up for a department (such as Sales or Tech Service), the Automated Attendantcan send calls directly to that department without any operator intervention. It is not necessary to have acompany employee handle the calls. The calls will ring a member of the group or queue (wait in line) if allco-worker’s in the group are busy. You can also set up Master Mailboxes to handle the UCD Hunting Groupoverflow traffic when all members are busy.To set up Transfer to a UCD Group, assign a TRF or UTRF action in the active Dial Action Table to route tothe UCD Hunting Group master number. Refer to Screened Transfer on page 161 and Unscreened Transferon page 180 for more on how these Automated Attendant options handle calls.Related FeaturesProgrammingDial Action Table (page 64)Set up TRF or UTRF Dial Action Table actions to route to the UCD Hunting Group master number.Master Mailbox (page 122)Use Master Mailboxes for UCD Hunting Group overflow.Screened Transfer (page 161)Automated Attendant Screened Transfers can automatically transfer an outside caller to a UCD HuntingGroup master number.Unscreened Transfer (page 180)Automated Attendant Unscreened Transfers can automatically transfer an outside caller to a UCD HuntingGroup master number.Step 1Step 2Optionally assign a TRF action to the key on the active Dial Action Table that you want toroute to the UCD Hunting Group master number.1.1 8008 - <strong>IntraMail</strong> Dial Action Tables: TRF Action - Screened Transfer (1) on page 247.- To transfer directly to the master number, Action should be TRF and the correspondingNumber option should be the master extension number.✔By default, the key 3 and 4 Action is UTRF and Number is XXX. This means that AutomatedAttendant callers can place Unscreened Transfers to extensions 300-499.Optionally assign a UTRF action to the key on the active Dial Action Table that you want toroute to the UCD Hunting Group master number.2.1 8008 - <strong>IntraMail</strong> Dial Action Tables: UTRF Action - Unscreened Transfer (2) on page 247.- To transfer directly to the master number, Action should be UTRF and the correspondingNumber option should be the master extension number.✔By default, the key 3 and 4 Action is UTRF and Number is XXX. This means that AutomatedAttendant callers can place Unscreened Transfers to extensions 300-499.OperationN/A178 ◆ Chapter 2: Features <strong>IntraMail</strong> <strong>System</strong> <strong>Guide</strong>
Undefined RoutingUndefined RoutingDescriptionAn Automated Attendant Undefined Routing is a Dial Action Table key assignment for which there is norouting defined. When an Automated Attendant caller dials a digit and there is no routing assigned, <strong>IntraMail</strong>plays, “That is an invalid entry. ” <strong>IntraMail</strong> then repeats the dialing options (Instruction Menu) to the caller.If a Dial Action Table key assignment has no function, you should normally leave it undefined. By default,keys 1, 2, 5, 6, 7, 8, and 9 have Undefined Routing.Related FeaturesProgrammingDial Action Table (page 64)Undefined Routing is a Dial Action Table Action.Instruction Menu (page 105)The active Call Routing Mailbox’s Instruction Menu repeats after a caller dials a digit with an UndefinedRouting.2Step 1To set up an Undefined Routing for a Dial Action Table:1.1 8008 - <strong>IntraMail</strong> Dial Action Tables: UND Action - Undefined Routing (0) on page 249.- For a key that should have an Undefined Routing, the Action entry should be UND. There isno corresponding Number option entry.✔By default, keys 1, 2, 5, 6, 7, 8, and 9 have Undefined Routing.OperationN/A<strong>IntraMail</strong> <strong>System</strong> <strong>Guide</strong> Chapter 2: Features ◆ 179
Unscreened TransferUnscreened TransferDescriptionUnscreened Transfer is an Automated Attendant option that allows callers to directly dial system extensions.Unscreened Transfer (and its related feature Screened Transfer) allow the <strong>IntraMail</strong> Automated Attendant totransfer outside calls to system extensions without the need for a live receptionist or operator. It is similar totelephone system unscreened transfers in which the transferring party immediately extends the call. After anAutomated Attendant caller dials an extension, <strong>IntraMail</strong> transfers the call to the destination and hangs up. Anyrecalls or additional routing are handled by the telephone system – just as with any other unscreened transfer.Screened vs. Unscreened TransferBoth Screened and Unscreened Transfer allow Automated Attendant callers to directly dial system extensions.The following summarizes the differences between these two types of Automated Attendant transfer.■ With Unscreened Transfer, calls from the Automated Attendant ring like other transferred calls and displaythe incoming Caller ID data (if provided by telco and enabled in programming). Screened Transfersring like Intercom calls and do not display Caller ID until the call is answered.■ Both Screened and Unscreened Transfers route unanswered calls to the subscriber’s greeting (recorded ordefault) so the caller can leave a message. However, only Screened Transfer allows the caller to dial 2 toreach the Next Call Routing Mailbox options (if programmed).Unscreened Transfer and Inactive MailboxesAn Unscreened Transfer will go through to the destination extension even if the destination doesn’t have anactive mailbox. If the Unscreened Transfer is unanswered at the destination, the call returns to the AutomatedAttendant.The table on the next page shows in detail how Unscreened Transfer operates.180 ◆ Chapter 2: Features <strong>IntraMail</strong> <strong>System</strong> <strong>Guide</strong>
Unscreened TransferUnscreened Transfer (UTRF) Operation■ Call = Call answered by the Automated Attendant.■ Extension = Extension dialed by Automated Attendant caller.If Auto Attendant Do Not Disturb is off (see page 37 for more on this feature):Extension Idle Extension Busy Extension in DNDWith Active GreetingRecordedWith Active GreetingNot Recorded1. Transfers call to extension.-If answered, connects call(just like a phone systemtransfer).-If unanswered 1 in adefault phone system,plays greeting (so callercan start recording). 21. Transfers call to extension.-If answered, connects call(just like a phone systemtransfer).-If unanswered 1 in adefault phone system,plays name (if recorded)or extension number. <strong>IntraMail</strong>then prompts callerto leave a message. 21. Transfers call to extension.2. Retrieves call.3. If unanswered 1 in adefault phone system,plays greeting (so callercan start recording) 21. Transfers call to extension.-If answered, connects call(just like a phone systemtransfer).-If unanswered 1 in adefault phone system,plays name (if recorded)or extension number. <strong>IntraMail</strong>then prompts callerto leave a message. 21. Transfers call to extension.2. Retrieves call.3. If unanswered 1 in adefault phone system,plays greeting (so callercan start recording). 21. Transfers call to extension.-If answered, connects call(just like a phone systemtransfer).-If unanswered 1 in adefault phone system,plays name (if recorded)or extension number. <strong>IntraMail</strong>then prompts callerto leave a message. 2If Auto Attendant Do Not Disturb is on (see page 37 for more on this feature):Extension Idle Extension Busy Extension in DNDWith Active GreetingRecorded1. Sends call immediately to mailbox:-Plays greeting.-Prompts caller to start recording.With Active GreetingNot Recorded1 After 0401 - Transfer Recall interval.2 Custom phone system programming may redirect the unanswered call (for example, to a hunt group or another extension).2Related FeaturesAnswer Tables (page 30)Determines how the Automated Attendant answers outside calls on each trunk.Automated Attendant (page 42)The Answer Table determines how the Automated Attendant answers calls.Call Routing Mailbox (page 49)The mailbox associated with an Answer Table that specifies which dialing options (Dial Action Table)and announcements are available to Automated Attendant callers.Caller ID (page 56)<strong>IntraMail</strong> provides Caller ID data for an Unscreened Transfer as the call is ringing.Dial Action Table (page 64)■ Defines the dialing options for the Call Routing Mailbox chosen by the active Answer Table.■ You cannot program a Call Routing Mailbox as an Unscreened Transfer (UTRF) Dial Action Tabledestination.<strong>IntraMail</strong> <strong>System</strong> <strong>Guide</strong> Chapter 2: Features ◆ 181
Unscreened TransferForced Unscreened Transfer (page 90)The Subscriber Mailbox can optionally convert Automated Attendant Screened Transfers to UnscreenedTransfers.Next Call Routing Mailbox (page 148)The Next Call Routing settings for a Subscriber Mailbox may provide additional options after the callerleaves a message.Screened Transfer (page 161)After an Automated Attendant caller dials an extension, <strong>IntraMail</strong> calls (screens) the destination extensionto see if the transfer can go through.ProgrammingStep 1Step 2Assign the UTRF action to a key on the active Dial Action Table.1.1 8008 - <strong>IntraMail</strong> Dial Action Tables: UTRF Action - Unscreened Transfer (2) on page 247.- Normally, the corresponding Number option should be XXX. Note that the key you choosefor this action is the first digit of the called extension number.- For example, to allow callers to place Unscreened Transfers to extensions 300-399,for key 3 enter UTRF for the Action and XXX for the corresponding Number.- To have Unscreened Transfer call a specific extension, the corresponding Number optionshould be that extension’s number. The caller then dials that single digit to reach the extension.- For example, to have callers dial 8 to reach extension 303, for key 8 enter UTRF forthe Action and 303 for the corresponding Number.✔By default, key 0 and TIMEOUT are both UTRF actions to 300. In addition, keys 3 and 4are UTRF actions to XXX.Optionally set the telephone system’s Transfer Recall interval.2.1 0401 - Transfer Recall Interval.- Unanswered Unscreened Transfers route to the extension’s mailbox after this interval.✔By default, this interval is 20 seconds.OperationN/A182 ◆ Chapter 2: Features <strong>IntraMail</strong> <strong>System</strong> <strong>Guide</strong>
Voice Mail OverflowVoice Mail OverflowDescriptionThe telephone system can automatically reroute unanswered outside calls to the <strong>IntraMail</strong> Automated Attendant.Voice Mail Overflow ensures that <strong>IntraMail</strong> will pick up calls that don’t go through. This allows callersto leave a message rather than having to call back later. Voice Mail can be the overflow destination for thefollowing types of calls:■ Direct Inward Line (DIL) OverflowA trunk that directly rings an extension can overflow to that extension’s mailbox if not answered.■ Group Ring DIL OverflowA Direct Inward Line (DIL) that rings extensions in a Ring Group can overflow to the <strong>IntraMail</strong> AutomatedAttendant if unanswered.■ Key Ring OverflowA trunk ringing an extension’s line keys can overflow to the <strong>IntraMail</strong> Automated Attendant.■ UCD Hunting OverflowA trunk that rings a UCD Hunting Group can overflow to the group’s master mailbox. See Master Mailboxon page 122 for more.2! Important !Group Ring Automated Attendant Recall to a master mailbox only occurs for Automated AttendantUnscreened Transfers routed to the Ring Group master number. For this type of recall, see Master Mailboxon page 122 for more.Related FeaturesProgrammingAnswer Tables (page 30)Determines how the Automated Attendant answers outside calls on each trunk.Automated Attendant (page 42)The Answer Table determines how the Automated Attendant answers calls.Call Routing Mailbox (page 49)The mailbox associated with an Answer Table that specifies which dialing options (Dial Action Table)and announcements are available to Automated Attendant callers.Dial Action Table (page 64)Defines the dialing options for the Call Routing Mailbox chosen by the active Answer Table.Extension Hunting to Voice Mail (page 79)A subscriber’s mailbox can pick up their unanswered calls.Master Mailbox (page 122)Use Master Mailboxes for:■ UCD Hunting Overflow■ Group Ring recalll for Automated Attendant Unscreened Transfers routed to a Ring GroupProgramming Group Ring DIL OverflowStep 1Set up a trunk as a DIL to the Ring Group master number.1.1 1003 - Trunk Options: Direct Termination (Day) on page 195.- To have the Ring Group answer the trunk during the day and at night, enter the Ring Groupmaster number (e.g., 600).✔By default, during the day trunks are terminated to Key Ring (entered by pressing CLEAR).<strong>IntraMail</strong> <strong>System</strong> <strong>Guide</strong> Chapter 2: Features ◆ 183
Voice Mail Overflow1.2 1003 - Trunk Options: Direct Termination (Night) on page 195.- To have the Ring Group answer the trunk only at night, enter the Ring Group master number(e.g., 600).✔By default, at night trunks are terminated to Key Ring (entered by pressing CLEAR).Step 2Assign the Ring Group DIL Overflow destination.2.1 1003 - Trunk Options: Activate Overflow During the Day.- To activate overflow during the day and at night, enter Y (9).- Refer to the DS1000/2000 Software Manual for more.- By default, this option is N (6).2.1.1 1003 - Trunk Options: Day Overflow Destination- Enter the <strong>IntraMail</strong> master number (700).✔By default, this option is 300.2.2 1003 - Trunk Options: Activate Overflow at Night.- To activate overflow only at night, enter Y (9).- Refer to the DS1000/2000 Software Manual for more.- By default, this option is N (6).2.2.1 1003 - Trunk Options: Night Overflow Destination- Enter the <strong>IntraMail</strong> master number (700).✔By default, this option is 300.Step 3Set the overflow time (the interval calls will ring before overflow occurs).3.1 0401 - Trunk Revert interval- A DIL to the Ring Group master number will overflow to the <strong>IntraMail</strong> Automated Attendantif not answered after this interval.✔By default, this interval is 15 seconds.Programming UCD Hunting Group OverflowStep 1To set up UCD Hunting Group overflow:1.1 See Master Mailbox on page 122.Programming DIL OverflowStep 1Step 2To set up DIL overflow during the day and at night:1.1 1003 - Trunk Options: Day Overflow.- Enter Y (9) to enable DIL overflow during the day and at night.- Refer to the DS1000/2000 Software Manual for more.✔By default, this option is N (6).1.2 1003 - Trunk Options: Day Overflow Destination- If you enable Day Overflow above, enter the <strong>IntraMail</strong> master number (700).- Refer to the DS1000/2000 Software Manual for more.- By default, this option is 300.To set up DIL overflow only at night:2.1 1003 - Trunk Options: Night Overflow.- Enter Y (9) to enable DIL overflow only when the trunk is in the night mode.- Refer to the DS1000/2000 Software Manual for more.✔By default, this option is N (6).2.2 1003 - Trunk Options: Night Overflow Destination- If you enable Night Overflow above, enter the <strong>IntraMail</strong> master number (700).- Refer to the DS1000/2000 Software Manual for more.- By default, this option is 300.184 ◆ Chapter 2: Features <strong>IntraMail</strong> <strong>System</strong> <strong>Guide</strong>
Voice Mail OverflowStep 3Set the overflow time (the interval calls will ring before overflow occurs).3.1 0401 - DIL No Answer interval- A DIL will overflow to the extension’s Subscriber Mailbox if not answered after this interval.✔By default, this interval is 15 seconds.Programming Key Ring OverflowStep 1Step 2Step 3To set up Key Ring overflow during the day and at night:1.1 1003 - Trunk Options: Direct Termination (Day)- Press CLEAR to make the trunk a Key Ring trunk during the day and at night.- Refer to the DS1000/2000 Software Manual for more.✔By default, during the day trunks are terminated to Key Ring (entered by pressing CLEAR).1.2 1003 - Trunk Options: Day Overflow.- Enter Y (9) to enable overflow for the trunk during the day.- Refer to the DS1000/2000 Software Manual for more.✔By default, this option is N (6).1.3 1003 - Trunk Options: Day Overflow Destination- If you enable Day Overflow above, enter the <strong>IntraMail</strong> master number (700).- Refer to the DS1000/2000 Software Manual for more.- By default, this option is 300.To set up Key Ring overflow only at night:2.1 1003 - Trunk Options: Direct Termination (Night)- Press CLEAR to make the trunk a Key Ring trunk when the system is in the night mode.- Refer to the DS1000/2000 Software Manual for more.✔By default, at night trunks are terminated to Key Ring (entered by pressing CLEAR).2.2 1003 - Trunk Options: Night Overflow.- Enter Y (9) to enable Key Ring overflow when the system is in the night mode.- Refer to the DS1000/2000 Software Manual for more.✔By default, this option is N (6).2.3 1003 - Trunk Options: Night Overflow Destination- If you enable Night Overflow above, enter the <strong>IntraMail</strong> master number (700).- Refer to the DS1000/2000 Software Manual for more.- By default, this option is 300.Set the overflow time (the interval calls will Key Ring before overflow occurs).3.1 0401 - Trunk Revert interval- A Key Ring call will overflow to the <strong>IntraMail</strong> Automated Attendant if not answered afterthis interval.✔By default, this interval is 15 seconds.2OperationN/A<strong>IntraMail</strong> <strong>System</strong> <strong>Guide</strong> Chapter 2: Features ◆ 185
Voice Prompting MessagesVoice Prompting MessagesDescription<strong>IntraMail</strong> provides the telephone system with Voice Prompting Messages which tell the extension user thestatus or progress of their call. For example, if an extension user calls a co-worker while their extension is inDND, they hear, “Please do not disturb.” Voice Prompting Messages guide the user while using certain features.The following table lists the available Voice Prompting Messages.Voice Prompting MessagesVoice Prompt Feature DescriptionThe number you have dialed is not in service. Intercom The extension you called is part of the extensiondata base but is not installed.Vacant numberThe extension you called is not part of theextension data base.This is extension ___.You press N (6) to hear your extension number.The time is ____. The date is ____. Time and Date You press T (8) on your idle keyset to hear theTime and Date.All lines are busy. For callback, press the callbackkey.Extension ___ is busy. For callback, press thecallback key.Your call cannot go through. Please call theoperator.Trunk Groups You dial a trunk group access code (9 or 90-98) and no trunks are available in that group.Intercom You place an Intercom call to a busy extensionToll RestrictionYou place a call that is blocked by your extension’sToll RestrictionPlease do not disturb. Do Not Disturb You call an extension in Do Not Disturb.Please hold on. Your call is being rerouted. Call Forwarding Off Call Forwarding Off Premise is rerouting yourPremisecall to the programmed destination.Please hold on. All lines are busy. Your callwill be answered when a line becomes free.Extension HuntingYou have called a UCD Hunting Group whileall agents are busy.Note: If your system has an UltraMail Voice Mail with Automated Attendant installed, you can install an<strong>IntraMail</strong> to provide the Voice Prompting Messages. The UltraMail will provide the voice mail services, notthe <strong>IntraMail</strong>.Related FeaturesN/AProgrammingOperationNo additional programming is required.N/A186 ◆ Chapter 2: Features <strong>IntraMail</strong> <strong>System</strong> <strong>Guide</strong>
Volume ControlVolume ControlDescriptionSince <strong>IntraMail</strong> is completely integrated with the telephone system software, Volume Control is available ata subscriber’s keyset any time while listening to a message, greeting, or prerecorded voice prompt. VolumeControls let the user interactively adjust the loudness of the <strong>IntraMail</strong> messages and prompts to a comfortablelevel.Related FeaturesN/AProgrammingOperationNo additional programming required.2Volume ControlTo adjust the volume while using any mailbox feature:1. Press VOL ▲ or VOL ▼.<strong>IntraMail</strong> <strong>System</strong> <strong>Guide</strong> Chapter 2: Features ◆ 187
Volume Control188 ◆ Chapter 2: Features <strong>IntraMail</strong> <strong>System</strong> <strong>Guide</strong>
Introduction to ProgrammingChapter 3:ProgrammingIntroduction to ProgrammingBefore You Start ProgrammingBefore You Start ProgrammingHow To Use This ChapterThis chapter provides you with detailed information about the <strong>IntraMail</strong> programmable options. Theseoptions allow you to customize the way the feature associated with an option works. In this section, you’ll:■ Find out about each option.■ Review the list of features that the option affects.■ Learn how to enter the option’s data into system memory.3When you want to customize a feature, find it in Section 2 and learn about it. Section 2 will tell you whatoptions you have to change to get the feature operation you want. Then, look up the options in this sectionand customize them as required.<strong>IntraMail</strong> <strong>System</strong> <strong>Guide</strong> Chapter 3: Programming ◆ 189
0101 - Class of Service0101 - Class of Service Options0101 - Class of Service0101 - Class of Service OptionsDescriptionOptionsUse 0101 - Class of Service Options to enable or disable various options in an extension’s Class of Service.The Class of Service options used by <strong>IntraMail</strong> are listed below. For information on the other 0101 - Class ofService options, refer to the DS1000/2000 Software Manual.Conversation Record(RECORD CONV)Use this option to enable (Yes) or disable (No) an extension’s ability to record conversations into their mailbox.If enabled, the user can press either their Conversation Record key or RECORD soft key to initiaterecording.■ See Conversation Record on page 61 for more.Options■ N (6) - No■ Y (9) - YesDefault✔ N (6) - NoUnsupervised ConferenceUNSUPERVSD CONF)Use this option to enable (Yes) or disable (No) Unsupervised Conference for the extension. The Class ofService for the <strong>IntraMail</strong> ports must have this option enabled in order to use External Transfer.■ See External Transfer on page 84 for more.Options■ N (6) - No■ Y (9) - YesDefault✔ N (6) - NoCall Screening(CALL SCREENING)Use this option to enable (Yes) or disable (No) Call Screening. If enabled, a display keyset use can listen to(screen) a voice mail message as it is being left in their mailbox. If disabled, voice mail messages go to themailbox normally.■ See Call Screening on page 53 for more.Options■ N (6) - No■ Y (9) - YesDefault✔ N (6) - No190 ◆ Chapter 3: Programming <strong>IntraMail</strong> <strong>System</strong> <strong>Guide</strong>
0101 - Class of Service0101 - Class of Service Options0101 Program Entry0101 - Class of Service Options (Page 1 of 2)(Entry Range) [Default Setting]ICM + #*#* + Password (372000) + HOLD + 0101 + HOLD.COS NUMEnter the number of the COS you want to program (1-15) + HOLDOFF PREM FWRDBREAK INCAMP-ON BUSY EXTCALL FORWARDINGSYS SPDL ACCESSEXTENDED RINGPRIVACYLINE Q PRIORITYFORCE DISCON<strong>NEC</strong>TCAMP-ON TO LINESPAGE ALL CALLPAGE ZONE 1PAGE ZONE 2PAGE ZONE 3PAGE ZONE 4PAGE ZONE 5PAGE ZONE 6PAGE ZONE 7SILENT MONITORFLASH FOR SLTACD SUPERVISORSINGLE RINGVIEW SYS ALARMSAUTO HOLDACTIVATE NITESDIRECT TRUNK ACCESSREMOTE FWRDSOFTKEYSRECORD CONVCLID DISPLAY2nd CALL CLID3rd PARTY CLID(9=Yes, 6=No) [No](9=Yes, 6=No) [COS 1=No, COS 2-15=Yes](9=Yes, 6=No) [Yes](9=Yes, 6=No) [Yes](9=Yes, 6=No) [Yes](9=Yes, 6=No) [No](9=Yes, 6=No) [No](9=Yes, 6=No) [No](9=Yes, 6=No) [COS 1=Yes, COS 2-15=No](9=Yes, 6=No) [COS 1=Yes, COS 2-15=No](9=Yes, 6=No) [Yes](9=Yes, 6=No) [Yes](9=Yes, 6=No) [Yes](9=Yes, 6=No) [Yes](9=Yes, 6=No) [Yes](9=Yes, 6=No) [Yes](9=Yes, 6=No) [Yes](9=Yes, 6=No) [Yes](9=Yes, 6=No) [No](9=Yes, 6=No) [Yes](9=Yes, 6=No) [No](9=Yes, 6=No) [No](9=Yes, 6=No) [No](9=Yes, 6=No) [No](9=Yes, 6=No) [COS 1=Yes, COS 2-15=No](9=Yes, 6=No) [COS 1=Yes, COS 2-15=No](9=Yes, 6=No) [COS 1=Yes, COS 2-15=No](9=Yes, 6=No) [Yes](9=Yes, 6=No) [No](9=Yes, 6=No) [Yes](9=Yes, 6=No) [Yes](9=Yes, 6=No) [No]3‘-’ IN CID DISP (9=Yes, 6=No) [Yes]<strong>IntraMail</strong> <strong>System</strong> <strong>Guide</strong> Chapter 3: Programming ◆ 191
0101 - Class of Service0101 - Class of Service Options0101 - Class of Service Options (Page 2 of 2)(Entry Range) [Default Setting]FORCE AC CODESVERIFY AC CODESAC FOR TOLL ONLYRING TYPE CONFIGEXT RING OVRDKEY RING OVRDSLT SP DIALTONESLT MW LAMP HVSLT MW LAMP FSKSLT LOOP DISCONENHANCED LNDDAY WALKING-COSNITE WALKING-COSEXT LOCKINGDND OVERRIDEUNSUPERVSD CONFALLOW DID CALLSDID CAMP ONOTG ANI PRIVACYCLID ALERT LAMPALLOW NAME PGMALLOW LANG PGMCALL SCREENING(9=Yes, 6=No) [No](9=Yes, 6=No) [No](9=Yes, 6=No) [No](9=Yes, 6=No) [No](9=Yes, 6=No) [No](9=Yes, 6=No) [No](9=Yes, 6=No) [No]DS2000 only (9=Yes, 6=No) [No](9=Yes, 6=No) [No](9=Yes, 6=No) [No](9=Yes, 6=No) [Yes](9=Yes, 6=No) [No](9=Yes, 6=No) [No](9=Yes, 6=No) [No](9=Yes, 6=No) [No](9=Yes, 6=No) [No](9=Yes, 6=No) [Yes](9=Yes, 6=No) [Yes](9=Yes, 6=No) [No](9=Yes, 6=No) [Yes](9=Yes, 6=No) [COS 1=Yes, COS 2-15=No](9=Yes, 6=No) [COS 1=Yes, COS 2-15=No](9=Yes, 6=No) [No]Press this:HOLDCONFVOL ▲ or Vol ▼CHECKTo do this:Enter (accept) data you entered.Cancel your entry and back up to the previous prompt level.Scroll to the next prompt on the same prompt level.Restore the previous entry.192 ◆ Chapter 3: Programming <strong>IntraMail</strong> <strong>System</strong> <strong>Guide</strong>
0200 - Tenant Options0201 - Tenant Option Programming0200 - Tenant Options0201 - Tenant Option ProgrammingDescriptionSoftwareNote:OptionsThe 0201 - Name Format option requires software version 03.20.07 or higher.Use the 0201 - Name Format option below to determine how extension names should be entered in 1801 -Extension Name on page 198. For information on the other 0201 - Tenant Option Programming options (notrelated to <strong>IntraMail</strong>), see the DS1000/2000 Software Manual.Name Format(NAME FMT)Use this option to determine how extension names should be entered in 1801-Extension Name or via thetelephone. The options are 1 (first-last) and 2 (last-first).If you enter 1 (first-last), the system assumes that all names are entered in the following format:M A R Y J O N E SFirstDelimiter(space or comma)LastComma delimiter is only availablewith the PC Program.3If you enter 2 (last-first), the system assumes that all names are entered in the following format:J O N E S M A R YLastSee the following for more:■ Directory Dialing on page 68.Options■ 1 (First-last)■ 2 (Last-first)Default✔ 1 (First-last)Delimiter(space or comma)FirstComma delimiter is only availablewith the PC Program.<strong>IntraMail</strong> <strong>System</strong> <strong>Guide</strong> Chapter 3: Programming ◆ 193
0200 - Tenant Options0201 - Tenant Option Programming0201 Program Entry0201 - Tenant Option Programming(Entry Range) [Default Setting]ICM + #*#* + Password (372000) + HOLD + 0201 + HOLD.CALL WAIT(9=Yes, 6=No) [Yes]HF REPLY ON ICMVOICE ANNOUNCEAUTO HANDSFREEENABLE MOHMOH ON TRANSFERENABLE BGMAC CODES IN SPDL(9=Yes, 6=No) [Yes](9=Yes, 6=No) [Yes](9=Yes, 6=No) [Yes](9=Yes, 6=No) [Yes](9=Yes, 6=No) [No](9=Yes, 6=No) [No](9=Yes, 6=No) [No]“#” KEY AC CODES (9=Yes, 6=No) [No]AC CODE TOLL LVL (0-7) [0]VIEW AC CODES(9=Yes, 6=No) [No]NAME FMT? (1=First/Last, 2=Last/First) [1]CPU RELAYDS2000 only (0=None, 1=Door, 2=Page) [No]PAGE ZONE DS2000 only (1=External paging-zone 1 and All Call, 2-7= Internal zones 2-70) [1]DOOR1 RELAY DS1000 only (0=Not assigned, 1=Analog Door Box relay control, 2=Page zone control) [0]PAGE ZONE DS1000 only (1=External paging-zone 1 and All Call, 2-7= Internal zones 2-70) [1]DOOR2 RELAY DS1000 only (0=Not assigned, 1=Analog Door Box relay control, 2=Page zone control) [0]PAGE ZONE DS1000 only (1=External paging-zone 1 and All Call, 2-7= Internal zones 2-70) [1]Press this:HOLDCONFVOL ▲ or Vol ▼CHECKCLEARTo do this:Enter (accept) data you entered.Cancel your entry and back up to the previous prompt level.Scroll to the next prompt on the same prompt level.Restore the previous entry.Clear the entry from the display (unless otherwise noted).194 ◆ Chapter 3: Programming <strong>IntraMail</strong> <strong>System</strong> <strong>Guide</strong>
1000 - Trunk Programming1003 - Trunk Options1000 - Trunk Programming1003 - Trunk OptionsDescriptionOptionsUse the 1003 - Trunk Options below to determine which trunks the <strong>IntraMail</strong> Automated Attendant shouldanswer, as well as assign an Answer Table to each of those trunks. Also use this program to set up the TandemTrunking option (required for External Transfer). For information on the other 1003 - Trunk Options (notrelated to <strong>IntraMail</strong>), see the DS1000/2000 Software Manual.Direct Termination (Day)(DAY TERM)For each trunk you want the <strong>IntraMail</strong> Automated Attendant to answer during the day and at night, enter the<strong>IntraMail</strong> master extension number (normally 700). For trunks terminated to the <strong>IntraMail</strong> master number,the setting of this option overrides the setting of 1003 - Direct Termination (Night) below. See the followingfor more:■ Start-Up Programming on page 6.■ Automated Attendant on page 42.Options■ Extension number■ UCD master number■ Voice Mail master number (e.g., 700)■ Ring Group master number■ Key Ring (entered by pressing CLEAR)Default✔ Key Ring (entered by pressing CLEAR)Direct Termination (Night)(NIGHT TERM)For each trunk you want the <strong>IntraMail</strong> Automated Attendant to answer only at night, enter the <strong>IntraMail</strong>master extension number (normally 700). Keep the following in mind:■ If a trunk is terminated to the <strong>IntraMail</strong> master number in 1003 - Direct Termination (Day) above, thattermination is also in force at night.■ If a trunk is terminated to Key Ring (entered by pressing CLEAR) during the day, the attendant’sNight (<strong>System</strong> Mode <strong>System</strong>) Key controls the day/night mode of the trunk.■ If a trunk is terminated to an extension during the day, that extension’s DND key controls the day/nightmode of the trunk.See the following for more:■ Start-Up Programming on page 6.■ Automated Attendant on page 42.Options■ Extension number■ UCD master number■ Voice Mail master number (e.g., 700)■ Ring Group master number■ Key Ring (entered by pressing CLEAR)Default✔ Key Ring (entered by pressing CLEAR)3<strong>IntraMail</strong> <strong>System</strong> <strong>Guide</strong> Chapter 3: Programming ◆ 195
1000 - Trunk Programming1003 - Trunk OptionsMOH Source(MOH SOURCE)Use this option to assign the Music On Hold Source. To enable Message On Hold for a trunk, set this optionto 4 (Message On Hold).■ See Message On Hold on page 139 for more.Options■ 0 = None■ 1 = External■ 2 = tone 1 (low pitch)■ 3 = tone 2 (high pitch)■ 4 = Message On HoldDefault✔ 1 = ExternalTandem Trunk(TANDEM TRUNK)Use this option to enable (Yes) or disable (No) a trunk’s ability to be included in an Unsupervised Conference.At least one of the trunks involved in an External Transfer must have this option enabled.■ See External Transfer on page 84 for more.Options■ N (6) - No■ Y (9) - YesDefault✔ N (6) - NoAnswer Table(ANS TABLE)Use this option to assign an Answer Table to each trunk that you want the <strong>IntraMail</strong> Automated Attendant toanswer. See the following for more:■ Start-Up Programming on page 6.■ Answer Tables on page 30.■ Automated Attendant on page 42.■ Flexible Answering Schedules on page 87.■ Multiple Company Greetings on page 147.Options■ 1-8 (Answer Table 1-8)Default✔ 1 (Answer Table 1)196 ◆ Chapter 3: Programming <strong>IntraMail</strong> <strong>System</strong> <strong>Guide</strong>
1000 - Trunk Programming1003 - Trunk Options1003 Program Entry1003 - Trunk Options Program Entry(Entry Range) [Default Setting]ICM + #*#* + Password (372000) + HOLD + 1003 + HOLD.PICK-UP GROUP (1-8, 0 = Unassigned)[0]DAY TERM (Extension, UCD master, Ring Group master, or Key Ring (Entered by pressing CLEAR)) [KEY RING]DAY OVERFLOW (Yes/No) [No]DAY OVRFLW DEST (Extension, UCD master, Ring Group master, or Key Ring (Entered by pressing CLEAR)) [300]NIGHT TERM (Extension, UCD master, Ring Group master, or Key Ring (Entered by pressing CLEAR)) [KEY RING]NIGHT OVERFLOW (Yes/No) [No]NT OVRFLW DEST (Extension, UCD master, Ring Group master, or Key Ring (Entered by pressing CLEAR)) [300]DAY RING TYPE (1=Type A, 2=Type B, 3=Type C) [Type A]NIGHT RING TYPE (1=Type A, 2=Type B, 3=Type C) [Type A]DELAY RING TYPE (1=Type A, 2=Type B, 3=Type C) [Type A]MOH SOURCE (0=None, 1=External, 2=Tone 1, 3=Tone 2, 4=Message On Hold) [External]TANDEM TRUNK (Yes/No) [No]ANS TABLE (1-16) [1]DIAL 9 GROUP (0-8) [0]EXT’S OPERATOR (Extension number) [300]Press this:To do this:HOLD Enter (accept) data you entered.CONF Cancel your entry and back up to the previous prompt level.VOL ▲ or Vol ▼ Scroll to the next prompt.CHECK Restore the previous entry.3<strong>IntraMail</strong> <strong>System</strong> <strong>Guide</strong> Chapter 3: Programming ◆ 197
1800 - Extension Options1801 - Extension Port Description1800 - Extension Options1801 - Extension Port DescriptionDescriptionOptionsUse 1801 - Extension Name to enter names for extensions. Names are required by Directory Dialing. Be surethe name entry you make is compatible with the setting of 0201 - Name Format on page 193. For informationon the other 1801 - Extension Port Description options (not related to <strong>IntraMail</strong>), see the DS1000/2000 SoftwareManual.Extension Name(NAME)Enter the name for each extension (up to 15 characters, A-Z, using upper and lower case letters). Do not usenon-alpha characters. To separate a first name from a last name, enter a space (by dialing 0) as a delimiter.By default, there are no extension names entered. You can enter names in any of the following formats:■ First■ Last■ First (space) Last■ Last (space) FirstYou can also use Name Programming from the telephone to enter extension names. For help with programmingnames, see the Name Programming chart on the next page.See the following for more:■ Directory Dialing on page 68.Options■ Characters (15 max, using upper and lower case letters).Default✔ No names entered.198 ◆ Chapter 3: Programming <strong>IntraMail</strong> <strong>System</strong> <strong>Guide</strong>
1800 - Extension Options1801 - Extension Port DescriptionName Programming ChartName Programming (03.10.08 or Higher)Press a key the indicated number of times for desired characterKey 1 Time 2 Times 3 Times 4 Times 5 Times 6 Times 7 Times 8 Times 9 Times1 & - / ‘ 12 A B C a b c 23 D E F d e f 34 G H I g h i 45 J K L j k l 56 M N O m n o 67 P Q R S p q r s 78 T U V t u v 89 W X Y Z w x y z 90 space : 0# Not used* Not usedAfter selecting a letter, press a key for another letter or wait 2 seconds for the cursor to automatically advance.Additional Name Programming OptionsHOLD Save name. In system programming, HOLD saves and exits name programming.CONF Exit name programming without saving name.VOL Up Scroll the cursor to the left.VOL Dn Scroll the cursor to the right.MW Put the cursor after the last entry.LND Delete the character under the cursor.FLASH Delete the character to the right of the cursor.CLEAR Clear the entire entry.CHECK Restore the previous entry,3<strong>IntraMail</strong> <strong>System</strong> <strong>Guide</strong> Chapter 3: Programming ◆ 199
1800 - Extension Options1801 - Extension Port DescriptionName Programming (Prior to 03.10.08)Press thiskey:Then one of these keys to enter the character in the white cell:1 2 3 4 #1 & - (dash) / (backslash) ‘(apostrophe) 12 A B C 23 D E F 34 G H I 45 J K L 56 M N O 67 P Q R S 78 T U V 89 W X Y Z 90 SPACE : 0* *#To enter characters in lower case (e.g., e instead of E), press MW before pressing the key in thefirst shaded column. Use LND to backspace over (erase) any characters you want to correct.200 ◆ Chapter 3: Programming <strong>IntraMail</strong> <strong>System</strong> <strong>Guide</strong>
1800 - Extension Options1801 - Extension Port Description1801 Program Entry1801 - Extension Port Description(Entry Range) [Default Setting]ICM + #*#* + Password (372000) + HOLD + 1801 + HOLD.EXTENSION # (Any valid extension number) [300]PT TYPEXTNAMEDOOR CHIMERELAY OWNER(The following circuit type options are available:)00=uninstalled01=22-Button Standard02=22-Button Display06=34-Button Display09=34-Button Super Display10=Door Box15=Analog Station21=2-OPX Module)[By default, digital station ports automatically detect the type of connected devicewhen the keyset, 2-OPX Module or Digital Door Box is plugged in. If no device isconnected, the default setting is circuit type 02.]• To scroll through the available types:- Press ICM (the ICM key flashes)- Press VOL ▲ or VOL ▼ to scroll through the entries.- Press HOLD to accept the displayed entry.(Extension number - view only)(Name) [No names entered]When entering names, see the Name Programming Chart on page 199.(For Door Boxes only: 0=Normal Ring Group ringing, 1=Low pitch chime pattern,2=Mid range pitch chime pattern, 3=High pitch chime pattern) [0](For Door Boxes only:)(DS1000: 0 = Relay not assigned, 1=Relay assigned to DOOR1, 2=Relayassigned to DOOR2) [0](DS2000: 0=CPU relay not assigned to Door Box, =CPRU Relay assigned toDoor Box) [0]3DSS TYPE (0=Uninstalled, 1=24-Button, 2=110 Button) [0]DSS BLOCK NUM (1-4) [1]CLASS OF SERVICE(1-15) [Extension 300=1, All others=2]STA TOLL LVL DAY (1-7, 0=No restriction) [0]STA TOLL LVL NITE (1-7, 0=No restriction) [0]ACCESS LVL(0-5) [Extension 300=5, All others=3]OVRFLW EXT (Any valid extension number) [300]Press this:HOLDCONFVOL ▲ or Vol ▼LNDCHECKCLEARDID OVRFLW B-R-D(0=No overflow, 1=Busy/DND Overflow, 2=Ring No Answer Overflow, 3=Busy/DND and Ring No Answer Overflow) [0]To do this:Enter (accept) data you entered, advance to the next prompt without changing your entry, or navigateto the next prompt level.Cancel your entry and back up to the previous prompt level.Scroll to the next prompt on the same prompt level.Erase the entry to the left of the cursor.Restore the previous entry.Clear the entry from the display (unless otherwise noted).<strong>IntraMail</strong> <strong>System</strong> <strong>Guide</strong> Chapter 3: Programming ◆ 201
1800 - Extension Options1808 - <strong>IntraMail</strong> Subscriber Mailbox Options1808 - <strong>IntraMail</strong> Subscriber Mailbox OptionsDescriptionSoftwareNote:■ The 1808 - Mailbox Type option requires software version 03.20.07 or higher.■ The 1808 - Mailbox Active option is only available in software versions prior to 03.20.07.■ The 1808 - Directory List Number option requires software version 03.20.07 or higher.Use 1808 - <strong>IntraMail</strong> Subscriber Mailbox Options to set up an extension’s Subscriber Mailbox. The <strong>IntraMail</strong>Subscriber Mailbox number is the same as the extension number.For information on the other options in 1800 - Extension Options (not related to <strong>IntraMail</strong>), see theDS1000/2000 Software Manual.OptionsExtension Number(EXTENSION)Use this option to select the extension number (and corresponding Subscriber Mailbox) you want to program.■ See Subscriber Mailbox on page 168 for more.Options■ Extension number (300-333 in DS1000, 300-427 in DS2000).Default✔ N/AMailbox Type(MBOX TYPE)(Software version 03.20.07 or higher)Use this option to set the mailbox type. For a Personal Subscriber Mailbox, enter 1. For Group Mailbox,enter 2. To disable the mailbox, enter 0. An extension’s mailbox is not accessible when it is disabled (eventhough its stored messages and configuration are retained in memory.) If disabled, a user pressing MW willinitiate a remote logon and be asked to enter their mailbox number. A voice prompt then announces, “Thatmailbox does not exist.”■ See Start-Up Programming on page 6 for more.■ See Group Mailbox on page 98 for more.■ See Guest Mailbox on page 101 for more.■ See Subscriber Mailbox on page 168 for more.Options■ 0 = None (Disabled)■ 1 = Personal■ 2 = GroupDefault✔ By default in DS1000, Subscriber Mailboxes 300-307 are Personal (1). All others are disabled (0).DS1000 has 34 Subscriber Mailboxes (300-333).✔ By default in DS2000, Subscriber Mailboxes 300-315 are Personal (1). All others are disabled (0).DS2000 has 128 Subscriber Mailboxes (300-427).Mailbox Active(MAILBOX ACTIVE)(Software versions prior to 03.20.07)Use this option to enable or disable the mailbox. An extension’s mailbox is not accessible when it is disabled(even though its stored messages and configuration are retained in memory.) If disabled, a user pressing MWwill initiate a remote logon and be asked to enter their mailbox number. A voice prompt then announces,“That mailbox does not exist.”202 ◆ Chapter 3: Programming <strong>IntraMail</strong> <strong>System</strong> <strong>Guide</strong>
1800 - Extension Options1808 - <strong>IntraMail</strong> Subscriber Mailbox Options■ See Start-Up Programming on page 6 for more.■ See Subscriber Mailbox on page 168 for more.Options■ N (6) - No■ Y (9) - YesDefault✔ By default in DS1000, Subscriber Mailboxes 300-307 are active (Y). All others are inactive (N).DS1000 has 34 Subscriber Mailboxes (300-333).✔ By default in DS2000, Subscriber Mailboxes 300-315 are active (Y). All others are inactive (N).DS2000 has 128 Subscriber Mailboxes (300-427).Number of Messages(NUMBER OF MSGS)Use this option to set the maximum number of messages that can be left in the Subscriber Mailbox. If acaller tries to leave a message once this limit is reached, they hear, “That mailbox is full.” <strong>IntraMail</strong> thenhangs up.■ See Message Storage Limit on page 145 for more.Options■ 0-99 messages- To conserve storage space, enter 0 for all unused mailboxes.Default✔ 20 messagesMessage Playback(MESSAGE PLAYBK)Use this option to set the Subscriber Mailbox message playback order. When a subscriber listens to theirmessages, <strong>IntraMail</strong> can play the oldest messages first (first-in-first-out, or FIFO), or the newest messagesfirst (last-in-first-out, or LIFO).■ See Message Playback Direction on page 141 for more.Options■ F (3) - FIFO (first-in-first-out, or oldest messages first)■ L (5) - LIFO (last-in-first-out, or newest messages first)Default✔ F (3) - FIFO (first-in-first-out)Auto Erase/Save of Messages(MESSAGE OPTION)Use this option to determine what happens when a Subscriber Mailbox user completely listens to a new messageand then exits their mailbox without either saving (SA) or erasing (E) the message. Depending on thesetting of this option, <strong>IntraMail</strong> will either automatically save or erase the message. If the mailbox userhangs up before listening to the entire new message, <strong>IntraMail</strong> retains the message as a new message.■ See Auto Erase or Save on page 40 for more.Options■ E (3) - Erase- After the subscriber listens to the entire new message and hangs up, <strong>IntraMail</strong> erases the message.■ S (7) - Save- After the subscriber listens to the entire new message and hangs up, <strong>IntraMail</strong> saves the message.Default✔ S (7) - Save (see above).3<strong>IntraMail</strong> <strong>System</strong> <strong>Guide</strong> Chapter 3: Programming ◆ 203
1800 - Extension Options1808 - <strong>IntraMail</strong> Subscriber Mailbox OptionsMessage Retention(MSG RETENTION)This feature is currently not available.Use this option to determine how long a Subscriber Mailbox will retain held and saved messages. If a messageis left in a Subscriber Mailbox longer than this interval, <strong>IntraMail</strong> deletes it.■ Message Retention on page 144 for more.Options■ 1-90 days■ Indefinite (0)Default✔ Indefinite (0)Recording Conversation Beep(REC CONV BEEP)Use this option to enable or disable the Conversation Record beep. If enabled, all parties on a call will hearthe voice prompt Recording followed by a beep when the extension user initiates Conversation Record. Ifdisabled, the voice prompt will not occur. When you disable the Conversation Record beep, the followingvoice prompts do not occur while <strong>IntraMail</strong> records the conversation:■ “Recording” (followed by a beep)■ “That mailbox is full” (if the mailbox message storage capacity is reached)■ “You have reached the recording limit” (if the recorded message is too long)■ See Conversation Record on page 61 for more.Options■ N (6) - No■ Y (9) - YesDefault✔ Y (9) - YesMessage Waiting Lamp(UPDATE MW LAMP)Use this option to enable or disable Message Waiting lamping at the extension associated with the Subscribermailbox. For Subscriber Mailboxes, you should leave this option enabled. For Guest Mailboxes, youshould leave this option disabled.■ See Guest Mailbox on page 101 for more.■ Disabling this option will also disable Message Notification. See Message Notification on page 133for more.■ See Message Waiting Lamp on page 146 for more.■ See Subscriber Mailbox on page 168 for more.Options■ N (6) - No■ Y (9) - YesDefault✔ Y (9) - YesAuto Attendant Do Not Disturb(AUTO-ATT DND)Use this option to enable or disable Auto Attendant Do Not Disturb. When a subscriber enables Auto AttendantDo Not Disturb, an Automated Attendant caller will route directly to the mailbox, hear the greeting, andbe asked to leave a message.A subscriber can also enable Auto Attendant Do Not Disturb while recording their mailbox greeting.■ See Auto Attendant Do Not Disturb on page 37 for more.204 ◆ Chapter 3: Programming <strong>IntraMail</strong> <strong>System</strong> <strong>Guide</strong>
1800 - Extension Options1808 - <strong>IntraMail</strong> Subscriber Mailbox OptionsOptions■ N (6) - No■ Y (9) - YesDefault✔ N (6) - NoForced Unscreened Transfer(FORCE UTRF)Use this option to enable or disable Automated Attendant Forced Unscreened Transfer for the SubscriberMailbox. If enabled, each Screened Transfer (TRF) to the extension is converted to an Unscreened Transfer(UTRF). If disabled, Screened Transfers from the Automated Attendant occur normally.■ See Forced Unscreened Transfer on page 90 for more.Options■ N (6) - No■ Y (9) - YesDefault✔ N (6) - NoAuto Time Stamp(AUTO TIME STAMP)Use this option to enable or disable Auto Time Stamp for the Subscriber Mailbox. If enabled, after the subscriberlistens to a message <strong>IntraMail</strong> will announce the time and date the message was left. Auto TimeStamp will also announce the message sender (if known).A subscriber can also enable Auto Time Stamp from their mailbox.■ See Auto Time Stamp on page 41 for more.Options■ N (6) - No■ Y (9) - YesDefault✔ N (6) - No<strong>System</strong> Administrator(SYSTEM ADMIN)Use this option to designate the Subscriber Mailbox as a <strong>System</strong> Administrator. This allows the subscriber touse the SA options after logging onto their mailbox.■ See <strong>System</strong> Administrator on page 171 for more.Options■ N (6) - No■ Y (9) - YesDefault✔ N (6) - NoDialing Option(DIALING OPTION)Dialing Option provides additional dialing options for Next Call Routing Mailbox calls (see Next Call RoutingMailbox below). If enabled, a caller who accesses the Subscriber Mailbox to leave a message can dialany of the options in the Next Call Routing Mailbox’s Dial Action Table. If disabled, the caller can only dial0 (to use the Next Call Routing Mailbox’s 0 action).■ See Next Call Routing Mailbox on page 148.Options■ N (6) - No■ Y (9) - YesDefault✔ N (6) - No3<strong>IntraMail</strong> <strong>System</strong> <strong>Guide</strong> Chapter 3: Programming ◆ 205
1800 - Extension Options1808 - <strong>IntraMail</strong> Subscriber Mailbox OptionsNext Call Routing Mailbox(NEXT CALLRT MBOX)Use this option to assign a Next Call Routing Mailbox to the Subscriber Mailbox. This provides callers withadditional dialing options while listening to a Subscriber Mailbox recorded or default greeting. The digitsthe caller can dial depends on the setting of the Next Call Routing Mailbox and Dialing Option options.■ For a detailed explanation of the interaction of these two programs, turn to Dialing Options while Listeningto a Subscriber Mailbox Greeting on page 148.■ For an explanation of the options a caller can dial while recording, see Record and Send a Message onpage 158.See the following features for more:■ Auto Attendant Do Not Disturb on page 37.■ Call Forward to a Mailbox on page 47.■ Exiting a Mailbox on page 78.■ Leaving a Message on page 107.■ Next Call Routing Mailbox on page 148Options■ Call Routing Mailbox Number (1-3 digits)■ UND (Undefined - entered by pressing CLEAR)Default✔ 0 (Call Routing Mailbox 000)- By default, Call Routing Mailbox numbers are 000=007.Directory List Number(DIRECTORY NUM)(Software version 03.20.07 or higher)Use this option to specify the Directory List to which the Subscriber Mailbox belongs. When setting up DirectoryDialing Mailboxes, you must specify which Directory List you want the Directory Dialing Mailbox touse. The Directory Dialing Mailbox can only call Subscriber Mailboxes that belong to the list it is programmedto use. The entries for this option are 1-8 (lists 1-8), 0 (belongs to no lists), or * (belongs to all lists).■ See Directory Dialing on page 68 for more.Options■ 1-8 (Directory List 1-8)■ * (Belongs to all lists)■ 0 (Belongs to no lists)Default✔ 0 (Belongs to no lists)206 ◆ Chapter 3: Programming <strong>IntraMail</strong> <strong>System</strong> <strong>Guide</strong>
1800 - Extension Options1808 - <strong>IntraMail</strong> Subscriber Mailbox Options1808 Program Entry1808 - <strong>IntraMail</strong> Mailbox Options Program EntryICM + #*#* + Password (372000) + HOLD + 1808 + HOLD.EXTENSIONPress this:HOLDCONFVOL ▲ or Vol ▼CHECKCLEAR(Software version 03.20.07 or higher)MAILBOX TYPE (0=None, 1=Personal, 2=Group) [See below]DS1000: 300-307 = 1. All others = 0.DS2000: 300-315 = 1. All others = 0.(Software versions prior to 03.20.07)MAILBOX ACTIVE (Yes/No) [See below]DS1000: 300-307 = Yes. All others = No.DS2000: 300-315 = Yes. All others = No.NUMBER OF MSGS (0-99) [20]MESSAGE PLAYBK (3=FIFO, 5=LIFO) [FIFO]MESSAGE OPTION (3=Erase, 7=Save) [Save]MSG RETENTION (1-90 Days, 0=IND) [IND]REC CONV BEEP (Yes/No) [Yes]UPDATE MW LAMP (Yes/No) [Yes]AUTO-ATT DND (Yes/No) [No]FORCE UTRF (Yes/No) [No]AUTO TIME STAMP (Yes/No) [No]SYSTEM ADMIN (Yes/No) [300 = Yes, All others = No]DIALING OPTION (Yes/No) [No]NEXT CALLRT MBOX (000-015, CLEAR=UND) [UND]DIRECTORY NUM (1-8=Lists 1-8, 0=No lists, *=All Lists) [0]To do this:Enter (accept) data you entered, advance to the next prompt without changing your entry,or navigate to the next prompt level.Cancel your entry and back up to the previous prompt level.Scroll to the next prompt on the same prompt level.Restore the previous entry.Clear the entry from the display (unless otherwise noted).3<strong>IntraMail</strong> <strong>System</strong> <strong>Guide</strong> Chapter 3: Programming ◆ 207
8000 - Voice Mail8001 - Voice Mail Setup8000 - Voice Mail8001 - Voice Mail SetupDescriptionOptionsUse the 8001 - Voice Mail Setup to enable <strong>IntraMail</strong>. If you install <strong>IntraMail</strong> in a system that has no othervoice mail installed, the options below will be automatically set for you. You do not need to make any entries.Voice Mail Type(V-MAIL TYP)Use this option to set the type of voice mail (I) connected to your system.■ See Start-Up Programming on page 6 for more on <strong>IntraMail</strong> installation and startup.Options■ E (3) - External (such as VANGARD Mail).■ I (4) - <strong>IntraMail</strong>■ UltraMail (set automatically if the UltraMail PCB is installed).■ 0 - NoneDefault✔ With <strong>IntraMail</strong> (and no other voice mail) installed, the default for this option is I (4).Voice Mail Master Extension Number(V-MAIL MST EXT)Use this option to set the voice mail master extension number (e.g., 700). In most installations, you shouldnot change this option from its default setting (700).■ See Start-Up Programming on page 6 for more on <strong>IntraMail</strong> installation and startup.Options■ Any valid extension number within the system’s number plan.Default✔ 7008001 Program Entry8001 - Voice Mail Setup Program Entry(Entry Range) [Default Setting]ICM + #*#* + Password (372000) + HOLD + 8001 + HOLD.V-MAIL TYP (Automatically set to INTRAMAIL when <strong>IntraMail</strong> is installed)Press this:HOLDCONFVOL ▲ or Vol ▼CHECKV-MAIL MST EXT (Automatically set to 700 when <strong>IntraMail</strong> is installed)To do this:Enter (accept) data you entered.Cancel your entry and back up to the previous prompt level.Scroll to the next prompt.Restore the previous entry.208 ◆ Chapter 3: Programming <strong>IntraMail</strong> <strong>System</strong> <strong>Guide</strong>
8000 - Voice Mail8002 - Voice Mail Port Options (Part 1)8002 - Voice Mail Port Options (Part 1)DescriptionOptionsUse the 8002 - Voice Mail Options (Part 1) to set various options for the system’s Voice Mail ports. Each ofthese options applies globally to all Voice Mail ports.Name(NAME)Use this option to modify the name for all Voice Mail ports. The system displays this name when a displaykeyset user calls a Voice Mail port (either by pressing MW or dialing the master number). You should alwaysend the name with the # character. The system substitutes the port number for the #. Using the default nameVM PORT # for example, the keyset display shows VM PORT 1 when calling port 1.■ See Start-Up Programming on page 6 for more on <strong>IntraMail</strong> installation and startup.Options■ When entering names, see Name Programming Chart on page 199.■ Consider leaving the option at its default setting.Default✔ VM PORT # (The system substitutes the port number for the # when calling the port).Class of Service(CLASS OF SERVICE)Use this option to set the Class of Service for all Voice Mail ports. Normally, you use the Voice Mail portClass of Service to control Message Notification callouts. See the following for more:■ Class of Service in the DS1000/2000 Software Manual.■ See Message Notification on page 133.Options■ 1-15 (Class of Service 1-15)Default✔ 2Toll Restriction Level (Day)(TOLL LEVEL DAY)Use this option to set the day mode Toll Restriction Level for all Voice Mail ports. This allows you to restrictMessage Notification callouts placed during the day. See the following for more:■ Toll Restriction in the DS1000/2000 Software Manual.■ See Message Notification on page 133.Options■ 0-7 (Toll Restriction Level 0-7)Default✔ 0 (Toll Restriction Level 0)Toll Restriction Level (Night)(TOLL LEVEL NITE)Use this option to set the night mode Toll Restriction Level for all Voice Mail ports. This allows you torestrict Message Notification callouts placed at night. See the following for more:■ Toll Restriction in the DS1000/2000 Software Manual.■ See Message Notification on page 133.Options■ 0-7 (Toll Restriction Level 0-7)Default✔ 0 (Toll Restriction Level 0)3<strong>IntraMail</strong> <strong>System</strong> <strong>Guide</strong> Chapter 3: Programming ◆ 209
8000 - Voice Mail8002 - Voice Mail Port Options (Part 1)Operator(OPERATOR)Use this option to determine which extension is called when a Voice Mail port dials 0.■ See Dial Action Table on page 64 for more.Options■ Extension number (300-333 in DS1000, 300-427 in DS2000)Default✔ 300Dial 9 Group(DIAL 9 GROUP)Use this option to specify the dial-9 group for Voice Mail ports. Whenever a Voice Mail port dials 9, the systemaccesses the first available trunk in the group specified by this option. This may occur when Voice Mailis processing Message Notification callouts.■ See Message Notification on page 133.Options■ 90-98 (Trunk Groups 90-98)Default✔ 90 (Trunk Group 90)Outgoing Trunk Group Access(LINE GROUP n)Use this option to control outgoing Trunk Group Access for Voice Mail ports. A Voice Mail port can dial outon a Trunk Group allowed in this option. This may occur when Voice Mail is processing Message Notificationcallouts. You make a separate entry for each Trunk Group (0-9).■ See Message Notification on page 133.Options■ Yes■ NoDefault✔ Yes (for all Trunk Groups)210 ◆ Chapter 3: Programming <strong>IntraMail</strong> <strong>System</strong> <strong>Guide</strong>
8000 - Voice Mail8002 - Voice Mail Port Options (Part 1)8002 Program Entry8002 - Voice Mail Options (Part 1) Program Entry(Entry Range) [Default Setting]ICM + #*#* + Password (372000) + HOLD + 8002 + HOLD.Press this:HOLDCONFVOL ▲ or Vol ▼CHECKNAME (Alpha numerics - see Name Programming Chart on page 199) [VM PORT #]CLASS OF SERVICE (1-15) [1]TOLL LEVEL DAY (0-7) [0]TOLL LEVEL NITE (0-7) [0]OPERATOR (300-333 in DS1000, 300-427 in DS2000) [300]DIAL 9 GROUP (90-98) [90]LINE GROUP 0-8 (Yes/No) [Yes]Enter (accept) data you entered.To do this:Cancel your entry and back up to the previous prompt level.Scroll to the next prompt.Restore the previous entry.3<strong>IntraMail</strong> <strong>System</strong> <strong>Guide</strong> Chapter 3: Programming ◆ 211
8000 - Voice Mail8003 - Voice Mail Port Options (Part 2)8003 - Voice Mail Port Options (Part 2)DescriptionOptionsUse the 8003 - Voice Mail Options (Part 2) to set trunk access for Voice Mail ports. The settings you make inthis option apply globally to all Voice Mail ports.Trunk Number(LINE NUMBER)Use this option to select the trunk you want to program. Trunk numbers are 1-6 in DS1000 and 1-64 in DS2000.Options■ Trunk number (1-6 in DS1000, 1-64 in DS2000)Default✔ N/ATrunk Access Type[N/A]For the trunk selected above, use this option to select the access type. All Voice Mail ports use the accesstype specified in this option for the selected trunk. A Voice Mail port can on dial out on a specific trunk onlyif it is allowed in this option. This may occur when Voice Mail is processing Message Notification callouts.You make a separate entry for each trunk.■ See Message Notification on page 133.Options■ 0 (No access)■ 1 (Incoming only)■ 2 (Outgoing only)■ 3 (Full access)Default✔ 3 (Full access)8003 Program Entry8003 - Voice Mail Options (Part 2) Program Entry(Entry Range) [Default Setting]ICM + #*#* + Password (372000) + HOLD + 8003 + HOLD.LINE NUMBER (1-6 in DS1000, 1-64 in DS2000) [N/A]Press this:HOLDCONFVOL ▲ or Vol ▼CHECKSelect Access Type (0=No Access, 1=Incoming Only, 2=Outgoing Only, 3=Full Access) [Full Access]To do this:Enter (accept) data you entered.Cancel your entry and back up to the previous prompt level.Scroll to the next prompt.Restore the previous entry.212 ◆ Chapter 3: Programming <strong>IntraMail</strong> <strong>System</strong> <strong>Guide</strong>
8000 - Voice Mail8004 - <strong>IntraMail</strong> <strong>System</strong> Options8004 - <strong>IntraMail</strong> <strong>System</strong> OptionsDescriptionOptionsUse 8004 - <strong>IntraMail</strong> <strong>System</strong> Options to set up the <strong>IntraMail</strong> system-wide options.Subscriber Message Length(SUBS MSG LENGTH)Use this option to set the maximum length of recorded messages for:■ Subscriber Mailbox users dialing RS to record and send a message.■ Extension users leaving a message in a Subscriber Mailbox.■ Outside Automated Attendant callers accessing a mailbox via a GOTO command and then dialing RSto record and send a message.■ Subscriber Mailbox Greetings.■ Announcement Messages.■ Call Routing Mailbox Instruction Menus.Note: The length of a Conversation Record is 10 times the Subscriber Message Length. Since the ConversationRecord time cannot exceed 4095 seconds, any settings in Subscriber Message Length larger than 409have no effect on the length of recorded conversations.See the following for more:■ Announcement Message on page 27.■ Automated Attendant on page 42.■ Call Routing Mailbox on page 49.■ Conversation Record on page 61.■ Greeting on page 94.■ Message On Hold on page 139.■ Subscriber Mailbox on page 168Options■ 1-4095 seconds.Default✔ 120 seconds.Non-Subscriber Message Length(MBOX MSG LENGTH)Use this option to set the maximum length of recorded messages for:■ Automated Attendant callers leaving a message or Quick Message in a Subscriber Mailbox.■ Outside callers transferred by an extension user to a Subscriber Mailbox.See the following for more:■ Automated Attendant on page 42.■ Message Length on page 131.■ Quick Message on page 156.■ Subscriber Mailbox on page 168Options■ 1-4095 seconds.Default✔ 120 seconds.Message Backup/Go Ahead Time(MSG BKUP/ADV TIME)Use this option to set the backup/go ahead interval. This interval sets how far <strong>IntraMail</strong> backs up when a userdials B while recording or listening to a message. This interval also sets how far <strong>IntraMail</strong> jumps ahead3<strong>IntraMail</strong> <strong>System</strong> <strong>Guide</strong> Chapter 3: Programming ◆ 213
8000 - Voice Mail8004 - <strong>IntraMail</strong> <strong>System</strong> Optionswhen a user dials G while listening to a message.See the following for more:■ See Listening to Messages on page 109.■ Message Length on page 131.Options■ 1-60 Seconds.Default✔ 5 Seconds.Fax Extension(FAX TRANSFER EXT)Use this option to specify which system extension is the fax machine. When the Automated Attendantanswers a call and detects fax (CNG) tone, it automatically transfers the call to this extension.■ See Fax Detection on page 86 for more.Options■ UND (Undefined, entered by pressing CLEAR)■ Extension number (e.g., 320).Default✔ UND (Undefined, entered by pressing CLEAR)Digital Pager Callback Number(PAGER CALLBACK NUM)Use this option to set the Digital Pager Callback Number portion of the Message Notification callout numberfor a digital pager. This is the portion of the callout number that is appended to the pager service telephonenumber. Normally, this option should be X*M#, where:- X is the number of the extension that generated the notification.- * is a visual delimiter (to make the pager display easier to read).- M is the number of new messages in the extension’s mailbox.- # is the digit normally used by the pager service for positive disconnect.■ See Message Notification on page 133 for more.Options■ Digits (12 maximum, using 0-9, # and *)■ M (Number of messages) (Entered by pressing MW)■■N (None) (Entered by pressing CLEAR)X (Extension number) (Entered by pressing ICM)<strong>IntraMail</strong> automatically replaces the X command with the number of the extension that initiallyreceived the message.Default✔ X*M#Delay in Dialing Digital Pager Callback Number(PAGER DIAL DELAY)Use this option to set the delay that occurs just before <strong>IntraMail</strong> dials the Digital Pager Callback Numberportion of the Message Notification callout number for a digital pager. Set this delay so the pager service hasenough time to connect to the digital pager before sending the callback number. Your pager service may beable to help you determine the best value for this option (0-99 seconds). By default, this option is 9 seconds.When placing a digital pager notification, the system:1. Seizes the trunk specified.2. Dials the user-entered notification number (in MSG + OP + N).3. Waits the 8004 - Delay in Dialing the Digital Pager Callback Number interval.4. Dials the number entered in 8004 - Digital Pager Callback Number.The system assumes that the notification number will complete dialing approximately 4 seconds after trunk214 ◆ Chapter 3: Programming <strong>IntraMail</strong> <strong>System</strong> <strong>Guide</strong>
8000 - Voice Mail8004 - <strong>IntraMail</strong> <strong>System</strong> Optionsseizure. This means that, by default, the Digital Pager Callback Number will be dialed into the pager serviceabout 13 seconds after trunk seizure.■ See Message Notification on page 133 for more.Options■ 0-99 secondsDefault✔ 9 secondsWait Between Digital Pager Callout Attempts(NTFY PAGER INTVL)Use this option to set minimum time (1-255 minutes) between unacknowledged or unanswered digital pagerMessage Notification callouts. (A subscriber acknowledges a digital pager notification by logging onto theirmailbox.) After this interval expires, <strong>IntraMail</strong> will try the callout again (for up to the number of times set in8004 - Number of Callout Attempts). By default, this interval is 15 minutes.If the system dials the callout number and the pager service is busy, it will retry the number in one minute.■ See Message Notification on page 133 for more.Options■ 1-255 minutesDefault✔ 15 minutesWait Between Non-Pager Callout Attempts(NTFY N-PGR INTVL)Use this option to set the minimum time (1-255 minutes) between non-pager Message Notification calloutsin which the destination answers, says “Hello,” dials 1 to acknowledge and then enters the wrong securitycode. By default, this interval is 20 minutes.■ See Message Notification on page 133 for more.Options■ 1-255 minutesDefault✔ 20 minutesWait Between Busy Non-Pager Callout Attempts(NTFY BUSY INTVL)Use this option to set how long <strong>IntraMail</strong> will wait (1-255 seconds), after it dials a busy non-pager calloutdestination, before retrying the callout number. The default setting for this option is 15 minutes.■ See Message Notification on page 133 for more.Options■ 1-255 minutesDefault✔ 15 minutesWait Between RNA Non-Pager Callout Attempts(NTFY RNA INTVL)Use this option to set how long <strong>IntraMail</strong> will wait (1-255 minutes), after it dials an unanswered non-pagercallout destination, before retrying the callout number. The default setting for this option is 30 minutes.3There are three types of unanswered non-pager callouts:■ If the callout rings the destination longer than the 8004 - Wait for Answer Non-Pager CalloutAttempts option.■ If the destination answers, says “Hello” (or the system detects answer supervision) and then hangs upwithout dialing 1 to log onto their mailbox. This typically happens if someone unfamiliar with notificationanswers the callout, or if the callout is picked up by an answering machine.<strong>IntraMail</strong> <strong>System</strong> <strong>Guide</strong> Chapter 3: Programming ◆ 215
8000 - Voice Mail8004 - <strong>IntraMail</strong> <strong>System</strong> Options■If the destination answers and then hangs up without saying “Hello.” This typically happens if someoneunfamiliar with the notification answers the callout (like the above example), or if the call is picked upby an answering machine with insufficient outgoing message volume.■ See Message Notification on page 133 for more.Options■ 1-255 minutesDefault✔ 30 minutesWait for Answer Non-Pager Callout Attempts(NTFY RNA RINGS)If a non-pager callout rings the destination longer than this interval (1-99 rings), <strong>IntraMail</strong> marks the call asunanswered (Ring No Answer) and hangs up. The default setting for this option is 5 rings.■ See Message Notification on page 133 for more.Options■ 1-99 ringsDefault✔ 5 ringsNumber of Callout Attempts(NTFY CALL ATTMPTS)Use this option to set how many times (1-99 attempts) <strong>IntraMail</strong> will retry an incomplete Message Notificationcallout. This total includes unacknowledged callouts, callouts to a busy destination, and callouts to anunanswered destination. This option applies to pager and non-pager callouts. The default setting for thisoption is 5.■ See Message Notification on page 133 for more.Options■ 1-99 attemptsDefault✔ 5 attemptsSend Pager Callout Until Acknowledged(RETRY UNTIL ACK)When this option is enabled (Yes), <strong>IntraMail</strong> will continue to retry a digital pager Message Notification calloutuntil the notification is acknowledged. If this option is disabled (N), <strong>IntraMail</strong> will retry a digital pagerMessage Notification the number of time specified in 8004-Number of Callout Attempts. This option doesnot apply to Message Notification callouts to telephone numbers. The default setting for this option is disabled(N).A digital pager notification is considered acknowledged when the recipient logs onto the mailbox.■ See Message Notification on page 133 for more.Options■ Y (Yes)■ N (No)Default✔ N (No)216 ◆ Chapter 3: Programming <strong>IntraMail</strong> <strong>System</strong> <strong>Guide</strong>
8000 - Voice Mail8004 - <strong>IntraMail</strong> <strong>System</strong> Options8004 Program Entry8004 - <strong>IntraMail</strong> <strong>System</strong> Options Program Entry(Entry Range) [Default Setting]ICM + #*#* + Password (372000) + HOLD + 8004 + HOLD.SUBS MSG LENGTH (1-4095) [120]MBOX MSG LENGTH (1-4095) [120]MSG BKUP.ADV TIME (1-60) [5]FAX TRANSFER EXT (Extension number, UND (Undefined, entered by pressing CLEAR)) [UND]PAGER CALLBACK NUM (No entry required)PAGER C-BACK (Digits, M (MW), N (CLEAR), X (ICM)) [No entry]PAGER DIAL DELAY (0-99) [9]NTFY PAGER INTVL (1-255) [15]NTFY N-PGR INTVL (1-255) [20]NTFY BUSY INTVL (1-255) [15]NTFY RNA INTVL (1-255) [30]NTFY RNA RINGS (1-99) [5]NTFY CALL ATTMPTS (1-99) [5]RETRY UNTIL ACK (Yes/No) [No]3Press this:HOLDCONFVOL ▲ or Vol ▼LNDCHECKCLEARTo do this:Enter (accept) data you entered, advance to the next prompt without changing your entry,or navigate to the next prompt level.Cancel your entry and back up to the previous prompt level.Scroll to the next prompt on the same prompt level.Erase the entry to the left of the cursor.Restore the previous entry.Clear the entry from the display (unless otherwise noted).<strong>IntraMail</strong> <strong>System</strong> <strong>Guide</strong> Chapter 3: Programming ◆ 217
8000 - Voice Mail8005 - <strong>IntraMail</strong> Master Mailbox Options8005 - <strong>IntraMail</strong> Master Mailbox OptionsDescriptionSoftwareNote:■■■The ability to assign a Master Mailbox as a Directory Dialing Mailbox requires software version03.20.07 or higher.Master Mailboxes are enabled by default in software version 03.20.07 or higher. They are disabled bydefault in prior versions.Master Mailbox programming is simplified in software version 03.20.07 or higher.Use 8005 - Master Mailbox Options to set up the 16 Master Mailboxes (600-607 and 700-707). The MasterMailboxes are additional mailboxes used for Ring Group and UCD Hunting Group overflow destinations. Youcan also use Master Mailboxes for Guest Mailboxes (i.e., Subscriber Mailboxes without associated telephones),additional Call Routing Mailboxes, or additional Announcement Mailboxes. See the following for more:■ Guest Mailbox on page 101.■ Master Mailbox on page 122.You can also set up a Master Mailbox as a Directory Dialing Mailbox. An outside caller can route to a MasterMailbox programmed as a Directory Dialing Mailbox from:■ The Answer Table’s Answer Schedule Override Mailbox, Default Mailbox, or Routing Mailbox.■ A GOTO action in the Dial Action Table of a Call Routing Mailbox.■ See Directory Dialing on page 68 for more.OptionsMailbox Number(EXTENSION)Use this option to select the Master Mailbox you want to program. If setting up overflow mailboxes for RingGroup or UCD Hunting Group master numbers, be sure the Master Mailbox extension number matches therespective group number. For example, the Master Mailbox used as the overflow destination for Ring Group600 should be mailbox 600. Refer to the following when selecting the Master Mailbox extension number:■ Group Mailbox on page 98.■ Using Master Mailboxes for UCD Hunting Group Overflow on page 123.■ Using Master Mailboxes for Group Ring Automated Attendant Recall on page 124.■ Using Master Mailboxes as Additional Call Routing Mailboxes on page 124.■ Using Master Mailboxes as Additional Announcement Mailboxes on page 125.■ Using Master Mailboxes as Guest Mailboxes on page 125.■ Using Master Mailboxes for Directory Dialing on page 125.Options■ Master Mailbox number (600-607, 700-707).Default✔ N/AMailbox Type(MAILBOX TYPE)Use this option to set the Master Mailbox type. There are 4 types: Call Routing (1), Announcement (2), Subscriber(3) and Directory Dialing (4). Refer to the following when setting up the Master Mailbox type:■ Using Master Mailboxes for UCD Hunting Group Overflow on page 123.■ Using Master Mailboxes for Group Ring Automated Attendant Recall on page 124.■ Using Master Mailboxes as Additional Call Routing Mailboxes on page 124.■ Using Master Mailboxes as Additional Announcement Mailboxes on page 125.■ Using Master Mailboxes as Guest Mailboxes on page 125.■ Using Master Mailboxes for Directory Dialing on page 125.Options■ 1 (Call Routing)218 ◆ Chapter 3: Programming <strong>IntraMail</strong> <strong>System</strong> <strong>Guide</strong>
8000 - Voice Mail8005 - <strong>IntraMail</strong> Master Mailbox Options■ 2 (Announcement)■ 3 (Subscriber)■ 4 (Directory Dialing)■ 0 (Undefined)Default✔ 3 (Subscriber)Mailbox Active(MAILBOX ACTIVE)Use this option to activate the selected mailbox. <strong>IntraMail</strong> can not use the mailbox unless it is active. See thefollowing for more:■ Announcement Mailbox on page 22.■ Call Routing Mailbox on page 49.■ Directory Dialing on page 68.■ Subscriber Mailbox on page 168.Options■ Y (Yes)■ N (No)Default✔ Y (Yes)Options for Call Routing Mailboxes (1)The following options are available to Master Mailboxes assigned as Call Routing Mailboxes. For more oneach option, refer to 8006 - <strong>IntraMail</strong> Routing Mailboxes: Options for Call Routing Mailboxes on page 228.■ Dial Action Table■ Screened Transfer Timeout■ Time Limit for Dialing Commands■ Fax Detection3Options for Announcement Mailboxes (2)The following options are available to Master Mailboxes assigned as Announcement Mailboxes. For more oneach option, refer to 8006 - <strong>IntraMail</strong> Routing Mailboxes: Options for Announcement Mailboxes on page 229.■ Next Call Routing Mailbox■ Repeat Count■ Hang Up AfterOptions for Subscriber Mailboxes (3)The following options are available to Master Mailboxes assigned as Subscriber Mailboxes. For more oneach option, refer to 1808 - <strong>IntraMail</strong> Subscriber Mailbox Options on page 202.■ Number of Messages■ Message Playback■ Auto Erase/Save of Messages■ Message Retention■ Recording Conversation Beep■ Message Waiting Lamp■ Auto Attendant Do Not Disturb■ Forced Unscreened Transfer■ Auto Time Stamp■ <strong>System</strong> Administrator■ Alternate Call Routing Mailbox■ Next Call Routing Mailbox<strong>IntraMail</strong> <strong>System</strong> <strong>Guide</strong> Chapter 3: Programming ◆ 219
8000 - Voice Mail8005 - <strong>IntraMail</strong> Master Mailbox OptionsOptions for Directory Dialing Mailboxes (4)The following options are available to Master Mailboxes assigned as Directory Dialing Mailboxes.Minimum Number of Letters Required(MIN NUM LETTERS)Use this option to specify the minimum number of letters the caller should dial in order to be routed by theDirectory Dialing Mailbox. Callers must dial this minimum number of letters, followed by #. The entries forthis option are 1-3.■ See Directory Dialing on page 68 for more.Options■ 1-3 (Minimum number of letters)Default✔ 1 (Minimum number of letters = 1)Directory List Number to Use(DIRECTORY NUM)Use this option to specify which Directory List the Directory Dialing Mailbox should use. The DirectoryDialing Mailbox can only call Subscriber Mailboxes that are in the list specified by this option. The entriesfor this option are 1-8 (use lists 1-8).By default, the Directory Number is 1 (list 1).■ See Directory Dialing on page 68 for more.Options■ 1-8 (Directory List 1-8)Default✔ 1 (Directory List 1)Extension Name Match(NAME MATCH)Use this option to determine which portion of the extension’s programmed name Directory Dialing will useto route the call. The options are 1 (first) or 2 (last). The setting you choose in this option depends on howyou set up 0201-Name Format. For example:0201-Name Format Setting 8006-Extension Name Match Entered Name Directory Dialing Routes by:1 (first-last) 1 (first) Mary Jones Mary2 (last) Jones2 (last-first) 1 (first) Jones2 (last) Mary■ See Directory Dialing on page 68 for more.Options■ 1 (First portion of programmed name)■ 2 (Second portion of programmed name)Default✔ 1 (First portion of programmed name)220 ◆ Chapter 3: Programming <strong>IntraMail</strong> <strong>System</strong> <strong>Guide</strong>
8000 - Voice Mail8005 - <strong>IntraMail</strong> Master Mailbox OptionsUnscreened or Screened Transfer(UTRF OR STRF)Use this option to define the action Directory Dialing uses when routing a call. The entries for this option are1 (Screened Transfer) or 2 (Unscreened Transfer).■ See Directory Dialing on page 68 for more.Options■ 1 (Screened Transfer)■ 2 (Unscreened Transfer)Default✔ 1 (Screened Transfer)Screened Transfer Timeout(SCRN TRF TIMEOUT)Use this option to set how long a Screened Transfer (STRF) from the Directory Dialing Mailbox willring an unanswered extension before recalling. The entry range for this option is 0-255 seconds. A settingof 0 = no recall.■ The 0401-Transfer Recall interval has no interaction with this timer.■ See Directory Dialing on page 68 for more.Options■ 1-255 seconds■ 0 (No recall)Default✔ 15 secondsTime Limit for Dialing Commands(DIALING TIMEOUT)This option determines how long <strong>IntraMail</strong> will wait for the caller connected to the Directory Dialing Mailboxto dial before repeating the Directory Dialing Message. If the caller doesn’t dial within three repeats ofthe message, <strong>IntraMail</strong> routes the call to the Next Call Routing Mailbox for the Directory Dialing Mailbox.The entry range for this option is 0-99 seconds. A setting of 0 = no timeout.■ See Directory Dialing on page 68 for more.Options■ 1-99 seconds■ 0 (No timeout)Default✔ 5 (5 seconds)Fax Detection(INCOMING FAX DET)Use this option to enable or disable Fax Detection for the Directory Dialing Mailbox. If enabled (Y), theDirectory Dialing Mailbox will detect incoming fax CNG tone. The fax will then route to the company faxmachine according to the settings of 8004-Fax Extension. If disabled (N), the Directory Dialing Mailboxwill not detect incoming fax calls.■ See Directory Dialing on page 68 for more.Options■ Y (Yes)■ N (No)Default✔ N (No)3<strong>IntraMail</strong> <strong>System</strong> <strong>Guide</strong> Chapter 3: Programming ◆ 221
8000 - Voice Mail8005 - <strong>IntraMail</strong> Master Mailbox OptionsNext Call Routing Mailbox(NEXT CALLRT MBOX)Use this option to specify the Next Call Routing Mailbox (000-015) for the Directory Dialing Mailbox. If aNext Call Routing Mailbox is specified, the following will occur:■ If the caller dials 0 while listening to the Directory Dialing Message, they route to the 0 action programmedinto the Dial Action Table associated with the Next Call Routing Mailbox.■ If the caller dials # while listening to the Directory Dialing Message, they route immediately to theNext Call Routing Mailbox and listen to the recorded Instruction Menu Message for that mailbox.■ See Directory Dialing on page 68 for more.Options■ 000-015 (Routing Mailbox 000-015)■ UND (Undefined - entered by pressing CLEAR)Default✔ UND (Undefined)222 ◆ Chapter 3: Programming <strong>IntraMail</strong> <strong>System</strong> <strong>Guide</strong>
8000 - Voice Mail8005 - <strong>IntraMail</strong> Master Mailbox Options8005 Program Entry (03.20.07 or Higher)8005 - Master Mailbox Options Program Entry (Page 1 of 2)(Entry Range) [Default Setting]ICM + #*#* + Password (372000) + HOLD + 8005 + HOLD.EXTENSION (Master Mailbox number 600-607 or 700-707)MAILBOX TYPE (1 = Call Routing, 2 = Announcement, 3 = Subscriber, 4 = Directory Dialing,0 = Undefined) [Subscriber]For Call Routing Mailboxes (Type 1)MAILBOX ACTIVE (Yes/No) [Yes]DIAL ACTION TABLE (1-16) [1]SCRN TRF TIMEOUT (0-255 seconds) [15]DIALING TIMEOUT (0-99 seconds) [5]INCOMING FAX DET (Yes/No) [No]For Announcement Mailboxes (Type 2)MAILBOX ACTIVE (Yes/No) [Yes]NEXT CALLRT MBOX (000-015, CLEAR = UND) [UND]NUM REPEATS (0-10) [0]HANG-UP (Yes/No) [No]For Subscriber Mailboxes (Type 3)MAILBOX ACTIVE (Yes/No) [Yes]NUMBER OF MSGS (0-99) [20]MESSAGE PLAYBK (3=FIFO, 5=LIFO) [FIFO]MESSAGE OPTION (3=Erase, 7=Save)[Save]MSG RETENTION (1-90 Days, CLEAR = IND) [IND]REC CONV BEEP (Yes/No) [Yes]UPDATE MW LAMP (Yes/No) [Yes]AUTO-ATT DND (Yes/No) [No]FORCE UTRF (Yes/No) [No]AUTO TIME STAMP (Yes/No) [No]SYSTEM ADMIN (Yes/No) [No]DIALING OPTION (Yes/No) [No]NEXT CALLRT MBOX (000-015, CLEAR = UND) [UND]For Directory Dialing Mailboxes (Type 4)MAILBOX ACTIVE (Yes/No) [Yes]MIN NUM LETTERS (1-3) [1]DIRECTORY NUM (1-8) [1]ALPHA NAME TOKEN (1 or 2) [1]UTRF or STRF (1=STRF, 2=UTRF) [STRF]SCRN TRF TIMEOUT (0-255 seconds) [15]DIALING TIMEOUT (0-99 seconds) [Y15]3<strong>IntraMail</strong> <strong>System</strong> <strong>Guide</strong> Chapter 3: Programming ◆ 223
8000 - Voice Mail8005 - <strong>IntraMail</strong> Master Mailbox Options8005 - Master Mailbox Options Program Entry (Page 2 of 2)(Entry Range) [Default Setting]INCOMING FAX DET (Yes/No) [Yes]NEXT CALLRT MBOX (000-015, CLEAR = UND) [UND]Press this:HOLDCONFVOL ▲ or Vol ▼LNDCHECKCLEARTo do this:Enter (accept) data you entered, advance to the next prompt without changing your entry,or navigate to the next prompt level.Cancel your entry and back up to the previous prompt level.Scroll to the next prompt on the same prompt level.Erase the entry to the left of the cursor.Restore the previous entry.Clear the entry from the display (unless otherwise noted).224 ◆ Chapter 3: Programming <strong>IntraMail</strong> <strong>System</strong> <strong>Guide</strong>
8000 - Voice Mail8005 - <strong>IntraMail</strong> Master Mailbox Options8005 Program Entry8005 - Master Mailbox Options Program Entry (Prior to 03.20.07)(Entry Range) [Default Setting]ICM + #*#* + Password (372000) + HOLD + 8005 + HOLD.EXTENSION (Master Mailbox number 600-607 or 700-707)MAILBOX TYPE (1 = Call Routing, 2 = Announcement, 3 = Subscriber, 0 = Undefined) [Subscriber]For Call Routing Mailboxes (Type 1)DIAL ACTION TABLE (1-16) [1]SCRN TRF TIMEOUT (0-255 seconds) [15]DIALING TIMEOUT (0-99 seconds) [5]INCOMING FAX DET (Yes/No) [No]To program the MAILBOX ACTIVE option, press Vol Up (not HOLD) afterselecting a Mailbox type.MAILBOX ACTIVE (Yes/No) [No]For Announcement Mailboxes (Type 2)NEXT CALLRT MBOX (000-015, CLEAR = UND) [UND]NUM REPEATS (0-10) [0]HANG-UP (Yes/No) [No]To program the MAILBOX ACTIVE option, press Vol Up (not HOLD) afterselecting a Mailbox type.MAILBOX ACTIVE (Yes/No) [No]For Subscriber Mailboxes (Type 3)NUMBER OF MSGS (0-99) [20]3MESSAGE PLAYBK (3=FIFO, 5=LIFO) [FIFO]MESSAGE OPTION (3=Erase. 7=Save)[Save]MSG RETENTION (1-90 Days, CLEAR = IND) [IND]REC CONV BEEP (Yes/No) [Yes]UPDATE MW LAMP (Yes/No) [Yes]AUTO-ATT DND (Yes/No) [No]FORCE UTRF (Yes/No) [No]AUTO TIME STAMP (Yes/No) [No]SYSTEM ADMIN (Yes/No) [No]DIALING OPTION (Yes/No) [No]NEXT CALLRT MBOX (000-015, CLEAR = UND) [UND]To program the MAILBOX ACTIVE option, press Vol Up (not HOLD) afterselecting a Mailbox type.MAILBOX ACTIVE (Yes/No) [No]<strong>IntraMail</strong> <strong>System</strong> <strong>Guide</strong> Chapter 3: Programming ◆ 225
8000 - Voice Mail8005 - <strong>IntraMail</strong> Master Mailbox Options8005 - Master Mailbox Options Program Entry (Prior to 03.20.07)(Entry Range) [Default Setting]Press this:HOLDCONFVOL ▲ or Vol ▼LNDCHECKCLEARTo do this:Enter (accept) data you entered, advance to the next prompt without changing your entry,or navigate to the next prompt level.Cancel your entry and back up to the previous prompt level.Scroll to the next prompt on the same prompt level.Erase the entry to the left of the cursor.Restore the previous entry.Clear the entry from the display (unless otherwise noted).226 ◆ Chapter 3: Programming <strong>IntraMail</strong> <strong>System</strong> <strong>Guide</strong>
8000 - Voice Mail8006 - <strong>IntraMail</strong> Routing Mailboxes8006 - <strong>IntraMail</strong> Routing MailboxesDescriptionSoftwareNote:■■The ability to assign a Routing Mailbox as a Directory Dialing Mailbox requires software version03.20.07 or higher.Routing Mailbox programming is simplified in software version 03.20.07 or higher.Use 8006 - <strong>IntraMail</strong> Routing Mailboxes to set up the 16 <strong>IntraMail</strong> Routing Mailboxes. Routing Mailboxescan be Announcement Mailboxes, Call Routing Mailboxes, or Directory Dialing Mailboxes. See thefollowing for more:■ Announcement Mailbox on page 22.■ Call Routing Mailbox on page 49.■ Directory Dialing on page 68.When using Directory Dialing, an outside caller can route to a Routing Mailbox programmed as a DirectoryDialing Mailbox from:■ The Answer Table’s Answer Schedule Override Mailbox, Default Mailbox, or Routing Mailbox.■ A GOTO action in the Dial Action Table of a Call Routing Mailbox.OptionsMailbox Number(EXTENSION)Use this option to select the Routing Mailbox (0-15) you want to program. See the following for more:■ Announcement Mailbox on page 22.■ Call Routing Mailbox on page 49.■ Directory Dialing on page 68.Options■ Routing Mailbox number (0-15)Default✔ N/A3Mailbox Type(MALBOX TYPE)Use this option to assign a mailbox type to the selected Routing Mailbox. Routing Mailboxes can be CallRouting Mailboxes, Announcement Mailboxes, or Directory Dialing Mailboxes. See the following for more:■ Announcement Mailbox on page 22.■ Call Routing Mailbox on page 49.■ Directory Dialing on page 68.Options■ 0 (Undefined)■ 1 (Call Routing Mailbox)■ 2 (Announcement Mailbox)■ 4 (Directory Dialing Mailbox)Default✔ Routing Mailboxes 0-7 are Call Routing Mailboxes (1).✔ Routing Mailboxes 8-15 are Announcement Mailboxes (2).Mailbox Active(MAILBOX ACTIVE)Use this option to activate the selected mailbox. <strong>IntraMail</strong> can not use the mailbox unless it is active. See thefollowing for more:■ Announcement Mailbox on page 22.■ Call Routing Mailbox on page 49.<strong>IntraMail</strong> <strong>System</strong> <strong>Guide</strong> Chapter 3: Programming ◆ 227
8000 - Voice Mail8006 - <strong>IntraMail</strong> Routing Mailboxes■ Directory Dialing on page 68.Options■ Y (Yes)■ N (No)Default✔ Y (Yes)Options for Call Routing MailboxesDial Action Table(DIAL ACTION TABLE)Use this option to assign the Dial Action Table to the Call Routing Mailbox. The Dial Action Table definesthe dialing options for the call Routing Mailbox.■ See Call Routing Mailbox on page 49 and Dial Action Table on page 64 for more.Options■ 1-16 (Dial Action Table 1-16)Default✔ 1 (Dial Action Table 1)Screened Transfer Timeout(SCRN TRF TIMEOUT)Use this option to set how long a Screened Transfer (TRF) from the Automated Attendant will ring an unansweredextension before recalling.■ This option has a similar function as Customize: Mailbox Options: Call Routing: [Call Handling]Options: Delay Rings Before Redirect Transfer in UltraMail.■ The 0401-Transfer Recall interval has no interaction with this timer.■ See Screened Transfer on page 161 for more.Options■ 0-255 seconds- Entering 0 causes immediate recall.Default✔ 15 secondsTime Limit for Dialing Commands(DIALING TIMEOUT)This option determines how long <strong>IntraMail</strong> will wait for an Automated Attendant caller who doesn’t dialbefore routing the call to the Timeout destination.■ Be sure your Dial Action Tables have a Timeout action programmed.■ See Call Routing Mailbox on page 49 and Dial Action Table on page 64 for more.If the caller waits too long to dial:■ When the associated Dial Action Table has a Timeout action programmed, the caller routes to that destination.■ When the associated Dial Action Table does not have a Timeout action programmed, the InstructionMenu repeats 3 times and then <strong>IntraMail</strong> hangs up.Options■ 0-99 seconds- Entering 0 causes the Automated Attendant to immediately route callers to the Timeout destinationprogrammed in the active Dial Action Table.Default✔ 5 seconds228 ◆ Chapter 3: Programming <strong>IntraMail</strong> <strong>System</strong> <strong>Guide</strong>
8000 - Voice Mail8006 - <strong>IntraMail</strong> Routing MailboxesFax Detection(INCOMING FAX DET)Use this option to enable or disable Fax Detection for the Call Routing Mailbox. In enabled, the <strong>IntraMail</strong>Automated Attendant (when using this Call Routing Mailbox) will detect incoming fax CNG tone. The faxcall will then route to the company fax machine according to the setting of 8001 - Fax Extension onpage 214. If disabled, the Automated Attendant will not detect incoming fax calls.■ See Fax Detection on page 86 for more.Options■ Y (Yes)■ N (No)Default✔ N (No)Options for Announcement MailboxesNext Call Routing MailboxIf you set up an Announcement Mailbox to answer Automated Attendant calls, use this option to provide additionalrouting options to the Automated Attendant callers. This option interacts with Repeat Count and HangUp After below. For a detailed explanation of the interaction of these options, turn to the following charts:■ Direct Announcement Mailbox Routing on page 150.■ Routed Announcement Mailbox Routing on page 151.■ Also see Announcement Mailbox on page 22 and Next Call Routing Mailbox on page 148 for more.Options■ Call Routing Mailbox Number (000-015)- By default, Call Routing Mailboxes are 000-007.■ UND (Undefined - entered by pressing CLEAR)Default✔ UND (Undefined - entered by pressing CLEAR)Repeat Count(NUM REPEATS)Enter the number of times you want the Announcement Mailbox message to repeat to callers. After anAnnouncement Mailbox caller initially listens to the message, it will repeat the number of times specified inthis option. This option interacts with Next Call Routing Mailbox and Hang Up After when providing routingoptions. For a detailed explanation of the interaction of these options, turn to the following charts:■ Direct Announcement Mailbox Routing on page 150.■ Routed Announcement Mailbox Routing on page 151.3■ Also see Announcement Mailbox on page 22 and Next Call Routing Mailbox on page 148 for more.Options■ 0 (No repeats)■ 1-10 (Announcement repeats 1-10 times)Default✔ 0 (No repeats)Hang Up After(HANG-UP)Use this option along with Next Call Routing Mailbox and Repeat Count above to provide additional routingoptions to Automated Attendant callers. For a detailed explanation of the interaction of these options, turn tothe following charts:■ Direct Announcement Mailbox Routing on page 150.■ Routed Announcement Mailbox Routing on page 151.<strong>IntraMail</strong> <strong>System</strong> <strong>Guide</strong> Chapter 3: Programming ◆ 229
8000 - Voice Mail8006 - <strong>IntraMail</strong> Routing Mailboxes■ Also see Announcement Mailbox on page 22 and Next Call Routing Mailbox on page 148 for more.Options■ Y (Yes)■ N (No)Default✔ N (No)Options for Directory Dialing MailboxesMinimum Number of Letters Required(MIN NUM LETTERS)Use this option to specify the minimum number of letters the caller should dial in order to be routed by theDirectory Dialing Mailbox. Callers must dial this minimum number of letters, followed by #. The entries forthis option are 1-3.■ See Directory Dialing on page 68 for more.Options■ 1-3 (Minimum number of letters)Default✔ 1 (Minimum number of letters = 1)Directory List Number to Use(DIRECTORY NUM)Use this option to specify which Directory List the Directory Dialing Mailbox should use. The DirectoryDialing Mailbox can only call Subscriber Mailboxes that are in the list specified by this option. The entriesfor this option are 1-8 (use lists 1-8).By default, the Directory Number is 1 (list 1).■ See Directory Dialing on page 68 for more.Options■ 1-8 (Directory List 1-8)Default✔ 1 (Directory List 1)Extension Name Match(NAME MATCH)Use this option to determine which portion of the extension’s programmed name Directory Dialing will useto route the call. The options are 1 (first) or 2 (last). The setting you choose in this option depends on howyou set up 0201-Name Format. For example:0201-Name Format Setting 8006-Extension Name Match Entered Name Directory Dialing Routes by:1 (first-last) 1 (first) Mary Jones Mary2 (last) Jones2 (last-first) 1 (first) Jones2 (last) Mary■ See Directory Dialing on page 68 for more.Options■ 1 (First portion of programmed name)■ 2 (Second portion of programmed name)Default✔ 1 (First portion of programmed name)230 ◆ Chapter 3: Programming <strong>IntraMail</strong> <strong>System</strong> <strong>Guide</strong>
8000 - Voice Mail8006 - <strong>IntraMail</strong> Routing MailboxesUnscreened or Screened Transfer(UTRF OR STRF)Use this option to define the action Directory Dialing uses when routing a call. The entries for this option are1 (Screened Transfer) or 2 (Unscreened Transfer).■ See Directory Dialing on page 68 for more.Options■ 1 (Screened Transfer)■ 2 (Unscreened Transfer)Default✔ 1 (Screened Transfer)Screened Transfer Timeout(SCRN TRF TIMEOUT)Use this option to set how long a Screened Transfer (STRF) from the Directory Dialing Mailbox will ringan unanswered extension before recalling. The entry range for this option is 0-255 seconds. A setting of 0= no recall.■ The 0401-Transfer Recall interval has no interaction with this timer.■ See Directory Dialing on page 68 for more.Options■ 1-255 seconds■ 0 (No recall)Default✔ 15 secondsTime Limit for Dialing Commands(DIALING TIMEOUT)This option determines how long <strong>IntraMail</strong> will wait for the caller connected to the Directory Dialing Mailboxto dial before repeating the Directory Dialing Message. If the caller doesn’t dial within three repeats ofthe message, <strong>IntraMail</strong> routes the call to the Next Call Routing Mailbox for the Directory Dialing Mailbox.The entry range for this option is 0-99 seconds. A setting of 0 = no timeout.■ See Directory Dialing on page 68 for more.Options■ 1-99 seconds■ 0 (No timeout)Default✔ 5 (5 seconds)Fax Detection(INCOMING FAX DET)Use this option to enable or disable Fax Detection for the Directory Dialing Mailbox. If enabled (Y), theDirectory Dialing Mailbox will detect incoming fax CNG tone. The fax will then route to the company faxmachine according to the settings of 8004-Fax Extension. If disabled (N), the Directory Dialing Mailboxwill not detect incoming fax calls.■ See Directory Dialing on page 68 for more.Options■ Y (Yes)■ N (No)Default✔ N (No)3<strong>IntraMail</strong> <strong>System</strong> <strong>Guide</strong> Chapter 3: Programming ◆ 231
8000 - Voice Mail8006 - <strong>IntraMail</strong> Routing MailboxesNext Call Routing Mailbox(NEXT CALLRT MBOX)Use this option to specify the Next Call Routing Mailbox (000-015) for the Directory Dialing Mailbox. If aNext Call Routing Mailbox is specified, the following will occur:■ If the caller dials 0 while listening to the Directory Dialing Message, they route to the 0 action programmedinto the Dial Action Table associated with the Next Call Routing Mailbox.■ If the caller dials # while listening to the Directory Dialing Message, they route immediately to theNext Call Routing Mailbox and listen to the recorded Instruction Menu Message for that mailbox.■ See Directory Dialing on page 68 for more.Options■ 000-015 (Routing Mailbox 000-015)■ UND (Undefined - entered by pressing CLEAR)Default✔ UND (Undefined)232 ◆ Chapter 3: Programming <strong>IntraMail</strong> <strong>System</strong> <strong>Guide</strong>
8000 - Voice Mail8006 - <strong>IntraMail</strong> Routing Mailboxes8006 Program Entry (03.20.07 or Higher)8006 - Routing Mailbox Options Program Entry(Entry Range) [Default Setting]ICM + #*#* + Password (372000) + HOLD + 8006 + HOLD.EXTENSION (Routing Mailbox number 000-015)MAILBOX TYPE (1 = Call Routing, 2 = Announcement, 4 = Directory Dialing, 0 = Undefined) [Subscriber]For Call Routing Mailboxes (Type 1)MAILBOX ACTIVE (Yes/No) [Yes]DIAL ACTION TABLE (1-16) [1]SCRN TRF TIMEOUT (0-255 seconds) [15]DIALING TIMEOUT (0-99 seconds) [5]INCOMING FAX DET (Yes/No) [No]For Announcement Mailboxes (Type 2)MAILBOX ACTIVE (Yes/No) [Yes]Press this:HOLDCONFVOL ▲ or Vol ▼LNDCHECKCLEARNEXT CALLRT MBOX (000-015, CLEAR = UND) [UND]NUM REPEATS (0-10) [0]HANG-UP (Yes/No) [No]For Directory Dialing Mailboxes (Type 4)MAILBOX ACTIVE (Yes/No) [Yes]MIN NUM LETTERS (1-3) [1]DIRECTORY NUM (1-8) [1]ALPHA NAME TOKEN (1 or 2) [1]UTRF or STRF (1=STRF, 2=UTRF) [STRF]SCRN TRF TIMEOUT (0-255 seconds) [15]DIALING TIMEOUT (0-99 seconds) [Y15]INCOMING FAX DET (Yes/No) [Yes]NEXT CALLRT MBOX (000-015, CLEAR = UND) [UND]To do this:Enter (accept) data you entered, advance to the next prompt without changing your entry,or navigate to the next prompt level.Cancel your entry and back up to the previous prompt level.Scroll to the next prompt on the same prompt level.Erase the entry to the left of the cursor.Restore the previous entry.Clear the entry from the display (unless otherwise noted).3<strong>IntraMail</strong> <strong>System</strong> <strong>Guide</strong> Chapter 3: Programming ◆ 233
8000 - Voice Mail8006 - <strong>IntraMail</strong> Routing Mailboxes8006 Program Entry (Prior to 03.20.07)8006 - Routing Mailboxes Program Entry(Entry Range) [Default Setting]ICM + #*#* + Password (372000) + HOLD + 8006 + HOLD.EXTENSION (Routing Mailbox number 0-15)MAILBOX TYPE (1 = Call Routing, 2 = Announcement))CALLRTANNCDIAL ACTION TABLE (1-16) [1]SCRN TRF TIMEOUT (0-255 seconds) [15]DIALING TIMEOUT (0-99 seconds) [5]INCOMING FAX DET (Yes/No) [No]NEXT CALLRT MBOX (000-015, CLEAR=UND) [UND]NUM REPEATS (0-10) [0]Press this:HOLDCONFVOL ▲ or Vol ▼LNDCHECKCLEARHANG-UP (Yes/No) [No]To program the MAILBOX ACTIVE option, press Vol Up (not HOLD) after selecting aMailbox type.MAILBOX ACTIVE (Yes/No) [No]To do this:Enter (accept) data you entered, advance to the next prompt without changing your entry,or navigate to the next prompt level.Cancel your entry and back up to the previous prompt level.Scroll to the next prompt on the same prompt level.Erase the entry to the left of the cursor.Restore the previous entry.Clear the entry from the display (unless otherwise noted).234 ◆ Chapter 3: Programming <strong>IntraMail</strong> <strong>System</strong> <strong>Guide</strong>
8000 - Voice Mail8007 - <strong>IntraMail</strong> Answer Tables8007 - <strong>IntraMail</strong> Answer TablesDescriptionOptionsUse 8007 - Answer Tables to set up the <strong>IntraMail</strong> Answer Tables. <strong>IntraMail</strong> provides 8 Answer Tables (1-8).■ See Answer Tables on page 30 for more.By default, Answer Table 1 has a single schedule that runs Monday through Friday from 8:30AM to5:00PM. This schedule and the Default Mailbox both use Call Routing Mailbox 000.Answer Table(SCHEDULE TABLE)Use this option to select the Answer Table you want to program.■ See Answer Tables on page 30 for more.Options■ Answer Table number (1-8)Default✔ N/AAnswer Schedule Override(OVERRIDE)Use this option to enable or disable Answer Schedule Override for the selected Answer Table. If enabled(and you make an entry for Override Mailbox below), the active Answer Table will route calls to the OverrideMailbox.■ See Answer Schedule Override on page 28 for more.Options■ Y (Yes)■ N (No)Default✔ N (No)Override Mailbox(OVERRIDE)Use this option to specify the mailbox to which Automated Attendant calls should route when you alsoenable Answer Schedule Override above.■ If the Override Mailbox is an Announcement Mailbox, the outside caller will hear the recordedannouncement. Depending on how the Announcement Mailbox is programmed, <strong>IntraMail</strong> will thenhang up, reroute the call, or provide additional dialing options.■ If the Override Mailbox is a Call Routing Mailbox, the outside caller will hear the instruction menuand can dial any options allowed by the associated Dial Action Table.■ If the Override Mailbox is a Subscriber Mailbox, the outside caller hears the mailbox greeting (ifrecorded) and can leave a message.■ See Answer Schedule Override on page 28 for more.Options■ Announcement Mailbox number (000-015)■ Call Routing Mailbox number (000-015)■ Master Mailbox number (600-607, 700-707)■ Subscriber Mailbox number (300-427)■ UND (Undefined - entered by pressing CLEAR)Default✔ UND (Undefined - entered by pressing CLEAR)3<strong>IntraMail</strong> <strong>System</strong> <strong>Guide</strong> Chapter 3: Programming ◆ 235
8000 - Voice Mail8007 - <strong>IntraMail</strong> Answer TablesDefault Mailbox(DEFAULT MBOX#)Use this option to set the Answer Table’s Default Mailbox. <strong>IntraMail</strong> uses the Default Mailbox whenever anAnswer Schedule is not in effect. By default, this occurs at all times other than Monday through Fridayfrom 8:30 AM to 5:00 PM.■ If the Default Mailbox is an Announcement Mailbox, the outside caller will hear the recordedannouncement. Depending on how the Announcement Mailbox is programmed, <strong>IntraMail</strong> will thenhang up, reroute the call, or provide additional dialing options.■ If the Default Mailbox is a Call Routing Mailbox, the outside caller will hear the instruction menu andcan dial any options allowed by the associated Dial Action Table.■ If the Default Mailbox is a Subscriber Mailbox, the outside caller hears the mailbox greeting (ifrecorded) and can leave a message.■ See Answer Schedule Override on page 28 for more.Options■ Announcement Mailbox number (000-015)■ Call Routing Mailbox number (000-015)■ Master Mailbox number (600-607, 700-707)■ Subscriber Mailbox number (300-427)■ UND (Undefined - entered by pressing CLEAR)Default✔ 000 (Call Routing Mailbox 000)Next Answer Table(NEXT TABLE#)When 10 Answer Schedules within an Answer Table are not sufficient, use this option to link two AnswerTables together. <strong>IntraMail</strong> treats the two linked tables as a single 20 entry Answer Table.■ See Answer Tables on page 30 for more.Options■ Answer Table (1-8)■ UND (Undefined - entered by pressing CLEAR)Default✔ UND (Undefined - entered by pressing CLEAR)Schedule Entry(SCHEDULE ENTRY#)For the selected Answer Table, use this option to select the Answer Schedule you want to program. <strong>IntraMail</strong>provides 10 Answer Schedules (1-10) for each of the 8 Answer Tables.■ See Answer Tables on page 30 for more.Options■ Answer Schedule number (1-10)Default✔ N/ASchedule Type(ENTRY TYPE)Use this option to assign a Schedule Type to the selected Answer Schedule. The Schedule Type determineshow the Answer Schedule answers calls.■ See Answer Tables on page 30 for more.The schedule can be one of the following types:1. Day of the WeekA Type 1 Answer Schedule runs on a specific day of the week. For this type of schedule, you select:- The day of the week the schedule should run:- The schedule start time.- The schedule end time.236 ◆ Chapter 3: Programming <strong>IntraMail</strong> <strong>System</strong> <strong>Guide</strong>
8000 - Voice Mail8007 - <strong>IntraMail</strong> Answer Tables- The Call Routing or Announcement Mailbox used to answer calls.2. Range of DaysA Type 2 Answer Schedule runs for a range of days. For this type of schedule, you select:- The day of the week the schedule should start.- The day of the week the schedule should stop.- The time on the start day the schedule should start.- The time on the stop day the schedule should stop.- The Call Routing or Announcement Mailbox used to answer the calls.3. DateA type 3 Answer Schedule runs only on a specific day of the year. For this type of schedule, youselect:- The specific date the schedule should run.- On the selected date, the time the schedule should start.- On the selected date, the time the schedule should stop.- The Call Routing or Announcement Mailbox used to answer the calls.Options■ 1 (Day of the Week)■ 2 (Range of Days)■ 3 (Date)■ UND (Undefined - entered by pressing CLEAR)Default✔ Answer Schedule 1 for Answer Table 1 is type 2 (Range of Days). It runs Monday through Fridayfrom 8:30 AM to 5:00 PM.✔ All other Answer Schedules are UND (Undefined - entered by pressing CLEAR).3<strong>IntraMail</strong> <strong>System</strong> <strong>Guide</strong> Chapter 3: Programming ◆ 237
8000 - Voice Mail8007 - <strong>IntraMail</strong> Answer TablesType 1 (Day of the Week) Answer Schedule OptionsRouting Mailbox Number(MAILBOX NUM)Use this option to select the Routing Mailbox that will answer calls when this Answer Schedule is active.Routing Mailboxes can be either Subscriber, Call Routing or Announcement Mailboxes.■ If the Routing Mailbox is an Announcement Mailbox, the outside caller will hear the recordedannouncement. Depending on how the Announcement Mailbox is programmed, <strong>IntraMail</strong> will thenhang up, reroute the call, or provide additional dialing options.■ If the Routing Mailbox is a Call Routing Mailbox, the outside caller will hear the instruction menuand can dial any options allowed by the associated Dial Action Table.■ If the Routing Mailbox is a Subscriber Mailbox, the outside caller hears the mailbox greeting (ifrecorded) and can leave a message.■ See Answer Tables on page 30 for more.Options■ Announcement Mailbox number (000-015)■ Call Routing Mailbox number (000-015)■ Master Mailbox number (600-607, 700-707)■ Subscriber Mailbox number (300-427)■ UND (Undefined - entered by pressing CLEAR)Default✔ There are no Type 1 (Day of the Week) Answer Schedules by default.✔ Once enabled, the default for this option is UND (Undefined - entered by pressing CLEAR).Day of the Week(DAY OF WEEK (1-7))Use this option to specify the day of the week this Answer Schedule should be active.■ See Answer Tables on page 30 for more.Options■ 1 = SUN (Sunday)■ 2 = MON (Monday)■ 3 = TUE (Tuesday)■ 4 = WED (Wednesday)■ 5 = THU (Thursday)■ 6 = FRI (Friday)■ 7 = SAT (Saturday)Default✔ There are no Type 1 (Day of the Week) Answer Schedules by default.✔ Once enabled, the default for this option is 1 (SUN - Sunday).Schedule Start Time(ST TIME (HH:MM))Use this option to specify the time the schedule should start on the day specified in Day of Week above whenthis Answer Schedule is active.■ See Answer Tables on page 30 for more.Options■ Time of day (in 24-hour format)Default✔ There are no Type 1 (Day of the Week) Answer Schedules by default.✔ Once enabled, the default for this option is 0000 (12:00 midnight).Schedule Stop Time(EN TIME (HH:MM))Use this option to specify the time the schedule should end on the day specified in Day of Week above when238 ◆ Chapter 3: Programming <strong>IntraMail</strong> <strong>System</strong> <strong>Guide</strong>
8000 - Voice Mail8007 - <strong>IntraMail</strong> Answer Tablesthe Answer Schedule is active.■ See Answer Tables on page 30 for more.Options■ Time of day (in 24-hour format)Default✔ There are no Type 1 (Day of the Week) Answer Schedules by default.✔ Once enabled, the default for this option is 0000 (12:00 midnight).Type 1 (Day of Week) ExampleIn the following example:■ Schedule 1 is a Range of Days schedule and runs Sunday through Wednesday from 8:00 AM to 10:30AM and answers with Call Routing Mailbox 001.■ Schedule 2 is a Range of Days schedule and runs Sunday through Wednesday from 10:30 AM to11:30 AM and answers with Announcement Mailbox 008.■ Schedule 3 is a Day of Week schedule and runs on Wednesday from 9:00 AM to 10:00 AM and usesAnnouncement Mailbox 009.■ The Default Mailbox (usually Call Routing Mailbox 000) answers at all other times not covered by theSchedules 1-3.■ When setting up Answer Tables with multiple types, build the Answer Schedules in the followingorder:- Range of Days- Day of Week- DateANSWER TABLE = 1SCHEDULE ENTRY # = 1ENTRY TYPE - 2SCHEDULE ENTRY # = 2ENTRY TYPE - 2SCHEDULE ENTRY # = 3ENTRY TYPE - 1Type 1 (Day of Week) ExampleMAILBOX NUM = 1START DAY = 1END DAY = 4ST TIME (HH:MM) = 0800EN TIME (HH:MM) = 1030MAILBOX NUM = 8START DAY = 1END DAY = 4ST TIME (HH:MM) = 1030EN TIME (HH:MM) = 1130MAILBOX NUM = 9DAY OF WEEK = 3ST TIME (HH:MM) = 0900EN TIME (HH:MM) = 10003<strong>IntraMail</strong> <strong>System</strong> <strong>Guide</strong> Chapter 3: Programming ◆ 239
8000 - Voice Mail8007 - <strong>IntraMail</strong> Answer TablesType 2 (Range of Days) Answer Schedule OptionsRouting Mailbox Number(MAILBOX NUM)Use this option to select the Routing Mailbox that will answer calls when this Answer Schedule is active.Routing Mailboxes can be either Subscriber, Call Routing or Announcement Mailboxes.■ If the Routing Mailbox is an Announcement Mailbox, the outside caller will hear the recordedannouncement. Depending on how the Announcement Mailbox is programmed, <strong>IntraMail</strong> will thenhang up, reroute the call, or provide additional dialing options.■ If the Routing Mailbox is a Call Routing Mailbox, the outside caller will hear the instruction menuand can dial any options allowed by the associated Dial Action Table.■ If the Routing Mailbox is a Subscriber Mailbox, the outside caller hears the mailbox greeting (ifrecorded) and can leave a message.■ See Answer Tables on page 30 for more.Options■ Announcement Mailbox number (000-015)■ Call Routing Mailbox number (000-015)■ Master Mailbox number (600-607, 700-707)■ Subscriber Mailbox number (300-427)■ UND (Undefined - entered by pressing CLEAR)Default✔ Answer Schedule 1 for Answer Table 1 uses Routing Mailbox 000.✔ All other Answer Schedules are UND (Undefined - entered by pressing CLEAR).Schedule Start Day(START DAY (1-7))Use this option to select the day of the week on which the selected Answer Schedule should become active.(To make a schedule run continuously, make the same entry for Schedule Start Day and Schedule End Day.)■ See Answer Tables on page 30 for more.Options■ 1 = SUN (Sunday)■ 2 = MON (Monday)■ 3 = TUE (Tuesday)■ 4 = WED (Wednesday)■ 5 = THU (Thursday)■ 6 = FRI (Friday)■ 7 = SAT (Saturday)Default✔ Answer Schedule 1 for Answer Table 1 starts on Monday (2).✔ All other Answer Schedules are UND (Undefined - entered by pressing CLEAR).Schedule End Day(END DAY (1-7))Use this option to select the day of the week on which the selected Answer Schedule should stop (becomeinactive). (To make a schedule run continuously, make the same entry for Schedule Start Day and ScheduleEnd Day.)■ See Answer Tables on page 30 for more.Options■ 1 = SUN (Sunday)■ 2 = MON (Monday)■ 3 = TUE (Tuesday)■ 4 = WED (Wednesday)■ 5 = THU (Thursday)■ 6 = FRI (Friday)240 ◆ Chapter 3: Programming <strong>IntraMail</strong> <strong>System</strong> <strong>Guide</strong>
8000 - Voice Mail8007 - <strong>IntraMail</strong> Answer Tables■ 7 = SAT (Saturday)Default✔ Answer Schedule 1 for Answer Table 1 stops on Friday (6).✔ All other Answer Schedules are UND (Undefined - entered by pressing CLEAR).Schedule Start Time(ST TIME (HH:MM)Use this option to specify the time the schedule should start on the day specified in Schedule Start Day abovewhen this Answer Schedule is active. (To make a schedule run continuously, make the same entry for ScheduleStart Time and Schedule End Time.)■ See Answer Tables on page 30 for more.Options■ Time of day (in 24-hour format)Default✔ Answer Schedule 1 for Answer Table 1 starts at 8:30 AM (08:30).✔ All other Answer Schedules are UND (Undefined - entered by pressing CLEAR).Schedule Stop TimeEN TIME (HH:MM)Use this option to specify the time the schedule should stop on the day specified in Schedule End Day abovewhen this Answer Schedule is active. (To make a schedule run continuously, make the same entry for ScheduleStart Time and Schedule End Time.)■ See Answer Tables on page 30 for more.Options■ Time of day (in 24-hour format)Default✔ Answer Schedule 1 for Answer Table 1 stops at 5:00 PM (17:00).✔ All other Answer Schedules are UND (Undefined - entered by pressing CLEAR).Type 2 (Range of Days) ExampleIn the following example:■ Schedule 1 is a Range of Days schedule that runs Sunday through Wednesday from 08:30 AM to 5:00PM and answers with Call Routing mailbox 001.■ Schedule 2 is a Range of Days schedule that runs Thursday through Saturday from 08:30 AM through5:00 PM and answers with Announcement Mailbox 008.■ The Default Mailbox (usually Call Routing Mailbox 000) answers at all other times not covered bySchedules 1 and 2.■ When setting up Answer Tables with multiple types, build the Answer Schedules in the followingorder:- Range of Days- Day of Week- Date3Type 2 (Range of Days) ExampleANSWER TABLE = 1SCHEDULE ENTRY # = 1ENTRY TYPE - 2MAILBOX NUM = 1START DAY = 1END DAY = 4ST TIME (HH:MM) = 0830EN TIME (HH:MM) = 1700<strong>IntraMail</strong> <strong>System</strong> <strong>Guide</strong> Chapter 3: Programming ◆ 241
8000 - Voice Mail8007 - <strong>IntraMail</strong> Answer TablesType 2 (Range of Days) ExampleSCHEDULE ENTRY # = 2ENTRY TYPE - 2MAILBOX NUM = 8START DAY = 5END DAY = 7ST TIME (HH:MM) = 0830EN TIME (HH:MM) = 1700Type 3 (Date) Answer Schedule OptionsRouting Mailbox Number(MAILBOX NUM)Use this option to select the Routing Mailbox that will answer calls when this Answer Schedule is active.Routing Mailboxes can be either Subscriber, Call Routing or Announcement Mailboxes.■ If the Routing Mailbox is an Announcement Mailbox, the outside caller will hear the recordedannouncement. Depending on how the Announcement Mailbox is programmed, <strong>IntraMail</strong> will thenhang up, reroute the call, or provide additional dialing options.■ If the Routing Mailbox is a Call Routing Mailbox, the outside caller will hear the instruction menuand can dial any options allowed by the associated Dial Action Table.■ If the Routing Mailbox is a Subscriber Mailbox, the outside caller hears the mailbox greeting (ifrecorded) and can leave a message.■ See Answer Tables on page 30 for more.Options■ Announcement Mailbox number (000-015)■ Call Routing Mailbox number (000-015)■ Master Mailbox number (600-607, 700-707)■ Subscriber Mailbox number (300-427)■ UND (Undefined - entered by pressing CLEAR)Default✔ There are no Type 3 (Date) Answer Schedules by default.✔ Once enabled, the default for this option is UND (Undefined - entered by pressing CLEAR).Schedule Run Date(DATE (MM/DD))Use this option to select the date on which the selected Answer Schedule should become active■ See Answer Tables on page 30 for more.Options■ Month and Day (MMDD).- For example, for Christmas day enter 1225.Default✔ There are no Type 3 (Date) Answer Schedules by default.✔ Once enabled, the default for this item is 0101 (January 1).Schedule Start Time(ST TIME (HH:MM)Use this option to specify the time the schedule should start on the date specified in Schedule Run Dateabove when this Answer Schedule is active.■ See Answer Tables on page 30 for more.Options■ Time of day (in 24-hour format)242 ◆ Chapter 3: Programming <strong>IntraMail</strong> <strong>System</strong> <strong>Guide</strong>
Default✔ There are no Type 3 (Date) Answer Schedules by default.✔ Once enabled, the default for this item is 0000 (12:00 midnight).8000 - Voice Mail8007 - <strong>IntraMail</strong> Answer TablesSchedule Stop Time(EN TIME (HH:MM))Use this option to specify the time the schedule should stop on the date specified in Schedule Run Dateabove when this Answer Schedule is active.■ See Answer Tables on page 30 for more.Options■ Time of day (in 24-hour format)Default✔ There are no Type 3 (Date) Answer Schedules by default.✔ Once enabled, the default for this item is 0000 (12:00 midnight).3<strong>IntraMail</strong> <strong>System</strong> <strong>Guide</strong> Chapter 3: Programming ◆ 243
8000 - Voice Mail8007 - <strong>IntraMail</strong> Answer TablesType 3 (Date) ExampleIn the following example:■ Schedule 1 is a Range of Days schedule and runs Monday through Friday from 8:00 AM to 5:00 PMand answers with Call Routing Mailbox 001.■ Schedule 2 is a Range of Days schedule and runs Saturday and Sunday from 8:00 AM to 5:00 PM andanswers with Announcement Mailbox 008.■ Schedule 3 is a Date schedule that only runs on Christmas day from 8:00 AM to 5:00 PM and answerswith Announcement Mailbox 009.■ The Default Mailbox (usually Call Routing Mailbox 000) answers at all other times not covered bySchedules 1-3.■ When setting up Answer Tables with multiple types, build the Answer Schedules in the followingorder:- Range of Days- Day of Week- DateANSWER TABLE = 1SCHEDULE ENTRY # = 1ENTRY TYPE - 2SCHEDULE ENTRY # = 2ENTRY TYPE - 2SCHEDULE ENTRY # = 3ENTRY TYPE - 3MAILBOX NUM = 1START DAY = 2END DAY = 6Type 3 (Date) ExampleST TIME (HH:MM) = 0800EN TIME (HH:MM) = 1700MAILBOX NUM = 8START DAY = 7END DAY = 1ST TIME (HH:MM) = 0800EN TIME (HH:MM) = 1700MAILBOX NUM = 9DATE (MM/DD) = 1225ST TIME (HH:MM) = 0800EN TIME (HH:MM) = 1700244 ◆ Chapter 3: Programming <strong>IntraMail</strong> <strong>System</strong> <strong>Guide</strong>
8000 - Voice Mail8007 - <strong>IntraMail</strong> Answer Tables8007 Program Entry8007 - Answer Table Program Entry(Entry Range) [Default Setting]ICM + #*#* + Password (372000) + HOLD + 8007 + HOLD.ANSWER TABLE - Enter the table number you want to program (1-8)OVERRIDE (Yes/No) [No]OVERRIDE MBOX# (000-015, 300-427, 600-607, 700-707, CLEAR = UND) [UND]DEFAULT MBOX# (000-015, 300-427, 600-607, 700-707, CLEAR = UND) [0]NEXT TABLE# (1-8, CLEAR = UND) [UND]SCHEDULE ENTRY # - Enter the schedule number you want to program (1-10)ENTRY TYPE - Enter the Answering Schedule Type (1 = Day of Week, 2 = Range of Days,3 - Date)For Type 1 (Day of Week) (There are no Type 1 schedules by default)MAILBOX NUMDAY OF WEEK (1-7)ST TIME (HH:MM)EN TIME (HH:MM)For Type 2 (Range of Days) (Only schedule 1 is defined as follows)MAILBOX NUM (0-15) [0]3START DAY (1-7) (1=SUN through 7=SAT) [MON]END DAY (1-7) (1=SUN through 7=SAT) [FRI]ST TIME (HH:MM) (00:00=23:59) [08:30]EN TIME (HH:MM) (00:00=23:59) [17:00]For Type 3 (Date) (There are no Type 3 schedules by default)MAILBOX NUMDATE (MM/DD)ST TIME (HH:MM)EN TIME (HH:MM)Press this:HOLDCONFVOL ▲ or Vol ▼LNDCHECKCLEARTo do this:Enter (accept) data you entered, advance to the next prompt without changing your entry,or navigate to the next prompt level.Cancel your entry and back up to the previous prompt level.Scroll to the next prompt on the same prompt level.Erase the entry to the left of the cursor.Restore the previous entry.Clear the entry from the display (unless otherwise noted).<strong>IntraMail</strong> <strong>System</strong> <strong>Guide</strong> Chapter 3: Programming ◆ 245
8000 - Voice Mail8008 - <strong>IntraMail</strong> Dial Action Tables8008 - <strong>IntraMail</strong> Dial Action TablesDescriptionUse 8008 - Dial Action Tables to set up the <strong>IntraMail</strong> Dial Action Tables. The Dial Action Table defines theoptions than an Automated Attendant caller can dial. A Dial Action Table is associated with a Call RoutingMailbox, which is in turn associated with an Answer Table. When an Answer Table is active, its associated CallRouting Mailbox selects the Dial Action Table which provides dialing options to callers. The illustration belowshows how this works in a default <strong>IntraMail</strong> system. There are 16 Dial Action Tables.DIL to Voice MailMaster (700)● 1003 - Direct Termination (Day)● 1003 - Direct Termination (Night)Trunks Route toAnswer Table 1● 1003 - Answer TableDefault Automated Attendant AnsweringAnswer Table 1Schedule 1 orDefault Mailbox● 8007 - Answer Tables● 8007 - Schedule Entry● 8007 - Default MailboxCalls always route to Call Routing Mailbox 000- Schedule 1 active M-F 8:30AM-5:00PM.- Default Mailbox active all other times.Dial Action Table 1Dialing OptionsDial an extension number, or0 for the operatorAll trunksCall RoutingMailbox 000● 8006 - Routing Mailboxes (000)Dial ActionTable 1● 8008 - Dial Action TablesFrom a <strong>System</strong> Administrator'smailbox, record an InstructionMenu (SA + I) for the active CallRouting Mailbox.Use AnswerTable 1Which chooses CallRouting Mailbox 000.And Dial ActionTable 1With thesedialing options■See Dial Action Table on page 64 for more.Dial Action Table Default SettingsKey Dial Action Table 1 Dial Action Tables 2-161 UND(Undefined)2 UND(Undefined)3 UTRF to XXX(Unscreened Transfer to user-dialed extension)4 UTRF to XXX(Unscreened Transfer to user-dialed extension)5 UND(Undefined)6 UND(Undefined)7 UND(Undefined)UND(Undefined)UND(Undefined)UND(Undefined)UND(Undefined)UND(Undefined)UND(Undefined)UND(Undefined)246 ◆ Chapter 3: Programming <strong>IntraMail</strong> <strong>System</strong> <strong>Guide</strong>
8000 - Voice Mail8008 - <strong>IntraMail</strong> Dial Action Tables8 UND(Undefined)9 HNGUP(Hangup)0 UTRF to 300(Unscreened Transfer to 300)* REC1 to IXXX(Quick Message with greeting touser-dialed extension)# LOGON to IXXX(Logon to user-dialed mailbox)TIMEOUT UTRF to 300(Unscreened Transfer to 300)UND(Undefined)UND(Undefined)UND(Undefined)UND(Undefined)UND(Undefined)UND(Undefined)Note: TIMEOUT provides the routing for rotary dial callers. See Automatic Routing for Rotary Dial Callerson page 46 for more.Dial Action Table ActionsTRF Action - Screened Transfer (1)(TRF)Use this action to allow an Automated Attendant caller to place a Screened Transfer to an extension. After anAutomated Attendant caller dials an extension, <strong>IntraMail</strong> calls (screens) the destination to see if the transfercan go through.■ If the destination is available, the Automated Attendant rings it. If the destination answers, the callgoes through.■ If the destination doesn’t answer within a preset interval, is busy, or is in Do Not Disturb, the AutomatedAttendant doesn’t extend the call. It then provides the caller with additional options.Number Option■ Normally, the corresponding Number option should be XXX. Note that the key you choose for thisaction is the first digit of the called extension number.- For example, to allow callers to place Screened Transfers to extensions 300-399, for key 3 enterTRF for the Action and XXX for the corresponding Number.■ To have Screened Transfer call a specific extension, the corresponding Number option should be thatextension’s number. The caller then dials that single digit to reach the extension.- For example, to have caller’s dial 8 to reach extension 303, for key 8 enter TRF for the Action and303 for the corresponding Number.Additional Information■ See the detailed Screened Transfer Operation call routing chart on page 162 for more.■ Also see Screened Transfer on page 161 and Unscreened Transfer on page 180.3UTRF Action - Unscreened Transfer (2)(UTRF)Use this action to allow an Automated Attendant caller to place an Unscreened Transfer to an extension. This issimilar to telephone system unscreened transfers in which the transferring party immediately extends the call.After an Automated Attendant caller dials an extension, <strong>IntraMail</strong> transfers the call to the destination andhangs up. Any recalls or additional routing are handled by the telephone system - just as with any otherunscreened transfer.Number Option■ Normally, the corresponding Number option should be XXX. Note that the key you choose for thisaction is the first digit of the called extension number.- For example, to allow callers to place Unscreened Transfers to extensions 300-399, for key 3 enterUTRF for the Action and XXX for the corresponding Number.<strong>IntraMail</strong> <strong>System</strong> <strong>Guide</strong> Chapter 3: Programming ◆ 247
8000 - Voice Mail8008 - <strong>IntraMail</strong> Dial Action Tables■ To have Unscreened Transfer call a specific extension, the corresponding Number option should bethat extension’s number. The caller then dials that single digit to reach the extension.- For example, to have caller’s dial 8 to reach extension 303, for key 8 enter UTRF for the Action and303 for the corresponding Number.Additional Information■ See the detailed Unscreened Transfer Operation call routing chart on page 181 for more.■ Also see Screened Transfer on page 161 and Unscreened Transfer on page 180.REC1 Action - Quick Message With Greeting (3)(REC1)Use this action to allow an Automated Attendant caller to leave a Quick Message at an extension. With thisaction, the caller will hear the extension’s greeting prior to leaving the message.Number Options■ To have the caller leave a quick Message at a specific extension, the corresponding Number optionshould be the extension number.■ To have the caller leave a Quick Message at any caller-dialed extension, the corresponding Numberoption should be IXXX.■ To have the caller leave a Quick Message at a caller-dialed extension in a specific range, the correspondingNumber option should be XXX.- For example, to allow callers to leave a Quick Message extensions 300-399, for key 3 enter REC1for the Action and XXX for the corresponding Number.Additional Information■ See Quick Message on page 156 for more.REC2 Action - Quick Message Without Greeting (4)(REC2)Use this action to allow an Automated Attendant caller to leave a Quick Message at an extension. With thisaction, the caller will not hear the extension’s greeting prior to leaving the message. Instead, the caller hearsthe voice prompt “Recording” followed by a beep.Number Option■ To have the caller leave a quick Message at a specific extension, the corresponding Number optionshould be the extension number.■ To have the caller leave a Quick Message at any caller-dialed extension, the corresponding Numberoption should be IXXX.■ To have the caller leave a Quick Message at a caller-dialed extension in a specific range, the correspondingNumber option should be XXX.- For example, to allow callers to leave a Quick Message extensions 300-399, for key 3 enter REC2for the Action and XXX for the corresponding Number.Additional Information■ See Quick Message on page 156 for more.LOGON Action - Log Onto Voice Mail (5)(LOGON)Use this key action to allow an Automated Attendant caller to log onto Voice Mail. Depending on programming(see Number Option below), the caller is logged directly into a Subscriber Mailbox or is prompted toenter a Subscriber Mailbox of their own choosing. You cannot use the LOGON option with Call Routing andAnnouncement Mailboxes.Number Option■ To log directly into a specific Subscriber Mailbox, enter the mailbox number in the correspondingNumber option.- For example, to have key 4 log directly into Subscriber Mailbox 305, for key 4 enter LOGON forthe Action and 305 for the corresponding Number.■ To have <strong>IntraMail</strong> request Automated Attendant callers to select a Subscriber Mailbox to log into, enterN in the corresponding Number option. The key you choose must represent the first digit in the SubscriberMailbox numbers.248 ◆ Chapter 3: Programming <strong>IntraMail</strong> <strong>System</strong> <strong>Guide</strong>
8000 - Voice Mail8008 - <strong>IntraMail</strong> Dial Action Tables- For example, to have the Automated Attendant request callers to enter the number of the SubscriberMailbox into which they wish to log, for key 3 enter LOGON for the Action and N for the correspondingNumber. When callers dial 3, they hear, “Please enter your mailbox number.”■ To have <strong>IntraMail</strong> require Automated Attendant callers to enter a Subscriber Mailbox to log into (withoutplaying an announcement), enter XXX in the corresponding Number option. The key you choosemust represent the first digit in the Subscriber Mailbox numbers.- For example, to allow callers to log onto mailboxes 300-399, for key 3 enter LOGON for the Actionand XXX for the corresponding Number.■ To log into any valid Subscriber Mailbox, enter IXXX in the corresponding Number option.- For example, to allow callers to dial 1 plus any Subscriber Mailbox number to log on, for key 1enter LOGON for the Action and IXXX for the corresponding Number.Additional Information■ See Log Onto Voice Mail on page 112 for more.Hang Up Action (6)(HNGUP)When an Automated Attendant caller presses a key assigned to this action, <strong>IntraMail</strong> says “Goodbye” andimmediately hangs up.Number Option■ There is no entry required in the corresponding Number option.Additional Information■ See Hang Up on page 104 for more.GOTO Action - Go to Mailbox (7)(GOTO)Use this option to provide Automated Attendant callers with the ability to route to Call Routing and AnnouncementMailboxes. For example, a caller can dial a digit for Sales, and then go to the Call Routing or AnnouncementMailbox that provides the dialing options and instructions for Sales.Number Option■ To have Automated Attendant callers dial a single digit to go to a Call Routing or AnnouncementMailbox, enter the mailbox number in the corresponding Number option.- For example, to have key 1 go to Call Routing Mailbox 001, for key 1 enter GOTO for the Actionand 001 for the corresponding Number.■ To have <strong>IntraMail</strong> require Automated Attendant callers to enter a Call Routing or AnnouncementMailbox to go to, enter XXX in the corresponding Number option. The key you choose must representthe first digit in the mailbox numbers.- For example, to allow callers to go to mailboxes 000-015, for key 0 enter GOTO for the Action andXXX for the corresponding Number.■ To log into any valid Call Routing or Subscriber Mailbox, enter IXXX in the corresponding Numberoption.- For example, to allow callers to dial 1 plus any Call Routing or Announcement Mailbox number togo to, for key 1 enter GOTO for the Action and IXXX for the corresponding Number.Additional Information■ See Go To A Mailbox on page 92 for more.UND Action - Undefined Routing (0)(UND)Use this key action if you want a key to have no routing (no operation). When an Automated Attendant callerpresses an undefined key, they hear, “That is an invalid entry.” The caller can then dial another option.Number Option■ N/AAdditional Information■ See Undefined Routing on page 179 for more.3<strong>IntraMail</strong> <strong>System</strong> <strong>Guide</strong> Chapter 3: Programming ◆ 249
8000 - Voice Mail8008 - <strong>IntraMail</strong> Dial Action TablesDial Action Table Numbers (Data)Digits(0-9, #, and *)Use Dial Action Table digits to route an Automated Attendant call to a specific location (such as an extension).For example, to set up a TRF Action to route to extension 305, for digit 3 enter TRF for the Action and 305 forthe corresponding Number.■ See Dial Action Table on page 64 for more.Options■ 0-9, #, and * (6 digits max.)Default✔ See Dial Action Table Default Settings on page 246.Caller Dialed Digits(X)Use the X option to route an Automated Attendant call based on digits the caller dials. Each X entry representsone caller-dialed digit. For example, to set up a TRF Action to route to any caller dialed extension in the 300-399 range, for digit 3 enter TRF for the Action and XXX for the corresponding Number.■ See Dial Action Table on page 64 for more.Options■ X (Entered by pressing DIAL)Default✔ See Dial Action Table Default Settings on page 246.Ignore Digits(I)Use the I option to represent any digit dialed by the Automated Attendant caller that <strong>IntraMail</strong> ignores for routing.An example of this is REC action assigned to the * key in Dial Action Table 1 by default. The Action isREC2 and the Number is IXXX. This means that a caller can dial * + any mailbox number to leave a QuickMessage in that mailbox. <strong>IntraMail</strong> ignores the first digit dialed by the caller (*), and routes according to thenext 3 digits dialed.■ See Dial Action Table on page 64 for more.Options■ I (Entered by pressing DND)Default✔ See Dial Action Table Default Settings on page 246.250 ◆ Chapter 3: Programming <strong>IntraMail</strong> <strong>System</strong> <strong>Guide</strong>
8000 - Voice Mail8008 - <strong>IntraMail</strong> Dial Action TablesNo Routing(N)Use the N option when you want no Automated Attendant routing to automatically occur. This can be usedwith the LOGON action when you want to prompt the caller to enter a mailbox number. To do this for the #key (for example), for the # key enter LOGON for the Action and N for the corresponding Number. When thecaller dials #, they hear, “Please enter the mailbox number. Or, to exit, press the pound key.”Options■ N (Entered by pressing FLASH)Default✔ See Dial Action Table Default Settings on page 246.Pause(P)Use the P option when you want the Automated Attendant to pause while dialing. This option is typicallyused with the Centrex Transfer feature to give the system adequate time to dial the stored <strong>System</strong> SpeedDial number.■ See Centrex Transfer on page 59 for more.■ To set the duration of the pause, use 0401 - Dialing Pause. The default for the pause is 1 second.Options■ P (Entered by pressing MIC)Default✔ See Dial Action Table Default Settings on page 246.3<strong>IntraMail</strong> <strong>System</strong> <strong>Guide</strong> Chapter 3: Programming ◆ 251
8000 - Voice Mail8008 - <strong>IntraMail</strong> Dial Action Tables8008 Program Entry8008 - Dial Action Tables Program Entry(Entry Range) [Default Setting for Dial Action Table 1]ICM + #*#* + Password (372000) + HOLD + 8008 + HOLD.DIAL ACTION TABLE - Enter the table number you want to program (1-16)When entering data, 1 = TRF, 2 = UTRF, 3 = REC1, 4 = REC 2, 5 = LOGON, 6 = Hangup, 7 = GOTO, 0 = Undefined.DIGIT “1” [UND - Undefined)No entryDIGIT “2” [UND - Undefined)No entryDIGIT “3” [UTRF][XXX]DIGIT “4” [UTRF][XXX]DIGIT “5” [UND - Undefined]No entryDIGIT “6” [UND - Undefined]No entryDIGIT “7” [UND - Undefined]No entryDIGIT “8” [UND - Undefined]No entryDIGIT “9” [HNGUP - Hangup]No entryDIGIT “0” [UTRF]DIGIT “*” [REC1][300 (Operator)][IXXX]DIGIT “#” [LOGON][IXXX]TIMEOUT [UTRF][300 (Operator)]252 ◆ Chapter 3: Programming <strong>IntraMail</strong> <strong>System</strong> <strong>Guide</strong>
8000 - Voice Mail8008 - <strong>IntraMail</strong> Dial Action Tables8008 - Dial Action Tables Program Entry(Entry Range) [Default Setting for Dial Action Table 1]Press this:HOLDCONFVOL ▲ or Vol ▼LNDCHECKCLEARTo do this:Enter (accept) data you entered, advance to the next prompt without changing your entry,or navigate to the next prompt level (except for Undefined entries).Cancel your entry and back up to the previous prompt level.Scroll to the next prompt on the same prompt level.Erase the entry to the left of the cursor.Restore the previous entry.Clear the entry from the display (unless otherwise noted).3<strong>IntraMail</strong> <strong>System</strong> <strong>Guide</strong> Chapter 3: Programming ◆ 253
8000 - Voice Mail8008 - <strong>IntraMail</strong> Dial Action Tables254 ◆ Chapter 3: Programming <strong>IntraMail</strong> <strong>System</strong> <strong>Guide</strong>
Soft Key GlossaryChapter 4:Soft Key GlossarySoft Key GlossarySoft Key Glossary■Following is an alphabetical index of the <strong>IntraMail</strong> soft keys. Also see the Operation section of each feature.Soft Key Feature Phone Type DefinitionALL MSGSAMListening to MessagesMain MenuMessage Listen ModeMessage NotificationSuper DisplaySuper DisplayKeysetPress to select the list of all messages.When programming a Message Notification time, press toindicate that the entered time is AM.4ANNOUNCEMENTANNAnnouncement Mailbox<strong>System</strong> AdministratorSuper DisplayKeysetPress to access the Announcement Mailbox message options.ANSWERANSWCall ScreeningSuper DisplayKeysetPress to intercept the call (and stop recording the message).CALLBACKCaller ID with Return CallListening to MessagesMake CallSuper DisplayPress to call the person who left you the message.CANCELCNCLAnnouncement MailboxAuto Att. Do Not DisturbCall Routing MailboxConversation RecordGreetingInstruction MenuMailbox NameMessage ForwardMessage On HoldMessage ReplyRecord and Send aMessageSuper DisplayKeysetPress to erase the current message, name, or greeting.<strong>IntraMail</strong> <strong>System</strong> <strong>Guide</strong> Chapter 4: Soft Key Glossary ◆ 255
Soft Key GlossarySoft Key Feature Phone Type DefinitionCHANGECHNGMessage NotificationSuper DisplayKeysetChange the Message Notification setup.CLEARMessage NotificationSuper DisplayKeysetErase the Message Notification number you just entered.CONTINUECONTMessage ForwardMessage ReplyRecord and Send aMessageSuper DisplayKeysetPress to begin recording.DND OFFAuto Att. Do Not DisturbGreetingSuper DisplayPress to turn Auto Attendant Do Not Disturb off.DND ONAuto Att. Do Not DisturbGreetingSuper DisplayPress to turn Auto Attendant Do Not Disturb of.DONEAnnouncement MailboxAuto Att. Do Not DisturbCall Routing MailboxConversation RecordGreetingInstruction MenuMailbox NameMessage ForwardMessage On HoldMessage ReplyRecord and Send aMessageSuper DisplayKeysetPress to exit the recording mode while recording a message,name, or greeting.ERASEAnnouncement MailboxAuto Att. Do Not DisturbCall Routing MailboxGreetingInstruction MenuListening to MessagesMailbox NameMessage DeleteMessage On HoldSecurity CodeSuper DisplayKeysetPress to erase the currently accessed message, name, greeting,or Security Code.ERASE ALL MSGSEAErasing All Messages<strong>System</strong> AdministratorSuper DisplayKeysetPress to erase all messages in the selected SubscriberMailbox.ERASE GREETINGEG<strong>System</strong> AdministratorSuper DisplayKeysetPress to erase a subscriber’s greeting from the <strong>System</strong>Administrator Mailbox.ERASE NAMEMailbox Name<strong>System</strong> AdministratorSuper DisplayPress this key to erase the selected Mailbox’s name.EN Mailbox Name Keyset Press this key to erase the selected Mailbox’s name.ERASE SECURITYCODEMailbox Sec. Code DeleteSecurity Code<strong>System</strong> AdministratorSuper DisplayPress to delete the selected mailbox’s Security Code.256 ◆ Chapter 4: Soft Key Glossary <strong>IntraMail</strong> <strong>System</strong> <strong>Guide</strong>
Soft Key GlossarySoft Key Feature Phone Type DefinitionEXITAnswer Schedule OverrideAnnouncement MailboxAuto Att. Do Not DisturbAuto Time StampCall Routing MailboxCall ScreeningErasing All MessagesExiting a MailboxGreetingInstruction MenuListening to MessagesMailbox NameMailbox Sec. Code DeleteMain MenuMessage ForwardMessage NotificationMessage On HoldMessage ReplyRecord and Send aMessageSecurity CodeSuper DisplayKeysetPress to go back to the previous menu level or exit yourmailbox.FORWARDListening to MessagesMessage ForwardSuper DisplayPress to access the Message Forward Menu.GREETINGGREETAuto Att. Do Not DisturbGreetingMain MenuSuper DisplayKeysetPress to access the Mailbox Greeting options.GREETING 1GREETING 2GREETING 3GR1GR2GR3INSTRUCTIONINSTAuto Att. Do Not DisturbGreetingCall Routing MailboxInstruction Menu<strong>System</strong> AdministratorSuper DisplayKeysetSuper DisplayKeysetPress to select a Greeting (software version 03.20.07 orhigher)Press to access the Instruction Menu options.4LISTENLSTNAnnouncement MailboxAuto Att. Do Not DisturbCall Routing MailboxCaller ID with Return CallGreetingInstruction MenuListening to MessagesMailbox NameMain MenuMake CallMessage DeleteMessage ForwardMessage On HoldMessage ReplyTime and Date StampSuper DisplayKeysetPress to listen to message, name, or greeting.MAILBOXMBOXAnswer Schedule OverrideMessage ForwardMessage ReplyRecord and Send aMessageSuper DisplayKeysetSelect another mailbox.<strong>IntraMail</strong> <strong>System</strong> <strong>Guide</strong> Chapter 4: Soft Key Glossary ◆ 257
Soft Key GlossarySoft Key Feature Phone Type DefinitionMBOX OPTSAuto Time StampMailbox Options MenuMain MenuMessage NotificationSecurity CodeSuper DisplayPress to access the Mailbox Options Menu.MSG LISTMain MenuMessage Listen ModeSuper DisplayPress to access the Message Listen Mode Menu.MSG ON HOLD Message On Hold Super DisplayFrom the <strong>System</strong> Administrator’s Mailbox, press to access theMessage On Hold recording options.NAMEMailbox NameMain MenuSuper DisplayPress to access the Mailbox Name Menu.NEXTMessage NotificationSuper DisplayKeysetPress to skip to the next option without changing your entry.NEXT MSGNEXTListening to MessagesSuper DisplayKeysetWhile listening to a message, press to listen to the next message.NEW MSGSListening to MessagesMain MenuMessage Listen ModeSuper DisplayPress to select the list of new messages.NOTIFICATIONNOTIFMessage NotificationSuper DisplayKeysetPress to access the Message Notification Options Menu.NUMBERNUMMessage NotificationSuper DisplayKeysetPress to program a telephone number as the notificationdestination.OFFAnswer Schedule OverrideAuto Time StampCall ScreeningMessage NotificationSuper DisplayKeysetPress to turn the selected feature off.OKMessage NotificationSuper DisplayKeysetAccept the notification number entered and back up to theprevious level.ONAnswer Schedule OverrideAuto Time StampCall ScreeningMessage NotificationSuper DisplayKeysetPress to turn the selected feature on.PMMessage NotificationSuper DisplayKeysetWhen programming a Message Notification time, press toindicate that the entered time is PM.PAGERPAGEMessage NotificationSuper DisplayKeysetPress to to program a pager number as the notificationdestination.258 ◆ Chapter 4: Soft Key Glossary <strong>IntraMail</strong> <strong>System</strong> <strong>Guide</strong>
Soft Key GlossarySoft Key Feature Phone Type DefinitionPAUSEAnnouncement MailboxAuto Att. Do Not DisturbCall Routing MailboxConversation RecordGreetingInstruction MenuListening to MessagesMailbox NameMessage ForwardMessage On HoldMessage ReplyRecord and Send aMessageSuper DisplayKeysetPress to pause while recording a a message, name, orgreeting.RECORDRECAnnouncement MailboxAuto Att. Do Not DisturbCall Routing MailboxGreetingInstruction MenuMailbox NameMain MenuMessage On HoldRecord and Send aMessageSuper DisplayKeysetPress to record a message, name, or greeting.RECORD MBOXNAMEMailbox Name<strong>System</strong> AdministratorSuper DisplayUsed by <strong>System</strong> Administrator to record the selectedmailbox’s name.REPEATRPTListening to MessagesSuper DisplayKeysetGo back to the beginning of the message.REPLYRESUMEListening to MessagesMessage ReplyAnnouncement MailboxAuto Att. Do Not DisturbCall Routing MailboxConversation RecordGreetingInstruction MenuMailbox NameMessage ForwardMessage On HoldMessage ReplyRecord and Send aMessageSuper DisplaySuper DisplayKeysetReply to the currently accessed message.Press to resume while recording a a message, name, orgreeting.4RETURNRETExiting a MailboxSuper DisplayKeysetPress to return to your mailbox.SAVED MSGSListening to MessagesMessage Listen ModeSuper DisplayPress to select the list of saved messages.ANS SCHEDULEAnswer ScheduleOverride<strong>System</strong> AdministratorSuper DisplayPress to access the Answer Schedule Override option.SEC CODESECSecurity CodeSuper DisplayKeysetPress to access the Security Code options.<strong>IntraMail</strong> <strong>System</strong> <strong>Guide</strong> Chapter 4: Soft Key Glossary ◆ 259
Soft Key GlossarySoft Key Feature Phone Type DefinitionSCREENSCRNCall ScreeningSuper DisplayKeysetPress to access the Call Screening options.SUBSCRIBERSUBSErasing All MessagesMailbox NameMailbox Sec. Code DeleteSecurity Code<strong>System</strong> AdministratorSuper DisplayKeysetPress to select the Subscriber Mailbox maintenance options.SYS ADMINAnnouncement MailboxAnswer Schedule OverrideCall Routing MailboxErasing All MessagesInstruction MenuMailbox NameMain MenuMailbox Sec. Code DeleteMessage On HoldSecurity Code<strong>System</strong> AdministratorSuper DisplayPress to access <strong>System</strong> Administrator options.TIME STAMPTIMEAuto Time StampSuper DisplayKeysetPress to select the Auto Time Stamp feature.260 ◆ Chapter 4: Soft Key Glossary <strong>IntraMail</strong> <strong>System</strong> <strong>Guide</strong>
<strong>NEC</strong> <strong>Unified</strong> <strong>Solutions</strong>, Inc.4 Forest Parkway, Shelton, CT 06484Tel: 800-365-1928 Fax: 203-926-5458www.necunifiedsolutions.comOther Important Telephone NumbersSales: . . . . . . . . . . . . . . . . . . . . . . . . . . . . . . . . . . . .203-926-5450Customer Service: . . . . . . . . . . . . . . . . . . . . . . . . . . .203-926-5444Customer Service FAX: . . . . . . . . . . . . . . . . . . . . . . .203-926-5454Technical Service: . . . . . . . . . . . . . . . . . . . . . . . . . . .203-925-8801Discontinued Product Service: . . . . . . . . . . . . . . . . . .900-990-2541Technical Training: . . . . . . . . . . . . . . . . . . . . . . . . . . .203-926-5430Emergency Technical Service (After Hours) . . . . . . . .203-929-7920(Excludes discontinued products)
*80044INS03*80044INS03<strong>NEC</strong> <strong>Unified</strong> <strong>Solutions</strong>, Inc.,4 Forest Parkway, Shelton, CT 06484TEL: 203-926-5400 FAX: 203-929-0535www.necunifiedsolutions.comNovember 4, 2004Printed in U.S.A.