

ADMIN

You also want an ePaper? Increase the reach of your titles
YUMPU automatically turns print PDFs into web optimized ePapers that Google loves.
OCFS2<br />
Tools<br />
ing. OCFS2 is fairly simplistic in its<br />
approach and only uses self-fencing.<br />
If a node notices that it is no longer<br />
cleanly integrated with the cluster, it<br />
throws a kernel panic and locks itself<br />
out. Just like the DLM, self-fencing<br />
in OCFS2 does not require a separate<br />
configuration. Once the cluster configuration<br />
is complete and has been<br />
distributed to all the nodes, the brunt<br />
of the work has been done for a functional<br />
OCFS2.<br />
Things are seemingly quite simple<br />
at this point: Start the cluster, create<br />
OCFS2 if needed, mount the filesystem,<br />
and you’re done.<br />
Getting Started<br />
As I mentioned earlier, OCFS2 is a<br />
cluster filesystem based on shared<br />
disks. The range of technologies<br />
that can provide a shared disk spans<br />
expensive SAN over Fibre Channel,<br />
from iSCSI to low-budget DRBD [7].<br />
In this article, I will use iSCSI and<br />
NDAS (Network Direct Attached Storage).<br />
The second ingredient in the<br />
OCFS2 setup is computers with an<br />
OCFS2-capable operating system. The<br />
best choices here are Oracle’s Enterprise<br />
Linux, SUSE Linux Enterprise<br />
Server, openSUSE, Red Hat Enterprise<br />
Linux, and Fedora.<br />
The software suite for OCFS2 comprises<br />
the ocfs2-tools and ocfs2console<br />
packages and the ocfs2‐`uname<br />
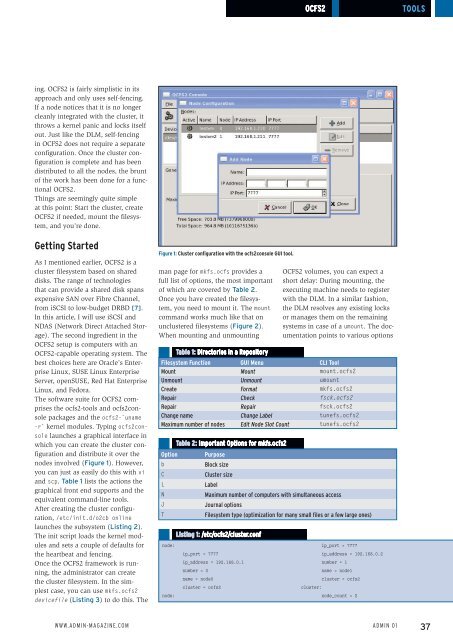
‐r` kernel modules. Typing ocfs2console<br />
launches a graphical interface in<br />
which you can create the cluster configuration<br />
and distribute it over the<br />
nodes involved (Figure 1). However,<br />
you can just as easily do this with vi<br />
and scp. Table 1 lists the actions the<br />
graphical front end supports and the<br />
equivalent command-line tools.<br />
After creating the cluster configuration,<br />
/etc/init.d/o2cb online<br />
launches the subsystem (Listing 2).<br />
The init script loads the kernel modules<br />
and sets a couple of defaults for<br />
the heartbeat and fencing.<br />
Once the OCFS2 framework is running,<br />
the administrator can create<br />
the cluster filesystem. In the simplest<br />
case, you can use mkfs.ocfs2<br />
devicefile (Listing 3) to do this. The<br />
Figure 1: Cluster configuration with the ocfs2console GUI tool.<br />
man page for mkfs.ocfs provides a<br />
full list of options, the most important<br />
of which are covered by Table 2.<br />
Once you have created the filesystem,<br />
you need to mount it. The mount<br />
command works much like that on<br />
unclustered filesystems (Figure 2).<br />
When mounting and unmounting<br />
Option<br />
b<br />
C<br />
L<br />
N<br />
J<br />
T<br />
Table 1: Directories in a Repository<br />
Table 2: Important Options for mkfs.ocfs2<br />
Purpose<br />
Block size<br />
Cluster size<br />
Label<br />
OCFS2 volumes, you can expect a<br />
short delay: During mounting, the<br />
executing machine needs to register<br />
with the DLM. In a similar fashion,<br />
the DLM resolves any existing locks<br />
or manages them on the remaining<br />
systems in case of a umount. The documentation<br />
points to various options<br />
Filesystem Function GUI Menu CLI Tool<br />
Mount Mount mount.ocfs2<br />
Unmount Unmount umount<br />
Create Format mkfs.ocfs2<br />
Repair Check fsck.ocfs2<br />
Repair Repair fsck.ocfs2<br />
Change name Change Label tunefs.ocfs2<br />
Maximum number of nodes Edit Node Slot Count tunefs.ocfs2<br />
node:<br />
node:<br />
Maximum number of computers with simultaneous access<br />
Journal options<br />
Filesystem type (optimization for many small files or a few large ones)<br />
Listing 1: /etc/ocfs2/cluster.conf<br />
ip_port = 7777<br />
ip_address = 192.168.0.1<br />
number = 0<br />
name = node0<br />
cluster = ocfs2<br />
ip_port = 7777<br />
ip_address = 192.168.0.2<br />
number = 1<br />
name = node1<br />
cluster = ocfs2<br />
cluster:<br />
node_count = 2<br />
www.admin-magazine.com<br />
Admin 01<br />
37