

ADMIN

Create successful ePaper yourself
Turn your PDF publications into a flip-book with our unique Google optimized e-Paper software.
Chef<br />
Management<br />
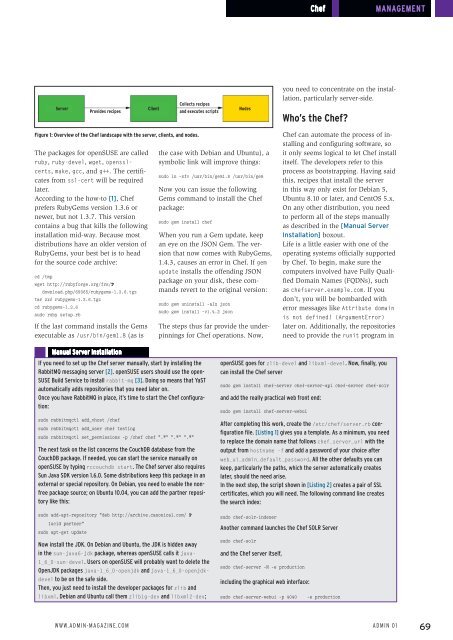
Server<br />
Provides recipes<br />
Client<br />
Collects recipes<br />
and executes scripts<br />
Nodes<br />
you need to concentrate on the installation,<br />
particularly server-side.<br />
Who’s the Chef?<br />
Figure 1: Overview of the Chef landscape with the server, clients, and nodes.<br />
The packages for openSUSE are called<br />
ruby, ruby-devel, wget, opensslcerts,<br />
make, gcc, and g++. The certificates<br />
from ssl-cert will be required<br />
later.<br />
According to the how-to [1], Chef<br />
prefers RubyGems version 1.3.6 or<br />
newer, but not 1.3.7. This version<br />
contains a bug that kills the following<br />
installation mid-way. Because most<br />
distributions have an older version of<br />
RubyGems, your best bet is to head<br />
for the source code archive:<br />
cd /tmp<br />
wget http://rubyforge.org/frs/U<br />
download.php/69365/rubygems‐1.3.6.tgz<br />
tar zxf rubygems‐1.3.6.tgz<br />
cd rubygems‐1.3.6<br />
sudo ruby setup.rb<br />
If the last command installs the Gems<br />
executable as /usr/bin/gem1.8 (as is<br />
the case with Debian and Ubuntu), a<br />
symbolic link will improve things:<br />
sudo ln ‐sfv /usr/bin/gem1.8 /usr/bin/gem<br />
Now you can issue the following<br />
Gems command to install the Chef<br />
package:<br />
sudo gem install chef<br />
When you run a Gem update, keep<br />
an eye on the JSON Gem. The version<br />
that now comes with RubyGems,<br />
1.4.3, causes an error in Chef. If gem<br />
update installs the offending JSON<br />
package on your disk, these commands<br />
revert to the original version:<br />
sudo gem uninstall ‐aIx json<br />
sudo gem install ‐v1.4.2 json<br />
The steps thus far provide the underpinnings<br />
for Chef operations. Now,<br />
Chef can automate the process of installing<br />
and configuring software, so<br />
it only seems logical to let Chef install<br />
itself. The developers refer to this<br />
process as bootstrapping. Having said<br />
this, recipes that install the server<br />
in this way only exist for Debian 5,<br />
Ubuntu 8.10 or later, and CentOS 5.x.<br />
On any other distribution, you need<br />
to perform all of the steps manually<br />
as described in the [Manual Server<br />
Installation] boxout.<br />
Life is a little easier with one of the<br />
operating systems officially supported<br />
by Chef. To begin, make sure the<br />
computers involved have Fully Qualified<br />
Domain Names (FQDNs), such<br />
as chefserver.example.com. If you<br />
don’t, you will be bombarded with<br />
error messages like Attribute domain<br />
is not defined! (ArgumentError)<br />
later on. Additionally, the repositories<br />
need to provide the runit program in<br />
Manual Server Installation<br />
If you need to set up the Chef server manually, start by installing the<br />
RabbitMQ messaging server [2]. openSUSE users should use the open-<br />
SUSE Build Service to install rabbit-mq [3]. Doing so means that YaST<br />
automatically adds repositories that you need later on.<br />
Once you have RabbitMQ in place, it’s time to start the Chef configuration:<br />
sudo rabbitmqctl add_vhost /chef<br />
sudo rabbitmqctl add_user chef testing<br />
sudo rabbitmqctl set_permissions ‐p /chef chef ".*" ".*" ".*"<br />
The next task on the list concerns the CouchDB database from the<br />
CouchDB package. If needed, you can start the service manually on<br />
openSUSE by typing rccouchdb start. The Chef server also requires<br />
Sun Java SDK version 1.6.0. Some distributions keep this package in an<br />
external or special repository. On Debian, you need to enable the nonfree<br />
package source; on Ubuntu 10.04, you can add the partner repository<br />
like this:<br />
openSUSE goes for zlib-devel and libxml-devel. Now, finally, you<br />
can install the Chef server<br />
sudo gem install chef‐server chef‐server‐api chef‐server chef‐solr<br />
and add the really practical web front end:<br />
sudo gem install chef‐server‐webui<br />
After completing this work, create the /etc/chef/server.rb configuration<br />
file. [Listing 1] gives you a template. As a minimum, you need<br />
to replace the domain name that follows chef_server_url with the<br />
output from hostname ‐f and add a password of your choice after<br />
web_ui_admin_default_password. All the other defaults you can<br />
keep, particularly the paths, which the server automatically creates<br />
later, should the need arise.<br />
In the next step, the script shown in [Listing 2] creates a pair of SSL<br />
certificates, which you will need. The following command line creates<br />
the search index:<br />
sudo add‐apt‐repository "deb http://archive.canonical.com/ U<br />
lucid partner"<br />
sudo apt‐get update<br />
Now install the JDK. On Debian and Ubuntu, the JDK is hidden away<br />
in the sun-java6-jdk package, whereas openSUSE calls it java-<br />
1_6_0-sun-devel. Users on openSUSE will probably want to delete the<br />
OpenJDK packages java-1_6_0-openjdk and java-1_6_0-openjdkdevel<br />
to be on the safe side.<br />
Then, you just need to install the developer packages for zlib and<br />
libxml. Debian and Ubuntu call them zlib1g-dev and libxml2-dev;<br />
sudo chef‐solr‐indexer<br />
Another command launches the Chef SOLR Server<br />
sudo chef‐solr<br />
and the Chef server itself,<br />
sudo chef‐server ‐N ‐e production<br />
including the graphical web interface:<br />
sudo chef‐server‐webui ‐p 4040 ‐e production<br />
www.admin-magazine.com<br />
Admin 01<br />
69