MAG-Manual - Refurbished Vending Machines
MAG-Manual - Refurbished Vending Machines
MAG-Manual - Refurbished Vending Machines

You also want an ePaper? Increase the reach of your titles
YUMPU automatically turns print PDFs into web optimized ePapers that Google loves.
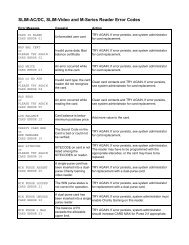
SECTION 2: INSTALLATIONOPTION SWITCH SETTINGS<strong>MAG</strong> bill acceptors contain an option switch bank on themain logic board which allows the unit to be customizedto the requirements of the individual account This switchbank is factory set with switch 3 and 8 in the ON positionand 1, 2, 4, 5, 6, and 7 in the OFF positionSetting Option Switches (see Figure 1)Remove power from the bill acceptor Remove the billbox Located on the side of the logic board cover is theoption switch access hole Insert a small screwdriverthrough the access hole to set the option switches asdesired (see Figure 2) Reinstall the bill box Applypower and test for proper operationFigure 1<strong>MAG</strong>**B Option Switch Settings(see Figure 2)SWITCH ON OFF1 High Security Standard Acceptance2 Accepts bills in one Accepts bills in bothdirections only (face directions (face up)up, green seal first)3 Standard credit pulse Short credit pulse150ms on 150ms off 50 ms on 50 ms off4 $20 Accept $20 Reject5 $10 Accept $10 Reject6 $5 Accept $5 Reject7 $2 Accept $2 Reject8 $1 Accept $1 Reject (see note)NOTE: The 407982 logic board with software67090 will accept $100 bills with Switch 8 "OFF",if no other bills are enabled This is the maximumaccept modeACCESS HOLEOPTION SWITCH#8#1If however, another bill switch is "ON", then $100bills will be rejected if Switch 8 is "OFF"<strong>MAG</strong>**SA Option Switch Settings(see Figure 2)SWITCH ON OFF1 High Security Standard Acceptance2 Accepts bills in one Accepts bills in bothdirections only (face directions (face up)up, green seal first)3 Serial or Parallel Pulse InterfaceInterface4 $20 Accept $20 Reject5 $10 Accept $10 Reject6 $5 Accept $5 Reject7 $2 Accept $2 Reject8 $1 Accept $1 RejectFigure 2ONOFF1 2 3 4 5 6 7 8INSTALLING THE BILL ACCEPTOR1 Remove power from the vending machine2 Set the bill acceptor option switches as desired3 Connect the bill acceptor harness to the matingharness in the vending machine4 Mount the bill acceptor according to the instructionsfound in the vending machine manual or appropriatekit literatureNOTE: Ensure bill acceptor is free of all obstructions5 Load the vending machine with product and fill thecoin changer with change6 Apply power to the vending machine7 Test for proper operation7