PNEG-1162CEX - DMC DIII Stir-Ator - David Manufacturing Co.
PNEG-1162CEX - DMC DIII Stir-Ator - David Manufacturing Co.
PNEG-1162CEX - DMC DIII Stir-Ator - David Manufacturing Co.

You also want an ePaper? Increase the reach of your titles
YUMPU automatically turns print PDFs into web optimized ePapers that Google loves.
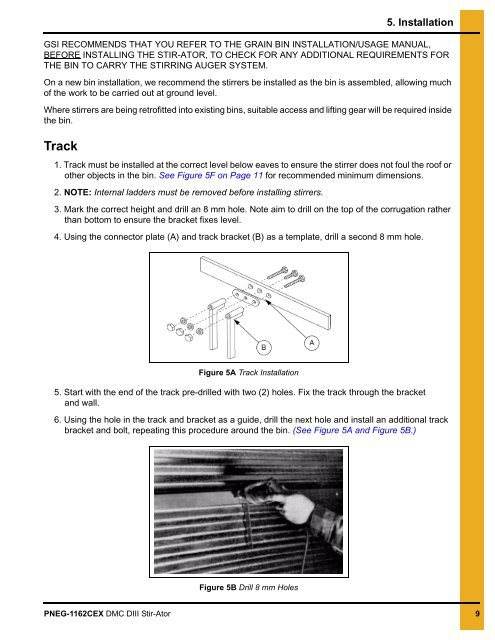
5. InstallationGSI RECOMMENDS THAT YOU REFER TO THE GRAIN BIN INSTALLATION/USAGE MANUAL,BEFORE INSTALLING THE STIR-ATOR, TO CHECK FOR ANY ADDITIONAL REQUIREMENTS FORTHE BIN TO CARRY THE STIRRING AUGER SYSTEM.On a new bin installation, we recommend the stirrers be installed as the bin is assembled, allowing muchof the work to be carried out at ground level.Where stirrers are being retrofitted into existing bins, suitable access and lifting gear will be required insidethe bin.Track1. Track must be installed at the correct level below eaves to ensure the stirrer does not foul the roof orother objects in the bin. See Figure 5F on Page 11 for recommended minimum dimensions.2. NOTE: Internal ladders must be removed before installing stirrers.3. Mark the correct height and drill an 8 mm hole. Note aim to drill on the top of the corrugation ratherthan bottom to ensure the bracket fixes level.4. Using the connector plate (A) and track bracket (B) as a template, drill a second 8 mm hole.Figure 5A Track Installation5. Start with the end of the track pre-drilled with two (2) holes. Fix the track through the bracketand wall.6. Using the hole in the track and bracket as a guide, drill the next hole and install an additional trackbracket and bolt, repeating this procedure around the bin. (See Figure 5A and Figure 5B.)Figure 5B Drill 8 mm Holes<strong>PNEG</strong>-<strong>1162CEX</strong> <strong>DMC</strong> <strong>DIII</strong> <strong>Stir</strong>-<strong>Ator</strong> 9