MA/FS-1535 SERIES - toshiba tec europe
MA/FS-1535 SERIES - toshiba tec europe
MA/FS-1535 SERIES - toshiba tec europe

You also want an ePaper? Increase the reach of your titles
YUMPU automatically turns print PDFs into web optimized ePapers that Google loves.
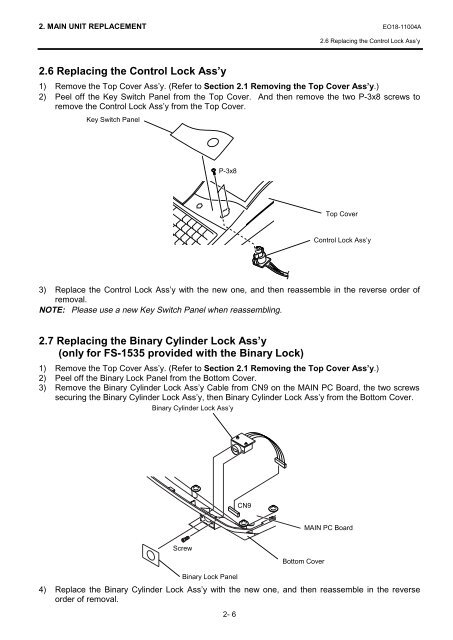
2. <strong>MA</strong>IN UNIT REPLACEMENT EO18-11004A2.6 Replacing the Control Lock Ass’y2.6 Replacing the Control Lock Ass’y1) Remove the Top Cover Ass’y. (Refer to Section 2.1 Removing the Top Cover Ass’y.)2) Peel off the Key Switch Panel from the Top Cover. And then remove the two P-3x8 screws toremove the Control Lock Ass’y from the Top Cover.Key Switch PanelP-3x8Top CoverControl Lock Ass’y3) Replace the Control Lock Ass’y with the new one, and then reassemble in the reverse order ofremoval.NOTE: Please use a new Key Switch Panel when reassembling.2.7 Replacing the Binary Cylinder Lock Ass’y(only for <strong>FS</strong>-<strong>1535</strong> provided with the Binary Lock)1) Remove the Top Cover Ass’y. (Refer to Section 2.1 Removing the Top Cover Ass’y.)2) Peel off the Binary Lock Panel from the Bottom Cover.3) Remove the Binary Cylinder Lock Ass’y Cable from CN9 on the <strong>MA</strong>IN PC Board, the two screwssecuring the Binary Cylinder Lock Ass’y, then Binary Cylinder Lock Ass’y from the Bottom Cover.Binary Cylinder Lock Ass’yCN9<strong>MA</strong>IN PC BoardScrewBinary Lock Panel4) Replace the Binary Cylinder Lock Ass’y with the new one, and then reassemble in the reverseorder of removal.2- 6Bottom Cover