MA/FS-1535 SERIES - toshiba tec europe
MA/FS-1535 SERIES - toshiba tec europe
MA/FS-1535 SERIES - toshiba tec europe

Create successful ePaper yourself
Turn your PDF publications into a flip-book with our unique Google optimized e-Paper software.
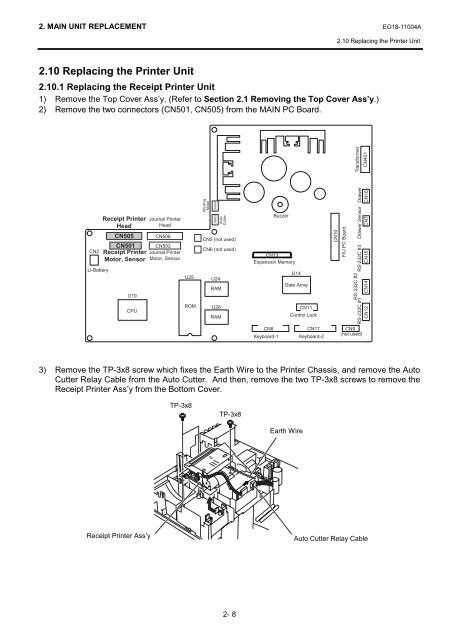
2. <strong>MA</strong>IN UNIT REPLACEMENT EO18-11004A2.10 Replacing the Printer Unit2.10 Replacing the Printer Unit2.10.1 Replacing the Receipt Printer Unit1) Remove the Top Cover Ass’y. (Refer to Section 2.1 Removing the Top Cover Ass’y.)2) Remove the two connectors (CN501, CN505) from the <strong>MA</strong>IN PC Board.TransformerCN401CN2Li-BatteryReceipt PrinterHeadCN505U19CPUJournal PrinterHeadCN506CN501 CN502Receipt Printer Journal PrinterMotor, Sensor Motor, SensorU25ROMWindingMotorCN504CN503U24RAMU26RA<strong>MA</strong>utoCutterCN5 (not used)CN6 (not used)BuzzerCN13Expansion MemoryU14Gate ArrayCN11Control LockCN10FIU PC BoardDrawerCN16Drawer SensorCN7RS-232C #1 RS-232C #2 RS-232C #3CN12 CN14 CN15CN8Keyboard-1CN17Keyboard-2CN9(not used)3) Remove the TP-3x8 screw which fixes the Earth Wire to the Printer Chassis, and remove the AutoCutter Relay Cable from the Auto Cutter. And then, remove the two TP-3x8 screws to remove theReceipt Printer Ass’y from the Bottom Cover.TP-3x8TP-3x8Earth WireReceipt Printer Ass’yAuto Cutter Relay Cable2- 8