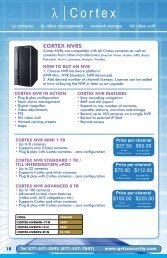
CORTEX- VMS Configuration manual - Qvis Security
CORTEX- VMS Configuration manual - Qvis Security
CORTEX- VMS Configuration manual - Qvis Security

You also want an ePaper? Increase the reach of your titles
YUMPU automatically turns print PDFs into web optimized ePapers that Google loves.
Clicking the Next step button will show the next step of the wizard.<br />
Clicking the Close button will cause the wizard to close (all remaining steps will be cancelled).<br />
2.1.3 Device detection<br />
This window is used for fast detection of cameras connected to the network.<br />
To start the search, fill out all search parameter fields (see below) and click Search. The search will begin and if a<br />
camera is found, it will appear in the Camera list. To cancel search while it is in progress, use the Cancel search<br />
button.<br />
The parameter fields in this window are:<br />
• Start IP – the IP address at which the search will start (e.g. 192.168.0.1).<br />
• End IP – the IP address at which the search will finish (e.g. 192.168.0.20).<br />
• Use only the default port (80) – if this option is selected, the cameras will be detected only at the default<br />
port 80.<br />
• Use port range – selecting this option allows you to specify the port range at which the cameras will be<br />
detected.<br />
• Start port – the port at which the search will start (e.g. 80).<br />
• End port – the port at which the search will end (e.g. 82).<br />
• Login – the login of the user having administration privileges on the camera (it is set in the camera<br />
settings, usually root or admin).<br />
• Password – password for the user identified by the login in the Login field (it is set in the camera<br />
settings)<br />
To add detected cameras to the system (after the search has finished), select them in the Camera list and then<br />
click Next step which will add the cameras, with their default settings, to the recording server and show the next<br />
step of the wizard.<br />
Clicking the Close button will cause the wizard to close (all remaining steps will be cancelled).<br />
Cortex IP Video Management System<br />
<strong>Configuration</strong> <strong>manual</strong><br />
7