


You also want an ePaper? Increase the reach of your titles
YUMPU automatically turns print PDFs into web optimized ePapers that Google loves.
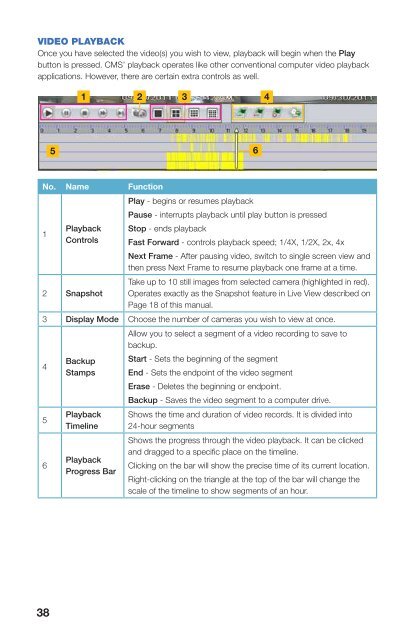
VIDEO PLAYBACKOnce you have selected the video(s) you wish to view, playback will begin when the Playbutton is pressed. <strong>CMS</strong>’ playback operates like other conventional computer video playbackapplications. However, there are certain extra controls as well.1 2 35 6No. Name FunctionPlay - begins or resumes playbackPause - interrupts playback until play button is pressed1Playback Stop - ends playbackControls Fast Forward - controls playback speed; 1/4X, 1/2X, 2x, 4xNext Frame - After pausing video, switch to single screen view andthen press Next Frame to resume playback one frame at a time.2 SnapshotTake up to 10 still images from selected camera (highlighted in red).Operates exactly as the Snapshot feature in Live View described onPage 18 of this manual.3 Display Mode Choose the number of cameras you wish to view at once.Allow you to select a segment of a video recording to save tobackup.4Backup Start - Sets the beginning of the segmentStamps End - Sets the endpoint of the video segmentErase - Deletes the beginning or endpoint.Backup - Saves the video segment to a computer drive.56PlaybackTimelinePlaybackProgress BarShows the time and duration of video records. It is divided into24-hour segmentsShows the progress through the video playback. It can be clickedand dragged to a specific place on the timeline.Clicking on the bar will show the precise time of its current location.Right-clicking on the triangle at the top of the bar will change thescale of the timeline to show segments of an hour.4PICTURE PLAYBACKIf you have an IP (Internet Protocol) camera connected to your network which is beingmonitored by <strong>CMS</strong>, you can view still images saved to the SD card within the camera.When you select a connected IP camerafrom the Select Device pull-down, you canthen choose the type of event (Motion and/or Sensor) and the date to search. A dateshown in red within the calendar indicatesthat a recording was made on that day.Clicking on the Search button will generate alist of events that were recorded, along withthe type of event they are.Once the list is populated, click on View tosee thumbnails of the available images.Clicking on an image in the thumbnail display will present it in the larger viewing window.Below the window, a 24-hour time line shows when pictures were taken. Images captured bya sensor alarm are shown in red while motion detection events are denoted with yellow. Rightclickingon the progress bar will change the scale to show events occurring within an hour.You can view the images as a slide show as well as zoom in or out of a picture using thecontrols located between the thumbnail and single picture viewing window. Other controlsin this area allow you to close some or all of the pictures in the thumbnail view, save a singleimage or all open images to the PC’s hard drive and adjust the size of the image on display.38 39


