TorqueStar DTT Opta Manual 7 - Crane Electronics
TorqueStar DTT Opta Manual 7 - Crane Electronics
TorqueStar DTT Opta Manual 7 - Crane Electronics
- No tags were found...

You also want an ePaper? Increase the reach of your titles
YUMPU automatically turns print PDFs into web optimized ePapers that Google loves.
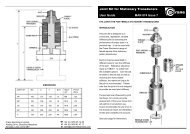
OPERATOR’S MANUALSECTION 1SETTING THE TIME AND DATESELECTING THE QUICK READ MODEFrom the Main Menu, enter the Time and Date setup screen- see below. The screen displays the currently set date, weeknumber, time and the date and time format.From the Main Menu select Quick Read. The availablemodes are:- Track, Peak, Pulse, Click or Force.To change Screen Contrast:Select Contrast. Adjust contrast using left and right arrowkeys.To change the date:Select the date. The Date is displayed in editable fields.Enter the required figures using the numbers on the keypad.When date is correct, ENTER to return to the setupscreen.To change the time:Select the time. The time is displayed in editable fields.Enter the required figures using the numbers on the keypad.When the time is correct, ENTER to return to the setupscreen.To change the date format:Select the date format. Highlight the required option andENTER to return to the setup menu.NOTE: Before entering the Quick Read Mode, make surea suitable transducer is connected to the <strong>TorqueStar</strong> <strong>Opta</strong>,otherwise an error message will be displayed on the screen.Attach the cable from the transducer to the 25-way Dconnector on the back of the <strong>TorqueStar</strong>.The selected Quick Read Mode screen will now appear. Ifthe transducer connected is not a UTA, the transducersettings must be specified before readings can be taken. Inthis case, the screen for the transducer settings, will bedisplayed automatically (see Changing the Settingspage 16).If a UTA transducer is connected, the <strong>Opta</strong> will automaticallyrecognise the settings.To change the time format:Select the time format. Highlight the required option andENTER to return to the setup menu.14