

ULTRA Plus+ 1500 Airless Paint Sprayer - Graco Inc.
ULTRA Plus+ 1500 Airless Paint Sprayer - Graco Inc.
ULTRA Plus+ 1500 Airless Paint Sprayer - Graco Inc.

You also want an ePaper? Increase the reach of your titles
YUMPU automatically turns print PDFs into web optimized ePapers that Google loves.
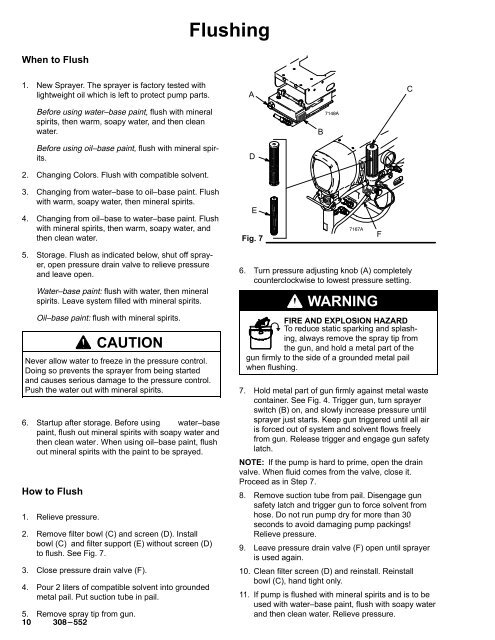
FlushingWhen to Flush1. New <strong>Sprayer</strong>. The sprayer is factory tested withlightweight oil which is left to protect pump parts.ACBefore using water–base paint, flush with mineralspirits, then warm, soapy water, and then cleanwater.BBefore using oil–base paint, flush with mineral spirits.D2. Changing Colors. Flush with compatible solvent.3. Changing from water–base to oil–base paint. Flushwith warm, soapy water, then mineral spirits.4. Changing from oil–base to water–base paint. Flushwith mineral spirits, then warm, soapy water, andthen clean water.EFig. 7F5. Storage. Flush as indicated below, shut off sprayer,open pressure drain valve to relieve pressureand leave open.Water–base paint: flush with water, then mineralspirits. Leave system filled with mineral spirits.Oil–base paint: flush with mineral spirits.CAUTIONNever allow water to freeze in the pressure control.Doing so prevents the sprayer from being startedand causes serious damage to the pressure control.Push the water out with mineral spirits.6. Startup after storage. Before using water–basepaint, flush out mineral spirits with soapy water andthen clean water. When using oil–base paint, flushout mineral spirits with the paint to be sprayed.How to Flush1. Relieve pressure.2. Remove filter bowl (C) and screen (D). Installbowl (C) and filter support (E) without screen (D)to flush. See Fig. 7.3. Close pressure drain valve (F).4. Pour 2 liters of compatible solvent into groundedmetal pail. Put suction tube in pail.5. Remove spray tip from gun. 6. Turn pressure adjusting knob (A) completelycounterclockwise to lowest pressure setting.WARNINGFIRE AND EXPLOSION HAZARDTo reduce static sparking and splashing,always remove the spray tip fromthe gun, and hold a metal part of thegun firmly to the side of a grounded metal pailwhen flushing.7. Hold metal part of gun firmly against metal wastecontainer. See Fig. 4. Trigger gun, turn sprayerswitch (B) on, and slowly increase pressure untilsprayer just starts. Keep gun triggered until all airis forced out of system and solvent flows freelyfrom gun. Release trigger and engage gun safetylatch.NOTE: If the pump is hard to prime, open the drainvalve. When fluid comes from the valve, close it.Proceed as in Step 7.8. Remove suction tube from pail. Disengage gunsafety latch and trigger gun to force solvent fromhose. Do not run pump dry for more than 30seconds to avoid damaging pump packings!Relieve pressure.9. Leave pressure drain valve (F) open until sprayeris used again.10. Clean filter screen (D) and reinstall. Reinstallbowl (C), hand tight only.11. If pump is flushed with mineral spirits and is to beused with water–base paint, flush with soapy waterand then clean water. Relieve pressure.


