VEXnet Field Control System User Guide - VEX Robotics
VEXnet Field Control System User Guide - VEX Robotics
VEXnet Field Control System User Guide - VEX Robotics
- No tags were found...

You also want an ePaper? Increase the reach of your titles
YUMPU automatically turns print PDFs into web optimized ePapers that Google loves.
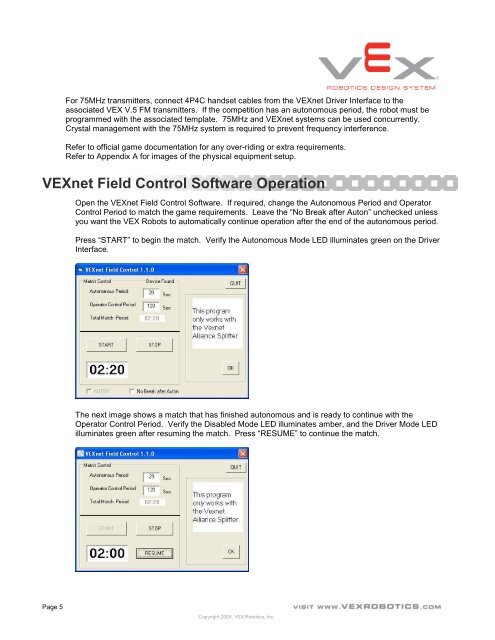
For 75MHz transmitters, connect 4P4C handset cables from the <strong><strong>VEX</strong>net</strong> Driver Interface to theassociated <strong>VEX</strong> V.5 FM transmitters. If the competition has an autonomous period, the robot must beprogrammed with the associated template. 75MHz and <strong><strong>VEX</strong>net</strong> systems can be used concurrently.Crystal management with the 75MHz system is required to prevent frequency interference.Refer to official game documentation for any over-riding or extra requirements.Refer to Appendix A for images of the physical equipment setup.<strong><strong>VEX</strong>net</strong> <strong>Field</strong> <strong>Control</strong> Software OperationOpen the <strong><strong>VEX</strong>net</strong> <strong>Field</strong> <strong>Control</strong> Software. If required, change the Autonomous Period and Operator<strong>Control</strong> Period to match the game requirements. Leave the “No Break after Auton” unchecked unlessyou want the <strong>VEX</strong> Robots to automatically continue operation after the end of the autonomous period.Press “START” to begin the match. Verify the Autonomous Mode LED illuminates green on the DriverInterface.The next image shows a match that has finished autonomous and is ready to continue with theOperator <strong>Control</strong> Period. Verify the Disabled Mode LED illuminates amber, and the Driver Mode LEDilluminates green after resuming the match. Press “RESUME” to continue the match.Page 5Copyright 2009. <strong>VEX</strong> <strong>Robotics</strong>, Inc.