Modine: Installation And Service Manual - Alpine Home Air Products
Modine: Installation And Service Manual - Alpine Home Air Products
Modine: Installation And Service Manual - Alpine Home Air Products

Create successful ePaper yourself
Turn your PDF publications into a flip-book with our unique Google optimized e-Paper software.
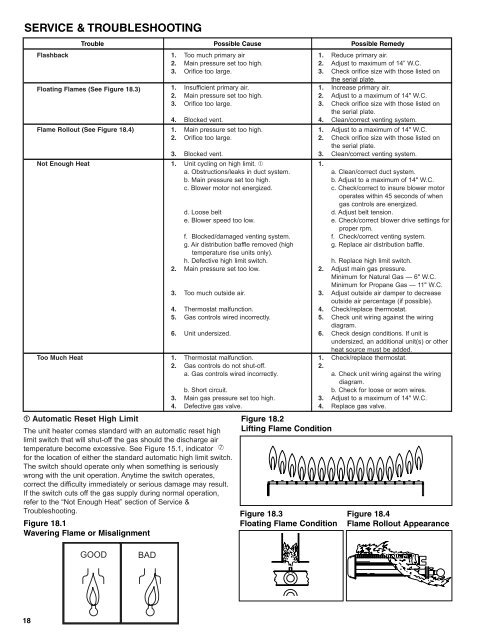
SERVICE & TROUBLESHOOTINGFlashbackFloating Flames (See Figure 18.3)Flame Rollout (See Figure 18.4)Not Enough HeatToo Much HeatTrouble Possible Cause Possible Remedy➀ Automatic Reset High Limit1. Too much primary air2. Main pressure set too high.3. Orifice too large.1. Insufficient primary air.2. Main pressure set too high.3. Orifice too large.4. Blocked vent.1. Main pressure set too high.2. Orifice too large.3. Blocked vent.1. Unit cycling on high limit. ➀a. Obstructions/leaks in duct system.b. Main pressure set too high.c. Blower motor not energized.d. Loose belte. Blower speed too low.f. Blocked/damaged venting system.g. <strong>Air</strong> distribution baffle removed (hightemperature rise units only).h. Defective high limit switch.2. Main pressure set too low.3. Too much outside air.4. Thermostat malfunction.5. Gas controls wired incorrectly.6. Unit undersized.1. Thermostat malfunction.2. Gas controls do not shut-off.a. Gas controls wired incorrectly.b. Short circuit.3. Main gas pressure set too high.4. Defective gas valve.The unit heater comes standard with an automatic reset highlimit switch that will shut-off the gas should the discharge airtemperature become excessive. See Figure 15.1, indicator ➆for the location of either the standard automatic high limit switch.The switch should operate only when something is seriouslywrong with the unit operation. Anytime the switch operates,correct the difficulty immediately or serious damage may result.If the switch cuts off the gas supply during normal operation,refer to the “Not Enough Heat” section of <strong>Service</strong> &Troubleshooting.Figure 18.1Wavering Flame or MisalignmentFigure 18.2Lifting Flame ConditionFigure 18.3Floating Flame Condition1. Reduce primary air.2. Adjust to maximum of 14” W.C.3. Check orifice size with those listed onthe serial plate.1. Increase primary air.2. Adjust to a maximum of 14" W.C.3. Check orifice size with those listed onthe serial plate.4. Clean/correct venting system.1. Adjust to a maximum of 14" W.C.2. Check orifice size with those listed onthe serial plate.3. Clean/correct venting system.1.a. Clean/correct duct system.b. Adjust to a maximum of 14" W.C.c. Check/correct to insure blower motoroperates within 45 seconds of whengas controls are energized.d. Adjust belt tension.e. Check/correct blower drive settings forproper rpm.f. Check/correct venting system.g. Replace air distribution baffle.h. Replace high limit switch.2. Adjust main gas pressure.Minimum for Natural Gas — 6" W.C.Minimum for Propane Gas — 11" W.C.3. Adjust outside air damper to decreaseoutside air percentage (if possible).4. Check/replace thermostat.5. Check unit wiring against the wiringdiagram.6. Check design conditions. If unit isundersized, an additional unit(s) or otherheat source must be added.1. Check/replace thermostat.2.a. Check unit wiring against the wiringdiagram.b. Check for loose or worn wires.3. Adjust to a maximum of 14" W.C.4. Replace gas valve.Figure 18.4Flame Rollout AppearanceGOODBAD18
![Owner's Manual (General) [pdf] - Appliance Factory Parts](https://img.yumpu.com/50830858/1/184x260/owners-manual-general-pdf-appliance-factory-parts.jpg?quality=85)