Maintenance & Inspection Guide - Johnstech
Maintenance & Inspection Guide - Johnstech
Maintenance & Inspection Guide - Johnstech

Create successful ePaper yourself
Turn your PDF publications into a flip-book with our unique Google optimized e-Paper software.
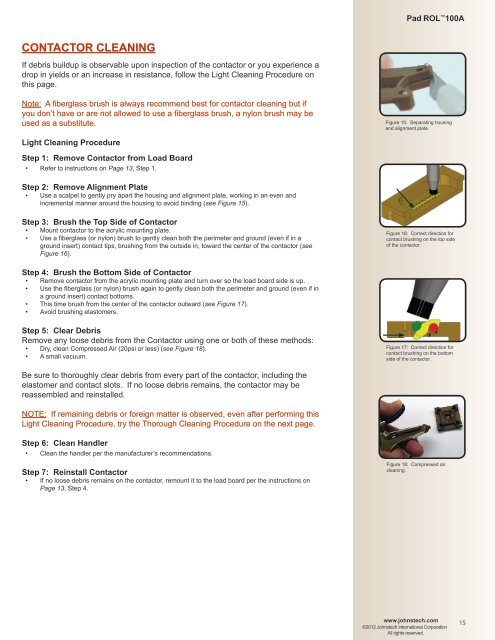
Pad ROL 100ACONTACTOR CLEANINGIf debris buildup is observable upon inspection of the contactor or you experience adrop in yields or an increase in resistance, follow the Light Cleaning Procedure onthis page.Note: A fiberglass brush is always recommend best for contactor cleaning but ifyou don’t have or are not allowed to use a fiberglass brush, a nylon brush may beused as a substitute.Figure 15: Separating housingand alignment plate.Light Cleaning ProcedureStep 1: Remove Contactor from Load Board• Refer to instructions on Page 13, Step 1.Step 2: Remove Alignment Plate• Use a scalpel to gently pry apart the housing and alignment plate, working in an even andincremental manner around the housing to avoid binding (see Figure 15).Step 3: Brush the Top Side of Contactor• Mount contactor to the acrylic mounting plate.• Use a fiberglass (or nylon) brush to gently clean both the perimeter and ground (even if in aground insert) contact tips, brushing from the outside in, toward the center of the contactor (seeFigure 16).Figure 16: Correct direction forcontact brushing on the top sideof the contactor.Step 4: Brush the Bottom Side of Contactor• Remove contactor from the acrylic mounting plate and turn over so the load board side is up.• Use the fiberglass (or nylon) brush again to gently clean both the perimeter and ground (even if ina ground insert) contact bottoms.• This time brush from the center of the contactor outward (see Figure 17).• Avoid brushing elastomers.Step 5: Clear DebrisRemove any loose debris from the Contactor using one or both of these methods:• Dry, clean Compressed Air (20psi or less) (see Figure 18).• A small vacuum.Figure 17: Correct direction forcontact brushing on the bottomside of the contactor.Be sure to thoroughly clear debris from every part of the contactor, including theelastomer and contact slots. If no loose debris remains, the contactor may bereassembled and reinstalled.NOTE: If remaining debris or foreign matter is observed, even after performing thisLight Cleaning Procedure, try the Thorough Cleaning Procedure on the next page.Step 6: Clean Handler• Clean the handler per the manufacturer’s recommendations.Step 7: Reinstall Contactor• If no loose debris remains on the contactor, remount it to the load board per the instructions onPage 13, Step 4.Figure 18: Compressed aircleaning.www.johnstech.com©2012 <strong>Johnstech</strong> International CorporationAll rights reserved.15