Maintenance & Inspection Guide - Johnstech
Maintenance & Inspection Guide - Johnstech
Maintenance & Inspection Guide - Johnstech

Create successful ePaper yourself
Turn your PDF publications into a flip-book with our unique Google optimized e-Paper software.
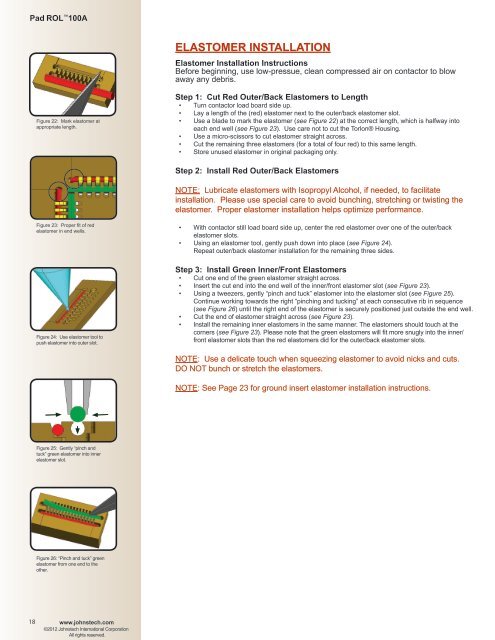
Pad ROL 100AELASTOMER INSTALLATIONElastomer Installation InstructionsBefore beginning, use low-pressue, clean compressed air on contactor to blowaway any debris.Figure 22: Mark elastomer atappropriate length.Step 1: Cut Red Outer/Back Elastomers to Length• Turn contactor load board side up.• Lay a length of the (red) elastomer next to the outer/back elastomer slot.• Use a blade to mark the elastomer (see Figure 22) at the correct length, which is halfway intoeach end well (see Figure 23). Use care not to cut the Torlon® Housing.• Use a micro-scissors to cut elastomer straight across.• Cut the remaining three elastomers (for a total of four red) to this same length.• Store unused elastomer in original packaging only.Step 2: Install Red Outer/Back ElastomersNOTE: Lubricate elastomers with Isopropyl Alcohol, if needed, to facilitateinstallation. Please use special care to avoid bunching, stretching or twisting theelastomer. Proper elastomer installation helps optimize performance.Figure 23: Proper fit of redelastomer in end wells.Figure 24: Use elastomer tool topush elastomer into outer slot.• With contactor still load board side up, center the red elastomer over one of the outer/backelastomer slots.• Using an elastomer tool, gently push down into place (see Figure 24).Repeat outer/back elastomer installation for the remaining three sides.Step 3: Install Green Inner/Front Elastomers• Cut one end of the green elastomer straight across.• Insert the cut end into the end well of the inner/front elastomer slot (see Figure 23).• Using a tweezers, gently “pinch and tuck” elastomer into the elastomer slot (see Figure 25).Continue working towards the right “pinching and tucking” at each consecutive rib in sequence(see Figure 26) until the right end of the elastomer is securely positioned just outside the end well.• Cut the end of elastomer straight across (see Figure 23).• Install the remaining inner elastomers in the same manner. The elastomers should touch at thecorners (see Figure 23). Please note that the green elastomers will fit more snugly into the inner/front elastomer slots than the red elastomers did for the outer/back elastomer slots.NOTE: Use a delicate touch when squeezing elastomer to avoid nicks and cuts.DO NOT bunch or stretch the elastomers.NOTE: See Page 23 for ground insert elastomer installation instructions.Figure 25: Gently “pinch andtuck” green elastomer into innerelastomer slot.Figure 26: “Pinch and tuck” greenelastomer from one end to theother.18www.johnstech.com©2012 <strong>Johnstech</strong> International CorporationAll rights reserved.