Maintenance & Inspection Guide - Johnstech
Maintenance & Inspection Guide - Johnstech
Maintenance & Inspection Guide - Johnstech

Create successful ePaper yourself
Turn your PDF publications into a flip-book with our unique Google optimized e-Paper software.
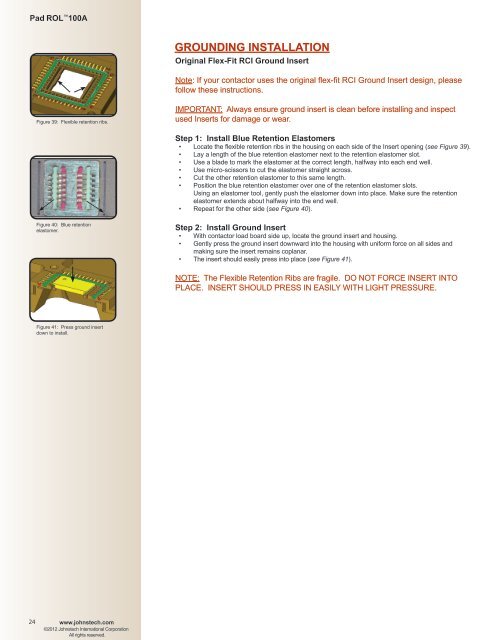
Pad ROL 100AGROUNDING INSTALLATIONOriginal Flex-Fit RCI Ground InsertNote: If your contactor uses the original flex-fit RCI Ground Insert design, pleasefollow these instructions.Figure 39: Flexible retention ribs.IMPORTANT: Always ensure ground insert is clean before installing and inspectused Inserts for damage or wear.Step 1: Install Blue Retention Elastomers• Locate the flexible retention ribs in the housing on each side of the Insert opening (see Figure 39).• Lay a length of the blue retention elastomer next to the retention elastomer slot.• Use a blade to mark the elastomer at the correct length, halfway into each end well.• Use micro-scissors to cut the elastomer straight across.• Cut the other retention elastomer to this same length.• Position the blue retention elastomer over one of the retention elastomer slots.Using an elastomer tool, gently push the elastomer down into place. Make sure the retentionelastomer extends about halfway into the end well.• Repeat for the other side (see Figure 40).Figure 40: Blue retentionelastomer.Step 2: Install Ground Insert• With contactor load board side up, locate the ground insert and housing.• Gently press the ground insert downward into the housing with uniform force on all sides andmaking sure the insert remains coplanar.• The insert should easily press into place (see Figure 41).NOTE: The Flexible Retention Ribs are fragile. DO NOT FORCE INSERT INTOPLACE. INSERT SHOULD PRESS IN EASILY WITH LIGHT PRESSURE.Figure 41: Press ground insertdown to install.24www.johnstech.com©2012 <strong>Johnstech</strong> International CorporationAll rights reserved.