
You also want an ePaper? Increase the reach of your titles
YUMPU automatically turns print PDFs into web optimized ePapers that Google loves.
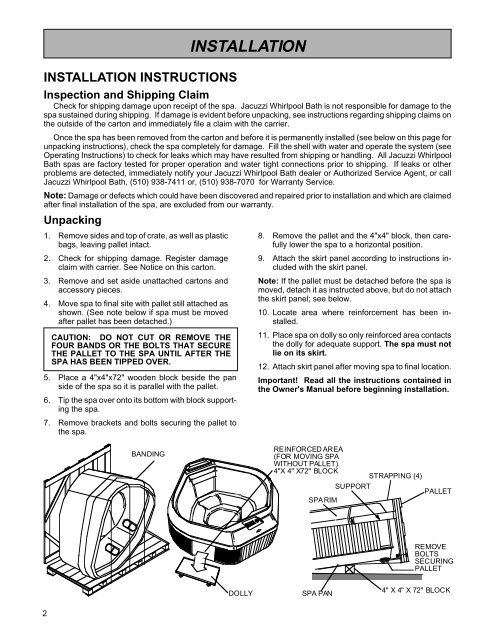
INSTALLATION INSTRUCTIONSInspection and Shipping ClaimCheck for shipping damage upon receipt of the spa. Jacuzzi Whirlpool Bath is not responsible for damage to thespa sustained during shipping. If damage is evident before unpacking, see instructions regarding shipping claims onthe outside of the carton and immediately file a claim with the carrier.Once the spa has been removed from the carton and before it is permanently installed (see below on this page forunpacking instructions), check the spa completely for damage. Fill the shell with water and operate the system (seeOperating Instructions) to check for leaks which may have resulted from shipping or handling. All Jacuzzi WhirlpoolBath spas are factory tested for proper operation and water tight connections prior to shipping. If leaks or otherproblems are detected, immediately notify your Jacuzzi Whirlpool Bath dealer or Authorized Service Agent, or callJacuzzi Whirlpool Bath, (510) 938-7411 or, (510) 938-7070 for Warranty Service.Note: Damage or defects which could have been discovered and repaired prior to installation and which are claimedafter final installation of the spa, are excluded from our warranty.UnpackingINSTALLATION1. Remove sides and top of crate, as well as plasticbags, leaving pallet intact.2. Check for shipping damage. Register damageclaim with carrier. See Notice on this carton.3. Remove and set aside unattached cartons andaccessory pieces.4. Move spa to final site with pallet still attached asshown. (See note below if spa must be movedafter pallet has been detached.)CAUTION: DO NOT CUT OR REMOVE THEFOUR BANDS OR THE BOLTS THAT SECURETHE PALLET TO THE SPA UNTIL AFTER THESPA HAS BEEN TIPPED OVER.5. Place a 4"x4"x72" wooden block beside the panside of the spa so it is parallel with the pallet.6. Tip the spa over onto its bottom with block supportingthe spa.8. Remove the pallet and the 4"x4" block, then carefullylower the spa to a horizontal position.9. Attach the skirt panel according to instructions includedwith the skirt panel.Note: If the pallet must be detached before the spa ismoved, detach it as instructed above, but do not attachthe skirt panel; see below.10. Locate area where reinforcement has been installed.11. Place spa on dolly so only reinforced area contactsthe dolly for adequate support. The spa must notlie on its skirt.12. Attach skirt panel after moving spa to final location.Important! Read all the instructions contained inthe Owner's Manual before beginning installation.7. Remove brackets and bolts securing the pallet tothe spa.BANDINGREINFORCED AREA(FOR MOVING SPAWITHOUT PALLET)4"X 4" X72" BLOCKSTRAPPING (4)SUPPORTPALLETSPA RIMREMOVEBOLTSSECURINGPALLETDOLLYSPA PAN4" X 4" X 72" BLOCK2