You also want an ePaper? Increase the reach of your titles
YUMPU automatically turns print PDFs into web optimized ePapers that Google loves.
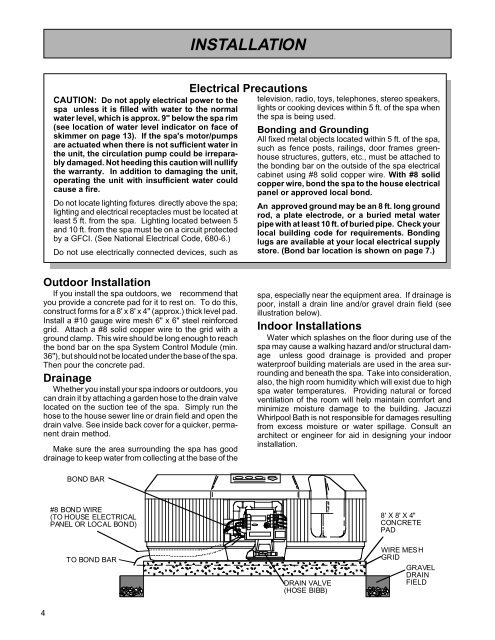
INSTALLATIONCAUTION: Do not apply electrical power to thespa unless it is filled with water to the normalwater level, which is approx. 9" below the spa rim(see location of water level indicator on face ofskimmer on page 13). If the spa's motor/pumpsare actuated when there is not sufficient water inthe unit, the circulation pump could be irreparablydamaged. Not heeding this caution will nullifythe warranty. In addition to damaging the unit,operating the unit with insufficient water couldcause a fire.Do not locate lighting fixtures directly above the spa;lighting and electrical receptacles must be located atleast 5 ft. from the spa. Lighting located between 5and 10 ft. from the spa must be on a circuit protectedby a GFCI. (See National Electrical Code, 680-6.)Do not use electrically connected devices, such asElectrical Precautionstelevision, radio, toys, telephones, stereo speakers,lights or cooking devices within 5 ft. of the spa whenthe spa is being used.Bonding and GroundingAll fixed metal objects located within 5 ft. of the spa,such as fence posts, railings, door frames greenhousestructures, gutters, etc., must be attached tothe bonding bar on the outside of the spa electricalcabinet using #8 solid copper wire. With #8 solidcopper wire, bond the spa to the house electricalpanel or approved local bond.An approved ground may be an 8 ft. long groundrod, a plate electrode, or a buried metal waterpipe with at least 10 ft. of buried pipe. Check yourlocal building code for requirements. Bondinglugs are available at your local electrical supplystore. (Bond bar location is shown on page 7.)Outdoor InstallationIf you install the spa outdoors, we recommend thatyou provide a concrete pad for it to rest on. To do this,construct forms for a 8' x 8' x 4" (approx.) thick level pad.Install a #10 gauge wire mesh 6" x 6" steel reinforcedgrid. Attach a #8 solid copper wire to the grid with aground clamp. This wire should be long enough to reachthe bond bar on the spa System Control Module (min.36"), but should not be located under the base of the spa.Then pour the concrete pad.DrainageWhether you install your spa indoors or outdoors, youcan drain it by attaching a garden hose to the drain valvelocated on the suction tee of the spa. Simply run thehose to the house sewer line or drain field and open thedrain valve. See inside back cover for a quicker, permanentdrain method.Make sure the area surrounding the spa has gooddrainage to keep water from collecting at the base of thespa, especially near the equipment area. If drainage ispoor, install a drain line and/or gravel drain field (seeillustration below).Indoor InstallationsWater which splashes on the floor during use of thespa may cause a walking hazard and/or structural damageunless good drainage is provided and properwaterproof building materials are used in the area surroundingand beneath the spa. Take into consideration,also, the high room humidity which will exist due to highspa water temperatures. Providing natural or forcedventilation of the room will help maintain comfort andminimize moisture damage to the building. JacuzziWhirlpool Bath is not responsible for damages resultingfrom excess moisture or water spillage. Consult anarchitect or engineer for aid in designing your indoorinstallation.BOND BAR#8 BOND WIRE(TO HOUSE ELECTRICALPANEL OR LOCAL BOND)8' X 8' X 4"CONCRETEPADTO BOND BARDRAIN VALVE(HOSE BIBB)WIRE MESHGRIDGRAVELDRAINFIELD4


