You also want an ePaper? Increase the reach of your titles
YUMPU automatically turns print PDFs into web optimized ePapers that Google loves.
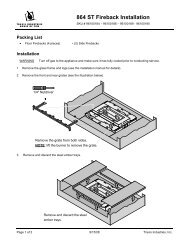
<strong>Lopi</strong> <strong>Door</strong> <strong>Shell</strong> (<strong>No</strong> <strong>Ashlip</strong> <strong>Trim</strong>)(Small Black - 96100634 Small Brass - 96100635 Small Pewter – 96100636)(Large Black - 96100664 Large Brass - 96100665 Large Pewter – 96100666)Compatibility• <strong>Lopi</strong> Answer ND (SKU 99800199)• <strong>Lopi</strong> Endeavor ND (SKU 99800203)• <strong>Lopi</strong> Revere ND (SKU 99800303)• <strong>Lopi</strong> Freedom ND (SKU 99800153)• <strong>Lopi</strong> Liberty ND (SKU 99800311)Installation InstructionsPacking List• <strong>Door</strong> <strong>Shell</strong>• <strong>Door</strong> Handle (with Nut, Washers, and Cam)• (2) Attachment ScrewsTools Needed• Standard Screwdriver• 9/16" Wrench• 5/16” Nutdriver (<strong>Door</strong> Screws)1. Remove the door retainer shipping latch following the directions below.StandardScrewdriverRotate this shaft1/4 turn clockwiseuntil the doorunlatches.Swing the door retianer open. Remove anddiscard the shipping latch and nut.Shipping Latch<strong>Door</strong> Retainer9/16" WrenchPage 1 of 4 17601772.docx Printed 9/13/13
<strong>Lopi</strong> <strong>Door</strong> <strong>Shell</strong> (<strong>No</strong> <strong>Ashlip</strong> <strong>Trim</strong>)(Small Black - 96100634 Small Brass - 96100635 Small Pewter – 96100636)(Large Black - 96100664 Large Brass - 96100665 Large Pewter – 96100666)2. Place the door shell face down on a non-scratching surface.Nickel (Cast Iron) <strong>Door</strong>s OnlyUse a socket-head wrench with 5/16” socket to pre-thread the holes six revolutions. If you pre-threadmore revolutions, it may bottom out and break the head off the screw. Remove and retain the screws.See the photos below.3. Place the door retainer into the door shell as shown below.<strong>Door</strong> Retainer<strong>Door</strong> <strong>Shell</strong>The indent on the door retainer slides intothe clip on the door shell (on both sides).Page 2 of 4 17601772.docx Printed 9/13/13
<strong>Lopi</strong> <strong>Door</strong> <strong>Shell</strong> (<strong>No</strong> <strong>Ashlip</strong> <strong>Trim</strong>)(Small Black - 96100634 Small Brass - 96100635 Small Pewter – 96100636)(Large Black - 96100664 Large Brass - 96100665 Large Pewter – 96100666)4. Make sure the holes in the retainer line up with the holes on the shell then use a 5/16” nutdriver tosecure the shell with the two screws. Tighten until the door shell is snug against the retainer (donot over-tighten).WARNING: Do not use a power drill or driver to attach the screws.The castings must be properly threaded and not stripped.5/16" Nutdriver5. Attach the door handle following the directions below.NOTE: If the door handle does not line up correctly with the retainer and door shell, loosen the twoscrews tightened in step 4, align the door retainer and shell, then re-tighten the two screws.9/16" Wrench6. Replace the door on the hinges and latch the door.Page 3 of 4 17601772.docx Printed 9/13/13
<strong>Lopi</strong> <strong>Door</strong> <strong>Shell</strong> (<strong>No</strong> <strong>Ashlip</strong> <strong>Trim</strong>)(Small Black - 96100634 Small Brass - 96100635 Small Pewter – 96100636)(Large Black - 96100664 Large Brass - 96100665 Large Pewter – 96100666)Cleaning InstructionsMake sure the stove or fireplace insert has fully cooled prior to cleaning.Black <strong>Door</strong>sBlack doors only require dusting. Wood stove touch-up paint may be used to improve the surface.Brass <strong>Door</strong>sThe solid brass doors should be cleaned with Flitz® or other non-abrasive brass cleaner. Refer to theinstructions included with the brass cleaner.Pewter <strong>Door</strong>sUse denatured alcohol or a non-abrasive glass cleaner and a soft cloth to clean plated surfaces.Page 4 of 4 17601772.docx Printed 9/13/13