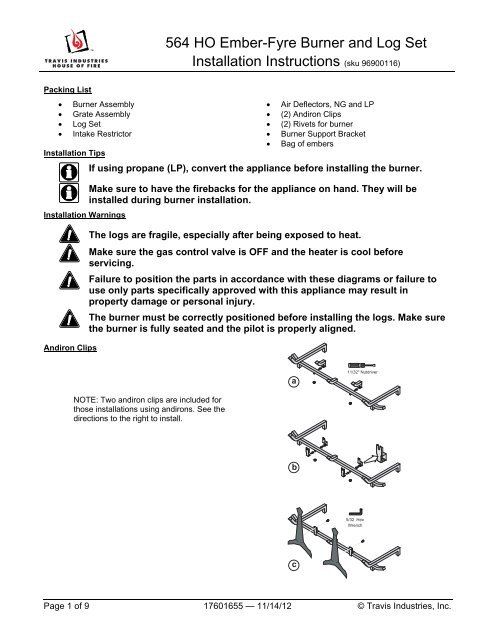
564 HO Ember-Fyre Burner and Log Set Installation ... - Avalon
564 HO Ember-Fyre Burner and Log Set Installation ... - Avalon
564 HO Ember-Fyre Burner and Log Set Installation ... - Avalon

You also want an ePaper? Increase the reach of your titles
YUMPU automatically turns print PDFs into web optimized ePapers that Google loves.
<strong>564</strong> <strong>HO</strong> <strong>Ember</strong>-<strong>Fyre</strong> <strong>Burner</strong> <strong>and</strong> <strong>Log</strong> <strong>Set</strong><strong>Installation</strong> Instructions (sku 96900116)5. Replace the Accent Lights. The fireplace should now look as shown below.6. Install the burner inside the firebox.7. Install the grate on top of the burner. Note how the grate slides into metal clips on the sides of the burner.Page 4 of 9 17601655 — 11/14/12 © Travis Industries, Inc.
<strong>564</strong> <strong>HO</strong> <strong>Ember</strong>-<strong>Fyre</strong> <strong>Burner</strong> <strong>and</strong> <strong>Log</strong> <strong>Set</strong><strong>Installation</strong> Instructions (sku 96900116)8. Install the correct air deflector as shown below. Note how the dimple inserts into a slot on the burner (“a”).NG aLPaFigure 1: Deflector Replacement9. Install the rivets on the burner as shown below.NGNLLLPNLLFigure 2: Rivets PlacementPage 5 of 9 17601655 — 11/14/12 © Travis Industries, Inc.
<strong>564</strong> <strong>HO</strong> <strong>Ember</strong>-<strong>Fyre</strong> <strong>Burner</strong> <strong>and</strong> <strong>Log</strong> <strong>Set</strong><strong>Installation</strong> Instructions (sku 96900116)10. Install the Rear <strong>Log</strong> onto the 2 pins at the rear of the firebox, as shown below. The log rests against the backwall or fireback.NOTE: NG <strong>and</strong> LP configurations require different log placement settings. For NG pull the rear log forward formaximum glow. For LP push the rear log to the back to avoid sooting.Figure 3: Rear <strong>Log</strong> LocationFigure 4: Rear <strong>Log</strong> InstalledFigure 5: Rear <strong>Log</strong> – Top ViewFigure 6: Rear <strong>Log</strong> - Bottom View11. Install the Left <strong>Log</strong> onto the 2 pins at the left of the firebox, as shown below. Note how the pin <strong>and</strong> metal postinsert into the holes on the log.Figure 7: Left <strong>Log</strong> LocationFigure 8: Left <strong>Log</strong> InstalledFigure 9: Left <strong>Log</strong> – Top ViewFigure 10: Left <strong>Log</strong> - Bottom ViewPage 6 of 9 17601655 — 11/14/12 © Travis Industries, Inc.
<strong>564</strong> <strong>HO</strong> <strong>Ember</strong>-<strong>Fyre</strong> <strong>Burner</strong> <strong>and</strong> <strong>Log</strong> <strong>Set</strong><strong>Installation</strong> Instructions (sku 96900116)12. Install the Right <strong>Log</strong> onto the 2 pins at the right of the firebox, as shown below. Note how the two pins on theburner insert into the holes on the log.Figure 11: Right <strong>Log</strong> LocationFigure 12: Right <strong>Log</strong> InstalledFigure 13: Right <strong>Log</strong> – Top ViewFigure 14: Right <strong>Log</strong> - Bottom View13. Install the Center <strong>Ember</strong> Chunk as shown below. Note how the pin inserts into the hole on the log.Figure 15: Center <strong>Ember</strong> Chunk LocationFigure 16: Center <strong>Ember</strong> Chunk InstalledFigure 17: Center <strong>Ember</strong> Chunk - Top ViewFigure 18: Center <strong>Ember</strong> Chunk - Bottom ViewPage 7 of 9 17601655 — 11/14/12 © Travis Industries, Inc.
<strong>564</strong> <strong>HO</strong> <strong>Ember</strong>-<strong>Fyre</strong> <strong>Burner</strong> <strong>and</strong> <strong>Log</strong> <strong>Set</strong><strong>Installation</strong> Instructions (sku 96900116)16. Install the Right Twig as shown below. Note how the flat side of the twig fits on the right log <strong>and</strong> the pin on therear log.Figure 27: Right Twig PinFigure 28: Right Twig InstalledFigure 29: Right Twig – Top ViewFigure 30: Right Twig -- Bottom View17. Remove the embers from their bag <strong>and</strong> place them around the front of the firebox, as shown below.Figure 31: <strong>Ember</strong>s PlacedPage 9 of 9 17601655 — 11/14/12 © Travis Industries, Inc.