
Create successful ePaper yourself
Turn your PDF publications into a flip-book with our unique Google optimized e-Paper software.
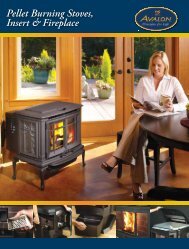
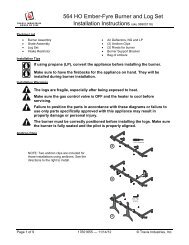
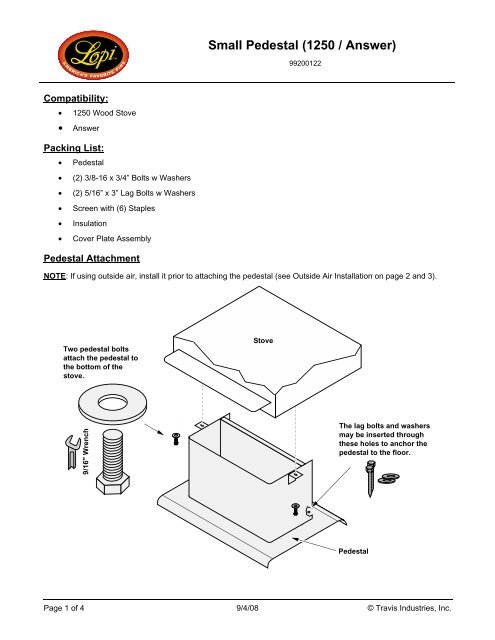
<strong>Small</strong> <strong>Pedestal</strong> (<strong>1250</strong> / <strong>Answer</strong>)99200122Compatibility:• <strong>1250</strong> Wood Stove• <strong>Answer</strong>Packing List:• <strong>Pedestal</strong>• (2) 3/8-16 x 3/4” Bolts w Washers• (2) 5/16” x 3” Lag Bolts w Washers• Screen with (6) Staples• Insulation• Cover Plate Assembly<strong>Pedestal</strong> AttachmentNOTE: If using outside air, install it prior to attaching the pedestal (see Outside Air Installation on page 2 and 3).Two pedestal boltsattach the pedestal tothe bottom of thestove.Stove9/16" WrenchThe lag bolts and washersmay be inserted throughthese holes to anchor thepedestal to the floor.<strong>Pedestal</strong>Page 1 of 4 9/4/08 © Travis Industries, Inc.
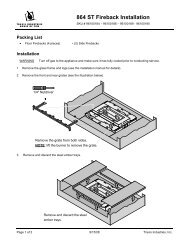
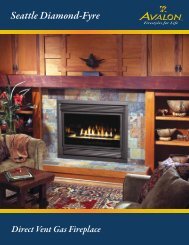
<strong>Small</strong> <strong>Pedestal</strong> (<strong>1250</strong> / <strong>Answer</strong>)99200122Outside Air Installation – Using the Outside Air Kit (99200139)aTuck insulation (included with thepedestal) under both sides of thepedestal and under the holes on thebase of the pedestal. This prevents airfrom beingdrawn from belowthe pedestal.bRemove the coverplate on the pedestal.Seal the area aroundthe tube to preventair from enteringthrough the wall.Select a location betweenframing members for thewall penetration.NOTE: If wall is thickerthan 8", attach the flex ductto the hood then slide thehood into place.eSecure the flex duct to theair duct assembly usingthe included hose clamp.Attach the outside air ductassembly to the pedestalwith the same screws thatheld the cover plate inplace.3" Dia. Flex Duct(4' max. length)dCover PlateSlide the cover plate over the flex ductthen attach the flex duct to the hood withthe included hose clamp. Secure thecover plate to the wall with the includedscrews (and drywall anchors if needed).HINT: The flex must be fully stretched andthe ends cut square and flatted for it to fitproperly. The tube on the hood and airduct may be crimped if necessary.Min. 3"Dia. Hole8"SiliconeSiliconeHood with Rodent ScreencSlide the hoodthrough the wall andsecure to the outsidewall with the twoincluded screws.Outside Air Cover Plate (Required on the <strong>Answer</strong> ONLY)When using outside air with the <strong>Answer</strong>, install the cover plate to insure combustion air is drawn from below.Remove the bridge and plugs from the front ofthe cover plate.Remove the air control stop on the stove.Attach the air control stop and cover plate asshown above. HINT: Place one screw through thecover plate and air control stop, and while holdingthem together, slide the components into placeand tighten the screws to secure.Re-attach the bridge to complete the cover plate installation.Page 2 of 4 9/4/08 © Travis Industries, Inc.
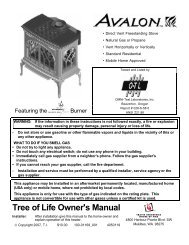
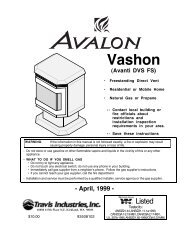
<strong>Small</strong> <strong>Pedestal</strong> (<strong>1250</strong> / <strong>Answer</strong>)99200122Outside Air Installation – Through the <strong>Pedestal</strong> into the Crawl SpaceThis pedestal has an internal air duct that may be used to direct air to the firebox. Outside air is then drawn fromthe crawl space under the stove (check with local building codes for requirements in your area). See thedirections below for installation details.1 Determine the location of the hole placed under the pedestal. The illustration below details the location of thepedestal in relation to the front of the stove. The hole should be at least 16 square inches.Top ViewThe faceplate of the <strong>Answer</strong>is flush with the front of theforward edge of the pedestalbase.The faceplate of the <strong>1250</strong> is1/4" in front of the forwardedge of the pedestal base.23 1/2"12"1516"Outside air may be drawnfrom this area underneaththe pedestal(min. 16 square inches)FRONT2 Outside Air Cover Plate (Required on the <strong>Answer</strong> ONLY) When using outside air with the <strong>Answer</strong>, installthe cover plate to insure combustion air is drawn from below.Remove the bridge and plugs from the front ofthe cover plate.Remove the air control stop on the stove.Attach the air control stop and cover plate asshown above. HINT: Place one screw through thecover plate and air control stop, and while holdingthem together, slide the components into placeand tighten the screws to secure.Re-attach the bridge to complete the cover plate installation.Page 3 of 4 9/4/08 © Travis Industries, Inc.
<strong>Small</strong> <strong>Pedestal</strong> (<strong>1250</strong> / <strong>Answer</strong>)992001223 Attach the included screen over the hole (staples are included with the pedestal). Place the pedestal in placeand tuck insulation under both sides of the pedestal and under the holes in the base of the pedestal (see step“a” on the previous page). This prevents air from entering under the pedestal.Insulation is used to seal the sideedges of the pedestal .Screen is used to preventrodents from entering.Staples are used to attachthe screen to the floor.4 Attach the stove to the pedestal.Page 4 of 4 9/4/08 © Travis Industries, Inc.