SP-2000/X-Y AutoCam⢠Pedestal - Vinten Radamec
SP-2000/X-Y AutoCam⢠Pedestal - Vinten Radamec
SP-2000/X-Y AutoCam⢠Pedestal - Vinten Radamec
- No tags were found...

You also want an ePaper? Increase the reach of your titles
YUMPU automatically turns print PDFs into web optimized ePapers that Google loves.
<strong>SP</strong>-<strong>2000</strong>/X-YAutoCam <strong>Pedestal</strong>Operation, InstallationAnd Maintenance(pn AB-300101 for sn 80xxxx0020 - 021601)i
<strong>SP</strong>-<strong>2000</strong>/X-Y <strong>Pedestal</strong>SafetyIMPORTANT!: Read the Safety Section starting on page 1-2before installing or using this equipment, or attempting anyadjustment or repair. This safety triangle is used in the manual toindicate important information. Read this information carefully toavoid the risk of personal injury, injury to others, or damage to the equipment.Warning LabelsVarious colored safety labels are attached to the AutoCam equipment to alert you tohazardous situations. The labels and their meaning are described below.DANGER (with a red background) indicates an imminentlyhazardous situation which, if not avoided, will result in death or serious injury.WARNING (with an orange background) indicates a potentiallyhazardous situation which, if not avoided, could result in death or seriousinjury.CAUTION (with a yellow background) indicates a potentiallyhazardous situation which, if not avoided, may result in minor or moderateinjury.CAUTION (with a yellow background, but without the SafetyAlert symbol) indicates a potentially hazardous situation which, if not avoided,may result in property damage.ii
Critical Data For <strong>SP</strong>-<strong>2000</strong>/X-YMass (Weight)Maximum LoadMaximum PressureInput VoltageInput Power*Date Of Manufacture 2001525 lb (239 kg)320 lb (145 kg)150 bar (2200 psi)+36 VDC nominal+4 Amps nominal+12 Amps peak* NOTE: In a typical system, the AC power consumption of the pedestal, head andrack mount power supply combined is 1000W maximum.iii
Technical SupportIf you are based in North, South or Central America and need technical support onthe AutoCam system, contact <strong>Vinten</strong> Inc. at:709 Executive Blvd.Valley Cottage, NY 10989USAPhone:1-888 4 VINTEN (1-888-484-6836) - Toll free in the U.S.A.+1 845-268-0100Fax:+1 845-268-0113Or, if you are based outside of North, South or Central America, contact <strong>Vinten</strong>Broadcast Limited at:Western WayBury St. EdmundsSuffolk IP33 3TBENGLANDPhone: +44 (0) 284 752121Fax: +44 (0) 284 750560iv
Warranty<strong>Vinten</strong>, Incorporated (<strong>Vinten</strong>) warrants that its equipment shall be free of defects inmaterial and workmanship for a period of twelve (12) months from the first date ofinstallation, but no more than eighteen (18) months from date of shipment, and isextended only to the original purchaser. <strong>Vinten</strong>, at its option, will repair or replacedefective components. Warranty covers only those defects that occur when the equipmentis used in the manner described in the Operation, Installation, and Service manual.<strong>Vinten</strong>’s liability is limited to parts, material, and labor necessary to repair orreplace equipment manufactured by <strong>Vinten</strong>. Any and all consequential damages areexcluded. Consumable supplies and normal wear items are the customer’s responsibilityand are not covered by this warranty.The warranty is in effect only when equipment is operated, adjusted, and maintainedin the manner described in the appropriate Operation, Installation, and Service manual.Modifications, service by non-authorized service personnel, failure to provideproper maintenance, and abuse and misuse of the equipment will void the warranty.Repairs not covered by this warranty will be billed for parts, labor, and expenses atthe rates in effect at the time of service.Warranty service and repair will normally be performed at the <strong>Vinten</strong> factory in ValleyCottage, New York, but may, at the discretion of <strong>Vinten</strong>, be performed on the customersite. It is the customer’s responsibility to contact <strong>Vinten</strong> and obtainauthorization prior to returning equipment for warranty service. Returned equipmentmust include a Return Material Authorization (RMA) number, and a failure reportdescribing the nature of the failure or complaint as well as the customer’s name,address, and a contact name and phone number.v
CopyrightThe <strong>Vinten</strong> Inc. AutoCam User Manual is copyrighted with all rights reserved. Underthe copyright law, this manual may not be copied, in whole or in part, without writtenconsent from <strong>Vinten</strong> Inc.© 1995 - 2001 by <strong>Vinten</strong> Inc.Disclosure Statement - AutoCam SystemThis document contains information proprietary to <strong>Vinten</strong> Inc. Except by writtenauthorization from <strong>Vinten</strong> Inc., the information contained in this document shall not,in whole or in part, be disclosed to third parties, reproduced for any purpose, or usedexcept for evaluation, operation and maintenance of equipment supplied by <strong>Vinten</strong>Inc. or <strong>Vinten</strong> Broadcast.Manual OutlineThis manual covers the installation, operation and maintenance of the AutoCam <strong>SP</strong>-<strong>2000</strong>/X-Y robotic pedestal. See Chapter 1 for a detailed description of the contents ofthis manual.Product Serial Numbers<strong>Vinten</strong> AutoCam products are marked with unique serial numbers that include a 2digit product identifier, a 4 digit serial number and a 2 character revision code. Theformat is AABBBBXXCD where:AABBBBProduct Identifier - 80 for the <strong>SP</strong>-<strong>2000</strong>/X-YSerial numberXX Reserved for future use - currently 00CDPrimary revision status - 0, 1, 2, 3 etc.Secondary revision status - 0, A, B, C etc.This manual is applicable to products that have serial numbers 80xxxx0020 wherexxxx may be any 4 digit number.AutoCam TM , <strong>Vinten</strong> Inc. TM and Lubricated Friction (LF TM ) are trademarks of<strong>Vinten</strong> Inc. or <strong>Vinten</strong> Broadcast Limited.Specifications and features are subject to change without prior notice.(021601)vi
Table Of Contents<strong>SP</strong>-<strong>2000</strong>/X-Y <strong>Pedestal</strong> . . . . . . . . . . . . . . . . . . . . . . . . . . . . . . . . . . . iiSafety . . . . . . . . . . . . . . . . . . . . . . . . . . . . . . . . . . . . . . . . . . . . . . . . iiWarning Labels . . . . . . . . . . . . . . . . . . . . . . . . . . . . . . . . . . . . . . . . . . . . .iiCritical Data For <strong>SP</strong>-<strong>2000</strong>/X-Y . . . . . . . . . . . . . . . . . . . . . . . . . . . . . . . . . iiiTechnical Support . . . . . . . . . . . . . . . . . . . . . . . . . . . . . . . . . . . . . ivWarranty . . . . . . . . . . . . . . . . . . . . . . . . . . . . . . . . . . . . . . . . . . . . . vCopyright . . . . . . . . . . . . . . . . . . . . . . . . . . . . . . . . . . . . . . . . . . . . . . . . . viDisclosure Statement - AutoCam System . . . . . . . . . . . . . . . . . . . . . . viManual Outline . . . . . . . . . . . . . . . . . . . . . . . . . . . . . . . . . . . . . . . . . . . . viProduct Serial Numbers . . . . . . . . . . . . . . . . . . . . . . . . . . . . . . . . . . . . . vi1 Safety & IntroductionSafety Issues . . . . . . . . . . . . . . . . . . . . . . . . . . . . . . . . . . . . . . . . 1–2<strong>Pedestal</strong> E-STOP Switches . . . . . . . . . . . . . . . . . . . . . . . . . . . . . . . . . 1–2Other E-StOP Switches . . . . . . . . . . . . . . . . . . . . . . . . . . . . . . . . . . . . 1–3Other Important Information . . . . . . . . . . . . . . . . . . . . . . . . . . . . . . . 1–5Customer Responsibility . . . . . . . . . . . . . . . . . . . . . . . . . . . . . . . . . . . 1–5Safe Working Environment . . . . . . . . . . . . . . . . . . . . . . . . . . . . . . . . . 1–5Safe Operating Zone And <strong>Pedestal</strong> Footprint . . . . . . . . . . . . . . . . . 1–6<strong>Pedestal</strong> Active Lights . . . . . . . . . . . . . . . . . . . . . . . . . . . . . . . . . . . . 1–6Warning Signs . . . . . . . . . . . . . . . . . . . . . . . . . . . . . . . . . . . . . . . . . . . 1–7<strong>Pedestal</strong>s And Heads Can Start Unexpectedly . . . . . . . . . . . . . . . 1–7Collision Bumper And Bumper Override . . . . . . . . . . . . . . . . . . . . . 1–8Bumper Override 1–8Pinch Points . . . . . . . . . . . . . . . . . . . . . . . . . . . . . . . . . . . . . . . . . . . . . 1–9Sharp Edges . . . . . . . . . . . . . . . . . . . . . . . . . . . . . . . . . . . . . . . . . . . . . 1–9Manual Outline . . . . . . . . . . . . . . . . . . . . . . . . . . . . . . . . . . . . . 1–10The <strong>SP</strong>-<strong>2000</strong>/X-Y Servo <strong>Pedestal</strong> . . . . . . . . . . . . . . . . . . . . . . . 1–12AutoCam Philosophy . . . . . . . . . . . . . . . . . . . . . . . . . . . . . . . . 1–14Seamless Integration Into The Studio . . . . . . . . . . . . . . . . . . . . . . . 1–14“Like Being Behind A Camera” . . . . . . . . . . . . . . . . . . . . . . . . . . . . 1–14An Easy Transition . . . . . . . . . . . . . . . . . . . . . . . . . . . . . . . . . . . . . . . 1–15Typical Applications . . . . . . . . . . . . . . . . . . . . . . . . . . . . . . . . . 1–16ACP-8000P System . . . . . . . . . . . . . . . . . . . . . . . . . . . . . . . . . . . . . . 1–16Typical System Configuration . . . . . . . . . . . . . . . . . . . . . . . . . 1–172 OperationIntroduction . . . . . . . . . . . . . . . . . . . . . . . . . . . . . . . . . . . . . . . . . 2–2Orientation . . . . . . . . . . . . . . . . . . . . . . . . . . . . . . . . . . . . . . . . . . 2–3vii
Table Of ContentsPowering Up The <strong>SP</strong>-<strong>2000</strong>/X-Y . . . . . . . . . . . . . . . . . . . . . . . . . . 2–4Powering Down . . . . . . . . . . . . . . . . . . . . . . . . . . . . . . . . . . . . . . . . . . 2–5Standby/Charge 2–5Stop 2–5Emergency STOP Switches . . . . . . . . . . . . . . . . . . . . . . . . . . . . . 2–6Direction Indicators . . . . . . . . . . . . . . . . . . . . . . . . . . . . . . . . . . 2–8<strong>Pedestal</strong> Active Lights . . . . . . . . . . . . . . . . . . . . . . . . . . . . . . . . 2–9Using The MCB Controller . . . . . . . . . . . . . . . . . . . . . . . . . . . . . 2–10Local/Remote . . . . . . . . . . . . . . . . . . . . . . . . . . . . . . . . . . . . . . . . . . 2–10Drive . . . . . . . . . . . . . . . . . . . . . . . . . . . . . . . . . . . . . . . . . . . . . . . . . . 2–10Rotate . . . . . . . . . . . . . . . . . . . . . . . . . . . . . . . . . . . . . . . . . . . . . . . . 2–10Raising/Lowering The Column . . . . . . . . . . . . . . . . . . . . . . . . . . . . . 2–10Targeting . . . . . . . . . . . . . . . . . . . . . . . . . . . . . . . . . . . . . . . . . . 2–113 InstallationIntroduction . . . . . . . . . . . . . . . . . . . . . . . . . . . . . . . . . . . . . . . . . 3–2Tools You Will Need . . . . . . . . . . . . . . . . . . . . . . . . . . . . . . . . . . . . . . 3–2Floor Preparation For Robotic <strong>Pedestal</strong>s . . . . . . . . . . . . . . . . . . 3–3Removing The <strong>SP</strong>-<strong>2000</strong>/X-Y From Its Crate . . . . . . . . . . . . . . . . 3–4Uncrating The <strong>Pedestal</strong> . . . . . . . . . . . . . . . . . . . . . . . . . . . . . . . . . . . 3–4Unloading The <strong>Pedestal</strong> . . . . . . . . . . . . . . . . . . . . . . . . . . . . . . . . . . . 3–6AC Powered Unloading . . . . . . . . . . . . . . . . . . . . . . . . . . . . . . . . . . . 3–8Mounting The Pan/Tilt Head & Payload . . . . . . . . . . . . . . . . . 3–10MCB Controller Mounting . . . . . . . . . . . . . . . . . . . . . . . . . . . . . . . . 3–11Pressurizing And Balancing The <strong>Pedestal</strong> . . . . . . . . . . . . . . . . 3–12Pressurizing The <strong>Pedestal</strong> . . . . . . . . . . . . . . . . . . . . . . . . . . . . . . . . . 3–12Balancing The <strong>Pedestal</strong> . . . . . . . . . . . . . . . . . . . . . . . . . . . . . . . . . . 3–14Finishing Up . . . . . . . . . . . . . . . . . . . . . . . . . . . . . . . . . . . . . . . . . . . . 3–15Discharging The <strong>Pedestal</strong> . . . . . . . . . . . . . . . . . . . . . . . . . . . . . . . . 3–15Calibrating The Collision Bumpers . . . . . . . . . . . . . . . . . . . . . 3–16Electrical Installation And Interconnection . . . . . . . . . . . . . . 3–18Removing The Payload . . . . . . . . . . . . . . . . . . . . . . . . . . . . . . 3–22Recrating The <strong>Pedestal</strong> . . . . . . . . . . . . . . . . . . . . . . . . . . . . . . . 3–24Crating The <strong>Pedestal</strong> . . . . . . . . . . . . . . . . . . . . . . . . . . . . . . . . . . . . 3–254 Maintenance And RepairSafety . . . . . . . . . . . . . . . . . . . . . . . . . . . . . . . . . . . . . . . . . . . . . . 4–2Other Important Information . . . . . . . . . . . . . . . . . . . . . . . . . . . . . . . 4–3viii
Table Of ContentsCustomer Responsibility . . . . . . . . . . . . . . . . . . . . . . . . . . . . . . . . . . . 4–3<strong>Pedestal</strong>s And Heads Can Start Unexpectedly . . . . . . . . . . . . . . . 4–3Pinch Points . . . . . . . . . . . . . . . . . . . . . . . . . . . . . . . . . . . . . . . . . . . . . 4–4Sharp Edges . . . . . . . . . . . . . . . . . . . . . . . . . . . . . . . . . . . . . . . . . . . . . 4–4Routine Maintenance . . . . . . . . . . . . . . . . . . . . . . . . . . . . . . . . . 4–6Cleaning The Targets . . . . . . . . . . . . . . . . . . . . . . . . . . . . . . . . . . . . . 4–6Removing Targets 4–6DC Power . . . . . . . . . . . . . . . . . . . . . . . . . . . . . . . . . . . . . . . . . . . . . . . 4–7Column Balance . . . . . . . . . . . . . . . . . . . . . . . . . . . . . . . . . . . . . . . . . 4–7Overall Operation . . . . . . . . . . . . . . . . . . . . . . . . . . . . . . . . . . . . . . . . 4–7E-STOP Switch Operation . . . . . . . . . . . . . . . . . . . . . . . . . . . . . . . . . . 4–8Collision Bumper Operation . . . . . . . . . . . . . . . . . . . . . . . . . . . . . . . 4–8Removing The Covers . . . . . . . . . . . . . . . . . . . . . . . . . . . . . . . . . . . . 4–9The North Cover 4–9The West Wheel Cover 4–10The East Wheel Cover 4–11Replacing The Covers 4–12Cleaning The Target Sensors . . . . . . . . . . . . . . . . . . . . . . . . . . . . . . 4–14Cleaning The Slip Rings . . . . . . . . . . . . . . . . . . . . . . . . . . . . . . . . . . 4–16Examining The Wheels . . . . . . . . . . . . . . . . . . . . . . . . . . . . . . . . . . . 4–18Cylinder Replacement . . . . . . . . . . . . . . . . . . . . . . . . . . . . . . . 4–20Electronics Repair . . . . . . . . . . . . . . . . . . . . . . . . . . . . . . . . . . . 4–22Service Philosophy . . . . . . . . . . . . . . . . . . . . . . . . . . . . . . . . . . . . . . 4–22Safety . . . . . . . . . . . . . . . . . . . . . . . . . . . . . . . . . . . . . . . . . . . . . . . . . 4–22Calibration . . . . . . . . . . . . . . . . . . . . . . . . . . . . . . . . . . . . . . . . . 4–24Collision Bumpers . . . . . . . . . . . . . . . . . . . . . . . . . . . . . . . . . . . . . . . 4–24Target Sensor Calibration . . . . . . . . . . . . . . . . . . . . . . . . . . . . . . . . 4–26Theory Of Operation . . . . . . . . . . . . . . . . . . . . . . . . . . . . . . . . . 4–30System . . . . . . . . . . . . . . . . . . . . . . . . . . . . . . . . . . . . . . . . . . . . . . . . 4–30Power Bus . . . . . . . . . . . . . . . . . . . . . . . . . . . . . . . . . . . . . . . . . . . . . . 4–30Data Bus . . . . . . . . . . . . . . . . . . . . . . . . . . . . . . . . . . . . . . . . . . . . . . . 4–30Battery Pack and Power Management . . . . . . . . . . . . . . . . . . . . . 4–31Battery Bypass 4–32The Targeting System . . . . . . . . . . . . . . . . . . . . . . . . . . . . . . . . 4–34Lowering The Sensors . . . . . . . . . . . . . . . . . . . . . . . . . . . . . . . . . . . . 4–34The Sensor Assembly . . . . . . . . . . . . . . . . . . . . . . . . . . . . . . . . . . . . . 4–34The Dolly Board . . . . . . . . . . . . . . . . . . . . . . . . . . . . . . . . . . . . . . . . . 4–344-Channel Servo Boards . . . . . . . . . . . . . . . . . . . . . . . . . . . . . . . . . 4–35Analog 4–35Digital 4–35Brushless Motors . . . . . . . . . . . . . . . . . . . . . . . . . . . . . . . . . . . . . . . . . 4–36Motor Drive Amplifiers . . . . . . . . . . . . . . . . . . . . . . . . . . . . . . . . . . . 4–36ix
Table Of ContentsThis page left blank intentionally.x
1 Safety & IntroductionUser Manual 1-1
<strong>SP</strong>-<strong>2000</strong>/X-YSafety & IntroductionSafety IssuesSafety issues including important warnings, risks and related topics are coveredin this section of the manual. It is very important that this information be availableto all personnel who will work on or near the Autocam equipment.<strong>Pedestal</strong> E-STOP Switches3 EMERGENCY STOP switches are located on the top ofeach pedestal base. Make sure that all personnel are aware ofthe location and operation of these pedestal E-STOP switchesand the main pedestal power down switch before operatingthe equipment. Press down firmly on any one of the E-STOP switches toimmediately disable the pedestal and head.Emergency STOP Switches(1 hidden)<strong>Pedestal</strong> Off SwitchThe Off Switch can also be used, but only if the operator can press it quicker thatthan one of the E-STOP switches.After clearing the cause for the emergency stop, twist the appropriate E-STOPswitch clockwise to release it. The pedestal and head can now be powered upand targeted - see Chapter 2 for operating procedures.1-2 User Manual
<strong>SP</strong>-<strong>2000</strong>/X-YSafety & IntroductionOther E-StOP SwitchesAn E-Stop switch for each pedestal (of the type shown below) is installed ateach operator location and optionally at other locations.Make sure that all personnel are aware of the location andoperation of these E-STOP switches before operating theequipment. Press down firmly on the E-STOP switch to immediatelydisable the associated pedestal and head.After clearing the cause for the emergency stop, pull up the appropriate E-STOPswitch. The pedestal and head can now be powered up and targeted - see Chapter2 for operating procedures.User Manual 1-3
<strong>SP</strong>-<strong>2000</strong>/X-YSafety & IntroductionWARNING! - Always set the column to minimum height, turnpower off and engage the two locking pins in the base of thecolumn before removing the camera or other payload equipmentfrom the head. Or, discharge the gas from the pedestal.Locking Pin InstalledWARNING - NEVER work directly under the camera if thecolumn is raised. In the unlikely event that the gas pressuresupporting the column is lost, the head and payload may dropquickly.CAUTION - NEVER stand under the payload when youpower up the pedestal or switching from Local to Remote onthe MCB Controller. The column may change height quickly.CAUTION - NEVER attach cables to the head or camerawhich could pull the pedestal over if it is moved with the columnextended.1-4 User Manual
<strong>SP</strong>-<strong>2000</strong>/X-YSafety & IntroductionCAUTION - Depending on your choice of equipment, the payloadin your application may be over 300 lb (over 136 kg).Therefore, to avoid personal injury, or injury to others, werecommend that each element of the payload (teleprompter,lens, camera etc.) be removed separately. ALWAYS follow the handlinginstructions supplied by the manufacturers of the payload equipment.Make sure that you have enough people involved to safely handle the weightof your payload equipment.Other Important Information1. To avoid personal injury, always exercise caution when working in thevicinity of energized pedestals as they can start to move without any warning.2. TUnless it is impossible, you should always de-energize the pedestal andhead before working on any part of the pedestal, the head, the camera/lens,or any associated equipment.Customer ResponsibilityIt is the customer’s responsibility to ensure that the workplace is safe. Make surethat you comply with local safety requirements for owning and operating roboticequipment. In normal operation, the remote controlled pedestals, heads and payloadsin an Autocam system can move suddenly and without warning. Sinceaudible warnings are out of the question in normal television applications, it isrecommended that only trained personnel be allowed to work in the active areaswhere the remote controlled pedestals, heads and payloads are located. As partof the training, personnel must be made aware of the hazards of working in arobot environment, including the specific hazards listed below. The forces aresufficient to cause personal injury, or injury to others and therefore, caution isessential.Safe Working EnvironmentEach of the remote controlled pedestals should be within the view of the operatorof the Autocam system at the controller. Before and during remote operation,the controller operator must verify visually that the active area is clear. If personnelare too close to one of the pedestals that is about to move, the operatorcan prevent the motion from starting, or stop the motion after it has started.If the direct line of sight is obstructed in your installation, it is recommendedthat one or more viewing cameras are installed to cover the active areas andallow the operator to view the entire workspace at all times.User Manual 1-5
<strong>SP</strong>-<strong>2000</strong>/X-YSafety & IntroductionSafe Operating Zone And <strong>Pedestal</strong> FootprintThe safe operating zone for personnel is a minimum of 3 feet (1m) outside of thepedestal footprint. This allows time for the personnel to avoid a pedestal thatstarts to move at its maximum speed of approximately 1 foot per second (0.3mper second).The pedestal footprint is typically larger than the pedestal base itself. In mostinstallations, the teleprompter is the piece of equipment mounted on the headthat protrudes the furthest beyond the base of the pedestal. Or, it may be themanual control bars on the rear that protrude the furthest. The footprint musttake into account the overhang of the teleprompter and/or manual control bars asthe head pans around.If your operating practices require personnel to work less than 3 feet (1m) outsidethe pedestal footprint, you must make sure that they are trained and areaware of the hazards of working in a robot environment, including the specifichazards listed below. The forces are sufficient to cause personal injury, or injuryto others and therefore, caution is essential.<strong>Pedestal</strong> Active LightsAt each corner of the base of the pedestal, a pair of lights will flash to indicatethat the pedestal is in motion, or may move at any time without additional warning.These lights are activated by Locate mode at the controller and do not operateif the pedestal is being controlled locally by the MCB controller.<strong>Pedestal</strong> In Motion Lights(2 East, 2 West, 2 North)1-6 User Manual
<strong>SP</strong>-<strong>2000</strong>/X-YSafety & IntroductionWarning SignsWarning signs should be displayed prominently in the workplace as a reminderto trained personnel, and a primary warning to untrained personnel and visitors.A typical sign might read:WARNING:Robotic <strong>Pedestal</strong>s, Heads And LensesMove Suddenly Without Warning<strong>Pedestal</strong>s And Heads Can Start UnexpectedlyThe hazards associated with robotic camera systems are only slightly differentthan those associated with operating a camera under conventional manual control.The speeds and camera weights are similar. The main difference is that withautomation, the operator is normally not near the cameras, and it is more difficultto verify that the area is clear. For personnel working on or near the pedestals,they must be aware that the equipment can start moving unexpectedly.All personnel should be trained and aware of the hazards of robotic pedestalsand heads, and the fact that they can move at any time. They must be trained onhow far the pedestals, heads and payloads can move, the speeds involved, andthe need to stay back an appropriate distance.Most adjustments to the camera and head, such as balancing and camera calibration,should be made with the system de-energized. However, if adjustments areabsolutely necessary while the pedestal and/or head is powered, they shouldonly be made by trained technical personnel familiar with the AutoCam roboticssystem. They must understand that the pedestal or head can move unexpectedlyat any time, and they must position themselves so that any motion would notcause them personal harm.When the robotic heads move, the speeds involved are fairly slow. However, theequipment is still capable of generating sufficient force to cause injury. Therefore,it essential that you exercise caution. In particular, be aware that the teleprompteris usually the fastest swinging element.Any failure of the system could possibly cause one or more axes to move ontheir own, but the speeds and forces should not be noticeably greater than thoseencountered during normal use.User Manual 1-7
<strong>SP</strong>-<strong>2000</strong>/X-YSafety & IntroductionCollision Bumper And Bumper OverrideThe skirts around the base of the pedestal contain a collision detection bumperthat automatically stops the pedestal if it collides with an obstacle. The bumperas shown below is electro-optical and is an integral part of the cable skirt..Loosen To AdjustSkirt HeightCollision BumperThe electro-optical bumper system does require calibration - see Chapter 4When a collision occurs, the sequence of events is:1. The pedestal involved in the collision stops immediately. Pan, tilt, zoom,focus and pedestal height are still active, so operation can still continueusing a stationary pedestal.2. An error message (“dolly “n” stopped, bumper contact”) appears on thecontroller touchscreen where “n” is the number of the pedestal that trippedits bumper. A “B” appears in the column of the pedestal that has tripped itsbumper circuit. Touch anywhere on the screen to clear the error messageand continue operation.3. As soon as is practical, check the work area to clear the obstacle thatcaused the collision and use LOCATE mode (see Controller User Manual)to back the pedestal away. Be aware that the other pedestals in the studioare still active and can move at any time.The “B” will disappear indicatingthat the bumper circuit is reset. Normal operation can now continue.Bumper OverrideIn the unlikely event that a pedestal stops due a failure in the collision detectionsystem, or the bumper does not reset after a collision, it is still possible to continueoperating in an emergency. In this situation, the “B” on the screen will notdisappear when you back away from the obstacle but you can still operate thepedestal.1-8 User Manual
<strong>SP</strong>-<strong>2000</strong>/X-YSafety & IntroductionHOWEVER, THIS IS FOR EMERGENCY OPERATION ONLYBECAUSE THE BUMPERS ARE NO LONGER ACTIVE AND WILLNOT STOP THE PEDESTAL IF THERE IS ANOTHER COLLISION. ITIS NOT SAFE TO OPERATE THE PEDESTAL WITHOUT COLLISIONBUMPER PROTECTION.As soon as possible, check the collision bumper system and circuit calibration(electro-optical bumper type only - see Chapter 4) to determine the cause of thefailure and take corrective action.Pinch PointsParticular care should be exercised around possible points where you could getpinched, such as the tilt cradle. Here, the forces can be somewhat greater, due tothe short lever arm.Sharp EdgesIf the lens, teleprompter or other camera attachments have sharp edges thatcould cause injury, make sure they are padded or protected.User Manual 1-9
<strong>SP</strong>-<strong>2000</strong>/X-YSafety & IntroductionManual OutlineChapter 1Chapter 2Chapter 3Chapter 4This chapter covers important safety issuesand gives an overview of the <strong>SP</strong>-<strong>2000</strong>/X-Ypedestal and the AutoCam system.Step by step instructions for operating the <strong>SP</strong>-<strong>2000</strong>/X-Y pedestal.Step by step instructions for unpacking andinstalling the <strong>SP</strong>-<strong>2000</strong>/X-Y pedestal.Technical information including routinemaintenance, circuit descriptions, calibration,schematics and parts lists.1-10 User Manual
<strong>SP</strong>-<strong>2000</strong>/X-YSafety & IntroductionThis page left blank intentionally.User Manual 1-11
<strong>SP</strong>-<strong>2000</strong>/X-YSafety & IntroductionThe <strong>SP</strong>-<strong>2000</strong>/X-Y Servo <strong>Pedestal</strong>The <strong>SP</strong>-<strong>2000</strong>/X-Y is a freely navigating XY servo pedestal designed to operatewith the HS-2010 series of pan/tilt heads to support full facility CCD studio orportable cameras with lens, viewfinder and teleprompter. The maximum payloadcapacity including the pan/tilt head is 320 lbs (145 kg).The <strong>SP</strong>-<strong>2000</strong>/X-Y base has specially designed servos with a proprietary guidanceand position sensing system which produces a very high degree of accuracy.Since the system does not use a closed loop reference, the <strong>SP</strong>-<strong>2000</strong>/X-Yavoids the need for constant visibility of the reference target during use. Oncethe target coordinates have been loaded into the system, the pedestal will operatewith unparalleled accuracy for extended periods without needing to verify itsposition with external sources. An exclusive split wheel design ensures that thepedestal has a very low cumulative error and will maintain its accuracy beyondthe length of any expected production.1-12 User Manual
<strong>SP</strong>-<strong>2000</strong>/X-YSafety & IntroductionThe <strong>SP</strong>-<strong>2000</strong>/X-Y has an extremely stable two-stage column. A rigid triangularbearing arrangement delivers smooth, yet stiff operation over the entire heightrange, from a low of 21” to a high of 50”.The pan bar mounted MCB controller allows you to drive and steer the pedestaland raise and lower the column under local control.When used with the ACP-8000P controller, the studio perimeter and objectswithin the studio can be mapped. <strong>Pedestal</strong> movements are then coordinated toensure that collisions are avoided. The <strong>SP</strong>-<strong>2000</strong>/X-Y also includes safetybumpers to stop the pedestal on contact with an object.Communication with the controller is by RS422 data via the power supply up toa maximum distance of 5000 feet (1,500 m). A slim power/data cable connectsthe pedestal to the rack mounted power supply up to a maximum distance ofapproximately 180 feet (55 m).The <strong>SP</strong>-<strong>2000</strong>/X-Y incorporates an on-board battery for backup in the event of apower failure. The pedestal automatically switches to battery operation if theinput DC power is lost. Depending on actual usage, battery operation can continuefor up to two hours. Battery operation is also used to drive the pedestal onand off the skid during packing and unpacking, or to drive the pedestal betweenstudios without cables attached.User Manual 1-13
<strong>SP</strong>-<strong>2000</strong>/X-YSafety & IntroductionAutoCam PhilosophyThe underlying goal of AutoCam is to build on the proven operating practices oftoday’s studios. Immense amounts of time and effort have gone into optimizingthese procedures, and it would be a mistake to suggest any significant change forthe sake of automation. Instead, camera automation should blend into andenhance the present studio environment, offering its substantial operating economies.On news and similar sets, one operator typically can control all of thecameras and often the CCU functions as well; and has no difficulty staying wellahead of the shots.From the outset, AutoCam was a top-down design, culminating years of discussionswith network, affiliate, independent, and EFP visionaries. It was engineeredto be expandable to accommodate the largest installations, such as 8-camera robotic-dolly studios on multiple floors, controlled from multiple locations.Yet it is also scaleable to the simplest single-camera EFP assignments.The identical system architecture is employed across this entire range of installations.Software configuration screens on the console are used to configureeach installation; as opposed to customized hardware. This stable architecturephilosophy has many benefits: easy system expansion or upgrading, better factorysupport, and higher reliability.Seamless Integration Into The StudioSuccessful camera automation should be as transparent as possible to the studiostaff, and particularly to the director. He or she should expect the same communicationswith the camera console operator, as with multiple camera operators ina traditional studio. As before, a named shot from the run-down list is relayedover the headsets. But the operator now no longer needs to continually re-framethose shots. They only need to be taught once at the console, and given the samenames that the director uses. Then, when each camera and shot is called over,the operator touches that name on the touch screen, sending the specified camerato that shot. AutoCam is also flexible and intuitive, and changes in the rundownare easily accommodated. Stories may readily be dropped or stretched orreordered as studio events unfold in a dynamic manner.“Like Being Behind A Camera”Effective camera automation should also be as transparent as possible to thecamera operator. In designing the console, a great deal of effort was devoted topresenting essentially the same controls that are present at the camera: a pan/tilt“bar”, and zoom, focus, pedestal, and dolly controls. Further, considerable engineeringwent into making the controls smooth and responsive, so that they havea quality feel like the controls on a camera. This allows both fast and reflexiveoperation, and superior on-air movement quality. To complete the “behind-thecamera”analogy, a color monitor at the console reproduces the viewfinder. The1-14 User Manual
<strong>SP</strong>-<strong>2000</strong>/X-YSafety & Introductionbig difference is that at the touch of a finger, not one but up to eight cameras cannow be controlled.The heart of the friendliness of the console is the color touch screen. It presentsall of the information the operator needs in one place, in a plain-language manner.The video underlay and the control sticks are assigned together and dynamicallyto the last camera event selected. Colors are used in a powerful andconsistent manner to convey important information; such as which named shoteach camera is framing, which keys are logical to be touched next, and whichcamera is on-air. Information on the screen is intelligently limited and dynamicallyupdated; only the touch-keys that have meaning in a given situation areshown.Going one step beyond remote camera control, the console adds the capability tomemorize essentially any camera event, from a simple shot to a dolly bumper orgroup move. The operator now “manages by exception”, directing AutoCam toframe the shots, and then trimming them as necessary.An Easy TransitionEveryone is concerned that the transition to automation be quick and painless.AutoCam facilitates this by adopting the genre and jargon of the studio, anddelivering stable software yet reconfigurable hardware. A measure of the successof this philosophy is how easy it is to install AutoCam and train operators touse the system. Stations have installed 3-camera dolly systems in one day, andaired programs the next.User Manual 1-15
<strong>SP</strong>-<strong>2000</strong>/X-YSafety & IntroductionTypical ApplicationsThe <strong>SP</strong>-<strong>2000</strong>/X-Y servo pedestal will typically be installed with the HS-2010Ror HS-2010MH pan & tilt head. Up to eight pedestals and heads can be controlledremotely with the AutoCam ACP-8000P touchscreen controller. Communicationbetween the head and the controller is by RS-422 data.Refer to the User Manuals for your specific heads and controller for more information.ACP-8000P SystemIn systems with one or more (up to eight) servo pedestals, the ACP-8000P controlleris used as shown belowThe distance between the controller and rack mounted power supply for the dataconnection can be up to a maximum of 5000 ft. (1500 m). The power/data connectionfrom the power supply to the pedestal can be up to a maximum of 180 ft(55 m). The power and data is looped from the pedestal up to the head.1-16 User Manual
<strong>SP</strong>-<strong>2000</strong>/X-YSafety & IntroductionTypical System ConfigurationThe diagram below illustrates the interconnection of a typical AutoCam system.In this example, two ACP controllers are installed to provide backup and/orworkload sharing. The 2x1 Data Selector routes the selected data lines to thepower supplies and optional CCU interface.User Manual 1-17
<strong>SP</strong>-<strong>2000</strong>/X-YSafety & IntroductionThis page left blank intentionally.1-18 User Manual
2 OperationUser Manual 2-1
<strong>SP</strong>-<strong>2000</strong>/X-YOperationIntroductionThis chapter covers operation of the pedestal and is limited to the switches, controlsand other features on the pedestal itself. Operating procedures for controllingthe pedestal remotely are described in the User Manual for the specificcontroller in your installation.2-2 User Manual
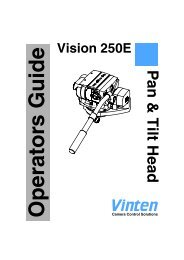
<strong>SP</strong>-<strong>2000</strong>/X-YOperationOrientationAs an aid in operating and maintaining the <strong>SP</strong>-<strong>2000</strong>/X-Y, it is useful to definethe orientation of the pedestal by the points of the compass - North, South, Eastand West.NorthWestEastSouthAs shown in the picture above, the main control panel is on the South side of thepedestal, the “front” wheel of the pedestal is on the North side and the other twowheels are on the East and West sides.User Manual 2-3
<strong>SP</strong>-<strong>2000</strong>/X-YOperationPowering Up The <strong>SP</strong>-<strong>2000</strong>/X-YA relay latching circuit ensures that if power is lost (even momentarily) the pedestalcannot restart automatically - it must be powered up manually.Standby/Charge Run Stop1. Before you power up a pedestal, first make sure that the head is turned off,the MCB controller is in Remote and the area around the pedestal is clear.Warning: At power up, the column (and payload) will drop toa low level for a few seconds. Make sure that nobody will behit by any part of the payload.2-4 User Manual
<strong>SP</strong>-<strong>2000</strong>/X-YOperation2. Press the Standby/Charge (yellow) button and hold it until the relay latchesand the yellow light stays on. If the external power supply is connected, itis now charging the batteries. The green Battery Charge LED will illuminateconfirming that DC power is reaching the pedestal. The “voltmeter” tothe left of the Battery Charge LED indicates the battery voltage.3. Press the Run (green) button to power up the pedestal.4. The column and the three wheels will initialize. You will see the directionindicators on the wheels rotate one by one as they initialize. Do not attemptto drive the pedestal until initialization is complete.5. Once the pedestal is powered up and initialized, turn on the head.Powering DownAlways power down the head before the pedestal.The pedestal can be powered down to Standby/Charge mode or turned off completelyin Stop mode. Or, in an emergency, use any one of the three EmergencySTOP Switches - see next section.Standby/ChargeIn normal operation, if the pedestal will be left unattended for a long period oftime (overnight for example), press Standby/Charge to power down the electronicsbut leave the batteries charging.StopPress Stop to power down the pedestal completely.User Manual 2-5
<strong>SP</strong>-<strong>2000</strong>/X-YOperationEmergency STOP SwitchesIn an emergency, a pedestal can be stopped and disabled immediately by pressingdown on any one of the three Emergency STOP Switches on the base of thepedestal, or one of the E-STOP switches at the operator console.Emergency STOP Switches(1 Hidden)An E-STOP switch for each pedestal (of the type shown below) is installed ateach operator location and optionally at other locations.2-6 User Manual
<strong>SP</strong>-<strong>2000</strong>/X-YOperationAfter clearing the cause for the emergency stop, release the E-STOP switch thatwas activated. On the pedestal, twist the E-STOP switch clockwise to release it.At the operator consloe just pull up on the E-STOP switch. Power up the pedestaland head as described earlier.User Manual 2-7
<strong>SP</strong>-<strong>2000</strong>/X-YOperationDirection IndicatorsOn each wheel assembly, the direction indicator shows which way the wheel isoriented. The red marker shows the “forward” direction of the wheel.(Hidden)Direction IndicatorsIn Drive mode, all three wheels are parallel to each other. This allows the pedestalto crab in any desired direction. In Rotate mode, the three wheels are tangentialto the pedestal circumference allowing it to rotate in place.2-8 User Manual
<strong>SP</strong>-<strong>2000</strong>/X-YOperation<strong>Pedestal</strong> Active LightsOn the North, East and West corners of the pedestal, a pair of green lights willflash to indicate that the pedestal is in motion, or may move at any time withoutadditional warning. These lights are activated by Locate mode at the controllerand do not operate if the pedestal is being controlled locally by the MCB controller.<strong>Pedestal</strong> Active LightsUser Manual 2-9
<strong>SP</strong>-<strong>2000</strong>/X-YOperationUsing The MCB ControllerThe MCB controller provides local control at the pedestal, with or without anACP-8000P controller connected.LOCREMROTATELocal/RemoteThe MCB must always be in Remote (top switch to the right) when the pedestalis powered up. In Remote, the controller has control of the pedestal operation.In Local mode (top switch to the left), the MCB joystick controls the pedestal.DriveWith the Rotate switch to the right, push the joystick up/down/left/right or anyangle in between to drive the pedestal in the desired direction. Regardless of thepan angle of the head, up/down on the joystick drives the pedestal in the Northand South direction. Right/left on the joystick drives the pedestal East and West.RotateWith the Rotate switch to the left, push the joystick left/right to rotate the pedestalin place.Raising/Lowering The ColumnTwist the joystick knob to raise or lower the column. Do not raise or lower thecolumn until it has been pressurized and balanced - see Chapter 3.2-10 User Manual
<strong>SP</strong>-<strong>2000</strong>/X-YOperationTargetingTargeting the pedestal is fundamental to the operation of the AutoCam system.However, targeting is initiated at the controller and cannot be performed at thepedestal itself. Installing the targets, measuring their positions and the targetingprocedure are described in Chapter 3 of the User Manual for your controller -for example the ACP-8000P.User Manual 2-11
<strong>SP</strong>-<strong>2000</strong>/X-YOperationThis page left blank intentionally.2-12 User Manual
3 InstallationUser Manual 3-1
<strong>SP</strong>-<strong>2000</strong>/X-YInstallationIntroductionThis chapter covers uncrating the pedestal, driving it off the skid and installing itinto your system. These instructions will also be useful if the pedestal needs tobe relocated to a different studio or a new facility. Refer to the User Manuals foryour pan/tilt heads and controller for additional information.For proper performance of the equipment and to prevent personalinjury it is critical that the procedures in this manualare followed exactly.Tools You Will NeedYou will need the following tools during the unpacking and installation:• 2 medium size crescent wrenches• 3/16” hex key• 1/4”, 5/16” hex keys (if covers need to be removed)3-2 User Manual
<strong>SP</strong>-<strong>2000</strong>/X-YInstallationFloor Preparation For Robotic <strong>Pedestal</strong>sBefore you install the <strong>SP</strong>-<strong>2000</strong>/X-Y pedestals, make sure that the floor in yourstudio is suitable for robotic operation.For proper robotic pedestal operation, you should consider the following floorspecifications when designing the floor for the operating environment:• Floor leveling - maximum 1/8 inch over 10 ft. (0.3 cm over 3 m)• Wheel contact floor loading - 500 PSI maximumThe <strong>SP</strong>-<strong>2000</strong>/X-Y pedestal uses a Blue Polyurethane 95 Shore “A” wheel treadto provide noiseless, stable operation while affording maximum protection tocustomers’ floors. Customers should specify floor covering that is consistentwith their anticipated frequency of operation under these load conditions.Although <strong>Vinten</strong> Inc. does not make specific floor recommendations, customershave reported excellent results with self-leveling epoxy over leveled concrete.Other issues that you should consider while specifying floor materials are:• Wear characteristics and ability to withstand the precise and repetitivemovements of free-roaming pedestals• Surface hardness and potential impact on camera stability androbotic accuracy• Texture and smoothness of the floor covering, including seams• Preparation of the subfloor and application of mastics and adhesives.Many floor covering materials conform precisely to the subfloorand faithfully ‘telegraph” effects of imperfectionsUser Manual 3-3
<strong>SP</strong>-<strong>2000</strong>/X-YInstallationRemoving The <strong>SP</strong>-<strong>2000</strong>/X-Y From Its CrateCAUTION: Do not try to push the pedestal off the base ofthe crate and down the ramp. You may cause serious electricaland/or mechanical damage.CAUTION: At least two people are needed to remove thepedestal from the crate.As shipped from the factory, the on board batteries of the <strong>SP</strong>-<strong>2000</strong>/X-Y are fullycharged. Therefore, unless the dolly is left crated for an extremely long time, itcan be driven off the skid under battery power using the ramp supplied. If youcannot drive the dolly under its own battery power, the alternate proceduredescribed below will require the temporary use of the AC power supply andpower/data cable.Uncrating The <strong>Pedestal</strong>1. The shipping crate is re-usable and should be saved for repacking the pedestalor should be shipped back to <strong>Vinten</strong>. Make sure that you retain thesides, top, ramp, interior brace and the four straps.2. Release the four straps that hold the crate together by pulling up on thelatch on each buckle. Remove the straps.Pull UpTo Release3. Using two or more people, lift the top of the crate and set it aside.3-4 User Manual
<strong>SP</strong>-<strong>2000</strong>/X-YInstallation4. Using two or more people, lift the ramp out of the top of the crate. Insertthe two pins at the end of the ramp into the mating holes in the base of thecrate. Unfold the ramp onto the floor.5. Remove the four sides of the crate and set them aside.6. Using two or more people, lift the brace frame up and off the pedestal andset it aside.Ramp Attached To Base Of Crate (3 Side Panels Removed)7. Remove and set aside any other items (for example the head mountingscrews, MCB joystick controller, targets etc.) that were packed inside thepedestal crate.User Manual 3-5
<strong>SP</strong>-<strong>2000</strong>/X-YInstallationUnloading The <strong>Pedestal</strong>1. Twist clockwise on each of the three Emergency Stop Switches to releasethem (they will pop up when released).2. Install the E-STOP bypass jumper plug on the Power/Data In connector onthe control panel as shown below. Without this jumper plug the E-STOPlogic will prevent battery powered operation.E-STOP Bypass Jumper3. The cable skirts around the pedestal base (4 in total) must be raised fullybefore you drive the pedestal off the base of the crate and down the ramp.For each skirt, loosen the thumbscrews, raise the skirt and tighten thethumbscrews.3-6 User Manual
<strong>SP</strong>-<strong>2000</strong>/X-YInstallation4. Plug the MCB controller cable into the Power/Data MCB connector on thepedestal. Set the Local/Remote switch on the MCB to Remote.LOCREMROTATEWARNING: The MCB controller MUST always be inRemote when you turn on the <strong>SP</strong>-<strong>2000</strong>/X-Y pedestal.5. Press and hold the Standby/Charge (yellow) button on the pedestal until thelight comes on and stays on. If the batteries are discharged (typically below24V on the control panel voltmeter) and the pedestal will not turn on, referto AC Powered Unloading below.6. Press the Run (green) button on the pedestal and the light will come on andthe pedestal circuits will initialize. Wait about 30 seconds until all threewheels have initialized (the North wheel is first, followed by the Westwheel then the East wheel) before moving on to the next step.User Manual 3-7
<strong>SP</strong>-<strong>2000</strong>/X-YInstallation7. Switch the Local/Remote switch on the MCB controller to Local. Set theRotate switch on the MCB controller to Drive (switch handle pointingtowards the joystick) and check to make sure that the direction indicator foreach wheel is pointing forwards/backwards (in line with the ramp).HiddenDirectionIndicators8. Gently pull back on the joystick to drive the pedestal towards the ramp.Push the joystick left or right as needed to keep the pedestal centered on theramp.9. Slowly drive the pedestal down the ramp and onto the studio floor. Note:Even with the cable skirts raised, they may hang up on the top and bottomof the ramp. If this happens, have an assistant pull up slightly on the pedestalso that the skirt will clear.AC Powered Unloading1. Connect the Power/Data Cable from the power supply Power/Data Outconnector to the Power/Data In connector on the pedestal. If the power supplyis not yet mounted in the rack, you can place it close to the crate forconvenience.2. Temporarily install the E-STOP jumper plug (normally installed on the lastE-STOP box in the loop) into the E-STOP LOOP connector on the powersupply.3. Connect the power supply AC cord and turn on the power supply.3-8 User Manual
<strong>SP</strong>-<strong>2000</strong>/X-YInstallation4. Continue with steps 3 through 9 above.After the pedestal is unloaded, and with this temporary power supply connected,leave the pedestal in Standby/Charge mode overnight to charge the batteries.Then you will be able to drive the pedestal to its final location using batterypower.Or, if the pedestal is already in its final location, you can continue with mountingthe head, pressurizing the pedestal and the electrical installation.Remove the E-STOP jumper plug from the power supply.User Manual 3-9
<strong>SP</strong>-<strong>2000</strong>/X-YInstallationMounting The Pan/Tilt Head & PayloadThe four screws to attach the head to the pedestal column should have beenremoved from the pedestal crate earlier.1. With the MCB controller in Local, twist the joystick to lower the column toits minimum height. Since the column is not balanced, you may need tohelp the servo by pushing down on the column.2. Switch the MCB controller to Remote.3. Press the Stop button on the pedestal control panel to power it down.4. Position the screws in the holes in the mounting plate at the top of the column.4 Mounting Screws(1 Hidden)5. Refer to the User Manual for the Pan/Tilt Head for specific instructions onmounting the head and payload.CAUTION: After mounting the head and payload, NEVERtry to raise or lower the column until the pedestal has beenpressurized - see the next section of this chapter.3-10 User Manual
<strong>SP</strong>-<strong>2000</strong>/X-YInstallationMCB Controller MountingAfter the pan/tilt head is mounted, the MCB controller is mounted to a rightangle bar that is attached to the head.Mounting BarMounting Bracket1. Attach the mounting bracket to the bottom of the head using the fourscrews and flat washers provided. Tighten the screws with a 3/16” hex key.2. Insert the right angle mounting bar into the bracket and tighten the clampscrews with a 3/16” hex key. The final positioning of the bar (left/right andup/down) will depend on the camera position and can be adjusted later.3. Mount the MCB controller on the bar and tighten the clamp.4. Plug the MCB controller cable into the Local Control Data connector onthe <strong>SP</strong>-<strong>2000</strong> control panel.User Manual 3-11
<strong>SP</strong>-<strong>2000</strong>/X-YInstallationPressurizing And Balancing The <strong>Pedestal</strong>It is recommended that three people be available for this procedure.DANGER: STRICT ADHERENCE TO THESE PROCE-DURES IS CRITICAL IN ORDER TO AVOID ANYBODILY INJURY TO PERSONNEL. ALL PERSONNELWORKING ON OR NEAR THE PEDESTAL MUST BETRAINED, AWARE OF THE CORRECT PROCEDURES AND AWAREOF THE HAZARDS INVOLVED.DANGER: THE MAXIMUM CYLINDER PRESSURE IS1,250 PSI (86 BAR).USE ONLY THE VINTEN SUPPLIED MANIFOLD FORADJUSTING PRESSURE.Pressurizing The <strong>Pedestal</strong>1. Make sure that the column locking pins are NOT installed - this will allowthe column to rise as the pressure is increased.T Valve4” ExtensionFill Switch(Older<strong>Pedestal</strong>s)Fill Valve(1 of 3)Fill HosePurge ValveFrom RegulatorAnd Tank3-12 User Manual
<strong>SP</strong>-<strong>2000</strong>/X-YInstallation2. Connect the input hose and regulator to the nitrogen tank. Close the regulatorvalve fully. Close the purge valve on the manifold and turn the three Tvalves fully CCW.3. Remove the yellow dust caps from the three fill valves on the column.4. Install a 4” valve extension (packed separately) onto each fill valve.Tighten the extensions with a crescent wrench - but do not overtighten.5. Connect a fill hose to each valve extension. Use one crescent wrench tohold the valve extension steady and use a second crescent wrench to tightenthe fill hose fitting. Open each T valve by turning it fully clockwise.6. With the regulator fully closed (turn CCW), open the main valve on thenitrogen tank.7. Press and hold the Standby/Charge (yellow) button on the pedestal until thelight comes on and stays on.8. If you have an older pedestal with a Fill Switch as shown opposite, pressand hold the switch while the pedestal is being pressurized, until the pedestalis powered up in step 11. (In newer pedestals, a set of contacts on theStandy/Charge switch perform the function of the Fill Switch)9. Start increasing the pressure setting on the regulator (turn CW). At approximately900 psi (63 bar) you will hear a hissing sound indicating that thethree holding chambers are being filled. Keep the regulator set just highenough to keep the nitrogen flowing but no higher. Listen for leaks at thefittings, tighten as needed.10. Have an assistant pull up gently on the payload and column (with around20-30 lb. of force) from time to time. Make sure that you support and liftthe manifold and fill hoses as the column rises to avoid straining the valveextensions. Make sure that the hoses do not get caught as the column rises.Keep nitrogen flowing until the column starts rising on its own and thenimmediately close the regulator (turn CCW) to prevent overfilling.11. Close the main valve on the nitrogen tank completely.12. Be prepared for the column to go up and down during initialization. PressRun to power up the pedestal.User Manual 3-13
<strong>SP</strong>-<strong>2000</strong>/X-YInstallationBalancing The <strong>Pedestal</strong>Balancing can only be done with the full payload mounted.CAUTION: If the payload is changed for any reason, the columnmust be rebalanced.The column balance should be checked daily. If gas needs to be added after abalance check, use the procedure in the previous section.1. Switch the MCB controller to Local mode and twist the joystick to raise thecolumn to approximately the middle of its range. Make sure that all cablesand equipment such as the prompter are in their normal operating positions.2. Twist the MCB joystick to move the column up and down slowly around itsmid point and watch the balance meter on the rear panel of the pedestal.Balance Meter3. If the column is balanced, the meter deflection will be equal in both directions.If the deflection is greater when the column is raised, the pressure istoo low and gas should be added (use step 4). If the deflection is greaterwhen the column is lowered, the pressure is too high and gas should be discharged(use step 5).4. Briefly open the main valve on the gas tank to add gas and then recheckbalance. Continue adding a little gas at a time until balance is achieved. Goto Finishing Up.5. Briefly open the Purge Valve on the manifold to release a little gas and thenrecheck balance. Continue releasing a little gas at a time until balance isachieved. Go to Finishing Up.3-14 User Manual
<strong>SP</strong>-<strong>2000</strong>/X-YInstallationFinishing Up1. Close the three T valves (turn CCW) at the ends of the fill hoses.2. Make sure the main valve on the tank is closed and then open the PurgeValve to relieve the pressure in the manifold and fill hoses.3. Use a crescent wrench to hold the valve extension steady and use a secondcrescent wrench to remove the fill hose fitting from the extension. Removethe valve extension from the fill valve on the pedestal.4. Repeat for the other two valve extensions and fill hoses.5. Replace the three yellow valve caps.Discharging The <strong>Pedestal</strong>To discharge the pedestal (to ship it for example):1. Lower the column to its minimum height and power down the pedestal.2. Follow steps 1-4 of Pressurizing The <strong>Pedestal</strong> earlier in this chapter.3. Close the regulator completely, close the purge valve on the manifold andopen the three T valves (turn CW) at the ends of the fill hoses.4. Slowly open the purge valve and allow the gas to escape.5. When the pressure reading on the manifold gauge is below 30 psi (2 bar),close the purge valve.6. Close the three T valves (turn CCW) at the ends of the fill hoses.7. Open the Purge Valve to relieve any remaining pressure in the manifold andfill hoses.8. Use a crescent wrench to hold the valve extension steady and use a secondcrescent wrench to remove the fill hose fitting from the extension. Removethe valve extension from the fill valve on the pedestal.9. Repeat for the other two valve extensions and fill hoses.10. Replace the three yellow valve caps.User Manual 3-15
<strong>SP</strong>-<strong>2000</strong>/X-YInstallationCalibrating The Collision BumpersIgnore this section if your pedestal has the electromechanical type of bumper.See page 1-7 if you are not sure which type of bumper you have.Before the <strong>SP</strong>-<strong>2000</strong>/X-Y is put into service it is essential for safety reasons thatthe collision bumper detection circuits are calibrated. Each cable skirt (4 total)has an internal collision detector. All four detectors are connected to the detectorcircuit board mounted just below the cable clamp.Collision Bumper Calibration PotsUse the calibration procedure in chapter 4.3-16 User Manual
<strong>SP</strong>-<strong>2000</strong>/X-YInstallationThis page left blank intentionally.User Manual 3-17
<strong>SP</strong>-<strong>2000</strong>/X-YInstallationElectrical Installation And InterconnectionA typical AutoCam system configuration is shown below..1. Refer to the User Manuals for the controller, the pan/tilt head and otherequipment for relevant installation instructions.2. The rackmount power supplies are installed up to 260 ft. (80 m) from theirrespective pedestals - refer to the User Manual for the power supply foradditional information.3-18 User Manual
<strong>SP</strong>-<strong>2000</strong>/X-YInstallation3. Install an E-STOP switch for each pedestal at a convenient location close tothe joystick panel. If you are using dual controllers, install a second E-STOP switch for each pedestal at the second controller location.E-STOP SwitchE-STOPJumperE-STOP cable to power supply4. Clearly label the E-STOP switches so that the operator can see at a glancewhich switch connects to each of the pedestals.5. Connect the E-STOP cable from the E-STOP loop connector on power supply#1 to E-STOP switch #1.6. If you have a single controller, install the E-STOP jumper on the open connectoron E-STOP switch #1. If you have a sencond controller, connectanother E-STOP cable from the first E-STOP switch #1 to the second E-STOP switch #1 and install the E-STOP jumper on the second switch.7. Repeat steps 5 and 6 for the other pedestals.User Manual 3-19
<strong>SP</strong>-<strong>2000</strong>/X-YInstallation8. Run the power/data cable from the power supply through the cable clampon the pedestal base to provide strain relief. Loop the cable to the Power/Data In connector on the <strong>SP</strong>-<strong>2000</strong>/X-Y rear panel. Run the power/datacable alongside the camera triax (or multicore) cable and any other cablesthat connect to the camera system in your installation.Cable ClampPower/Data InPower/Data Out9. You may want to use a light weight jacketing material for the cable bundleto each pedestal. Several customers have reported that a product called“Flexo” works well. Flexo is sold in several diameters (1.25” is usually agood choice) and is available from:3-20 User Manual
<strong>SP</strong>-<strong>2000</strong>/X-YInstallationTechflex Inc.50 Station RoadSparta NJ 07871Phone: +1 973-729-6253Fax: +1 973-729-9320You may want to include a rope in the cable bundle to add bulk and make iteasier for the pedestals to push the bundle out of the way as they movearound.10. Connect the power/data cable from the Power/Data Out connector on the<strong>SP</strong>-<strong>2000</strong>/X-Y rear panel through the cable clamp to the pan/tilt head.11. Tighten the cable clamp.The installation of the AutoCam targets which are required for automated operationis covered in the User Manual for your controller (e.g. ACP-8000P).The <strong>SP</strong>-<strong>2000</strong>/X-Y is now ready for operation. Refer to Chapter 2 of this manualand the User Manual for your controller.User Manual 3-21
<strong>SP</strong>-<strong>2000</strong>/X-YInstallationRemoving The PayloadWARNING: ALWAYS lower the column to its minimumheight, power down the pedestal and install the locking pinsbefore removing all or part of the payload. Or, discharge thepressure in the pedestal (see Discharging The <strong>Pedestal</strong> earlierin this chapter). This will prevent column from risingunexpectedly and causing injury and/or damage.CAUTION: NEVER try to raise or lower the column if thelocking pins are installed, You will cause serious mechanicaland/or electrical damage.Refer to the documentation for the payload equipment and the User Manual forthe pan/tilt head for specific instructions.3-22 User Manual
<strong>SP</strong>-<strong>2000</strong>/X-YInstallationThis page left blank intentionally.User Manual 3-23
<strong>SP</strong>-<strong>2000</strong>/X-YInstallationRecrating The <strong>Pedestal</strong>If you do not have a crate, contact <strong>Vinten</strong> for a replacement.1. Use the MCB controller joystick to lower the column to its minimumheight.2. Press the Off button on the pedestal to power down the pedestal.3. Disconnect the Power/Data cable from the power supply to the pedestal,and the Power/Data cable from the pedestal to the pan/tilt head. Leave theMCB controller connected to the pedestal.4. Install the E-STOP bypass jumper plug on the Power/Data In connector onthe control panel as shown below. Without this jumper plug the E-STOPlogic will prevent battery powered operation.E-STOP Bypass Jumper5. The pressure in the column must be reduced to less than 30 psi (2 bar)before the pedestal can be crated - see Discharging The <strong>Pedestal</strong> earlier inthis chapter.6. Remove each element of the payload (lens, camera, teleprompter, headetc.). Refer to the User Manuals for the payload equipment and the pan/tilthead for specific instructions.3-24 User Manual
<strong>SP</strong>-<strong>2000</strong>/X-YInstallationCrating The <strong>Pedestal</strong>1. Place the base of the crate close to the pedestal, leaving room for the ramp.2. Using two or more people, insert the two pins at the end of the ramp intothe mating holes in the base of the crate. Unfold the ramp onto the floor.3. Install the first side panel of the crate (with the large foam pad) as a guideto help you position the pedestal on the base.First Side PanelLarge Foam PadMates With <strong>Pedestal</strong>4. The cable skirts around the pedestal base (4 in total) must be raised fullybefore you drive the pedestal up the ramp onto the crate base. For eachskirt, loosen the thumbscrews, raise the skirt and tighten the thumbscrews.5. With the MCB controller in Remote, press and latch Standby/Charge, andthen press Run.6. Allow 30 seconds for the pedestal circuits to initialize.7. Switch the MCB controller to Local and Drive mode. Drive the pedestal tothe base of the ramp. Use Rotate mode to line up the pedestal with theramp. As shown in the photo on the previous page, the North side of thepedestal goes up the ramp first.8. Carefully drive the pedestal up the center of the ramp. Note: Even with thecable skirts raised, they may hang up on the bottom of the ramp and also atthe top. If this happens, have an assistant pull up slightly on the pedestal sothat the skirt will clear.9. When the pedestal is correctly positioned on the base of the crate, switch toRotate mode on the MCB controller and then switch to Remote. Push downand latch all three Emergency STOP switches.10. Remove the E-STOP bypass jumper plug.User Manual 3-25
<strong>SP</strong>-<strong>2000</strong>/X-YInstallation11. Push the column down to its minimum height and disconnect the MCBcontroller from the pedestal control panel.12. Using at least two people, install the brace frame onto the top of the pedestalcolumn.13. Install the three remaining sides of the crate, matching the foam padding tothe shape of the pedestal.14. Using at least two people, install the top of the crate.15. Insert the four straps in the cut outs in the top of the crate. Pull the eachstrap hand tight and then close the latch to tension the strap.3-26 User Manual
4 Maintenance And RepairUser Manual 4-1
<strong>SP</strong>-<strong>2000</strong>/X-YMaintenance And RepairSafetySafety issues including important warnings, risks and related topics a re coveredin Chapter 1 of this manual. It is very important that all personnel who work onor near the Autocam equipment read this safety information. The warnings aresummarized here - refer to Chapter 1 for more details.WARNING: ALWAYS set the column to its minimum height,turn power off and engage the two locking pins in the base ofthe column before removing the camera or payload equipmentfrom the head. Or, discharge the gas from the pedestal.WARNING: NEVER work directly under the camera if thecolumn is raised. In the unlikely event that the gas pressuresupporting the column is lost, the head and payload may dropquickly.CAUTION: NEVER attach cables to the head or the camerawhich could pull the pedestal over if it is moved with the columnextended.CAUTION: Depending on your choice of equipment, the payloadin your application may be over 300 lb (over 136 kg).Therefore, to avoid personal injury, or injury to others, werecommend that each element of the payload (teleprompter,lens, camera etc.) be removed separately. ALWAYS follow the handlinginstructions supplied by the manufacturers of the payload equipment.Make sure that you have enough people involved to safely handle the weightof your payload equipment.4-2 User Manual
<strong>SP</strong>-<strong>2000</strong>/X-YMaintenance And RepairOther Important Information1. To avoid personal injury, always exercise caution when working in thevicinity of energized pedestals as they can start to move without any warning.2. Unless it is impossible, you should always de-energize the pedestal andhead before working on any part of the pedestal, the head, the camera/lens,or any associated equipment.Customer ResponsibilityIt is the customer’s responsibility to ensure that the workplace is safe. In normaloperation, the remote controlled pedestals, heads and payloads in an AutoCamsystem can move suddenly and without warning. Since audible warnings are outof the question in normal television applications, it is recommended that onlytrained personnel be allowed to work in the active areas where the remote controlledpedestals, heads and payloads are located. As part of the training, personnelmust be made aware of the hazards of working in a robot environment,including the specific hazards listed below. The forces are sufficient to causepersonal injury, or injury to others and therefore, caution is essential.<strong>Pedestal</strong>s And Heads Can Start UnexpectedlyThe hazards associated with robotic camera systems are only slightly differentthan those associated with operating a camera under conventional manual control.The speeds and camera weights are similar. The main difference is that withautomation, the operator is normally not near the cameras, and it is more difficultto verify that the area is clear. For personnel working on or near the pedestals,they must be aware that the equipment can start moving unexpectedly.All personnel should be trained and aware of the hazards of robotic pedestalsand heads, and the fact that they can move at any time. They must be trained onhow far the pedestals, heads and payloads can move, the speeds involved, andthe need to stay back an appropriate distance.Most adjustments to the camera and head, such as balancing and camera calibration,should be made with the system de-energized. However, if adjustments areabsolutely necessary while the pedestal and/or head is powered, they shouldonly be made by trained technical personnel familiar with the AutoCam roboticssystem. They must understand that the pedestal or head can move unexpectedlyat any time, and they must position themselves so that any motion would notcause them personal harm.When the robotic heads move, the speeds involved are fairly slow. However, theequipment is still capable of generating sufficient force to cause injury. Therefore,it essential that you exercise caution. In particular, be aware that the teleprompteris usually the fastest swinging element.Any failure of the system could possibly cause one or more axes to move ontheir own, but the speeds and forces should not be noticeably greater than thoseencountered during normal use.User Manual 4-3
<strong>SP</strong>-<strong>2000</strong>/X-YMaintenance And RepairPinch PointsParticular care should be exercised around possible points where you could getpinched, such as the tilt cradle. Here, the forces can be somewhat greater, due tothe short lever arm.Sharp EdgesIf the lens, teleprompter or other camera attachments have sharp edges thatcould cause injury, make sure they are padded or protected.4-4 User Manual
<strong>SP</strong>-<strong>2000</strong>/X-YMaintenance And RepairThis page left blank intentionally.User Manual 4-5
<strong>SP</strong>-<strong>2000</strong>/X-YMaintenance And RepairRoutine MaintenanceThe <strong>SP</strong>-<strong>2000</strong>/X-Y is a highly reliable and stable product. Many of the mechanicalcomponents are sealed and permanently lubricated. The electronics are wellventilated and highly rated. The number of connectors is kept to a minimumand the best quality connectors are utilized. All this adds up to a product thatdoes not require much general routine maintenance.However, a few preventive maintenance procedures and routine operationalchecks will reduce the likelihood of problems occurring in normal operation.The procedures are described in detail following the summary chart.Topic Daily Monthly As RequiredClean The TargetsCheck DC PowerCheck Column BalanceCheck Overall OperationXXXXTest Emergency Stop SwitchesTest Collision Bumper OperationXXClean The Target Sensors (X) XClean The Slip RingsExamine The WheelsXXCleaning The TargetsIt is very important to keep the targets clean to ensure repeatable targeting. It isrecommended that you clean the targets every day. The top surface of the targetis clear lexan which can be cleaned with any standard household cleaner such asFantastic or 409.Removing TargetsIf a target is damaged, or the studio configuration is changed, targets will needto be replaced. Peel up one corner with a razor blade and try to keep the adhesiveon the back of the target, not on the floor. Slowly pull the target off the floor.Small areas of adhesive left on the floor can be removed carefully with a razorblade or by rubbing back and forth with your finger. To move larger areas ofadhesive from the floor before you install the new targets, you can use:• A 50/50 solution of isopropyl alcohol and water• A slightly more aggressive cleaner called “Citrus Based Cleaner”is available from 3M Company (1-800-524-0399)4-6 User Manual
<strong>SP</strong>-<strong>2000</strong>/X-YMaintenance And Repair• A more aggressive product called “Oil-Flo” is available from TitanChemical (1-800-475-3300 or 1-415-965-9900)DC PowerEvery day when you power up the pedestal, check that the green Battery ChargeLED on the control panel is On (dual LEDs for positive and negative voltages inolder systems). This confirms that the rack mounted power is on and supplyingdc power to the pedestal.Column BalanceEvery day when you power up the pedestal, check the column balance. Columnbalance must be checked with the normal payload mounted.1. After initialization is complete, switch the MCB controller to Local andtwist the joystick to raise the column to approximately the middle of itsrange.2. Make sure that all cables and equipment such as the prompter are in theirnormal operating positions.3. Move the column up and down slowly around its mid point and watch thebalance meter on the rear panel of the pedestal. The meter deflection willbe equal in both directions if the column is balanced.4. If the deflection is greater when the column is raised, the pressure is toolow and gas should be added. Conversely, if the deflection is greater whenthe column is lowered, the pressure is too high and gas should be discharged.Refer to Pressurizing The <strong>Pedestal</strong> in Chapter 3 if the column isnot balanced.5. Switch the MCB controller to Remote to return control to the controller.Overall Operation1. Switch the MCB controller to Local and use the joystick to verify that thepedestal drive, steer and height operate smoothly and consistently throughoutthe entire range.2. Switch the MCB controller back to Remote.3. Check the operation of pan, tilt, zoom, focus from controller.User Manual 4-7
<strong>SP</strong>-<strong>2000</strong>/X-YMaintenance And RepairE-STOP Switch OperationFor obvious safety reasons, it is essential that the E-STOP switches at the controllerlocations and the three E-STOP switches on the pedestal base are alwaysfunctioning correctly. It is recommended that you check the switches once amonth.1. With pedestal#1 in Run mode, press down the E-STOP switch at the controllerand verify that the pedestal immediately turns off.2. Pull up the E-STOP switch to release it.3. Press Standby/Charge on <strong>Pedestal</strong> #1 until it latches and then press Run topower up the pedestal.4. If you have a second controller, repeat steps 1, 2 and 3 for the E-STOPswitch at the second controller.5. With pedestal#1 in Run mode, press down the first E-STOP switch on thepedestal base and verify that the pedestal immediately turns off.6. Twist the E-STOP switch clockwise to release it.7. Press Standby/Charge until it latches and then press Run to power up thepedestal.8. After the pedestal has initialized, repeat steps 5, 6, 7 for the other two E-STOP switches.9. Repeat steps 1 through 8 for the other pedestals.Collision Bumper OperationFor safety reasons it is essential that the collision bumpers on the pedestal baseare operating correctly at all times. It is recommended that you check thebumper circuit operation at least once a month.1. Locate the bumper detector circuit board mounted just below the cableclamp on the rear of the pedestal. The board has a pot and LED indicatorfor each of the four bumpers. All four LEDs should be a steady green. Ifnot, the circuit must be calibrated as described on page 4-18.2. Observe the LEDs while an assistant presses firmly on the first bumperwith his hand or foot. The corresponding LED should turn red as thebumper is pressed and back to green when it is released. If not, the circuitmust be calibrated as described on page 4-18.3. Repeat these steps for the other three bumpers.4-8 User Manual
<strong>SP</strong>-<strong>2000</strong>/X-YMaintenance And RepairRemoving The CoversThe North Cover1. Press the Stop button to power down the pedestal2. Use a 3/16” hex key to remove the direction indicator for the North wheel.Screw (5/16” hex)Screw (5/16” hex)NorthCoverDirection Indicator(3/16” hex)Screw(1/4” hex)1 each sideof cover3. Use a 1/4” hex key to remove the two screws in the sides of the Northwheel cover.4. Use a 5/16” hex key to remove the two screws in the top of the North cover.cover.When you remove any of the wheel covers, lift the cover upand off carefully. Otherwise you may damage the electricalharnesses that are attached to the cover, or other hardwareunder the cover. Ue similar caution when you replace the5. Have an assistant close by to disconnect the E-Stop switch harness andbumper sensor harness. Carefully lift the cover up and off a few inches, disconnectthe E-Stop harness connector and the bumper sensor connector.6. Remove the cover.User Manual 4-9
<strong>SP</strong>-<strong>2000</strong>/X-YMaintenance And RepairThe West Wheel Cover1. Use a 3/16” hex key to remove the direction indicator for the West wheel.Screw on the side(1/4” hex)Screws (5/16” hex)Direction Indicator(3/16” hex)2. Use a 1/4” hex key to remove the screw in the side of the West wheel cover.3. Use a 5/16” hex key to remove the two screws in the top of the West cover.4. Have an assistant close by to disconnect the E-Stop switch harness andbumper sensor harness. Carefully lift the cover up and off a few inches, disconnectthe E-Stop harness connector and the bumper sensor connector5. Remove the cover.4-10 User Manual
<strong>SP</strong>-<strong>2000</strong>/X-YMaintenance And RepairThe East Wheel Cover1. Use a 3/16” hex key to remove the direction indicator for the East wheel.Screws (5/16” hex)Screw on the side(1/4” hex)Direction Indicator(3/16” hex)2. Use a 1/4” hex key to remove the screw in the side of the East wheel cover.3. Use a 5/16” hex key to remove the two screws in the top of the East cover.4. Have an assistant close by to disconnect the E-Stop switch harness andbumper sensor harness. Carefully lift the cover up and off a few inches, disconnectthe E-Stop harness connector and the bumper sensor connector5. Remove the cover.User Manual 4-11
<strong>SP</strong>-<strong>2000</strong>/X-YMaintenance And RepairReplacing The CoversInstall the East and West covers first and then install the North cover.1. Have an assistant close by to connect the E-Stop switch harness and collisionbumper harness as you replace each cover. Position the cable to theback of the gear box as the cover is installed. Take care when installing thecovers to prevent damage.2. Install the two screws on the top (5/16” hex key) of the cover.3. Install the screw on the side (1/4” hex key) of the cover (two side screws forthe North cover).4. Make sure the cover fits correctly and tighten all of the screws.5. Install the direction indicator on each wheel and tighten the screw (3/16”hex key).4-12 User Manual
<strong>SP</strong>-<strong>2000</strong>/X-YMaintenance And RepairThis page left blank intentionally.User Manual 4-13
<strong>SP</strong>-<strong>2000</strong>/X-YMaintenance And RepairCleaning The Target SensorsFor consistent, accurate targeting, it is important to keep the sensors clean. If apedestal has to be commanded to target two or three times before it succeeds, itis likely that the sensors need cleaning.The frequency of cleaning depends on the general cleanliness of your studio -every 3-4 weeks is common, less frequently in a very clean studio. Monitor thetargeting performance over the first couple of months of use. If targeting startsto be erratic after say four weeks, you should clean the sensors every threeweeks. If ten weeks go by before targeting is erratic, clean the sensors every 8weeks.The sensors must always be cleaned before sensor calibration (described later).1. Remove the three wheel covers as described in the previous section.2. Locate the sensor assemblies - each is at the base of the pedestal on the endof a counter balanced arm that is activated by a solenoid. The location ofthe East sensors are shown below and the North and West sensors areshown oppositeEast Sensors3. The sensors are recessed inside the sensor block and do not touch the floordirectly. Use a dry cotton swab (Q-Tip) or one moistened with 91% pure(or greater) Isopropyl Alcohol (typically used for cleaning of VTR heads)to clean the three sensors on the East sensor assembly.4. Repeat for the North and West sensor assemblies.4-14 User Manual
<strong>SP</strong>-<strong>2000</strong>/X-YMaintenance And RepairNorth SensorsWest SensorsUser Manual 4-15
<strong>SP</strong>-<strong>2000</strong>/X-YMaintenance And RepairCleaning The Slip RingsIt is important to keep the slip rings on each wheel assembly clean in ordermaintain good electrical contact.Be very careful not to bend or break the brushes when youclean the slip rings.1. Remove the three wheel covers as described in the previous section.2. Remove the slip ring covers from the wheel assemblies.Slip Ring Covers(1 hidden)4-16 User Manual
<strong>SP</strong>-<strong>2000</strong>/X-YMaintenance And Repair3. Use a dry cotton swab (Q-Tip) or one moistened with 91% pure (or greater)Isopropyl Alcohol (typically used for cleaning of VTR heads) to carefullyclean the slip ring surfaces on each wheel assembly.Slip RingsUser Manual 4-17
<strong>SP</strong>-<strong>2000</strong>/X-YMaintenance And RepairExamining The WheelsA fully loaded pedestal can weigh up to 845 lb (384 kg). Therefore, it is essentialthat the pedestal is not driven over holes or sharp objects that would causesubstantial impact to the wheel assemblies.Once a month, remove the wheel covers (as described earlier in this chapter) andcheck the wheels and gear train for any possible damage due to abuse such asriding over sharp objects.If there is any obvious wheel or gear damage, it should be repaired immediatelyby replacement of damaged parts. Also, the cause of damage should beresearched and avoided in the future.4-18 User Manual
<strong>SP</strong>-<strong>2000</strong>/X-YMaintenance And RepairThis page left blank intentionally.User Manual 4-19
<strong>SP</strong>-<strong>2000</strong>/X-YMaintenance And RepairCylinder ReplacementWhen you check the column balance, if you find that gas needs to be added frequently,you may need to replace one or more of the three cylinders in the column.Remove the yellow dust caps and test each cylinder with a pressure gauge. Ifone or more cylinders is low relative to the others, use the following procedureto replace it.1. Lower the column to minimum height and power down the pedestal.2. Fully discharge the gas from the cylinders using the procedure in chapter 3.3. Remove the payload and head from the pedestal. Refer to the documentationfor the payload equipment and the User Manual for the pan/tilt headfor specific instructions.DANGER: DO NOT REMOVE THE SCREWS IN STEP 4 IFTHE COLUMN IS PRESSURIZED. YOU CAN CAUSESERIOUS INJURIES AND DAMAGE TO THE PEDESTAL.4. Use a 3 mm hex key to remove the four socket head cap screws from thetop plate over the cylinders being replaced. Set the top plate and screwsaside.4 Screws InEach Top Plate5. Remove the cylinder from the column.4-20 User Manual
<strong>SP</strong>-<strong>2000</strong>/X-YMaintenance And Repair6. Install the replacement cylinder.7. Install the top plate and tighten the four screws in the plate with a 3 mm hexkey.8. Install the head and payload. Refer to the User Manual for your head andthe documentation for your payload equipment.9. Presurize and balance the pedestal as described in chapter 3 of this manual.User Manual 4-21
<strong>SP</strong>-<strong>2000</strong>/X-YMaintenance And RepairElectronics RepairService PhilosophyServicing is supported at three levels by <strong>Vinten</strong> Inc. after the 12-month warrantyperiod expires:• On-site service may be contracted from <strong>Vinten</strong> Inc. or through therepresentative from which the system was purchased.• Board-level replacement may be readily accomplished by stationpersonnel, using stocked or ordered circuit boards.• Component level replacement is feasible to some extent, by qualifiedstation engineers or technicians, using the material in thischapter.Service questions may be directed to factory service specialists at <strong>Vinten</strong> Inc. inValley Cottage, NY, by phone at 1-845 268-0100, or toll free (in the U.S.A.) at1-888 4 VINTEN (1-888-484-6836). You can also fax <strong>Vinten</strong> at 1-845-268-0113. An emergency telephone service is available 24 hours a day, seven days aweek using the 1-845-268-0100 or 1-888 4VINTEN numbers.To streamline service and support, the same boards are used in multiple locationswherever possible. This allows you to swap boards in many cases to isolatea fault. For example, the 503 Power Amplifier (motor driver) is used six times inthe <strong>SP</strong>-<strong>2000</strong>/X-Y (and twice in each head). The 4 Channel Servo Board is usedtwice in the <strong>SP</strong>-<strong>2000</strong>/X-Y (and once in each head). Note however, that thejumper setting (J1) on the 4 Channel Board must be changed depending onwhether it is used for Steer, Drive or Pan/Tilt.SafetyWARNING: Service should only be performed by qualifiedpersonnel, who are familiar with the equipment. At somepoints inside the power supplies 120 (or 240) volts AC isexposed, with a potential of electrical shock. Unless there is apower supply failure, the highest voltage present in the cable or pedestalshould be no more than +42 VDC (±42 VDC in older dual voltage systems).The normal unregulated supply voltages supplied to the head are ±30 VDC.WARNING: When you are working on a pedestal, disconnectthe Power/Data cable to isolate the pedestal from the system.4-22 User Manual
<strong>SP</strong>-<strong>2000</strong>/X-YMaintenance And RepairWARNING: Some maintenance procedures must be performedwith the pedestal and head powered. There is dangerthat an unexpected motion could swing the head or move thepedestal, possibly striking or pinching you and causing physicalinjury. Read the Safety section in Chapter 1 of this User Manual beforestarting.CAUTION: The camera/head combination, is very heavy - beespecially careful when working under it.User Manual 4-23
<strong>SP</strong>-<strong>2000</strong>/X-YMaintenance And RepairCalibrationCollision BumpersAll four detectors are connected to the detector circuit board mounted just belowthe cable clamp.#2(North Side)Calibration Pots#1#3Cover Screws#4The potentiometer for each of the four collision detectors can be adjusted withoutremoving the cover. Or, you can remove the cover (using a 3/16” hex key)for greater access. The collision bumpers are numbered 1 through 4 as shownabove and the corresponding pots are numbered 1 through 4 from left to right.1. Starting with #1, turn the pot clockwise slowly until the adjacent LED is asteady red. Turn the pot counterclockwise slowly until the LED is a steadygreen.2. Press firmly on bumper #1 with your hand or foot. The #1 LED will turnred as you press on the bumper and back to green when you release. If theLED tends to flicker when you release the bumper, readjust pot #1.3. Repeat these steps for the other three bumpers and pots.4-24 User Manual
<strong>SP</strong>-<strong>2000</strong>/X-YMaintenance And RepairThis page left blank intentionally.User Manual 4-25
<strong>SP</strong>-<strong>2000</strong>/X-YMaintenance And RepairTarget Sensor CalibrationThe calibration pots and indicators for the sensors are on the Dolly Board. TheDolly Board is mounted on the West side of the pedestal and is visible throughthe removable window in the North cover. Each sensor assembly contains threeindividual sensors, each with its own calibration pot on the Dolly Board.Dolly Board WindowThe window allows you to monitor the sensor status during targeting and calibratethe sensors without removing the covers. Errors during targeting are anindication that sensor calibration and/or cleaning may be necessary. If the redERR LED flashes after targeting, this indicates that one or more sensors areincorrectly set. In normal operating mode, the “light meter” LEDs are used asindividual sensor indicators as marked on the board. Therefore, one or more ofthese LEDs will be on to indicate which sensor(s) need calibration.Dolly BoardLEDsSW1SW2Calibration Pots4-26 User Manual
<strong>SP</strong>-<strong>2000</strong>/X-YMaintenance And RepairIf you are calibrating the sensors but not cleaning them, remove the window inthe North cover and start with step 3.1. Remove the three pedestal covers and thoroughly clean the sensors asdescribed earlier in this chapter Also, clean the targets using Fantastic, 409or a similar type of household cleaner.2. When you disconnect the Stop switch harness as you remove each cover,install a jumper plug to bypass the switch and allow the pedestal to be operatedwith the covers removed.3. Power up the pedestal, allow each wheel to initialize. Select Local on theMCB controller and center the pedestal over the target. This will positionall three sensor assemblies over the target.4. Turn the rotary switch SW2 so that the index mark is on position 1. Thegreen RUN LED will turn off and the vertical row of LEDs is now functioningas a light meter. The “light meter” has 5 yellow (DS10 - DS14) and5 green (DS5 - DS9) LEDs. The space between DS9 (green) and DS10(yellow) is the threshold for detecting the white and black areas of the target.The goal during calibration is to set each sensor so that its reading forwhite (in the green region) and black (in the yellow region) is symmetricalabove and below the “threshhold” point.5. Press and release SW1, the DROP switch (located above the rotary switch)to energize the solenoids and drop the sensors. After about three minutes,the sensors will automatically retract . If the adjustments are not completedby that time, simply press and release SW1 again to drop the sensors foranother three minutes.6. Select Rotate on the MCB controller and rotate the pedestal until the Eastsensor assembly is over the black part of the target. Note which light meterLED is ON - it should be one of the yellow ones since the sensor is detectingblack.7. Rotate the pedestal until the East sensor assembly is over the white part ofthe target. Note which light meter LED is ON - it should be one of thegreen ones since the sensor is detecting white.8. If the readings in steps 6 and 7 are already symmetrical, no adjustment isrequired. For example, if the readings are the third yellow LED down andthe third green LED up, move on to step 10.9. However, if the readings are not symmetrical, adjust R1 until they are. Forexample, if the reading s are the first yellow LED down and the third greenLED up, adjust R1 until the third green LED goes out and the second greenLED comes on. Rotate the pedestal between black and white and adjust thepot until the sensor readings are symmetrical.10. Turn the rotary switch SW2 to position 2 and repeat steps 6 through 9 forthe second East sensor, adjusting R2 if necessary.11. Turn the rotary switch SW2 to position 3 and repeat steps 6 through 9 forthe third East sensor, adjusting R3 if necessary.User Manual 4-27
<strong>SP</strong>-<strong>2000</strong>/X-YMaintenance And Repair12. Positions 4,5,6 on SW2 are for the three North sensors (the silkscreen onsome dolly boards may be marked South). Use the same procedure (steps 6through 9) for the North sensors adjusting R4, R5, R6 if necessary.13. Use the same procedure (steps 6 through 9) for the West sensors (positions7,8,9 of SW2) adjusting R7, R8, R9 if necessary.14. After all of the sensors have been calibrated, set SW2 to position 0. TheSensor assemblies will be raised and the RUN LED will turn on.15. Pull off the Reset jumper JMP1 (located above rotary switch SW2). All ofthe LEDs will turn on in rapid succession indicating that the microprocessorhas been reset. Reinstall the jumper.16. Switch the MCB controller to Remote and target the pedestal from the controller(refer to the controller User Manual). After the pedestal targets successfully,only the green OK LED on the Dolly Board should be on.17. If the red ERR LED flashes after targeting, this indicates that one or moresensors are incorrectly set. In normal operating mode, the “light meter”LEDs are used as individual sensor indicators as marked on the board.Therefore, one or more of these LEDs will be on to indicate which sensor(s)need calibration. Repeat the adjustment for that particular sensor (orsensors) and reset the microprocessor by removing and reinserting thejumper JMP1.Never use the Reset jumper JMP1 unless the calibration procedure has justbeen completed. Otherwise, the automatic tracking thresholds will bereplaced by the prior starting thresholds which probably are no longeroptimum. If the jumper is accidentally reset, it is necessary to perform acomplete calibration as described above.If you did not remove the covers earlier, replace the window in the North coverand skip step 18.18. Power down the pedestal and remove the jumper plug from the Stop switchharness for each cover. Replace the East, West and North covers asdescribed earlier in this chapter.4-28 User Manual
<strong>SP</strong>-<strong>2000</strong>/X-YMaintenance And RepairThis page left blank intentionally.User Manual 4-29
<strong>SP</strong>-<strong>2000</strong>/X-YMaintenance And RepairTheory Of OperationSystemRefer to the Dolly Wiring diagram in the drawings file for a block diagram ofthe overall AutoCam system. The primary circuit boards in the pedestal are themotor drivers, the 4-channel servo boards which control up to four motors each,the dolly board which handles targeting and several other functions and the battery-packboard which manages battery charging. Other components such asrelays, switches and so on are also shown on the block diagram.Power BusThe boards in the pedestal are all connected to a common power bus. Thepower is nominally 36 volts DC.Each board locally regulates its own operating voltages from the single 36Vsupply. Usually these on-board supplies include a 24V supply for relays, lamps,and solenoids, +15V and -15V for analog circuitry, and +5V for digital circuitry.The +5V and -15V supplies are switching supplies.The pedestal should always be switched off before disconnecting cables. Thedolly is designed to operate at voltages as high as 40V, but at voltages higherthan approximately 45V, the circuit boards will clamp the voltage from goinghigher to minimize damage and will possibly blow on-board fuses in the process.Data BusThe data bus is a 4-wire bi-directional 9600-baud RS-422 signal originating atthe controller, looping through the power supply to the pedestal. From the pedestalthe data is looped up to the head. Feedback data from the pedestal loopsthrough the power supply and back to the controller. With RS-422, both sides ofthe data leads are electrical mirror images of each other. Each should look like aTTL signal. A fault condition is indicated by identical signal phase on bothlines, or one line stuck. Some types of problems with the data areas of theboards can block data from reaching other boards downstream. A symptom ofmissing data can be a useful troubleshooting aid. The on-board “happy light”LEDs are a valuable aid when troubleshooting data path problems.The data frames are sent to and received from the dolly at 25ms intervals.Within each frame are command bytes for each servo axis, which each servoboard picks off as appropriate. Each servo board has an address, as determinedby an on-board jumper (J1) and the wiring harness. This allows 4-channelboards complete with ROMs to be interchangeable.Under local control, the pan bar mounted joystick is used to drive and steer thepedestal with the dolly board generating the serial data instead of the controller.4-30 User Manual
<strong>SP</strong>-<strong>2000</strong>/X-YMaintenance And RepairBattery Pack and Power ManagementThe Battery Pack board manages the power to the pedestal. When the Standby/Charge button is pressed, the enable signal to the rack mounted AC power supplyis pulled low. This trickle charges the batteries at the rate of approximately0.5 amps. The maximum charge voltage is set at the factory by pots on the BatteryPack board. These pots should not normally be readjusted. However, calibrationinformation is provided on the schematic should you need to make anadjustment. Overvoltage should be avoided as it offers no advantage and greatlyshortens battery life. Battery life under normal operation should exceed fiveyears.The battery voltage is displayed on the LED voltmeter on the pedestal controlpanel. Depending on usage and how well the head and pedestal are balanced,the batteries should have enough capacity to run the dolly for several hours.Complete recharging takes overnight. Charging also takes place during normalAC powered operation in either the Standby/Charge or Run modes.When the Run button is pressed, a chassis mounted relay connects power to therest of the pedestal. If the AC power supply is connected via the cable to thepedestal, it will be turned on (if it was not already on), and supply voltages arepassed through the Battery Pack board to the rest of the pedestal. If the voltagefrom the power supply drops out, the batteries will catch the load and maintainpedestal power. When the batteries are drained to the 10% point and only deliver21 volts, the Battery Pack board will power down the dolly.When operating without the AC power supply, the Run button starts delivery ofbattery power to the pedestal, under the control of the Battery Pack board. Thebattery pack also sources momentary high current demands made by the pedestal,even when the system is AC powered. This permits the use of cables that arelighter and longer than on previous systems.User Manual 4-31
<strong>SP</strong>-<strong>2000</strong>/X-YMaintenance And RepairBattery BypassIn the event of a battery failure, you can use the following battery bypass procedure.Bypassing the battery eliminates the ability to operate thepedestal in the event of power loss to the unit. Prompt serviceis essential to restore full operational capability.1. Power down the pedestal and turn off the power supply in the rack.2. Remove the pedestal rear cover.3. Locate the back panel harness cables and identify the three in line Molexconnectors that are marked “S” “D” and “B”.4. Disconnect the Power Supply Molex connector marked “S”.5. Disconnect the Contact Block Molex connector marked “D”. (Do not disconnectthe battery harness marked “B”)6. Connect the Power Supply Molex connector marked “S” (purple. black, redwires) to the Contact Block Molex connector marked “D” (purple, black,red wires).7. Disconnect the four pin square female Berg connector from the top of thebattery board on the back panel (located under the positive side of the balancemeter).8. Use a jumper wire to connect pins 1 (white/brown) and 3 (brown/black) onthe four pin Berg connector.JumperWhite/BlackWhite/BrownBrown/Black9. Replace the pedestal cover.4-32 User Manual
<strong>SP</strong>-<strong>2000</strong>/X-YMaintenance And Repair10. Power up the pedestal for temporary operation without battery back up.User Manual 4-33
<strong>SP</strong>-<strong>2000</strong>/X-YMaintenance And RepairThe Targeting SystemThe targeting system in the pedestal consists primarily of the Dolly Board andthe three sensors. If the controller is operating normally, the cables are ok andthe target itself is clean, a failure to target is likely to be caused by a problem inthe sensors (cleaning or calibration) or the Dolly Board.Lowering The SensorsIn normal operation, the Dolly Board supplies +24V to the three chassismounted solenoids. Targeting is initiated by an active low signal from the DollyBoard to energize the solenoids and drop the sensors.Each solenoid operates an arm to lower the respective sensor assembly onto thetarget. The arm is counterbalanced so that the arm lower smoothly when thesolenoid is energized and will retract under the force of gravity.The Sensor AssemblyEach sensor assembly contains three optosensors that generate red and infraredlight and detect the light reflected off the target. The three sensors provide forredundancy in case of dirt or marks on the target. Each sensor assembly is connectedby a cable to the Dolly Board that provides sensor power and detects thesensor output. The sensor assemblies are somewhat difficult to access, so theiroperation is best verified from measurements made on the Dolly Board.If the sensors are kept clean (as described earlier in this chapter) and the targetsthemselves are also kept clean and free from damage such as delamination, thereshould be no need for electrical readjustments of the sensor voltage offsets.The Dolly BoardThe Dolly Board performs several functions including local control and targeting.When the pedestal is controlled by the MCB controller, the Dolly Boardinterprets the local control joystick output and generates the serial data signalsto control the pedestal. The Dolly Board also controls the targeting operation.U15 and Q22 activate the solenoids which lower the three sensors to read thetarget. U19, U20, U21 and U16 interpret the signals from the three optosensorson each sensor assembly. The three signals from each sensor block are voted toreduce errors caused by floor dirt. The threshold values on the sensors aretracked electronically to allow for the slow accumulation of film on the optosensorwindows.The Dolly Board is controlled by microprocessor U9, with ROM (U3), RAM(U2), and peripheral devices. Basic operation of the microprocessor may beconfirmed by looking for signal activity at pins 26, 27, and 28. The RS-422 datapath section of U15, U27, U28 and associated circuitry manages the rerouting ofdata when control is transferred from remote to local. The analog sectionincluding U24, U25 and U17 buffers and measures signals from the joystick onthe MCB controller.4-34 User Manual
<strong>SP</strong>-<strong>2000</strong>/X-YMaintenance And RepairThe Dolly Board has an Auto Setup feature. After each successful targetingoperation, the voltage excursions of each individual sensor are sensed and anoffset voltage is stored in memory so that the voltage swing is kept symmetricalwith respect to the 2.5V threshold.4-Channel Servo BoardsTwo of these boards form the core of the pedestal servo electronics (a third forpan, tilt, zoom and focus is in the head). Each board can control up to fourmotors. The board contains a microprocessor and related circuitry, local powersupply regulation and data interconnections.Although the three boards are electrically identical, the Shunt jumper (J1) in thelower right corner must be changed if you swap boards during troubleshooting.The jumper is on position 3 for Steer and position 4 for Drive. In the head forPan/Tilt, no jumper is installed.The four identical servo channels receive data commands from the controller viathe local data bus at a frame rate of 25ms. This fast frame rate supports thehighly responsive behavior of the AutoCam system to joystick commands.However, this rate is too coarse to feed the motors directly since it would causerough movement. Therefore, the 25ms interval is linearly interpolated intoshorter segments of a few milliseconds each. After each segment is computed, itis outputted as a position demand signal to the appropriate servo channel.Each of the four servo channels is configured as either an analog channel with aposition demand output, or a digital channel with a torque demand output.AnalogThe analog position demand output mode is only used to control zoom andfocus on the lens. The circuitry is not used in the <strong>SP</strong>-<strong>2000</strong>/X-Y.DigitalFor the digital servo channels (steer, drive, height, pan, tilt), the servo loop isclosed on the 4-channel board itself. Feedback is derived from an incrementalencoder on the servo motor which generates the position follow signal. This followsignal is in the form of quadrature TTL signals which are counted by the onboardHCTL-<strong>2000</strong> ICs. The follow signal is relayed to the microprocessorwhere it is compared to the interpolated demand signal. The difference betweenthese two signals is the position error signal.The servo produces a motor velocity which is proportional to the position error.The motor velocity (computed by differentiating the position follow signal, orsubtracting subsequent motor positions) is subtracted from the position error toderive the velocity error. The servo controls the motor current to reduce thevelocity error to zero by feeding the error to the on-board DAC and converting itto a voltage between -10V and +10V to generate the current (or torque) desiredin the motor. The current demand signal leaves the board to feed the motoramplifier.User Manual 4-35
<strong>SP</strong>-<strong>2000</strong>/X-YMaintenance And RepairBrushless MotorsSeven brushless motors and their switching drivers are used in the <strong>SP</strong><strong>2000</strong>/X-Y.One of the advantages of brushless motors is that they are quieter because theyavoid the screechy high-frequency sound emitted by the brushes of conventionalDC brush motors and tachometers. Tachometers are eliminated completelybecause the velocity information is derived from the Hall effect encoders.Brushless motors are far more reliable and are expected to last the life of theproduct. In addition, the switching drivers are very efficient, so power consumptionis reduced and battery operating time is extended. Motor servicing islimited to verifying the integrity of the two quadrature signals coming back fromeach motor.Motor Drive AmplifiersThe Motor Drive Amplifiers amplify the demand signal from the 4 ChannelBoard to generate a torque-producing current that drives the motor. In addition,they electronically commutate the brushless motor by processing the TTL phasingsignals from the hall encoders. There are no adjustments on the Motor DriveAmplifiers. Each amplifier does have pluggable, factory selected current-settingresistors.The Motor Drive Amplifiers for steer and drive are not serviceable at the componentlevel in the field. However, they can be swapped with each other or thepan/tilt Motor Drive Amplifiers in the head to isolate a fault. Note that the MotorDrive Amplifier for column elevation is a 60V amplifier which cannot beswapped for troubleshooting.Contact <strong>Vinten</strong> to arrange a board exchange if necessary. If replacement amplifiersare installed, the resistor values in the pluggable resistor packs must bechecked and to be sure that they are the same as the original factory installedamplifiers.4-36 User Manual
<strong>SP</strong>-<strong>2000</strong>/X-Y IndexNumerics4-Channel Board, Theory Of Operation 4–35AACP-8000 System 1–16Active Lights 2–9Applications 1–16ACP-8000 1–16AutoCam Philosophy 1–14BBalance, Column 4–7Balancing The <strong>Pedestal</strong> 3–12, 3–14Battery Bypass 4–32Battery Pack, Theory Of Operation 4–31Brushless Motors 4–36Bumper Operation 4–8Bumper Override 1–8Bypass The Batteries 4–32CCalibrationCollision Bumper 4–24Collision Bumpers 3–16Target Sensor 4–26Charging Status LEDs 2–5Cleaning Slip Rings 4–16Cleaning The Target Sensors 4–14Cleaning The Targets 4–6Collision Bumper 1–8, 4–8Collision Bumper Calibration 3–16Collision Bumper, Calibration 4–24Column Balance 4–7Column, Raising/Lowering 2–10Compass Headings 2–3Covers, Removing 4–9Crating The <strong>Pedestal</strong> 3–25Critical Data, <strong>SP</strong>-<strong>2000</strong>/X-YiiiCustomer Responsibility 1–5Cylinder Replacement 4–20DData Bus, Theory Of Operation 4–30DC Power, Checking 4–7Direction Indicators 2–8Discharging The <strong>Pedestal</strong> 3–15Dolly Board, Theory Of Operation 4–34Drive 2–10Drive Amplifiers 4–36EElectrical Installation/Interconnection 3–18Electronics Repair 4–22Emergency STOP Switches 2–6E-STOP Switch 4–8E-STOP Switches 1–2, 1–3, 2–6Examining The Wheels 4–18FFloor Preparation 3–3HHeight, Raising/Lowering 2–10IIndicators, Direction 2–8Installation, Electrical 3–18Installation, Tools Needed 3–2LLights, <strong>Pedestal</strong> Active 1–6, 2–9Local/Remote 2–10Lowering The Column 2–10Lowering The Sensors 4–34I
<strong>SP</strong>-<strong>2000</strong>/X-Y IndexMMaintenance 4–6Checking The Wheels 4–18Claning Targets 4–6Cleaning Slip Rings 4–16Cleaning Target Sensors 4–14Collision Bumper 4–8Column Balance 4–7DC Power 4–7Overall Operation 4–7Removing Covers 4–9Removing Targets 4–6STOP Switch 4–8STOP Switches 4–7Manual Outline 1–10MCB Controller 2–10Drive 2–10Height 2–10Local/Remote 2–10Rotate 2–10MCB Controller Mounting 3–11Motor Drive Amplifiers 4–36Motors, Brushless 4–36Mounting The MCB Controller 3–11Mounting The Pan/Tilt Head 3–10OOrientation 2–3PPan/Tilt Head, Mounting 3–10Payload, Removing 3–22<strong>Pedestal</strong> Active Lights 1–6, 2–9<strong>Pedestal</strong> Footprint 1–6Pinch Points 1–9Power Bus, Theory Of Operation 4–30Power Management, Operation Theory 4–31Powering Down 2–5Powering Up 2–4Pressurizing The <strong>Pedestal</strong> 3–12RRaising/Lowering The Column 2–10Recrating The <strong>Pedestal</strong> 3–24Removing Targets 4–6Removing The Covers 4–9Removing The Payload 3–22Removing The <strong>Pedestal</strong> From Its Crate 3–4Replacing Cylinders 4–20Rotate 2–10Routine Maintenance 4–6SSafe Operating Zone 1–6Safe Working Environment 1–5Safety 1–2Active Lights 1–6Bumper Override 1–8Collision Bumper 1–8Customer Responsibility 1–5Operating Zone 1–6<strong>Pedestal</strong> Footprint 1–6Pinch Points 1–9Sharp Edges 1–9STOP Switches 2–6Unexpected Motion 1–7Warning Signs 1–7Warnings 1–5Working Environment 1–5Sensor, Target 4–34Service Philosophy 4–22Sharp Edges 1–9Slip Rings, Cleaning 4–16<strong>SP</strong>-<strong>2000</strong>/X-Y Critical Dataiii<strong>SP</strong>-<strong>2000</strong>/X-Y Servo <strong>Pedestal</strong> 1–12Standby/Charge 2–5Stop 2–5Support, TechnicalivSystem, Theory Of Operation 4–30TTargetCleaning 4–6Removing 4–6Target Sensor Assembly 4–34II
<strong>SP</strong>-<strong>2000</strong>/X-Y IndexTarget Sensor Calibration 4–26Target Sensors, Cleaning 4–14Target Sensors, Lowering 4–34Targeting 2–11Targeting System, Theory Of Operation 4–34Technical SupportivTheory Of Operation 4–304 Channel Board 4–35Battery Pack 4–31Brushless Motors 4–36Data Bus 4–30Dolly Board 4–34Motor Drive Amplifiers 4–36Power Bus 4–30Power Management 4–31System 4–30Targeting System 4–34Tools Neede For Installation 3–2Typical Applications 1–16UUncrating The <strong>Pedestal</strong> 3–4Unexpected Motion 1–7Unloading The <strong>Pedestal</strong> 3–6WWarning LabelsiiWarning Signs 1–7Warnings 1–5WarrantyvWheels, Checking 4–18III
<strong>SP</strong>-<strong>2000</strong>/X-Y IndexThis page left blank intentionally.IV