
Create successful ePaper yourself
Turn your PDF publications into a flip-book with our unique Google optimized e-Paper software.
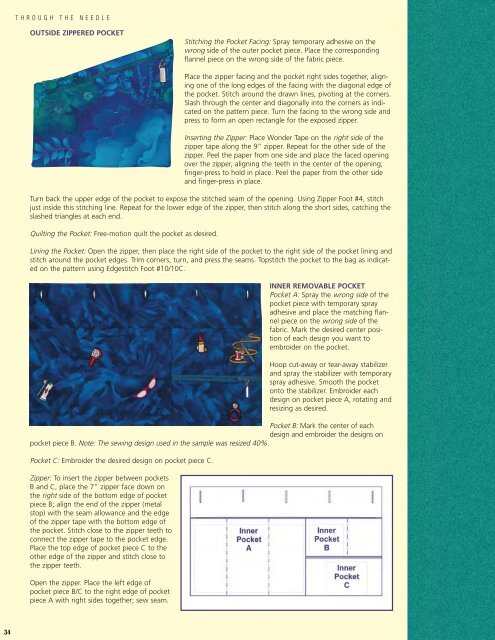
THROUGH THE NEEDLEOUTSIDE ZIPPERED POCKETStitching the Pocket Facing: Spray temporary adhesive on thewrong side of the outer pocket piece. Place the correspondingflannel piece on the wrong side of the fabric piece.Place the zipper facing and the pocket right sides together, aligningone of the long edges of the facing with the diagonal edge ofthe pocket. Stitch around the drawn lines, pivoting at the corners.Slash through the center and diagonally into the corners as indicatedon the pattern piece. Turn the facing to the wrong side andpress to form an open rectangle for the exposed zipper.Inserting the Zipper: Place Wonder Tape on the right side of thezipper tape along the 9” zipper. Repeat for the other side of thezipper. Peel the paper from one side and place the faced openingover the zipper, aligning the teeth in the center of the opening;finger-press to hold in place. Peel the paper from the other sideand finger-press in place.Turn back the upper edge of the pocket to expose the stitched seam of the opening. Using Zipper Foot #4, stitchjust inside this stitching line. Repeat for the lower edge of the zipper, then stitch along the short sides, catching theslashed triangles at each end.Quilting the Pocket: Free-motion quilt the pocket as desired.Lining the Pocket: Open the zipper, then place the right side of the pocket to the right side of the pocket lining andstitch around the pocket edges. Trim corners, turn, and press the seams. Topstitch the pocket to the bag as indicatedon the pattern using Edgestitch Foot #10/10C.INNER REMOVABLE POCKETPocket A: Spray the wrong side of thepocket piece with temporary sprayadhesive and place the matching flannelpiece on the wrong side of thefabric. Mark the desired center positionof each design you want toembroider on the pocket.Hoop cut-away or tear-away stabilizerand spray the stabilizer with temporaryspray adhesive. Smooth the pocketonto the stabilizer. Embroider eachdesign on pocket piece A, rotating andresizing as desired.Pocket B: Mark the center of eachdesign and embroider the designs onpocket piece B. Note: The sewing design used in the sample was resized 40%.Pocket C: Embroider the desired design on pocket piece C.Zipper: To insert the zipper between pocketsB and C, place the 7” zipper face down onthe right side of the bottom edge of pocketpiece B; align the end of the zipper (metalstop) with the seam allowance and the edgeof the zipper tape with the bottom edge ofthe pocket. Stitch close to the zipper teeth toconnect the zipper tape to the pocket edge.Place the top edge of pocket piece C to theother edge of the zipper and stitch close tothe zipper teeth.Open the zipper. Place the left edge ofpocket piece B/C to the right edge of pocketpiece A with right sides together; sew seam.34