

HTNVY.DUTY CIRCULAR SNWS T ITSTNII ... - Wood Tools
HTNVY.DUTY CIRCULAR SNWS T ITSTNII ... - Wood Tools
HTNVY.DUTY CIRCULAR SNWS T ITSTNII ... - Wood Tools

Create successful ePaper yourself
Turn your PDF publications into a flip-book with our unique Google optimized e-Paper software.
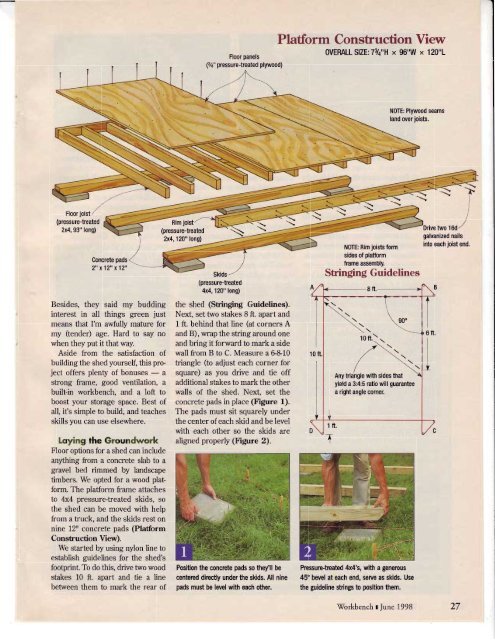
Floor panels(7+" pressurc-freated plyu,ood)Plaffom Construction ViewOVERAIISIZE:dq"H x g6"W x 120"1N0TE: Plywood seamsland over joisb.Floor joist(pressurc-treated,x4,93" long)Besides, they said my buddinginterest in all things green justmeans that I'm awfully mature formy (tender) age. Hard to say nowhen they put it thatway.Aside from the satisfaction ofbuilding the shed yourself, this project offers plenty of bonuses - asfong frame, good ventilation, abuilt-in workbench, and a loft toboost your storage space. Best ofall, ifs simple to build, and teachesskills you c:m use elsewhere.l.ofng the GrcundworkFloor options for a shed can includeanything from a concrete slab to agravel bed rimmed by landscapetimbers. We opted for a wood platform.The plafform frame attachesto 4x4 pressuretreated skids, sothe shed can be moved with helpfrom a truck, and the skids rest onnine 12rr concrete pads (PlaformC,onstruction View).We started by using nylon line toestablish guidelines for the shed'sfootprint To do this, drive two woodstakes 10 ft. apart and tie a linebetween them to mark the rear of(pressure-troat€d2x4, 120" long)Sklrls(prcssure-teated4x4, 120" long)the shed (Stringing Guidelines).Next, set two stakes 8 ft apart and1 ft. behind that line (at corners Aand B), wrap the sbing around oneand bring it forward to rnark a sidewall from B to C. Measure a 6&10triangle (to adjust each corner forsquare) as you drive and tie offadditional stakes to mark the otherwalls of the shed. Nexf set theconcrete pads in place (Figure 1).The pads must sit squarely underthe center ofeach skid and be levelwith each other so the skids arealigned properly @igure 2).Poaition the concrcte padso thqyrll becenbrcdiructly under the skids. All ninepads must be level wi[r each offier.NOTE: Rlm Joisb formsldes of platturmframe assombly,/\Any tiangle wltr sldes thatyleld a 3:4:5 rato wlll guaranteea right angle corner.Prcssupteabd 4x4's, with a genercus45" bwel at each end, sena as skids. Usethe guideline sfrings b poaition $em.two 16dgalvanized nailsInto oach Jolst end.\Torkbench r lune 199827


![Til]tl](https://img.yumpu.com/45878240/1/190x245/tiltl.jpg?quality=85)


