

HTNVY.DUTY CIRCULAR SNWS T ITSTNII ... - Wood Tools
HTNVY.DUTY CIRCULAR SNWS T ITSTNII ... - Wood Tools
HTNVY.DUTY CIRCULAR SNWS T ITSTNII ... - Wood Tools

You also want an ePaper? Increase the reach of your titles
YUMPU automatically turns print PDFs into web optimized ePapers that Google loves.
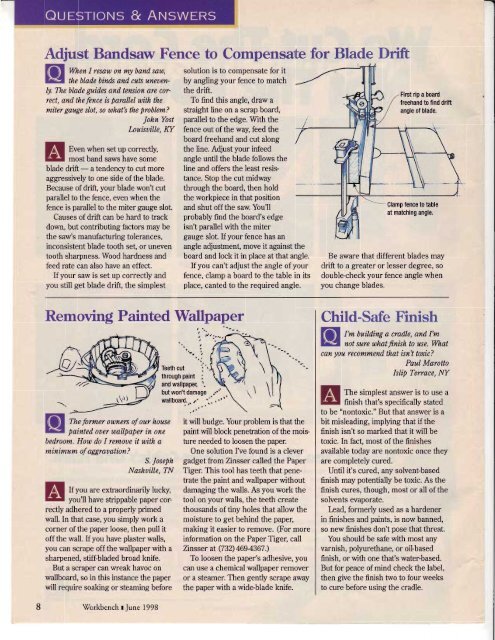
Adjust Bandsaw Fence to Compensate for Blade DriftWen I resaw on my band saw,the blade binds and cuts uneuen-Iy. The blade guida and tension are correct,and the fence is parallel with themiter gauge slot, so what's the problem?lohn YostLouisuille. KYEven when set up correctly,most band saws have someblade drift - a tendency to cut moreaggressively to one side ofthe blade.Because of drift, your blade won't cutparallel to the fence, even when thefence is parallel to the miter gauge slot.Causes of drift can be hard to trackdown, but confibuting factors may bethe saw's manufacturing tolerances,inconsistent blade tooth set, or uneventooth sharpness. <strong>Wood</strong> hardness andfeed rate can also have an effect.Ifyour saw is set up correctly andyou still get blade drift, the simplestsolution is to compensate for itby angling your fence to matchthe drift.To find this angle, draw astraight line on a scrap board,parallel to the edge. \Mith thefence out of the way, feed theboard freehand and cut alongthe line. Adjust your infeedangle until the blade follows theline and offers the least resistance.Stop the cut midwaythrough the board, then holdthe workpiece in that positionand shut off the saw. You'llprobably find the board's edgeisn't parallel with the mitergauge slot. Ifyourfence has anangle adjustment, move it against theboard and lock it in place at that angle.If you can't adjust the angle of yourfence, clamp a board to the table in itsplace, canted to the required angle.First rip a boardfreehand to find driftangle of blade.Clamp fence to tableat matching angle.Be aware that different blades maydrift to a greater or lesser degree, sodouble-check your fence angle whenyou change blades.Removing Painted WallpaperThe former ouners of our housepainted ouer wallpaper in onebedroom. How do I remoue it with aminimum of aggrau ation ?S. IosebhNashuille. TNIfyou are extraordinarily lucky,you'll have strippable paper correcflyadhered to a properly primedwall. In that case, you simply work acorner of the paper loose, then pull itoff the wall. ffyou have plaster walls,you can scrape off the wallpaper with asharpened, stiff-bladed broad knife.But a scraper can wreak havoc onwallboard, so in this instance the paperwill require soaking or steaming beforel)Itt, t,Teeth cut i'through paint :and wallpaper; 1but won't damagewallboard.it will budge. Your problem is that thepaintwill block penefation of the moisture needed to loosen the paper.One solution I've found is a clevergadget from Zinsser called the PaperTiger. This tool has teeth that penetratethe paint and wallpaper withoutdamaging the walls. As you work thetool on your walls, the teeth createthousands of tiny holes that allow themoisture to get behind the paper,making it easier to remove. (For moreinformation on the Paper Tiger, callZinsser at (732) 469-4367.)To loosen the paper's adhesive, youcan use a chemical wallpaperemoveror a steamer. Then genfly scrape awaythe paper with a wide-blade knife.Child-Safe FinishEDl fm building a cradle, and.I'm^vt :.-El not sure what finish to use. Whatcan you recommend ihat isn't toxic?Paul MarottoIsliP Terrace, NYThe simplest answer is to use afinish that's specifically statedto be "nontoxic." But that answer is abit misleading, implying that if thefinish isn't so marked that it will betoxic. In fact, most of the finishesavailable today are nontoxic once theyare completely cured.Until it's cured, any solvent-basedfinish may potentially be toxic. As thefinish cures, though, most or all of thesolvents evaporate.lead, formerly used as a hardenerin finishes and paints, is now banned,so new finishes don't pose that threat.You should be safe with most anyvarnish, polyurethane, or oil-basedfinish, or with one that's water-based.But for peace of mind check the label,then give the finish two to four weeksto cure before using the cradle.\Torkbench I June 1998


![Til]tl](https://img.yumpu.com/45878240/1/190x245/tiltl.jpg?quality=85)


