

HTNVY.DUTY CIRCULAR SNWS T ITSTNII ... - Wood Tools
HTNVY.DUTY CIRCULAR SNWS T ITSTNII ... - Wood Tools
HTNVY.DUTY CIRCULAR SNWS T ITSTNII ... - Wood Tools

You also want an ePaper? Increase the reach of your titles
YUMPU automatically turns print PDFs into web optimized ePapers that Google loves.
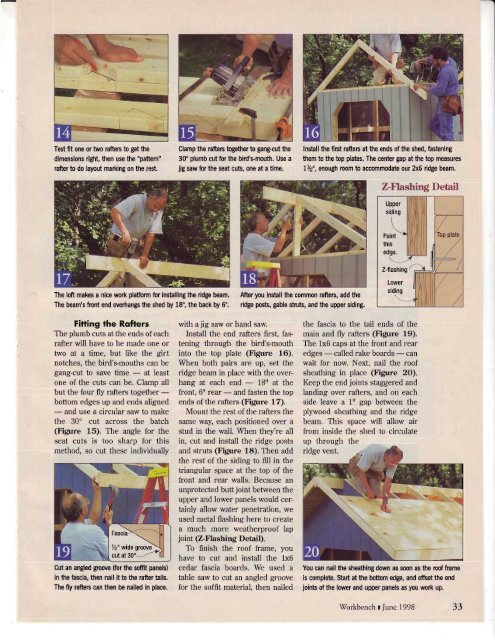
Test fit one or two raften to get thedimensions right, then use the "pattern"rafter to do layout marking on the rcst.Clamp the raften togethergang-cut the30' plumb cut for the bird's-mouth. Use ajig saw for the seat cub, one at a time.Install the fint rafters at the ends of the shed, fasteningthem to the top plates. The center gap at the top measures1V2", enough room to accommodate our 2x5 ridge beam.The loft makes a nice work platform for installing the ridge beam. After you install the common rafters, add theThe beam's front end overhangs the shed by 18", the back by 6". ridge posb, gable stlub, and the upper siding.ZFlashing Detailu.p.?r'I''l'nnI\lPaintIthis I"qlZ-flashingLowersidingFifting the RoftersThe plumb cuts at the ends of eachrafter will have to be made one ortwo at a time, but like the girtnotches, the bird's-mouths can begang-cut to save time - at leastone of the cuts can be. Clamp allbut the four fly rafters together -bottom edges up and ends aligned- and use a circular saw to makethe 30' cut across the batch(Figure 15). The angle for theseat cuts is too sharp for thismethod, so cut these individuallyCut an angled groove (for the soffit panels)in the fascia, then nail it to the rafter tails.The fly raften can then be nailed in place.with a jig saw or hand saw.Install the end rafters first, fasteningthrough the bird's-mouthinto the top plate (Figure 16).When both pairs are up, set theridge beam in place with the overhangat each end - 18rr at thefront, 6rr rear - and fasten the topends ofthe rafters (Figure 17).Mount the rest of the rafters thesame way, each positioned over astud in the wall. When they're allin, cut and install the ridge postsand struts (Figure 18). Then addthe rest of the siding to fiIl in thetriangular space at the top of thefront and rear walls. Because anunprotected butt joint between theupper and lower panels would certainlyallow water penetration, weused metal flashing here to createa much more weatherproof lapjoint (Z-Flashing Detail).To finish the roof frame, youhave to cut and install the 1x6cedar fascia boards. We used atable saw to cut an angled groovefor the soffit material, then nailedthe fascia to the tail ends of themain and fly rafters (Figure l9).The 1x6 caps at the front and rearedges - called rake boards - canwait for now. Next, nail the roofsheathing in place (Figure 2O).Keep the end joints staggered andlanding over rafters, and on eachside leave a |r gap between theplpvood sheathing and the ridgebeam. This space will allow airfrom inside the shed to circulateup through theYou can nail the sheathing down as soon as the rooframeis complete. Start at the bottom edge, and offsethe endjoinb of the lower and upper panels as you work up.Y/orkbench I Tune 1998 33


![Til]tl](https://img.yumpu.com/45878240/1/190x245/tiltl.jpg?quality=85)


