

HTNVY.DUTY CIRCULAR SNWS T ITSTNII ... - Wood Tools
HTNVY.DUTY CIRCULAR SNWS T ITSTNII ... - Wood Tools
HTNVY.DUTY CIRCULAR SNWS T ITSTNII ... - Wood Tools

You also want an ePaper? Increase the reach of your titles
YUMPU automatically turns print PDFs into web optimized ePapers that Google loves.
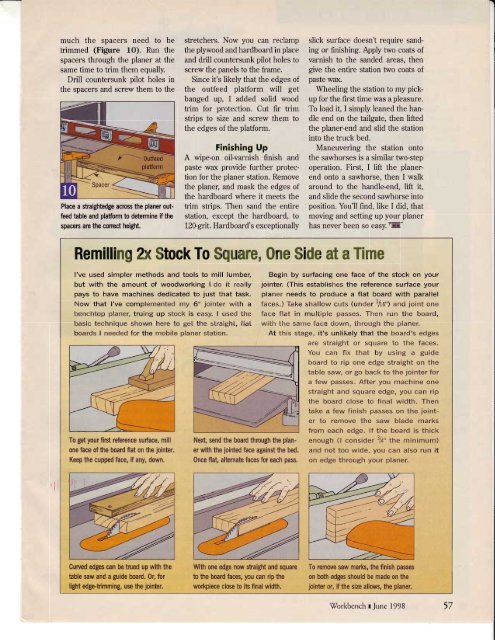
much the spacers need to betrimmed (Figure 1O). Run thespacers through the planer at thesame time to trim them equally.Drill countersunk pilot holes inthe spacers and screw them to thePlace a straightedge acrcss the planer outfeedtable and platform to determine if thespacem are the correct height.stretchers. Now you can reclampthe plywood and hardboard in placeand drill countersunk pilot holes toscrew the panels to the frame.Since it's likely that the edges ofthe outfeed platform will getbanged up, I added solid woodtrim for protection. Cut fir trimstrips to size and screw them tothe edges of the plafform.Finishing UpA wipe-on oil-varnish finish andpaste wax provide further protectionfor the planer station. Removethe planer, and mask the edges ofthe hardboard where it meets thetrim strips. Then sand the entirestation, except the hardboard, to120-git. Hardboard's exceptionallyslick surface doesn't require sandingor finishing. Apply two coats ofvarnish to the sanded areas, thengive the entire station two coats ofpaste wax.Wheeling the station to my pickupfor the first time was a pleasure.To load it, I simply leaned the handleend on the tailgate, then liftedthe planer-end and slid the stationinto the truck bed.Maneuvering the station ontothe sawhorses is a similar two-stepoperation. First, I lift the planerendonto a sawhorse, then I walkaround to the handle-end, lift it,and slide the second sawhorse intoposition. You'll find,like I did, thatmoving and setting up your planerhas never been so easy.tffiRemilling A( Stock To Square, One Side at a TimeI've used simpler methods and tools to mill lumber,but with the amount of woodworking I do it reallypays to have machines dedicated to just that task.Now that I've complemented my 6" jointer with abenchtop planer, truing up stock is easy. I used thebasic technique shown here to get the straight, flatboards I needed for the mobile planer station.To get your firut reference surface, millone face of the board flat on the jointer.Keep the cupped face, if any, down.Next, send the boad thrcugh the planerwith the jointed face against the bed,Once flat, altemab faces fur each pass.Begin by surfacing one face of the stock on yourjointer. (This establishes the reference surface yourplaner needs to produce a flat board with parallelfaces.) Take shallow cuts (under Yro") joint one"nOface flat in multiple passes. Then run the board,with the same face down, through the planer.At this stage, it's unlikely that the board's edgesare straight or square to the faces.You can fix that by using a guideboard to rip one edge straight on thetable saw, or go back to the jointer fora few passes. After you machine onestraight and square edge, you can ripthe board close to final width. Thentake a few finish passes on the jointerto remove the saw blade marksfrom each edge. lf the board is thickenough (l consider 3/4" th" minimum)and not too wide, you can also run iton edge through your planer.Curued edges can be trued up wift thebble saw and a guide boad. 0r, brlight edgefimming, use the jointer.With one edge now sfaight and squarcb the boad faces, you can rip theworlqiece close to'rb final width.To rcmove saw mafts, he finish passeson both edgeshould be made on $ejoinbr or, if the size allows, the planer.\W'orkbench I Tune 1998 >/


![Til]tl](https://img.yumpu.com/45878240/1/190x245/tiltl.jpg?quality=85)


