

HTNVY.DUTY CIRCULAR SNWS T ITSTNII ... - Wood Tools
HTNVY.DUTY CIRCULAR SNWS T ITSTNII ... - Wood Tools
HTNVY.DUTY CIRCULAR SNWS T ITSTNII ... - Wood Tools

Create successful ePaper yourself
Turn your PDF publications into a flip-book with our unique Google optimized e-Paper software.
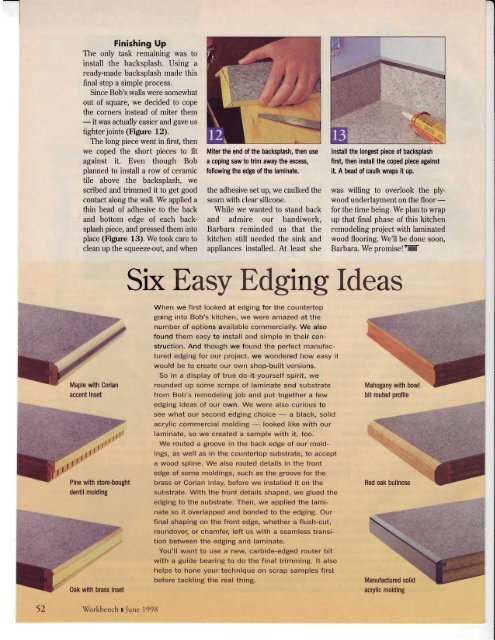
Finishing UpThe only task remaining was toinstall the backsplash. Using aready-made backsplash made thisfinal step a simple process.Since Bob's walls were somewhatout of square, we decided to copethe corners instead of miter them- itwas actually easier and gave ustighter joints (Figure 12).The long piece went in first, thenwe coped the short pieces to fitagainst it. Even though Bobplanned to install a row of ceramictile above the backsplash, wescribed and trimmed it to get goodcontact along the wall. We applied athin bead of adhesive to the backand bottom edge of each backsplashpiece, and pressed them intoplace (Figure 13). We took care toclean up the squeezeout, and whenMiter the end of the baclsplash, then usea coping saw to tilm away the orcess,following the edge of the laminate.the adhesive set up, we caulked theseam with clear silicone.While we wanted to stand backand admire our handiwork,Barbara reminded us that thekitchen still needed the sink andappliances installed. At least sheInstall the longest piece of baclaplashfint, then install the coped piece againstit. A bead of caulk wraps it up.was willing to overlook the plywoodunderlayment on the floor -for the time being. We plan to wrapup that final phase of this kitchenremodeling project with laminatedwood flooring. We'll be done soon,Barbara. We promise!tMSix Easy Edging IdeasWhen we first looked at edging for the countertopgoing into Bob's kitchen, we were amazed at thenumber of options available commercially. We alsofound them easy to install and simple in their construction.And though we found the perfect manufacturededging for our project, we wondered how easy itwould be to create our own shop-built versions.So in a display of true do-it-yourself spirit, werounded up some scraps of laminate and substratefrom Bob's remodeling job and put together a fewedging ideas of our own. We were also curious tosee what our second edging choice - a black, solidacrylic commercial molding - looked like with ourlaminate, so we created a sample with it, too.We routed a groove in the back edge of our moldings,as well as in the countertop substrate, to accepta wood spline. We also routed details in the frontedge of some moldings, such as the groove for thebrass or Corian inlay, before we installed it on thesubstrate. With the front details shaped, we glued theedging to the substrate. Then, we applied the laminateso it overlapped and bonded to the edging. Ourfinal shaping on the front edge, whether a flush-cut,roundover, or chamfer, left us with a seamless transitionbetween the edging and laminate.You'll want to use a neq carbide-edged router bitwith a guide bearing to do the final trimming. lt alsohelps to hone your technique on scrap samples firstbefore tackling the real thing.Mahogany with bowlbit rcuted prcfile52 \Torkbench rJune 1998


![Til]tl](https://img.yumpu.com/45878240/1/190x245/tiltl.jpg?quality=85)


