

HTNVY.DUTY CIRCULAR SNWS T ITSTNII ... - Wood Tools
HTNVY.DUTY CIRCULAR SNWS T ITSTNII ... - Wood Tools
HTNVY.DUTY CIRCULAR SNWS T ITSTNII ... - Wood Tools

Create successful ePaper yourself
Turn your PDF publications into a flip-book with our unique Google optimized e-Paper software.
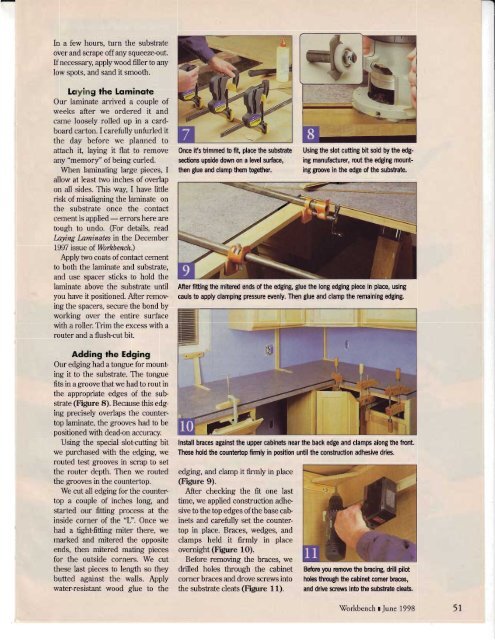
In a few hours, turn the substrateover and scrape offany squeezeout.ff necessary, apply wood filler to anylow spots, and sand it smooth.Loying the LominqteOur laminate arrived a couple ofweeks after we ordered it andcame loosely rolled up in a cardboardcarton. I carefullyunfurled itthe day before we planned toattach it, laying it flat to removeany "memory" of being curled.When laminating large pieces, Iallow at least two inches of overlapon all sides. This way, I have littlerisk of misaligning the laminate onthe substrate once the contactcement is applied - errors here aretough to undo. (For details, readl^aying Inminatw in the December1997 issue of. Workbench.)Apply two coats of contact cementto both the laminate and substrate,and use spacer sticks to hold thelaminate above the substrate untilyou have it positioned. After removingthe spacers, secure the bond byworking over the entire surfacewith a roller. Trim the excess with arouter and a flushcut bit.Once ifs tdmmed b fit, place the substrab Using the slot cufting bit sold by the edgingmanufacturer, rcut the edging mount-srtions upside down on a lwel surface,then glue and clamp them bgether. ing grcove in the edge of the substrate,After fitting the mitercd ends of the edging, glue the long edging piece in place, usingcauls to apply clamping pressure evenly. Then glue and clamp the remaining edging.Adding the EdgingOur edging had a tongue for mountingit to the substate. The tonguefits in a groove that we had to rout inthe appropriate edges of the subsfate (Figure 8). Because this edgingprecisely overlaps the countertoplaminate, the grooves had to bepositioned with dead-on accuracy.Using the special slotcutting bitwe purchased with the edging, werouted test grooves in scrap to setthe router depth. Then we routedthe grooves in the countertop.We cut all edging for the countertopa couple of inches long, andstarted our fitting process at theinside corner of the "L'. Once wehad a tight-fitting miter there, wemarked and mitered the oppositeends, then mitered mating piecesfor the outside corners. We cutthese last pieces to lengttr so theybutted against the walls. Applywater-resistant wood glue to theInstall braces against the upper cabineb near the back edge and clamps along the front.These hold the countertop firmly in position until the construction adhesive dries.edgrng, and clamp it firrnly in place(Figure 9).After checking the fit one lasttime, we applied construction adhesive to the top edges of the base cabinets and carefully set the countertopin place. Braces, wedges, andclamps held it firmly in placeovernight(Fiepre 1O).Before removing the braces, wedrilled holes through the cabinetcornerbraces and drove screws intothe substrate cleats @igure 11).Befure you rcmove he bracing, ddll pilotholes hrcugh the cabinet comer bnces,and ddve scrcws inb the subsffie cleab.-WorkbenchI Tune 19985r


![Til]tl](https://img.yumpu.com/45878240/1/190x245/tiltl.jpg?quality=85)


