4 CHANNEL DVR
4 CHANNEL DVR
4 CHANNEL DVR
- No tags were found...

Create successful ePaper yourself
Turn your PDF publications into a flip-book with our unique Google optimized e-Paper software.
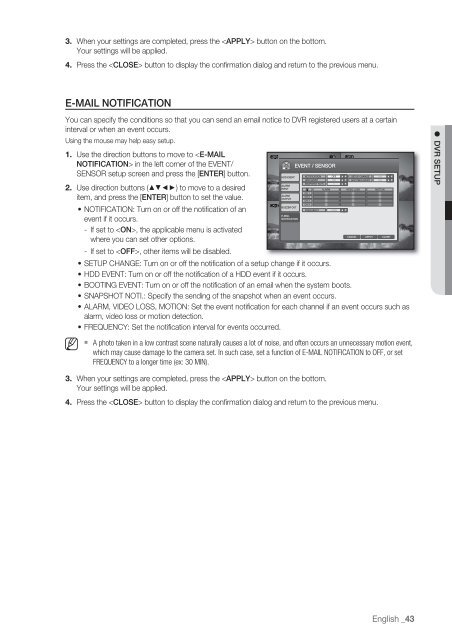
3.4.When your settings are completed, press the button on the bottom.Your settings will be applied.Press the button to display the confirmation dialog and return to the previous menu.E-MAIL NOTIFICATIONYou can specify the conditions so that you can send an email notice to <strong>DVR</strong> registered users at a certaininterval or when an event occurs.Using the mouse may help easy setup.1. Use the direction buttons to move to in the left corner of the EVENT/EVENT / SENSORSENSOR setup screen and press the [ENTER] button.HDD EVENT NOTIFICATION OFFSETUP CHANGE ONHDD EVENTONBOOTING EVENT ONSNAPSHOT NOTI. 1ALARM2. Use direction buttons (▲▼◄►) to move to a desiredINPUTALARMVIDEO LOSSMOTIONCH 1ALARMCH 2item, and press the [ENTER] button to set the value.OUTPUTCH 3CH 4BUZZER OUT• NOTIFICATION: Turn on or off the notification of anFREQUENCY 5 MINE-MAILNOTIFICATIONevent if it occurs.- If set to , the applicable menu is activatedCANCEL APPLY CLOSEwhere you can set other options.- If set to , other items will be disabled.• SETUP CHANGE: Turn on or off the notification of a setup change if it occurs.• HDD EVENT: Turn on or off the notification of a HDD event if it occurs.• BOOTING EVENT: Turn on or off the notification of an email when the system boots.• SNAPSHOT NOTI.: Specify the sending of the snapshot when an event occurs.• ALARM, VIDEO LOSS, MOTION: Set the event notification for each channel if an event occurs such asalarm, video loss or motion detection.• FREQUENCY: Set the notification interval for events occurred.M A photo taken in a low contrast scene naturally causes a lot of noise, and often occurs an unnecessary motion event,which may cause damage to the camera set. In such case, set a function of E-MAIL NOTIFICATION to OFF, or setFREQUENCY to a longer time (ex: 30 MIN).<strong>DVR</strong> SETUP3.4.When your settings are completed, press the button on the bottom.Your settings will be applied.Press the button to display the confirmation dialog and return to the previous menu.English _43