Job Aid: Replacing the Avaya S8710 Media Server ... - Avaya Support
Job Aid: Replacing the Avaya S8710 Media Server ... - Avaya Support
Job Aid: Replacing the Avaya S8710 Media Server ... - Avaya Support
- No tags were found...

Create successful ePaper yourself
Turn your PDF publications into a flip-book with our unique Google optimized e-Paper software.
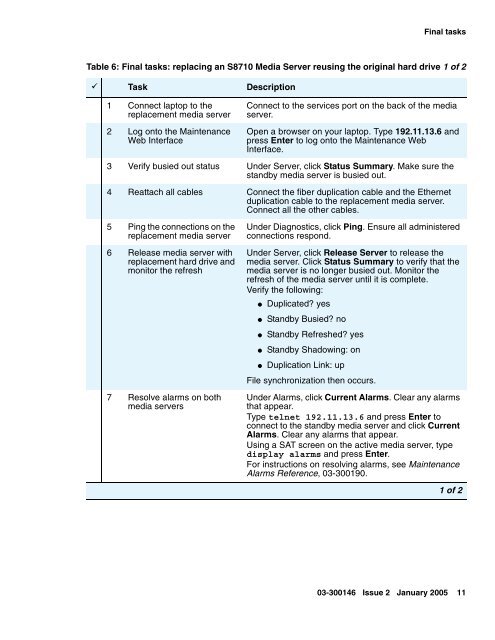
Final tasksTable 6: Final tasks: replacing an <strong>S8710</strong> <strong>Media</strong> <strong>Server</strong> reusing <strong>the</strong> original hard drive 1 of 29 Task Description1 Connect laptop to <strong>the</strong>replacement media server2 Log onto <strong>the</strong> MaintenanceWeb InterfaceConnect to <strong>the</strong> services port on <strong>the</strong> back of <strong>the</strong> mediaserver.Open a browser on your laptop. Type 192.11.13.6 andpress Enter to log onto <strong>the</strong> Maintenance WebInterface.3 Verify busied out status Under <strong>Server</strong>, click Status Summary. Make sure <strong>the</strong>standby media server is busied out.4 Reattach all cables Connect <strong>the</strong> fiber duplication cable and <strong>the</strong> E<strong>the</strong>rnetduplication cable to <strong>the</strong> replacement media server.Connect all <strong>the</strong> o<strong>the</strong>r cables.5 Ping <strong>the</strong> connections on <strong>the</strong>replacement media server6 Release media server withreplacement hard drive andmonitor <strong>the</strong> refresh7 Resolve alarms on bothmedia serversUnder Diagnostics, click Ping. Ensure all administeredconnections respond.Under <strong>Server</strong>, click Release <strong>Server</strong> to release <strong>the</strong>media server. Click Status Summary to verify that <strong>the</strong>media server is no longer busied out. Monitor <strong>the</strong>refresh of <strong>the</strong> media server until it is complete.Verify <strong>the</strong> following:● Duplicated? yes●●●Standby Busied? noStandby Refreshed? yesStandby Shadowing: on● Duplication Link: upFile synchronization <strong>the</strong>n occurs.Under Alarms, click Current Alarms. Clear any alarmsthat appear.Type telnet 192.11.13.6 and press Enter toconnect to <strong>the</strong> standby media server and click CurrentAlarms. Clear any alarms that appear.Using a SAT screen on <strong>the</strong> active media server, typedisplay alarms and press Enter.For instructions on resolving alarms, see MaintenanceAlarms Reference, 03-300190.1 of 203-300146 Issue 2 January 2005 11